
Creating Business Applications With REBOL
By: Nick Antonaccio
Updated: 12-16-2015
Learn to solve common business data management problems with a versatile development tool that's simple enough for "non-programmers".
** It's recommended that you first read http://re-bol.com/rebol_quick_start.html for a quick introduction to Rebol coding. Then return to read this text for a more complete look at all of Rebol's capabilities.
Also, be sure to see the short examples at http://re-bol.com/short_rebol_examples.r for a fast and interesting overview of Rebol's simple/productive coding style.
See http://re-bol.com/examples.txt for many more Rebol code examples.
Go to http://rebolforum.com to ask questions.
See also 68 YouTube video tutorials about REBOL (10 hours of video).
The previous introduction to this text has been removed. It's available here and in a shorter version here
A slideshow presentation covering the previous introduction is available here.
Contents:
1. A Crash Course Introduction to REBOL1.1 Installing and Running Programs
1.2 Opening REBOL Directly to the Console
1.3 Some Short Code Examples to Whet Your Appetite
1.4 Basics of REBOL Coding
1.5 Conditional Evaluations
1.6 Some More Useful Functions
2. Lists, Tables, and the "Foreach" Function
2.1 Managing Spreadsheet-Like Data
2.2 Some Simple List Algorithms (Count, Sum, Average, Max/Min)
2.3 Searching
2.4 Gathering Data, and the "Copy" Function
2.5 List Comparison Functions
2.6 Creating Lists From User Input
2.7 Three Useful Data Storage Programs: Inventory, Contacts, Schedule
2.8 Working With Tables of Data: Columns and Rows
2.9 Additional List/Block/Series Functions and Techniques
2.10 Sorting Lists and Tables of Data
2.11 CSV Files and the "Parse" Function
2.12 Two Paypal Report Programs, Analyzed
2.13 Some Perspective about Studying These Topics
3. Using GUI Windows and Widgets to Input and Display Data
3.1 Basic Layout Guidelines and Widgets
3.2 Breathing Life Into GUI Programs - Performing Actions
3.3 GUI Language Reference
3.4 A Telling Comparison
4. Quick Review and Clarification
5. SOME COMPLETE GUI APPLICATION EXAMPLES
5.1 Generic Text Field Saver
5.2 Calculator
5.3 File Editor
5.4 Web Page Editor
5.5 Inventory List Creator
5.6 Inventory Sorter and Viewer
5.7 Contacts Viewer
5.8 Minimal Retail Cash Register and Sales Report System
5.9 Email
5.10 Scheduler
5.11 Parts Database
5.12 Time Clock and Payroll Report
5.13 Blogger
5.14 FTP Group Chat
5.15 Group Reminder
5.16 A Univeral Report Generator, For Paypal and any other CSV Table Data
5.17 Reviewing and Using the Code You've Seen To Model New Applications
6. User Defined Functions and Imported Code Modules
6.1 "Do", "Does", and "Func"
6.2 Return Values
6.3 Scope
6.4 Function Documentation
6.5 Doing Imported Code
6.6 Separating Form and Function in GUIs - The Check Writer App
6.7 A Full Featured Group Note Sharing App
7. A Few Useful Data Visualization Tools
7.1 Displaying and Sorting Data Using Spreadsheet-Like GUI Grids
7.2 Creating Graphs, Plots, and Charts with "Q-Plot"
7.3 Drawing Charts Using Raw GUI Code
7.4 Creating 3D Graphs With r3D
7.5 Using the Google Chart API
7.6 Using the "Nano-Sheets" Spreadsheet App
8. Using REBOL to Create Presentations
8.1 REBOL as Presentation Software
8.2 Some Basic Layout Ideas and a Simple Code Framework for Presentations
8.3 Using Tab Panels and Menus to Present Information
8.4 Show.r - A Useful Line-By-Line Presentation System
8.5 Creating "Screen Shot" Images of GUIs
8.6 Embedding Binary Resources (images, sounds, files etc.) in Code
8.7 Playing Sounds
8.8 Launching Code in Separate Processes
8.9 Running Command Line Applications
8.10 Creating Simple Animations
8.11 A Simple Animation Framework for Presentations
8.12 Using Animated GIF Images
8.13 And That's Just the Beginning
9. Makedoc And Other Useful REBOL Productivity Tools
9.1 Makedoc.r - HTML Document Builder
9.2 An Improved Text Editor
9.3 GUI Builders and Learning Tools
10. Real World Concerns and Examples: Why "Programming" > Office Software
10.1 An Expanded Inventory Program
10.2 Receipt Printer
10.3 Advanced Time Clock and Automated Payroll Reports
11. More REBOL Language Fundamentals
11.1 Comments
11.2 Function Refinements
11.3 White Space and Indentation
11.4 Multi Line Strings, Quotes, and Concatenation
11.5 More About Variables
11.6 Data Types
11.7 Random Values
11.8 More About Reading, Writing, Loading, and Saving to and from Varied Sources
11.9 Understanding Return Values and the Order of Evaluation
11.10 More About Conditional Evaluations
11.11 More About Loops
11.12 More About Why/How Blocks are Useful
11.13 REBOL Strings
12. More Essential Topics
12.1 Built-In Help and Online Resources
12.2 Saving and Running REBOL Scripts
12.3 "Compiling" REBOL Programs - Distributing Packaged .EXE Files
12.4 Common REBOL Errors, and How to Fix Them
13. Creating Web Applications using REBOL CGI
13.1 An HTML Crash Course
13.2 A Standard CGI Template to Memorize
14. Example CGI Applications
14.1 Form Mail
14.2 A Generic Drop Down List Application
14.3 Photo Album
14.4 Simple Interactive REBOL Web Site Console
14.5 Attendance
14.6 Bulletin Board
14.7 GET vs POST Example
14.8 Group Note System
14.9 Generic Form Handler
14.10 File Uploader
14.11 File Downloader
14.12 A Complete Web Server Management Application
14.13 The RebolForum.com CGI Code
14.14 Etsy Account Manager
14.15 A Note About Working With Web Servers
14.16 WAP - Cell Phone Browser CGI Apps (deprecated)
15. Organizing Efficient Data Structures and Algorithms
15.1 A Simple Loop Example
15.2 A Real Life Example: Checkout Register and Cashier Report System
16. Additional Topics
16.1 Objects
16.2 Ports - Fine Grained Access to Files, Email, Network and More
16.3 Console and CGI Email Apps Using Ports
16.4 Network Ports - Transferring Data and Files with HTTP
16.5 Transferring Binary Files Through TCP Network Sockets
16.6 Transferring Data Through UDP Network Ports
16.7 Parse (REBOL's Answer to Regular Expressions)
16.8 Using Parse to Load Speadsheet CSV Files and Other Structured Data
16.9 Using Parse's Pattern Matching Mode to Search Data
16.10 Responding to Special Events in a GUI - "Feel"
16.11 2D Drawing, Graphics, and Animation
16.12 3D Graphics with r3D
16.13 Several 3D Scripts Using Raw REBOL Draw Dialect
16.14 Sprite Sheets
16.15 Multitasking
16.16 Using DLLs and Shared Code Files in REBOL
16.17 A Multiple Network Security Camera App Using The Window's Webcam DLL
16.18 REBOL as a Browser Plugin
16.19 Using Databases
16.20 Menus
16.21 Creating Multi Column GUI Text Lists (Data Grids) From Scratch
16.22 RebGUI
16.23 RebGUI Apps - Spreadsheet, Rolodex, Member Manager, Editor, POS system
16.24 Creating PDF files using pdf-maker.r
16.25 Bar Codes
16.26 Creating .swf Files with REBOL/Flash
16.27 Printing With REBOL
16.28 A Remote Check Printing Application
16.29 Creating Apps on Platforms That Don't Support GUI Interfaces
16.30 Encryption and Security
16.31 Rebcode
16.32 Useful REBOL Tools: XML, Zip, Database, Network, Web Server, and More
16.33 6 REBOL Flavors
16.34 Bindology, Dialects, Metaprogramming and Other Advanced Topics
17. REBOL on Android, Open Source R3 (Saphirion Builds), and RED
17.1 Open Source
17.2 Creating an Android Working Environment - Necessary Tools
17.3 R3 GUI Basics
17.4 Simple Requestors
17.5 Layout
17.6 Styles
17.7 Some More Simple Examples
17.8 Additional Essential Resources
17.9 RED
18. Implementing Multi-User Data Management Applications with Rebol
18.1 Multi-User Database Systems In Rebol
18.2 The Typical REBOL 101 Example
18.3 Multi-User Databases
18.4 A Longer Example
18.5 Obtaining Dynamically Assigned Server Addresses
18.6 Serving Clients HTML Form Interfaces
18.7 Simplicity
19. Building Mobile and Web Apps with jsLinb & Sigma Visual Builder
19.1 What are the jsLinb Library and Sigma Visual Builder?
19.2 Installing Sigma Builder on a Web Server
19.3 Basic jsLinb Code and Sigma IDE Examples
19.4 Connecting jsLinb Apps to Rebol CGI Server Applications
19.5 Example Apps made with jsLinb and Rebol CGI Code
19.6 Saving and Deploying your jsLinb Apps in Sigma IDE
19.7 Some Data Grid Examples
19.8 Powerful Layout Widgets
19.9 jsLinb and Sigma Builder Documentation Features
19.10 Using the jsLinb Databinder to Collect and Set Form Data
19.11 A Larger Example App
19.12 Connecting to Stand-Alone Rebol Server Apps
19.13 CrossUI
19.14 A Powerful Addition to the Rebol Toolkit
20. REAL WORLD CASE STUDIES - Learning To Think In Code
20.1 Case: Scheduling Teachers
20.2 Case: A Simple Image Gallery CGI Program
20.3 Case: Days Between Two Dates Calculator
20.4 Case: Simple Search
20.5 Case: A Simple Calculator Application
20.6 Case: A Backup Music Generator (Chord Accompaniment Player)
20.7 Case: FTP Tool
20.8 Case: The "Jeoparody" Training Program
20.9 Case: Scheduling Teachers, Part Two
20.10 Case: An Online Member Page CGI Program
20.11 Case: A CGI Event Calendar
20.12 Case: Media Player (Wave/Mp3 Jukebox)
20.13 Case: Guitar Chord Chart Printer
20.14 Case: Web Site Content Management System (CMS), Sitebuilder.cgi
20.15 Case: Downloading Directories - A Server Spidering App
20.16 Case: Vegetable Gardening
20.17 Case: An Additional Teacher Automation Project
21. Game Programming to Improve Algorithmic Thought and Graphic Skills
21.1 Case: More About Creative Algorithmic Thought: a Tetris Clone
21.2 Case: More Full Program Loops: Ski, Snake, and Invaders
21.3 Case: A GUI Playing Card Framework (Creating a Freecell Clone)
21.4 Case: Creating the REBOL "Demo"
22. Other Scripts
22.1 Thumbnail Maker
22.2 Loops and Conditions - A Simple Data Storage App
22.3 Listview Multi Column Data Grid Example
22.4 Image Effector
22.5 Little Menu Example
22.6 Shoot-Em-Up Video Game
22.7 Bingo Board
22.8 Voice Alarms
22.9 Odds and Ends
23. Learning More About REBOL - Important Documentation Links
24. Beyond REBOL
25. About The Author
25.1 My Businesses
25.2 Client List and Previous Experience
25.3 Contact Me
1. A Crash Course Introduction to REBOL
1.1 Installing and Running Programs
To get started, download and install REBOL/View from http://www.rebol.com/download-view.html (it takes just a few seconds).
Once it's installed, run REBOL (Start -> Programs -> REBOL -> REBOL View), then click the "Console" Icon.
Type "editor none" at the prompt - that will run REBOL's built in text editor.
At this point, you are ready to start typing in REBOL programs. Copy/paste each example from this tutorial into the REBOL editor to see what the code does. Try it right now. Paste the following code into the REBOL editor, then press [F5] on your keyboard to save and run the program. You can save the file using the default "temp.txt" file name, as prompted, or rename it if you'd like. If you see the REBOL security requestor, select "Allow all":
REBOL []
alert "Hello World!"
If you save your program with a ".r" extension in the file name (i.e., "myprogram.r"), then you can also click your saved program's file icon, and it will run just like any normal executable (.exe) file. Try saving the program above on your desktop as "hello.r", then run it by clicking the hello.r icon on your desktop with your mouse.


1.2 Opening REBOL Directly to the Console
Before typing in or pasting any more code, adjust the following option in the REBOL interpreter: click the "User" menu in the graphic Viewtop that opens by default with REBOL, and uncheck "Open Desktop On Startup". That'll save you the trouble of clicking the "Console" button every time you start REBOL.
Setting your email account information and other user settings, is also recommended at this point.


1.3 Some Short Code Examples to Whet Your Appetite
Here are some REBOL program examples which demonstrate the simple and concise nature of REBOL code. Paste each program into the REBOL editor and press [F5] to see it run. Read briefly through each line of the programs to familiarize yourself with what REBOL code looks like. You'll understand exactly how everything works, very shortly.
Here's a short and useful example that saves text field data to a text file. It can be used as the basis for entering and saving categorical units of data of almost every type, for receipts, notes, etc.
REBOL [title: "Text Field Saver"]
view layout [
    f1: field
    f2: field
    f3: field
    btn "Save Fields" [
        write/append %fields.csv rejoin [
            mold f1/text ", " mold f2/text ", " mold f3/text newline
        ]
        alert "Added to File"
    ]
]
Here's an example of a text editor program that allows you to read, edit, and save any text file:
REBOL [title: "Text Editor"]
view layout [
    h1 "Text Editor:"
    f: field 600 "filename.txt"
    a: area 600x350
    across
    btn "Load" [
        f/text: request-file
        show f
        filename: to-file f/text
        a/text: read filename
        show a
    ]
    btn "Save" [
        filename: to-file request-file/save/file f/text
        write filename a/text
        alert "Saved"
    ]
]
Here's a variation of the program above, repurposed as a web page editor (this program can actually be used to edit real, live web pages on the Internet):
REBOL [title: "Web Page Editor"]
view layout [
    h1 "Web Page Editor:"
    f: field 600 "ftp://user:pass@site.com/public_html/page.html"
    a: area 600x350
    across
    btn "Load" [
        a/text: read to-url f/text
        show a
    ]
    btn "Save" [
        write (to-url f/text) a/text
        alert "Saved"
    ]
]
Here's a basic calculator app:
REBOL [title: "Calculator"]
view layout [
    origin 0  space 0x0  across
    style btn btn 50x50 [append f/text face/text  show f]
    f: field 200x40 font-size 20 return
    btn "1"  btn "2"  btn "3"  btn " + "  return
    btn "4"  btn "5"  btn "6"  btn " - "  return
    btn "7"  btn "8"  btn "9"  btn " * "  return
    btn "0"  btn "."  btn " / "   btn "=" [
        attempt [f/text: form do f/text  show f]
    ]
]
Here's a variation of the Paypal example from this tutorial's introduction. It downloads a Paypal account file from the web and reports the sum of all gross account transactions, displays all purchases made from the name "Saoud Gorn", and computes the total of all transactions from "Ourliptef.com" which occured between midnight and noon hours. Try running it on a computer that's connected to the Internet:
REBOL [title: "Paypal Reports"]
sum1: sum2: $0
foreach line at read/lines http://re-bol.com/Download.csv 2 [
    sum1: sum1 + to-money pick row: parse/all line "," 8
    if find row/4 "Saoud" [print rejoin [row/1 ", Saoud Gorn: " row/8]]
    if find row/4 "Ourliptef.com" [
        if (0:00am <= time: to-time row/2) and (time <= 12:00pm) [
            sum2: sum2 + to-money row/8
        ]
    ]
]
alert join "GROSS ACCOUNT TRANSACTIONS: " sum1
alert join "2012 Ourliptef.com Morning Total: " sum2
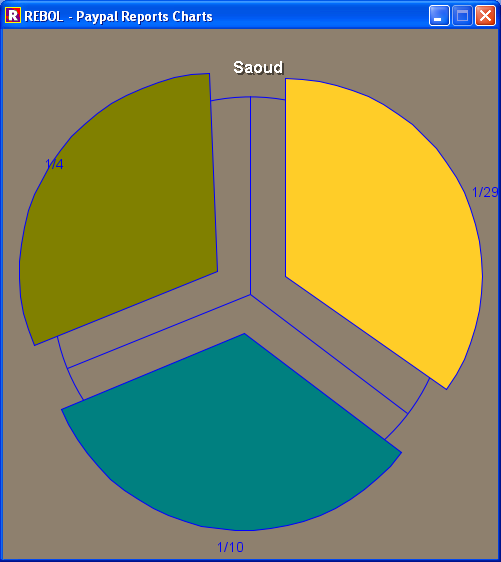
This example extends the reports above with graphs of the collected data (Internet connection required for this example too):
REBOL [title: "Paypal Report Charts"]
transactions: copy []
saoud: copy []
dates: copy []
foreach line at read/lines http://re-bol.com/Download.csv 2 [
    row: parse/all line ","
    append transactions to-integer row/8
    if find row/4 "Saoud" [
        append saoud to-integer row/8
        append dates replace row/1 "/2012" ""
    ]
]
if not exists? %q-plot.r [write %q-plot.r read http://re-bol.com/q-plot.r]
do %q-plot.r
view center-face quick-plot [
    594x400
    bars [(data: copy transactions)]
    label "All Paypal Transactions"
]
view center-face quick-plot [
    495x530
    pen blue
    pie [(data: copy saoud)] labels [(data: copy dates)] explode [1 2 3]
    title "Saoud" style vh2
]
Here's a slighty more mature version of the first example in this section. This program creates an inventory list using a simple GUI form (a window with some text fields and buttons). The file created could be used, for example, to determine re-order requirements, to calculate inventory and sales tax due, or sent to an accountant to be imported and used in a spreadsheet, etc.:
REBOL [title: "Inventory"]
view layout [
    text "SKU:"
    f1: field
    text "Cost:"
    f2: field "1.00"
    text "Quantity:"
    f3: field
    across
    btn "Save" [
        write/append %inventory.txt rejoin [
            mold f1/text " " mold f2/text " " mold f3/text newline
        ]
        alert "Saved"
    ]
    btn "View Data" [editor %inventory.txt]
]
This program allows users to view the inventory data created by the program above, sorted by any chosen column:
REBOL [title: "Sort Inventory"]
inventory: load %inventory.txt
blocked: copy []
foreach [sku cost qty] inventory [
    append/only blocked reduce [
        sku
        to-money cost
        to-integer qty
    ]
]
field-name: request-list "Choose Field To Sort By:" [
    "sku" "cost" "qty"
]
field: select ["sku" 1 "cost" 2 "qty" 3] field-name
order: request-list "Ascending or Descending:" ["ascending" "descending"]
either order = "ascending" [
    sort/compare blocked func [a b] [(at a field) < (at b field)]
][
    sort/compare blocked func [a b] [(at a field) > (at b field)]
]
foreach item blocked [
    print rejoin [
        "SKU:  " item/1 "  COST: " item/2 "  QTY: " item/3 newline
    ]
]
halt
Here's a little contact database app that displays user information in a tabular display:
REBOL [title: "Contacts"]
users: [
    "John Smith" "123 Tomline Lane Forest Hills, NJ" "555-1234"
    "Paul Thompson" "234 Georgetown Pl. Peanut Grove, AL" "555-2345"
    "Jim Persee" "345 Pickles Pike Orange Grove, FL" "555-3456"
    "George Jones" "456 Topforge Court Mountain Creek, CO" ""
    "Tim Paulson" "" "555-5678"
]
gui: [
    backdrop white
    across
    style header text black 200
    header "Name:" header "Address:" header "Phone:" return
]
foreach [name address phone] users [
    append gui compose [
        field (name) field (address) field (phone) return
    ]
]
view layout gui
Here's a simple email app:
REBOL [title: "Email"]
view layout[
    h1 "Send:"
    btn "Server settings" [
        system/schemes/default/host: request-text/title "SMTP Server:"
        system/schemes/pop/host:     request-text/title "POP Server:"
        system/schemes/default/user: request-text/title "SMTP User Name:"
        system/schemes/default/pass: request-text/title "SMTP Password:"
        system/user/email: to-email request-text/title "Your Email Addr:"
    ]
    a: field "user@website.com"
    s: field "Subject"
    b: area
    btn "Send"[
        send/subject to-email a/text b/text s/text
        alert "Sent"
    ]
    h1 "Read:"
    f: field "pop://user:pass@site.com"
    btn "Read" [editor read to-url f/text]
]
Here's a scheduling app that allows users to create events on any day. The user can then click days on the calendar to see the scheduled events:
REBOL [title: "Schedule"]
view center-face gui: layout [
    btn "Date" [date/text: form request-date  show date]
    date: field
    text "Event Title:"
    event: field
    text "Time:"
    time: field
    text "Notes:"
    notes: field
    btn "Add Appointment" [
        write/append %appts.txt rejoin [
            mold date/text newline
            mold event/text newline
            mold time/text newline
            mold notes/text newline
        ]
        date/text: "" event/text: "" time/text: "" notes/text: ""
        show gui
        alert "Added"
    ]
    a: area
    btn "View Schedule" [
        today: form request-date
        foreach [date event time notes] load %appts.txt [
            if date = today [
                a/text: copy ""
                append a/text form rejoin [
                    date newline
                    event newline
                    time newline
                    notes newline newline
                ]
                show a
            ]
        ]
    ]
]
Here's a small but fully functional cash register application:
REBOL [title: "Minimal Cash Register"]
view gui: layout [
    style fld field 80
    across
    text "Cashier:"   cashier: fld
    text "Item:"      item: fld
    text "Price:"     price: fld [
        if error? try [to-money price/text] [alert "Price error" return]
        append a/text reduce [mold item/text "    " price/text newline]
        item/text: copy "" price/text: copy ""
        sum: 0
        foreach [item price] load a/text [sum: sum + to-money price]
        subtotal/text: form sum
        tax/text: form sum * .06
        total/text: form sum * 1.06
        focus item
        show gui
    ]
    return
    a: area 600x300
    return
    text "Subtotal:"   subtotal: fld
    text "Tax:"        tax: fld
    text "Total:"      total: fld
    btn "Save" [
        items: replace/all (mold load a/text) newline " "
        write/append %sales.txt rejoin [
            items newline cashier/text newline now/date newline
        ]
        clear-fields gui
        a/text: copy ""
        show gui
    ]
]
This program computes a sum all sales made on the current day:
REBOL [title: "Daily Total"]
sales: read/lines %sales.txt
sum: $0
foreach [items cashier date] sales [
    if now/date = to-date date [
        foreach [item price] load items [
            sum: sum + to-money price
        ]
    ]
]
alert rejoin ["Total sales today: " sum]
Here's a full screen slide show presentation example:
REBOL [title: "Simple Presentation"]
slides: [
    [
        at 0x0 box system/view/screen-face/size white [unview]
        at 20x20 h1 blue "Slide 1"
        box black 2000x2
        text "This slide takes up the full screen."
        text "Adding images is easy:"
        image logo.gif
        image stop.gif
        image info.gif
        image exclamation.gif
        text "Click anywhere on the screen for next slide..."
        box black 2000x2
    ]
    [
        at 0x0 box system/view/screen-face/size effect [
            gradient 1x1 tan brown
        ] [unview]
        at 20x20 h1 blue "Slide 2"
        box black 2000x2
        text "Gradients and color effects are easy in REBOL:"
        box effect [gradient 123.23.56 254.0.12]
        box effect [gradient blue gold/2]
        text "Click anywhere on the screen to close..."
        box black 2000x2
    ]
]
foreach slide slides [
    view/options center-face layout slide 'no-title
]
Here's a parts database application:
REBOL [title: "Parts"]
write/append %data.txt ""
database: load %data.txt
view center-face gui: layout [
    text "Parts in Stock:"
    name-list: text-list blue 400x100 data sort (extract database 4) [
        if value = none [return]
        marker: index? find database value
        n/text: pick database marker
        a/text: pick database (marker + 1)
        p/text: pick database (marker + 2)
        o/text: pick database (marker + 3)
        show gui
    ]
    text "Part Name:"       n: field 400
    text "Manufacturer:"    a: field 400
    text "SKU:"      p: field 400
    text "Notes:"      o: area  400x100
    across
    btn "Save" [
        if n/text = "" [alert "You must enter a Part name." return]
        if find (extract database 4) n/text [
            either true = request "Overwrite existing record?" [
               remove/part (find database n/text) 4
            ] [
               return
            ]
        ]
        save %data.txt repend database [n/text a/text p/text o/text]
        name-list/data: sort (extract copy database 4)
        show name-list
    ]
    btn "Delete" [
        if true = request rejoin ["Delete " n/text "?"] [
            remove/part (find database n/text) 4
            save %data.txt database
            do-face clear-button 1
            name-list/data: sort (extract copy database 4)
            show name-list
        ]
    ]
    clear-button: btn "New" [
        n/text: copy  ""
        a/text: copy  ""
        p/text: copy  ""
        o/text: copy  ""
        show gui
    ]
]
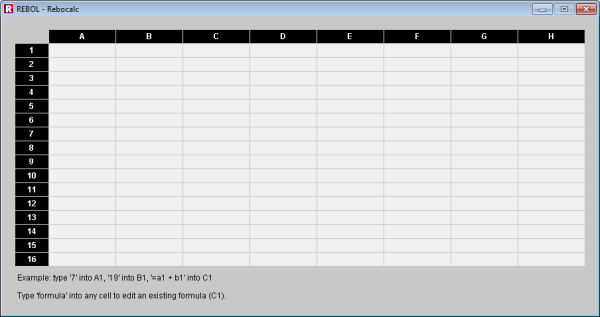
Here's a spreadsheet application, originally written in REBOL by Carl Sassenrath, which can inherently use the entire REBOL language and all it's features to process cell data (math, graphics, Internet, file and network protocols, parse, native dialogs, GUI, and all other general purpose capabilities of the language are available to functions in this tiny 68 line program):
REBOL [Title: "Rebocalc" Authors: ["Carl Sassenrath" "Nick Antonaccio"]]
csize: 100x20  max-x: 8  max-y: 16
pane: []
xy: csize / 2 + 1 * 1x0
yx: csize + 1 * 0x1
layout [
    cell: field csize edge none [enter face compute face/para/scroll: 0x0]
    label: text csize white black bold center
]
char: #"A"
repeat x max-x [
    append pane make label [offset: xy text: char]
    set in last pane 'offset xy
    xy: csize + 1 * 1x0 + xy
    char: char + 1
]
repeat y max-y [
    append pane make label [offset: yx text: y size: csize * 1x2 / 2]
    yx: csize + 1 * 0x1 + yx
]
xy: csize * 1x2 / 2 + 1
cells: tail pane
repeat y max-y [
    char: #"A"
    repeat x max-x [
        v: to-word join char y
        set v none
        char: char + 1
        append pane make cell [offset: xy text: none var: v formula: none]
        xy: csize + 1 * 1x0 + xy
    ]
    xy: csize * 1x2 / 2 + 1 + (xy * 0x1)
]
enter: func [face /local data] [
    if empty? face/text [exit]
    set face/var face/text
    data: either face/text/1 = #"=" [next face/text][face/text]
    if error? try [data: load data] [exit]
    if find [
        integer! decimal! money! time! date! tuple! pair!
    ] type?/word :data [set face/var data exit]
    if face/text/1 = #"=" [face/formula: :data]
]
compute: has [blk] [
    unfocus
    foreach cell cells [
        if cell/formula [
            either cell/text = "formula" [
                cell/text: join "=" form cell/formula
                show cell return
            ][
                if error? cell/text: try [do cell/formula] [
                    cell/text: "ERROR!"
                ]
            ]
            set cell/var cell/text
            show cell
        ]
    ]
]
lo: layout [
    bx: box second span? pane
    text "Example: type '7' into A1, '19' into B1, '=a1 + b1' into C1"
    text "Type 'formula' into any cell to edit an existing formula (C1)."
]
bx/pane: pane
view center-face lo
The process of learning a programming language is similar to learning any spoken language (English, French, Spanish, etc.). If you move a person from the United States to Spain, you can be fairly certain that within a year, they will be able to speak Spanish adequately, even if they aren't provided any appropriate structured Spanish training or guidance. Guidance certainly helps clarify the process, but a key essential component is immersion. Immersion in code works the same way. It may be painful and confusing at first to see or comprehend a totally foreign language and environment, but diving right into code is required if you want to become proficient at "speaking" REBOL. Run each example in this section, and along the way, try changing some text headers, button labels, text field sizes, and other obvious properties to see how the programs change. Getting used to using the REBOL interpreter, becoming aware that code examples in this text are malleable, and opening your mind to the prospect and activity of actually typing REBOL code, is an important first step.


1.4 Basics of REBOL Coding
Computer programming is about processing data - that's all computers do internally (although the results of that data processing can appear, and actually end up being, magically more human). Everything you learn about in this text, therefore, will necessarily have to do with inputting, manipulating, and outputting processed data.
Every REBOL program must begin with the following header:
REBOL []Function words perform actions upon data values. The following function examples display some data values (text, in this case) and request useful data values from users (any text after a semicolon in these examples is a human readable "comment", and is ignored completely by the REBOL interpreter):
REBOL []
alert "Hello world"      ; "ALERT" is the function word here.
editor "Hello world"     ; "Hello world" is the text data parameter.
print "Hello world"      ;
wait 2                   ; "Wait" is the function here, "2" is the data.
request-date             ; Requestor functions get some data from a user.
request-pass
request-text/title "What is your Name?"
request-file
request-list "Choose a color:" ["Red" "Green" "Blue"]
request ["Size:" "Small" "Medium" "Large"]
request-color
Be sure to paste EVERY code example into the REBOL editor, and watch each line run.
In REBOL, the output of one function (the "return value") can be used as the input ("argument" or "parameter") of another function:
; Here, the "editor" function edits whatever date is input by the user:

editor request-date

; Here, the "alert" function displays whatever text is input by the user:

alert request-text
In REBOL you can assign data to a label word (also called a "variable"), using the colon symbol. Once data is assigned to a word label, you can use that word anywhere to refer to the assigned value:
REBOL []
balance: $53940.23 - $234
print balance
name: request-text/title "Name:"
print name
date: request-date
print date
alert "Click [OK] to continue"
You can join together, or concatenate, data values using the "rejoin" function. Try adding this line to the end of the program above:
alert rejoin [name ", your balance on " date " is " balance]There are a variety of useful values built into REBOL:
REBOL []
alert rejoin ["Right now the date and time is: " now]
alert rejoin ["The date is: " now/date]
alert rejoin ["The time is: " now/time]
alert rejoin ["The value of PI is " pi]
alert rejoin ["The months are " system/locale/months]
alert rejoin ["The days are " system/locale/days]
REBOL can perform useful calculations on many types of values:
REBOL []
alert rejoin ["5 + 7 = " 5 + 7]
alert rejoin ["Five days ago was " now/date - 5]
alert rejoin ["Five minutes ago was " now/time - 00:05]
alert rejoin ["Added coordinates: " 23x54 + 19x31]
alert rejoin ["Multiplied coordinates: " 22x66 * 2]
alert rejoin ["A multiplied coordinate matrix: " 22x66 * 2x3]
alert rejoin ["Added tuple values: " 192.168.1.1 + 0.0.0.37]
alert rejoin ["The RGB color value of purple - brown is: " purple - brown]
Remember, programming is fundamentally about managing data, so REBOL's ability to appropriately handle operations and computations with common data types leads to greater simplicity and productivity for programmers.


1.5 Conditional Evaluations
Conditional evaluations can be performed using the syntax: "if (this is true) [do this]":
REBOL []
if (now/time > 6:00am) [alert "It's time to get up!"]
Notice the natural handling of the time value in the example above. No special formatting or parsing is required to use that value. REBOL natively "understands" how to perform appropriate computations with time and other common data types.
Use the "either" evaluation to do one thing if a condition is true, and another if the condition is false:
REBOL []
user: "sa98df"
pass: "008uqwefbvuweq"
userpass: request-pass
either (userpass = reduce [user pass]) [
    alert rejoin ["Welcome back " user "!"]
][
    alert "Incorrect username/password combination"
]
In the code above:
- The word label (variable) "user" is assigned to a text value.
- The variable "pass" is assigned to some text.
- A username/password combination is requested from the user, and the result of that function is labeled "userpass".
- An "either" conditional evaluation is performed on the returned "userpass" value. If the userpass value equals the set "user" and "pass" variables, the user is alerted with a welcome message. Otherwise, the user is alert with an error message.
1.6 Some More Useful Functions
Try pasting every individual line below into the REBOL interpreter console to see how each function can be used to perform useful actions:
REBOL [] print read http://rebol.com ; "read" retrieves the data from many sources editor http://rebol.com ; the built in editor can also read many sources print read %./ ; the % symbol is used for local files and folders editor %./ write %temp.txt "test" ; write takes TWO parameters (file name and data) editor %temp.txt editor request-file/only ; "only" refinement limits choice to 1 file write clipboard:// (read http://rebol.com) ; 2nd parameter in parentheses editor clipboard:// print read dns://msn.com ; REBOL can read many built in protocols print read nntp://news.grc.com write/binary %/c/bay.jpg (read/binary http://rebol.com/view/bay.jpg) write/binary %tada.wav (read/binary %/c/windows/media/tada.wav) write/binary %temp.dat (compress read http://rebol.com) ; COMPRESS DATA print decompress read/binary %temp.dat ; DECOMPRESS DATA print read ftp://user:pass@website.com/name.txt ; user/pass required write ftp://user:pass@website.com/name.txt "text" ; user/pass required editor ftp://user:pass@website.com/name.txt ; can save changes to server! editor pop://user:pass@website.com ; read all emails in this account send user@website.com "Hello" ; send email send user@website.com (read %file.txt) ; email the text from this file send/attach user@website.com "My photos" [%pic1.jpg %pic2.jpg pic3.jpg] name: ask "Enter your name" print name ; request a user value in console call/show "notepad.exe c:\config.sys" ; run an OS shell command browse http://re-bol.com ; open system default web browser to a page view layout [image %pic1.jpg] ; view an image view layout [image request-file/only] ; view a user selected image insert s: open sound:// load request-file/only wait s close s ; play sound insert s: open sound:// load %/c/windows/media/tada.wav wait s close s rename %temp.txt %temp2.txt ; change file name write %temp.txt read %temp2.txt ; copy file write/append %temp2.txt "" ; create file (or if it exists, do nothing) delete %temp2.txt change-dir %../ what-dir list-dir make-dir %./temp print read %./ attempt [print 0 / 0] ; test for and handle errors if error? try [print 0 / 0] [alert "*** ERROR: divide by zero"] parse "asdf#qwer#zxcv" "#" ; split strings at character set trim " asdf89w we " ; remove white space at the beginning and end replace/all "xaxbxcxd" "x" "q" ; replace all occurrences of "x" with "q" checksum read %file.txt ; compute a checksum to ensure validity print dehex "a%20space" ; convert from URL encoded string print to-url "a space" ; convert to URL encoded string print detab "tab separated" ; convert tabs to spaces print enbase/base "a string" 64 ; convert string or bin to base 64, 16, 2 print encloak "my data" "my pass" ; encrypt and decrpyt data (AES, blow- print decloak "µÜiűŽz®" "my pass" ; fish and other formats also supported read-cgi ; neatly parse all data submitted from a web page form for i 1 99 3 [print i] ; count from 1 to 99, by steps of 3 halt ; "HALT" stops the REBOL console from closing, ; so you can see the printed results.In order to see each of the lines above execute, paste them directly into the REBOL console, instead of into the editor. When running code directly in the console, it's not necessary to include the REBOL[] header, or the "halt" function:
Really take a look at how much computing ability is enabled by each of the functions above. That short collection of one line code snippets demonstrates how to do many of the most commonly useful tasks performed by a computer:
- Reading data from and writing data to files on a hard drive, thumb drive, etc.
- Reading/writing data from/to web servers and other network sources, the system clipboard, user input, etc.
- Reading emails, sending emails, sending attached files by email.
- Displaying images.
- Playing sounds.
- Navigating and manipulating folders and files on the computer.
- Compressing, decompressing, encrypting, and decrypting data.
- Running third party programs on the computer.
- Reading, parsing, and converting back and forth between common data types and values.
And those lines are just a cursory introduction to a handful of built in REBOL functions. There are hundreds more. At this point in the tutorial, simply read the examples and paste them into the REBOL interpreter console to introduce yourself to the syntax, and to witness their resulting action. You will see these functions, and others, used repeatedly throughout this tutorial and in real working code, for as long as you study and use REBOL. Eventually, you will get to know their syntax and refinements by heart, but you can always refer to reference documentation while you're learning. If you're serious about learning to program, you should take some time now to try changing the parameters of each function to do some useful work (try reading the contents of different file names, send some emails to yourself, compress and decompress some data and view the results with the editor function, etc.)
You can get a list of all function words by typing the "what" function into the REBOL console:
what ; press the [ESC] key to stop the listingYou can see the syntax, parameters, and refinements of any function using the "help" function:
help print
help prin
help read
help write
You can learn more about all the useful functions built in to REBOL by running the following program. Try it now:
write %wordbrowser.r read http://re-bol.com/wordbrowser.r
do %wordbrowser.r
By learning to combine simple functions with a bit of conditional evaluation (if/then) thinking, along with some list processing techniques, you can accomplish truly useful programming goals that go far beyond the capabilities of even complex office suite programs (much more about 'list processing' will be covered shortly).
The important thing to understand at this point is that functions exist in REBOL, to perform actions on all sorts of useful data. Learning to recognize functions and the data parameters which follow them, when you see them in code, is an important first step in learning to read and write REBOL. Eventually memorizing the syntax and appropriate use patterns of all built in functions is a necessary goal if you want to write code fluently.
The benefit of pasting (or even better typing) every single example into the REBOL editor and/or console, cannot be overstated. Concepts will become more understandable, and important code details will be explicitly clarified as this text progresses. For now, working by rote is the best way to continue learning. Read and execute each example, and pay attention to which words are functions and which words are data arguments.


2. Lists, Tables, and the "Foreach" Function
2.1 Managing Spreadsheet-Like Data
2.1.1 Warning
NOTE: This section of the tutorial is the longest and most difficult to grasp at first read. Read through it once to introduce yourself to all the topics, and skim the code structures. Be prepared for it - the code is going to get hairy. Just press on, absorb what you can, and continue to read through the entire section. You'll refer back to it later in much greater detail, once you've seen how all the concepts, functions, and code patterns fit together to create useful programs.
2.1.2 Blocks
Most useful business programs process lists of data. Tables of data are actually dealt with programatically as consecutive lists of items. A list or "block" of data is created in REBOL by surrounding values with square brackets:
REBOL []
names: ["Bob" "Tom" "Bill"]
To perform an operation/computation with/to each data item in the block, use the foreach function. Foreach syntax can be read like this: "foreach (labeled item) in (this labeled block) [perform this operation with/to each labeled item]:
REBOL []
names: ["Bob" "Tom" "Bill"] ; create a block of text items labeled "names"
foreach name names [print name]       ; print each name value in the block
halt
This example prints each value stored in the built-in "system/locale/months" block:
REBOL []
months: system/locale/months     ; set the variable "months" to the values
foreach month months [print month]                ; print each month value
halt
Note that in the example above, the variable words "months" and "month" could be changed to any other desired, arbitrarily determined, label:
REBOL []
foo: system/locale/months
foreach bar foo [print bar]                ; variable labels are arbitrary
halt
Labeling the system/locale/months block is also not required. Without the label, the code is shorter, but perhaps just a bit harder to read:
REBOL []
foreach month system/locale/months [print month]
halt
Learning to read and think in terms of "foreach item in list [do this to each item]" is one of the most important fundamental concepts to grasp in programming. You'll see numerous repeated examples in this text. Be aware every time you see the word "foreach".
You can obtain lists of data from a variety of different sources. Notice that the "load" function is typically used to read lists of data. This example prints the files in the current folder on the hard drive:
REBOL []
folder: load %.
foreach file folder [print file]
halt
This example loads the list from a file stored on a web site:
REBOL []
names: load http://re-bol.com/names.txt
foreach name names [print name]
halt
NOTE: you can write the data required for the above example to your own web server, using the following line of code. Note that the "save" function is typically used to write lists of data:
REBOL []
save ftp://user:pass@site.com/folder/names.txt ["Bob" "Tom" "Bill"]
2.2 Some Simple List Algorithms (Count, Sum, Average, Max/Min)
2.2.1 Counting Items
The "length?" function counts the number of items in a list:
REBOL []
receipts: [$5.23 $95.98 $7.46 $34]        ; a list labeled "receipts"
alert rejoin ["There are " length? receipts " receipts in the list."]
You can assign counts to variable labels and use the values later:
REBOL []
month-count: length? system/locale/months
day-count: length? system/locale/days
alert rejoin ["There are " month-count " months and " day-count " days."]
Another way to count items in a list is to create a counter variable, initially set to 0. Use a foreach loop to go through each item in the list, and increment (add 1) to the count variable:
REBOL []
count: 0
receipts: [$5.23 $95.98 $7.46 $34]
foreach receipt receipts [count: count + 1]   ; increment count by 1
alert rejoin ["There are " count " receipts in the list."]
Here's an alternate syntax for incrementing counter variables:
REBOL []
count: 0
receipts: [$5.23 $95.98 $7.46 $34]
foreach receipt receipts [++ count]           ; increment count by 1
alert rejoin ["There are " count " receipts in the list."]
This example counts the number of months in a year and the number of days in a week, using counter variables:
REBOL []
month-count: 0
day-count: 0
foreach month system/locale/months [++ month-count]
foreach day system/locale/days [++ day-count]
alert rejoin ["There are " month-count " months and " day-count " days."]
Counter variables are particularly useful when you only want to count certain items in a list. The following example counts only items that are number values:
REBOL []
count: 0
list: ["screws" 14 "nuts" 38 "bolts" 23]
foreach item list [
    ; Increment only if item type is integer:
    if (type? item) = integer! [++ count]
]
alert rejoin ["The count of all number values in the list is: " count]
2.2.2 Sums
To calculate the sum of numbers in a list, start by assigning a sum variable to 0. Then use a foreach loop to increment the sum by each individual number value. This example starts by assigning the label "balance" to a value of 0. Then the label "receipts" is assigned to a list of money values. Then, each value in the receipts list is added to the balance, and that tallied balance is displayed:
REBOL []
sum: 0                                ; a sum variable, initially set to 0
receipts: [$5.23 $95.98 $7.46 $34]            ; a list, labeled "receipts"
foreach item receipts [sum: sum + item]                      ; add them up
alert rejoin ["The sum of all receipts is: " sum]
You could total only the items in a list which contain number values, for example, like this:
REBOL []
sum: 0
list: ["screws" 14 "nuts" 38 "bolts" 23]
foreach item list [
    if (type? item) = integer! [            ; only if item type is integer
        sum: sum + item                     ; add item to total
    ]
]
alert rejoin ["The total of all number values in the list is: " sum]
2.2.3 Averages
Computing the average value of items in a list is simply a matter of dividing the sum by the count:
REBOL []
sum: 0
receipts: [$5.23 $95.98 $7.46 $34]
foreach item receipts [sum: sum + item]
average: sum / (length? receipts)
alert rejoin ["The average balance of all receipts is: " average]
2.2.4 Maximums and Minimums
REBOL has built in "maximum-of" and "minimum-of" functions:
REBOL []
receipts: [$5.23 $95.98 $7.46 $34]
print first maximum-of receipts
print first minimum-of receipts
halt
You can perform more complicated max/min comparisons by checking each value with a conditional evaluation. This example looks for the highest receipt value under $50:
REBOL []
highest: $0
receipts: [$5.23 $95.98 $7.46 $34]
foreach receipt receipts [
    if (receipt > highest) and (receipt < $50) [highest: receipt]
]
alert rejoin ["Maximum receipt below fifty bucks: " highest]
2.3 Searching
The "find" function is used to perform simple searches:
REBOL []
names: ["John" "Jane" "Bill" "Tom" "Jen" "Mike"]
if find names "Bill" [alert "Yes, Bill is in the list!"]
if not find names "Paul" [alert "No, Paul is not in the list."]
You can determine the index position of a found item in a list, using the "index?" function:
REBOL []
names: ["John" "Jane" "Bill" "Tom" "Jen" "Mike"]
indx: index? find names "Bill"
print rejoin ["Bill is at position " indx " in the list."]
halt
You can search for text within each item in a list using a foreach loop to search each individual value:
REBOL []
names: ["John" "Jane" "Bill" "Tom" "Jen" "Mike"]
foreach name names [
    if find name "j" [
        print rejoin ["'j' found in " name]
    ]
]
halt
The "find/any" refinement can be used to search for wildcard characters. The "*" character allows for portions of search text to contain random character strings of any length. The "?" character allows for random character searches of a specified length (at specific character positions within a search term):
REBOL []
names: ["OJ" "John" "Joan" "Jan" "Major Bill" "MJO" "Mike"]
foreach name names [
    if find/any name "*jo*" [
        print rejoin ["'jo' found in " name]
    ]
]
print ""
foreach name names [
    if find/any name "j*n" [
        print rejoin ["'j*n' found in " name]
    ]
]
print ""
foreach name names [
    if find/any name "j??n" [
        print rejoin ["'j--n' found in " name]
    ]
]
halt
2.4 Gathering Data, and the "Copy" Function
When collecting ("aggregating") values into a new block, always use the "copy" function to create the new block. You'll need to do this whenever a sub-list or super-list of values is created based upon conditional evaluations performed on data in a base list:
REBOL []
low-receipts: copy []             ; Create blank list with copy [], NOT []
receipts: [$5.23 $95.98 $7.46 $34]
foreach receipt receipts [
    if receipt < $10 [append low-receipts receipt]     ; add to blank list
]
print low-receipts
halt
For example, the following line should should NOT be used (it does not contain the word "copy" when creating a blank list):
low-receipts: [] ; WRONG - should be low-receipts: COPY []The same is true when creating blank string values. Use the "copy" function whenever you create an empty text value that you intend to adjust or add to:
REBOL []
names: copy {}                  ; Create blank string with copy {}, NOT {}
people: ["Joan" "George" "Phil" "Jane" "Peter" "Tom"]
foreach person people [
    if find person "e" [
        append names rejoin [person " "]    ; This appends to blank string
    ]
]
print names
halt
2.5 List Comparison Functions
REBOL has a variety of useful built in list comparison functions. You'll use these for determining differences, similarities, and combinations between sets of data:
REBOL []
group1: ["Joan" "George" "Phil" "Jane" "Peter" "Tom"]
group2: ["Paul" "George" "Andy" "Mary" "Tom" "Tom"]
print rejoin ["Group 1: " group1]
print ""
print rejoin ["Group 2: " group2]
print newline
print rejoin ["Intersection:           " intersect group1 group2]
print "^/(values shared by both groups)^/^/"
print rejoin ["Difference:             " difference group1 group2]
print "^/(values not shared by both groups)^/^/"
print rejoin ["Union:                  " union group1 group2]
print "^/(all unique values contained in both groups)^/^/"
print rejoin ["Join:                   " join group1 group2]
print "^/(one group tacked to the end of the other group)^/^/"
print rejoin ["Excluded from Group 2:  " exclude group1 group2]
print "^/(values contained in group1, but not contained in group2)^/^/"
print rejoin ["Unique in Group 2:      " unique group2]
print "^/(unique values contained in group2)"
halt

2.6 Creating Lists From User Input
2.6.1 Creating New Blocks and Adding Values
You can create a new block using the code pattern below. Simply assign variable labels to "copy []":
REBOL []
items: copy []          ; new empty block named "items"
prices: copy []         ; new empty block named "prices"
Add values to new blocks using the "append" function:
REBOL []
items: copy []
prices: copy []
append items "Screwdriver"
append prices "1.99"
append items "Hammer"
append prices "4.99"
append items "Wrench"
append prices "5.99"
Use the "print", "probe", or "editor" functions to view the data in a block. The "print" function simply prints the values in the block. The "probe" function shows the block data structure (square brackets enclosing the values, quotes around text string values, etc.). The "editor" function opens REBOL's built in text editor, with the block structure displayed:
REBOL []
items: copy []
prices: copy []
append items "Screwdriver"
append prices "1.99"
append items "Hammer"
append prices "4.99"
append items "Wrench"
append prices "5.99"

editor items
editor prices

print rejoin ["ITEMS:   " items newline]
print rejoin ["PRICES:  " prices newline]

probe items
probe prices

halt
2.6.2 Accepting Data Input from a User
You've already been introduced to the "request-text" function. It accepts text input from a user:
REBOL []
request-text
You can assign a variable label to the data entered by the user, and then use that data later in your program:
REBOL []
price: request-text
alert price
You can add a text title to the request-text function, with the "/title" refinement:
REBOL []
price: request-text/title "Input a dollar value:"
alert price
You can add a default text response using the "/default" refinement:
REBOL []
price: request-text/default "14.99"
alert price
You can combine the "/title" and "/default" refinements:
REBOL []
price: request-text/title/default "Input a dollar value:" "14.99"
alert price
The "ask" function does the same thing, but within the text environment of the REBOL interpreter console (instead of using a popup windowed requestor):
REBOL []
price: ask "Input a dollar value:  $"
alert price
2.6.3 Building Blocks from User-Entered Data
Add data to a block, which has been entered by the user, using the code pattern below. Append the variable label of the entered data to the block label:
REBOL []
items: copy []
prices: copy []
item: request-text/title/default "Item:" "screwdriver"
price: request-text/title/default "Price:" "1.99"
append items item
append prices price
The example below uses a "forever" loop to repeatedly perform the "request-text" and "append" operations. A conditional "if" evaluation checks to see if the user enters "" (empty text) in the Item requestor. If so, it stops the forever loop using the "break" function, and displays the data in each block:
REBOL []
items: copy []
prices: copy []
forever [
    item: request-text/title "Item:"
    if item = "" [break]
    price: request-text/title "Price:"
    append items item
    append prices price
]
print "Items:^/"                       ; THE ^/ CHARACTER PRINTS A NEWLINE
probe items
print "^/^/Prices:^/"
probe prices
halt
You could just as easily add the entered data to a single block:
REBOL []
inventory: copy []
forever [
    item: request-text/title "Item:"
    if item = "" [break]
    price: request-text/title "Price:"
    append inventory item
    append inventory price
]
print "Inventory:^/"
probe inventory
halt
2.6.4 Saving and Reading Block Data To/From Files
Save a block to a text file using the "save" function. Remember that in REBOL, file names always begin with the "%" character:
REBOl []
inventory: ["Screwdriver" "1.99" "Hammer" "4.99" "Wrench" "5.99"]
save %inv.txt inventory
alert "Saved"
Load blocked data from a saved file using the "load" function. You can assign a variable label to the loaded data, to use it later in the program:
REBOL []
inventory: load %inv.txt
print "Inventory^/"
probe inventory
halt
You can also append data directly to a file using the "write/append" function. When using the "write/append" function, use the "mold" function to enclose each text value in quotes, and the "rejoin" function to separate each value with a space:
REBOL []
forever [
    item: request-text/title "Item:"
    if item = "" [break]
    price: request-text/title "Price:"
    write/append %inv.txt rejoin [
        mold item " " mold price " "
    ]
]
inventory: load %inv.txt
print "Inventory:^/"
probe inventory
halt


2.7 Three Useful Data Storage Programs: Inventory, Contacts, Schedule
The last program above provides a nice template for practical applications of all types. It stores and displays inventory items and prices. Notice that a "title" variable has been added to the header, set to the text "Inventory". It's good practice to assign titles to all your programs:
REBOL [title: "Inventory"]
forever [
    item: request-text/title "Item:"
    if item = "" [break]
    price: request-text/title "Price:"
    write/append %inv.txt rejoin [
        mold item " " mold price " "
    ]
]
inventory: load %inv.txt
print "Inventory:^/"
probe inventory
halt
Here's the same program as above, changed slightly to store and display contact information:
REBOL [title: "Contacts"]
forever [
    name: request-text/title "Name:"
    if name = "" [break]
    address: request-text/title "Address:"
    phone: request-text/title "Phone:"
    write/append %contacts.txt rejoin [
        mold name " " mold address " " mold phone " "
    ]
]
contacts: load %contacts.txt
print "Contacts:^/"
probe contacts
halt
Here it is again, repurposed to hold schedule information:
REBOL [title: "Schedule"]
forever [
    event: request-text/title/default "Event Title:" "Meeting with "
    if event = "" [break]
    date: request-text/title/default "Date:" "1-jan-2013"
    time: request-text/title/default "Time:" "12:00pm"
    notes: request-text/title/default "Notes:" "Bring: "
    write/append %schedule.txt rejoin [
        mold event " " mold date " " mold time " " mold notes " "
    ]
]
schedule: load %schedule.txt
print "Schedule:^/^/"
probe schedule
halt
The types of data you store using these sorts of operations can be adjusted specifically to your particular data management needs for any given task. Your ability to apply this code to practical situations is limited only by your own creativity. All you need to do is change the requestor titles and the variable labels to clarify the type of data being stored.


2.8 Working With Tables of Data: Columns and Rows
Columns within tables of data are arranged in sequential order in blocks. Indentation and white space helps to display columns neatly, within a visual "table" layout. The following table conceptually contains 3 rows of 3 columns of data, but the whole block is still just a sequential list of 9 items:
accounts:  [
    "Bob"   $529.23   21-jan-2013
    "Tom"   $691.37   13-jan-2013
    "Ann"   $928.85   19-jan-2013
]
The foreach function in the next example alerts the user with every three consecutive data values in the table (each row of 3 consecutive name, balance, and date column values):
REBOL []
accounts:  [
    "Bob" $529.23 21-jan-2013
    "Tom" $691.37 13-jan-2013
    "Ann" $928.85 19-jan-2013
]
foreach [name balance date] accounts [
    alert rejoin [
        "Name: " name ", Date: " date ", Balance: " balance
    ]
]
This example displays the computed balance for each person on the given date. The amount displayed is the listed "balance" value for each account, minus a universal "fee" value):
REBOL []
accounts:  [
    "Bob" $529.23 21-jan-2013
    "Tom" $691.37 13-jan-2013
    "Ann" $928.85 19-jan-2013
]
fee: $5
foreach [name balance date] accounts [
    alert rejoin [name "'s balance on " date " will be " balance - fee]
]
Here's a variation of the above example which displays the sum of values in all accounts:
REBOL []
accounts:  [
    "Bob" $529.23 21-jan-2013
    "Tom" $691.37 13-jan-2013
    "Ann" $928.85 19-jan-2013
]
sum: $0
foreach [name balance date] accounts [sum: sum + balance]
alert rejoin ["The total of all balances is: " sum]
Here's a variation that computes the average balance:
REBOL []
accounts:  [
    "Bob" $529.23 21-jan-2013
    "Tom" $691.37 13-jan-2013
    "Ann" $928.85 19-jan-2013
]
sum: $0
foreach [name balance date] accounts [sum: sum + balance]
alert rejoin [
    "The average of all balances is: "
    sum / ((length? accounts) / 3)
]
Here is a variation of the "Schedule" application from the previous section, slightly adjusted using the "foreach" function to format a more cleanly printed data display:
REBOL []
forever [
    event: request-text/title "Event Title:"
    if event = "" [break]
    date: request-text/title/default "Date:" "1-jan-2013"
    time: request-text/title/default "Time:" "12:00pm"
    notes: request-text/title/default "Notes:" "Bring: "
    write/append %schedule.txt rejoin [
        mold event " " mold date " " mold time " " mold notes " "
    ]
]
schedule: load %schedule.txt
print newpage                          ; "newpage" prints a cleared screen
print "SCHEDULE:^/^/"
foreach [event date time notes] schedule [
    print rejoin [
        "Event:  " event newline
        "Date:   " date newline
        "Time:   " time newline
        "Notes:  " notes newline newline
    ]
]
halt
Here is the "Inventory" program from the previous section, adjusted slightly to count the number of items and calculate a sum of inventory prices:
REBOL [title: "Inventory"]
forever [
    item: request-text/title "Item:"
    if item = "" [break]
    price: request-text/title "Price:"
    write/append %inv.txt rejoin [
        mold item " " mold price " "
    ]
]
inventory: load %inv.txt
count: 0
sum: $0
foreach [item price] inventory [
    count: count + 1
    sum: sum + to-money price
]
print newpage
print rejoin ["Total # of Items:  " count]
print rejoin ["Sum of Prices:     " sum]
halt
Here's a variation of the "Contacts" application that searches for saved names, and prints out any matching contact information:
REBOL []
search: request-text/title/default "Search text:" "John"
contacts: load %contacts.txt
print newpage
print rejoin [search " found in:^/"]
foreach [name address phone] contacts [
    if find name search [
        print rejoin [
            "Name:      " name newline
            "Address:   " address newline
            "Phone:     " phone newline
        ]
    ]
]
halt
The ability to conceptually "flatten" tabular data into sequential streams of items, and vice-versa, to think of consecutive groups of items in a list as rows within mapped categorical columns, is fundamentally important to working with all sorts of business data sets. You'll see this concept applied regularly throughout examples in this tutorial and in real working code.


2.9 Additional List/Block/Series Functions and Techniques
REBOL has built-in functions for performing every imaginable manipulation to list content, order, and other block properties - adding, deleting, searching, sorting, comparing, counting, replacing, changing, moving, etc. Here's a quick demonstrative list of functions. Try pasting each line individually into the REBOL interpreter to see how each function works:
REBOL []

names: ["John" "Jane" "Bill" "Tom" "Jen" "Mike"]  ; a list of text strings

print "Two ways of printing values, 'probe' and 'print':"
probe names   ; "Probe" is like "print", but it shows the actual data
print names   ;  structure. "Print" attempts to format the displayed data.

print "^/Sorting:"
sorted: sort copy names    ; "Sort" sorts values ascending or descending.
probe names                ; "Copy" keeps the names block from changing
print sorted
sort/reverse names         ; Here, the names block has been sorted without
probe names                ; copy, so it's permanently changed.

print "^/Picking items:"
probe first names                 ; 3 different ways to pick the 1st item:
probe names/1
probe pick names 1
probe second names                ; 3 different ways to pick the 2nd item:
probe names/2
probe pick names 2

print "^/Searching:"
probe find names "John"                            ; How to search a block
probe first find names "John"
probe find/last names "Jane"
probe select names "John"                    ; Find next item after "John"

print "^/Taking sections of a series:"
probe at names 2
probe skip names 2                                  ; Skip every two items
probe extract names 3                           ; Collect every third item

print "^/Making changes:"
append names "George"
probe names
insert (at names 3) "Lee"
probe names
remove names
probe names
remove find names "Mike"
probe names
change names "Phil"
probe names
change third names "Phil"
probe names
poke names 3 "Phil"
probe names
probe copy/part names 2
replace/all names "Phil" "Al"
probe names

print "^/Skipping around:"
probe head names
probe next names
probe back names
probe last names
probe tail names
probe index? names

print "^/Converting series blocks to strings of text:"
probe form names
probe mold names

print "^/Other Series functions:"
print length? names
probe reverse names
probe clear names
print empty? names
halt
To demonstrate just a few of the functions above, here are some practical examples of common list operations, performed on a block of user contact information. The demonstration block of data is organized as 5 rows of 3 columns of data (name, address, phone), or 15 consecutive items in a list labeled "users". Notice that to maintain the column and row structure, empty strings ("") are placed at positions in the list where there is no data:
REBOL []
users: [
    "John Smith" "123 Tomline Lane Forest Hills, NJ" "555-1234"
    "Paul Thompson" "234 Georgetown Pl. Peanut Grove, AL" "555-2345"
    "Jim Persee" "345 Pickles Pike Orange Grove, FL" "555-3456"
    "George Jones" "456 Topforge Court Mountain Creek, CO" ""
    "Tim Paulson" "" "555-5678"
]

append users ["Joe Thomas" "" "555-321-7654"]  ; append to end of list
probe users

probe (at users 4)                      ; parentheses are not required

insert (at users 4) [
    "Tom Adams" "321 Way Lane Villageville, AZ" "555-987-6543"
]
probe users

remove (at users 4)                                   ; remove 1 item
probe users

; BE CAREFUL - the line above breaks the table structure by removing
; an item entirely, so all other data items are shifted into incorrect
; columns.  Instead, either replace the data with an empty place holder
; or remove the address and phone fields too:

remove/part (at users 4) 2                            ; remove 2 items
probe users

change (at users 1) "Jonathan Smith"
probe users

remove (at users 1) insert (at users 1) "Jonathan Smith"
probe users
halt
The "extract" function is useful for picking out columns of data from structured blocks:
REBOL []
users: [
    "John Smith" "123 Tomline Lane Forest Hills, NJ" "555-1234"
    "Paul Thompson" "234 Georgetown Pl. Peanut Grove, AL" "555-2345"
    "Jim Persee" "345 Pickles Pike Orange Grove, FL" "555-3456"
    "George Jones" "456 Topforge Court Mountain Creek, CO" ""
    "Tim Paulson" "" "555-5678"
]
probe extract users 3             ; names
probe extract (at users 2) 3      ; addresses
probe extract (at users 3) 3      ; phone numbers
halt
You can "pick" items at a particular index location in the list:
REBOL []
users: [
    "John Smith" "123 Tomline Lane Forest Hills, NJ" "555-1234"
    "Paul Thompson" "234 Georgetown Pl. Peanut Grove, AL" "555-2345"
    "Jim Persee" "345 Pickles Pike Orange Grove, FL" "555-3456"
    "George Jones" "456 Topforge Court Mountain Creek, CO" ""
    "Tim Paulson" "" "555-5678"
]
print pick users 1                  ; FIRST name
print pick users 2                  ; FIRST address
print pick users 3                  ; FIRST phone
;
print pick users 4                  ; SECOND name
print pick users 5                  ; SECOND address
print pick users 6                  ; SECOND phone
;
indx: length? users                 ; index position of the LAST item
print pick users indx               ; last item
print pick users (indx - 1)         ; second to last item
print pick users (random length? users)  ; random item
halt
You can determine the index location at which an item is found, using the "find" function:
indx: index? find users "John Smith"In REBOL there 4 ways to pick items at such a variable index. Each syntax below does the exact same thing. These are just variations of the "pick" syntax:
print pick users indx
print users/:indx
print compose [users/(indx)]       ; put composed values in parentheses
print reduce ['users/(indx)]       ; put a tick mark on non-reduced values
Pay particular attention to the "compose" and "reduce" functions. They allow you to convert static words in blocks to evaluated values:
REBOL []

; This example prints "[month]" 12 times:

foreach month system/locale/months [
    probe [month]
]

; These examples print all 12 month values:

foreach month system/locale/months [
    probe reduce [month]
]

foreach month system/locale/months [
    probe compose [(month)]
]
Here's a complete example that requests a name from the user, finds the index of that name in the list, and picks out the name, address, and phone data for that user (located at the found indx, indx + 1, and indx + 2 positions):
REBOL [title: "Search Users"]
users: [
    "John Smith" "123 Tomline Lane Forest Hills, NJ" "555-1234"
    "Paul Thompson" "234 Georgetown Pl. Peanut Grove, AL" "555-2345"
    "Jim Persee" "345 Pickles Pike Orange Grove, FL" "555-3456"
    "George Jones" "456 Topforge Court Mountain Creek, CO" ""
    "Tim Paulson" "" "555-5678"
]

name: request-text/title/default "Name:" "Jim Persee"
indx: index? find users name

print rejoin [
    (pick users indx) newline
    (pick users (indx + 1)) newline
    (pick users (indx + 2)) newline
]
halt
Here's a version that uses code from the "Contacts" program you saw earlier. It allows you to create your own user database, and then search and display entries with the code above:
REBOL [title: "Search My Stored Contacts"]

; This code is borrowed from the "Contacts" program seen earlier:

forever [
    name: request-text/title "Name:"
    if name = "" [break]
    address: request-text/title "Address:"
    phone: request-text/title "Phone:"
    write/append %contacts.txt rejoin [
        mold name " " mold address " " mold phone " "
    ]
]
users: load %contacts.txt

; This is a variation of the code above which adds an error check, to
; provide a response if the search text is not found in the data block:

name: request-text/title/default "Search For:" "Jim Persee"
if error? try [indx: index? find users name] [
    alert "Name not found" quit
]
print rejoin [
    (pick users indx) newline
    (pick users (indx + 1)) newline
    (pick users (indx + 2)) newline
]
halt
2.10 Sorting Lists and Tables of Data
You can sort a list of data using the "sort" function:
REBOL []
print sort system/locale/months
halt
This example displays a list requestor with the months sorted alphabetically:
REBOL []
request-list "Sorted months:" sort system/locale/months
If you sort a block of values consisting of data types that REBOL understands, the values will be sorted appropriately for their type (i.e., chronologically for dates and times, numerically for numbers, alphabetically for text strings):
REBOL []
probe sort [1 11 111 2 22 222 8 9 5]  ; sorted NUMERICALLY
probe sort ["1" "11" "111" "2" "22" "222" "8" "9" "5"]  ; ALPHABETICALLY
probe sort [1-jan-2012 1-feb-2012 1-feb-2011]  ; sorted CHRONOLOGICALLY
halt
To sort by the first column in a table, use the "sort/skip" refinement. The table below is made up of 5 rows of 3 conceptual columns, so the first item of each row is found by skipping every 3 values:
REBOL []
users: [
    "John Smith" "123 Tomline Lane Forest Hills, NJ" "555-1234"
    "Paul Thompson" "234 Georgetown Pl. Peanut Grove, AL" "555-2345"
    "Jim Persee" "345 Pickles Pike Orange Grove, FL" "555-3456"
    "George Jones" "456 Topforge Court Mountain Creek, CO" ""
    "Tim Paulson" "" "555-5678"
]
editor sort/skip users 3
Sorting by any other selected column requires that data be restructured into blocks of blocks which clearly define the column structure. For example, this "flat" table, although visually clear, is really just a consecutive list of 15 data items:
users: [
    "John Smith" "123 Tomline Lane Forest Hills, NJ" "555-1234"
    "Paul Thompson" "234 Georgetown Pl. Peanut Grove, AL" "555-2345"
    "Jim Persee" "345 Pickles Pike Orange Grove, FL" "555-3456"
    "George Jones" "456 Topforge Court Mountain Creek, CO" ""
    "Tim Paulson" "" "555-5678"
]
To sort it by colomn, the data must be represented as follows (notice that conceptual rows are now separated into discrete blocks of 3 columns of data):
blocked-users: [
    ["John Smith" "123 Tomline Lane Forest Hills, NJ" "555-1234"]
    ["Paul Thompson" "234 Georgetown Pl. Peanut Grove, AL" "555-2345"]
    ["Jim Persee" "345 Pickles Pike Orange Grove, FL" "555-3456"]
    ["George Jones" "456 Topforge Court Mountain Creek, CO" ""]
    ["Tim Paulson" "" "555-5678"]
]
The following code demonstrates how to convert a flattened block into such a structure of nested row/column blocks:
REBOL []
users: [
    "John Smith" "123 Tomline Lane Forest Hills, NJ" "555-1234"
    "Paul Thompson" "234 Georgetown Pl. Peanut Grove, AL" "555-2345"
    "Jim Persee" "345 Pickles Pike Orange Grove, FL" "555-3456"
    "George Jones" "456 Topforge Court Mountain Creek, CO" ""
    "Tim Paulson" "" "555-5678"
]
blocked-users: copy []
foreach [name address phone] users [
    ; APPEND/ONLY inserts blocks as blocks, instead of as individual items
    ; The REDUCE function convert the words "name", "address", and "phone"
    ; to text values:
    append/only blocked-users reduce [name address phone]
]
editor blocked-users
Now you can use the "/compare" refinement of the sort function to sort by a chosen column (field):
REBOL []
blocked-users: [
    ["John Smith" "123 Tomline Lane Forest Hills, NJ" "555-1234"]
    ["Paul Thompson" "234 Georgetown Pl. Peanut Grove, AL" "555-2345"]
    ["Jim Persee" "345 Pickles Pike Orange Grove, FL" "555-3456"]
    ["George Jones" "456 Topforge Court Mountain Creek, CO" ""]
    ["Tim Paulson" "" "555-5678"]
]
field: 2                          ; column to sort (address, in this case)
sort/compare blocked-users func [a b] [(at a field) < (at b field)]
editor blocked-users                ; sorted by the 2nd field (by address)
To sort in the opposite direction (i.e., descending, as opposed to ascending), just change the "<" operater to ">":
REBOL []
blocked-users: [
    ["John Smith" "123 Tomline Lane Forest Hills, NJ" "555-1234"]
    ["Paul Thompson" "234 Georgetown Pl. Peanut Grove, AL" "555-2345"]
    ["Jim Persee" "345 Pickles Pike Orange Grove, FL" "555-3456"]
    ["George Jones" "456 Topforge Court Mountain Creek, CO" ""]
    ["Tim Paulson" "" "555-5678"]
]
field: 2
sort/compare blocked-users func [a b] [(at a field) > (at b field)]
editor blocked-users
Here's a complete example that converts a flat data block to a nested block of blocks, and then sorts by a user-selected field, in a chosen ascending/descending direction:
REBOL [title: "View Sorted Users"]
users: [
    "John Smith" "123 Tomline Lane Forest Hills, NJ" "555-1234"
    "Paul Thompson" "234 Georgetown Pl. Peanut Grove, AL" "555-2345"
    "Jim Persee" "345 Pickles Pike Orange Grove, FL" "555-3456"
    "George Jones" "456 Topforge Court Mountain Creek, CO" ""
    "Tim Paulson" "" "555-5678"
]
blocked-users: copy []
foreach [name address phone] users [
    append/only blocked-users reduce [name address phone]
]
field: to-integer request-list "Choose Field To Sort By:" ["1" "2" "3"]
order: request-list "Ascending or Descending:" ["ascending" "descending"]
either order = "ascending" [
    sort/compare blocked-users func [a b] [(at a field) < (at b field)]
][
    sort/compare blocked-users func [a b] [(at a field) > (at b field)]
]
editor blocked-users
Here's a version of the program above that uses code from the "Contacts" app presented earlier, which allows you to enter your own "users" contact info, and then sort and display it as above:
REBOL [title: "Sort My Stored Contacts"]

; This code is borrowed from the "Contacts" program seen earlier:

forever [
    name: request-text/title "Name:"
    if name = "" [break]
    address: request-text/title "Address:"
    phone: request-text/title "Phone:"
    write/append %contacts.txt rejoin [
        mold name " " mold address " " mold phone " "
    ]
]
users: load %contacts.txt

; This is a variation of the code above:

blocked-users: copy []
foreach [name address phone] users [
    append/only blocked-users reduce [name address phone]
]
field-name: request-list "Choose Field To Sort By:" [
    "Name" "Address" "Phone"
]

; The "select" function chooses the next value in a list, selected by the
; user.  In this case if the field-name variable equals "name", the
; "field" variable is set to 1.  If the field-name variable equals
; "address", the "field" variable is set to 2.  If field-name="phone", the
; "field" variable is set to 3:

field: select ["name" 1 "address" 2 "phone" 3] field-name

order: request-list "Ascending or Descending:" ["ascending" "descending"]
either order = "ascending" [
    sort/compare blocked-users func [a b] [(at a field) < (at b field)]
][
    sort/compare blocked-users func [a b] [(at a field) > (at b field)]
]
editor blocked-users
Note again that REBOL sorts data appropriately, according to type. If numbers, dates, times, and other recognized data types are stored as string values, the sort will be alphabetical for the chosen field (because that is the appropriate sort order for text):
REBOL []
text-data: [
    "1"    "1-feb-2012"  "1:00am"   "abcd"
    "11"   "1-mar-2012"  "1:00pm"   "bcde"
    "111"  "1-feb-2013"  "11:00am"  "cdef"
    "2"    "1-mar-2013"  "13:00"    "defg"
    "22"   "2-feb-2012"  "9:00am"   "efgh"
    "222"  "2-feb-2009"  "11:00pm"  "fghi"
]
blocked: copy []
foreach [number date time string] text-data [
    append/only blocked reduce [number date time string]
]
field-name: request-list "Choose Field To Sort By:" [
    "number" "date" "time" "string"
]
field: select ["number" 1 "date" 2 "time" 3 "string" 4] field-name
order: request-list "Ascending or Descending:" ["ascending" "descending"]
either order = "ascending" [
    sort/compare blocked func [a b] [(at a field) < (at b field)]
][
    sort/compare blocked func [a b] [(at a field) > (at b field)]
]
editor blocked
Convert values to appropriate data types during the process of blocking the "flattened" data, and fields will magically be sorted appropriately (in numerical, chronological, or other data-type-appropriate order):
REBOL []
text-data: [
    "1"    "1-feb-2012"  "1:00am"   "abcd"
    "11"   "1-mar-2012"  "1:00pm"   "bcde"
    "111"  "1-feb-2013"  "11:00am"  "cdef"
    "2"    "1-mar-2013"  "13:00"    "defg"
    "22"   "2-feb-2012"  "9:00am"   "efgh"
    "222"  "2-feb-2009"  "11:00pm"  "fghi"
]
blocked: copy []
foreach [number date time string] text-data [
    append/only blocked reduce [
        to-integer number
        to-date date
        to-time time
        string
    ]
]
field-name: request-list "Choose Field To Sort By:" [
    "number" "date" "time" "string"
]
field: select ["number" 1 "date" 2 "time" 3 "string" 4] field-name
order: request-list "Ascending or Descending:" ["ascending" "descending"]
either order = "ascending" [
    sort/compare blocked func [a b] [(at a field) < (at b field)]
][
    sort/compare blocked func [a b] [(at a field) > (at b field)]
]
editor blocked
2.11 CSV Files and the "Parse" Function
"Comma Separated Value" (CSV) files are a universal text format used to store and transfer tables of data. Spreadsheets, database systems, financial software, and other business applications typically can export and import tabular data to and from CSV format.
In CSV files, rows of data are separated by a line break. Column values are most often enclosed in quotes and separated by a comma or other "delimiter" character (sometimes a tab, pipe (|), or other symbol that visually separates the values).
2.11.1 Saving Tabular Data Blocks to CSV Files
You can create a CSV file from a block of REBOL table data, using the "foreach" function. Just rejoin each molded value (value enclosed in quotes), with commas separating each item, and a newline after each row, into a long text string. Then save the string to a file with the extension ".csv":
REBOL [title: "Save CSV"]
users: [
    "John Smith" "123 Tomline Lane Forest Hills, NJ" "555-1234"
    "Paul Thompson" "234 Georgetown Pl. Peanut Grove, AL" "555-2345"
    "Jim Persee" "345 Pickles Pike Orange Grove, FL" "555-3456"
    "George Jones" "456 Topforge Court Mountain Creek, CO" ""
    "Tim Paulson" "" "555-5678"
]
foreach [name address phone] users [
    write/append %users.csv rejoin [
        mold name ", " mold address ", " mold phone newline
    ]
]
Try opening the file above with Excel or another spreadsheet application. Because the particular values in this data block contain commas within the address field, you may need to select "comma", "space", and "merge delimiters", or similar options, in programs such as OpenOffice Calc.
2.11.2 Loading Tabular Data Blocks From CSV Files
To import CSV files into REBOL, use the "read/lines" function to read the file contents, with one text line per item stored in the resulting block. Assign the results of the read/lines function to a variable label. Use "foreach" and REBOL's "parse" function to separate each item in the lines back to individual values. Collect all the resulting sequential values into an empty block, and you're ready to use the data in all the ways you've seen so far:
REBOL [title: "Load CSV - Flat"]
block: copy []
csv: read/lines %users.csv
foreach line csv [
    data: parse line ","
    append block data
]
probe block
foreach [name address phone] block [
    alert rejoin [name ": " address " " phone]
]
halt
The first parameter of the parse function is the data to be parsed (in the case above, each line of the CSV file). The second parameter is the delimiter character(s) used to separate each value. Assign a variable to the output of the parse function, and you can refer to each individual value as needed (using "pick" and other series functions). The code above creates a "flat" block. To create a block of blocks, in which each line of the CSV file is delineated into a separate interior (nested) block, just use the append/only function, as you've seen earlier:
REBOL [title: "Load CSV - Block of Blocks"]
block: copy []
csv: read/lines %users.csv
foreach line csv [
    data: parse line ","
    append/only block data
]
probe block
foreach line block [probe line]
halt
Parse's "/all" refinement can be used to control how spaces and other characters are treated during the text splitting process (for example, if you want to separate the data at commas contained within each quoted text string). You can use the "trim" function to eliminate extra spaces in values. Other functions such as "replace", "to-(value)", and conditional evaluations, for example, can be useful in converting, excluding, and otherwise processing imported CSV data.
Try downloading account data from Paypal, or export report values from your financial software, and you'll likely see that the most prominent format is CSV. Accountants and others who use spreadsheets to crunch numbers will be able to instantly use CSV files in Excel, and/or export worksheet data to CSV format, for you to import and use in REBOL programs.
You'll learn much more about the extremely powerful "parse" function later. For now, it provides a simple way to import data stored in the common CSV format.
2.12 Two Paypal Report Programs, Analyzed
Take a look at the Paypal code examples you've seen so far in this text. You should be able to follow the code a bit now:
REBOL [title: "Paypal Report"]

; A variable used to calculate the sum is initially set to zero dollars:

sum: $0

; A foreach loop goes through every line in the downloaded CSV file,
; starting at the second line (the first line contains columns labels):

foreach line (at (read/lines http://re-bol.com/Download.csv) 2) [

    ; The sum is computed, using the money value in column 8:

    sum: sum + to-money pick (parse/all line ",") 8

]

; The user is alerted with the total:

alert form sum
Here's the whole program, without comments:
REBOL [title: "Paypal Report"]
sum: $0
foreach line (at (read/lines http://re-bol.com/Download.csv) 2) [
    sum: sum + to-money pick (parse/all line ",") 8
]
alert form sum
This example deals with several different columns, and performs conditional evaluations on the name and time fields:
REBOL [title: "Paypal Reports"]

; Variables used to calculate 2 different sums are initially set to $0:

sum1: sum2: $0

; A foreach loop goes through every line in the downloaded CSV file,
; starting at the second line (the first line contains columns labels):

foreach line at read/lines http://re-bol.com/Download.csv 2 [

    ; The first sum is computed, using the money value in column 8:

    sum1: sum1 + to-money pick row: parse/all line "," 8

    ; If the name column (col #4) contains the text "Saoud", print a
    ; a concatenated message.  That message text consists of the date
    ; (column 1), the characters ", Saoud Gorn: ", and the money value
    ; in column 8:

    if find row/4 "Saoud" [print rejoin [row/1 ", Saoud Gorn: " row/8]]

    ; If the name column contains "Ourliptef.com", then perform an
    ; additional conditional evaluation checking if the time field value
    ; (column 2) is between midnight and noon.  If so, add to the sum2
    ; variable the money value in column 8:

    if find row/4 "Ourliptef.com" [
        time: to-time row/2
        if (time >= 0:00am) and (time <= 12:00pm) [
            sum2: sum2 + to-money row/8
        ]
    ]

]

; Alert the user with some concatenated messages displaying the sums:

alert join "GROSS ACCOUNT TRANSACTIONS: " sum1
alert join "2012 Ourliptef.com Morning Total: " sum2
Here's the whole program, without comments:
REBOL [title: "Paypal Reports"]
sum1: sum2: $0
foreach line at read/lines http://re-bol.com/Download.csv 2 [
    sum1: sum1 + to-money pick row: parse/all line "," 8
    if find row/4 "Saoud" [print rejoin [row/1 ", Saoud Gorn: " row/8]]
    if find row/4 "Ourliptef.com" [
        time: to-time row/2
        if (time >= 0:00am) and (time <= 12:00pm) [
            sum2: sum2 + to-money row/8
        ]
    ]
]
alert join "GROSS ACCOUNT TRANSACTIONS: " sum1
alert join "2012 Ourliptef.com Morning Total: " sum2
To see the data these scripts are sorting through, take a look at the raw data in the Download.csv file.
2.13 Some Perspective about Studying These Topics
The List and Table Data topics are the most difficult sections in the first half of the tutorial. They will likely require several readings to be fully understood. Start by skimming once, and become familiar with the basic language structures and general code patterns. During the first read, you should be aware that demonstrated functions and code snippets can simply be copied, altered, and pasted for use in other applications. You don't need to memorize or even thoroughly understand how each line of code works. Instead, it's more important to understand that the functions and block/table concepts contained here simply exist and produce the described results. You will learn and interalize the details only by rote, through an extended period of reading, studying, copying, altering, and eventually writing fluently. There is a lot of material here to consume. It will likely take numerous applied hours of coding to fully understand it all.
You may find small snippets of code which provide solutions for the initial problem(s) and curiosities that motivated you to "learn how to program". Spend extra time experimenting with those pieces of code that are most interesting and relevant to your immediate needs. Copy, paste, and run examples in the REBOL interpreter. Get used to editing and altering pieces of code to become more familiar with the syntax. Change variable labels, enter new data values, and try repurposing code examples to fit new data sets. Try to break working code and figure out how to fix it. Get used to USING the REBOL text editor and the interpreter console. Get your hands dirty and bury yourself in the mechanics of typing and running code. Becoming comfortable with the tool set and working environment is huge part of the battle.
You will learn REBOL and all other programming languages in the exact same way you would learn any spoken language: by "speaking" it. You must mimic at first (copy/paste code), and then learn to put together "phrases" that make sense (edit, experiment, and rearrange words), and eventually write larger compositions fluently. You will regularly make mistakes with function syntax as you learn to code, just as children make mistakes with grammar as they learn to speak. You'll only learn by experimenting creatively, and by experiencing errors.
It's important not to let initial confusion and error stop you from learning at this point. Use the materials in this section as a reference for looking up functions and syntax as you progress through the tutorial. Try to understand some key points about the structure of the language, especially the code patterns related to block and table operations, but realize that you'll only internalize so much detail during your first read. Acquire as much understanding and experiment with code as much as your curiosity and motivation allows, then move on and see how other important topics fit together to form useful coding skills.
Once you've made it past the next few sections, and in particular the complete programs section, you will have gotten a solid overview of how all the fundamental concepts are put to use. It's a good idea to review the entire first part of the tutorial at that point, paying closer attention to the fine details of each line of code, memorizing functions, immersing yourself in the logic of each word's operation, etc. For now, read and understand the general conceptual overview, and try not to get stuck on any single topic.
For more information about using lists and tables of data in REBOL, see http://www.rebol.com/docs/core23/rebolcore-6.html.
3. Using GUI Windows and Widgets to Input and Display Data
You've already seen how a number of functions can be used to display and request information from the user (print, request-text, request-list, editor, etc.). For simple utilities, these input/output functions are often all that's needed to build functional scripts. To create more complex programs that allow for both increasingly complex data entry, and increased ease of use, "GUI" or Graphic User Interfaces are typically employed. GUIs are windows, forms, and data entry screens that typically contain "widgets" such as text fields, buttons, drop down selectors, multi-line text areas, data grids, menus, and other recognizable visual components. The requestors you've seen so far are very simple types of GUIs, but they only accept single units of data. Windowed GUIs allow users to view and edit multiple fields of data on a single screen. This tends to be more efficient and less error prone than responding to sequential requests for input, and is the "normal" interface expected by users of business applications. GUI coding requires quite a bit of core knowledge in most programming languages. REBOL makes it easy (in fact, REBOL provides absolutely the simplest way to create GUIs with code).
3.1 Basic Layout Guidelines and Widgets
To create a program window, paste the the following code into the REBOL editor and press [F5] to save and run:
REBOL []
view layout [size 600x440]
To center a program window on your computer screen, use "center-face"
REBOL []
view center-face layout [size 600x440]
You can put a title in your program header, which will appear in the title bar of your program window:
REBOL [title: "My Program"]
view center-face layout [size 600x440]
By default, REBOL program windows have a gray backdrop. You can change that using the "backdrop" word:
REBOL [title: "My Program"]
view center-face layout [size 600x440  backdrop white]
Instead of the "backdrop" word, you can use the following code to change the default color for all items in a GUI. This provides a slightly cleaner feel than REBOL's default grey color:
svv/vid-face/color: whiteHere's how you add "widgets" (buttons, text fields, multi-line text areas, drop down lists, etc.) to your program window. Notice that everything in the GUI window code is still contained between square brackets, but it has all been indented 4 spaces. Indentation is not required for multi-line block sections, but makes the code easier to read, and is expected. Notice also that the window sizes automatically to fit the contained widgets:
REBOL [title: "My Program"]
svv/vid-face/color: white
view center-face layout [
    field "Type Here"
    area "Multi^/line^/text"
    text-list data ["first" "second" "third"]
    image logo.gif   ; this image is built into REBOL
    btn "Click Me"
]
You can adjust the size, color, and other properties of a widget by including modifiers next to each widget. Notice the GUI window automatically expands to fit resized widgets:
REBOL [title: "My Program"]
svv/vid-face/color: white
view center-face layout [
    field 600 "Type Here"
    area 600 "Multi^/line^/text"
    text-list 600 data ["first" "second" "third"]
    image purple logo.gif
    btn red 100 "Click Me"
]
By default, REBOL places widgets below one another in the program window. You can align widgets horizontally using the "across" word. You can change back to the default vertical positioning with the word "below":
REBOL []
view center-face layout [
    across
    text-list 194
    text-list 194
    text-list 194
    below
    field 600
    area 600
    across
    text "" 368
    btn 50 "First"
    btn 50 "Next"
    btn 50 "Prev"
    btn 50 "Last"
]
You can change the default starting position of widgets placed on screen using the "origin" word, and adjust default spacing using the "space" word:
REBOL []
view center-face layout [
    size 251x251
    origin 0x0
    space 100x100
    across
    btn 50x50
    btn 50x50
    return
    btn 50x50
    btn 50x50
    origin 50x50
    btn 50x50
    btn 50x50
    return
    btn 50x50
    btn 50x50
]
You can place widgets at a specific coordinate using the "at" word:
REBOL []
view center-face layout [
    at 20x50 btn
    at 70x100 btn
    at 130x150 btn
]


3.2 Breathing Life Into GUI Programs - Performing Actions
Put function words in a block (between square brackets) after GUI widgets, and that function's action will be performed whenever the widget is clicked with a mouse, submitted with the keyboard, or otherwise activated. Notice that the word "value" holds the current/selected value in each widget:
REBOL [title: "My Program"]
svv/vid-face/color: white
view center-face layout [
    field "Type Here" [alert value]
    area "Multi^/line^/text" [alert value]
    text-list data ["first" "second" "third"] [alert value]
    image logo.gif [alert "Nice logo"]
    btn "Click Me" [alert "Clicked"]
]
You can give any widget a variable label and change a labeled widget's text using the "/text" refinement, followed by a colon. Whenever you make changes to a window's appearance, you must use the "show" function to update the display:
REBOL []
view layout [
    size 600x400
    field1: field "field 1"  ; this field is labeled "field1"
    btn "change field1's text" [

        ; These actions occur when the button is pressed:

        field1/text: "You just changed field 1's text!"
        show field1
    ]
]
You can read text from a file into a text area, using the "read" function. In REBOL, file names are always preceded by the percent symbol ("%"):
REBOL []
view layout [
    a: area  ; this area is labeled "a"
    btn "Read" [

        ; When btn is clicked, a's text is set to data read from file:

        a/text: read %temp.txt
        show a
    ]
]
You can write text from a text area to a file, using the "write" function:
REBOL []
view layout [
    a: area
    btn "Save" [

        ; When btn is clicked, write to temp.txt file, the text in area:

        write %temp.txt a/text
        alert "Saved"
    ]
]
IMPORTANT: GUI text fields are only able to display text ("string") values. Note that the following program produces errors because the values returned by the requestors are NOT string values, but rather other data types recognized by REBOL (file, date, tuple, etc. values):
REBOL []
view layout [
    btn "File" [
        f1/text: request-file
        show f1
    ]
    f1: field
    btn "Date" [
        f2/text: request-date
        show f2
    ]
    f2: field
    btn "Color" [
        f3/text: request-color
        show f3
    ]
    f3: field
]
When copying formatted text values into a text area, use the "form" function to convert data to a text string:
REBOL []
view layout [
    btn "File" [

        ; when btn pressed, set text of field 1 to selected file name:

        f1/text: form request-file   ; FORM converts file name to text
        show f1
    ]
    f1: field
    btn "Date" [

        ; set text of field 2 to selected date:

        f2/text: form request-date   ; FORM converts date value to text
        show f2
    ]
    f2: field
    btn "Color" [

        ; set text of field 3 to selected color:

        f3/text: form request-color  ; FORM converts color value to text
        show f3
    ]
    f3: field
]
You can change other properties of a widget, beyond just the text. Change the coordinate position of a widget using the "/offset" refinement, change it's size using the "/size" refinement, just as you alter it's text using the "/text" refinement. The word "face" allows a widget to refer to itself. In the code below, a button widget changes it's own position, size, and text when clicked:
REBOL []
view layout [
    size 594x440
    btn "click me" [
        face/offset: 200x300
        face/size: 150x50
        face/text: "I've moved and changed!"
        show face
    ]
]
The "style" word allows you to create new widgets with predefined properties and actions. Here, the label "green-button" is defined as a green btn widget with the text "click me", which when clicked, jumps to a random coordinate within the range 580x420:
REBOL []
view layout [
    size 594x440

    style green-button btn green "click me" [
        face/offset: random 580x420
        show face
    ]

    ; The word "green-button" now refers to all the above code.  Every
    ; "green-button" shares the same color and text properties, and
    ; PERFORMS THE SAME ACTIONS when clicked.

    at 254x84 green-button
    at 19x273 green-button
    at 85x348 green-button
    at 498x12 green-button
    at 341x385 green-button
]
Here's a little puzzle example, with detailed comments describing the layout and thought processes behind every action in the code:
REBOL [title: "Sliding Puzzle"]

; Create a GUI that's centered on the user's screen:

view center-face layout [

    ; Define some basic layout parameters.  "origin 0x0"
    ; starts the layout in the upper left corner of the
    ; GUI window.  "space 0x0" dictates that there's no
    ; space between adjacent widgets, and "across" lays
    ; out consecutive widgets next to each other:

    origin 0x0  space 0x0  across

    ; The section below creates a newly defined button
    ; widget called "piece", with an action block that
    ; swaps the current button's position with that of
    ; the adjacent empty space.  That action is run
    ; whenever one of the buttons is clicked:

    style piece button 60x60 [

        ; The lines below check to see if the clicked button
        ; is adjacent to the empty space.  The "offset"
        ; refinement contains the position of the given
        ; widget.  The word "face" is used to refer to the
        ; currently clicked widget.  The "empty" button is
        ; defined later (at the end of the GUI layout).
        ; It's ok that the empty button is not yet defined,
        ; because this code is not evaluated until the
        ; the entire layout is built and "view"ed:

        distance: (face/offset - empty/offset)
        if not find [0x60 60x0 0x-60 -60x0] distance [exit]

        ; In English, that reads 'subtract the position of
        ; the empty space from the position of the clicked
        ; button (the positions are in the form of
        ; Horizontal x Vertical coordinate pairs).  If that
        ; difference isn't 60 pixels on one of the 4 sides,
        ; then don't do anything.' (60 pixels is the size of
        ; the "piece" button defined above.)

        ; The next three lines swap the positions of the
        ; clicked button with the empty button.

        ; First, create a variable to hold the current
        ; position of the clicked button:

        temp: face/offset

        ; Next, move the button's position to that of the
        ; current empty space:

        face/offset: empty/offset

        ; Last, move the empty space (button), to the old
        ; position occupied by the clicked button:

        empty/offset: temp
    ]

    ; The lines below draw the "piece" style buttons onto
    ; the GUI display.  Each of these buttons contains all
    ; of the action code defined for the piece style above:

    piece "1"   piece "2"   piece "3"   piece "4" return
    piece "5"   piece "6"   piece "7"   piece "8" return
    piece "9"   piece "10"  piece "11"  piece "12" return
    piece "13"  piece "14"  piece "15"

    ; Here's the empty space.  Its beveled edge is removed
    ; to make it look less like a movable piece, and more
    ; like an empty space:

    empty: piece 200.200.200 edge [size: 0]
]
Here's the whole program without comments. It's tiny:
REBOL [title: "Sliding Puzzle"]
view center-face layout [
    origin 0x0 space 0x0 across
    style piece button 60x60 [
        if not find [0x60 60x0 0x-60 -60x0] (face/offset - e/offset)[exit]
        temp: face/offset
        face/offset: e/offset
        e/offset: temp
    ]
    piece "1"   piece "2"   piece "3"   piece "4" return
    piece "5"   piece "6"   piece "7"   piece "8" return
    piece "9"   piece "10"  piece "11"  piece "12" return
    piece "13"  piece "14"  piece "15"
    e: piece 200.200.200 edge [size: 0]
]


3.3 GUI Language Reference
Here are all the main GUI words built in to REBOL's GUI dialect (called "VID") that you should get to know. The first block of "styles" contains all the predefined widgets available. The layout words affect how and where items are positioned, and other layout preferences. The attribute words adjust the appearance and function of widgets. The style facets adjust some specific options that are available for individual widgets:
STYLES-WIDGETS: [
    face blank-face IMAGE BACKDROP BACKTILE BOX BAR SENSOR KEY BASE-TEXT
    VTEXT TEXT BODY TXT BANNER VH1 VH2 VH3 VH4 LABEL VLAB LBL LAB TITLE
    H1 H2 H3 H4 H5 TT CODE BUTTON CHECK CHECK-MARK RADIO CHECK-LINE
    RADIO-LINE LED ARROW TOGGLE ROTARY CHOICE DROP-DOWN ICON FIELD INFO
    AREA SLIDER SCROLLER PROGRESS PANEL LIST TEXT-LIST ANIM BTN BTN-ENTER
    BTN-CANCEL BTN-HELP LOGO-BAR TOG
]

LAYOUT-WORDS: [
    return at space pad across below origin guide tab tabs indent style
    styles size backcolor backeffect do
]

STYLE-FACETS--ATTRIBUTES: [
    edge font para doc feel effect effects keycode rate colors texts help
    user-data with bold italic underline left center right top middle
    bottom plain of font-size font-name font-color wrap no-wrap as-is
    shadow frame bevel ibevel
]

SPECIAL-STYLE-FACETS: [
    ARROW: [up right down left]  ROTARY: data  CHOICE: data  DROP-DOWN:
    [data rows]  FIELD: hide  INFO: hide  AREA: hide  LIST: [supply map
    data]  TEXT-LIST: data  ANIM: [frames rate]
]
You can obtain the word lists above using the following lines of code:
probe extract svv/vid-styles 2
probe remove-each i copy svv/facet-words [function? :i]
probe svv/vid-words
By default, all REBOL GUIs contain the text "REBOL - " in the window title bar. In Windows, you can eliminate that text with the following code. Just set the "tt" variable to hold the title text you want displayed:
tt: "Your Title"
user32.dll: load/library %user32.dll
gf: make routine![return:[int]]user32.dll"GetFocus"
sc: make routine![hw[int]a[string!]return:[int]]user32.dll"SetWindowTextA"
so: :show show: func[face][so[face]hw: gf sc hw tt]
The widgets and techniques you've seen so far are enough to create an overwhelming majority of potentially useful windowed business applications. Here's a collection of useful pieces of code demonstrating how to accomplish various common tasks in GUIs, and some other available widgets. Every piece of code in these examples will be explained in greater detail later in the tutorial. For now, just paste and run these examples to see what they do, and keep the code handy for use when needed:
REBOL [title: "GUI Reference"]
print "GUI Output:^/"
view center-face layout [
    h1 "Some More GUI Widgets:"
    box red 500x2
    drop-down 200 data system/locale/months [
        a/text: join "Month:  " value show a
    ]
    a: field
    slider 200x18 [bar1/data: value show bar1]
    bar1: progress
    scroller 200x16 [bar2/data: value show bar2]
    bar2: progress
    across
    toggle "Click here" "Click again" [print value]
    rotary "Click" "Again" "And Again" [print value]
    choice "Choose" "Item 1" "Item 2" "Item 3" [print value]
    return
    x: radio y: radio z: radio
    btn "Get Radio States" [print [x/data y/data z/data]]
    return
    led
    arrow
    below
    code "Code text"
    tt "Typewriter text"
    text "Little Text" font-size 8
    title "Centered title" 500
]

; The word "value" refers to data contained in a currently active widget:

view layout [
    text "Some widgets with values and size/color properties.  Try them:"
    button red "Click Me" [alert "You clicked the red button."]
    f: field 400 "Type some text here, then press the [Enter] key" [
        alert value                 ; SAME AS alert f/text
    ]
    t: text-list 400x300 "Select this line" "Then this one" "Now this" [
        alert value                 ; SAME AS alert t/text
    ]
    check yellow [alert "You clicked the yellow check box."]
    button "Quit" [alert "I don't want to stop yet!"]
]

; List Widget:

y: read %.   c: 0   x: copy []
foreach i y [append/only x reduce [(c: c + 1) i (size? to-file i)]]
slider-pos: 0
view center-face layout [
    across space 0
    the-list: list 400x400 [
        across  space 0x0
        text 50 purple
        text 250 bold [editor read to-file face/text]
        text 100 red italic
        return box green 400x1
    ] supply [
        count: count + slider-pos
        if none? q: pick x count [face/text: none exit]
        face/text: pick q index
    ]
    scroller 16x400 [
        slider-pos: (length? x) * value
        show the-list
    ]
]

view layout [
    h3 "Just a few effects - fit, flip, emboss:"
    area 400x400 load http://rebol.com/view/bay.jpg effect [
        Fit Flip Emboss              ; you can fit images on most widgets
    ]
]

effects:  [
  invert  contrast 40  colorize 0.0.200  gradcol 1x1 0.0.255 255.0.0
  tint 100  luma -80  multiply 80.0.200  grayscale  emboss  flip 0x1
  flip 1x0  rotate 90  reflect 1x1  blur  sharpen  aspect  tile tile-view
]
view layout [
    area 400x400 wrap rejoin [
        "And there are MANY more effects:" newline newline form effects
    ]
]

view layout [area effect [gradient red blue]]  ; gradients are color fades
view layout [
    size 500x400
    backdrop effect [gradient 1x1 tan brown]
    box effect [gradient 123.23.56 254.0.12]
    box effect [gradient blue gold/2]
]

view layout [
    btn "Right/Left Click Me" [alert "left click"] [alert "right click"]
]

panels: layout [
    across
    btn "Fields"      [window/pane: pane1 show window]
    btn "Text List"   [window/pane: pane2 show window]
    return
    window: box 400x200
]
pane1: layout/tight [field 400 field 400 area 400]
pane2: layout/tight [text-list 400x200 data system/locale/days]
window/pane: pane1
view center-face panels

svv/vid-face/color: white
alert "New global background color is now white."

; The word "offset" refers to a widget's coordinate position.
; The word "style" builds a new widget with the specified style & actions:

view center-face layout [
    size 600x440
    h3 "Press the left or right arrow key"
    key keycode [left]  [alert "You pressed the LEFT arrow key"]
    key keycode [right] [alert "You pressed the RIGHT arrow key"]
    btn #"a" "Click Me or Press the 'a' Key" [alert "clicked or pressed"]
]

; Here's a little program to show all key codes:

insert-event-func func [f e] [if e/type = 'key [print mold e/key] e]
view layout [text "Type keys to see their character/keycode"]

; How to refer to the main layout window:

view gui: layout [
    btn1: btn "Button 1"
    btn2: btn "Remove all widgets from window" [
        foreach item system/view/screen-face/pane/1/pane [
            remove find system/view/screen-face/pane/1/pane item
        ]
        show gui
    ]
]

; "Feel" and "Engage" together detect events:

view layout [
    text "Mouse me." feel [
        engage: func [face action event] [
            if action = 'up [print "You just released the mouse."]
        ]
    ]
]

print "Click anywhere in the window, then click the text."
view center-face layout [
    size 400x200
    box 400x200 feel [
        engage: func [f a e] [     ; f a e = face action event
            print rejoin ["Mouse " a " at " e/offset]
        ]
    ]
    origin
    text "Click me" [print "Text clicked"] [print "Text right-clicked"]
    box blue [print "Box clicked"]
]

movestyle: [                     ; generic click and drag code
    engage: func [f a e] [
        if a = 'down [
            initial-position: e/offset
            remove find f/parent-face/pane f
            append f/parent-face/pane f
        ]
        if find [over away] a [
            f/offset: f/offset + (e/offset - initial-position)
        ]
        show f
    ]
]
view layout/size [
    style moveable-object box 20x20 feel movestyle
    at random 600x400 moveable-object (random 255.255.255)
    at random 600x400 moveable-object (random 255.255.255)
    at random 600x400 moveable-object (random 255.255.255)
    at random 600x400 moveable-object (random 255.255.255)
    at random 600x400 moveable-object (random 255.255.255)
    text "This text and all the boxes are movable" feel movestyle
] 600x440

; The following box code creates a repeating, multitasking loop in a GUI.
; The "within" function checks for graphic collisions:

view center-face layout [
    size 400x400
    btn1: btn red
    at 175x175 btn2: btn green
    box 0x0 rate 0 feel [engage: func [f a e] [if a = 'time [
        btn1/offset: btn1/offset + 5x5
        show btn1
        if within? btn1/offset btn2/offset 1x1 [alert "Collision" unview]
    ]]]
]

view center-face layout [                    ; follow all mouse movements
    size 600x440
    at 270x209 b: btn "Click Me - Aha!" feel [
        detect: func [f e] [
            if e/type = 'move [
                if (within? e/offset b/offset 59x22) [
                    b/offset: b/offset + ((random 50x50) - (random 50x50))
                    if not within? b/offset -59x-22 659x462 [
                        b/offset: 270x209
                    ]
                    show b
                ]
            ]
            e
        ]
    ]
]

; To trap other events (this example traps and responds to close events):

closer: insert-event-func [
    either event/type = 'close [
        really: request "Really close the program?"
        if really = true [remove-event-func :closer]
    ] [event]  ; always return other events
]
view center-face layout [
    text "Close me"
    size 600x400
]

insert-event-func [                    ; this example traps resize events
    either event/type = 'resize [
        fs: t1/parent-face/size
        t1/offset: fs / 2x2
        t2/offset: t1/offset - 50x25
        t3/offset: t1/offset - 25x50
        show gui  none
    ] [event]
]
svv/vid-face/color: white
view/options gui: layout [
    text "Centered in resized window:"
    across
    t1: text "50x50"
    t2: text "- 50x25"
    t3: text "- 25x50"
] [resize]

; Use "to-image" to create a SCREEN SHOT of any layout:

picture: to-image layout [
    page-to-read: field "http://rebol.com"
    btn "Display HTML"
]
save/png %layout.png picture     ; save the image to a file
browse %layout.png

flash "Just waiting..."  wait 3  alert "Done waiting!"  unview
inform layout [btn "Click Me" [flash "Just waiting..." wait 3 unview]]

; Embed files (images, sounds, etc.) in code:

alert "Select a picture from your hard drive:"
system/options/binary-base: 64
editor picture: compress to-string read/binary to-file request-file/only
view layout [image load (to-binary decompress picture)]

; This example embedded image was created with the script above:

logo-pic: load to-binary decompress #{
789C018A0375FC89504E470D0A1A0A0000000D49484452000000640000001808
020000008360CFB90000001374455874536F667477617265005245424F4C2F56
6965778FD916780000033249444154789CD599217402310C86F7CE6227B1481C
1637874362B1382C1687C4A15168240A89C5A2B058ECDEBE47DFFA429276DCEE
10FDCD582F97267FD33F2D7CF47ABDCF32D1ED76E7F3F9ED76FB4EE0743A8D46
A3B6A683A80FFE540562381C1E8FC7144D12DBEDB6951C3B9D4E91648DC7E34C
41B925465D349C14A2CA230BA65EA729E27C3E37CCB43CB228905A3525B1DBED
9A4CED93851C7C193088A0667C0D0603FB5640BFDFB7F648C0D0836B1C41C22E
11D7EBF57038F074BFDF534429BE2693891B4626CE1C59BC7CB95CDC99EEF7FB
66B349F922D65A4B4A8DE0D0B547B9DD85212B6B4CB4D3E994B055FEE8943566
30134626BBDA64052C974BD757A637B1DA2E599959A05EE61F4032D62C55EFBC
6EED01878954188DC80AE714C07126D24F91BBBE6265A129B3D96C2A4085BB64
459FEBF51A1B2692E5A9FA17A428B562EBE595A1F29650AD5C6B9525FD4621E0
A95D73491606F9046C94101A06178B4518E19122023655DA184B03ECA15BE98E
6D9D302E536E8D2C96A5FF0061458FEE9EAA045958720EDCFC82CF145A9E2C7C
52BC6CF0503B8C2B2200DAACD24698A4B710361E6421930E05A85E9484BE51B3
0885AE9727CB22A5591981B73D1AC6A58D2ABD5892DF46C5993DCFF25BC8828E
14538AACEB3390A43C59D890213B5D2AA3D2AC3C59ABD54ACE2E85C29E36DE42
162B8C0AC47F0942B512972CCCF0D91170ED6594ECC130288549ED44744DE52C
771381C571D5AFEDB14B2E79CB022F13C834A056049EFCE35C2A7449877A2B00
2D872635082FEA2D267D8BC047AD910D3875CE9247078A826259FC8234F264E1
9FAD4AAC52015465D973193B3755B611B417FB562A0C66C77EF7001F5463FD83
2CF20F83B2B8E0C22DAE760FA556B32AAF87B86A18C18259CFAA3567C250C7C3
1AE72CD95350531BD93FAE3B6CEADB33188174FCBBD77B7B7A0841DAB6C3EBEE
F13DE8696B6455E222ADCE23F162ECF644064709A47AA8FD3632BFAD78EA5E92
D947500C3BB04CAD419F3D5B05580DC127118E3D2866CAFB8AC6CAFCEB68F895
56796455CF47AAD741F5B957D4D751245980BD569729B723D742A964558FFB4D
EAB6A440BF6ACE54157EB028F7A730B695BDF749D05EA9C1B612C4CF0F396EDC
8E943F5C020000000049454E44AE426082CAEBA2D78A030000
}
view layout [image logo-pic]

write/append %s ""                          ; A very compact GUI program
view center-face g: layout [
    h3 "Name:"   x: field   h3 "Info:"   z: area wrap   across
    btn "Save" [do-face d 1  save %s  repend f [x/text z/text]]
    btn "Load" [
        c: request-list" Select:" extract (f: load %s) 2
        if c = none [return]
        x/text: first find f c  z/text: select f x/text  show g
    ]
    btn "New" [x/text: copy ""  z/text: copy ""  show g  focus x]
    d: btn "Delete" [
        if true = request "Sure?" [
            remove/part (find (f: load %s) x/text) 2 save %s f alert "ok"
        ]
    ]
]

; Some examples of the "draw" dialect for creating graphics:

view layout [
    box 400x400 black effect [
        draw [
            pen red
            line 0x400 400x50
            pen white
            box 100x20 300x380
            fill-pen green
            circle 250x250 100
            pen blue
            fill-pen orange
            line-width 5
            spline closed 3 20x20 200x70 150x200
            polygon 20x20 200x70 150x200 50x300
        ]
    ]
]

view layout [
    box 400x220 effect [
        draw [
            fill-pen 200.100.90
            polygon 20x40 200x20 380x40 200x80
            fill-pen 200.130.110
            polygon 20x40 200x80 200x200 20x100
            fill-pen 100.80.50
            polygon 200x80 380x40 380x100 200x200
        ]
        gradmul 180.180.210 60.60.90
    ]
]
view layout [
    h3 "Draw On Me:"
    scrn: box black 400x400 feel [
        engage: func [face action event] [
            if find [down over] action [
                append scrn/effect/draw event/offset
                show scrn
            ]
            if action = 'up [append scrn/effect/draw 'line]
        ]
    ] effect [draw [line]]
]

pos: 300x300
view layout [
    scrn: box pos black effect [
        draw [image logo.gif 0x0 300x0 300x300 0x300]
    ]
    btn "Animate" [
        for point 1 450 4 [
            scrn/effect/draw: copy reduce [
                'image logo.gif
                (pos - 300x300)
                (1x1 + (as-pair 300 point))
                (pos - (as-pair 1 point))
                (pos - 300x0)
            ]
            show scrn
        ]
        scrn/effect/draw: copy [
            image logo.gif 0x0 300x0 300x300 0x300
        ]
        show scrn
    ]
]
See http://rebol.com/docs/easy-vid.html and http://rebol.com/docs/view-guide.html for some additional information and examples demonstrating basic GUI techniques.
3.4 A Telling Comparison
To provide a quick idea of how much easier REBOL is than other languages, here's a short example. The following code to create a basic program window with REBOL was presented earlier:
view layout [size 400x300]It works on every type of computer, in exactly the same way.
Code for the same simple example is presented below in the C++ language. It does the exact same thing as the REBOL one-liner above, except it only works on Microsoft Windows machines. If you want to do the same thing with a Macintosh computer, you need to memorize a completely different page of C++ code. The same is true for Linux or any other operating system. You have to learn enormous chunks of code to do very simple things, and those chunks of code are different for every type of computer. Furthermore, you typically need to spend a semester's worth of time learning very basic things about code syntax and fundamentals about how a computer 'thinks' before you even begin to tackle useful basics like the code below:
#include <windows.h>

/*  Declare Windows procedure  */
LRESULT CALLBACK WindowProcedure (HWND, UINT, WPARAM, LPARAM);

/*  Make the class name into a global variable  */
char szClassName[ ] = "C_Example";

int WINAPI
WinMain (HINSTANCE hThisInstance,
         HINSTANCE hPrevInstance,
         LPSTR lpszArgument,
         int nFunsterStil)

{
    HWND hwnd;
    /* This is the handle for our window */
    MSG messages;
    /* Here messages to the application are saved */
    WNDCLASSEX wincl;
    /* Data structure for the windowclass */

    /* The Window structure */
    wincl.hInstance = hThisInstance;
    wincl.lpszClassName = szClassName;
    wincl.lpfnWndProc = WindowProcedure;
    /* This function is called by windows */
    wincl.style = CS_DBLCLKS;
    /* Catch double-clicks */
    wincl.cbSize = sizeof (WNDCLASSEX);

    /* Use default icon and mouse-pointer */
    wincl.hIcon = LoadIcon (NULL, IDI_APPLICATION);
    wincl.hIconSm = LoadIcon (NULL, IDI_APPLICATION);
    wincl.hCursor = LoadCursor (NULL, IDC_ARROW);
    wincl.lpszMenuName = NULL;
    /* No menu */
    wincl.cbClsExtra = 0;
    /* No extra bytes after the window class */
    wincl.cbWndExtra = 0;
    /* structure or the window instance */
    /* Use Windows's default color as window background */
    wincl.hbrBackground = (HBRUSH) COLOR_BACKGROUND;

    /* Register window class. If it fails quit the program */
    if (!RegisterClassEx (&wincl))
        return 0;

    /* The class is registered, let's create the program*/
    hwnd = CreateWindowEx (
           0,
            /* Extended possibilites for variation */
           szClassName,
            /* Classname */
           "C_Example",
            /* Title Text */
           WS_OVERLAPPEDWINDOW,
            /* default window */
           CW_USEDEFAULT,
            /* Windows decides the position */
           CW_USEDEFAULT,
            /* where the window ends up on the screen */
           400,
            /* The programs width */
           300,
            /* and height in pixels */
           HWND_DESKTOP,
            /* The window is a child-window to desktop */
           NULL,
            /* No menu */
           hThisInstance,
            /* Program Instance handler */
           NULL
            /* No Window Creation data */
           );

    /* Make the window visible on the screen */
    ShowWindow (hwnd, nFunsterStil);

    /* Run the message loop.
        It will run until GetMessage() returns 0 */
    while (GetMessage (&messages, NULL, 0, 0))
    {
        /* Translate virtual-key messages
            into character messages */
        TranslateMessage(&messages);
        /* Send message to WindowProcedure */
        DispatchMessage(&messages);
    }

    /* The program return-value is 0 -
        The value that PostQuitMessage() gave */
    return messages.wParam;
}

/*  This function is called by the Windows
        function DispatchMessage()  */

LRESULT CALLBACK
WindowProcedure (HWND hwnd, UINT message,
    WPARAM wParam, LPARAM lParam)
{
    switch (message)
    /* handle the messages */
    {
        case WM_DESTROY:
            PostQuitMessage (0);
                /* send a WM_QUIT to the message queue */
            break;
        default:
            /* for messages that we don't deal with */
            return DefWindowProc (hwnd, message,
                wParam, lParam);
    }

    return 0;
}
Yuck. Back to REBOL...
4. Quick Review and Clarification
The list below summarizes some key characteristics of the REBOL language. Knowing how to put these elements to use constitutes a fundamental understanding of how REBOL works:
- To start off, REBOL has hundreds of built-in function words that perform common tasks. As in other languages, function words are typically followed by passed data parameters. Unlike other languages, passed parameters are placed immediately after the function word and are not necessarily enclosed in parentheses. To accomplish a desired goal, functions are arranged in succession, one after another. The value(s) returned by one function are often used as the argument(s) input to another function. Line terminators are not required at any point, and all expressions are evaluated in left to right order, then vertically down through the code. Empty white space (spaces, tabs, newlines, etc.) can be inserted as desired to make code more readable. Text after a semicolon and before a new line is treated as a comment. You can complete significant work by simply knowing the predefined functions in the language, and organizing them into a useful order.
- REBOL contains a rich set of conditional structures, which can be used to manage program flow and data processing activities. If, either, and other typical structures are supported.
- Because many common types of data values are automatically recognized and handled natively by REBOL, calculating, looping, and making conditional decisions based upon data content is straightforward and natural to perform, without any external modules or toolkits. Numbers, text strings, money values, times, tuples, URLs, binary representations of images, sounds, etc. are all automatically handled. REBOL can increment, compare, and perform proper computations on most common types of data (i.e., the interpreter automatically knows that 5:32am + 00:35:15 = 6:07:15am, and it can automatically apply visual effects to raw binary image data, etc.). Network resources and Internet protocols (http documents, ftp directories, email accounts, dns services, etc.) can also be accessed natively, just as easily as local files. Data of any type can be written to and read from virtually any connected device or resource (i.e., "write %file.txt data" works just as easily as "write ftp://user:pass@website.com data", using the same common syntax). The percent symbol ("%") and the syntax "%(/drive)/path/path/.../file.ext" are used cross-platform to refer to local file values on any operating system.
- Any data or code can be assigned a word label. The colon character (":") is used to assign word labels to constants, variable values, evaluated expressions, and data/action blocks of any type. Once assigned, variable words can be used to represent all of the data contained in the given expression, block, etc. Just put a colon at the end of a word, and thereafter it represents all the following data.
- Multiple pieces of data are stored in "blocks", which are delineated by starting and ending brackets ("[]"). Blocks can contain data of any type: groups of text strings, arrays of binary data, other enclosed blocks, etc. Data items contained in blocks are separated by white space. Blocks can be automatically treated as lists of data, called "series", and manipulated using built-in functions that enable searching, sorting, ordering, and otherwise organizing the blocked data. Blocks are used to delineate most of the syntactic structures in REBOL (i.e., actions resulting from conditional evaluations, GUI widget layouts, etc.).
- "Foreach" function can be used to process lists and tables of data. Rows and columns if data in tables can be processed using the format: "foreach [col1 col2 col3...] table-block [do something to each row pof values]". Data can be saved to CSV files by rejoining molded (quoted) text and delimiters. CSV files can be read using the "read/lines" and "parse" functions. Sorting data by column with the sort/compare function requires that rows be saved in nested blocks, rather than as "flat" sequential lists of items. Data stored as (quoted) text string values is sorted alphabetically. Data stored or converted to specific data type values is sorted appropriately for the type.
- The syntax "view layout [block]" is used to create basic GUI layouts. You can add widgets to the layout simply by placing widget identifier words inside the block: "button", "field", "text-list", etc. Color, position, spacing, and other facet words can be added after each widget identifier. Action blocks added immediately after any widget will perform the enclosed functions whenever the widget is activated (i.e., when the widget is clicked with a mouse, when the enter key pressed, etc.). Path refinements can be used to refer to items in the GUI layout (i.e., "face/offset" refers to the position of the selected widget face, "face/text" to it's text, etc.). Those simple guidelines can be used to create useful GUIs for data input and output, in a way that's native (doesn't require any external toolkits) and much easier than any other language.
5. SOME COMPLETE GUI APPLICATION EXAMPLES
The examples in this section were presented at the very beginning of the tutorial as demonstrations. At this point in the tutorial, you should now be able to understand every bit of code in each program! Every example in this section is documented with detailed line-by-line explanations of what each function, variable, and language construct does. Run every example in the REBOL interpreter, and read every line of code, along with all the comments. Really pay attention to the material in this section - it's one of the most formative in the entire text. Not only are the applications useful as a basis for more personalized production pieces of software, the logic and code patterns demonstrated here will form a strong fundamental understanding about how to create other imagined pieces of software.
5.1 Generic Text Field Saver
Little programs like this form the initial basis for all types of simple data entry app. The entered data is stored in CSV file format, so it can be easily opened by a spreadsheet or other program:
REBOL [title: "Text Field Saver"]

; The words "view layout" create a GUI window:

view layout [

    ; Create 3 text fields widgets labeled f1, f2, and f3:

    f1: field
    f2: field
    f3: field

    ; Create a button widget:
    btn "Save" [

        ; When the button is clicked, write to the file fields.txt some
        ; rejoined text.  The /append refinement of the write function
        ; ensures that data is ADDED to the end of the existing text file,
        ; instead of erasing the file and writing totally new data to it.
        ; If the fields.csv file doesn't exist, it's created:

        write/append %fields.csv rejoin [

            ; The "mold" function surrounds text with quotes.
            ; So the concatenated text written to the fields.txt file
            ; includes the quoted text from each field widget above,
            ; each separated by a comma and a quote, and completed with
            ; a carriage return:

            mold f1/text ", " mold f2/text ", " mold f3/text newline

        ]

        ; Alert the user when the data has been saved:

        alert "Saved"

    ]
]
Here's the whole program without comments. It's tiny:
REBOL [title: "Text Field Saver"]
view layout [
    f1: field
    f2: field
    f3: field
    btn "Save" [
        write/append %fields.txt rejoin [
            mold f1/text ", " mold f2/text ", " mold f3/text newline
        ]
        alert "Saved"
    ]
]
5.2 Calculator
This calculator is as basic as could be, but adding advanced math functions and other useful capabilities is easy. Imagine adding industry specific operations such as amortization calculations. The potential to add genuinely useful unique features is limitless (see the next example below, which performs currency conversion operations that draw from current live rates on the Internet, for example). At this point, try to understand the fundamental layout and operation of the GUI widgets:
REBOL [title: "Calculator"]

; Create a GUI Window:

view layout [

    ; Set the layout properties so that widgets are placed immediately
    ; next to one another, starting at the top left corner of the screen:

    origin 0  space 0x0  across

    ; Here's a text field, labeled "f".  It's size is 200 pixels across
    ; and 40 pixels down.  The font size of text in the field is set to
    ; 20.  After this field widget, the "return" word is used to jump
    ; to the beginning of a new line:

    f: field 200x40 font-size 20  return

    ; The "style" word below is used to create a new widget called "btn",
    ; which is a button, sized 50 pixels by 50 pixels.  When clicked, the
    ; button appends the text on it's face to the text field widget above,
    ; labeled "f", then the display is updated using the "show" function:

    style btn btn 50x50 [append f/text face/text  show f]

    ; Below the field widget are 4 lines of buttons, displaying either
    ; numbers or operators on their face.  Each of these buttons performs
    ; the actions defined above in the "style" definition (appends its
    ; face text to the field widget display):

    btn "1"  btn "2"  btn "3"  btn " + "  return
    btn "4"  btn "5"  btn "6"  btn " - "  return
    btn "7"  btn "8"  btn "9"  btn " * "  return
    btn "0"  btn "."  btn " / "   btn "=" [

        ; When the "=" button is pressed, the "f" field text is set to the
        ; result of the expression displayed in the "f" field text (the
        ; evaluation is performed using the "do" function), and the
        ; display is updated with the "show" function.  Remember, the
        ; "form" function is used to convert the result to a text string
        ; value, which is the only type of data that text field widgets
        ; display.  The "attempt" function is used to keep the program
        ; from crashing if the user tries to enter an illegal expression,
        ; such as division by zero or incomplete expressions (i.e., 1 + ):

        attempt [f/text: form do f/text  show f]

    ]
]
Here's the whole program, without comments:
REBOL [title: "Calculator"]
view layout [
    origin 0  space 0x0  across
    f: field 200x40 font-size 20 return
    style btn btn 50x50 [append f/text face/text  show f]
    btn "1"  btn "2"  btn "3"  btn " + "  return
    btn "4"  btn "5"  btn "6"  btn " - "  return
    btn "7"  btn "8"  btn "9"  btn " * "  return
    btn "0"  btn "."  btn " / "   btn "=" [
        attempt [f/text: form do f/text  show f]
    ]
]
The following example downloads and parses the current (live) US Dollar exchange rates from http://x-rates.com and allows the user to select from a list of currencies to convert to, then performs and displays the conversion from USD to the selected currency. This example will likely be a bit too advanced to understand completely at this point in the tutorial, but it's good to run it in the REBOL interpreter and browse through the code to recognize functions such as "read", "find", "parse", "attempt", etc., to which you've already been introduced. See if you can get a general concept of what the code is doing:
REBOL [title: "Currency Rate Conversion Calculator"]
view center-face layout [
    origin 0  space 0x0  across
    f: field 200x40 font-size 20
    return
    style btn btn 50x50 [append f/text face/text  show f]
    btn "1"  btn "2"  btn "3"  btn " + "  return
    btn "4"  btn "5"  btn "6"  btn " - "  return
    btn "7"  btn "8"  btn "9"  btn " * "  return
    btn "0"  btn "."  btn " / "   btn "=" [
        attempt [f/text: form do f/text  show f]
    ] return
    btn 200x35 "Convert" [
        x: copy []
        html: read http://www.x-rates.com/table/?from=USD&amount=1.00
        html: find html "src='/themes/bootstrap/images/xrates_sm_tm.png'"
        parse html [
            any [
                thru {from=USD} copy link to {</a>} (append x link)
            ] to end
        ]
        rates: copy []
        foreach rate x [
            parse rate [thru {to=} copy c to {'>}]
            parse rate [thru {'>} copy v to end]
            if not error? try [to-integer v] [append rates reduce [c v]]
        ]
        currency: request-list "Select Currency:" extract rates 2
        rate: to-decimal select rates currency
        attempt [alert rejoin [currency ": " (rate * to-decimal f/text)]]
    ]
]
5.3 File Editor
Next is an example of a text editor that allows you to read, edit, and save any text file. Here's the GUI layout code. It consists of a "h1" header text widget displaying the text "Text Editor:", a 600 pixel wide field widget labeled "f" containing the text "filename.txt", a 600x350 pixel area widget labeled "a", and two buttons aligned across the screen (next to each other):
REBOL []
view layout [
    h1 "Text Editor:"
    f: field 600 "filename.txt"
    a: area 600x350
    across
    btn "Load" []
    btn "Save" []
]
And here's the full code that makes it run:
REBOL []
view layout [
    h1 "Text Editor:"
    f: field 600 "filename.txt"
    a: area 600x350
    across
    btn "Load" [

        ; When the load button is pressed, request a file name from the
        ; user, and display it in the "f" field.  Be sure to update the
        ; display using the "show" function:

        f/text: request-file
        show f

        ; In order to load the file, the text version of file name
        ; displayed in the field must be converted from text to a file
        ; value:

        filename: to-file f/text

        ; Set text in the area widget to the data read from file location,
        ; and update the display:

        a/text: read filename
        show a

    ]
    btn "Save" [

        ; When the save button is clicked, request a file name from the
        ; user.  The default file name shown in the requestor is the text
        ; currently displayed in the "f" field:

        filename: to-file request-file/save/file f/text

        ; Write to the selected file name, the text contained in the "a"
        ; area widget:

        write filename a/text

        ; Alert the user when the file is saved:

        alert "Saved"

    ]
]
Here's the whole program without comments:
REBOL [title: "Text Editor"]
view layout [
    h1 "Text Editor:"
    f: field 600 "filename.txt"
    a: area 600x350
    across
    btn "Load" [
        f/text: request-file
        show f
        filename: to-file f/text
        a/text: read filename
        show a
    ]
    btn "Save" [
        filename: to-file request-file/save/file f/text
        write filename a/text
        alert "Saved"
    ]
]
5.4 Web Page Editor
REBOL can read and write to FTP (web site) servers just as easily as it can to local files. All you need to know is an account username/password, folder location on the server (often "public_html"), and a file name to edit. Here's a variation of the program above repurposed as a web page editor:
REBOL [title: "Web Page Editor"]
view layout [
    h1 "Web Page Editor:"
    f: field 600 "ftp://user:pass@site.com/public_html/file.txt"
    a: area 600x350
    across
    btn "Load" [

        ; Be sure to convert the file name text in "a" area widget to a
        ; URL data value.  Set text in the area widget to the data read
        ; from the URL location:

        a/text: read to-url f/text
        show a

    ]
    btn "Save" [

        ; Covert the text in "a" area widget to a URL value and write the
        ; data in the "a" area widget to the URL:

        write (to-url f/text) a/text
        alert "Saved"

    ]
]
Here's the whole program without comments:
REBOL [title: "Web Page Editor"]
view layout [
    h1 "Web Page Editor:"
    f: field 600 "ftp://user:pass@site.com/public_html/page.html"
    a: area 600x350
    across
    btn "Load" [
        a/text: read to-url f/text
        show a
    ]
    btn "Save" [
        write (to-url f/text) a/text
        alert "Saved"
    ]
]
5.5 Inventory List Creator
This is another simple GUI field example. It's very similar to the first example, but improved a bit with text labels for each field and repurposed to satisfy a very concise specialized task. It creates an inventory list using a simple GUI form. The file created is a list that can be used as needed to re-order required items, to calculate inventory and sales tax due, etc. Here's the GUI layout code:
REBOL [title: "Inventory"]
view layout [
    text "SKU:"
    f1: field
    text "Cost:"
    f2: field "1.00"
    text "Quantity:"
    f3: field
    across
    btn "Save" []
    btn "View Data" []
]
And here's the code that makes the entire inventory program run:
REBOL [title: "Inventory"]
view layout [
    text "SKU:"
    f1: field
    text "Cost:"
    f2: field "1.00"
    text "Quantity:"
    f3: field
    across
    btn "Save" [
        write/append %inventory.txt rejoin [
            mold f1/text " " mold f2/text " " mold f3/text newline
        ]
        alert "Saved"
    ]

    ; A button is added to allow viewing/editing of the saved data, using
    ; REBOL text editor function:

    btn "View Data" [editor %inventory.txt]
]
Here's whole program without comments:
REBOL [title: "Inventory"]
view layout [
    text "SKU:"
    f1: field
    text "Cost:"
    f2: field "1.00"
    text "Quantity:"
    f3: field
    across
    btn "Save" [
        write/append %inventory.txt rejoin [
            mold f1/text " " mold f2/text " " mold f3/text newline
        ]
        alert "Saved"
    ]
    btn "View Data" [editor %inventory.txt]
]
5.6 Inventory Sorter and Viewer
The inventory program creates lists of data that look like this (saved in the file "inventory.txt"):
"932984729812" "1.00" "14"
"392328389483" "2.59" "93"
"602374822852" "4.92" "3"
This little program allows users to view the inventory data, sorted by a chosen column. You've already seen most of the important code patterns in this example, during the discussion about sorting columns of values in a table:
REBOL [title: "Sort Inventory"]

; Load the data block from the inventory.txt file and label it
: "inventory":

inventory: load %inventory.txt

; Create a new empty block named "blocked":

blocked: copy []

; Convert the "flat" data in the "inventory" block to "blocked" format
; (with rows delineated as separate blocks).  Remember, as shown earlier,
; the "append/only" function refinement makes this easy to do.  Just run
; a "foreach" function on every 3 items in the "inventory" block, and
; add each group of three items as a new block within the "blocked" block.
; Notice that during the process, the "cost" and "qty" are converted from
; strings to money and number values:

foreach [sku cost qty] inventory [
    append/only blocked reduce [
        sku
        to-money cost
        to-integer qty
    ]
]

; Use the "request-list" function to allow the user to select a column to
; sort by.  Assign the response to the variable "field-name":

field-name: request-list "Choose Field To Sort By:" [
    "sku" "cost" "qty"
]

; The "select" function chooses the next value in a list, selected by the
; user.  In this case if the field-name variable equals "sku", the "field"
; variable is set to 1.  If field-name="cost", the "field" variable is set
; to 2.  If field-name="qty", then "field" is set to 3:

field: select ["sku" 1 "cost" 2 "qty" 3] field-name

; Use the "request-list" function to allow the user to select an order to
; sort by.  Assign the response to the label "order":

order: request-list "Ascending or Descending:" ["ascending" "descending"]

; Sort by the appropriate "field" column, ascending or descending,
; depending on the value of the "order" variable:

either order = "ascending" [
    sort/compare blocked func [a b] [(at a field) < (at b field)]
][
    sort/compare blocked func [a b] [(at a field) > (at b field)]
]

; Use the foreach function to loop through the sorted "blocked" block of
; data.  Print the 3 items in each block within the "blocked" block:

foreach item blocked [
    print rejoin [
        "SKU:  " item/1           ; The 1st item in each block is the SKU.
        "  COST: " item/2         ; 2nd item is the cost.
        "  QTY: " item/3          ; 3rd item is the quantity.
        newline                   ; print a carriage return at the end
    ]
]
halt
Here's the whole program without comments:
REBOL [title: "Sort Inventory"]
inventory: load %inventory.txt
blocked: copy []
foreach [sku cost qty] inventory [
    append/only blocked reduce [
        sku
        to-money cost
        to-integer qty
    ]
]
field-name: request-list "Choose Field To Sort By:" [
    "sku" "cost" "qty"
]
field: select ["sku" 1 "cost" 2 "qty" 3] field-name
order: request-list "Ascending or Descending:" ["ascending" "descending"]
either order = "ascending" [
    sort/compare blocked func [a b] [(at a field) < (at b field)]
][
    sort/compare blocked func [a b] [(at a field) > (at b field)]
]
foreach item blocked [
    print rejoin [
        "SKU:  " item/1
        "  COST: " item/2
        "  QTY: " item/3
        newline
    ]
]
halt
5.7 Contacts Viewer
Here's a contact database app that displays user information in a tabular display:
REBOL [title: "Contacts"]

; First create a block of user data.  15 values - 5 rows, 3 columns:

users: [
    "John Smith" "123 Tomline Lane Forest Hills, NJ" "555-1234"
    "Paul Thompson" "234 Georgetown Pl. Peanut Grove, AL" "555-2345"
    "Jim Persee" "345 Pickles Pike Orange Grove, FL" "555-3456"
    "George Jones" "456 Topforge Court Mountain Creek, CO" ""
    "Tim Paulson" "" "555-5678"
]

; Next, define a GUI layout block.  White background, widgets positioned
; next to each other horizontally, a new "header" text widget style which
; is 200 pixels wide, and 3 of those widgets containing appropriate header
; labels for each column of data, followed by a new GUI line:

gui: [
    backdrop white
    across
    style header text 200
    header "Name:" header "Address:" header "Phone:" return
]

; Use the foreach function to loop through each row in the user block:

foreach [name address phone] users [

    ; For each row in the user block, add the following code to the GUI
    ; layout block:

    append gui compose [

        ; Add a new field widget containing each row's name, address, and
        ; phone values.  The "compose" function above converts the
        ; parenthesized words below to evaluated values (the text data
        ; in each row, instead of the text "name", "address", "phone"):

        field (name) field (address) field (phone) return

    ]
]

; Show the constructed GUI block:

view layout gui
Here's the whole program without comments:
REBOL [title: "Contacts"]
users: [
    "John Smith" "123 Tomline Lane Forest Hills, NJ" "555-1234"
    "Paul Thompson" "234 Georgetown Pl. Peanut Grove, AL" "555-2345"
    "Jim Persee" "345 Pickles Pike Orange Grove, FL" "555-3456"
    "George Jones" "456 Topforge Court Mountain Creek, CO" ""
    "Tim Paulson" "" "555-5678"
]
gui: [
    backdrop white
    across
    style header text black 200
    header "Name:" header "Address:" header "Phone:" return
]
foreach [name address phone] users [
    append gui compose [
        field (name) field (address) field (phone) return
    ]
]
view layout gui
This app combines some the techniques used in the previous two examples, to create a prettier sorted inventory display:
REBOL [title: "Sort Inventory"]

; First, load some data created by the inventory app.  Assign the loaded
; block to the variable label "inventory":

inventory: load %inventory.txt

; Create a new empty block:

blocked: copy []

; Create a block of blocks, so that the data can be sorted by columns,
; with column data converted from text to money and integer values.
; The "reduce" function works just like "compose", but does not require
; parentheses:

foreach [sku cost qty] inventory [
    append/only blocked reduce [
        sku
        to-money cost
        to-integer qty
    ]
]

; Use the "request-list" requestor to get a sort column from the user.
; Assign the user's response to the variable label "field-name":

field-name: request-list "Choose Field To Sort By:" [
    "sku" "cost" "qty"
]

; Used the "select" function to assign a number value to the column
; chosen above.  Assign that number to variable label "field":

field: select ["sku" 1 "cost" 2 "qty" 3] field-name

; Use the "request-list" requestor to get a sort order from the user.
; Assign the user's response to the variable label "order":

order: request-list "Ascending or Descending:" ["ascending" "descending"]

; If the chosen sort order is "ascending", sort the block of blocks in
; ascending order, based on the chosen "field" column.  Otherwise, sort
; it in descending order:

either order = "ascending" [
    sort/compare blocked func [a b] [(at a field) < (at b field)]
][
    sort/compare blocked func [a b] [(at a field) > (at b field)]
]

; Create a GUI block with some 200 pixel wide text headers:

gui: [
    backdrop white
    across
    style header text black 200
    header "SKU:" header "Cost:" header "Qty:" return
]

; For each row in the block of blocks, append 3 fields containing the
; name, address, and phone text, to the GUI layout:

foreach row blocked [
    append gui compose [
        field (form row/1) field (form row/2) field (form row/3) return
    ]
]

; View the GUI layout:

view center-face layout gui
Here's the whole program without comments:
REBOL [title: "Sort Inventory"]
inventory: load %inventory.txt
blocked: copy []
foreach [sku cost qty] inventory [
    append/only blocked reduce [
        sku
        to-money cost
        to-integer qty
    ]
]
field-name: request-list "Choose Field To Sort By:" [
    "sku" "cost" "qty"
]
field: select ["sku" 1 "cost" 2 "qty" 3] field-name
order: request-list "Ascending or Descending:" ["ascending" "descending"]
either order = "ascending" [
    sort/compare blocked func [a b] [(at a field) < (at b field)]
][
    sort/compare blocked func [a b] [(at a field) > (at b field)]
]
gui: [
    backdrop white
    across
    style header text black 200
    header "SKU:" header "Cost:" header "Qty:" return
]
foreach row blocked [
    append gui compose [
        field (form row/1) field (form row/2) field (form row/3) return
    ]
]
view center-face layout gui

5.8 Minimal Retail Cash Register and Sales Report System
The example below is a trivial POS ("Point of Sale", or retail cash register) program:
REBOL [title: "Minimal Cash Register"]
view gui: layout [

    ; Create a new widget style named "fld".  It's just a text field,
    ; 80 pixels wide:

    style fld field 80

    ; Place consecutive widgets next to each other:

    across

    ; Here are 3 text labels and 3 text entry fields to allow users to
    ; enter a cashier name, item name, and price.  The text entry fields
    ; are labeled appropriately:

    text "Cashier:"   cashier: fld
    text "Item:"      item: fld
    text "Price:"     price: fld [

        ; When the user enters a price, perform the following operations:
        ; First, check to make sure the price entered can be converted to
        ; a money value.  If not, alert the user with an error message and
        ; exit the action block:

        if error? try [to-money price/text] [alert "Price error" return]

        ; Otherwise, add the quoted item text, and the price to the area
        ; widget (separated by a few spaces):

        append a/text reduce [mold item/text "    " price/text newline]

        ; Then erase the text in the item and price entry fields:

        item/text: copy "" price/text: copy ""

        ; Now, compute a subtoal of all the entered items.  Update the
        ; subtotal, tax, and total amount fields with the appropriate
        ; computed values:

        sum: 0
        foreach [item price] load a/text [sum: sum + to-money price]
        subtotal/text: form sum
        tax/text: form sum * .06
        total/text: form sum * 1.06

        ; Put the cursor back in the "item" field, and update the display:

        focus item
        show gui

    ]

    ; On a new row, put an area widget, 600 pixels across and 300 tall,
    ; labeled "a":

    return
    a: area 600x300

    ; On a new line, 3 more text and field widgets, labeled appropriately,
    : and a button with the text "Save":

    return
    text "Subtotal:"   subtotal: fld
    text "Tax:"        tax: fld
    text "Total:"      total: fld
    btn "Save" [

        ; When the button is pressed, do the following:
        ; first create a quoted block of items in the area widget.
        ; Replace all the newline characters with a space, so that all
        ; the data is on one line.  Label the whole chunk of data "items":

        items: replace/all (mold load a/text) newline " "

        ; Append the "items" data, the cashier name, and the date to the
        ; file "sales.txt" (all separated by carriage returns):

        write/append %sales.txt rejoin [
            items newline cashier/text newline now/date newline
        ]

        ; Erase all the text in every field widget, erase the text in the
        ; the area widget, and update the display:

        clear-fields gui
        a/text: copy ""
        show gui

    ]
]
The code below reports the total sum of cash register sales for the current day:
REBOL [title: "Daily Total"]

; Read in each line of the "sales.txt" block, and label it "sales":

sales: read/lines %sales.txt

; Label a variable to hold a computed sum, and set it initially to $0:

sum: $0

; Use a foreach loop to go through every 3 items in the sales data
; (remember each group of items, cashier, and date were separated by a
; newline in the code above):

foreach [items cashier date] sales [

    ; If the today's date is foun in any saved date entry:

    if now/date = to-date date [

       ; Use a foreach loop to go through the values in the "items" data:

        foreach [item price] load items [

            ; Add the price value to the computed sum:

            sum: sum + to-money price

        ]
    ]
]

; Alert the user with the computed sum:

alert rejoin ["Total sales today: " sum]
The report below shows the total of all items sold on any chosen day, by any chosen cashier:
REBOL [title: "Cashier Report"]

; Start by requesting a selected date and the name of a cashier:

report-date: request-date
report-cashier: request-text/title "Cashier:"

; Read in the lines of the "sales.txt" file:

sales: read/lines %sales.txt

; Prepare to compute a sum value:

sum: $0

; Use a foreach loop to go through each entry in the sales data:

foreach [items cashier date] sales [

    ; Perform 2 conditional evaluations to check for any entries in which
    ; the selected cashier name and date match:

    if ((report-cashier = cashier) and (report-date = to-date date)) [

        ; For any entry that matches, add to the sum:

        foreach [item price] load items [
            sum: sum + to-money price
        ]

    ]
]

; Alert the user with a concatenated message:

alert rejoin ["Total for " report-cashier " on " report-date ": " sum]
Here are all 3 programs, without comments:
REBOL [title: "Minimal Cash Register"]
view gui: layout [
    style fld field 80
    across
    text "Cashier:"   cashier: fld
    text "Item:"      item: fld
    text "Price:"     price: fld [
        if error? try [to-money price/text] [alert "Price error" return]
        append a/text reduce [mold item/text "    " price/text newline]
        item/text: copy "" price/text: copy ""
        sum: 0
        foreach [item price] load a/text [sum: sum + to-money price]
        subtotal/text: form sum
        tax/text: form sum * .06
        total/text: form sum * 1.06
        focus item
        show gui
    ]
    return
    a: area 600x300
    return
    text "Subtotal:"   subtotal: fld
    text "Tax:"        tax: fld
    text "Total:"      total: fld
    btn "Save" [
        items: replace/all (mold load a/text) newline " "
        write/append %sales.txt rejoin [
            items newline cashier/text newline now/date newline
        ]
        clear-fields gui
        a/text: copy ""
        show gui
    ]
]

REBOL [title: "Daily Total"]
sales: read/lines %sales.txt
sum: $0
foreach [items cashier date] sales [
    if now/date = to-date date [
        foreach [item price] load items [
            sum: sum + to-money price
        ]
    ]
]
alert rejoin ["Total sales today: " sum]

REBOL [title: "Cashier Report"]
report-date: request-date
report-cashier: request-text/title "Cashier:"
sales: read/lines %sales.txt
sum: $0
foreach [items cashier date] sales [
    if ((report-cashier = cashier) and (report-date = to-date date)) [
        foreach [item price] load items [
            sum: sum + to-money price
        ]
    ]
]
alert rejoin ["Total for " report-cashier " on " report-date ": " sum]


5.9 Email
This example is a complete graphical email client that can be used to read and send messages. It has a button feature which allows the user to enter all necessary email account settings:
REBOL [Title: "Little Email Client"]

; The line below creates the program's GUI window:

view layout [

    ; This line adds a text label to the GUI:

    h1 "Send Email:"

    ; This line adds a button to the GUI:

    btn "Server settings" [

        ; When the button is clicked, the following lines are run.
        ; These lines set all the email user account information
        ; required to send and receive email.  The settings are gotten
        ; from the user with the "request-text" function, and assigned
        ; to their appropriate locations in the REBOL system:

        system/schemes/default/host: request-text/title "SMTP Server:"
        system/schemes/pop/host:     request-text/title "POP Server:"
        system/schemes/default/user: request-text/title "SMTP User Name:"
        system/schemes/default/pass: request-text/title "SMTP Password:"
        system/user/email: to-email request-text/title "Your Email Addr:"

    ]

    ; This line creates a text entry field, containing the default text
    ; "recipient@website.com".  The variable word "address" is assigned to
    ; this widget:

    address: field "recipient@website.com"

    ; Heres another text entry field, for the email subject line:

    subject: field "Subject"

    ; This line creates a larger, multi-line text entry area for the body
    ; text of the email:

    body: area "Body"

    ; Here's a button displaying the word "send".  The functions inside
    ; its action block are executed whenever the button is clicked:

    btn "Send" [

        ; This line does most of the work.  It uses the REBOL "send"
        ; function to send the email.  The send function, with its
        ; "/subject" refinement accepts three parameters.  It's passed the
        ; current text contained in each field labeled above (referred to
        ; as "address/text" "body/text" and "subject/text").  The
        ; "to-email" function ensures that the address text is treated as
        ; an email data value:

        send/subject (to-email address/text) body/text subject/text

        ; This line alerts the user when the previous line is complete:

        alert "Message Sent."

    ]

    ; Here's another text label:

    h1 "Read Email:"

    ; Here's another text entry field.  The user's email account info is
    ; entered here.

    mailbox: field "pop://user:pass@site.com"

    ; This last button has an action block that reads messages from a
    ; specified mailbox.  It only takes one line of code:

    btn "Read" [

        ; The "to-url" function ensures that the text in the mailbox field
        ; is treated as a URL.  The contents of the mailbox are read and
        ; displayed using REBOL's built-in text editor:

        editor read to-url mailbox/text

    ]
]
Here's the whole program without comments:
view layout[
    h1 "Send:"
    btn "Server settings" [
        system/schemes/default/host: request-text/title "SMTP Server:"
        system/schemes/pop/host:     request-text/title "POP Server:"
        system/schemes/default/user: request-text/title "SMTP User Name:"
        system/schemes/default/pass: request-text/title "SMTP Password:"
        system/user/email: to-email request-text/title "Your Email Addr:"
    ]
    a: field "user@website.com"
    s: field "Subject"
    b: area
    btn "Send"[
        send/subject to-email a/text b/text s/text
        alert "Sent"
    ]
    h1 "Read:"
    f: field "pop://user:pass@site.com"
    btn "Read" [editor read to-url f/text]
]
5.10 Scheduler
Here's the GUI code for a scheduling app that allows users to create events on any day. Later, the user can click any day on the calendar to see the scheduled events:
view center-face gui: layout [
    btn "Date" []
    date: field
    text "Event Title:"
    event: field
    text "Time:"
    time: field
    text "Notes:"
    notes: field
    btn "Add Appoinment" []
    a: area
    btn "View Schedule" []
]
Here's the final code that makes the whole scheduling app run. This entire program is really nothing more complex than the field saver, inventory, cash register, and other GUI examples you've seen so far. There are just a few more widgets, and of course a date requester to allow the user to select dates, but the same GUI, file reading/writing, and foreach block management are repurposed to enter, save, load, and display calendar data:
view center-face gui: layout [
    btn "Date" [date/text: form request-date  show date]
    date: field
    text "Event Title:"
    event: field
    text "Time:"
    time: field
    text "Notes:"
    notes: field
    btn "Add Appoinment" [
        write/append %appts.txt rejoin [
            mold date/text newline
            mold event/text newline
            mold time/text newline
            mold notes/text newline
        ]
        date/text: "" event/text: "" time/text: "" notes/text: ""
        show gui
        alert "Added"
    ]
    a: area
    btn "View Schedule" [
        today: form request-date
        foreach [date event time notes] load %appts.txt [
            if date = today [
                a/text: copy ""
                append a/text form rejoin [
                    date newline
                    event newline
                    time newline
                    notes newline newline
                ]
                show a
            ]
        ]
    ]
]
5.11 Parts Database
Here's an application that allows workers to add, delete, edit, and view manufactured parts. This is another quintessential simple text field storage application. It can be used as shown here, to save parts information, but by adjusting just a few lines of code and text labels, it could be easily adapted to store contacts information, or any other type of related fields of blocked text data. Be sure to pay special attention to how the text-list widget is used, and be particularly aware of how the "pick" function is used to select consecutive values after a found index:
REBOL [title: "Parts]

; The line below writes a new empty data file to the hard drive, if it
; doesn't already exist.  If the file DOES already exist, then this
; function simply writes an empty string to it (i.e., leaves the file
; alone):

write/append %data.txt ""

; This line loads all saved records from the database file:

database: load %data.txt


; Here's the GUI window:

view center-face gui: layout [

    ; Here's a text label to instruct the user:

    text "Load an existing record:"

    ; This text list displays an alphabetically sorted list of the
    ; names found in the database (every forth item).  The number
    ; pair indicates the widget's pixel size:

    name-list: text-list blue 400x100 data (sort extract database 4) [

        ; The following line is included to avoid potential errors.
        ; When an item in the text list is clicked, we first check that
        ; the selected data (represented by the word "value") is NOT
        ; equal to nothing.  If so, exit the widget's action block
        ; (the "return" word quits the text-list's action routine):

        if value = none [return]

        ; The following code finds the selected part in the loaded
        ; database.  The display fields in the GUI are then set
        ; to show the found part, and each of the 3 items after
        ; it in the database (part name = field 1, manufacturer =
        ; field 2, SKU = field 3, notes = field 4):

        marker: index? find database value
        n/text: pick database marker
        a/text: pick database (marker + 1)
        p/text: pick database (marker + 2)
        o/text: pick database (marker + 3)

        ; Update the display to show the changed text fields (notice
        ; the "gui" label defined above - it refers to the entire GUI
        ; layout):

        show gui
    ]

    ; Here are the text display fields, and some text labels to show
    ; what should be typed into each field:

    text "Part Name:"       n: field 400
    text "Manufacturer:"    a: field 400
    text "SKU:"             p: field 400
    text "Notes:"           o: area  400x100

    ; The "across" word adds widgets to the GUI next to one another,
    ; instead of beneath one another, which is the default behavior
    ; (the following 3 buttons will appear next to each other):

    across

    ; Here's a GUI button to let the user save the contents of the
    ; text fields to the database:

    btn "Save" [

        ; When this button is clicked, make sure the required field
        ; contains some text.  If not, notify the user, and then exit
        ; this button's routine (the "return" word quits the save
        ; button's action block):

        if n/text = "" [alert "You must enter a part name." return]

        ; Now run through every forth item in the database to check if
        ; the part already exists.  If so, give the user the option to
        ; overwrite that record.  If they respond yes, delete the old
        ; record from the database ("remove/part" deletes 4 items at
        ; the location where the selected part is found).  If the user
        ; responds no, escape out of the save button's routine:

        if find (extract database 4) n/text [
            either true = request "Overwrite existing record?" [
               remove/part (find database n/text) 4
            ] [
               return
            ]
        ]

        ; Now update the database with the new data, and write it to
        ; the hard drive.  The "repend" function appends the evaluated
        ; variables inside the brackets (in this case a block of 4
        ; separate text strings contained in the GUI fields) to the
        ; database:

        save %data.txt repend database [n/text a/text p/text o/text]

        ; Update the text-list to show the added record:

        name-list/data: sort (extract copy database 4)
        show name-list
    ]

    ; This button allows the user to clear the screen and enter a
    ; new record:

    btn "Delete" [

        ; When this button is clicked, the code below gives the user
        ; the option to delete the selected record.  If the user
        ; selects "yes", the "remove/part" function deletes 4 items
        ; from the database, at the location where the selected part
        ; is found.  The database is saved, and the text fields are
        ; cleared ("do-face" runs the action block of the
        ; "clear-button" widget above, to clear the GUI fields), then
        ; the part name list is updated:

        if true = request rejoin ["Delete " n/text "?"] [
            remove/part (find database n/text) 4
            save %data.txt database
            do-face clear-button 1
            name-list/data: sort (extract copy database 4)
            show name-list
        ]
    ]

    clear-button: btn "New" [

        ; When this button is clicked, set the text of each field to an
        ; empty string:

        n/text: copy  ""
        a/text: copy  ""
        p/text: copy  ""
        o/text: copy  ""

        ; As always, when any on data in the GUI is changed, the
        ; screen must be updated:

        show gui
    ]
]
Here's the whole program without comments:
REBOL [title: "Parts"]
write/append %data.txt ""
database: load %data.txt
view center-face gui: layout [
    text "Parts in Stock:"
    name-list: text-list blue 400x100 data sort (extract database 4) [
        if value = none [return]
        marker: index? find database value
        n/text: pick database marker
        a/text: pick database (marker + 1)
        p/text: pick database (marker + 2)
        o/text: pick database (marker + 3)
        show gui
    ]
    text "Part Name:"       n: field 400
    text "Manufacturer:"    a: field 400
    text "SKU:"             p: field 400
    text "Notes:"           o: area  400x100
    across
    btn "Save" [
        if n/text = "" [alert "You must enter a part name." return]
        if find (extract database 4) n/text [
            either true = request "Overwrite existing record?" [
               remove/part (find database n/text) 4
            ] [
               return
            ]
        ]
        save %data.txt repend database [n/text a/text p/text o/text]
        name-list/data: sort (extract copy database 4)
        show name-list
    ]
    btn "Delete" [
        if true = request rejoin ["Delete " n/text "?"] [
            remove/part (find database n/text) 4
            save %data.txt database
            do-face clear-button 1
            name-list/data: sort (extract copy database 4)
            show name-list
        ]
    ]
    clear-button: btn "New" [
        n/text: copy  ""
        a/text: copy  ""
        p/text: copy  ""
        o/text: copy  ""
        show gui
    ]
]
Here's the same program as above, repurposed as a contacts database app (quite a bit more versatile than the earlier example). The field labels have simply been changed:
REBOL [title: "Contacts"]
write/append %data.txt ""
database: load %data.txt
view center-face gui: layout [
    text "Existing Contacts:"
    name-list: text-list blue 400x100 data sort (extract database 4) [
        if value = none [return]
        marker: index? find database value
        n/text: pick database marker
        a/text: pick database (marker + 1)
        p/text: pick database (marker + 2)
        o/text: pick database (marker + 3)
        show gui
    ]
    text "Name:"       n: field 400
    text "Address:"    a: field 400
    text "Phone:"      p: field 400
    text "Notes:"      o: area  400x100
    across
    btn "Save" [
        if n/text = "" [alert "You must enter a name." return]
        if find (extract database 4) n/text [
            either true = request "Overwrite existing record?" [
               remove/part (find database n/text) 4
            ] [
               return
            ]
        ]
        save %data.txt repend database [n/text a/text p/text o/text]
        name-list/data: sort (extract copy database 4)
        show name-list
    ]
    btn "Delete" [
        if true = request rejoin ["Delete " n/text "?"] [
            remove/part (find database n/text) 4
            save %data.txt database
            do-face clear-button 1
            name-list/data: sort (extract copy database 4)
            show name-list
        ]
    ]
    clear-button: btn "New" [
        n/text: copy  ""
        a/text: copy  ""
        p/text: copy  ""
        o/text: copy  ""
        show gui
    ]
]
5.12 Time Clock and Payroll Report
Here's a time clock program that can be used to log employee punch-in and punch-out times for shift work. The GUI allows for easy addition and deletion of employee names, and a full audit history backup of every entry made to the sign ins, is saved to the hard drive each time any employee signs in or out.
REBOL [title: "Time Clock"]

; First, check to see if an employee file has been created.  If not,
; create it.  This list will be displayed in a text-list widget.  It
; contains the item "(Add New...)", which will be used to allow users to
; add new names to the list:

unless exists? %employees [write %employees {"John Smith" "(Add New...)"}]

; Initialize a current-employee value to an empty string:

cur-employee: copy ""

view center-face layout [

    ; Here's the text list widget that displays the employee names, sorted
    ; alphabetically.  It's labeled "tl1":

    tl1: text-list 400x400 data sort load %employees [

        ; When the user selects a name from the list, set the
        ; "cur-employee" variable to hold the selected name:

        cur-employee: value

        ; If the user selected "(Add New...)", run the code required to
        ; add a name to employee list:

        if cur-employee = "(Add New...)" [

            ; First, request the name from the user, and save the quoted
            ; value to the %employees file:

            write/append %employees mold trim request-text/title "Name:"

            ; Reload the new employee list into the text-list widget, and
            ; update the display:

            tl1/data: sort load %employees  show tl1
        ]
    ]

    ; The "key" widget does not display any face in the GUI.  It just
    ; waits for a key to be pressed, and performs the desired actions:

    key #"^~" [

        ; First, get the name of the employee to be deleted, and assign
        ; it the variable label "del-emp":

        del-emp: copy to-string tl1/picked

        ; Next, load the employee list and assign it the label "temp-emp":

        temp-emp: sort load %employees

        ; Confirm that the user actually wants to delete the employee:

        if true = request/confirm rejoin ["REMOVE " del-emp "?"] [

            ; Find the employee name in the employee list, remove the
            ; name, and assign the variable label "new-list" to the
            ; pruned employee list:

            new-list: head remove/part find temp-emp del-emp 1

            ; Save the pruned employee list to the %employees file:

            save %employees new-list

            ; Update the text-list widget and alert the user that the
            ; action has been completed:

            tl1/data: sort load %employees show tl1
            alert rejoin [del-emp " removed."]
        ]
    ]

    ; Here's a button to allow employees to clock in and out of shifts:

    btn "Clock IN/OUT" [

        ; First make sure that a name is selected.  If not, alert the user
        ; and exit the button's action routine:

        if ((cur-employee = "") or (cur-employee = "(Add New...)")) [
            alert "You must select your name." return
        ]

        ; Concatenate the quoted name and time values inside square
        ; brackets, and beginning with a carriage return.  Assign that
        ; text the variable label "record":

        record: rejoin [
            newline {[} mold cur-employee { "} mold now {"]}
        ]

        ; Confirm with the employee that the selected name and clock time
        ; are correct:

        either true = request/confirm rejoin [
            record " -- IS YOUR NAME AND THE TIME CORRECT?"
        ] [

            ; This routine saves a backup of the current time sheet in
            ; a folder named "clock_history".  First, the folder is
            ; created if it doesn't exist:

            make-dir %./clock_history/

            ; Next, a file name is created by rejoining the folder name
            ; and the current day and time.  Illegal file name characters
            ; are replaced (i.e., "/" and ":" can't be used in file names
            ; on most operating systems).  The text of the existing
            ; %time_sheet.txt file is written to the date stamped backup
            ; file name:

            write rejoin [
                %./clock_history/
                replace/all replace form now "/" "--" ":" "_"
            ] read %time_sheet.txt

            ; Write the new record to the %time_sheet.txt file:

            write/append %time_sheet.txt record

            ; Alert the user that the operation is complete:

            alert rejoin [
                uppercase copy cur-employee ", YOUR TIME IS LOGGED."
            ]
        ] [

            ; If the user replied negatively to the confirmation above,
            ; alert the user that the action is cancelled, and exit the
            ; routine:

            alert "CANCELED"
            return

        ]
    ]
]
Here's the whole program without comments:
REBOL [title: "Time Clock"]
unless exists? %employees [write %employees {"John Smith" "(Add New...)"}]
cur-employee: copy ""
view center-face layout [
    tl1: text-list 400x400 data sort load %employees [
        cur-employee: value
        if cur-employee = "(Add New...)" [
            write/append %employees mold trim request-text/title "Name:"
            tl1/data: sort load %employees show tl1
        ]
    ]
    key #"^~" [
        del-emp: copy to-string tl1/picked
        temp-emp: sort load %employees
        if true = request/confirm rejoin ["REMOVE " del-emp "?"] [
            new-list: head remove/part find temp-emp del-emp 1
            save %employees new-list
            tl1/data: sort load %employees show tl1
            alert rejoin [del-emp " removed."]
        ]
    ]
    btn "Clock IN/OUT" [
        if ((cur-employee = "") or (cur-employee = "(Add New...)")) [
            alert "You must select your name." return
        ]
        record: rejoin [
            newline {[} mold cur-employee { "} mold now {"]}
        ]
        either true = request/confirm rejoin [
            record " -- IS YOUR NAME AND THE TIME CORRECT?"
        ] [
            make-dir %./clock_history/
            write rejoin [
                %./clock_history/
                replace/all replace form now "/" "--" ":" "_"
            ] read %time_sheet.txt
            write/append %time_sheet.txt record
            alert rejoin [
                uppercase copy cur-employee ", YOUR TIME IS LOGGED."
            ]
        ] [
            alert "CANCELED"
            return
        ]
    ]
]
Here's a program that creates payroll reports of hours worked by employees, logged by the program above, between any selected start and end dates:
REBOL [title: "Payroll Report"]

; Request start and end dates from a user:

timeclock-start-date: request-date
timeclock-end-date: request-date

; Initials a "totals" variable to an empty string.  This string will be
; used to collect (aggregate) the entire output report text:

totals: copy ""

; Load the employee list, and assign it the variable label "names":

names: load %employees

; Load all the saved time sheet information, and assign it the variable
; label "log":

log: load %time_sheet.txt

; Use a foreach loop to collect the log information for each employee:

foreach name names [

    ; Don't try to collect info for the "(Add New...)" entry in the list:

    if name <> "(Add New...)" [

        ; Create a new block to hold report information for the current
        ; employee, initially just containing the employee name.  Assign
        ; the variable label "times" to the block:

        times: copy reduce [name]

        ; Use foreach to loop through every entry in the time sheet log:

        foreach record log [

            ; If the current employee name matches the name in the current
            ; entry in the log file, add the record to the report:

            if name = log-name: record/1 [

                ; Split up the date and time in the current date/time
                ; entry (data/time is the second item in each log entry).
                ; Assign the variable "date-time" to the result:

                date-time: parse record/2 "/"

                ; Convert the date portion of the result above to a REBOL
                ; date value.  Assign the label "log-date" to that value:

                log-date: to-date date-time/1

                ; Convert the time portion of the result above to a REBOL
                ; time value.  Assign the label "log-time" to that value:

                log-time: to-time first parse date-time/2 "-"

                ; If the date in the current timesheet entry is within the
                ; start and end date period selected by the user, add the
                ; current entry to the employee's report:

                if (
                    (log-date >= timeclock-start-date) and
                    (log-date <= timeclock-end-date)
                ) [
                    append times log-date
                    append times log-time
                ]
            ]
        ]

        ; Append the employee name and a carriage return to the final
        ; report text:

        append totals rejoin [name ":" newline]

        ; Initialize a sum variable to 0:

        total-hours: 0

        ; Go through the entire collected "times" block created above
        ; to calculate end-times - start-times.  Remember that the first
        ; item in the block was the user's name, so start this process at
        ; the second item:

        foreach [in-date in-time out-date out-time] (at times 2) [

            ; Append some nicely formatted text containing the start and
            ; end days and times, to the final report text:

            append totals rejoin [
                newline
                "    in: " in-date ", " in-time
                "  out: " out-date ", " out-time "    "
            ]

            ; Add the total hours worked to the "total-hours" sum.  Wrap
            ; this routine in an error check, just in case a start or end
            ; time is missing:

            if error? try [
                total-hours: total-hours + (out-time - in-time)
            ] [
                alert rejoin [
                    "Missing login or Missing logout: " name
                ]
            ]
        ]

        ; Append the employee's total computed hours to the final report,
        ; along with some concatenated text and carriage returns, to
        ; create a nicely formatted printout:

        append totals rejoin [
            newline newline
            "    TOTAL HOURS: " total-hours
            newline newline newline
        ]

    ]
]

; Write the final report to a file name containing the start and end dates
; chosen for the report, and open it using Window's "notepad" application
; (you could simply use REBOL's "editor" function to do this):

write filename: copy rejoin [
    %timeclock_report-- timeclock-start-date
    "_to_" timeclock-end-date ".txt"
] totals
call/show rejoin ["notepad " to-local-file filename]
Here's the whole program without comments:
REBOL [title: "Payroll Report"]
timeclock-start-date: request-date
timeclock-end-date: request-date
totals: copy ""
names: load %employees
log: load %time_sheet.txt
foreach name names [
    if name <> "(Add New...)" [
        times: copy reduce [name]
        foreach record log [
            if name = log-name: record/1 [
                date-time: parse record/2 "/"
                log-date: to-date date-time/1
                log-time: to-time first parse date-time/2 "-"
                if (
                    (log-date >= timeclock-start-date) and
                    (log-date <= timeclock-end-date)
                ) [
                    append times log-date
                    append times log-time
                ]
            ]
        ]
        append totals rejoin [name ":" newline]
        total-hours: 0
        foreach [in-date in-time out-date out-time] (at times 2) [
            append totals rejoin [
                newline
                "    in: " in-date ", " in-time
                "  out: " out-date ", " out-time "    "
            ]
            if error? try [
                total-hours: total-hours + (out-time - in-time)
            ] [
                alert rejoin [
                    "Missing login or Missing logout: " name
                ]
            ]
        ]
        append totals rejoin [
            newline newline
            "    TOTAL HOURS: " total-hours
            newline newline newline
        ]
    ]
]
write filename: copy rejoin [
    %timeclock_report-- timeclock-start-date
    "_to_" timeclock-end-date ".txt"
] totals
call/show rejoin ["notepad " to-local-file filename]


5.13 Blogger
This program allows users to create and add entries to an online blog page. The GUI has text fields which allow the user to enter a title, link, and blog text, as well as a button to select an image file which will be uploaded and included in the blog entry. When the "Upload" button is clicked, an HTML code file is created and uploaded to the user's web server, along with the image (you'll learn more about HTML later in the tutorial - for now just pay attention to the fact that a bunch of foreign HTML code is concatenated together with values entered by the user). Be sure to edit the ftp-url and html-url variables to represent actual user account information (you'll need a user name, password, and folder on a web server to run this example).
REBOL [title: "Blogger"] ; Store the blog file name in a variable: page: "blog.html" ; Store the FTP account address, with username and password: ftp-url: ftp://user:pass@site.com/public_html/folder/ ; Store the blog's web page URL in a variable: html-url: join http://site.com/folder/ page ; Create a 1 pixel blank image to upload, for when the user ; doesn't want to upload any image for a given blog entry: save/png %dot.png to-image layout/tight [box white 1x1] ; Here's the GUI: view center-face gui: layout [ ; Display the blog URL in the GUI (the "form" function converts ; the URL data type created above, to a string data type required ; by the h2 widget): h2 (form html-url) ; Here's a descriptive header and a text entry field where the user ; can enter a title for the blog. The field is labeled by the ; variable word "t": text "Title:" t: field 400 ; Header and entry field for a URL link to be included in the blog: text "Link:" l: field 400 ; Header and selection button for an image to be included in the ; blog. When the button is clicked, a file requestor pops up. The ; button's text is set to display the selected file name: text "Image:" i: btn 400 [i/text: request-file show i] ; Header and text entry field for the blog text: text "Text:" x: area 400x100 ; Layout all the following widgets across the screen: across ; Here's the GUI button which does most of the work: btn "Upload" [ ; When the button is clicked, first try to read the existing ; blog text (HTML source). If it's readable, assign that data ; the variable label "existing-text". If it's not readable, ; create the folder and an empty blog file on the FTP server, ; then assign the "existing-text" variable an emptry string: if error? try [existing-text: read html-url] [ make-dir ftp-url write (join ftp-url page) "" existing-text: copy "" ] ; Assign the variable word "picture" to the image file name ; chosen above ("last split-path" trims off the directory path ; portion of the file name (i.e., %/C/folder/myimage.jpg would ; be trimmed to %myimage.jpg)): picture: last split-path to-file i/text ; Write the image to the FTP server: write/binary (join ftp-url picture) (read/binary to-file i/text) ; Write the following rejoined HTML to the blog file on the FTP ; server: write (join ftp-url page) rejoin [ ; First add the title, enclosed in "h1" tags: {<h1>} t/text {</h1>} ; Now add a link to the uploaded picture, followed by 2 ; HTML line break tags: {<img src="} picture {"><br><br>} ; Add the date and time, followed by 5 spaces, no line breaks: now/date { } now/time { } ; Add a link tag (because there were no line breaks above, ; this link appears on the same line as the date and time in ; the blog), followed by 2 line breaks: {<a href="} l/text {">} l/text {</a><br><br>} ; Put the blog text inside a table which takes up 80% of the ; screen. Center the table on the screen (so it's indented). ; Use the "pre" tag to make sure that the text is formatted ; exactly the way it was typed in by the user (with carriage ; returns and spaces as entered into the area widget above), ; and use the "strong" tag to bold the text. Follow that ; entire section of HTML with a line break and then a ; "horizontal rule" tag (a separator line): {<center><table width=80%><tr><td><pre><strong>} x/text {</strong></pre></td></tr></table></center><br><hr>} ; Add the previously existing blog HTML below the new entry: existing-text ] ; After the blog has been updated, open the blog URL in the ; browser: browse html-url ] ; Add a GUI button to open the blog URL in the browser: btn "View" [browse html-url] ; This GUI button allows the user to edit the existing blog file ; (the HTML data created by this program), using REBOL's built in ; text editor. Remember that REBOL's editor has the ability to ; read and SAVE data directly to/from FTP files, so this editor ; enables the user to actually edit and MAKE CHANGES to the blog ; file on the FTP server: btn "Edit" [editor (join ftp-url page)] ]Here's the whole program, without comments:
REBOL [title: "Blogger"] page: "blog.html" ftp-url: ftp://user:pass@site.com/public_html/folder/ html-url: join http://site.com/folder/ page save/png %dot.png to-image layout/tight [box white 1x1] ; blank image view center-face gui: layout [ h2 (form html-url) text "Title:" t: field 400 text "Link:" l: field 400 text "Image:" i: btn 400 [i/text: request-file show i] text "Text:" x: area 400x100 across btn "Upload" [ if error? try [existing-text: read html-url] [ make-dir ftp-url write (join ftp-url page) "" existing-text: copy "" ] picture: last split-path to-file i/text write/binary (join ftp-url picture) (read/binary to-file i/text) write (join ftp-url page) rejoin [ {<h1>} t/text {</h1>} {<img src="} picture {"><br><br>} now/date { } now/time { } {<a href="} l/text {">} l/text {</a><br><br>} {<center><table width=80%><tr><td><pre><strong>} x/text {</strong></pre></td></tr></table></center><br><hr>} existing-text ] browse html-url ] btn "View" [browse html-url] btn "Edit" [editor (join ftp-url page)] ]


5.14 FTP Group Chat
This example is a simple chat application that lets users send instant text messages back and forth across the Internet. The chat "rooms" are created by dynamically creating, reading, appending, and saving text files via ftp (to use the program, you'll need access to an available ftp server: ftp address, username, and password. Nothing else needs to be configured on the server). This enables unlimited private conversation spaces that can be used to connect any number of individuals or teams within a group. This program runs entirely in the REBOL console (i.e., there is no graphic user interface - it's all printed text), so it can be used even on simple devices which don't have GUI support. It includes password protected access for administrators to erase chat contents. It also allows users to pause activity momentarily, and requires a username/password to continue (["secret" "password"], in this example case).
REBOL [title: "FTP Chat Room"]

; The following line gets the URL of a text file on the user's web server
; to use for the chat.  The ftp username, password, domain, and filename
; must be entered in the format shown:

webserver: to-url ask trim/lines {
    URL of text file on your server (ftp://user:pass@site.com/chat.txt):
}

; The following line gets the user's name:

name: ask "Enter your name:  "

; The following line writes some text to the webserver file (obtained
; above), indicating that the user has entered the chat.  The "/append"
; refinement adds to the existing text in the webserver file (as opposed
; to erasing what's already there).  Using "rejoin", the text written to
; the webserver is the combined value of the user's name, some static
; text, the current date and time, and a carriage return.  If the file
; doesn't exist, it is created.  Any number of "room" files can be
; automatically created on the web server:

write/append webserver rejoin [now ": " name " has entered the room.^/"]

; Now the program uses a "forever" loop to continually wait for user
; input, and to do appropriate things with that input:

forever [

    ; First, read the messages that are currently in the "webserver" text
    ; file, and assign the variable word "current-chat" to that text:

    current-chat: read webserver

    ; Clear the screen:

    prin "^(1B)[J"

    ; Display a greeting and some instructions:

    print rejoin [
        "--------------------------------------------------"
        newline {You are logged in as: } name newline
        {Type "room" to switch chat rooms.} newline
        {Type "lock" to pause/lock your chat.} newline
        {Type "quit" to end your chat.} newline
        {Type "clear" to erase the current chat.} newline
        {Press [ENTER] to periodically update the display.} newline
        "--------------------------------------------------" newline
    ]

    print rejoin ["Here's the current chat text at: " webserver newline]
    print current-chat

    ; In the line below, the "ask" function is used to get some text from
    ; the user.  The returned text (the text entered by the user) is
    ; assigned the label "entered-text", and concatenated with the user's
    ; name and the text " says: ".  This prepares it to be added to the
    ; webserver file and displayed in the chat.  Notice that the user
    ; must first respond to the "ask" function, before the rejoin
    ; evaluation can occur:

    sent-message: copy rejoin [
        name " says: "
        entered-text: ask "You say:  "
    ]

    ; The "switch" structure below is used to check for commands in the
    ; text entered by the user.  If the user enters "quit", "clear",
    ; "room", or "lock", appropriate actions occur:

    switch/default entered-text [   ; "switch" handles multiple "if" cases

        ; If the user typed "quit", stop the forever loop (exit the
        ; program):

        "quit" [break]

        ; If the user typed "clear", erase the current text chat.  But
        ; first, ask user for the administrator username/password:

        "clear" [

            ; "if/else" does the same thing as "either" (deprecated):

            adminu: ask "Admin Username:  "
            adminp: ask "Admin Password:  "
            if/else ((adminu = "secret") and (adminp = "password")) [
                write webserver ""
            ] [
                ask trim/auto {
                    ^LYou must know the administrator password to clear
                    the room!
                }
            ]
        ]

        ; If the user typed "room", request a new FTP address, and run
        ; some code that was presented earlier in the program, using the
        ; newly entered "webserver" variable, to effectively change chat
        ; "rooms":

        "room" [

            ; Add a message the chat file, indicating that the user has
            ; left the chat:

            write/append webserver rejoin [
                now ": " name " has left the room." newline
            ]

            ; Get the URL of a new chat text file (the new room address).
            ; Use the old address as the default displayed URL:

            webserver: to-url ask rejoin [
                {New Web Server Address (} to-string webserver {):  }
            ]

            ; Display a message in the newly chosen chat text file,
            ; showing that the user has entered the chat:

            write/append webserver rejoin [
                now ": " name " has entered the room." newline
            ]

        ]

        "lock" [

            ; Display a message to the user that the program will be
            ; paused:

            ask trim/lines {
                ^LPress [Enter] to resume.  You'll need the correct
                username and password to continue.
            }

            ; Don't go on until the user gets the password right:

            forever [

                ; The while loop below continually asks the user for
                ; a password, until correct:

                while [
                    adminu: ask "Admin Username:  "
                    adminp: ask "Admin Password:  "
                    ((adminu <> "secret") or (adminp <> "password"))
                ][
                    ask "^LIncorrect password - look in the source!"
                ]

                ; After the user has entered the correct username and
                ; password, exit the forever loop and continue with
                ; the program:

                break

            ]
        ]
    ][

        ; The following line is the default case for the switch structure:
        ; as long as the entered message is not blank ([Enter]), write the
        ; entered message to the web server (append it to the current chat
        ; text):

        if entered-text <> "" [
            write/append webserver rejoin [sent-message newline]
        ]
    ]
]

; When the "forever" loop is exited, do the following:

prin "^(1B)[J"   ; clear screen
print "Goodbye!"
write/append webserver rejoin [now ": " name " has closed chat." newline]
wait 1
The bulk of this program runs within the "forever" loop, and uses the conditional "switch" structure to decide how to respond to user input. This is a classic outline that can be adjusted to match a variety of generalized situations in which the computer repeatedly waits for and responds to user interaction at the command prompt.

5.15 Group Reminder
This program operates along the same lines as the FTP Chat app. It stores reminder notes for a group of users in a text file accessible by FTP. Unlike the FTP chat application, this program makes use of GUI features, and focuses on popping up when new messages are sent to the group. Users can run the program at any time to type a new text reminder into a text area widget. The program can also be started and minimized to run in the background and listen for reminders. In listen mode, a GUI window will pop up with a message whenever someone else in the group adds a new reminder. The system can be used to share event reminders, notes, task lists, or any other relevant and time sensitive information. This app only requires that someone in the group has access to an FTP server. Just like the FTP chat program, nothing needs to be configured on the server. All that's required is a username and password, and a connection to the Internet.
REBOL [title: "Group Reminder System"]

; This variable is set to store the username, password, folder, file and
; URL of the FTP server at which the reminder texts are stored:

group-url: ftp://user:pass@site.com/public_html/reminders.txt

; The request-list function here allows the user to choose between adding
; a new reminder text, or listening in the background.  The user's
; response is stored in the variable "menu":

menu: request-list "" ["Create New Reminder" "Listen For Reminders"]

; The code pattern below was demonstrated earlier in the "Parts" program.
; It creates a new file, if the file doesn't exist.  Otherwise, it does
; nothing:

write/append %reminders.txt ""

; If the user chose to create a new reminder, do the following code:

if menu = "Create New Reminder"  [

    ; Create a GUI window with some header text, an area widget, and a
    ; button:

    view center-face layout [

        h3 "Add a new reminder for the group:"
        a: area wrap
        btn "Submit" [

            ; When clicked, run the following code with an error check,
            ; just in case an Internet connection isn't available:

            if error? try [

                ; Attempt to write the area widget text to the FTP file:

                write/append group-url mold a/text

            ; If there's an error writing, alert the user and quit:

            ] [alert "ERROR: Not Saved (check Internet connection)" quit]

            ; Otherwise, alert with user with a success message, and end:

            alert "Saved"
            quit

        ]
    ]
]

; If the user chose to listen for reminders, do the following code:

if menu = "Listen For Reminders" [

    ; Print a waiting message in the console.  This can be minimized:

    print "Listening for reminders..."

    ; Repeat the following code endlessly:

    forever [

        ; Waiting a few seconds saves a lot of bandwidth:

        wait 5

        ; "Attempt" is just like "if error? try" - it just doesn't do
        ; anything if an error occurs.  The point of attempting the
        ; following code is to ensure the program continues to run if
        ; the Internet connection is disabled, or the FTP file can't be
        ; read for any other reason:

        attempt [

            ; Read the text in the FTP file, and assign it the label
            ; "reminders":

            reminders: read group-url

            ; If a new reminder has been added by anyone in the group,
            ; the "reminders" text will not match the text stored in the
            ; file reminders.txt:

            if reminders <> read %reminders.txt [

                ; If that's the case, update the reminders.txt file, with
                ; the new text read from the FTP file:

                write %reminders.txt reminders

                ; Create a blank string to store the current reminders:

                remind: copy {}

                ; Reverse the order of all reminders in the FTP file, so
                ; that the newest messages are first, then loop through
                ; them with the "foreach" function:

                foreach reminder (reverse load reminders) [

                    ; Append each reminder to the blank text string
                    ; created above, separated by 2 blank lines:

                    append remind rejoin [reminder newline newline]

                ]

                ; Open a GUI window and display the formatted reminder
                ; text in an area widget:

                view center-face layout [
                    h3 "Reminders for the group:"
                    area remind
                ]

            ]
        ]
    ]
]
Here's the whole program without comments:
REBOL [title: "Group Reminder System"]
group-url: ftp://user:pass@site.com/public_html/reminders.txt
menu: request-list "" ["Create New Reminder" "Listen For Reminders"]
write/append %reminders.txt ""
if "" = read group-url [write group-url {""}]
if menu = "Create New Reminder"  [
    view center-face layout [
        h3 "Add a new reminder for the group:"
        a: area wrap
        btn "Submit" [
            if error? try [
                write/append group-url mold a/text
            ] [alert "ERROR: Not Saved (check Internet connection)" quit]
            alert "Saved"
            quit
        ]
    ]
]
if menu = "Listen For Reminders" [
    print "Listening for reminders..."
    forever [
        wait 5
        attempt [
            reminders: read group-url
            if reminders <> read %reminders.txt [
                write %reminders.txt reminders
                remind: copy {}
                foreach reminder (reverse load reminders) [
                    append remind rejoin [reminder newline newline]
                ]
                view center-face layout [
                    h3 "Reminders for the group:"
                    area remind
                ]
            ]
        ]
    ]
]


5.16 A Univeral Report Generator, For Paypal and any other CSV Table Data
This example creates reports on columns and rows of data in a .csv table. The script demonstrates typical CSV file operations using parse, foreach, and simple series functions. The code performs sums upon columns, and selective calculations upon specified fields, based upon conditional evaluations, searches, etc. Practical column and row based reporting capabilities such as this are a simple and useful skill in REBOL. Using basic permutations of techniques shown here, it's easy to surpass the capabilities of spreadsheets and other "office" reporting tools.
Actual data for use in testing this example can be downloaded as follows:
- Log into your Paypal account
- Click on My Account -> History -> Download History
- Pick a range of dates
- Select "Comma Delimited - All Activity" (where it's labeled "File Types to Download")
- Save the file to %Download.csv.
At the time this example code was created, the author's CSV file download contained the following fields ("A" through "AP" - 42 columns).
Date, Time, Time Zone, Name, Type, Status, Currency, Gross, Fee, Net, From Email Address, To Email Address, Transaction ID, Counterparty Status, Address Status, Item Title, Item ID, Shipping and Handling Amount, Insurance Amount, Sales Tax, Option 1 Name, Option 1 Value, Option 2 Name, Option 2 Value, Auction Site, Buyer ID, Item URL, Closing Date, Escrow Id, Invoice Id, Reference Txn ID, Invoice Number, Custom Number, Receipt ID, Balance, Address Line 1, Address Line 2/District/Neighborhood, Town/City, State/Province/Region/County/Territory/Prefecture/Republic, Zip/Postal Code, Country, Contact Phone Number
The code automatically handles tables with any arbitrary number of columns, allowing fields to be referred to by labels present in the first line of the .csv file.
The script is simple to understand:
REBOL [title: "Paypal Reports"]

; First, read in the lines of the CSV file
; (as described earlier in the CSV/parse section of this tutorial):

filename: request-file/only/file %Download.csv
lines: read/lines filename

; The first row contains column labels.  Let's convert that CSV line to a
; block, using the parse/all function:

labels: copy parse/all lines/1 ","

; Remove extra spaces from each of the labels in the "labels" block:

foreach label labels [trim label]

; Now we'll convert the CSV lines into a REBOL data block.  First,
; create an empty block to store the data:

database: copy []

; The data values start at line two of the CSV file.  Use foreach and
; parse/all to separate the individual values in each line, and collect
; them into a block of blocks (as described in the CSV/parse section):

foreach line (at lines 2) [
    parsed: parse/all line ","
    append/only database parsed
]

; For the first report, let's get a list of every person in the "Name"
; Column.  Find the index number of the "Name" column in the "labels"
; block.  We'll use that to pick out name values from each row:

name-index: index? find labels "Name"

; Create an empty text string to collect the names:

names: copy {}

; Loop through the database, picking the item at the name-index location
; from each row

foreach row database [
    append names rejoin ["Name:  " (pick row name-index) newline]
]

; Display the results:

editor names

; Now let's view every transaction in which the name field includes
; "Netflix".  It's basically the same routine as above, only now with an
; added conditional evaluation that uses the "find" function.  And for
; this report, I want to see the amount paid.  I'll set a variable to
; refer to the index position of the "Net" column:

net-index: index? find labels "Net"
amounts: copy {}
foreach row database [
    if find/only (pick row name-index) "Netflix" [
        append amounts rejoin ["Amount:  " (pick row net-index) newline]
    ]
]
editor amounts

; Now, let's get a sum of every Netflix transaction between January and
; December, 2012.  The dates are stored in a column labeled "Date", with
; a format like: "12/26/2012" (month/day/year).  We'll need to convert
; that to REBOL's internal format (day-month-year)

date-index: index? find labels "Date"

; You've seen earlier how to collect sums.  Start by setting a sum
; variable to 0.  We'll add values to the sum to get a total:

sum: $0

; Now loop through the database and perform some conditional evaluations
; on every row:

foreach row database [
    if find/only (pick row name-index) "Netflix" [

        ; We'll use "parse" to separate the date text at the
        ; "/" character:

        date: parse (pick row date-index) "/"

        ; Pick the month using the values in system/locale/months

        month:  pick system/locale/months to-integer date/1

        ; Then rearrange and put back together the date pieces using
        ; "rejoin":

        reb-date: to-date rejoin [date/2 "-" month "-" date/3]

        ; If the date is within the chosen range, add the value to
        ; the sum:

        if ((reb-date >= 1-jan-2012) and (reb-date <= 31-dec-2012)) [
            sum: sum + (to-money pick row net-index)
        ]
    ]
]

; Show the answer:

alert form sum
Here's the entire program without comments:
REBOL [title: "Paypal Reports"]
filename: request-file/only/file %Download.csv
lines: read/lines filename
labels: copy parse/all lines/1 ","
foreach label labels [trim label]
database: copy []
foreach line (at lines 2) [
    parsed: parse/all line ","
    append/only database parsed
]
name-index: index? find labels "Name"
names: copy {}
foreach row database [
    append names rejoin ["Name:  " (pick row name-index) newline]
]
editor names
net-index: index? find labels "Net"
amounts: copy {}
foreach row database [
    if find/only (pick row name-index) "Netflix" [
        append amounts rejoin ["Amount:  " (pick row net-index) newline]
    ]
]
editor amounts
date-index: index? find labels "Date"
sum: $0
foreach row database [
    if find/only (pick row name-index) "Netflix" [
        date: parse (pick row date-index) "/"
        month:  pick system/locale/months to-integer date/1
        reb-date: to-date rejoin [date/2 "-" month "-" date/3]
        if ((reb-date >= 1-jan-2012) and (reb-date <= 31-dec-2012)) [
            sum: sum + (to-money pick row net-index)
        ]
    ]
]
alert form sum
If you want to use this example to create reports for any other CSV file, just copy and paste the first part of the script. It loads and parses a user selected CSV file, and creates a block of labels from the first line:
REBOL [title: "Reports"]
filename: request-file/only/file %filename.csv
lines: read/lines filename
labels: copy parse/all lines/1 ","
foreach label labels [trim label]
database: copy []
foreach line (at lines 2) [
    parsed: parse/all line ","
    append/only database parsed
]
You can use this line of code to view the list of column labels in the CSV file:
editor labelsNext, assign variable(s) to the column label(s), on which you want to perform computations:
name-index: index? find labels "Name"
date-index: index? find labels "Date"
net-index: index? find labels "Net"
Set any initial variables needed to perform computations (sum, max/min, etc.), or to hold blocks of collected values:
sum: $0
names: copy {}
amounts: copy {}
Use foreach loop(s) to perform conditional evaluations and desired computations on every row of data:
foreach row database [
    append names rejoin ["Name:  " (pick row name-index) newline]
]
foreach row database [
    if find/only (pick row name-index) "Netflix" [
        append amounts rejoin ["Amount:  " (pick row net-index) newline]
    ]
]
foreach row database [
    if find/only (pick row name-index) "Netflix" [
        date: parse (pick row date-index) "/"
        month:  pick system/locale/months to-integer date/1
        reb-date: to-date rejoin [date/2 "-" month "-" date/3]
        if ((reb-date >= 1-jan-2012) and (reb-date <= 31-dec-2012)) [
            sum: sum + (to-money pick row net-index)
        ]
    ]
]
Display all the computed or collected results:
editor names
editor amounts
alert form sum
Of course, the computations above involve quite a bit of evaluation and data processing, in order to demonstrate useful reusable code snippets (such as converting dates to REBOL values that can be manipulated intelligently). In most cases, simple sums, averages, searches, and other common computations will require far less code. You can shorten code even further by using numbers to refer to columns. Simple reports rarely require much more code than the first example in this tutorial:
sum: $0
foreach line at read/lines http://re-bol.com/Download.csv 2 [
    sum: sum + to-money pick (parse/all line ",") 8
]
alert form sum
5.17 Reviewing and Using the Code You've Seen To Model New Applications
You're already well on your way to understanding how to build useful business applications. At this point, it's wise to go back and review every section in the tutorial. The perspective you have now will help to clarify the value of concepts that were skimmed during a first read. Focus on experimenting with individual lines of code, memorizing functions, and understanding the details of syntax that may have been confusing the first time around. Try repurposing, altering, and editing the complete programs you've seen to far, to be useful in data management activities that apply to your own interests. Here are some ideas for experimentation:
- Add columns to data blocks in the existing apps (i.e, perhaps "email" and "mobile", "home", "work" fields to the contacts examples, or "name" a "title" fields to messages in the reminder app).
- Add new computations to the reporting examples (perhaps average, max, and min functions to columns in the Paypal reports).
- Apply the CSV, sorting, computing, and reporting code patterns you've seen to columns of data exported from other desktop applications and web sites.
- Apply new and more complex conditional operations to computations (perhaps apply tax only to items in a Paypal file that were shipped from a certain state, or apply a fee to prices of items that are made by a certain manufacturer in the "Parts" database app).
- Create a few small GUI apps that save CSV files which can be imported into a spreadsheet (perhaps add a CSV export feature to the "Contacts" or "Parts" examples, and especially try exporting computed reports as CSV files).
- Add list features to the email program (perhaps allow email addresses to be chosen from a contact list, or send emails to a group of users).
- Add useful features to the file editor and web page editor programs (maybe try storing a history of edited files, or FTP login credentials).
- Combine the Inventory and Cash Register programs, so that users can select inventory items from a drop down list in the cash register app.
- Add unique computation routines to the calculator app.
- Experiment with the "parse" and "find" functions (perhaps try adding a search feature to the schedule and email programs, or send pre-formed responses to email messages that contain a given string of text in the subject).
- Experiment with printing and displaying formatted data in the console and in GUI fields (perhaps build an email program that parses the header of each email message, and displays each part on separately printed lines in the console or in separate area widgets in a GUI).
- Add image and file sharing features to the Group Reminders app.
- Add images to stored records in the Parts database app.
- Build GUI versions of the FTP chat and Paypal Reports applications. Use text-list widgets to display messages in chat and to select column names and computation options in reports.
- Experiment with GUI layouts. Position text headers, fields, buttons, areas, text lists, etc. in ways that allow data to be arranged coherently and pleasantly on screen, and which invite intuitive user interactions and natural work flow patterns.
- Experiment with how colors, fonts, widget sizes, images, and other cosmetic features can be used to change the appearance of applications.
You'll see much more about how to approach tasks like this, as the tutorial progresses, but exploring creatively and learning to use the tools you've seen so far, will go a long way towards building fundamental coding ability. If you learn nothing more than the code presented up to this point, you will already be able to create a wide variety of practical business applications that would be impossible to implement quite so personally using generic off-the-shelf software products. Continue learning, and that potential will increase dramatically.
6. User Defined Functions and Imported Code Modules
6.1 "Do", "Does", and "Func"
REBOL's built-in functions satisfy many fundamental needs. To achieve more complex or specific computations, you can create your own function definitions.
Data and function words contained in blocks can be evaluated (their actions performed and their data values assigned) using the "do" word. Because of this, any block of code can essentially be treated as a function. That's a powerful key element of the REBOL language design:
some-actions: [
    alert "Here is one action."
    print "Here's a second action."
    write %/c/anotheraction.txt "Here's a third action."
    alert "Writing to the hard drive was the third action."
]

do some-actions
New function words can also be defined using the "does" and "func" words. "Does" is included directly after a word label definition, and forces a block to be evaluated every time the word is encountered:
more-actions: does [
    alert "Counting some more actions:  4"
    alert "And another:  5"
    alert "And finally:  6"
]

; Now, to use that function, just type the word label:

more-actions
Here's a useful function to clear the command line screen in the REBOL interpreter.
cls: does [prin "^(1B)[J"]

cls
6.1.1 "Func"
The "func" word creates an executable block in the same way as "does", but additionally allows you to pass your own specified parameters to the newly defined function word. The first block in a func definition contains the name(s) of the variable(s) to be passed. The second block contains the actions to be taken with those variables. Here's the "func" syntax:
func [names of variables to be passed] [
    actions to be taken with those variables
]
This function definition:
sqr-add-var: func [num1 num2] [print square-root (num1 + num2)]Can be used as follows. Notice that no brackets, braces, or parentheses are required to contain the data arguments. Data parameters simply follow the function word, on the same line of code:
sqr-add-var 12 4      ; prints "4",  the square root of 12 + 4  (16)
sqr-add-var 96 48     ; prints "12", the square root of 96 + 48 (144)
Here's a simple function to display images:
display: func [filename] [view layout [image load to-file filename]]

display (request-file)
6.2 Return Values
By default, the last value evaluated by a function is returned when the function is complete:
concatenate: func [string1 string2] [join string1 string2]

string3: concatenate "Hello " "there."
print string3
You can also use the word "return" to end the function with a return value. This can be helpful when breaking out of loops (the "for" function performs a count operation - it will be covered in depth in a later section of this tutorial):
stop-at: func [num] [
    for i 1 99 1 [
        if (i = num) [return i]
        print i
    ]
    return num
]
print stop-at 38
6.3 Scope
By default, values used inside functions are treated as global, which means that if any variables are changed inside a function, they will be changed throughout the rest of your program:
x: 10

change-x-globally: func [y z] [x: y + z]

change-x-globally 10 20
print x
You can change this default behavior, and specify that any value be treated as local to the function (not changed throughout the rest of your program), by using the "/local" refinement:
x: 10

change-x-locally: func [y z /local x] [x: y + z]

change-x-locally 10 20     ; inside the function, x is now 30
print x                    ; outside the function, x is still 10
You can specify refinements to the way a function operates, simply by preceding optional operation arguments with a forward slash ("/"):
compute: func [x y /multiply /divide /subtract] [
    if multiply [return x * y]
    if divide   [return x / y]
    if subtract [return x - y]
    return x + y
]

compute/multiply 10 20
compute/divide 10 20
compute/subtract 10 20
compute 10 20
6.4 Function Documentation
The "help" function provides usage information for any function, including user defined functions:
help for
help compute
You can include documentation for any user defined function by including a text string as the first item in it's argument list. This text is included in the description displayed by the help function:
doc-demo: func ["This function demonstrates doc strings"] [help doc-demo]
doc-demo
Acceptable data types for any parameter can be listed in a block, and doc strings can also be included immediately after any parameter:
concatenate-string-or-num: func [
    "This function will only concatenate strings or integers."
    val1 [string! integer!] "First string or integer"
    val2 [string! integer!] "Second string or integer"
] [
    join val1 val2
]

help concatenate-string-or-num
concatenate-string-or-num "Hello " "there."  ; this works correctly
concatenate-string-or-num 10 20              ; this works correctly
concatenate-string-or-num 10.1 20.3          ; this creates an error
6.5 Doing Imported Code
You can "do" a module of code contained in any text file, as long as it contains the minimum header "REBOL [ ]" (this includes HTML files and any other files that can be read via REBOL's built-in protocols). For example, if you save the previous functions in a text file called "myfunctions.r":
REBOL []  ; THIS HEADER TEXT MUST BE INCLUDED AT THE TOP OF ANY REBOL FILE

sqr-add-var: func [num1 num2] [print square-root (num1 + num2)]
display: func [filename] [view layout [image load filename]]
cls: does [prin "^(1B)[J"]
You can import and use them in your current code, as follows:
do %myfunctions.r

; now you can use those functions just as you would any other
; native function:

sqr-add-var
display
cls
Here's an example function that plays a .wave sound file. Save this code as C:\play_sound.r:
REBOL [title: "play-sound"]  ; you can add a title to the header

play-sound: func [sound-file] [
    wait 0
    ring: load sound-file
    sound-port: open sound://
    insert sound-port ring
    wait sound-port
    close sound-port
]
Then run the code below to import the function and play selected .wav files:
do %/c/play_sound.r

play-sound %/C/WINDOWS/Media/chimes.wav
play-sound to-file request-file/file %/C/WINDOWS/Media/tada.wav
Imported files can contain data definitions and any other executable code, including that which is contained in additional nested source files imported with the "do" function. Any code or data contained in a source file is evaluated when the file is "do"ne.
6.6 Separating Form and Function in GUIs - The Check Writer App
One common use for functions is to help keep GUI layout code clean and easy to read. Separating widget layout code from action block code helps to clarify what each widget does, and simplifies the readability of code which lays out screen design.
For example, the following buttons all perform several slightly different actions. The first button counts from 1 to 100 and then alerts the user with a "done" message, the second button counts from 101 to 200 and alerts the user when done, the third button counts from 201 to 300 and alerts the user when done (the "for" function performs a count operation):
view layout [
    btn "Count 1" [
        for i 1 100 1 [print i]
        alert "Done"
    ]
    btn "Count 2" [
        for i 101 200 1 [print i]
        alert "Done"
    ]
    btn "Count 3" [
        for i 201 300 1 [print i]
        alert "Done"
    ]
]
The action blocks of each button above can all be reduced to a common function that counts from a start number to an end number, and then alerts the user. That function can be assigned a label, and then only that label needs to be used in the GUI widget action blocks:
count: func [start end] [
    for i start end 1 [print i]
    alert "Done"
]
view layout [
    btn "Count 1" [count 1 100]
    btn "Count 2" [count 101 200]
    btn "Count 3" [count 201 300]
]
In large applications where the actions can become complex, separating function code from layout code improves clarity. You'll see this outline often:
action1: func [args] [
    actions
    actions
    actions
]
action2: func [args] [
    other actions
    other actions
    other actions
]
action3: func [args] [
    more actions
    more actions
    more actions
]
view layout [
    widget [action1]
    widget [action2]
    widget [action3]
]
Here's a simple check writing example that takes amounts and names entered into an area widget and creates blocks of text to be written to a check. One function is created to "verbalize" the entered amounts for printing on the check (it converts number values to their spoken English equivalent, i.e., 23482194 = "Twenty Three million, Four Hundred Eighty Two thousand, One Hundred Ninety Four"). Another function is created to loop through each bit of raw check data and to create a block containing the name, the numerical amount, the verbalized amount, some memo text, and the date. The GUI code consists of only 4 lines:
REBOL [title: "Check Writer"] verbalize: func [a-number] [ if error? try [a-number: to-decimal a-number] [ return "** Error ** Input must be a decimal value" ] if a-number = 0 [return "Zero"] the-original-number: round/down a-number pennies: a-number - the-original-number the-number: the-original-number if a-number < 1 [ return join to-integer ((round/to pennies .01) * 100) "/100" ] small-numbers: [ "One" "Two" "Three" "Four" "Five" "Six" "Seven" "Eight" "Nine" "Ten" "Eleven" "Twelve" "Thirteen" "Fourteen" "Fifteen" "Sixteen" "Seventeen" "Eighteen" "Nineteen" ] tens-block: [ { } "Twenty" "Thirty" "Forty" "Fifty" "Sixty" "Seventy" "Eighty" "Ninety" ] big-numbers-block: ["Thousand" "Million" "Billion"] digit-groups: copy [] for i 0 4 1 [ append digit-groups (round/floor (mod the-number 1000)) the-number: the-number / 1000 ] spoken: copy "" for i 5 1 -1 [ flag: false hundreds: (pick digit-groups i) / 100 tens-units: mod (pick digit-groups i) 100 if hundreds <> 0 [ if none <> hundreds-portion: (pick small-numbers hundreds) [ append spoken join hundreds-portion " Hundred " ] flag: true ] tens: tens-units / 10 units: mod tens-units 10 if tens >= 2 [ append spoken (pick tens-block tens) if units <> 0 [ if none <> last-portion: (pick small-numbers units) [ append spoken rejoin [" " last-portion " "] ] flag: true ] ] if tens-units <> 0 [ if none <> tens-portion: (pick small-numbers tens-units) [ append spoken join tens-portion " " ] flag: true ] if flag = true [ commas: copy {} case [ ((i = 4) and (the-original-number > 999999999)) [ commas: {billion, } ] ((i = 3) and (the-original-number > 999999)) [ commas: {million, } ] ((i = 2) and (the-original-number > 999)) [ commas: {thousand, } ] ] append spoken commas ] ] append spoken rejoin [ "and " to-integer ((round/to pennies .01) * 100) "/100" ] return spoken ] write-checks: does [ checks: copy [] data: to-block a1/text foreach [name amount] data [ check: copy [] append/only checks reduce [ rejoin ["Pay to the order of: " name " "] rejoin ["$" amount newline] rejoin ["Amount: " verbalize amount newline] rejoin ["Sales for November " now/date newline newline] ] ] a2/text: form checks show a2 ] view layout [ text "Amounts and Names:" a1: area {"John Smith" 582 "Jen Huck" 95 "Sue Wells" 71 "Joe Lask" 38} btn "Create Check Data" [write-checks] a2: area ]
One of the clear benefits of using functions is that you don't have to remember, or even understand, how they work. Instead, you only really need to know how to use them. In the example above, you don't have to understand exactly how all computations in the "verbalize" function work. You just need to know that if you type "verbalize (number)", it spits out text representing the specified dollar amount. You can use that function in any other program where it's useful, blissfully unaware of how the verbalizing magic happens. Just paste the verbalize code above, and use it like any other function built into the language. This is true of any function you create, or any function that someone else creates. Working with functions in this way helps improve code re-usability, and the power of the language, dramatically. It also encourages clear code structures that others can read more easily.
Note: The verbalize algorithm was partially derived from the article at http://www.blackwasp.co.uk/NumberToWords.aspx (C# code):

6.7 A Full Featured Group Note Sharing App
In the previous section, the "Group Reminders" and "FTP Chat" applications demonstrated how to save text messages to a web server, so they can be shared with a group of connected users. This application builds on the same idea, adding a number of useful features. The message list display can be updated manually or automatically, at any chosen interval. A repeated beep can be played as an alarm to notify users of new messages (a beep is created with the code: call "echo ^G"). Beep notifications can be turned on and off. Messages are stamped with a time and date, and numbered. Messages can be erased individually by number, or the entire note list can be removed at once. An unlimited number of private "rooms" can be created, simply by changing the URL. A new file will be automatically created at the entered URL, if it doesn't exist.
All of the features in this program are implemented as separate functions. The "update" function, in particular is called not only when the user clicks the update button, but also by other functions, any time a change is made which requires updating the display (when erasing messages, when autoupdate is turned on, etc). Notice that the GUI layout is kept clean, and each widget simply calls a function:
REBOL [title: "Group Notes"] url: ftp://user:pass@site.com/public_html/Notes beep: false autoupdt: false call "" write/append %notes.txt "" update: does [ if error? try [notes: copy read/lines url] [write url notes: ""] if ((beep = true) and (notes <> read/lines %notes.txt)) [ loop 4 [call "echo ^G" wait 1] ] write/lines %notes.txt notes display: copy {} count: 0 foreach note reverse notes [ either note = "" [ note: newline ] [ count: count + 1 note: rejoin [count ") "note] ] append display note ] a/text: display if a/text = "" [a/text: copy " "] show a ] autoupdate: does [ either autoupdt: not autoupdt [ time: request-text/title/default "Refresh display (seconds):" "10" b/text: join "Auto Update: " autoupdt show b forever [ either autoupdt = true [wait to-integer time update] [break] ] ] [ b/text: join "Auto Update: " autoupdt show b ] ] submit: does [ if f/text = "" [focus f return] if error? try [ write/lines/append url rejoin [ "^/^/" now " (" n/text "): " f/text ] ] [alert "ERROR: Not Saved (check Internet connection)" return] update f/text: copy "" show f focus f ] erase: func [arg] [ if true = request rejoin ["Really erase " arg "?"] [ write/lines to-file replace/all replace form now "/" "--" ":" "_" notes if arg = "all" [write url ""] if arg = "" [ indx: ( 3 * to-integer request-text/title/default "Index:" "1" ) - 2 remove/part at notes indx 3 write/lines url reverse notes ] update ] ] changeurl: does [ url: to-url u/text update focus f ] setbeep: does [ beep: not beep p/text: join "Beep: " beep show p ] insert-event-func [either event/type = 'close [quit][event]] view center-face layout [ h3 "Current notes for:" u: field 600 form url [changeurl] a: area 600x260 h3 "Name:" n: field 600 h3 "New Note:" f: field 600 [submit] across btn "Update" [update] b: btn join "Auto Update: " autoupdt [autoupdate] p: btn join "Beep: " beep [setbeep] btn "Erase" [erase ""] btn "Erase All" [erase "all"] do [update focus f] ]
Later in this text, a web based CGI version of this application will be presented, so that users can view and enter notes with either this desktop version of the program, or with a browser based interface, to share and interact with the exact same live data on any platform. Enabling different interfaces can be useful on mobile OSs or on any system where an executable program can't be installed.

7. A Few Useful Data Visualization Tools
7.1 Displaying and Sorting Data Using Spreadsheet-Like GUI Grids
As you've already seen in the "Contacts" example, it's possible to dynamically construct GUIs using foreach loops, to display data in GUI fields. We'll build on examples such as the following in a later chapter:
REBOL [title: "Display a Table of Data"] ; Build 500 rows of 3 columns of random data: x: copy[] for i 1 500 1[append x reduce [i random "abcd" random 1-1-2012]] ; Display it: grid: copy [across space 0] foreach [indx text date] x [ append grid compose [ field 50 (form indx) field 70 (form text) field 110 (form date) return ] ] view center-face layout [ across g: box 230x200 with [pane: layout/tight grid pane/offset: 0x0] scroller [g/pane/offset/y: g/size/y - g/pane/size/y * value show g] ]Using raw building blocks of GUI field widgets, even the simple example above requires quite a bit of thought to display a small grid filled with table data, and normal features such as column resizing, sorting, etc., require advanced coding skill. To load, display, sort, and save flat lists and blocked table data, the following compressed code is provided to simplify the required code. Just define a block of header labels, assign the variable label "x" to your grid data, and include the compressed grid code, and you've got a fully functional data grid:
REBOL [title: "Table/Grid/Listview Example"] headers: ["Numbers" "Text" "Dates"] x: [ [1 "1" 1-1-2012] [11 "11" 1-2-2012] [2 "2" 1-3-2012] ] do decompress #{ 789CC518C98EDB36F4AEAF78500FB11228B2074D0AA8B3A01F904BAF860EB245 D9CAD0A2225133720CFF7B1F77D24BE324456A60C626F9F69D1C5B4A86015E4A 3A922778B3199B7445D9FA1996F6670E8763118D21E004CB298735EBF6B02CCE 4EC9AEE3FB74E8CA3581A5B7C8615E447B8D3741B46674DCB5430E94B41BBE7D 822D292BD20F91FA36FC25F8E118F5A423258706341E2C23C04FD975A4ADC0C7 819E7C664D0BCB781B237C9C713271888BA83821CD9946F0B7A355734AEFCDB0 1F38D945949595DA22550EF5D8AE615995BC4CEB8612C87AF26524032FB4644D 0D7AC783CACD9E5C65ACA5FB4C625B8842A9C5B9309D26253ED672FA5B08E3B0 2CD8B065AF401BB9161A0FE50BF945320B56C2A6E1194C2885B45C4D4BFECBCD 56A3BDAE98CAC5303870D663C82C606682B29E929388331FC12908D265119C0B 529F610E33839EC22241D2211517C28E1E740DFEAB279835F00E3E271060845C 14B2B40826554FAA11D3CE91B2B09E8E3692FE3D68FE37775D720A29D75BE851 CAE9C47EDA78B5D51D819CD24E43119B4E8B7A72BAB29EA7CA4546DBBA21B432 0A92866F490F128CF55814726819F7D69E4062335BB35D57F618F79A5A092BA4 35C3DA5582A49CC02388E54A2F9594C50FD0B9BF484719CEF8B4889E0956E075 CF28350AAA555AEED8D85A4F0E69C7B01ACB2F0CBB00C6B85A1D3EBAF4C0EC58 6A44BB5584D0F798030666AE2B05CD842F0CB32CA01788AF7F0C14F5E8C9D07C 25E9A66F6C25EB48BF262D2F37C468213A970043DAB268672F0D79CD501942DA B4C6369475654BB2452680E04F9194F3692E516983012BB6B345EE2FE02D383E 279077B9E598DD2131AFDF4948AE85E9D18A15AAE951F5B4F6BB4D92681369CC 126D54363D2C3EFA6C25CCD84AE564EEA314A0561D6F18561B212FD2142A032D F76CE4E0357865CBC259B56E30D92B46861FB1A3C4F0DC03336B14A1A7AF750A EF1709B22DAB2AA54D4B0CD3B014600B9E647F6E50890DE698A927A29567BCE1 58552A529723C5C6FE5755A9E163C082228BC46F79EC178F9D4F89BDF4E9DA45 B4E0040F22447BC2C7BE5501DA92D754910C6BFB597B083C278ABBAE478E80C2 8F639D15ED4030B7A5CB44EE4E5280C48777992B9CB363588AFF2343FD8D7439 0345348FE1E76C8407BC1F09DC3FDA0E6007AFBF150B88552B535A42FC141721 0D254A60095FFD33E52512A355FA5D7A7F123CEA9EEDBE2B38844B6E60A3C90B BB7AC4D138B399A1206C970086CECC882E7792DBEDF929B4A625736E5161B20C 855126358089D5C66F0C3BAC5463D7511C08825E475E48FB84718B851F9BA1C8 75EC8F0C1BDFEBB6E1A2D2FA7B77BFCFDFCBBF0F1F9404122FD7E8EF5489370A B6ACC52BC297DC28E2F31026CD4DB600991A6EEDA2DD8256BB20D4DD1C99CF3D 01E4A1EA2F6BDBBC3C1692F717116E44CCA6036D2A34F65E8C2DDA0CED062BBD 9D06B0DF12BF3B3762E701DE8C1DF635373D288238318AFB831E46826B442DF9 BB99643DAAF29CDF88E90B6070E1F1012ED5A230287CA94BCAD38ABD62540DBC 94C2E31493034E69753D104F3C214D8AF1A0653C0463573F7CC5D140F8B96E7A 8CD4966C4A8E898CB54F51C442EFD14F02648C3BE90ED36BC335621AEA01165A 7966D44E2CEEA5DD5B2860642E12ADF3299DF0EC766A9764F24FF0F7454ADBAB 525D3BB926D329BC91E8F2FE35796485D04E399DC44E288939C1E21EED2FBCAC 530112C4101C9CA78E36826FC691FC8E10AE2F86B748CC4B0187C11A6CDB6075 E11F5EB590A8854173DD9FB640F3A95828F5C905448C59A46A785064B04EF7AE C4B093023363508A81D1543E6C0AB5AC69A26BE8CD5C6F190F19664AB59B4B58 7869D53532E873A691AAC3E0B6182AF9EDA1514EDD29CCA70FF3C88E856E86C6 A39919783FCEFD693A89BE3511FFD0A86DEE25105CF0641F066B66D1B5223DD8 B9195A154429B5151F4ABC350D628693CF5FE666211DAF59C36AE49CB5560B25 2476315861F83FAB1E0B2BECDCD1B71EBD9C2C6650B03E39887FDB23621E72C3 F888C301354F5B4396E319D48450701DF028E604317059979EB1928C0C79FBB6 2173F1DC44B9D156E916F7312CFE9850D72014A5B91FECD483D32366E2536C1F 19F797225CE5A1BE8EA9FB9A0B07FF2E2D6DBF2694828C5E0D2015B74969A1CF FDF7B34E101F44D4AE90721C3D35507DF3702AE799C15E211C6139A5AA53F45A 7199BB71DC05971DF4C3801AF6C08E7DFAA299EBBBBE78E5A0DA7C3A2FFC7BF9 5B252884CED06E385EE3FA4CF6E26FCD2AA43A765884DC7304A40BF35A118089 F12404BC0CD761894BCF68DECDAF039F5356D0C7C87BF1B6CFC2764FBD093BD5 CC83F03FD2FC2B1641170000 } view center-face gui: layout gui-blockOther options such as coloring rows, and specifying column data types, using the compressed table code above, are demonstrated in the following example. This is a critically useful tool for data entry, visualization, and demonstration:
REBOL [title: "Table/Grid/Listview Example With Expanded Features"] headers: ["Numbers" "TEXT (Note Sort)" "Dates"] ; REQUIRED COLUMN LABELS ; ALL THESE ADDITIONAL SETUP PARAMETERS ARE *** OPTIONAL ***: x: [[1 "1" 1-1-2012][11"11"1-2-2012][2"2"1-3-2012]] ; some default data colors: [blue black red] ; specify column colors like this empty-space: 235 ; size of blank GUI area to appear below grid svv/vid-face/color: white ; default GUI face color ; Here's how to include GUI layout code to appear above the grid: gui-block: { h3 "RIGHT-CLICK/DRAG HEADERS TO RESIZE COLUMNS. RESIZE WINDOW..." text "Click headers to sort (note that sort is DATA-TYPE SPECIFIC)." text "Notice Arrow Keys, PgUp/PgDn Keys, Scroll Bar, and highliting" text "Click any cell to edit data. Buttons load and save data to HD." } ; The following line automatically fits grid to resized GUI window: insert-event-func [either event/type = 'resize [resize-fit none] [event]] do decompress #{ 789CC518C98EDB36F4AEAF78500FB11228B2074D0AA8B3A01F904BAF860EB245 D9CAD0A2225133720CFF7B1F77D24BE324456A60C626F9F69D1C5B4A86015E4A 3A922778B3199B7445D9FA1996F6670E8763118D21E004CB298735EBF6B02CCE 4EC9AEE3FB74E8CA3581A5B7C8615E447B8D3741B46674DCB5430E94B41BBE7D 822D292BD20F91FA36FC25F8E118F5A423258706341E2C23C04FD975A4ADC0C7 819E7C664D0BCB781B237C9C713271888BA83821CD9946F0B7A355734AEFCDB0 1F38D945949595DA22550EF5D8AE615995BC4CEB8612C87AF26524032FB4644D 0D7AC783CACD9E5C65ACA5FB4C625B8842A9C5B9309D26253ED672FA5B08E3B0 2CD8B065AF401BB9161A0FE50BF945320B56C2A6E1194C2885B45C4D4BFECBCD 56A3BDAE98CAC5303870D663C82C606682B29E929388331FC12908D265119C0B 529F610E33839EC22241D2211517C28E1E740DFEAB279835F00E3E271060845C 14B2B40826554FAA11D3CE91B2B09E8E3692FE3D68FE37775D720A29D75BE851 CAE9C47EDA78B5D51D819CD24E43119B4E8B7A72BAB29EA7CA4546DBBA21B432 0A92866F490F128CF55814726819F7D69E4062335BB35D57F618F79A5A092BA4 35C3DA5582A49CC02388E54A2F9594C50FD0B9BF484719CEF8B4889E0956E075 CF28350AAA555AEED8D85A4F0E69C7B01ACB2F0CBB00C6B85A1D3EBAF4C0EC58 6A44BB5584D0F798030666AE2B05CD842F0CB32CA01788AF7F0C14F5E8C9D07C 25E9A66F6C25EB48BF262D2F37C468213A970043DAB268672F0D79CD501942DA B4C6369475654BB2452680E04F9194F3692E516983012BB6B345EE2FE02D383E 279077B9E598DD2131AFDF4948AE85E9D18A15AAE951F5B4F6BB4D92681369CC 126D54363D2C3EFA6C25CCD84AE564EEA314A0561D6F18561B212FD2142A032D F76CE4E0357865CBC259B56E30D92B46861FB1A3C4F0DC03336B14A1A7AF750A EF1709B22DAB2AA54D4B0CD3B014600B9E647F6E50890DE698A927A29567BCE1 58552A529723C5C6FE5755A9E163C082228BC46F79EC178F9D4F89BDF4E9DA45 B4E0040F22447BC2C7BE5501DA92D754910C6BFB597B083C278ABBAE478E80C2 8F639D15ED4030B7A5CB44EE4E5280C48777992B9CB363588AFF2343FD8D7439 0345348FE1E76C8407BC1F09DC3FDA0E6007AFBF150B88552B535A42FC141721 0D254A60095FFD33E52512A355FA5D7A7F123CEA9EEDBE2B38844B6E60A3C90B BB7AC4D138B399A1206C970086CECC882E7792DBEDF929B4A625736E5161B20C 855126358089D5C66F0C3BAC5463D7511C08825E475E48FB84718B851F9BA1C8 75EC8F0C1BDFEBB6E1A2D2FA7B77BFCFDFCBBF0F1F9404122FD7E8EF5489370A B6ACC52BC297DC28E2F31026CD4DB600991A6EEDA2DD8256BB20D4DD1C99CF3D 01E4A1EA2F6BDBBC3C1692F717116E44CCA6036D2A34F65E8C2DDA0CED062BBD 9D06B0DF12BF3B3762E701DE8C1DF635373D288238318AFB831E46826B442DF9 BB99643DAAF29CDF88E90B6070E1F1012ED5A230287CA94BCAD38ABD62540DBC 94C2E31493034E69753D104F3C214D8AF1A0653C0463573F7CC5D140F8B96E7A 8CD4966C4A8E898CB54F51C442EFD14F02648C3BE90ED36BC335621AEA01165A 7966D44E2CEEA5DD5B2860642E12ADF3299DF0EC766A9764F24FF0F7454ADBAB 525D3BB926D329BC91E8F2FE35796485D04E399DC44E288939C1E21EED2FBCAC 530112C4101C9CA78E36826FC691FC8E10AE2F86B748CC4B0187C11A6CDB6075 E11F5EB590A8854173DD9FB640F3A95828F5C905448C59A46A785064B04EF7AE C4B093023363508A81D1543E6C0AB5AC69A26BE8CD5C6F190F19664AB59B4B58 7869D53532E873A691AAC3E0B6182AF9EDA1514EDD29CCA70FF3C88E856E86C6 A39919783FCEFD693A89BE3511FFD0A86DEE25105CF0641F066B66D1B5223DD8 B9195A154429B5151F4ABC350D628693CF5FE666211DAF59C36AE49CB5560B25 2476315861F83FAB1E0B2BECDCD1B71EBD9C2C6650B03E39887FDB23621E72C3 F888C301354F5B4396E319D48450701DF028E604317059979EB1928C0C79FBB6 2173F1DC44B9D156E916F7312CFE9850D72014A5B91FECD483D32366E2536C1F 19F797225CE5A1BE8EA9FB9A0B07FF2E2D6DBF2694828C5E0D2015B74969A1CF FDF7B34E101F44D4AE90721C3D35507DF3702AE799C15E211C6139A5AA53F45A 7199BB71DC05971DF4C3801AF6C08E7DFAA299EBBBBE78E5A0DA7C3A2FFC7BF9 5B252884CED06E385EE3FA4CF6E26FCD2AA43A765884DC7304A40BF35A118089 F12404BC0CD761894BCF68DECDAF039F5356D0C7C87BF1B6CFC2764FBD093BD5 CC83F03FD2FC2B1641170000 } ; APPEND ANY WIDGETS AND/OR GUI CODE TO APPEAR BELOW THE GRID, HERE: append gui-block [ ; REPLACE 'BTN' WITH 'KEY' TO HIDE BTNS AND STILL USE KEY SHORTCUTS. ; CHANGE/REMOVE BUTTONS AND/OR KEYBOARD SHORTCUTS AS NEEDED: text "" return btn "Insert (Ins)" keycode [insert] [add-line] btn "Remove (Del)" #"^~" [remove-line] btn "Move (CTRL+M)" #"^M" [move-line] btn "Grow (+)" #"+" [resize-grid 1.333] btn "Shrink (-)" #"-" [resize-grid .75] btn "Fit (CTRL+R)" #"^R" [resize-fit] return btn "Load Blocked (CTRL+O)" #"^O" [load-blocked/request %blocked.txt] btn "Save Blocked (CTRL+S)" #"^S" [save-blocked/request %blocked.txt] btn "Load Flat (CTRL+U)" #"^U" [load-flat/request %flat.txt] btn "Save Flat (CTRL+F)" #"^F" [save-flat/request %flat.txt] ; LOAD A DEFAULT DATA *FILE HERE (instead of specifying it in code above): ; Not that the "load-flat" and "save-flat" functions load "flat" blocks, ; which are simply long sequences of data values. The "load-blocked" and ; "save-blocked" functions load block which have rows enclosed inside ; deliniated blocks. All of those functions provide an optional ; "/request" refinement that allows the user to select a file: ; do [load-blocked %blocked.txt] ] view/options center-face gui: layout gui-block [resize]
Details about how to build GUI grids from native REBOL code, including the compressed code above, will be examined fully in later sections of this tutorial. For now, the general solution above is immediately functional, and can be applied to the majority of situations where a visual grid tool is required to enter, display, sort, load, save, and otherwise manipulate table data.

7.2 Creating Graphs, Plots, and Charts with "Q-Plot"
REBOL's complete graphics toolkit will be fully explored in detail, in future sections of this tutorial. For the moment, the "q-plot" dialect by Matt Licholai is a simple solution for creating bar, line, pie and other charts from block data. You can download and run the q-plot dialect like this:
REBOL [] if not exists? %q-plot.r [write %q-plot.r read http://re-bol.com/q-plot.r] do %q-plot.rOnce q-plot is downloaded, graphing a block of values is as simple as this:
view quick-plot [ 600x400 ; set the program window size bars [5 3 8 2 10 3 4 9 5 7] ; set graph type and data to plot ]Using the code above, here's a complete bar graph example:
REBOL [title: "Minimal Bar Graph Example"] if not exists? %q-plot.r [write %q-plot.r read http://re-bol.com/q-plot.r] do %q-plot.r view quick-plot [ 600x400 bars [5 3 8 2 10 3 4 9 5 7] ]
Notice that the q-plot dialect syntax looks very much like REBOL's build in VID dialect for building GUIs. The primary difference is that "view layout" is replaced with "view quick-plot". Here's an example that demonstrates how to adjust colors, add text labels, and attach scales for each XxY data axis:
REBOL [title: "Another Bar Graph Example"] if not exists? %q-plot.r [write %q-plot.r read http://re-bol.com/q-plot.r] do %q-plot.r view center-face quick-plot [ 600x300 y-min 0 ; minimum value to display on y axis fill-pen blue ; set fill color pen green ; set outline and text color bar-width 80 ; set bar width bars [5 3 8 2 10 3 4 9 5 7] pen black ; set outline and text color label "Fat Bars" ; optionally add labels y-axis 11 x-axis 10 ]
Pie charts are just as simple to create. Here's a pie chart example with 2 specified sections of the pie "exploded" out for emphasis (the "explode [3 5]" code is optional):
REBOL [title: "Exploded Pie Chart"] if not exists? %q-plot.r [write %q-plot.r read http://re-bol.com/q-plot.r] do %q-plot.r view center-face quick-plot [ 400x400 pie [10 3 6 1 8] labels [A B C D E] explode [3 5] title "Exploded Sections C and E" style vh2 ]
Line graphs are also simple to create:
REBOL [title: "Simple Line Graph Example"] if not exists? %q-plot.r [write %q-plot.r read http://re-bol.com/q-plot.r] do %q-plot.r view quick-plot [ 400x400 line [1 2 4 8 16 32 64 128 256] ]
Here's a more complex line graph example that demonstrates how to plot a predefined block of data, how to add a title, how to add text with a font and defined position (up and over a percentage of the window), and how to attach a scaled grid to the display:
REBOL [title: "Another Line Graph Example"] if not exists? %q-plot.r [write %q-plot.r read http://re-bol.com/q-plot.r] do %q-plot.r my-block: copy [2] loop 10 [append my-block (2 * last my-block)] option-font: make face/font [ size: 30 style: [italic bold underline] name: font-serif ] view center-face quick-plot [ 500x500 scale linear line [(data: copy my-block)] title style vh1 "Linear scale" x-axis 7 border y-axis 7 border x-grid 7 y-grid 7 text font option-font "Formatted Text" color red up 50 over 40 ]
Here's an extension of the "Paypal Reports" program you've seen earlier in this text. It plots all the gross transaction numbers using a bar graph, and makes a pie chart of transactions with Saoud Gorn:
REBOL [title: "Paypal Reports Charts"] transactions: copy [] saoud: copy [] dates: copy [] foreach line at read/lines http://re-bol.com/Download.csv 2 [ row: parse/all line "," append transactions to-integer row/8 if find row/4 "Saoud" [ append saoud to-integer row/8 append dates replace row/1 "/2012" "" ] ] if not exists? %q-plot.r [write %q-plot.r read http://re-bol.com/q-plot.r] do %q-plot.r view quick-plot [ 594x400 bars [(data: copy transactions)] label "All Paypal Transactions" ] view center-face quick-plot [ 495x530 pen blue pie [(data: copy saoud)] labels [(data: copy dates)] explode [1 2 3] title "Saoud" style vh2 ]
This example demonstrates how to include several plots in one window. The default alignment for multi-plots is vertical. The "multi-plot/across" refinement lays them out horizontally:
REBOL [title: "Multi-Plots"] if not exists? %q-plot.r [write %q-plot.r read http://re-bol.com/q-plot.r] do %q-plot.r m-plots: multi-plot/across 594x200 [ [ title "2 to a Power" pen green line [0 2 4 8 16 32 64 128] ] [ title "Rizing" pen white line [0 5 10 15 20 25] ] [ title "Falling" pen blue line [25 20 15 10 5 0] ] ] view m-plots
This example demonstrates how to place plots in sub-panels for easy switching:
REBOL [title: "Switching Plots"] if not exists? %q-plot.r [write %q-plot.r read http://re-bol.com/q-plot.r] do %q-plot.r window: layout [ vh2 "Switching Plots" guide pad 20 button "Sine Wave" [graph/pane: plot1 show graph] button "Parabola" [graph/pane: plot2 show graph] button "Cubic Curve" [graph/pane: plot3 show graph] return box 2x204 blue return graph: box 354x204 coal ] data1: copy [] data2: copy [] data3: copy [] for i -400 400 .5 [ append data1 sine i append data2 (i * i) append data3 (i ** 3) ] graph-size: 350x200 plot1: quick-plot [ (graph-size) line [(data1)] title "Sine Wave" ] plot2: quick-plot [ (graph-size) line [(data2)] title "Parabola" ] plot3: quick-plot [ (graph-size) line [(data3)] title "Cubic Function" ] plot1/offset: 2x2 plot2/offset: 2x2 plot3/offset: 2x2 graph/pane: plot1 view window
Be aware that instead of downloading and running the q-plot dialect from an external file, you can include the compressed q-plot code directly in your program:
REBOL [title: "Q-Plot Compressed"] do decompress #{ 789CED7DFB93E3B871F0EFFB57E0A6F2D5483BC779DDAD1F5ADF6DD93EA77229 3B71EE6C5752AA498A92A0197A299126A91DCA17FFEFE9071E0D02943433BB4E 3E27AABB5989041A40BFD16800DFFDEA17FFFC6B357FA5E0F3BBA22BF54C9DFD CBAE58BE57BF2DAB4E7D53E4A55E7667F4FE9BBC83D7376FB2BFD78BECF6FAFA 969EFE41376D516D67EAFAF2E6F29A1EFD7D8170FEDF9FB21A605C36F4ECE7BB EEA16A00FA6FF2AE53BF2E960F5599170CF8BBE2FEA16BE1DD64395500F8E673 84AE7E733928F7FB36BF07C03FFCBED52A6F55AE1665053D5D6BBD2AB6F7EA3B 1ACB1FBEFD46ADB8DB974A7DAFB5D27F361D51EBAA512BDDE545D9FE8520FE76 D7D4558B307FDB541F8A15C0557FA2E1E7DB95D279BB575DA576D09E01492010 5A872D165B6E9481FDB2DA6CF4B60360BFABB26F2AF5D557F4587EFE0146AAB2 2C7AFE1BBDC2C7FF9EFD7B261F5FA8DFD72BC0FAD5AFFA9A3AE446B2AA963B6C 2CEF00F711B85F578F004E25E0FD7CB5526D972FDF43838BBC51CB87BCE9DAA8 E06BF59D7EAC9AF7AA576575AFDA655EC278A91D1EEB3F146D5735FB999A5F5F 02E1D5FCE63AFB462F912D6ED4D9B7DBA2037C39A42DF216DAABB66AB327E4A9 F56EBBC49EB767778AE021945B80F2A580F28BBC2D9640E81A40B40ABB037DB8 9435BE801A3FF6357EF8E543BEBD879680668DEE76CD16C859E6FB6AD7A96AF1 4700F3B9DAE408057AD6D6F006495CE8E6F22F02E8976AFE26FBC77C4B2CAECE 7E59EA7C0B3077B55A56C82040872553BAFD5CE5AB15BC03E4E8AC06C6D64D38 A437D04101EC875F564D03DD802AB9AA9B6A51EA8D7A2CBA0755ADD7AD66A6EA 1EB48A286A3F3D52AFE9545D15DB8EFAB205742EA133BAC1CA40D3560EE647D0 811F253B10345FE60B5DB604EF43DE14D5AE558BDDBD5A17BD0EC0FD18C0FD54 20E7E734FCCDAEEC8A2C20AC44C24FD4FCF64654FA4DB105215A225E33C02A36 DAE84DF50118A65AABFBB25AC03720F72A40E54F018A68FA87EF090F4C712478 BE75342E3630B80F5AD5800CCD4AE2F3518C02051D8F6B46C112FEC0F70EF500 B039FC2531F18800454784B58A10F1BAA94B8D785D528F5AEC12B5FF3981643E 591047D7858E01DE10A104C090EDAE2CCB0968BA0794E317071068F5EA8E40FE 6A034A0E74F026CBDA2C2B8D1ACDB2426B9D6555C3B2EC9052168B262771F68F F4070D10E605B2D606342CE8A13B5F03A4A7035DB8811279598A17DDBE067D3A 37A27FE79EAF2AE8129889F97D93D70FC5B2B5DAA105990416BCDF15BE7007D8 D7AB6CB75D69B019DB6A2B44A2DDD575D574C3C73046BD45553E280DE3CDCBB6 025C38ED492F1153AF48D7D3D3CCF466861A421B56FA0CF0C1AAFD0FDF67DFAE 40B3ABBFC37FAC65FBFC83BAB9FCE20BB459B757F0DFCD4FC13CCEBEB89EDDFC 0407D529D0DBEAEF4065BAEED097B7A09C871FF3E26CA59765DEE83316005006 7907225A966AA1D10EADD0E6A086E00E9A5A60BB1F8A56C17F5BB085AC00EB06 08083A82E104B5D4BAA936AEEA62B758A0764756837A46FE88FC4A4D48090385 F754BFCD37647ACFA12B024007D4D5EDF6BC8376BAA65AED966848B7FAD18001 B12E8094C65C5D4E4DD541A7573B1664543DEF6C8F1F4149B3615F361A581014 1380B2C6089B478B8C83841A2D5A70675B48B515562DB497A6C6F7BA43C8A019 DEEB7D123DD00964A2515A196A81C2CEF6D90699DA1537CFF27EF0AC4F94EB07 E53AF6BFC2DF19A8C5563C244D9D6D1BF108747EF658ACBA07F16C9F81DF908B 07FDF0419DB5C59F6573EB5D590E9F35BA05DD2E1E0086C0D0351BD9A5955EE7 502A5B57DB402AEDF3655556617F41E6860F1D10E075F17857C725ABC76D0C13 C8A86334F419BF0830133DEA333000191980A060EA2913A5EDF6C1D3D57E9B6F 8A65541A9E67F5D222F000438D7E4C1DE35101758CBD0496754F1E1FF4D608D1 739A606A7978331221610AE6CBBC5B3E78ED7C0516352FDD4FE26D45DCAC481E D4DE7C5F15EB35FC435869EC9755F667DD54501E547C4DCC4B5F3ABDA9B345F9 9E95B36FBC58AB89E3BAA99A1BC7CE3DBA83E1B6EF8B9A04D80D82140D3B6C00 E0519F833B9097A041567B6020E0D0A20B75F233F036201243F827DD83CE8549 C7B6DD0195487F234A906A8414FAD6839B55EED0DD8032A00B040014CDA6AA75 032AD7F9CD383634ACA849518EB185DC330114BD2F40DB5F8670BEA9C83B0457 A8510D4F6E406F376441CB42AFB813971F71FC1A342E366035A39A1B05E99EDC 09BE1235585F0DDEB11452FD75D1B484C862B3DB64D5DA5688CA03B551D6DE19 4E8C01E2C7F21AF40B3C0960937A6F00268B3F3EC08456CD05DCE128467BEC5B DA2263044C3EFCDC454FC32777A76307EC5EB362DF353DACBF6534BD8ABF8D30 28C8E3DC586BF7E4190C8AF50D09F2FE290C8AED7F0ACCC7A318EDF1A767D024 765ABDACB62773E8DF1A9E4EE45036ACF3DEABD0FE800AEDC738B41F5112FD11 C4F74F540D23F0F013203E3988D10E7F6206356DDD3C9740C89ABD5721FD0115 72884049213981404F928C2710E8B064F49F4A32F0738C62C714B2E860A9B7F7 DDC3BB319590009EA8BCAE764DF77048558D4BB7F4C7806CE8A4B9B0356A410A 2ED54DB1D4EDE714E1E4701CBA7BCBB26A752BDD60F4E5ECA8EDFC2EEA9C6813 AA04F39234574E26F9A2354A3633EEC095F9FD5ADD5C5F4FD5D7761E334DDA3F 314DEA9A9D3E6E12448535CC6EF571F4F15402E057D94A2F8B4D5E7A3670D0D2 E3CBB77B3537E3F94A5D9B11C2B7148323AC9B6B3509D0313D9525A9A90937F0 F55718B59C5A503FE39FD0A6AD9364BDB7C15C013DFC4505E47DC83F681F7F69 8BFB38E48F1F24E46462C6E0A83A8571D871998730A6E9A9D2107669D9546DAB 7002972C6C1B370D5FA8B03300E874E109BB135024CD223CCD9CA989E0128E72 5CEDA7C4D3C84452263996BEAC36F5CE85DE8359EA50E91FE536C75D18210E40 E102D975521C82426EB6FC3A41B41154E1A7589BB67F063C7EB495ADBECFBBB1 B1862001EB5FAB78301307024B5C593EBFB0A47FED517F3285C306042606A3BF 53C1A4BDC030A96E50B3E2A2424331C3AE52ED43F508862DEFCE5BB5D0B4EA83 337F2CFA6EC836B655DB691A88448E8876F05ACDCC9B750E28A9B90C4281A45F DFC95A18E448F2668FBC299F4F42B385F27BA3A612167246BEFAA3E8C2185B4A B843B0D0EAF5E5ED1B94D2F0CD1885ECFA2E93D17DB5219C678D4E4DC5C84474 B1D114459E9FBB8812FC3DB78125FC7BEEE24EF8867D21FA1BF4F97C187E6ADC 2313880A7F9D9BB894F9E7DCC5A7DC3043F0961D1C5FE023431F4FA914DA8681 AC57FC1EFF9EB05EE02283E17AAA9AE06A3886E12BB56AF247BBC8323D04E815 0B02AE62B647837FD6032127E6B33B75F60BEBCDEC6D500B571FA05767AECE20 60B8CF6AC4172EF8C1FF30FAA2E1E5B70C676FF89810C283173C685843443E61 44F78072FD41377B8CF5DFA313BEAB3FB7EE9209F93908A61554B3CB5DD3EC19 E455C802C1B306CD0434B1E300A37966F11DCF0E68583303C3F184353508620D 1AAAD4EB4EC5958B6DABB1545E9426F4AECE912A52F68BEDB2D19C6710889B69 10399444CE3E301CE8857A5D014E960F4C85A417FD1615E579C7AC854E0DC5F4 0D7127F9BA030CB86E20D2FBD03291E100E0B119B2E4264F8EE86EE51CC7824B 8DF7A4CEA01CB84E9E27EA6E7A64A230823EDBE001CB69283609502B7EA0291B E0125426B36F629E98E8C45CE607DCC9DE1B71777FF6D97D53AC8E0B212B5735 C7A17DE61F6F1B16625EB505548A77910C7A39736CEA110EA37FBEF8BD3A1919 C45918C137E1F247CD5A6B592163ED300F8106F4EAD34B308D392553D6F374BF C0DC9084396C837D9E0A09B5FE41A8035E85A89F4978523356ADF04200B2F457 093738086C57E5AC4F6086D0551B45515F4D323B44FF985AA1C106521889D4C4 767FAAA484523FA777D343848E804FAC4B40E27310AC1FF40E18A18459D3C055 240C320F5F30E90605088F8151090A84FAEAC5687A0AAA3E01BA46474625704A 10786EFEAFFFD3FFD5340F6B4E52B02FB5F347ACEE8508EBF509F1B6F8CDD46D 2CD0F060A0F64F576B42A3459A2CA293E1F0133992636ED4DA5D8267622B7AFD 1CD64B18633F9D0BE105E67336C419184F46BDB3997165985F4A5E8F89383DC2 BB928BF3BE783613BB0C88147B6FF2E6FD69EC6DE60FC8DFFBEC416372AB637A 14C7DA7C47F4B000141FC1D4BE550F94B6C646AE061E874696796BD203AA6D69 03C03861A69FB7AAE8F4A6152070CEDC740888D26A6C4A22CFB168E13A986081 A39797A89D0D608C3E99D99D7932555F8170DD0D15B8488961864E84A6458A8C 592D4A144AE5A3784A0C525EFC0BE412CB059EEA8ECA09B7EEF499BC8332A245 3C201298438B03036C22340B7D6C8E6EC061D6F03BD7747A1DC74D11A47FD373 C473388ED07F4EC04A4C4522B0EA18DC4378B7A234F3042307E9F6CD9815908E 556F1CAB50B78CCEC0C6156FA7FBEEA8E245B31CA3C88EE088DF0490DA8E9279 5303198E88554A622033E54D7ED2898212456022050A8FAD58D5981A6BDE36D5 6EBBCAAED5A40065CFBAFE18B7489EB85002756C45004E7128D6190CFDC24BA4 51BDF17CED39AEDF617AA73DC08809D244170DA7091F08319B8E39FD7337676C DFF2D3BBF1813172C0B27A69416934389A0E4D6A50BF588711458E54F9826F29 693A07146D31AC881989642ED0F2A0D053A400A6EF404A4CB4C2459EB2C51477 5ED8C24C6555E1081F0BB1F8F31611F840B649A389420C71AA2A556BC88E6A30 03958023D666B03E06F87583937653BB622CB691C4BD9CE203CC3E41F1DACF9B 37C957230B31F8F92930F7E4269419B34C50B3E45AFE104A385645D4CAC7D050 2946152DDFCD6BCFA649AF6DFF2287ED096ED99E750347369C01E01924CF92F6 DE217BF984E47F68BC2261788541B1818B1BD1C85342153FFA78F634E6CDE707 223CBB86C2B14F1BD6FFDE88C373CCCECB020F317A8E74FEF4A002FDE1DC84EA A15C1E15F3C1CAC2BCAA61E6F2807BE6CAEA913322EE1405AF8B56E65170687A 74BD01C1B404A74540ADC9AD008EEFD88FC1F158CAD990A825F0C75103D4053B D9096631D42D37C5095E615F6726973378C1FD77D91FC13B21CF38BA99301593 60950054C2974A08CE1A198910F2339CB8CC6DFD9B3B0132E5455F98A686331B D9D88B02B811D70F65759C574D6EB8DBB1891A95DD13182FB826B8FB04FD8DC9 AAA96ADA5A407B60C4563C4A6AD2252D05B4D13A0713D4F0532C9E2264BBCAF7 E7CC84D802F273ABEF116854E9C4E0CF912594E41C043F6E5985A111FF255657 12CD9FD0E2103AB2F03458AF4F9269802B927B831EC496F7FF8CEF87FB6833DC E54AAB631F0B81479DFA09AB8ACC30FC341A2E89F92743E618F443A824D61CE2 92961F3F292A9FC78B2C472FC7DFC44F0D994ECF6EFCC00C0BD774756D512AD5 046E27232BF5412F3B988100A639C72FA86F4C0255A4EFC15B6316E82D7D0FDE B265A097F83578678D03BD1D6411468388A6D2EC54C6515C13C43D840EDCB449 79375A6CBAA1B566DC91F8A0E5E48DE390DB21080556BDD1359098370B020083 C31F08457F09CA233BBC1BE0EE090BB1D265A1BF30ABFD0F74BCAC9FD2F566F3 0CB8E2BBB6A10D6EC6B75080AFA29329849173202DABAB3D4FF40AF3CF5048E7 546262CB82DA4CCCCDA9DD78F95C2AA9F158FA6B1ECE15A57586A88CEBEF71AE 892541DFED6A53494D0F22D80D05D10890B0B3E895F6DD89F518057247E1344D 278A3A5842199AF4661E17BB73BC6B12E5F5903BE71D2FB7C9D27E0B02651EDA 2C405C94B875A56EDF60229F01123A5B020C785CB730479B4BC0B791DB25E7FC BEEAEBD0A91BD27CE0DF99A0905CFA7A2382B4864FA6C3445F8F90305CE82891 90BF97387A83D914851B4DAA8A18FAA159666A3197987228398269EE0C7060D7 E1740635529721ABCC68AFB3C04F6A0942D4A428D113AB13FA12BB86C5F360E7 B07D3EDC8D2C9E07E587F3344C6DA36DF947676867E458E414A000558E478850 4531F90A26715ED8D2119C68F10C8901262D2317655767ECF6719486C3912E23 EF53258905228305DC06EBA158889DD75EA4AE128AE00233380FC65C5F4998AC 015836A2B4C3F4240C0689C7D4B8E410E063F0E9C01ABBDC71BDBA27E4B5EA0C 03B2188FF5447B3B0236F363446D76798DC1DFB2AD68BB3182A7D3124C38D69C C471EEAAC4A3DBDBC4FF672805F7C566B0215724D3D768CE47A6CEFB1A07A67B 3ED52BE1AA16145E48EE15602E3D96CBC69E3C27B13207CBC89C7D769DF07A2D FB275A50F1ACE442F0E9D4A54F63E79F903B77D4DF5F54FD5D2CA0077CE68187 39C2D4A7BB6D0A4F08C8C0E7B37EC12B11653227B7FCD5024DF678028F4F7F3A 817FF6F2701456618C5359A31557F99E9BFABF40D5C70B5445DD7B891FE319E5 7F78A02A1542D078F00FDA1252EFC4D276950F384F4D30FB638B53035C64C30E C1D378A6ED9874E6779CC970066E8D9A04337020A995ABBBB997A75889E575AD E9308CC11CC22808C0956D7BAA06BF4FD08887A22A7F03C1BC97C4F212A8B9E7 5375800ACD5637AD9DE783B9F0137ACBA9ACA5E19D70BAECC769BAD8E8A511F0 31C27342A91EB6E61F2FB0849F431C2670E43D19246F569E16AB4B4D80901A49 5372C07E0FB5D4FFBE98D728A0016AFE3F8B7F914A0CCE688A5C2B1A24BB574B AA143956380EDCEDED9DA91F6868EC31F52003E065804776450FDA2B942C318A F621AF41C4F0102EA8AA7EE0DFD6CAB4FBCDA22AED7622516BBF31B349B7EC0F 55F181C1EE58C568B6490714F5C3738978C5BDE7FD31F0A7EEA259A6CD2DA47D F5F33B39C1095E785569272D752790165A694130935B55775737A365F6AECCED A199E578984BCCFE9E77DC8F4B54E8ED11A1D85ABE41CFA17D31F47E74D3F7F8 7EC760D3B74C44C4ADDF322BE7C806F003A991A1AE3CB2195C36E9B6844BE0FF 3D1BC36576D0607BB81CEBA7DD241E7422D82A2EB1167761C4580DBA364A4121 2B82D50E6C1EA7B4DEFEA4CDE3812A71654FE5DA017FE216F200E0D816F24121 A7C15E8F12F680BD07CB25FB91DE4E3E68D1EC054F8F3E05D86E2A4FF2C700B8 DD692E2B5F85427411F2D26B4FB9E772CF481F046A93E864EF783075EC91243C 754C9B9A174D350F4E31D17CD9C97CE210945EBC36C9F583EA26831EDDAA647D F13E05A04EF9D3D1ACDCA0892D6EBCEF3304194EFADAC7A203A36AFC88D8B12F 9A25481B7CE674C8ABF90DCD581FE204AF1CBD66FE3010FCFD3408AB22DF60D0 C442B0BF9F0685D5AA180CFD7E1A8C7FA514400FC3FC7E1A103E7C5A74C461F5 664CBC2238ECBB0E784A0670FCDE8DD8B97AD0F96A5857BAACF8E7ADF5025D48 C56D92A7F7A2E7D6ABC52DCBBC3EA186EEE5C0731CBA83662FBF3BB440F09943 A9313796859EDEE8AEE6791B465F9B6ED805F376868D6604CABDE20AF4E6227C 33EC37B276D84CDC7766999775DF058F3FEA680860AC70B8C2951BD9D5FE2E00 968E36D8C2BD6950D61AA28D565C42BC99ADA3E1606364920C3F0B9735B704FF 341DFD8056E0DF0422534AB8C6814DE0EFDEA0771AE2E4489D8BA80EB79ED2F6 1D2D3353799CAB48341EAA7291AE3282798F0D8377EE0F3711AE14480DFC7F98 7F36E6EBAADCDF575B83108309468B453EBD1A20BF70DA76B008E3E7ABC14AB1 7FDEE00964923267F81B66FCB8C24E5DF6EB327C9F41189838F3E903620547F7 F5A018872EDC396CDBDD66A1299E45D3F716CF99C7C882397D7F34E9B88129D1 8A2D65BBDBA81A0FBAC70ED3DE4F3E2BE55635B743AEC1104C3B1BB832F755B9 0AADA71E24685765F1218C082E1AB9D2C1B8DF860F1EC1A50D936BEB5D539721 9C0F4555EA3040F8FE217F5F0C1AAB1EB7830EAD9A7C113C2A75BE0E1E2CC103 D4616B5D1E82D9E4F718090B9E6DF30F61DCB86A70E939F412FFB40B2B61F8A5 ED06B09BAA4A4E072DE5ECF6065CFA1607F7CC68B66B0B81C4B8AF89240220BE DC8A7764ED9A4A23BF5CA8610EBEE81F32930F319D08DA38CEC48872968BC5AF B0CD83F90947D75AFCA9EE42398DD432EED1C4E20D7C7E402ACEAA58C839D74C 0E38A1AC04FE83FC354F0C507ECDD1BEF0090FA2273CE7B0B596D50EF9C01390 F681E0DC5CF92040DEC16476A5EF1BAD5BD554E69A03195FFB37323B2DAF93B9 3D6D5D55ABB65205DE81516C776D444A4406116C3E101CEA14FD136DE1C47936 544BCFAF815E48243BE9236D131502D9E5ED2EC882D15B545C182E5F623EE1CD 4F1015D304BB3A5C99925FFC88825FE9823D53BF2DF89CA1E8FD9EDF2FABD112 497396E20A3A4E631A2E1C052C333CB00E3FA90E4F1A28FC662ABA7D9BEAB72F E67B1F176439FAA86318E933B0CBF5299DB6E50EF59AD3E5FECAA87F921C1F85 F6F62D1EB7BFD46DCB71544D5344BFE86E0EDF7777ED94459B58E4C5F5F5EDCA 39132C98E9E856F37A66926A85AE43CD972CDD43E9E6F54172E1676F8B1DA216 7E003FAF0F660F87C47A3DAA58F7AF131C4608C59C3A73F1414F21E13DDF72D0 D12D36F64603663073E3D44867C7D92BECD56BEEECD00ABCE68E8EF4F3A84133 AA32C14407AA5BAF1819F1F54855B3BC0506DA285A32C16F0E9DB72CD423D51C 2D192ACAC3655F8ED831C82172EA5860F0730A5EB1B1A85882A02F20E658D5B2 AA5654AF4C9F3E67924775D354CD3BD5357BDA2F600DAB9F808CAC988C34CB79 F396F17943A7D99D4949F4C97E702CCDCC1C28164BDF79FCAD0997D1F7B8BAEF A85D5B770F06DE67F8EDCEDE66A368CF3ECF0E3157CE46D95803E089D7AC59DD A5261CCBB6A7455A28F4A1E3116DFD026F0873DBF9D7F6CA935D8BC8C8FD9D6D 04C104CCA3F5E933B7A91ADFE39D2734B1E3A70868596DC187DB76624A1886DB E7C64F1649CB0EE6E09D20F5D1F382CD749ABBBB4F3009A6B9ED7119C8DF7913 6CEE157D8CA96A2AD8842B40F6D70428C98A32BF251C7B169CC26BCF763E7D59 701CF2450AB23D5238D5C018331EC2AADDAB43076744200F0F9B4E1DE60E4ED5 D87A5918DBC06333FD622C6A7977CDCF84CE5B12F734E1F59C26A78281F7630C DC2719B83FC4C0FD3106EE4F66E0F135CB00D5FD0803F7A30CDC3F8D81FB5319 B81FB259BC1ADA3F8F81FB218FC490ED2AE14762E014560F8F9592964EE55AFC 6B58D7ECFC8FB88F32DF3902E658C4837CCBF5D40294FA43B1A645161B5540C7 AE6B005ADED9CBFAF063088A70E39565936AFF3305B8C44F8A6F5096D1C76429 82C9331E194AA7D562961C58EDC7143E831CBE093662AE36C8602AFF663A2527 1C26B26364313DFB5A71C7467BF6A4B62FB86D15371E10C8D3E7FA24FA88A8C3 C7254F72C88CC123EC3CA842031F192EFEA153B4FDD59C6A38EA1FBEC5CB5629 EB30BAAED9ADF6D9BB87BB4AF923B1FF50E8C7AB6F9AFCD1E7840DB7062C37AB 564483BFDDD6BBCE5E348D773FF364115A188DFCF262B44B52B3D95E31798EE4 567DA73391C1EF2FAB94D7537249652E0544C4E1D61ECA30E4CCBE636958EEF5 D83E343FAC4FB421CDBD90F75D0E639BEE8BDD1D3B009ABA03133FFDF8652307 EE21F1D7460EABA49F377CC9E34F7C9410BC68F6A9870331218203238CAEEEE4 1E251E46B7737249EACBB58037781032EA8CCFCE6FBCBB6F3977A6BE90E3311B 40AF3DC1C28B3F6927D83A5FEA2BDEE91C28028677F365F010C3A7748FE67C01 33E150796EC187C27D23DB2E6BF36D9BB5BA29FCEA41026D83DB4617652E963F C2DB45EF9B7C2F38C7DF46DAE885DB4E831F7FFB685B941FC45A89BC83F4CB37 97F49FD8C2175C46FAC59B67F3D5F3B877701969F492F9016CCE40F20C31CE1F 8233A74FC902FD46AFED3E11BE73BBD9953A3857F47774418739DC0DDF9232A5 ED48AAAA79BEC79136A3B74FEA81284486226C96D388409FCF40CB9F1B1FF61C E78D93E8D2A204AAA7EA3FE3702156A7438273F2BF8675E2DB9000CA0810EC47 00E1C4BAA9C6636E48D6359C811857733416861B945F549D0CB887FB117A926A E2F7338BC8082DACF3D9AA8CF5F9B93969D53C84665B3528BF0FCAF32F732A9C 2D2FC4C13D46927292EFFC9C8FFA9B0C8408C9776E6E6611EF783C7729DA2214 77469AC58892A730EC0F76A03FD081FE651D0871466C0EE8E21CE3188CE5FB04 0B0C683456627FA8046E541B9D5A4899B45B4342B1A43D082C953681838FE2F3 1B073E630E25058B45EF4862E9686EB3A3DA378996DF40C30426DCDFCC7871B5 01D514C6E3AF515B77B87669F6BFBB9CFA6C906561B6975A5D42F7B611287FF3 DA68D7FD0168A2B4806D36AD3AE8E6B719863ADFD526CDDEECD298D3968ACF60 2C66DF444AD2719D9124DCEF47E56D16508DEB230B0A1C25B9311E5D3C559F04 5B6F6515D763DF0989520E7F58D1373FCDA8CF4DF21E7522D8240242456E35BD 496C048907728011DC4E0CC70AB61BEE4DE8CD4FA5FE2AB4ED3C7C2578F84862 8BC7C221552A60FC42FB3E6561CC521315B70B4AAEB81F7B3350DC01A00976C8 75C62431700DDB03037A2AA3423468A7BAA92E5F6D24C54594BF6F568E6BF902 01ABC358589D0E9B98EB056C576C89A9D4AD12DAFE20B4FD516847CDD0E4D821 E0D348ED8FDBA8C93E009600C11E961D1DFD729C8E6E178D54B861CACAAA7BAE 7819E0B3D01EC1F44AE00CD3525830DC05DC2638404C91B4DA34159330F23E80 013F8FC2E8837EF4613FFAD3FAD107FDE8C37EF4A7F563C13EB7A5943FBA02E1 F85FF161B13CBDB18DF389C6465CF93C188B7D357147DE48EAEABEF3268DD670 DA6A43CB816DD159D5837319FE7A4CEDCA06EFB8493EBB86D2EC518A6952E726 C3522B6D8A76E9FA82C0F0C150F7C3171B3502F08325B7762986861B521D6268 77AA836994D2E1FAF0D4BBE1F373F3D31C9E1C10D1EB55DE9FE874ABD9AE3868 C73C9EB214B94E792591EA96C093A301B6C166CA636B68612DB010E6392E2D0E C66B0D0C42C5EF4F07EA162D0D648F17CB4C440BDA14CCDA591A02B411C661D8 8716C277D13022732B4DD6C9BFB0679471F7C2E248A7B8CA563F8A2AA303C212 B6A81CD0113FD63A8A0921314E5F4A7CACA3967204BCA395AAE9FD91945B5C8C F5C59BCDE44B63D512EFF607DE1D74D10F7AE7CE26A4DFB18E4DB6385EAF3F50 4FE8DCC45B67F712EF9CD24DD5331A35F14A68943415ED3BB34CC00BD4B817D8 AE40DFE3325D53EDEE1F5CB414A3BE112CABFB12CD582D4BFBBE113EB644AD2C 340CACED78996E5BD11159EBAA2CAB478C4A17712EC4C8540A3F2045726A15D5 382D3AF3DB46D7B8726ED622298A0DD3245A46C7845017D17E125CAFBBCDE90F 1695A6195C93C2549F5D97EAB74D78C00A8508B13399281D0B9582061BB5C285 9EEF7EF58B7FFEB5A88FF47BE411EC3907A3B5012453DF152ED63649033A7C85 E5CFE137676C20D967B633572BAD6BB5C0442E5A04104B10C3ADC2D43C823D14 91743EA54D0A21A8302DEEBB265FF2711972D77A70759BEC3E1D4286693AEF3C CCE15A28F78862B034DACFD41937CA87C8982624AA373B78BBD0AE69EECB84D2 EEA7678706C658E3B316A4DC48DEA0C074B409FEF91BCDCDC6F76AD7B8950D5E D2A1B381D9D2D0B85EDCD630330786E0D3BBE8141919699E2A71DC8C88321F48 82960047CFBB247C3E51D039F62A64FAC901555F8699C7F106996A35D1EBB536 9C8BE7B934FCD62F34E3111833D30FE2761FAF0A3944B4B4ADD8A7A4B62C1BE2 204895B7F61E11780D92CEEDA3AA894F3AAAADB059199132E46F69B67B8367C1 319832662FCF2A5DBBE0BCABB99F893352A39A839111AA9271B00857E16BC9FB 6B73C1F5638E6A91051CD59D55E3D682E197AD51056223C55B65AA1871D9B562 29C3E4B1D1E125F38416F9FD365F94B4E3C574B5DA6C803AED59423190987698 6D06FA86D77E3959CB29775A8AA56944B34BABEBB7CE90D035DEC64E97F91E2C 09F2022EFDFA83A8702889BB2CDE9A84313E1F81A6CF3481C27B6B0A770C7678 57E6DA141CE8D5038B92A6BB350CA12F3679A7C1B75802A1CD693D0C6E509A77 11E1DD356002F0686122E0C30DB9D974DADC0207FAE3CB37E072F6183602C6D2 974A7D4FA90EB4903F046986B329567864508982FFA5ADDD151B9380E73732B9 D6DBA877787C0D6D69401A59D6A2815C26D0323C9676224FC1C4136D3335F912 D363CC7198546B3A1D6E050E6085E9A8F695BA1E9C52101F72E429E5D56BD514 F705A660583853E6838908B5C0AC907EC57D1AACAC26181E4895558B3FE2A1AE B6CF8133313C9872D9E8BC33A7743247436DD46840DA479C2DBA84895850F163 2A2562FE64BB8577109530A8B8EEAFA357B8EB57EEDF090019959BCE8F22499E 4FD8B425926413D1624FA6275CFE66EF4A6774BFE252F40FE58A6CA0F5227337 A19F7C91903A93FE1752AED4401E0FCEBB41BC7D2771EBB9C853F15152791749 CEFBF4CF0CEDACE26981662B4DC93945B08D9042F789E27CE61F2DB1DECBF20D EE3612A8C29F6DB49F911472C9474AE1A05B7FCAD26E410D8CE6B36C9B8C7B80 131DC21F4E20B69AF75702F3304E0D1C2E556C4075545D5E66D41F6FF4F0A561 454C0532954CDC14277DFC529E5E2D72666C57664EA5D0CFA4D7CC7899B37DCB F49F7679F9CE55335872434B24DAC5A6F03B8228BC67322F6890B7389BA0156D DAB515704EC8D2412FA91D8F2599A4811FB9A1CF9235EEA7AC2F7E247710C6DF 1C216703CFD4CC06860B61F6742366EAF40E43C71BE75C2C2864F92556F6B7C2 ADA2DD47A35992714374DCF189EDC803F2718FD36D0A2F82516781D204A2A083 92621BC3CC76BA17B2267EC2C93D63D2B06982FFACB08564BD32D09921E2E808 3D36B3B34499544AA968C90AC4A9DC7B881D044A462891BCB5E04AEA994C7D39 55EE92B1D89CC42AE339AD401303FF2281A6C3437180D3572944837ADE50AE4F 807EF006138C264CBA7DADDF193632A3C27B7A79E68FA9AD9BEA83D3E7617DAB DCD9EDC3DDD9D2004E68A78971CAAC3D90783B70136724D3B113E74572AAB8ED 09E92CDBA9E921352BE5595AA18B31B32351463324DA654372452292CA467FD2 20F8DE7176BE8CB29A42054C703E45FC126E92F1195CF36C3ED55BEFD0BCBA7B F55FAB2C8BF4F3A50000 } view quick-plot [ 400x400 line [1 2 4 8 16 32 64 128 256] ]A complete tutorial about all of q-plot's features is available by downloading and running the "ez-plot" tutorial from rebol.org:
write %ez-plot.r read http://www.rebol.org/library/scripts/ez-plot.r do %ez-plot.r


7.3 Drawing Charts Using Raw GUI Code
It should be noted that creating bar charts using native REBOL GUI elements is as simple as drawing box widgets, each sized to the numerical value of items in a list:
REBOL [title: "Simplest Bar Chart Maker"] data: [12 3 9 38 1 23 18] gui: copy [backdrop white] foreach val data [append gui compose [box blue (as-pair (val * 10) 40)]] view layout gui
The code below adds a number of features such as text labels, randomly colored bars, and a 3D look using buttons instead of box widgets:
REBOL [title: "Simple Bar Chart Maker"] data: [12 3 9 38 1 23 18] labels: [Jan Feb Mar Apr May Jun Jul] gui: copy [backdrop white across] repeat i length? data [ append gui compose [ text bold 30 (form labels/:i) button random white (as-pair (data/:i * 12) 40) (mold data/:i) return ] ] view layout gui
This example adds variables for auto scaling and sizing, a gradient and colored grid background pattern, and vertical bar layout:
REBOL [title: "Simple Bar Chart Maker"] data: [12 3 9 38 1 23 18] labels: ["Jan" "Feb" "Mar" "Apr" "May" "Jun" "Jul"] height: 11 width: 50 gui: copy [ backdrop effect [ gradient 1x1 180.255.255 255.255.100 grid 10x10 220.220.189 ] across ] foreach val reverse data [ append gui compose [ button random white (as-pair width (val * height)) ] ] chart: to-image layout gui gui2: [ backdrop white style txt text bold (width) tabs 20 across image (chart) effect [rotate 180] return tab ] foreach label labels [append gui2 compose [txt (label)]] view center-face layout gui2


7.4 Creating 3D Graphs With r3D
A tutorial about the 3D library "r3D" by Andrew Hoadley is covered at http://re-bol.com/rebol.html#section-9.6. A nice business use example of r3D is available by running this code:
do http://www.rebol.net/demos/BF02D682713522AA/histogram.rThe following example demonstrates how to edit code in histogram.r to create 3D graphs using a block of your own revelent data. This can provide a nice flourish for displaying data graphs in presentation settings. You can use the "asdfghqwerty" keys to adjust the camera position of the 3d view. Simply load your data into the "graph-data" block:
REBOL [title: "3D Graph"] ; Here is where you put your block of data to be graphed. ; The first column contains labels for each value. ; The second column contains the actual values to be graphed. graph-data: [ ["Jan" 11.0] ["Feb" 22.0] ["Mar" 25.0] ["Apr" 55.0] ["May" 35.0] ["Jun" 75.0] ["Jul" 20.0] ["Aug" 33.0] ["Sep" 21.0] ["Oct" 55.0] ["Nov" 65.0] ["Dec" 45.0] ] ; This compressed code is the r3D module. You never need to touch it: do to-string decompress 64#{ eJzFWluP2zYWft5/weYl9gSOTUm2x0a2i23aAQq0m0VTZMcWhEAjcTJqdKskq2P/ +j28UxSVmXR3sQHGEs/147lQpJRffvju3U9h1PjpIktJ2WXdeY9C/HqFVtbfV9CY uZo0bU2SLuvJHt2fyiRMw5QkWRHn30RR2JD0lJBne3LJLFHKvDF3XROXbR530tmt dnbQt8cnINwOABwG7o6jaTLHbRLnX+/0djSjw4hydM2aO22qDqZ6O3YbhW1WUga9 wHSSSoz5DVC+EHghPFsw7du5pLOR5D4F6iBAHWxQBwHqICwdFKiDBCUYyukwAfJe 4DvMNeZx8CxUR4HqaKM6ClRHYemoUB2HqI7C7XEQFqX27N5goO7jhCzSrKH9UZUC 2/fvbsK7vEo+fxOdanm3hEuco8f4MWvRmf1e6G8UssseUXNl1cCUspYgsMFlbQYd JU3VtnVTwaw6dKpRCsLnZwkrszImbLDEXB2uF3Gls+Q8T/A8wfMMni94vuD505Gq Ibw0Rovq7jeIlggVH3yUTBksOf7YVR/zqvr8Me4mIwpTimjI+dzfn+5gBYGZOkwg yxv6DyNPww7R/y9H3gIJlKk82JLeZFZsSd+doyJ4LAKRmQLLOKPCs0LekPaUd3QN pFfaaPU5jO6rhsTJQxijO5SgFPRwGNc1KVOhIGc+i9EVGF3i+avZHb9dw23Cb3dw mwoBfy5lPS270bJ4ZQgHStjXwltDGBvCayUcaOFrQ9gzhDdziA+fswhT78swqSj1 E0HqSFHDvYzSUzGTIRNqg5j1KmQ9C0jC7mC2oBllZb/4Yy/kZ/y5KozAHF2JUGwM dpg6+qKY9zwxf0KMQmpId2pKZAdzETdNfBYh7UnTZQlpZTyLwBlZROXI40QVCi5S xpyVqACgIpD2ojHGpCqgdchCN0fcNdkjNHo3kfSkCBY5gQcC/HzqHv6GtAbK7pFg o7+iVSjdGTu3QZEYqpCogTIOh1hh7oybIU9JYRUf1eGozpLPJiKuIyc8mj7bklkB eGJFEPEtAHGxXMPfDv4whBmKqFhu6GBFfwL4odQtHVBZTIUp9ZoOqDDe8MUJSgp2 ok9iQHWcNS3kk5YgbaCUAC5GNGHRkqe2uZcr6RlQjeiBQV8jrRuwaY3EfU02pQ2y adCPFFIFbzZjcJdcky53fByw8VaN12x8PZ8vpIZnafiWxkZqDBXWSmBrKQiYpg9s qVxbKjvbh+9U0CBFhEwfgROWoeLZTjaWxs6tsTWcrC0VMdcRsK0dLs+Kr2/FNxhF y7Ny6Fs5DLQLUS5WtHxrYsEo6dgKlm/Py/ARODU8O1imE98Jy7NjZThZWxoCxkjF N7xsLJ2dGxioRHZHc4DXbPW4EiuKZ9E2irZFUoO1riW3VjQtp2naytpsXvGA0QuP s5txYJUCXlu1ALuNUW4Dq+IMpY1SsnR8K714VOkDT9jWura1diNP/oROYOd44CmY wBfYaTZdbWyl3ZTSetTieNQLDoTr0bSwHWNdh8LVauzKqFUpY+Uba0c7t87Ojic2 /GxtcHJKNrqd9rO1ochY2evSziwIbMv4bnQrY/HCNrq1pSPRmqHbTcGzMwDwInic 72eiFWWrsRVDNKWieYzmD2g+owUDWjCnJuWLKNIh937yUas495KzR7AK6vPI2NCZ OydzR5VWnTgXyj2vPm31T522hL8esyD0/BwFI4+PPD7y+cifR/ZR9E+7DA0vPqRP e/HmxgBzFpaCxsDjLE8KOjabfMMsMT4LF2p/P8UNWTRV1c1mPXfGo8Jd8ZhwfOzh QR39PU2Fl1h6ubPcZXCkmT7scjZWW/wYuc+7M7bdjpk4LWg6uuMjx/zlC4z/A7bF U9h+hpuszs82tlK/jPvfobtCpQPS91kPp6avAoTSrLdBwbGKncZer8J/NlnZoRfc MLo7owtpKhR39HjbkfSFPMPGEdiR60aJ/vy0KJzxxNSrpCdagZ0ydeOgHpGseyDN TJwv53KmofHKJxq1Nu2aJUVOu0Xd+fzOdSauaZgch7EodLzTYMKKEPFhZNhR71P6 kR1Ecohqz22wgdL/BUJLGqH5R9XkqdRO4oI0qhxg4fuNv6HV/LKP2/fZhbCjoX2G ZOs2fR/A7zzY1lUpyfkvcwSMLC4/5aS1S0kxJIFj+ZEfX3mu9FkWcS6SkwUuf1mH +HyYR6b0jpHpgVqB2Gtx/jowqfKqMaV99DOVfsucmK8ABqC4yX+JecGEP8DUlbR8 PcOlJACJO07oTDnLY8Mfy/uKK7+N8+REv+XcAPkfrKBb7YDrygiP3ekk6PzJXbYK MtPideClv0rqos2KOicqe9yTBId09lXQzLS1VdMtG8JDoz3JFEmKZoX3WZ5TMycI vqTC1sf5zukl0GZaAZ5J+DXsfSK3MBVcAANpDUvypcIzpCsc3hTDn2IEjn535XLi hR2LtvvlTErq7qGnZdBj2AKg3kd9V9SY/cIwqVEeN59IO3psKE17Y0a98QTDlmbP 321JRIy+pJ6cDOrfyRCoeE228pMCxSuQ2hyfMZN6P37xb83P/lBAp8zTsKzK/Kxe bupI7NECr+AfLN3wmGL7rG8lL1QylE4fY3TL5eR7gu9P8IEuK0tnSSZDvi+1ssiX 8HH7vWftJ8qDNSFkqyDphy9VimzPyTUaevUt7dWwO4H10ZpNn8+yFXpeFhkAe0RV k33KSiibU8kXnYtdXFxiPzMWhit4Tq7n94NiFwChoIxqpNSMUj3uAbYEyFGb9Jdn XVScYVpAk0aFgM4CZwvrfPCKegELRw6AW4bMQoYZGb1Bq9AMiZyq8XlBRUt6Urh5 3KihsBdoHFkUYi6LYqMjIv8Kxe2C5pBuy9l2nCX7ApXN8wESq9fYZWkmkw4JYaJz R7OYCoMvNT9Vcbp4d3Mjvzbe36dxF09/TmjFk6I8FR/YEG5uJOWHFFqBifG8Aonp QFC6h6xlNNEvqIDjIjwwL3RNjcK/QFaEb5j/m2/RS8AkNjQvvqNgUAYuqg7FJQIW XezJC74GwzZHotkrIx51Lh69kuZTGqEYNU0eOmXye25GLKBcnw/UOsA+iEMt5WrE srxHa7BVk5gHSkUoNNPBQyhfyYFOVy3ERpzveQUubnJenJ+QoFU+Ly5PS0FBCZSS wtY6yIJjpSseGe/s5J0Z7+LkXYTNNypAoY6UsurmSrtu7iUSsZWFxdcMWWE3VfMr VBitRNGNwwAIZai1mcyLoQJN5s0HeeJFLg/1GMI1EftpHvh6lgRkxk4N1XDAjOwT ie7HmWyrhYoemE1Od7CDZvvjMGT/D0b8V42IDRZqtHAMB6Liz9DDQz080GPfy8Ej tMQGdNAGeVHowWVLL1uovdCHyzW9XKMgCgO4rOlljXAUXgNvQy8bSsTIowoY+SAZ Rf8G28Udt8glAAA= } ; This compressed code is some initial preparation to enable plotting. ; You never need to touch it either: do decompress #{ 789CED564B6F9B4010BEF7574C4F6912110763471187F6901E7388A2283D581C D6B0B669318B96C5C1F9F59D7DC00EC458E9BDC896601EDFCC7C33B3000090B2 3D97EC45B2B26E6308A2DB9BDB2F30941F8DFC84E23D867039943F0AF187298D 343FA540A853620DD407C8F2BA2AD8F191AD791183920DA7E25756349C885351 8846F2CC98D7560146F3266491C568501D619518D196ABE0C138C4B069CA1456 D6D4E033C58283468755C6D37CCF8AAF49AF9D152265056468606409AC7A5DBE A1CEDFE10E2B4164C955234B98234391FE4132E9B11C7A20154BFDFBB44768CC 6F90C3332E8BA18B0D323FEB120D5C969FF0980F3C4CDD37E1D94AC281073E8C CA208AC80E88D53515C2F0AE8FB41FA73A6FAE5A31696673D10F9BB97899A174 242C9BBD491167AAE0E556ED7EC056B26A17E8ECBD599B36B216384F169C286A C5AB18BE1974089C1E2E61064A046EC27C14EFB866B2C659E3DAD780C01556BF 44887B64EAD21B6E84E42CDD6100258F2439478537D497E73CB60EB3F947230C 1DEC45C60BC7A08CB260BF68F70B73A7F4CE17487A57B46E8AF96BADC9B94FDE DF90665F414419EE228AF56F9E2A8CC6B326C5ED83B459739BC72823B2C01437 1962B2AA42CEED1478501F696CDFB7B02BEBDAF1EECD88873DB72C3795A87395 8BB203065283313394B5F4E1481FDEC7A94C5F236077CEBAA7C21EAE83A77FC0 5EF58D0CF19F90BA9FA4D0856189B14942D7CC655D69D9819BB38D34F41969E7 F245E6ACDC167A71A411B84ED8E408A4DEB836BA230079797820F4E22306C351 5838676F69E8A3035A79587473B108F2064AA1466F0B2CDCCD8A1C668E8A0B94 C3DB2EC7694F289393FB3EBD8DA32D2B74EC1DCFB73B455FB824D3874F66D9CF 844996EC46B7E0C9680610FB2779BBD233B3E395B7EA976ED7931B6DB29674EB 491127E6AC4E25E72542F41D3A44B665268099876E77269C51DDE2D702BE6DDA F0FE165792D541C572E9D5B390DCCFE1038E23ED798A34B8D0B9D0708EB7104E 9434ECDADDB86B533CBFDA0F8AFF3C0F78C61760AD645E6EFDAB283943E7D401 7DF27CB64BA2BA3CC817C387E3A9FB40F80B7F5D1FA3080B0000 } ; The user definable GUI layout goes here. If you want to use other ; key controls, or widgets such as sliders to control the view angle ; and size of the 3D view, put that code here. The "cameraTrans_" and ; "cameraLookat_" variables make all the adjustments: out: layout [ origin 1x5 at 0x0 scrn: box 400x360 black effect [draw RenderTriangles] across text "" #"a" [cameraTransx: (cameraTransx + 10) update show scrn] text "" #"s" [cameraTransx: (cameraTransx - 10) update show scrn] text "" #"d" [cameraTransy: (cameraTransy + 10) update show scrn] text "" #"f" [cameraTransy: (cameraTransy - 10) update show scrn] text "" #"g" [cameraTransz: (cameraTransz + 10) update show scrn] text "" #"h" [cameraTransz: (cameraTransz - 10) update show scrn] text "" #"q" [cameraLookatx: (cameraLookatx + 10) update show scrn] text "" #"w" [cameraLookatx: (cameraLookatx - 10) update show scrn] text "" #"e" [cameraLookaty: (cameraLookaty + 10) update show scrn] text "" #"r" [cameraLookaty: (cameraLookaty - 10) update show scrn] text "" #"t" [cameraLookatz: (cameraLookatz + 10) update show scrn] text "" #"y" [cameraLookatz: (cameraLookatz - 10) update show scrn] ] ; Try changing the variables below to affect whether the lables and values ; are shown at the bottom of each 3D bar in the graph, and whether or not ; the data is shown in color or black and white: DisplayLabel: true DisplayValue: true ColouredLabels: false ; The following 2 lines update and show the display. Don't change them: update view out

7.5 Using the Google Chart API
Google.com provides a powerful and nice looking chart generator which is freely accessible by anyone, at http://https://developers.google.com/chart/. The syntax for preparing chart data and displaying results is dramatically simplified using the REBOL script at http://reb4.me/r/google-charts.r/, by Chris Ross Gill. To use it, just include the line "do http://reb4.me/r/google-charts.r" in your script, or paste the following code:
REBOL[title: "Google Chart API"] #{ 789C8D56EB6FDB3610FF2CFD1517015BBAAEB6E2B4EB5A0D4390BED26ED99A65 6DF710848092684B0D256A2495D85DF7BFEFEE28594ED002FD6253C77BFCEECD F3E74F5E9F421A066F6AA76402D189D62B25E169258C83E3B3575118BC93C6D6 BA4DE060BE982FC2E0B8779536C8FBB432B575BAABA481736DEDECA4560A055E EA065555CE75491C1BBA58E1C5BCD04DDC89958CBD8D0BB6612F445B5E9C138C 3078261C0A3E9E1DF7ABD9E1C1C1A33078BEEE3432259016C49D85C18B9A707E B5621D33A6DAB90983B3DE74DAE2D5BF27B29506355910F0F6FC149C065114D2 5A7095845D072D79F85F189CD6B91166935020825379255502FBB95CD52D6A42 D299126EA94D8354A11412DE6C3AB4942EFBB670181A6874D9A352A7B582B216 4A16043578A61B5163E0D281663928A0CA02AE654E1CA775215B42BD5F14B37C 33B3220CB2300B43762C81DE4A0265B476E0D0A8851FC04AE7EA7665C3A0111D 7158902D62D61D5E16DA481871210BC19ED9BAE9101E9F0BADB4F14785D99B4E D61F4BE104EA21635049D561F2C36C80B04D2AA39B8BAEB6739F084E2E538FC2 3060A43E9AAA6E2544AA88804EF17A831FEB4D04B613E672B8B45833412E0C44 F9958D004F311658FD41B74E282456CCD0D5C8DBDD8F000FF11233825F44A720 442EA2B88501452361FF21ED8CC6D4A7B9D2C5E55E861665B1FD228F02664830 64AD936B07FC89642F2DCCCA8EECA0F3F7983E1443E686CA2CD6ADDAB0830131 26D0884B097758C5374024BA2A35E4755BC21DB2BD25671E2AE21E915A696ACC 622ADACD6C842B7C65316DCCE780DBB313F06E13975276E02978755D617B40DA 52B9885A1D0D372C36C955A2C536ECA8C507D38335FF152F60E171069514E556 3BA11E2A6D447E85096288947282276B47E360EBC911300BFE64A991655F48FF 9191B29DE21C4ADDE9D9C3053A560E98F984A3E6F8C9D367CF5F9CBC7CF5D3CF A7BFFCFAFAECB7F3DFDFBC7DF7C79F7FFD2DF2A294CB5555BFBF544DABBB7F8C 75FDD5F57AF3E1607178FFC1770FBF7FF438425B01ABBE81BBED9B5C9A3D6875 2B87D006F5923F07D846BADEB4105D44148C006994E93534750B0B6639207A57 17971E3452BF05A37B4C3AFA7197583892DBB24A0BE18A2A036EB3A936252643 386CCC1BC124DD46BED7688DAA9C6512F6632AA3A9A947DF7C87A7AEC7B0A2EE 186D2050DD3B5688FFBE7220A2EE31B293D84AE48A92EDCA554730C8736D779D 44575006BB127DE41F2A2C1C75B34AAE3D6F9C8C6E62BFEB6B690A81B944A11D 8434614680ECF5279DA709B207D6199C6F43008C6CF495849D3078F16D1E7D98 F876D264AF6B0C3336C752F4CA8FCEA3F85A9BD2E795248252167523D41EA699 1216E3B0E08CCE179CECC00710A7FC3436C91CDF71C9403AF3AC1E4270CBE864 2918421AE5AB28031E93F851E019D7099E842F2FD4A0555D22C1E2D5CA88B296 2D712A12A3A8D0024869607AFE2C1D0165B70A8207FA186F9AAE5F1872DC2454 C7D36ADB23CD313A5681EDF3CFCA85C117248BCF9F4CD760D533EFDAB9E51675 C0E8D5CD0E9AAA9CE31EF344F76B221ED65FAC442E7DB9F4ADA2F7001AC142F5 4AA761EA155B7CC4C0A09D217BB67186D15736B636D7BB1FB1DE54CAFE453689 76F72B2B8EEE4590EC0C3E4E1FE34C27561FF05BFCBCAE239F7A766547827971 6E471FFD3DBB3FA0703750ECAAFE7853F5BD41D6F4F273603E29914DBB97A370 254DCE4FB1A550145F99F7AB64B761872531F0F1A6CE253797DF0D7E4CDD4DFC 88924DBD1D1DFBB843615826E368BA8B2DF17544DB15A21FBDAB30AA71FE594B ED4A8BB3FE801FF70F0FD6870F68703B7EC6EDD333241C7337A00EC784A75938 F46FE2A71DB615471FFF8591C881EF153B9AF04B4B497CCC10B2013DB6BCA395 489B9EDE81C3538EDF580C974ED9C46C81904EDF250C111BCB6BDB0C636D7339 EE9039FF638D5279C63C6938BD141248475C0886089C7986E867D50D8FB391BB D03B8FC4A115C6B727B34EC569B726D424E35B702BE219BD690CE55662B96385 2E9883C2BCE5C8AB1D16BA19EAD00F167E2E73D9414B81F0A9C077F5FFE11722 94EF0C0000 }That code enables a simple REBOL dialect to create and display charts:
REBOL [title: "Google Chart Introduction"] do http://reb4.me/r/google-charts.r probe chart [ title: "Chart Example" type: 'line size: 350x150 labels: ["Red" "Green" "Blue"] data: [50 40 10] colors: reduce [red green blue] area: [color solid 244.244.240] ] haltThe block of chart properties is easy to understand. Edit it to include your ownd data values, title, chart type, size, labels, colors, etc. To create the chart above using the native Google API, you'd need to learn how write the following code (paste this into any web browser, all as 1 line, and you'll see the chart appear):
http://chart.apis.google.com/chart?cht=p3&chs=350x150& chd=t:50,40,10&chtt=Chart%20Example&chco=ff0000,00ff00, 0000ff&chl=Red|Green|Blue&chf=bg,s,f4f4f0You can view the results of the REBOL "chart" function using the "browse" function:
REBOL [title: "Google Chart Introduction"] do http://reb4.me/r/google-charts.r browse chart [ title: "Chart Example" type: 'pie size: 350x150 labels: ["Red" "Green" "Blue"] data: [50 40 10] colors: reduce [red green blue] area: [color solid 244.244.240] ]
Or view it directly in a GUI by loading the results into an "image" widget:
REBOL [title: "Google Chart Introduction"] do http://reb4.me/r/google-charts.r my-chart: chart [ title: "Chart Example" type: 'line size: 350x150 labels: ["Red" "Green" "Blue"] data: [50 40 10] colors: reduce [red green blue] area: [color solid 244.244.240] ] view layout [image load my-chart]
Changing the properties is easy:
REBOL [title: "Another Google Chart"] do http://reb4.me/r/google-charts.r my-chart: chart [ title: "Chart 2" type: 'pie size: 500x400 labels: ["John" "Paul" "Sue"] data: [35 55 10] colors: reduce [orange purple pink] area: [color solid 225.225.245] ] view layout [image load my-chart]
You can include REBOL code directly in the chart block to perform calculations, format data, etc:
REBOL [title: "Example by Chris Ross Gill"] do http://reb4.me/r/google-charts.r clipdata: {Adsense Revenue^-300 Sponsors^-500 Gifts^-50 Others^-58} browse chart [ title: "Revenue" size: 650x300 type: 'pie ; extract raw data data: parse/all clipdata "^/^-" labels: extract data 2 data: extract/index data 2 2 ; format data and labels sum: 0 forall data [sum: sum + data/1: to-integer data/1] forall data [change data round 100 * data/1 / sum] forall labels [ labels/1: rejoin [labels/1 " " data/(index? labels) "%"] ] ]
More information about the REBOL Google Chart API is available at http://www.ross-gill.com/page/Google_Charts_and_REBOL.
7.5.1 Working with Other Web Site APIs
Chris has created a number of other web APIs that make easy work of interacting with popular sites such as Twitter, Facebook, and Etsy. A tutorial about using REBOL with the Etsy API is available here. You can read more about using REBOL with the Twitter API, and simplifying the use of Rest, OAuth, and other protocols at http://www.ross-gill.com/page/REBOL


7.6 Using the "Nano-Sheets" Spreadsheet App
In the introductory demos section of this text, you saw a small spreadsheet app titled "Rebocalc". This application idea was extended in an article by Steve Irvin and Steve Shireman at http://www.devx.com/opensource/Article/27454. The resulting "Nano-Sheets" app is actually useful in production situations and can be improved using simple REBOL code. Saving, loading, printing, and other features are already available in the Nano-Sheets app. You can create your own functions that use any of the features of the REBOL language to process cell data (math, graphics, parse, native dialogs and GUI interfaces, Internet connectivity, file and network protocols to connect with data sources, etc.). This program and the free REBOL interpreter are so small that they can both be sent easily, even by email, to others who may need to use it. No large or expensive office software installations are required to run spreadsheets created with this tool.
Here's a slightly modified version, with scroll bars, for grids of any size. Column sum and row sum functions are also added the included abilities:
REBOL [Title: "Nano-Sheets Spreadsheet"] cell-size: 125x20 sheet-size: 10x50 window-size: 800x450 scalar-types: [ integer! | decimal! | money! | time! | date! | tuple! | pair! ] protect 'scalar-types sheet: lay: current-file: sheet-code: none cells: copy [] sheet-buttons: copy [] use [ buttons== cell== sheet-code== id val text action face style ] [ id: val: text: action: face: none style: 'btn buttons==: [ 'buttons into [ any [ set val word! (id: val) 2 [ set val string! (text: val) | set val block! (action: val) ] ( repend sheet-buttons [id text action] append lay/pane face: make-face/size/offset style cell-size cells/:id/offset if 'button = style [face/edge/size: 1x1] if not none? face [ face/text: text face/action: action face/style: style ] ) ] ] ] cell==: [ set id word! into [ opt 'formula set val [block! | path!](cells/:id/formula: :val) | opt 'value set val [string! | scalar-types] ( set cells/:id/var cells/:id/text: val ) ] ] sheet-code==: ['do set sheet-code block! (do sheet-code)] sheet==: [ (sheet-code: none clear sheet-buttons) opt sheet-code== any [buttons== | cell==] ] ] if link? [ hilight-all: func [face] [ either empty? face/text [unlight-text] [ highlight-start: head face/text highlight-end: tail face/text ] ] ] clear-cell: func [cell] [set cell/var cell/text: cell/formula: none] clear-sheet: does [ foreach [id cell] cells [clear-cell cell] clear next find lay/pane last cells show lay ] compute: does [ unfocus foreach [id cell] cells [ if cell/formula [ if error? try [cell/text: do cell/formula] [ cell/text: "ERROR!" ] set cell/var cell/text show cell ] ] ] cur-cell: does [either in-cell? [system/view/focal-face] [none]] empty-cell?: func [cell] [ all [ none? cell/formula any [ none? cell/text all [string? cell/text empty? cell/text] ] ] ] enter: func [face /local data] [ if empty? face/text [exit] set face/var face/text data: either #"=" = face/text/1 [next face/text][face/text] if error? try [data: load data] [exit] if scalar? :data [face/formula: none set face/var data exit] face/formula: either formula? face/text [compose [(:data)]] [none] ] event-func: func [face event /local f] [ if all ['key = event/type in-cell?] [ switch event/key [ F2 [if in-cell? [show-formula system/view/focal-face]] up [move up] down [move down] ] ] event ] formula?: func [text] [#"=" = text/1] in-cell?: has [f] [all [f: system/view/focal-face 'cell = f/style]] load-sheet: func [file [file! url!]] [ clear-sheet parse load/all file sheet== current-file: file show lay compute ] move: func ['way /local pos] [ pos: find cells cur-cell cell: pick switch way [ up [enter cur-cell skip pos negate sheet-size/x * 2] down [enter cur-cell skip pos sheet-size/x * 2] ] 1 if not object? cell [cell: none] ; if 'A1 = cell [cell: cells/A1] if cell [focus cell] ] new-sheet: does [ clear-sheet current-file: none show lay focus second cells ] use [not-vals] [ not-vals: reduce [none ""] no-val?: func [cell-val] [find not-vals cell-val] ] open-sheet: func [/with file [file! url!]] [ if not file [ if %none = file: to-file request-file [exit] ] load-sheet file focus second cells ] save-sheet: func [/as /local file buffer] [ if any [not file: current-file as] [ if %none = file: to-file request-file/save [exit] ] if all [file <> current-file exists? file] [ if not confirm join file { already exists. Do you want to write over it?} [exit] ] buffer: copy [] if sheet-code [repend buffer ['do sheet-code]] if not empty? sheet-buttons [repend buffer ['buttons sheet-buttons]] foreach [id cell] cells [ if not empty-cell? cell [ repend buffer [ cell/var reduce [any [cell/formula get cell/var]] ] ] ] save file buffer current-file: file ] scalar?: func [val] [find scalar-types type?/word :val] set-cell: func [id val /local cell] [ cell: select cells id cell/text: form val enter cell show cell compute ] show-formula: func [face] [ if face/formula [ face/text: join "=" mold/only face/formula focus face ] ] ctx-html-export: context [ out-buff: make string! 10'000 html-template: { <html> <!--Page generated by REBOCalc--> <head> <title>$title</title> <style type="text/css"> html, body, p, td, li {font-family: arial, sans-serif, helvetica; font-size: 10pt;} table, tr {border-collapse: collapse;} th, td {font-size: 12px; border: 1px solid #C0C0C0; padding: 0.5em 0.5em 0;} th {background: #8E806E; font-weight: bold; text-align: center; color: #404040;} </style> </head> <body bgcolor="white"> $table </body></html> } emit: func [data] [repend out-buff [reduce data newline]] set 'emit-html func [/to file /local val] [ clear out-buff emit <table> repeat row 1 + sheet-size/y [ emit [<tr><th> either 1 = row [""] [form row - 1]</th>] repeat col sheet-size/x [ emit either 1 = row [[<th> col-lbl col </th>]] [ [ <td width="110"> any [ get/any mk-var col row - 1 "" ] </td> ] ] ] emit </tr> ] emit </table> out-buff: replace copy html-template "$table" out-buff write %rebolcalc-out.html out-buff browse %rebolcalc-out.html ] ] avg: average: func ["Arithmetitc mean" block [any-block!]] [ remove-each val block [no-val? val] either empty? block [0] [divide sum block length? block] ] gcd: func ["Greatest common denominator" m [integer!] n [integer!]] [ either (m // n) = 0 [n] [gcd n (m // n)] ; Euclid's algorithm ] geo-mean: func ["Geometric mean" block [any-block!]] [ either empty? block [0] [(product block) ** (1 / length? block)] ] median: func [ "Returns the number in the middle of a set of numbers sorted by value" block [any-block!] /local len mid ] [ block: sort copy block len: length? block mid: to integer! len / 2 either odd? len [ pick block add 1 mid ][ (block/:mid) + (pick block add 1 mid) / 2 ] ] mode: func [ "Returns the most frequently occurring value in the block" block [any-block!] /local last-item result high-count count ][ block: sort copy block result: last-item: first block count: high-count: 1 foreach item next block [ either item = last-item [count: count + 1] [ if count > high-count [ high-count: count result: last-item ] last-item: item count: 1 ] ] if count > high-count [result: last-item] result ] product: func [ "Multiplies all the values in the block" block [any-block!] /local result ][ remove-each val block [no-val? val] result: 1 foreach value block [result: result * value] result ] sum: func [ "Adds all the values in the block" block [any-block!] /local result ][ remove-each val block [no-val? val] result: 0 foreach value block [result: result + value] result ] sum-rows: func [ "Adds a range of row values" row start end ][ total: 0 for i start end 1 [ do rejoin ["total: total + " row i] ] total ] ; =sum-rows "b" 1 4 sum-cols: func [ "Adds a range of column values" col start end ][ total: 0 for i start end 1 [ do rejoin ["total: total + " i col] ] total ] ; =sum-cols 2 #"b" #"e" col-lbl: func [col] [form to char! 64 + col] cell-name: func [col row] [join col-lbl col row] mk-cell-size: func [col] [ either any [none? col-widths col > length? col-widths] [cell-size] [ as-pair col-widths/:col cell-size/y ] ] mk-var: func [col row] [to lit-word! cell-name col row] sheet: [ origin 5x5 space 1x1 across style cell field cell-size edge none with [formula: none] [ enter face compute face/para/scroll: 0x0 ] style label text cell-size white rebolor bold center style menu button 60x20 silver edge [size: 0x0] shadow off with [ font/colors: [0.0.0 0.0.128] ] menu "New" #"^n" [new-sheet] menu "Open" #"^o" [open-sheet] menu "Save" #"^s" [save-sheet] menu "Save As" #"^a" [save-sheet/as] menu "HTML" #"^t" [emit-html] text 10 "" text "(Press [F2] to edit cell formulas)" return ] repeat row 1 + sheet-size/y [ ; +1 accounts for header row repend sheet ['label (as-pair 30 cell-size/y) either 1 = row [ "" ][ form row - 1 ] ] repeat col sheet-size/x [ append sheet compose/deep either 1 = row [[label (col-lbl col)]] [ [cell with [var: (mk-var col row - 1)]] ] ] append sheet 'return ] lay: layout sheet foreach face lay/pane [ if 'cell = face/style [ repend cells [face/var face] set face/var none ] ] focus second cells insert-event-func :event-func gui: [ across g: box window-size with [pane: lay pane/offset: 0x0] scroller as-pair 16 window-size/y [ g/pane/offset/y: g/size/y - g/pane/size/y * value show g ] return scroller as-pair window-size/x 16 [ g/pane/offset/x: g/size/x - g/pane/size/x * value show g ] ] view layout guiTry saving the text below to a text file, then load it as a spreadsheet in Nano-Sheets to see how some useful features are implemented. This is the "native" internal format that Nano-Sheets uses to save data. You can also use the modified version above to save and load flat and blocked tables of REBOL data, as well as standard CSV files that are compatible with traditional spreadsheet applications:
do [ right-now: does [now/time/precise] circle-area: func [diameter] [diameter / 2 ** 2 * pi] ] buttons [ A10 "Random-test" [ set-cell 'a11 circle-area random 10 1E-2 ] C10 "test-2" [set-cell 'c11 right-now] A5 "Check" [print "check"] F16 "Done" [quit] ] A1 ["test"] C1 [[now/date]] D1 [3] E1 [$200.00] F1 [1x2] E2 [[d1 * e1]] A11 [19.63] C11 [0:46:00.171] C12 [[c11 + 1]]As you learn more about REBOL coding, you'll be able to easily modify and extend the capabilities of the Nano-Sheets program in ways that would be very difficult or impossible to accomplish using other spreadsheet applications.

8. Using REBOL to Create Presentations
8.1 REBOL as Presentation Software
REBOL GUI features enable simple methods for laying out images and text with a variety of fonts, styles, colors, gradients, and the ability to create animations, add sounds, and make use of other elements that are useful in creating captivating audio/visual presentations. REBOL's graphic capabilities provide advanced methods for creating images from code, which are difficult to design even with complex graphic manipulation software (a topic for much later in this text). In most simple cases, applications such as PowerPoint and Photoshop can be easily replaced by straightforward REBOL code.
8.2 Some Basic Layout Ideas and a Simple Code Framework for Presentations
Slide show presentations are often shown in full screen mode. In REBOL, the size of the screen is stored in the value "system/view/screen-face/size", so the following code creates a full screen white box that closes the GUI when clicked:
REBOL [title: "Empty White Screen"] view center-face layout [ at 0x0 box system/view/screen-face/size white [unview] ]Here are a couple of GUI layouts that serve as examples of slides with text and images. Clicking anywhere on the screen advances from one slide to the next:
REBOL [title: "Slide 1"] view center-face layout [ at 0x0 box system/view/screen-face/size white [unview] at 20x20 h1 blue "Slide 1" box black 2000x2 text "This slide takes up the full screen." text "Adding images is easy:" image logo.gif image stop.gif image info.gif image exclamation.gif text "Click anywhere on the screen to close..." box black 2000x2 ] REBOL [title: "Slide 2"] view center-face layout [ at 0x0 box system/view/screen-face/size effect [ gradient 1x1 tan brown ] [unview] at 20x20 h1 blue "Slide 2" box black 2000x2 text "Gradients and color effects are easy in REBOL:" box effect [gradient 123.23.56 254.0.12] box effect [gradient blue gold/2] text "Click anywhere on the screen to close..." box black 2000x2 ] REBOL [title: "Slide 3"] view/options center-face layout [ at 0x0 box 600x400 [unview] at 20x20 text "This slide is smaller, and as simple as can be" text "Click anywhere on the screen to close..." ] 'no-title
This program uses q-plot to create graph images of monthly sales and expense numbers, and then displays them in a full screen presentation that can be shown to a group:
REBOL [] do %q-plot.r save/png %sales.png to-image quick-plot [ 600x400 bars [5 3 8 2 10 3 4 9 5 7] ] save/png %expenses.png to-image quick-plot [ 600x400 line [9 2 4 1 7 3 8 14 10 5 6] ] view center-face layout [ at 0x0 box system/view/screen-face/size white [unview] at 20x20 h1 blue "February Sales:" image load %sales.png ] view center-face layout [ at 0x0 box system/view/screen-face/size white [unview] at 20x20 h1 blue "February Expenses:" image load %expenses.png ]
Making a slideshow framework to display consecutive layouts is as simple as creating a block of nested blocks containing the GUI code, and then using a foreach loop to display each layout:
REBOL [title: "Simple Presenter"] slides: [ [ at 0x0 box system/view/screen-face/size white [unview] at 20x20 h1 blue "Slide 1" box black 2000x2 text "This slide takes up the full screen." text "Adding images is easy:" image logo.gif image stop.gif image info.gif image exclamation.gif text "Click anywhere on the screen for next slide..." box black 2000x2 ] [ at 0x0 box system/view/screen-face/size effect [ gradient 1x1 tan brown ] [unview] at 20x20 h1 blue "Slide 2" box black 2000x2 text "Gradients and color effects are easy in REBOL:" box effect [gradient 123.23.56 254.0.12] box effect [gradient blue gold/2] text "Click anywhere on the screen to close..." box black 2000x2 ] [ at 0x0 box 600x400 [unview] at 20x20 text "This screen is smaller, and as simple as can be" text "Click anywhere on the screen to close..." ] ] foreach slide slides [ view/options center-face layout slide 'no-title ]You can simplify coding tediously repetitive layout elements, by only putting unique GUI elements in each slide. Widgets and layout code to appear in all slides can be inserted in a "forever" loop. This example separates out the title, the text background box color/effect, and layout code to appear in each unique slide, and adds forward and back controls, bar lines (black boxes), and colors to appear in every slide. In this example, the "compose" function is used to insert data contained within parentheses. To create your own slides, all you need to do is edit the unique code to appear in each individual slide layout (title string and unique GUI code for each slide):
REBOL [title: "Presenter"] slides: [ "Slide 1 - A Few Basics" [ text "By default these slides are white and full screen." text bold "Adding images is easy:" image logo.gif image stop.gif image info.gif image exclamation.gif text { Press the space bar, right arrow key, or left click screen for the next slide. Press the left arrow key, or right click screen to go back to previous slide. Press the 'X' key to quit... } ] "Slide 2 - Colors and Gradients" [ at 0x90 box as-pair system/view/screen-face/size/1 220 effect [ gradient 1x1 tan brown ] at 20x70 text "Colors and gradient effects are easy in REBOL:" box effect [gradient 123.23.56 254.0.12] box effect [gradient blue gold/2] text { Left arrow key or right click screen to go back, 'X' key to Quit... } ] "Slide 3 - A Simple Window" [ text "This slide is as simple as can be." ] "Slide 4 - Lots of Stylized Text" [ across text "Normal" text "Bold" bold text "Italic" italic text "Underline" underline text "Bold italic underline" bold italic underline text "Serif style text" font-name font-serif text "Spaced text" font [space: 5x0] return h1 "Heading 1" h2 "Heading 2" h3 "Heading 3" h4 "Heading 4" tt "Typewriter text" code "Code text" below text "Big" font-size 32 title "Centered title" 200 across vtext "Normal" vtext "Bold" bold vtext "Italic" italic vtext "Underline" underline vtext "Bold italic underline" bold italic underline vtext "Serif style text" font-name font-serif vtext "Spaced text" font [space: 5x0] return vh1 "Video Heading 1" vh2 "Video Heading 2" vh3 "Video Heading 3" vh4 "Video Heading 3" label "Label" below vtext "Big" font-size 32 banner "Banner" 200 ] "Slide 5 - Live Code" [ h3 "Remember, These Slides Are Live, Fully Functional GUIs!" box red 500x2 bar: progress slider 200x16 [bar/data: value show bar] area "Type here" drop-down 200 data reduce [now now - 5 now - 10] across toggle "Click" "Here" [alert form value] rotary "Click" "Again" "And Again" [alert form value] choice "Choose" "Item 1" "Item 2" "Item 3" [alert form value] radio radio radio led arrow return ] ] indx: 1 forever [ slide: compose [ size system/view/screen-face/size backdrop white [ if indx < ((length? slides) / 2) [indx: indx + 1 unview] ] [ if indx > 1 [indx: indx - 1 unview] ] at 20x20 h1 blue (pick slides (indx * 2 - 1)) box black as-pair (system/view/screen-face/size/1 - 40) 2 (pick slides (indx * 2)) box black as-pair (system/view/screen-face/size/1 - 40) 2 key #"x" [quit] key #" " [ if indx < ((length? slides) / 2) [indx: indx + 1 unview] ] key keycode [right] [ if indx < ((length? slides) / 2) [indx: indx + 1 unview] ] key keycode [left] [ if indx > 1 [indx: indx - 1 unview] ] ] slide: layout slide view/options center-face slide 'no-title ]
It's important to realize that because these slides consist of live, running REBOL code, they can contain much more than just static text and images. Any sort of fully functional application of deep complexity can be included. You could, for example, include charts, tables, or even a working spreadsheet that performs live calculations on instantly updated data. Using the few simple tools you've seen so far, you can easily create presentations that are all but impossible using traditional presentation software.


8.3 Using Tab Panels and Menus to Present Information
Though not a traditional slide format, a simple and effective way to present multiple screen layouts is by using a tab panel widget. The following code contains a tab panel, and also a useful menu widget, created by Richard Smolak. The same 5 example slides shown in the previous section are demonstrated here. Menus can be used to pop up small text alerts, requestors, and choices that alter the state of screens in the presentation. Simply copy the compressed tab panel code (and menu code if needed), plus the "insert-event-func" code, then put your slide code inside the "tab-panel data" block. The syntax required to use optional menus should be intuitively understandable by examining the example code provided here. Beyond being a nice way to display pages of presentation data, these two GUI tools are useful for building all types of applications which require significant screen real estate:
REBOL [title: "Tab Panel and Menu Presentation"] ; Tab Panel Widget: do load decompress #{ 789CBD586973E2B816FDCEAF50577FE86428C7989824506F2695349DADB37496 4E4FA09C2A63CBE0C6D8C4368DC9BCF9EFEF5E495E65B2CCAB9AA4005BBAD2DD 8E8EAEF45714AF3CF799AA33338A6948868D47253647CADCF4A9D7238E6951B2 74E309EBE05D6648CD1E999953CABB79CFA312384E44E31E6925ED9668A2F698 0A517CCC441F1577666297179836890365E4FA66B82236B582D93CA4514476F4 8F7F35E8D973D8FF76F8DC69FEB8D56767E387ABBED63D39383B884FC79713EB E4B8D38F2EEF9ED4A3969BCCFBBF76AE7E9E2E4757ABB079D3D28FADC99F8DDB 6F0FA77BB3FBF1D3D199F7703C0906B3BEDEBCE99EFE6A1F8EBFF6EFC70F27EE FDF2E2707C39681F5EDF256A337A1ADCEB874FB7CF897DF2E5E2A9D171EFBA4D 4775FC78767D6D1E4D6EA6D6F5D765D4D793E3D9E0AC3B4816E777E7CFA74F17 9FA7AD9B2FC9F27C104C8F0E7FBA17DD4B6B7BFAE3B6D1FC71393BD8BB9AF447 30CF73D3695D7C3B595EDEDE3C58BB5F4EA3CF5DB77564FF79D78CC0BC643038 39F8BAFB5DBB3EBF98B9FDD1FDFC9BAD37BE3E07CBF3D3D5C21B3C75CD8BE6F7 B3B63538BE9C3E9CF8FABDF7BDD554E943AB75A21FDF6996EA6DDF5F7DFEDE3A 38D8D54E0F9AD303F8FBBDF17716F40812DD237AA293ACC90ABC20EC113FF0A9 6833C4AF4311003CCDF058C85DA3F4F3A884D40ECD258065E15B64E8109350A3 200E30000001B61C750ED8F1630561A38E82D0A6E17E4910B4AA0814953A0EB5 004B08872002E0D024A6BECD6CDF7054748428446B6D12E600BE6E94A767ED91 AA6D1A85F98D3A6525EF8B1110225553C6A169BBA00780AE9176A7BDC53F3A69 EBFA565BDFDE6A6FEFBDC72CA31478235D67754B8C27B0038ABB6996023F4E25 E1B1104D9159ADDDDA129F0A0E34AD92F1F5AB5546493A0998F266DC507FCC16 7D012744F502CBF448E43965C844403AD60444CA19B383A55F690259CFE955C0 55789685D594C55464B91E89A8071926A227620F4E602D229E06D7B769B24F1C F84D65945190B0C1A016463B151DAE039E0D51D6B46237F071587956E335ABD4 BA900BD949B064B3A15CA9CFA805B1F1D2425D9300173B7F279F98AE72BCDF11 6D474DF78499EBE3982012DFCDCA0C76E0C495A12200E868BA684A1282544A61 0593DF902D09409C50D4558FB4DB521777013B5B521F2EB9D4D091675A531908 68433DD5F129EAE84EB5299D9321268B0CE7D4271BC5286C82739EA7D4B4839F B820BB408C2DD88535A30AB35A3E0B8305C44AEBEC6D693B5DF874C876755CF9 DD581FBF8C97EAE227C7568A1F0063A71AE6F706B166C914FDAEF39720A7831D 8CD2351DD8927F8023E1977F5E89C98B4BAF48ED9C373323855B3D12870BDE52 A01EA4A31EB1CDD864CF0864781D99D31E31C33058463D22A257D9C83826C0D9 8F436C3320313B5B6D0DF6A64E879BB104BD28202C441D64E8D3A5CAB5396E18 C5C4876D17348DA3FC2975C90F84E97C54E686637A00AA5C927FBBBECB20375F 91D94ABCA5AA33C7E4FD2E2F2AF524470F9205EE3C850D2DA6F348CC3FCCC33F 33936C9BCA85EB2386FF7C3B28CF62E4560A0B916786D2BE6B14048B2572FA0A 254C757B2D0DC92320DE7213380ACA66C1A2F08398E4CC372CC0464BA5B84340 FB0B0C6A668AD050988BA79F238B29C2868A2E16373214E15B4EDC98A6120BE4 11C80AF9657A0B1223563C73455C3B210EB32E9ECD59260AD49136959323529B 271BE60087F28255184367F378B52FEC2EAC3DD854C016A9192012CCA8C41DA6 0F21057C71BBE1812D8B0F063E7237A23874FDF107D6802E0D47B05F4E3F90FF 9260F413F8049FC4986C32EEF2279610836C485C042EE0907D3E217CF5C8984F 2FF335C8328D4561F80A166BE4A151CD0F62552A65F3A1AF741FECE3B891444A 0C04E1AF1158F8E8279F41EAAE752255CA025DA733CB0278B05E234ABC4D2182 841D13EA94E5D8038AE0894B9B306A061AC10F194DA2ED25DBDB6FD109168680 1AD3F5186F67CB0E57417D6E11DAD80B4A5E9B2EAF61320E2A170B355E426F8F 540B2B116DDCAF7161B5B014635C8F4D0AC37C8187418F5AA0BAF41578888843 04AB343A6CB1F4C806FE6CCA9E3E2AC5FE9A6E991BDF1F711622B613088F7051 41DDE999515C0EE127B45D9A8E510F9258136F24E6A61B6629D4B228BD3C2791 AA844DE08768EACEDF502CA4A501E7119C2D63CD824CAA34DFDBCA19CE02C1FA 36D83CBF112D81A3729328DA0E948505695828305C4DC81F8443A202A4628899 9B69D9C139282DEEE0A83B86A8BC8848D30A8328AA348A81DB499B4473445C95 B1983EA2ED26DA2ED910956E7B937814F2149A31253B35D067DB51E54099FE3B FC52EB8DA74511232493093581B2F30305475A9D0AAC364B5250DC626D5B697D 6524AF72CAEF2F42B36A9A844501323CD265B23522AF2FBDEAFB9A24416E27FF 284BFF384788D37D5EABBE3751B5E156FEFF704B50A8B3EEDF499451A60385E8 AD44694B65025FE26B2E205E3EDBD4DFFD08C190724EE2B70FC4618CD324A5D3 A438D463C8F7457FF5CA2E3D6AA64F901026A816CB06E9A28FAB6682EBC89785 5B722F33BE7A7512A45727B083BFE9EA846354A14F0BD34322C16A1B7FE45A75 E2DA9438B51E48875B474D2959EAB20332C26B104715672EDCB91CB0AC7A6355 719D252271E33581023FC4A583949BF42AA2974AD4F5BF78DFCA6A222CCA3476 67E4517F1C4F8AB42BEE71B212B5519C3FBB421348CB2F8AA1469124D3E9544D 45B4AAFC7EB2A24BED6185F6895D3C56EC6681E0D19722F1E2222A0808FD42AE DCDCCE9B5352AD9F242DF8D39BF1F202AF8C29121C96803E1D2343D7788D3775 6AB266B86033AC6DD8D628F1617D8E44D4AA550C141EFF917995973065A7A088 D1BB50C4D45CE2554CABB36AED18F94E614D8C15A87813FC7A43452753A4D130 FEFE1F50628086731B0000 } ; Menu Widget: do load decompress #{ 789CB51B6B73DAB8F67B7E85BA3B770237430CE4D12EDD6EC6109A92266D499A B629E3CE1810C6606C6A9BE074BBFFFD9E23C9B66CCB84A477C384C8B2747474 5E3A0FE5EF5118D516D45DB5C8C29C53E20D6774143E23839D6F357B615A3468 119F8E5723CABABED55EE260329C5B646D875342C71665FD8E678EC9F1E1EF7F DB9FDAEFAFD6F5B76796A7C3CFBBEB9B69F7C68256BB87CFD71DFD161F3EFFF0 8EBE6047FB6CDCFE78D3D5F58BB3F7930FE1D5CE7C0DBD9DF6ECFAF5F93B787D 7CDED775AB77A9EB1F5C0D5EE8C7F07AFC11BEDE2F11ECB103E35F37F7BE7CFF EADE20C09DE6DCE9F63F5D1DBA67172F34ED85A6FFB8D1FB7A27B27A33FFD38B BDABAFE7DF17E1B43B5B4DA7B06AD7BABE3A773AEFDAD7FE7BC07074D5DDB1E7 776BC4D25B2EDB00BBFBEE1656F7ACC08AACAF67572BBDD9A6BDC6E7B6ADEB6F BAD6FCC5E91B5B3F8F2EBFF6FBD142BFA6D6E71D58EDEAF8C7CDF2EB25ECA0D3 D1DFBEE95E754EEFDF74FA7AB7FBEEA67376DFD1BF9FDDF6FBFA69FBEEF6D68F AE7A17BADEEB0DDB9DE69DFEFEEDCE17EB6BEFB6F7767D7EEE0125EF69AF1FE8 EDB61E5993FAE5349AF5828B4B86E17A31E97FBC9E863F7AFACDFBFACCBA38EF 996DA0FBCE6D70F5E58D7DE67EE94CFBFDD7A3D3C6C58B8B2BFDB2DB7D7D7C7A AD03B5FBB7FAC5DC72BF1EDE6B07EDBECE5873F3E9FDD5DBA3CE6DAFF7EA1F89 D9A3291DCD413CFCF9969CD6D9578F73FAB47BFAFCF8E2DFE1F44D3DE6F4F97C 4FDFEBAE7AB0F41A609DBE99CED7FDB6A5B7EDFECAB4AE0F7B20017A74DBB7EC B707CF3F009C7EFFEDF4F38ED75D74901A97D7AF7FD43B9FDAC8ACB3CBCE9ED5 EDB65FB70F6F75ABDFEF358EEE74EB3540EEEA7BF3E0CB878F079ED6EE3292ED E46966C06F10DE3BF60FAA2DCC20A4BED01BAE6313131489290EEFFD561B798E E7B788EBB954F44C3C3714DA88CD64643276E898A379D2E94D26018509F5A89E F4055373ECAD33500DF117155640C7A6043D009C5BA41135F2EB359E37F71BC7 2FF61B4707DF6A39706BCF1F838948A18CCDD0240397AE356CC18E6D3F08894B A39098BE15A42D2399623ACBA92981F856C3E9ACB7305F1A04066A42827BA0F1 421BAE6C678C2B52F22769366AE7A65B6BD6EB8719A839C8CDA323522324E9C9 8C34A4A70C62793C8C1C41BC498617410838B5083029E5376C8A711824A236C9 304960164F9E50EAC492004D69333EE5DC9AACDC11190019E069CF90374B41C8 40F896A6ED9F90898603C84034B4A895B4C81E9F0C2D79CFF1D078603C4C1E13 4CBD35991428912388EDDA612B2BC42D62BAF764C0C48B6D3F850A2C75BD90F0 57032180CD83E3FDE6C1C17EB3719C8E5C9A2E6037F2960029ED659445B5497B 3C9F9A2350389B0C0DC2C553DA84ED06D40F4968DA0E419082DCE688E6642704 D6B7889DE9E3CA243130A337857E3835F93BE9503DFC63BF513FDE6FFCF13C47 098EBB1B1666ACA73688393302C5D1B1B8A0DD301DDB725B64D7A193303B7269 FAA618894D80E99BCB13344F4E003E806F5B364C6C46F5EC342E1087D1214883 45C35AC84408D7B271C5CCD8D82C813E64FAB9551812FCC9625F2AEC02E01DF5 5381378967E44730E9311D986A82D4C2C628500F39A9312DCCF571F55300E1B6 5A0315A321CC4184156354C0346F19DA9E1B2858BF6152B85872ABA10629E858 59DBAE202AE873153850A9470DF25FA19F553065F5E870DB353927033AF2DC31 0940EE4FD4AB732563D695D9AB7887822E894CEE7285CDC2803EB28BD231D1D8 41B6CB0D7D7610EB33B6C55B9C29654CE1164931B130B6B8E244136ABBB4C1DB 9968A9B292E2527C47B91992B62AA6E4ACA51A0DEA5AA6456531A70A090DC083 008B661674842998B776952FF2241547139A5BC50B0500159756CB92B5401555 3AA81E0C16C99BE715945963DB1DD3088413FEAA5E8324536722AC066F0F5468 E2671BAD8E1905F82C574B0D740EC8A9996BF35E2956ADD2D342FE240AFECBBA 2C84447DEAC89FB2132823289B7549880C3B53F2C63D4356738426A1852702B0 2B4B27D079F6B67476A981798C7979BC71119C2E5A41C4A7743CC8346C50B89C 77365D935D90135CA9A63CB232847CE078933F78368E1C2FA0357A077B41FF9A 3D96EF84CF015FC61ED393C47C2003180483B75FF1270D1F1E82B5F4BD110D82 9AB70A1128C74405F90138F8B3721D00C59578B080839C84F68212148D3B5471 D198D37BC2AC5730F23DC7A93936F84302E5F07E097230454C986A3E843EFEB0 990F8C7B900CDEB236A6211D852DE0E153362F1C71C11B92CE7E5004721018F9 64B128210DF723C980A3B8C51AC6D698288542DAD2368BFD0243CADF95BD3118 D56ADC8E174EDFF8B336EDB0FCDC509E9ACC53564E508129F6E57BB2CFF293DC 16A74888274623AAC3895129F1C6C12456AB85D0EC5BEDE543364F0C38AED7A3 669A504093A5F1A093B0539687E5B17DE6FD6C621232C47F172B27B485E5636D 49DA26B643333665E8CC334A0516973957D04F1A393165ECE087184B49719460 A4927859B40C96AA81AF8470311AEC7510FAECAF961E7C136F38C3497C804FC3 95EFB22DB3C050E107A003844A9E49E70C672067312A22E152879F887D8B7E1E 69C638705459582D7248299ECC0B49CEEFF8EC640F041E44EF24CE56404BF42D CD702A3A97A2C55D23DE74BC91E9B0E65D92E0F55760C4590BED329F0381E842 38D7E355DC0A5643DE630727AC319ACE79C35E58ECEFD0F44547B8607FC1F2B3 BF3402591CF377AE07E6920F172C8D43C9241309188340C95CC1E76C5200D8C0 3616B305741942DC847004B605C76BE0C1793440C0102F7B2EA960536BE0C304 1CB49F04BD4614C2219066FE8C543818EC010055783FB79706093D42DD315F98 E076EC30E16192DB40DA275282BB0CB2181B29E15BE4203A48C99BA65114C1F0 D843E72476C2B82E9818976C769D779937B28B001F31CBC41457925254052DBF 860E07F92884A84C3D2E982AF7BCE03C6F4CC0629E2A3172D4013700F52A753B 8DE4D478446E67DBAC4E2E7768A4CA9718F0ACDDFFEDF237C277AE2529B08CD0 81AEC7B2561766881D29A9962BD4834AF95DAE278951455A0C7641D1CDA14349 0535BE45427F45AB06A3D380E5F976E1B4421B205E8136EDD6E21E768E560D31 1CB50C8C0419B0D2D33318892704FE45FC9FC5C376C180900A5A91643536335C A0D5B45DEB191FF73BEB46B75274C7F3C144910A33300900AEFB0916C21211BE 6134093F992D90314DED81412AD2A1C3625926B43CAB08946F908A8864719DAA 34384E59A1809C24CBB22E84CF90348C814853E26C8E471604235AE674147C67 843C89896A89A3125A598783BD0A3D5EF293B5466887E553EA92547738DC1683 4B2713748F4129C08B4A8A08E09B3051355E368E23396F9BF568004D9040ED1E 629383FC0EA4CC2CB7EC04F896D169F2127A588D0A9F732E15FAC580557C1CC9 9B15B86379536BBC64E2CEAB214390217349FE634D2216E2EF2F5D2B373BDEEE C85B2CC117073F3B0AC1E813166B8283432A65468347A8CDA323A3CA13DCE835 958E96B2E3D5BCB7581EDE97E606D4E97289090119A439DB20DCCE218599A886 1B3807E4D7F27975C2EB8A63EAD80BB057BE9A710058BD6DA91EB5EDEE13574B AA6E091396E6A9C18F06A7B774DF19F73B9F9FE1C6281F156448554A146EB213 B2E06306B6A047B19F5724C2450E4975E2DDF73CF42A73DA90398B44A089669C 0C061299659283319226955720BC7C098208F649B3B5E653EA12982B83238599 1730331008E51444442251B31819C11191A90E31A9111A1D47EA92C92C0820D3 796D4CE9920CC6BEB9164715BA4360E2175695D4F741C3F7EB464E81F2A0C462 780A2AC2EF0C6C0CF184B16A9680572C80BE65410FCAB51A04741C0903B14C82 03C1D6C79666088F20C88C848B25FE7AF815E0976D902C150B68C3A0B2F89A1F 6A35FA7D653A2719416AC822AACC673C2ABFFFA40C7F31CA57E6FCE532154FBE A36A663CDB3809FA0A5E025BD4099AF2792D3EAD300742928A0A12F4CFD2AA73 EE4D5C3F75B96CB08045890FC12F803303ADCB5BD9FCCE2B0E78F8E1F484235A 257FBE2249975B65647193DD6FCCAC7307AE74048421C9415D0107074C638DF9 C2E2C89D79109E0C7621F0406292DD4CEE1A3D6003F1C97B5CD98F4F594ED30C 057166A52319756AA5D4512D414A324A55456745D127EC4CD6A1243CBC050AB3 9D95E4FF4AD3829BC98E32A3F1B43F999448221B97C4C9998D0D54BD6011D5DD 6A188AF594F42A2D5DA1D92AABA115B44E594C2D8CDA504A2D8C55153F846F28 46F3334B7889E8472A0AADEA19B19F5A26CF42602A251B65374614EF44910B5E 436CC7E3F624F89732B0E08F6385AB4AFE22F50D69676081642294B44410F994 60414C3DB55993463063A95C406B8AE23BDBF231D90CC756C249A8B261726C60 6D7ECBA9049B8D3B4DB8868800B2B68CB91DF3ED2FF2105F1E5824DE285BA526 AF524B567900403AA7C5FD8274261279E3EC8DE51625F03DEE76D41E02BCF12D 1792ADF6C7252E4563C3E027D432CAB7AF7205124A3C412CCB5040B5E47BE492 C4BF379A3C38DB376A7A2AFD4F117C99E319A1378781E7AC42CAE4E0D1A4FE05 8A72992B5FF297CE8F47B24B5C87C983528EDED2C9D85CB7FA3F5E6099C49536 F022CA2E9EB03B26E25E49DEE530480A41EDBCB15B1D83CDA3B62FD32519371E 3DE7E6C57724A452D79DE9AC681C28452C32F5E154264A874DE5A2257EADCAB3 D9E0EA32D7B6D4DB85D80FFDDDE28D8D2D02CE38B0F35CE75E89166C92DF81D6 3077A118C0D3CF6C448953C4CA354A09CEE5A6B39F48DC39DDDD63E96783D1BB 126189870B2344A31313738CD047067B301206D57082610CA04FE970E3E72789 5AB9B21082C0B250E90CAC16A9B550949054CAA85415520119C92F14D7DAD574 5CC48A9248E12F887D2E1988B9F6C7E602C14AF9E1681516135F49EA2BAE0FA6 9FF20CE813EFB666925752112549812B2EDC6E4838F2DC5C116F6EEB9B8AD414 922E5FBC493FE2F0B96FF174791EF55C82262DC6AA39086B15B0CE7172B3FD79 98ABA6EFC3E153CE52F67E6BA696D239CEDD0DF87AF5FDE7F00B1FE27BEC5CF8 A3C0E64285E25FA474194DE3320FC6DFAEA1222DB7A18CBE3CA9A04CCCB14A13 D697E25889D79AF68863825F961FAD28A8F0407412B00B0149448A28629A9B9D 1808B25E128C4A858A5D9E5E4DF5261B84A605906DEEB6F0DB9095B20CAEB44C 55B67D80774148784D32D7C9CA5DB93E5E8FCC750A4615FA45ED30D39B629231 F0F11E25C3CEBBC41D92F412C30EBBE4C13204995B1EE9058FF45E867C3323BD 1921DFCDE0D1C84E725067FE312577BBE0A1A23262A03552BB943AED99FFA7B0 852B5B6902F7D81278B735E3D8DAB21F2B7BEF7238920BA3EEF3C3EFE597B082 ACA8316A33B194FC0F4EDCEB9C891B73123B8BC7D62C1358A4898F38807E8040 79F1CE5F8A5253AAD26477BA18373653EE49BB44B5891369E93EE37F084A7659 93B0D222BC8C7CA8DC1378B5CCE66E41B81A99A54D01B8042696F69F80E28B52 24C4202067732BD6487628BE646727D7B20587528E714B85025B2DAAB6505CE9 F69674D5077ACCF13873A72BBDFD1697FB714A72A52D003F4943CBA2C141A2A1 B30D5E5D6C99F9D04301C9244363202209FC77431B040804940CD96F930C307B 8BB782C12732E21B663C8F5D82914872B36B38325AB011E325D6BFBD0989FF97 78E79FFF0120649CE6573C0000 } insert-event-func [ either event/type = 'resize [ mn/size/1: system/view/screen-face/pane/1/size/1 my-tabs/size: system/view/screen-face/pane/1/size - 15x30 show [mn my-tabs] none ] [event] ] view/options center-face layout [ across space 0x0 origin 0x0 mn: menu with [ size: 470x20 data: compose/deep [ " File " [ "Open" # "Ctrl+O" [request-file] "Save" # "Ctrl+S" [request-file/save] bar "Exit" [quit] ] " Options " [ "Preferences" sub [ "Colors" [alert form request-color] "Settings" [request-text/title "Enter new setting:"] ] "About" [alert "Menu Widget by Cyphre"] ] ] ] below at 10x25 my-tabs: tab-panel data [ "1" [ h1 "Slide 1 - A Few Basics" text "By default these slides are white and full screen." text bold "Adding images is easy:" image logo.gif image stop.gif image info.gif image exclamation.gif text { Press the space bar, right arrow key, or left click screen for the next slide. Press the left arrow key, or right click screen to go back to previous slide. Press the 'X' key to quit... } ] "2" [ h1 "Slide 2 - Colors and Gradients" at 0x90 box as-pair system/view/screen-face/size/1 220 effect[ gradient 1x1 tan brown ] at 20x70 text "Colors and gradient effects are easy in REBOL:" box effect [gradient 123.23.56 254.0.12] box effect [gradient blue gold/2] text { Left arrow key or right click screen to go back, 'X' key to quit... } ] "3" [ h1 "Slide 3 - A Simple Window" text "This slide is smaller, and as simple as can be." ] "4" [ h1 "Slide 4 - Lots of Stylized Text" across text "Normal" text "Bold" bold text "Italic" italic text "Underline" underline text "Bold italic underline" bold italic underline text "Serif style text" font-name font-serif text "Spaced text" font [space: 5x0] return h1 "Heading 1" h2 "Heading 2" h3 "Heading 3" h4 "Heading 4" tt "Typewriter text" code "Code text" below text "Big" font-size 32 title "Centered title" 200 across vtext "Normal" vtext "Bold" bold vtext "Italic" italic vtext "Underline" underline vtext "Bold italic underline" bold italic underline vtext "Serif style text" font-name font-serif vtext "Spaced text" font [space: 5x0] return vh1 "Video Heading 1" vh2 "Video Heading 2" vh3 "Video Heading 3" vh4 "Video Heading 3" label "Label" below vtext "Big" font-size 32 banner "Banner" 200 ] "5" [ h1 "Slide 5 - Live Code" h3 "Remember, These Slides Are Live, Fully Functional GUIs!" box red 500x2 bar: progress slider 200x16 [bar/data: value show bar] area "Type here" drop-down 200 data reduce [now now - 5 now - 10] across toggle "Click" "Here" [alert form value] rotary "Click" "Again" "And Again" [alert form value] choice "Choose" "Item 1" "Item 2" "Item 3" [alert form value] radio radio radio led arrow return ] ] ] [resize]

8.4 Show.r - A Useful Line-By-Line Presentation System
Carl Sassenrath (the creator of REBOL) released a simple and productive presentation tool at http://www.rebol.com/notes/devcon07-carl.zip. Here's the code (you only need to edit the title and background image - copy and paste the rest):
REBOL [ Title: "Slideshow Presenter" Author: "Carl Sassenrath" Version: 3.0.3 ] file: system/script/args if not file? file [file: request-file/only] title-line: "Presentation Title" ; EDIT THIS diags: %diags.r save/png %logo.png svv/image-stock/2 ; demo image back-image: %logo.png ; AND EDIT THIS author-mode: off time-need: 1:00 ;-- Configuration -------------------------------------------------------- page-size: system/view/screen-face/size ;page-size: 800x600 ;page-size: 1024x800 ;page-size: 740x480 big-size: page-size/x > 1000 sect-size: page-size/x / 4 - 40 text-size: (round/to page-size/y / 32 4) - 1 ;pick [28 20] big-size margin: round page-size/x / 10 h2-size: as-pair page-size/x - margin - 30 text-size * 2 h3-size: h2-size - (text-size / 2) origin: page-size / 11 def-in: round page-size/x / 7 spacing: page-size / 100x200 ;-- Styles --------------------------------------------------------------- back-image: load back-image stylize/master [ vh2: vh2 h2-size left top font [ size: text-size + 6 name: "arial black" style: [underline] color: 240.220.60 shadow: 3x3 ] vh3: vh2 h3-size left middle font [ color: white style: [bold] ; underline] size: text-size name: "arial" ] para [origin: 10x2] effect [merge gradmul 96.96.96 128.128.128] txt: vtext page-size/x - margin - 50 font [ style: 'bold size: text-size shadow: 2x2 ] txtb: txt page-size/x - margin - 50 font [ color: sky + 30 ] txti: txt italic white effect [merge colorize red] code: tt page-size/x - (margin * 2) - 50 black snow edge [size: 2x2 color: gold] ;snow coal edge [size: 2x2 color: gray] font [ size: round (text-size * .8) style: 'bold colors: [0.0.0 0.0.80] ] as-is para [origin: margin: 12x8] ] bullet: to-image make face [ size: text-size / 2 - 1 * 1x1 color: 160.0.0 edge: make edge [color: black size: 0x0] effect: [oval gradmul 1x1 255.255.255 0.0.0 oval] ] shift-bullet: text-size - bullet/size/y * 0x1 ;bold: make face/font [name: "Arial Black" size: 480] ;scale: page-size/x / 800 / 17 backdrop: layout [ size page-size across at 0x15 box as-pair page-size/x text-size * 2 edge [size: 0x2 color: gold] effect [merge grid navy gradmul 200.120.100 128.128.128] origin 10x20 banner font-size text-size + 4 italic title-line white ;font-color silver return ] backdrop/image: back-image backdrop/effect: [gradmul 1x-1 50.50.90 100.120.140 fit] backdrop: to-image backdrop end-mark: make face [ offset: page-size * 0x1 + 40x-20 size: 140x3 ; -140x80 effect: [gradient maroon green] ] pan-mark: make face [ offset: page-size * 0x1 + 40x-20 size: 140x3 effect: [gradient maroon purple] ] ;-- Scanner -------------------------------------------------------------- *scanner*: context [ ;-- Variables: text: none part: none code: none title: none out: [] ; holds output block ;-- Emitters: emit: func ['word data] [ if block? word [word: do word] if string? data [trim/tail data] repend out [word data] ] emit-section: func [num] [ emit [to-word join "sect" num] text title: true ] ;--- Text Format Language: rules: [ [to "^/=start" skip to newline (author-mode: true) | none] some parts ] parts: [ ;here: (print here) newline | spaces ;--Document sections: "===" text-line (emit-section 1) | "---" text-line (emit-section 2) | "###" to end (emit end none) | ;--Special common notations: "***" para opt newline (emit bullet3 part) | "**" para opt newline (emit bullet2 part) | "*" para opt newline (emit bullet1 part) | ":" define opt newline (emit define reduce [text part]) | "#" para opt newline (emit enum part) | "!" para (emit txti part)| "[" example (emit code detab code) | ; trim/auto ";" thru newline | ; comment ";===" to "===" | "==" output (emit output head insert code " ") | "=image" file (emit image text) | "=all" (emit all true) | "=intro" (emit intro true) | "=diagram" some-chars (emit diagram text) | "=pad" num (emit pad num-n) | "=skip" num (clear back back tail out) num-n [to "===" thru newline] | "=" some-chars | ; ignore unknown options ;--Defaults: para (emit para part) | skip ] space: charset " ^-" nochar: charset " ^-^/" chars: complement nochar spaces: [any space] some-chars: [some space copy text some chars] text-line: [copy text thru newline] ;par: [copy part some chars newline] para: [copy part some [chars thru newline]] ;example: [copy code some indented] ; | some newline indented]] example: [thru newline copy code to "^/]" skip thru newline] indented: [some space chars thru newline] output: [ copy code indented any [ "==" copy text indented (append code head insert text " ") ] ] ; compensate for == define: [ copy text to " -" 2 skip any space para ] file: [ spaces copy text some chars thru newline (text: to-file trim text) ] num: [ spaces copy text any chars (num-n: either text [to-integer text][1]) ] num-n: 0 ;-- Export function to scan doc. Returns format block. set 'scan-doc func [str] [ clear out parse/all detab str rules copy out ] ] ;-- Load it up ----------------------------------------------------------- doc-text: read file if find doc-text "=author" [author-mode: on] doc: scan-doc doc-text ;?? doc halt ;do diags ;;; NASTY! ;-- Globals -------------------------------------------------------------- this-page: doc ; points to current page position title: select doc 'title options: select doc 'options time-left: 1.0 time-start: now/time back-flag: false ;-- Helpers ------------------------------------------------------------- title-of: :second next-page: does [this-page: any [find next this-page 'sect1 this-page]] back-page: does [ this-page: any [find/reverse back this-page 'sect1 this-page] ] limg: :load-image load-image: func [file][ either exists? file [ limg file ][ make image! reduce [page-size / 3 200.0.0] ] ] ;-- Page Builder --------------------------------------------------------- build-page: has [page out emit bull count] [ at-once: author-mode intro: false in-sect: false count: 0 ; Slide title line and indentation: out: compose [ across space spacing at (origin) ; vh2 (title-of this-page) return ; indent margin guide ] emit: func [blk] [append out compose blk] bull: func [depth] [ emit [pad (20x0 * 2 * depth + shift-bullet)] emit [image bullet effect [key 0.0.0]] emit [pad (-8x0 - shift-bullet)] ] foreach [type data] this-page [ switch type [ sect1 [ if in-sect [break] in-sect: true emit [ vh2 (data) return indent (margin) guide ] ] sect2 [emit [pad 0x4 * spacing vh3 (data) return]] para [emit [txt (data) return]] code [ emit [ pad to-integer margin / 3 code (trim/auto data) return ] ] bullet1 [bull 1 emit [txtb (data) return]] bullet2 [bull 2 emit [txtb (data) return]] enum [ emit [ txtb (join count: count + 1 [". " data]) return ] ] pad [emit [pad (data * text-size * 0x1)]] txti [emit [txti (data) return]] define [ emit [ pad 30 txt def-in no-wrap (data/1) txtb (data/2) return ] ] diagram [ type: layout/tight blk: get to-word data emit [ pad (as-pair margin 30) ;panel (type/size) [(blk)] return ] ] image [ data: load-image data emit [ pad ( as-pair page-size/x - data/size/x / 2 - margin text-size ) image (data) return ] ] intro [ intro: true at-once: true ] all [at-once: true] ] ] out: layout/tight out offs: 100x100 if intro [ foreach face out/pane [ if face/style = 'txt [offs: 110x120] face/offset: face/offset + offs ] ] out/pane ] ;-- Show page: show-page: func [out] [ ; Do we step through items one at a time? either any [at-once back-flag] [ items: [] ][ items: copy next out clear next out ] screen/pane: out if at-once [show-end-mark] show screen back-flag: false ] pan: [] show-end-mark: does [ time-used: now/time - time-start either time-need - time-used <= 0:00 [ end-mark/effect/3: red end-mark/size/x: 140 ][ end-mark/size/x: ( to-decimal (time-need - time-used) / to-integer (time-need) ) * 140 ] append screen/pane end-mark ] ;-- Traverse pages: next-item: does [ if not empty? pan [ append panel pan/1 remove pan if empty? pan [ append screen/pane pan-mark ] show screen exit ] either not empty? items [ if items/1/style = 'panel [ panel: items/1/pane pan: copy panel clear panel append screen/pane items/1 remove items next-item exit ] if items/1/style = 'image [ append screen/pane items/1 remove items ] append screen/pane items/1 remove items if empty? items [show-end-mark] show screen ][ next-page show-page build-page ] ] back-item: does [ pan: [] back-page back-flag: true show-page build-page ] ;-- Handle Keystrokes: do-key: func [key] [ if key = escape [quit] switch key [ #" " [next-item] #"^(back)" [back-item] down [next-item] up [back-item] page-down [next-page show-page build-page] page-up [back-item] ] ] count-slides: has [n d] [ n: 0 d: doc-text while [d: find/tail d "^/==="] [n: n + 1] n ] this-page: doc ;next-page halt ;-- Build screen and event handler: screen: [ size page-size across ] if not author-mode [ append screen [ at (as-pair page-size/x - 150 20) t1: txt form now/time at (origin) guide v1: vh2 "Show07.r Information and Setup" return vh3 200 "Version:" vh3 gold form system/script/header/version return pad 0x30 vh3 200 "File: " vh3 gold form file return vh3 200 "File size:" vh3 gold reform [ round (511 + size? system/options/script) / 1024 "K" ] return vh3 200 "Slides: " vh3 gold form count-slides return pad 0x30 vh3 200 "Page size: " vh3 gold form page-size return vh3 200 "Font size: " vh3 gold form text-size return vh3 200 "Head font: " vh3 gold form v1/font/name return vh3 200 "Body font: " vh3 gold form t1/font/name return vh3 200 "Origin: " vh3 gold form (origin) return vh3 200 "Margin: " vh3 gold form margin return vh3 200 "Spacing: " vh3 gold form spacing return ] ] screen: layout/tight screen screen/image: backdrop screen/color: navy view/new screen insert-event-func func [face event][ switch event/type [ key [do-key event/key] down [next-item] alt-down [back-item] close [quit] ] event ] items: [] if author-mode [show-page build-page] do-eventsUsing the program above is easy. Save it as %show.r. Edit the "title-line" and "back-image" variables. Upon running the program, a file is requested. Save the following text file as show-example.txt, and load it into show.r when requested (you can also examine the text files included in the download at http://www.rebol.com/notes/devcon07-carl.zip - it contains three actual presentations created by Carl). The space bar, mouse, and cursor keys control progress of the slide contents:
===Presentation Title =intro ---Nick Antonaccio Operating Manager Merchants' Village, LLC Pittston, PA 2013 ===A Main Slide Header ---A Sub Header (Some sub text) =pad #Numbered item 1 #Numbered item 2 #Numbered item 3 #Numbered item 4 ===Another Main Slide ---Another Sub Header *Bullet Item 1: **Sub Bullet Item 1a **Sub Bullet Item 1b **Sub Bullet Item 1c *Bullet Item 2: **Sub Bullet Item 2a **Sub Bullet Item 2b **Sub Bullet Item 2c *Bullet Item 3 *Bullet Item 4 ===A Third Main Slide ---Subheader: =image rebol.gif =pad =image info.gif ===Slide 4 ---Subheader 4: Topic 1 - idea 1 Topic 2 - idea 2 Topic 3 - idea 3 Topic 4 - idea 4 [ A preformatted text block: Idea 1: some thoughts Idea 2: some thoughts Idea 3: some thoughts Idea 4: some thoughts ] ===Slide 5 Some Text ---Definitions: :Idea 1 - definition of Idea 1 :Idea 2 - definition of Idea 2 :Idea 3 - definition of Idea 3 :Idea 4 - definition of Idea 4 =all ---Last Idea 1 ---Last Idea 2 ---Last Idea 3 ### Notes: nothing below the 3 pound characters appears in the presentation.
Because this program is entirely REBOL code, you can make changes and add functionality to it as needed. And just as with all other REBOL software tools, you can transfer, install, and quickly send by email the entire program, together with the REBOL interpreter, even to users with low powered computers and slow bandwidth Internet connections. The program will run on any operating system supported by REBOL, and the entire setup is free for anyone to copy, use, alter, etc.

8.5 Creating "Screen Shot" Images of GUIs
When building presentations, it can be helpful to have screen shots of programs and/or to build graphic layouts using the REBOL graphic dialect. You can use the "to-image" function to create images from GUI layouts, and the "save/png" function to save image data to a .png file:
REBOL [title: "Create Images From GUI Code"] save/png %image1.png to-image layout [ size 600x400 backdrop white h1 blue "Slide 1" text "Here's a red box:" box red "I'm red!" ] browse %image1.pngHere's an advanced graphic example by John Niclasen (the "draw" dialect used here will be covered in more depth later in this tutorial):
REBOL [title: "Shiny Black Button"] sz: 200x400 img: make image! sz img/alpha: 255 draw img compose [ pen none fill-pen linear (as-pair 0 sz/y / 2) -50.5 70.5 90.0 1.0 1.0 45.45.47 9.9.11 108.113.117 circle (as-pair sz/x - 115 sz/y / 2) 70.5 fill-pen 1.0.5 circle (as-pair sz/x - 115 sz/y / 2) 68.5 reset-matrix fill-pen linear (as-pair sz/x - 115 sz/y / 2) -60.5 30.5 45.0 1.0 1.0 161.164.169 161.164.169 89.94.100 box (as-pair sz/x - 115 - 26 sz/y / 2 - 26) (as-pair sz/x - 115 + 26 sz/y / 2 + 26) 10.0 fill-pen 1.0.5 box (as-pair sz/x - 115 - 22 sz/y / 2 - 22) (as-pair sz/x - 115 + 22 sz/y / 2 + 22) 6.0 reset-matrix fill-pen linear (as-pair 0 sz/y / 2 - 26) -50.5 100.5 90.0 1.0 1.0 1.0.5.255 200.214.226.224 200.214.226.128 shape [ move 154x200 arc 16x200 68.0 68.0 arc 154x200 -149.0 68.0 ] ] save/png %black-btn.png to-image layout [ backdrop 1.0.5 image img ] browse %black-btn.png
8.6 Embedding Binary Resources (images, sounds, files etc.) in Code
The following program can be used to encode external files (images, sounds, DLLs, .exe files, etc.) so that they can be included within the text of your program code:
REBOL [Title: "Simple Binary Embedder"] system/options/binary-base: 64 file: to-file request-file/only data: read/binary file editor dataUse "load (data)" to make use of any text data created by the above program. This example uses a text representation of the image at http://musiclessonz.com/test.png, encoded with the program above:
picture: load 64#{ iVBORw0KGgoAAAANSUhEUgAAAFUAAABkCAIAAAB4sesFAAAAE3RFWHRTb2Z0d2Fy ZQBSRUJPTC9WaWV3j9kWeAAAAU1JREFUeJztlzEOgzAQBHkaT7s2ryZUUZoYRz4t e9xsSzTjEXIktqP3trsPcPPo7z36e4/+3qO/9y76t/qjn3766V/oj4jBb86nUyZP lM7kidKZPFE6kydq/Pjxq/nSElGv3qv50vj/o59++hNQM6Z93+P3zqefAw12Fyqh v/ToX+4Pt0ubiNKZPFE6Ux5q/O/436lkh6affvrpp38ZRT/99Ov6+f4tPPqX+8Ps /meidCZPlM7kidKZPFE6kydKZ/JE6UyeKJ3JE6UzeaJ0Jk+UzuSJ0pk8UTMmvn8L j/7l/nC7tIkonekLdXm9dafSmeinn376D/rpp5/+vv1GqBkT37+FR/9yf7hd2kSU zuSJ0pk8UTqTJ0pn8kTpTJ4onckTpTN5onQmT5TO5InSmTxROpMnasbE92/h0b/Q //jR33v09x79vUd/73XvfwNmVzlr+eOLmgAAAABJRU5ErkJggg== } view layout [image picture]The program below allows you to compress and embed files in your code. This compressing BINARY RESOURCE EMBEDDER program will be referred to many times throughout the tutorial. Save it to a .r file so that it can be run later:
REBOL [Title: "Binary Resource Embedder *** SAVE THIS PROGRAM ***"] system/options/binary-base: 64 editor picture: compress to-string read/binary to-file request-file/onlyTo use the compressed version of data created by the program above, use the following code:
to-binary decompress {compressed data}For example:
REBOL [] image-compressed: load to-binary decompress 64#{ eJzrDPBz5+WS4mJgYOD19HAJAtL/GRgYdTiYgKzm7Z9WACnhEteIkuD8tJLyxKJU hiBXJ38f/bDM1PL+m2IVDAzsFz1dHEMq5ry9u3GijKcAy0Fh3kVzn/0XmRW5WXGV sUF25EOmKwrSjrrF9v89o//u+cs/IS75763Tv7ZO/5qt//p63LX1e9fEV0fu/7ap 7m0qZRIJf+2DmGZoVER5MQiz+ntzJix6kKnJ6CNio6va0Nm0fCmLQeCHLVMY1Ljm TRM64HLwMpGK/334Hf4n+vkn+1pr9md7jAVsYv+X8Z3Z+M/yscIX/j32H7sl/0j3 KK+of/CX8/X63sV1w51WqNj1763MjOS/xcccX8hzzFtXDwyXL9f/P19/f0vxz4f2 OucaHfmZDwID+P7Hso/5snw8m+qevH1030pG4kr8fhNC4f/34Z89ov+vHe4vAeut SsdqX8T/OYUCv9iblr++f67R8pp9ukzLv8YHL39tL07o+3pekn1h/dDVBgzLU/d3 9te/Lki4cNgBmA6/lO+J/RPdzty8Rr5y94/tfOxsX6/r8xJK0/UW9vlH93/9oAzR e09yKIUBVbT9/br/U/m7x6CU98VAAJS2ZPPF/197eEDhtfs9vX9rDzc6/v3qzUyo nJA/dz76Y77tHw+w3gXlbEMpDKihza/+7/o/c3+DU54tDwsobR2/fXR/qYXBiV8T t3eDEmpA/d9LDASK0y/tnz+H/Ynmt78E1vti7lAKA6pouxz/X7v+uR045ZFdRE6x 1q21pG7NiSzx1f5R40pvvdNn+oB1P4Onq5/LOqeEJgCemFy1KQgAAA== } view layout [image image-compressed]You will use the binary resource embedder regularly. It's a good idea to save it now to your desktop or some location on your hard drive that's easily accesible.
8.7 Playing Sounds
Playing .wav sound files is easy in REBOL:
insert s: open sound:// load %/c/windows/media/tada.wav wait s close sJust as with images, you can use the "Binary Resource Embedder" program to save sound files as code in your programs. This example loads and plays an embedded sound:
REBOL [] my-sound: load to-binary decompress 64#{ eJxtlHtMU1ccx6vGR3kWLMWpm5pskc2pi3MkqFNYJsh0oigV5KEULK2lpdDb9vbe 9r56W1pogSKltBQqSGGAlYeimAlDkU1H1KgssrhBmFNhjAECHcZl2bVo1LjfyTm/ nO/vdf45n9joyMjphTTaoQj2Tq4QWB1Io9HmUSt8Fc2z59GWUEp6KpB6k8pC3zJs 7nzTvXbB/sdhmMdjcx5744q9SkHf1l4f/LLhq+K33jZnOI6/3gZBVAjq8Qj6Mkzl ek5KwBEpL11saGyrANhx4kKHzUBgmFKhUKKIAgBAlNRqNaSayiO1pEqeLeTzxZjJ nA+KAK2ByBaidle1XoGVnrLjx3kSlULEOSaBIBmkMZkL9Lo8owYUZYqyRLwMMVJo NqgkoL7MQoqOiXUVzpPl1a7OiyXS6K2RBxJiE1KgitrTteYyq0ktStgbE3MwTUha 7BXFmDxHjpGITE5Unu++dLaupc2UFTLfd5PEZi8xObp7W/Ts8N3Jx3npXMjqarQA 8XFHpJBUeAwscNRZ8wwF1a7auvIzVWRCwCL/XY6B4c5CWGYol+8LWfk52X63t1Ka mnw0Izk+XkCcbDpVKueKUdvpRofVfulms3TlIh8mODQ7fjpx2359ERTFZB3u+Gt2 MH+zr8+mgwJMZ2/vajYeDt2aYr72U7eNUDf+es+yYQFzQcQvs+MTmQH0zaTTsued j/HHT2b6vloc6L0+71Z/hw2RykVHvt6bVtTZd+ecraCq3sT28fNnFD4bdQ/sWhwQ xHG14HH7iHtPpi6ELgn0CnFNTQybdwSviYLs39TYyqwN565cq+evoQctDvv+6cjT ns/ogQGH6r4tVwh0PWMjzq1egb5rqqfHJhq3+Pt9kOW61l2jh3TOG0Pt/BV01sL9 A+7H/5xi+TGWpl/pq0cScxruP2qI8g70W2Zxj7ovb/cJYCS0D49dMXC5up4H13OC vFkLEodnhv8t8WUE+AsHn9w27totPj94XbXCZ6l31uj45MOkJUz65tbJiZGahJ1p rv6fcZYXa/7eodlHtLplXqyFkXenJ7qSwz4VNlxuTlrK8NvYNDPqrl9LDcq4Pzk5 aIyNFpdftITSmfQP256NuH9jL2L6MhVDk2Mdiojt8WBZniB8bWha7f2JOyf2BLO2 4b1jk301pAxAeFtWegfvbJgan36ofc/Hj7G/cuCPvlaYx04SZPCT4lKExvqLbRXg wS+jBZbv+vuuNhWDieuCAoN3EP0zU5PnOcu9vEO41Tdu9zp1AOc4N4PDPpSYlV/T dtaBcWJi+YbWH+/e7HAoD6zyZyyP0t9z//1nq2Cjj/8nKaXtP1ytOyHn8TkZ3DRu ugjWWU9WFqMivhCznunq6W42Z4Yt8wrYwGt++NR9x5K0/t33I0TFrZ1tTj3ATU7l iUFQli2SwFrTiaJ8jdZgrmpou+CqkOz+yD94XZK568Hvt5rwo3u+iEmR6IttZUYS yBRkyhFCDcnEmdkArMkvsTlqapx1VeWGnCNRYWHhidKi+pbW+tJ8pVwuQ3G1BoVz eOkcbg6caywoyMWVIKTEqf9ozNPrcrUYLMuRABBO6nUkppACAIzpqLQ8LYmpIBAE FRAEwbASwQmCwFSwgpIgJarW6inTUfUakiTVOAJTMkJoNCSuAmVSQCqHUdwTec4X tRrHVEpYqaKMIg9OqNVqAvcgh9RoczUkgSKeGMUlRKWkBqpQah6Gzkko/oJjOE7g L2FFAc2DM8zTjHoZDKsw4vlEDwyRF5xUKZVUj7lagsCxOfYR/wHwfuhW/AUAAA== } insert port: open sound:// my-sound wait port close port
8.8 Launching Code in Separate Processes
For background sounds and other elements of a presentation, it can be helpful to run code sections as separate programs which don't block or interfere with the operation of your main program. You can accomplish this easily by writing the separate code to a text file, and then using the "launch" function to run it. The "launch" function opens a new instance of the REBOL interpreter, to run the loaded file. The launched code executes as a totally separate and independent program. Be sure to include a REBOL header in the saved program:
REBOL [] write %playsound.r { REBOL [] insert s: open sound:// load %/c/windows/media/tada.wav wait s close s } launch %playsound.r
8.9 Running Command Line Applications
The "call" function executes commands in your computer's operating system (i.e., DOS and Unix commands). This can be really useful when creating presentations of all kinds. The example below opens Windows' Notepad to edit the "C:\YOURNAME.txt" text file created earlier (leaving out the /show option runs the program in a hidden window):
call/show "notepad.exe c:\YOURNAME.txt"This next example opens Windows' Paint program to edit an image we downloaded earlier in the tutorial:
call/show "mspaint.exe c:\bay.jpg"Here's an example that embeds an executable program into the code, decompresses, and writes the program to the hard drive, and then runs it with the call function:
program: load to-binary decompress 64#{ eJztF11sU2X03K4VqJsrkZJp6OzchhFJsx8qDB9od1fHdIO6ds7AgJX2jttyey/p vWUjJuNnmNhMibzwaCSLi+EBE1ziGIkBGh0BSYTwwAMme9Dk4kgkgSiKcj3nu7es QrKFhMUQOcn5+c7fd875+vXe27FJAg4AbIiGAQwWIwZMEbqTcmODN5xRdmRi6aoy Z83YogngLlaNtV+s6kV7q9KelHeu9LYqQTXt7e/v97UqLcLuqKJIvriShnAIoJ0r gXvPn+StlDAF5dyzHLwAdlw4TZ1Mm7oQvWDu7jKLslsxBc4KQ30bb9bMHF3F/D5j MFAHEIbHD+cwb88s9riSEIjvK7EKogZs//bxAvQmYlqM5JsOUwHPWFgEAYDTvqTp eYdy1Fn5Sh/O96h9nLrrDcD4IpQm7UOkWL/nt6MlqMvxrkl+GVWS7xqWalzDzqGz 9rbyD5ehpmnl+ezt3M/RSPe7Q9/ajeh5+9Ztm3vKh9xoM7SaimLUR18C2JKf+Kg2 APoJwzDOuiAF+hHU/pHXryObdLyP+y2kEhx7UaLfo0gq/RJa60/n88Ndrpz7FmqG u5bk3L8zwdWXc0+jdOYXkn4lnYfW++/qOPLyDz7BfH3jTXVnplx949inhPvnSgw/ 8RSIHM7P8PdSUYtxlxSkONE+o/u7EkNElMbpcuRKUhTjmLH/iHbDQQ7DHqL77zbh oQxeRa9duBQHkRj+HnIdr7y/e178AvmmnHt5VQAmaNo59/EZ8QSJAY7EURJvMu2x KipYj2CaEToYve2eYYiwl4rWY6jN8RWF5XtsuWSyhO7aJG8XXQFkNdWYIqIHK8nH 8FOSFJMoteEfZfQEo1SNCPCW2/BTjWK1uXkp9dDDegjrDqpkAUtiJhNp4ma3qUrx MG6dqkyFMQ2ExQmaxgU2c/07D2ZJsCz3Q68Xh76Cvac2pZwi8jCO8rIZd4jielmc uHxmsEMe1vMBZJf0YY8Pda95yH5p+tWrI86XMZbTE5a1gVlXFKyryeowp0Cy4Wf+ hdSrWGp26N008hW4XnS6/OBS7MnUVHoK0osoTV+22qF56c95qKdtZBzB66J/imSc /Rmsg/KDdHFbA9O3RrZWByD/qPf1KTCwze3y2KCbn9vnP4ExoItiwr11zvncqq6+ oXGV//XVa5qCzXxL6M3ZfBfMZyFPBvywgD3FGDjLnGVl83o4T+HJAZ/PFxWTqrcj GxerHljRqyL9sWXxqU2/nkHki1H4HDkvJeM7vZooeLdnNU2R10K34G1XdgveTmE7 vmv7fNDcFY1u3ABpNa5J6rZd9MouqGpjw6z1GLXn6vDxV/s9o1cYvcroNUanGP2J UZ3RG4zeZPQ2o3cY/YtRqCdqZ3Qho6WMuhitYHQZ0pr6mRr21Zvv03VFuuMoX0Gd VqT7BlupKFoXw8eo/8yynUR+HvEa4g3EPxEXYuwSxOWIaxADiGHEBKKGeADxCOIx a1wXkE81zH/ut0OdG0LtjQ2+hCSBzLUKWoeSyErC+pickIQgfAmhgaSG319xPEvo ioQ6Ld9D0CL04ddZQuknaxA4W1hRtXeySa0DXWM7BHjDFhHkhLUKYs2cJTcrA0H4 mmtXYgk+m1GVTBBOsVVbXJGDsNTWKexIqpqQ4aWYqgbps4LPCDFNMPcLYXQpldrC g0bcVHcKcQ220DqyB4PTHYKWScZVgCGsw/LBEgHWsjYLZR2zRTMxWZUwfaFwOAot SXVXTIuLM9V/ZeuSMw/UxW/s4KOF6W2GNjmp8Uo6rci8ImsZRVLxG+1hZWhgrlv6 /4F/ABcSIgQAEAAA } write/binary %program.exe program call/show %program.exeThe "call" function has many options that allow you to monitor, control, and make use of output from external command line applications. Type "help call" into the REBOL interpreter for an introduction. For more information, see http://rebol.com/docs/shell.html.
8.10 Creating Simple Animations
You can place your widgets at specified coordinate positions (XxY coordinates indicate X pixels over and Y pixels down):
REBOL [] view layout [ size 600x400 at 200x250 btn "button 1" at 300x350 btn "button 2" ]Change a labeled widget's position using the "/offset" refinement, followed by a colon:
REBOL [] view layout [ size 600x400 at 20x20 btn1: btn "button 1" at 100x20 btn "change button 1's position" [ btn1/offset: 300x250 show btn1 ] ]You can create a coordinate position from two separate numbers, using the "as-pair" function (paste/F5):
REBOL [] x-size: 600 y-size: 400 x-position: 20 y-position: 20 view layout [ size (as-pair x-size y-size) at (as-pair x-position y-position) button1: btn "button 1" ]To create a repeating loop, just copy the line below that starts with the word "box", and the closing 3 square brackets, into your GUI code. Anything inside those brackets will be repeated continuously. This is a simple way to create continuous motion:
REBOL [] view layout [ size 600x440 btn1: btn red box 0x0 rate 0 feel [engage: func [f a e] [if a = 'time [ btn1/offset: btn1/offset + 2x2 show btn1 ]]] ]To control movement using keyboard controls, you need to check for user keystrokes:
REBOL [] view center-face layout [ size 600x440 text "Press an arrow key" key keycode [left] [alert "You pressed the LEFT arrow key"] key keycode [right] [alert "You pressed the RIGHT arrow key"] ]Put the motions to be performed inside square brackets following an if test:
REBOL [] direction: "down" view layout [ size 600x440 btn1: btn red box 0x0 rate 0 feel [engage: func [f a e] [if a = 'time [ if btn1/offset/2 > 420 [direction: "up"] if btn1/offset/2 < 1 [direction: "down"] if direction = "down" [btn1/offset: btn1/offset + 0x5] if direction = "up" [btn1/offset: btn1/offset - 0x5] show btn1 ]]] ]Use REBOL's "within?" function to test for graphic collisions (i.e., when graphics touch, or share coordinate locations):
REBOL [] direction: "down" view layout [ size 600x440 btn1: btn red at 20x350 btn2: btn green box 0x0 rate 0 feel [engage: func [f a e] [if a = 'time [ if btn1/offset/2 > 420 [direction: "up"] if btn1/offset/2 < 1 [direction: "down"] if direction = "down" [btn1/offset: btn1/offset + 0x5] if direction = "up" [btn1/offset: btn1/offset - 0x5] show btn1 if (within? btn1/offset btn2/offset 1x1) [alert "Collision!"] ]]] ]This simple program demonstrates the some of most important animation techniques discussed here. Catch the falling pieces:
REBOL [title: "Catch"] alert "Arrow keys move left/right, up goes faster, down goes slower" random/seed now/time speed: 11 score: 0 view center-face layout [ size 600x440 backdrop white across at 270x0 text "Score:" t: text bold 100 (form score) at 280x20 y: btn 50x20 orange at 280x420 z: btn 50x20 blue key keycode [left] [z/offset: z/offset - 10x0 show z] key keycode [right] [z/offset: z/offset + 10x0 show z] key keycode [up] [speed: speed + 1] key keycode [down] [if speed > 1 [speed: speed - 1]] box 0x0 rate 0 feel [engage: func [f a e] [if a = 'time [ y/offset: y/offset + (as-pair 0 speed) show y if y/offset/2 > 440 [ y/offset: as-pair (random 550) 20 show y score: score - 1 ] if within? z/offset (y/offset - 50x0) 100x20 [ y/offset: as-pair (random 550) 20 show y score: score + 1 ] t/text: (form score) show t ]]] ]Your ability to create interesting animations is limited only by creative application of movement.
8.11 A Simple Animation Framework for Presentations
A simple animation framework, specifically designed to make easy work of moving and resizing GUI elements in presentations, created by Jeff Kreis, is available at http://www.cs.unm.edu/~whip/presentation.r (be sure to download the demo file at http://www.cs.unm.edu/~whip/test-prez.r). A short discussion of this tool is available on the REBOL mailing list at http://www.rebol.org/ml-display-thread.r?m=rmlBYZS
8.12 Using Animated GIF Images
Another easy way to work with animations in REBOL is with the "anim" style in GUIs. Anim takes a series of still image frames, and plays them in order as an animation with a given rate. The basic format is:
view layout [ speed: 10 anim rate (speed) [%image1.gif %image2.gif etc...] ]The following script will convert an animated .gif into a folder filled with individual frame images:
REBOL [] gif-anim: load to-file request-file make-dir %./frames/ count: 1 for count 1 length? gif-anim 1 [ save/png rejoin [ %./frames/ "your_file_name-" count ".png" ] pick gif-anim count ]This next script will convert a directory of images (such as above, or any other series of images) into an embeddable block of REBOL code. It looks for all the images named [%your_file_name-1.* your_file_name-2.* etc...]:
REBOL [] system/options/binary-base: 64 file-list: read %./frames/ anim-frames-block: copy [] foreach file file-list [ ; Unique portion of file names for your image frames go here. ; Leave out this check if you instead want to convert all ; files in the directory: if find to-string file "your_file_name-" [ print file uncompressed: read/binary file compressed: compress to-string uncompressed append anim-frames-block compressed ] ] editor anim-frames-blockHere's some sample output:
anim-frames-block: [64#{ eJxz93SzsEwMZwhn+M4AAg1g3ACmGsCsBjDnPxj/B1P/waz/YM4oGAXDBij+ZAHT OiAClCfYOf4zCHLIeGxYcLCZQ1gr5sSGhYfbBZS95nhsXHS0W8I4686JjYuP9ys4 d8l4blpycrJG8KqYk5uWnp5ukHxqjufmZWdnWxS/OsPJcODoPLtKprUcW9TPLXJT V7LdFZIZuMx/Ll/rrJCkC3NZ1ztd6SpVCG+L363EsXpCTvhmtovzVCWurr7R6jG7 rzZarKFpd8XTS77Z1/Xu7Qn+vunr6+/v725rqv6nm/Oj4Or2Ll7jvDUOa8+e6FX3 3uYjbPz0fN/RKjbeWcU+Z5do2qfN2lWaelnXfbveKwkz7ytLqu0qBK6Xed1cyfhG TC58xeujhyuF422FXxQeOPybbR1nzbbP18+khtXvu/H95Ns7Gzdv5ZtfaVX64fjZ crf/d6xPvV7XmJ7PZ1/x/ueXm/nXrOfVZKyZ+DL8nt85zhWzqu8LPosvPyYZEdW8 QrJjvjdj3TOFJuXQFVEVEl0iC9L49pVJJvZcnR7XLn/w+ux64XUpizrvbF0R1PFx 4QvB3s29OxLylB9tW9Cj9+vEol5NLk+5ia7vLB74GvxbETxZRklSqI+HyWNpR7ri VbkJtreOp05nF1O/EeGW9C01/RqjmVrF3l7PZxnfPStv12qxsjBYAwBolvDW2AQA AA== } 64#{ eJxz93SzsEwMZwhn+M4AAg1g3ACmGsCsBjDnPxj/B1P/waz/YM4oGAXDBij+ZAHT OiAClCfYOf4zMHLIeGxYcLCZQ1gr5sSGhYfbBZS95nhsXHS0W8I4686JjYuP9ys4 d8l4blpycrJG8KqYk5uWnp5ukHxqjufmZWdnW6hqBUwQfnxuvkPltxaJLSsuLOTt ZWPdIPzSaal3vZUth6nWhZUsq7NsrUqzQ9f47K17qyWmdW1T2txFsreLdW/Pydu6 rXe2mHrsYuf3j86uLn95Z1/Qf6ZnWeUGD2e38V/3WVOh9viYkfzh3Fvmb1Iap+oq P7OUKH64ocH2tsisGfkvTy7nXi6nG/n11dGZzLv3RQt8On3c19zY7e8stbyDCxtf h0rLZBZuKjyYFrv6jsLdZ8xr99lGi3wueRLuGN6+zqSq7MW1700y/hHle4o/PhP8 5Xt+397f3z88Pj3ff/++v79/vGdnYbAGAJfEqNM/BAAA } 64#{ eJxz93SzsEwMZwhn+M4AAg1g3ACmGsCsBjDnPxj/B1P/waz/YM4oGAXDBij+ZAHT OiAClCfYOf4zMHLIeGxYcLCZQ1gr5sSGhYfbBZS95nhsXHS0W8I4686JjYuP9ys4 d8l4blri2cIVNC+GU2Hp6elcEX0tnsbLfPpNs++9mTE57fRcyepfJZxfFgUsdNWU s51l8ihoma+8XatU6cOQVaHCca6zQh+GrYvlrWOVnvbgxrzUo/POzrz2JmpuLuu+ VuntT+9ML316T3VWuf79HXX/t/GuKTJIPBj5UW7bzB0fko75frwVGzP1ffIRa934 tpiQp88O9Zq3q84pL3qwq593uZ621dus61NCJ097K/714b7l3tf1bAv03jfNmv/v 264t3wu2Hn0r9973y6uiy2aql235hJeef35hovexONmK8jc3rzapXLeL03r+6cXl 1fHn9+39/f3D49Pz/ffv+/v7x+fX98/v3////1NWFgZrALxatNdHBAAA } 64#{ eJxz93SzsEwMZwhn+M4AAg1g3ACmGsCsBjDnPxj/B1P/waz/YM4oGAXDBij+ZAHT OiAClCfYOf4zMHLIeGxYcLCZQ1gr5sSGhYfbBZS95nhsXHS0W8I4686JjYuP9ys4 d8l4blpycrJG8KqYk5uWnp5ukHxKZMWCZWdnSuW+urOSId11nkP+rx6JLS8C2l0n y6XO2PLyUovvXDtTCdNXV5pCl8YtnRn68tq6qOVNX6tKdW4uT+ud5sv9RTt6Xt79 Vz3a4Stu7Cq7+OitZ/i7i3tza5n4tCo+3JzWdniTz5oI1cfHNOVXt2pWqp87VaPv LZf1413C3s7pdmKys0rSL88PZGbbe+vzva1rY3+/PV32+sCubRtnnd0rkJdwj/0h 0wyemh2p644UC7fl7H778NGh3vO6fKbGX1/f2Jx9/9ze3d/fPzjczSvvv2/Pz88v Lq+Oj7dTYLAGANdbpyswBAAA } 64#{ eJxz93SzsEwMZwhn+M4AAg1g3ACmGsCsBjDnPxj/B1P/waz/YM4oGAXDBij+ZAHT OiAClCfYOf4zMHLIeGxYcLCZQ1gr5sSGhYfbBZS95nhsXHS0W8I4686JjYuP9ys4 d8l4blpycrJG8KqYk5uWnp5ukHxqjufmZWdnWxS/unNy8/Lz8x2auWR/BTVeXOwi Khe7y2Sl47KAiVamXApZV5b4rnWSXbVVO3RB3OF/PN7X1G9usjnfdXdl2dpz2/IK D339VZZ3fVfZ2kdnd5uqx++t+/9tqvaMlWfXh3IrT7sZ/jHxaHim0zWtSqOnM6a9 FDtbU26cfkDPvrlNc1dm6kVTb22Lv5alaYfm5C+qu3OrNPfa+tzj13Ijv+XemZzI zv9n+oq7Kye6f9+js2Fz5IFZx4PK+MR+JSy/sTn7/rm9u7+/f3C4m/m7pACDNQAX yZ/iJgQAAA== } 64#{ eJxz93SzsEwMZwhn+M4AAg1g3ACmGsCsBjDnPxj/B1P/waz/YM4oGAXDBij+ZAHT OiAClCfYOf4zMHLIeGxYcLCZQ1gr5sSGhYfbBZS95nhsXHS0W8I4686JjYuP9ys4 d8l4blpycrJG8KqYk5uWendyiezhkdy8zHemsfm9O5LG6m7zHGqjWKRCMo7MY+h4 Z/IrYGXwMp65dq2rAl6FrGJbG3fUKuB12DrPvVqs2gFvwlelHZ/ku3qadvSilMP7 9kqW653fWvay6ezq67rxS6r/P1qjPWPDg4Nu/N+/rvyh9/iYt7zzNs0So6enpi2M cuuRNLp3qJH/d6hNlEnY+eXS09l6w0qzLq+PPP7s98yy3N2Fp5+dvTtVN78lqf77 u5XTi3wfHpYVj5lTnX3xfsHkeDe98qrS11catc/PK7D+/u74fnNpHv19e35+fnF5 dfz5fXt/f//w+PR8//37/v5mYGJisAYARqapGj4EAAA= } 64#{ eJxz93SzsEwMZwhn+M4AAg1g3ACmGsCsBjDnPxj/B1P/waz/YM4oGAXDBij+ZAHT OiAClCfYOf4zMHLIeGxYcLCZQ1gr5sSGhYfbBZS95nhsXHS0W8I4686JjYuP9ys4 d8loBjYyMaj5ToqJNHjqOV0zsq/l56RnnjPlcq9t6Zy8+Nx8w+okFq8vywK6XDvl ZGdNeR7Uyb9oUY7X55dH2INX7trCZbr62oIYSa+vv65mRDRHs05rrRR7GLU09+K+ v5LmD++sKuW/d3R2+YO4fbUn//G+MV+bsKpF9JzvnSKDx/vbhJ3DTkbo3j5coB2v F72z4MzWubrBbLJWL25fWuZv7/d6y4q0bdMNj6udub7mzYnGuVV+v6qK8k/sl/We l7Nb/+Ojyv5ytX0yFq/2LnRdfW3P79ef515b73/9nFRGSVPJ00c2fXwSf9685y1d 7B9ft/fu53ei/f3/5xnVtie8f33//P79wEKATeNBA4tYxoNGDrUVD5p4zF48aBZw 00h0ZGRksAYAd264o18EAAA= } 64#{ eJxz93SzsEwMZwhn+M4AAg1g3ACmGsCsBjDnPxj/B1P/waz/YM4oGAXDBij+ZAHT OiAClCfYOf4zMHLIeGxYcLCZQ1gr5sSGhYfbBZS95nhsXHS0W8I4686JjYuP9ys4 d8l4blpycrJG8KqYk5tUvVi5Yia1eG5edqbPtPjSnpWBy/0YDCvDvvwsXh7Q6TL5 kI1UYGbQMv65Wq2nAl6FrApd++vIrA8HmRc4smbxni59cH294d46Vu2tOQc3OzDO cc2+ujZiZ9zjc6mvr+hFNGV+/rT31bUX9xuTTybFWllsTFzXI5uv6xO2yXe3m669 nrfIxrAzDaLqx9bc2Jx8aVZ90bWcWYZXr6xj39+W++NT4K1VuZ9LeqPfpM2cWHj8 ytmQHx/u79b9zSf3e9un5iOth/QkYnd9fHVy/fSydbWl5e8PBbYHLreJ+1Oyv1d1 cX5tVe2Li+94t/X7y9b9Wf5y4mx3u5919d/Orr1+s8jyovr9ZFYpjol1XGYvHjQL uGk8bBEJy3jYKpG24mGbTNmLh+0KbRqPOoTYWBisAbfrxM90BAAA } 64#{ eJxz93SzsEwMZwhn+M4AAg1g3ACmGsCsBjDnPxj/B1P/waz/YM4oGAXDBij+ZAHT OiAClCfYOf4zMHLIeGxYcLCZQ1gr5sSGhYfbBZS95nhsXHS0W8I4686JjYuP9ys4 d8l4blpycrJG8KqYk5uWnp5ukHxqjufmZWdnWxRHhRwIfu46z6Hx1xSJLSsuLOTt 1XLdFfDy0mIfTqu5t4xfOayKWMt04NRVretrAvc3yWqVrTm/LnqlUuusba9Ct6aL ctQ4mL+9syt3+jHWgO+Nd/fVPXxm88p8Q8y+Gl7/q5Il667sZjp7S0drqm7UHP/T UrJ7LNc/2zFFOXudlNWyG9uzvs6yO1NgEj29V3RXH2/1tzfTthVv9lt52+zdvcXZ zPZ/rb99OKfvLF+vu+d50Xaju3b3bSutnj+fsTx4/sra6pK3N9fed2Op/2uR/OZ5 +/pQf7GKiJ37tlb905I3LVw7s//St1W7NgW8f/l1+41qZr6O+MxvjuH3m3jMXjxo FnDTeNgiEpbxsFUibUViGyMjgzUAhlm/D2kEAAA= } 64#{ eJxz93SzsEwMZwhn+M4AAg1g3ACmGsCsBjDnPxj/B1P/waz/YM4oGAXDBij+ZAHT OiAClCfYOf4zMHLIeGxYcLCZQ1gr5sSGhYfbBZS95nhsXHS0W8I4686JjYuP9ys4 d8l4blpycrJGcFnIAgdVr2kGybtEJDernZmpnfsqp9P48bn5tvr/ZKSuPApY4Koo Fzvry8OgZb6Sdq1Sog9DZjJlh/l6mLz2ZeDfU3c3SuClwzQm+RWsC6bqOC7JOrwo Vnv72uht1gfbeK0n6MWtKW/8pbrj2/uI7QU/F9Vmf14XMbfnolxpjWlR3GGbyXZb a3ZufLY619b5H8+vnNRL8z7K6ciWbnG80B7Y3SZrrZF7bVN+ee6q6uKr9/ZFM8/X qfnx7s6xYPGrs+7oPXrWzex83qes6svaa+v/n9OrtUp9fX9ve7j/ux8fP3x61rjY vLZ6b+iNdzsPre/9l5a86itjv21cXGXk5p+Wx+fVM3K9CK15v7MtwZlL74RCAp+b xsMWkbCMh60SaSsetsmUvXjYrtCm8ahDZVrGo06NPFEBBmsAOJHArHoEAAA= } 64#{ eJxz93SzsEwMZwhn+M4AAg1g3ACmGsCsBjDnPxj/B1P/waz/YM4oGAXDBij+ZAHT OiAClCfYOf4zMHLIeGxYcLCZQ1gr5sSGhYfbBZS95nhsXHS0W8I4a8uKBYvd+6Wd i/54bFp8YjKf9yqTzk2ph6ZqxZ4S4dj87Mw00+J7IjM3Pz/Xa1v674jElecXJrom yq3NKFbwWC4/PSiE68FB5llMay/1aJkuClobLhqyV2pa9vUp8SeZBLjL1t7czDM7 S9ViukrMlpCNYj2V5YlB03x/7/uzu3RpQqsjL5tdjYFhyIF8yfehWT82Rmz3VxXf 9rvi0+VJs8zdv8lsLYo/NK2b699pqS93r20wLu/lrTbNvbYt3/rcWmv9x5f2prb7 1VZbvHxwrPO1n94u8+IzB/XV+/VsTEpfXl5pn+9Xbf3l6b2J1cHP+6psKhc/43zk d99Cs/qrXW17eW3Nl7Jfp1aff17zb2/Rjz8/v8uWMf1aGt/IobbiQROP2YsHzQJu Gg9bRMIyHrZKpK142CZT9uJhu0KbxqMOlWk7Eh0YrAGyBMCKdgQAAA== } 64#{ eJxz93SzsEwMZwhn+M4AAg1g3ACmGsCsBjDnPxj/B1P/waz/YM4oGAXDBij+ZAHT OiAClCfYOf4zMHLIeGxYcLCZQ1gr5sSGhYfbBZS95nhsXHS0W8I4686JjYuP9ys4 d8l4blpycrJG8KqYk5uWnp5ukHxqjufmZb79XEWvrlROfnRuvn21F4tXSOOFNptu JttVBisuzfURtJsrdfXBleWhnHFLZ5VqX18V18lnImW6JmwT/yamD1ofHG9tZbi0 TLV6ytrbOwqeHkrNCtePaiypntX7u+z9rTml7OIxWiZrbhy2kbbm45IsTDrevTDu GM/PgptrkzWj360qefhi9nLH+b09VUa3Z62zPN+zNkLt7fVt+eK21tHf8w40Jv7S Oxv148Pxg73y1898t4h4Pnvh9rh5c9S+XjZbH/5+757K7y/22bc716+Lzn168ln4 db/1917kfwvbOH+6/zzLD8ez7p/X9/u1/d+fiEq2+Joe3owHjRxqKx408Zi9eNAs 4KbxsEUkLONhq0SaqACDNQAYMLy/ZgQAAA== }]And here's an example of how to write the files in that block back to the hard drive and display them in a GUI:
; Write files: count: 1 make-dir %./frames/ for count 1 length? anim-frames-block 1 [ write/binary rejoin [ %./frames/ "frame-" count ".gif" ] to-binary decompress pick anim-frames-block count ] ; Create file list, with frames in numerical order: file-list: read %./frames/ animation-frames: copy [] for count 1 length? file-list 1 [ append animation-frames rejoin [ %./frames/ "frame-" count ".gif" ] ] ; Display that file list as an animation: view layout [ anim: anim rate 10 frames animation-frames ]Here's an example that combines the above animated GIF files with normal GUI animation (/offset values adjusted using "for" loops):
view center-face layout [ size 625x415 backcolor black anim: anim rate 10 frames load animation-frames btn "Run Animation" [ for counter 0 31 1 [ anim/offset: anim/offset + (as-pair counter 0) show anim wait .05 ] for counter 0 24 1 [ anim/offset: anim/offset + (as-pair 0 counter) show anim wait .05 ] for counter 0 31 1 [ anim/offset: anim/offset + (as-pair (negate counter) 0) show anim wait .05 ] for counter 0 24 1 [ anim/offset: anim/offset + (as-pair 0 (negate counter)) show anim wait .05 ] ] ]
8.13 And That's Just the Beginning
As you learn more about general REBOL coding throughout this text and beyond, you'll improve your ability to design GUI screens that exactly match your creative vision. If you want to create more complex visual layouts, GUI and graphic programming should be the focus of your study. For now, understanding the basic framework and concept of switching between slides, adding graphics, text, animation, sound, etc., along with specific pre-made tools like Carl's show.r script, are more than enough to put together effective presentations.
Other tools such as the REBOL Flash .swf creator, covered later in this tutorial, provide additional powerful capability for building and distributing presentations.
9. Makedoc And Other Useful REBOL Productivity Tools
9.1 Makedoc.r - HTML Document Builder
The show.r presentation script demonstrated earlier is really just a variation of another useful REBOL script called "Makedoc". Makedoc is used to create HTML (web) pages quickly and easily using a simple text markup format. Using minimal character patterns, Makedoc allows users to layout headers, subheaders, numbered lists, images, and other common page elements. Makedoc also automatically generates a hyperlinked table of contents for all topics and subtopics. Here's a short sample of the syntax:
Page Title By: Author Name Some descriptive info about the page. ===Main Section Header Main section text. ---Sub Header Sub section text. # Automatically numbered item 1 # Automatically numbered item 2 # Automatically numbered item 3 Here's how to include an image: =image %image.pngSave the text above as a file named example.txt, then download and run the makedoc.r script from http://www.rebol.org/library/scripts/makedoc2.r. When prompted, select the example.txt file, and Makedoc will convert it into a nicely formatted HTML page.
This entire tutorial is actually written in Makedoc format. The source text is available at http://www.re-bol.com/business_programming.txt.
More information and instructions about how to use Makedoc are available at http://www.rebol.net/docs/makedoc.html.
Makedoc has been integrated into the Sitebuilder CGI script, so you can create and edit pages on a web site using only a browser, with simple Makedoc syntax. Much more about creating and using web site CGI programs will be covered in depth in later sections of this tutorial.
9.2 An Improved Text Editor
The text "editor" function built into REBOL is very simple. It doesn't even enable undo/redo for when typing mistakes occur. The following version allows for several such useful features. After running the code below, just use the "editor" function is the normal way, and the new features will be added. Notice that the download procedure is wrapped in a block executed by the "attempt" function, just in case an Internet connection is not available:
if not exists? %e [ attempt [ write %e read http://re-bol.com/e do e% ] ] ; editor noneHere's the program in compressed format, for use in situations where an Internet connection is not available. This script uses Romano Paolo Tenca's undo/redo code to add [ctrl]-z and [ctrl]-y features:
REBOL [Title: "Advanced Editor"] do undo: decompress #{ 789CAD58DD6EA33A10BEA64F61F55C546A85C856DA1BBAE7F441908FE4829358 4B2002A709FBF4677E6C6C2034ED9E8DD406EC99F137BF9E49D936565FAC7833 4DC5FF8ABBE4D4546D7A50975C7CDB6C3642BC88A66DB4F85B9C9ADA1C8CD595 7044AAAA72B13D35A528B6AAD412B913B315AAAE45611A818BE20149418415DB 5AED525C7BE59DBDA9B44496C434BDEEAC286BAD3ADACB8849C1527B1C788580 02447D7915A5EAB425467798C72CC6871FA2D6CDCEEE5FC55EAB2A0805909D3E B4EF7ABE8EE2C6B75C5865EAB00B9B40209DDE3B6D977A8F2073964C1881CC74 BD9D08A2E7DA343AAD4D0F14685D5876A8169495E9ECF00A80BA932608CE5804 F0A71E0EEA48E7FF75FFEFAF7BE138E165B8179DF62F27DE49C15824E365DB76 42F7E55DD26B2B1EF6A636BBBDC56DA7973B5D646D530FC0422BDAD8BD06BEC3 1110455E293032901FDFD8A37B78E7B5DEAACEDB64649992E8A68A0DEE086414 4C183E88448C5105E025593F83A77C1627E4ABBB040DEA1DA5DF7503E164BB5A 1C6B659AA946B899F57BB3056554338862865F2CF421F74A39551D243AB74F04 9790665D5B47A7B36A93631D07F143B2CD01CC6C3C339E4313D44E87384245A5 6BAB4456B7A502046D2FECE1887FCFE42D78C845BBDD422CA4B64D1942C4F784 2CEE10246052A6F0A988C25648602B981AE9B241FCF80765C243010BB260FC0C 9F22525786559DC523BB5195D6B46844A711A481C08C1A447F5647E6F31A8AA3 DAE9F474E4EFAA3D7304A5BDF9A57D608F0B39C7103E8AD43B91A3ACDA69513C 8BC7F04A64B2D8A0DB0141EEFC098FECDE6BF52E00CCE964B67D48A5A88A70F6 2BB0FFF8943B5BCEA3ACEBDAEE152AC48065375448594C934A16CAAE1453E912 0E374CB36D193155297ADDC01E59380F8BA47FE6942DF70A20A023482D6F3ABC 5360B1C79870856BA4192F113A8C56982445618C808D99C8820CDCEB5A97D657 3DF892A14E9CDBAE8A0038AF8395391D58DCE868F02E078CFF7E149B4BFA4D8E AC18283799918979E0B672E058B55A634E5345E7902DDE54F9334590DE37B810 12173E1DE6F394A901774C987061C204811D73F8609F009F68C86C94070BC6B0 BA64F59C93133CCE70E3490F21A25E1CC67119D3230973ECDB835E155EBCE91D D49614614DCCA0B1775939A180CDAB4CE4128A3576DA95804CE836E0C704AAA1 B61002E4685DA5FE2643D48031EA4B92D9D5E26F002F89D33E2677F77F76C462 EFD23B848C2B668E56FA1626A20B699C704A2457FB87711374F943AAA3A53FA3 FA4241B188EE58ADCFAB02A7E8518F2B7517849DBA6654E5666576747CC984D4 A70ABC2EC3AAB737688D8B6D5B9E7A566D6B74CD0695DE321763277A5D31FBA2 0636FA8CA11B690C3D115F7245D4B951AB169D862D91A30A8F2470DEB300EDC9 DDB6EBD1403226FE8F36D7C3E323C71D550F4C37CEBD217AD948AF1EEA6F4D3F 6D500C76545C6A737C6B5557E55916E1A37924A54AB28E6F19D68B7273DB1210 3C936CFC20BEA63936F6C39DE6C01B2B0C1DE757A34E73AC2151297A9E35ACAE 25A5FA130571B112D59F4EA90F732A61A808C763FC3F5903F68A0CFC024934F6 1C91955746552EE761381C6B0787CE5746D464325652A98E67BC519D9D8E134A 46D8718CBB0D99CBF0127274F8EFA1BF81CECF95AB08613E5B4407C5D008319A FBA360F9EA0F09B35F0F6410D3DBCE343B671C8453C496087D37CE945FBC24FE D44540FFA56B775D478BF43006E08443F2D9C26BC8D898EF469F1FB3C5B43A5F A6A171AC976C8DAC82AE2E32228D1EF78FF7E30F29530761C71B1B03400BF709 CDCDCAB418113EBB4107EAA7CAFA123A853AECFB1000BA0C7FD2D9F0F8488F92 47DB9831BBE49E2015C423AFCB1A82AC614DD6907B02963544B2B88CE5938980 DAB3F830A221ACDF3F84FA144853F15D5E138220B913FF08E7532077030A4555 BF6FCF3E7769C49602AF8D7E80CBF79061648807B85DB7B858DA0BDFC7B4F21F C9601ECC1F140000 } base-color: 230.230.255 base-effect: [] ctx-edit: mold :ctx-edit changes: [ {style tx vtext bold 40x22 font [colors: [0.0.0 200.200.200]]} {style tx text 40x22 font [colors: [0.0.0 170.170.170]]} {vtext} {text} {btn-enter} {btn} {btn-cancel} {btn} {btn green} {btn} {btn red + 50} {btn} {[tabs: 28 origin: 4x4]} {[tabs: 28 origin: 4x4] with [ undo: [] colors: [254.254.254 255.255.255] ]} {Ctrl-V - paste text} {Ctrl-V - paste text^/^-^-Ctrl-Z - undo^/^-^-Ctrl-Y - redo} ] foreach [original changed] changes [replace/all ctx-edit original changed] ctx-edit: do ctx-editWriting/editing code is the core activity engaged in by programmers, so being able to edit directly with the REBOL interpreter is an essentially useful capability. One benefit of using the simple built in editor is that it operates on any platform supported by REBOL. It works the same way on Windows, Mac, Unix, or other operating systems which may be unfamiliar. The ability to edit scripts provides an instant environment for developing portable software on any OS. The tiny REBOL interpreter is all you need. Metapad (http://liquidninja.com/metapad/download.html) is a great third party editor that can be used for REBOL coding on Windows. Click Options -> Settings -> Primary External Viewer, and set your REBOL path (usually C:\Program Files\rebol\view\rebol.exe).
9.3 GUI Builders and Learning Tools
A primary difference between REBOL and other programming tools is that REBOL tends to require fewer lines of code to accomplish equivalent goals. The GUI dialect is particularly concise compared to other solutions. Typing "view layout [button]" does what requires a page or more of code in other environments. REBOL also has built-in help available for all language constructs. You can search for forgotten functions, look up the syntax of any function or list the content of any object using the "help" function, list all available words using the "what" function, quickly test short bits of code in the console and the text editor, and use the console's auto-complete feature to remember spellings and speed typing. Much more about these and other work enhancing features will be covered later in this tutorial.
As a result of the inherently simple workflow, most REBOL developers tend to write code using a plain text editor, instead of a bloated integrated development environment ("IDE"). It's generally faster and more effective to keep a copy of the REBOL interpreter open, and simply write REBOL code, than it is to use heavy third party GUI builders to layout interfaces, or to rely on complex IDE features to help remember and manage large APIs. One of the pleasant advantages of REBOL is that it's tiny and instantly installed on any computer. No other tools are required to develop or to distribute REBOL software.
Nevertheless, it can be helpful to have a few extraneous tools to help learn and explore the language, and to create simple visual layouts without writing code. The following examples are not industry strength applications, but may be useful for quick design and instruction, to speed presentation layout, etc.:
http://www.rebol.org/view-script.r?script=vid-build.r
http://www.rebol.org/library/scripts/layout-1.8.r
http://www.rebol.org/view-script.r?script=rebolide.r


10. Real World Concerns and Examples: Why "Programming" > Office Software
The programs in this section demonstrate practical, real world examples of how critical company specific features were added to different types of simple applications for managing inventory, payroll, and rent collections.
You've already seen that by creating GUIs, you can make input forms which enable easy input, create custom output displays, and more. Adding extended functionality such as emailing data files to others and sending data to a web server, for example, require simple one-line scripts in REBOL code. You can also create web and network applications that allow users to access data from any location, and from virtually any web connected device. A programmer's potential ability to simply save data to a web server, for example, alone adds a truly dynamic scope of power and usability beyond what's possible with office apps. With REBOL, web and mobile programming requires very little additional learning overhead and provides a wide range of capabilities that aren't so easily acquired using other tools.
But that's just the beginning. Another of the great benefits of custom built applications over spreadsheets, for example, is that they allow perfect control over data entry and display. It's easy to check data for errors using simple form validation code, before incorrect data is permanently saved, and only essential categories of values need to be displayed. You can also easily make automated backups of data, so that information is never accidently overwritten or permanently erased. You can ensure that protected fields of data are never touched during data entry, but only viewable and editable when needed. You can choose that user interfaces are cleanly laid out and labeled exactly as you see fit, and insist upon the workflow order in which data is entered. Collections of small data entry routines, reports and other elements of daily work can be collected and run from a core GUI app, data can be saved, read, and shared between each component, and other features automated behind the scenes so that users see and interact with data exactly as needed. Your ability to use code to speed use, reduce error, and perform calculations and manipulations to data are limited entirely to your own interests, abilities, and priorities. Your palette of fine data management controls and powerful tools will continue to grow as you learn more, and the potential features you can enable are limited only by your own experience, insight, and creative effort.
10.1 An Expanded Inventory Program
You've already witnessed how simple it is to create the example inventory program earlier in this tutorial:
REBOL [title: "Inventory"] view layout [ text "SKU:" f1: field text "Cost:" f2: field "1.00" text "Quantity:" f3: field across btn "Save" [ write/append %inventory.txt rejoin [ mold f1/text " " mold f2/text " " mold f3/text newline ] alert "Saved" ] btn "View Data" [editor %inventory.txt] ]That application creates a data file which can be easily opened as a spreadsheet in Excel, viewed as text in Word, imported into an Access database, etc. In fact, that program and others so far in this text allow users to accomplish many of the same goals as typical office software. You can get columns of data entered by users, display tables in a visual grid, sort and perform calculations on columns/rows, create charts from the values, (and you can engineer other complex functions as needed), etc. Developing even the simplest custom GUI apps, however, enables greatly increased control over data management.
Below is an enhanced inventory program which implements a variety of specifically useful features for the environment in which it was used, as well as additional general security features, control over data entry, etc. Read the comments to see all the specialized features that were added:
REBOL [title: "Real World Inventory"] ; The script allows for manual editing of data using the "editor" ; function. The improved editor, from the previous section of this ; tutorial, is added here to enable undo/redo for when typing mistakes ; occur: if not exists? %e [ attempt [ write %e read http://re-bol.com/e do e% ] ] ; This is stock code that removes the word "REBOL" from the GUI header ; bar in Windows. This makes the program look more professional. You ; can copy and use these five lines in any program: tt: "Real World Inventory" user32.dll: load/library %user32.dll gf: make routine![return:[int]]user32.dll"GetFocus" sc: make routine![hw[int]a[string!]return:[int]]user32.dll"SetWindowTextA" so: :show show: func[face][so[face]hw: gf sc hw tt] ; We can choose to automatically create and save to any desired file name ; in any location: make-dir %/c/merchants-inventory/ datafile: %/c/merchants-inventory/merchants_mv_inventory.csv write/append datafile "" prcnt: 1.0 scanmode: false roundmode: false ; This backup routine is used to automatically save incremental versions ; of the inventory file, so that no changes are ever lost: backup-data3: func [msg] [ write ( to-file bak-file: replace form datafile "_mv_inventory" rejoin [ "_mv_inventory-backup--" now/date "_" replace/all form now/time ":" "-" ] ) read datafile if msg = "msg" [alert (join "Data has been backed up to " bak-file)] ] ; These routines check that appropriate values are entered into the cost ; and quantity fields: check-errors-f2: does [ if ( (f2/text = "0.0") or (f2/text = "") or (error? try [to-decimal f2/text]) ) [ alert { *** ERROR: Enter a decimal in cost field (set mode to 'key' if using keyboard). } focus f2 show f2 return 0 ] return 1 ] check-errors-f3: does [ if ((f3/text = "") or (error? try [to-integer f3/text])) [ alert "*** ERROR: Enter an integer in quantity field." focus f3 show f3 return 0 ] return 1 ] ; This routine saves the data, and automatically performs a backup. ; Along the way, a common default value is reset in the cost field, ; and the user is notified that the process was successful: enter-item: does [ if check-errors-f2 = 0 [return] if check-errors-f3 = 0 [return] backup-data3 "" write/append datafile rejoin [ mold f1/text " | " mold f2/text " | " mold f3/text " | " mold f4/text " | " mold {} " | " mold {} " | " mold {} newline ] request/timeout/ok "Done" 00:00:01 set-face f1 "" set-face f2 ".99" set-face f3 "" set-face f4 "" focus f1 ] ; This routine allows the user to manually edit the data file, if desired. ; A backup is made first, just to be safe. Along the way a total inventory ; sum is calculated and displayed, and the data file is checked for ; integrity: view-data: does [ backup-data3 "" total: 0 inv: read/lines datafile if error? try [ foreach line inv [ ln: parse line "|" line-total: (to-decimal ln/3) * (to-decimal ln/2) total: total + line-total ] alert join "Total Inventory: $" total ][ alert { *** ERROR: Improperly formed data in database. Check each line. } ] editor datafile ] ; The program provides an option to automatically compute a standard ; margin markup, to figure the wholesale cost of any entered item, based ; upon the scanned retail cost. These functions enable those ; computations, with appropriate data validation error checks along the ; way: calc-percent: does [ if error? try [ if scanmode [f2/text: calculate-barcode-price f2/text show f2] f2/text: form (prcnt * (to-decimal f2/text)) if roundmode [f2/text: form (round/to (to-decimal f2/text) .01)] show f2 ] [alert "*** ERROR: Enter a decimal in cost field."] ] set-percent: does [ if error? try [ prcnt: to-decimal request-text/title/default "Default Percent:" form prcnt ] [alert "*** ERROR: Enter a decimal."] ] ; The program allows for prices to either be entered by hand, or to be ; extracted from a specialized bar code format that can be entered by a ; USB scanner. This allows the user to switch entry modes: scan-mode: does [ scanmode: not scanmode either scanmode [ b2/text: "Mode: Scan" ] [ b2/text: "Mode: Key" ] show b2 ] ; This routine allows the user to switch between automatically rounding ; computed wholesale values above, or using exact fractional values: round-mode: does [ roundmode: not roundmode either roundmode [ b1/text: "Round: On" ] [ b1/text: "Round: Off" ] show b1 ] ; This routine parses values from the specially encoded barcode price ; data entered with a scanner. This bar code format is unique to the ; business is which this particular inventory is found (i.e., it could ; not simply be entered into or used directly by a spreadsheet - the ; price data needs to be extracted using a parse computation): calculate-barcode-price: does [ scanned-price: to-integer (trim/all copy (at copy f2/text 8)) final-price: rejoin [ to-string to-integer ( (scanned-price - (scanned-price // 100)) / 100 ) "." either (scanned-price // 100) < 10 [ rejoin ["0" scanned-price // 100] ] [ scanned-price // 100 ] ] final-price ] ; Here's the program's GUI window: view/options center-face layout [ size 240x400 ; Users can select from specialized item categories found in this ; business, using a quick list choise: text "Item:" [ picked-item: request-list "Items" [ "1 - Food" "2 - CVS" "3 - Bread" "4 - Electronics" "5 - Coke" "6 - Drinks" "7 - " "8 - " "9 - " "10 - " ] f1/text: copy at picked-item ( (index? find/only picked-item " - ") + 3 ) show f1 ] ; All the special routines created earlier are executed by entering ; data into fields, clicking buttons, and otherwise interacting with ; simple widgets: f1: field "Food" text "Cost" f2: field ".99" [calc-percent check-errors-f2] across btn "%" #"^x" [set-percent] b1: btn "Round: Off" [round-mode] b2: btn "Mode: Key" [scan-mode] below text "Quantity:" f3: field [check-errors-f3] text "Description:" f4: field text 100 "" across btn 95 "Enter [CTRL+Z]" #"^Z" [enter-item] btn 95 "View Data" [view-data] do [focus f1] ] [resize]
This program enables a specialized work flow which is as fast, efficient, and error proof as possible, and it satisfies the exact specifications required to enter data in the unique environment for which it was created. The special modifications are simply additions to the generic inventory program presented at the beginning of the tutorial.


10.2 Receipt Printer
In one of this author's businesses, receipts for rent payments were initially provided using a traditional paper receipt book. This was an error prone process, paper receipts could be damaged and lost, and seaching for information on receipts later was too time consuming. A very quick solution was initially devised by copying all the fields on the paper receipts to a GUI form (similar to the "Generic Text Field Saver" example). That simple program evolved into the following script, which validates correct data entry, requests confirmation before saving, automatically saves audit trail backups, provides simple entry using GUI features such as drop-down selection lists and automatic date/time entry, and displays a nicely formatted text receipt for printing:
REBOL [title: "Cash Receipt"] make-dir %/M/merchant/documents/ make-dir %/M/merchant/documents/cash_receipts/ make-dir %/M/merchant/documents/cash_receipts/history/ write/append %/M/merchant/documents/cash_receipts/cash_receipts.txt "" write/append %/M/merchant/documents/cash_receipts.txt "" view center-face layout [ across style field field 400 text 50 right "Name: " name: field return text 50 right "Booth: " booth: field return text 50 right "Amount: " amount: field "$" return text 50 right "" paytype: drop-down "Cash" "Check" "Credit" "Other" text right 15 "#:" num: field 270 return text 50 right "Signed: " signed: field return text 50 right "Date" date: field 400 (form now) return text 50 right "Note: " note: area "Rent for ..." return indent 405 btn 50 "SAVE" [ if error? try [ to-integer booth/text to-money amount/text to-date date/text ][ alert { ERROR: booth must be a number, amount must be valid money amount, date must be a date/time in the default format (1-jan-2011/12:00:00-4:00). Make sure there are no additional spaces in the data. ENTER ANY OTHER INFORMATION IN THE "NOTE" FIELD. } return ] unless true = request "Confirm Save" [return] backup-receipt: rejoin [ %/M/merchant/documents/cash_receipts/history/ now/date "_" replace/all copy form now/time ":" "-" ".txt" ] write backup-receipt read %/M/merchant/documents/cash_receipts/cash_receipts.txt write/append %/M/merchant/documents/cash_receipts/cash_receipts.txt receipt-data: reduce [ newline mold name/text " " mold booth/text " " mold amount/text " " mold paytype/text " " mold num/text " " mold signed/text " " mold date/text " " mold note/text " " ] write/append %/M/merchant/documents/cash_receipts.txt receipt-data cur-receipt: rejoin [ %/M/merchant/documents/cash_receipts/ name/text "_" now/date "_" replace/all copy form now/time ":" "-" ".txt" ] write/append cur-receipt reduce [ newline newline newline " M E R C H A N T S ' R E C E I P T" newline " ____________________________________" newline newline newline newline " Name: " name/text " " newline newline " Booth: " booth/text " " newline newline " Amount: " amount/text " " newline newline " Pay Type: " paytype/text " " newline newline " Number: " num/text " " newline newline " Signed by: " signed/text " " newline newline " Date: " date/text " " newline newline " Note: " note/text newline newline newline newline newline newline newline newline " X _____________________________________________" newline newline newline newline " X _____________________________________________" ] alert "This receipt is not valid until signed by both parties!" call/show rejoin ["notepad " to-local-file cur-receipt] ] ]
Using the data saved by the program above, the script below can be used to produce a report calculating total rent collected between selected dates:
REBOL [title: "Total "] start-date: request-date end-date: request-date receipts: load %/m/merchant/documents/cash_receipts/cash_receipts.txt total: $0 foreach [name booth amount type number signed date notes] receipts [ date: to-date first parse date "/" if ((date >= start-date) and (date <= end-date)) [ ; print name print date total: total + to-money amount ] ] alert form totalHere is a program that displays the entire rent history for every client, prominently noting those who currently owe rent:
REBOL [title: "Rent History and Currently Due Report"] due-dates: copy "" total-money: 0 grand-total-monthly: 0 booths: load %booths.txt foreach [a b c d e f g] booths [if error? try [ append due-dates rejoin ["Booth " a ", " b newline] due-date: copy "" parse g [ thru "[" copy due-date to "]" ] due-date: parse due-date " " if not empty? due-date [ if error? try [ either now/date >= (current-date: to-date first due-date) [ append due-dates rejoin [" DUE: " (form current-date)] money-is-due: true ] [ append due-dates rejoin [" " (form current-date)] money-is-due: false ] ] [ append due-dates " (Invalid Date)" ] if error? try [ current-money: to-money second due-date grand-total-monthly: grand-total-monthly + current-money if money-is-due = true [ total-money: total-money + current-money ] append due-dates rejoin [ newline " " (form current-money) newline ] ] [ append due-dates rejoin [ newline " (Invalid amount)" newline ] ] ] append due-dates "-------------------------------------------------^/" ] [alert rejoin ["ERROR: booth " a " " b " " c " " d " " e " " f " " g]] ] append due-dates rejoin [ newline newline "Total Due: " total-money newline newline "Total Monthly Rent: " grand-total-monthly ] make-dir %./rent_reports/ change-dir %./rent_reports/ write report-filename: to-file rejoin [ "rent_" now/date "_" (replace/all to-string now/time ":" "-") ".txt" ] due-dates call/show rejoin ["notepad " to-local-file what-dir "\" report-filename]Again, what started with a tiny GUI form for saving a few text fields, evolved into a full featured application set. Only a basic understanding of saving files, concatenating and splitting text, using foreach loops, testing for errors, etc., is required to create all of the code above. The report scripts can be integrated back into the main program's GUI window with code this simple (inside the view layout block):
btn "Rent Due Report" [launch %rentdue.r] btn "Total Rent Report" [launch %rentcollected.r]


10.3 Advanced Time Clock and Automated Payroll Reports
In the same business as above, a specialized time clock machine with fingerprint validation was initially employed to manage employee payroll and work reports. The software that came with the fingerprint machine was very difficult for managers to use, and the reports it generated were awkward and inadequate for the needs of the business. In order to solve the problem, the following program was created. It simply adds features to the simple "Time Clock" app demonstrated earlier in the tutorial. This version uses an NIST clock script to set the computer's internal clock to the exact correct time (Internet connection is required). To ensure that employees never sign in for others, the program takes a photo of the person performing each signin (the code routine to capture photos is covered later in this text). To enhance security further, a full audit history of every single entry made to the signins, is saved to the hard drive, and each file is uploaded to the company's web server. This simple added feature ensures that signin times cannot be tampered with by anyone who doesn't have approved access:
REBOL [title: "Time Clock"] insert-event-func [ either event/type = 'close [ really: request { To restart this program you must also restart the computer. Really close? } if really = true [quit] ] [event] ] ; Ladislav Mecir's nistclock.r, to ensure the computer's clock ; is set correctly: do decompress #{ 789C6D544B6FDB300CBEFB57B005861D0ADB49BA6081D7B5971D765977688162 087C506D3AD1224B811E09BC61FF7D941C278A13388E2592FAF8FA44CB5B4C0D EA1D6A53C032819A759664459EFB4FCA32C98DCD566A77A17ABFAAF2B2692ABB CC199270B9CA945E5D18644C8974C732D3B52D5ACD2BD566F42665D2C7924A55 C024F1B66938078D93958FEFEF33921E9C41B06B6E82DC7225A1551A41351625 299804252B042EA1514E83C14AC9DADCFC4B2017AA62028ED0D0FEAE61DD9AA4 F4F04E5A2EFC02A2408E4BB88329A97813891E41A05CD9F513D8A896B08CCE4F 4B3A249505D45A6932D41D2CA3DC34B21AB6BCDA9C431C11E838FDB64C1BCC99 88635F9A0DDF42A5B65D48630E613FA30A6807B7F4041565078BA02298C8EFF4 73FEAC76F974315F50665651B92CAE50DF78B0C832EFCDC9C02F6E42B54E5A6A 5AA5B4C6D086D443E81D13D4BE62514C62558F22D51E52B872A2EFF649E111E8 3913637D4687432F351A276CE85FBFECBDDCC10831F19DBBE2191EBE42CD9B06 357AD2F418308A3C906280BFCCEA580D187B2DAE605378A1A7FD36D0DEA6A633 16DB8092EEB98C384F5AE8B5A1039ED66F5CD66A6FBE1084755AC2AB76415E31 E3AF01185755680C117E59315BAD4B7F072D1EF93F7238B05FD019A092387C82 8F1BD412C5FD0C96C3AA00A1589D0BFEAE1991F8C320CF6A21C8C308B480966D 2867E52C97C49B70AD82FA405EAB5D65495E96A1B63E111A42D416CF7838BABF 7D41FB12CEBDD2B9DB3E9322FC1395FC27FFA32426A765E04E021378781C07D5 C774744D8EF7BF90698A66ADB4770CFB1F4ADA752CF8C6BA9FCD1BE266248CB7 DFFD9C8941B8741663C94B1842E73642F0C36C3AC94B2A45EDAA9E7121A58E02 1CD6AD0F6ED8EC29261AADC3365A867BBBA698CE046D088A44F1653FA9FB5048 3DF1ECBC60254DC23D272E1D9A98FB29E5472FA3AC26997F66F3B97F7DE4BDE0 3E9BC2B2B8C2EE72B0F894CDAE58086F4183C5D12D9236BE64E7936064D128DD 422C0A792561609FB3E00AD661268F2650F91F6BB4707323070000 } make-dir img-dir: %./clock_photos/ unless exists? %employees [ write %employees {"Nick Antonaccio" "(Add New...)"} ] cur-employee: copy "" avicap32.dll: load/library %avicap32.dll user32.dll: load/library %user32.dll find-window-by-class: make routine! [ ClassName [string!] WindowName [integer!] return: [integer!] ] user32.dll "FindWindowA" sendmessage: make routine! [ hWnd [integer!] val1 [integer!] val2 [integer!] val3 [integer!] return: [integer!] ] user32.dll "SendMessageA" sendmessage-file: make routine! [ hWnd [integer!] val1 [integer!] val2 [integer!] val3 [string!] return: [integer!] ] user32.dll "SendMessageA" cap: make routine! [ cap [string!] child-val1 [integer!] val2 [integer!] val3 [integer!] width [integer!] height [integer!] handle [integer!] val4 [integer!] return: [integer!] ] avicap32.dll "capCreateCaptureWindowA" log-it: func [inout] [ if ((cur-employee = "") or (cur-employee = "(Add New...)")) [ alert "You must select your name." return ] if set-system-time nist-corrected-time [nist-correction: 0:0] cur-time: now record: rejoin [ newline {[} mold cur-employee { "} mold cur-time {" "} inout { "]} ] either true = request/confirm rejoin [ record " -- IS YOUR NAME AND THE TIME CORRECT?" ] [ make-dir %./edit_history/ write/append %time_sheet.txt "" write rejoin [ %./edit_history/time_sheet-- "_" now/date "_" replace/all form now/time ":" "-" ] read %time_sheet.txt write/append %time_sheet.txt record if error? try [ write ftp://user:pass@site.com/public_html/time_sheet.txt read %time_sheet.txt ] [alert "Error uploading to web site (saved locally)."] alert rejoin [ uppercase copy cur-employee ", YOU ARE " inout "." ] ] [ alert "CANCELED" return ] time-filename: copy replace/all copy to-string cur-time "/" "_" time-filename: copy replace/all copy time-filename ":" "+" img-file: rejoin [ img-dir (replace/all copy cur-employee " " "_") "_" time-filename "_" next find inout " " ".bmp" ] sendmessage cap-result 1085 0 0 sendmessage-file cap-result 1049 0 img-file ; call to-rebol-file img-file ] timeclock-report: does [ timeclock-start-date: request-date timeclock-end-date: request-date totals: copy "" names: load %employees log: load %time_sheet.txt foreach name names [ if name <> "(Add New...)" [ times: copy reduce [name] foreach record log [ if name = log-name: record/1 [ flag: none date-time: parse record/2 "/" log-date: to-date date-time/1 log-time: to-time first parse date-time/2 "-" if ( (log-date >= timeclock-start-date) and (log-date <= timeclock-end-date) ) [ previous-flag: flag either record/3 = "CLOCKED IN " [ flag: true ] [ flag: false ] either flag <> previous-flag [ append times log-date append times log-time ] [ alert rejoin [ "Duplicate successive IN/OUT entry: " name ", " record/2 ] ] ] ] ] append totals rejoin [name ":" newline] total-hours: 0 foreach [in-date in-time out-date out-time] (at times 2) [ append totals rejoin [ newline " in: " in-date ", " in-time " out: " out-date ", " out-time " " ] if error? try [ total-hours: total-hours + (out-time - in-time) ] [ alert rejoin [ "Missing login or Missing logout: " name ] ] ] append totals rejoin [ newline newline " TOTAL HOURS: " total-hours newline newline newline ] ] ] write filename: copy rejoin [ %timeclock_report-- timeclock-start-date "_to_" timeclock-end-date ".txt" ] totals call/show rejoin ["notepad " to-local-file filename] ] view/new center-face layout/tight [ image 320x240 tl1: text-list 320x200 data sort load %employees [ cur-employee: value if cur-employee = "(Add New...)" [ write/append %employees mold trim request-text/title "Name:" tl1/data: sort load %employees show tl1 ] ] key #"^~" [ del-emp: copy to-string tl1/picked temp-emp: sort load %employees if true = request/confirm rejoin ["REMOVE " del-emp "?"] [ new-list: head remove/part find temp-emp del-emp 1 save %employees new-list tl1/data: sort load %employees show tl1 alert rejoin [del-emp " removed."] ] ] across btn "Clock IN" [log-it "CLOCKED IN"] btn "Clock OUT" [log-it "CLOCKED OUT"] btn "Report" [timeclock-report] btn "EXIT" [ sendmessage cap-result 1205 0 0 sendmessage cap-result 1035 0 0 free user32.dll quit ] ] hwnd: find-window-by-class "REBOLWind" 0 cap-result: cap "cap" 1342177280 0 0 320 240 hwnd 0 sendmessage cap-result 1034 0 0 sendmessage cap-result 1077 1 0 sendmessage cap-result 1075 1 0 sendmessage cap-result 1074 1 0 sendmessage cap-result 1076 1 0 do-events
The reports printed by the program above are produced in an easily readable, consistent format. Paychex.com is used to process payroll for the business that uses the script above. Even though the report format is clean, entering payroll figures into the Paychex.com web interface required quite a bit of time each week. In order to speed that process, the following additional script was created. This program enables extremely fast copying and pasting directly into Paychex's custom web interface. The text reports created by the script above can be emailed, copied to the clipboard of any remote machine where the payroll manager is working, and the processed output can be entered instantly into Paychex's web site. Inputting payroll for 30+ employees takes less than a minute, using this script:
REBOL [title: "Enter Time Clock Report into Paychex"] dec-time: func [tm] [ qq: (to-decimal second q: parse form round/to tm 00:00:60 ":") / 60 write clipboard:// form round/to ((to-decimal q/1) + qq) .01 ] data1: copy read clipboard:// data2: copy parse/all data1 "^/" foreach line data2 [ if line = (trim copy line) [print line] if find line "TOTAL HOURS:" [ hours: to-time (last parse line " ") if hours <> none [ dec-time hours ask "Paste Into Paychex, Then Press [ENTER]..." ] ] ] haltThe script above is very simple, but such a time saving and error reducing routine would have been impossible to create without custom software coding.
Here's another little custom report script that can be used to check the entire audit history of all log-ins for any given employee, starting on any given date, to ensure that no entries have been manually changed (this can be used to compare files on the local server, or on the backup web server):
REBOL [title: "Payroll Audit History Report"] start: ["John Smith" "18-Mar-2012/8:30:53-4:00" "CLOCKED IN "] current: find/only (load %./time_sheet.txt) start erased: copy [] collected: copy [] foreach file read %./edit_history/ [ if error? try [ current-period: find/only (load join %./edit_history/ file) start if current-period <> none [ probe length? current-period difs: difference current current-period append collected difs ] ] [print file] ] probe length? current probe length? final: unique collected ask "Done..." editor difference current final haltHopefully, the examples in this section have shed a bit more light on simple ways in which real world custom apps can help maintain data integrity, security, and critically functional customised workflow preferences that are just not possible with generic "office applications" or 1-size-fits-all third party software solutions.

11. More REBOL Language Fundamentals
This section covers a variety of topics that form a more complete understanding of the basic REBOL language.
11.1 Comments
You've already seen that text after a semicolon and before a new line is treated as a comment (ignored entirely by the interpreter). Multi-line comments can be created by enclosing text in square or curly brackets and simply not assigning a label or function to process it. Since this entire program is just a header and comments, it does nothing:
REBOL [] ; this is a comment { This is a multi line comment. Comments don't do anything in a program. They just remind the programmer what's happening in the code. } [[ This is also a multi line comment. alert "See... Nothing." ]] comment [ The "comment" function can be used to clarify that the following block does nothing, but it's not necessary. ]
11.2 Function Refinements
Many functions have "refinements" (options separated by "/"):
request-text/default "Text" request-text/title "The /title refinement sets this header text" request-text/title/default "Name:" "John Smith" ; 2 options together request-text/title/offset "/offset repositions the requester" 10x100 request-pass/offset/title 10x100 "title" alert "Processing" ; 2 functions request-file/file %temp.txt ; default file name request-file/filter ["*.txt" "*.r"] ; only show .txt and .r files request-file/only ; limit selection to a single file request-file/save ; save dialog (instead of open dialog) request-file/save/file/filter %temp.txt ["*.txt" "*.r"]Typing "help (function)" in the REBOL interpreter console displays all available refinements for any function.
11.3 White Space and Indentation
Unlike other languages, REBOL does not require any line terminators between expressions (functions, parameters, etc.), and you can insert empty white space (tabs, spaces, newlines, etc.) as desired into code. Notice the use of indentation and comments in the code below. Notice also that the contents of the brackets are spread across multiple lines:
alert rejoin [ "You chose: " ; 1st piece of joined data (request "Choose one:") ; 2nd piece of joined data ]The code above works exactly the same as:
alert rejoin ["You chose: " request "Choose one:"]ONE CAVEAT: parameters for most functions should begin on the same line as the function word. The following example will not work properly because the rejoin arguments' opening brackets need to be on the same line as the rejoin function:
alert rejoin ; This does NOT work. [ ; Put this bracket on the line above. "You chose: " (request "Choose one:") ]Blocks often contain other blocks. Such compound blocks are typically indented with consecutive tab stops. Starting and ending brackets are normally placed at the same indentation level. This is conventional in most programming languages, because it makes complex code easier to read, by grouping things visually. For example, the compound block below:
big-block: [[may june july] [[1 2 3] [[yes no] [monday tuesday friday]]]]can be written as follows to show the beginnings and endings of blocks more clearly:
big-block: [ [may june july] [ [1 2 3] [ [yes no] [monday tuesday friday] ] ] ] probe first big-block probe second big-block probe first second big-block probe second second big-block probe first second second big-block probe second second second big-blockIndentation is not required, but it's really helpful.
11.4 Multi Line Strings, Quotes, and Concatenation
Strings of text can be enclosed in quotes or curly brackets:
print "This is a string of text." print { Curly braces are used for multi line text strings (instead of quotes). } alert {To use "quotes" in a text string, put them inside curly braces.} alert "You can use {curly braces} inside quotes." alert "'Single quotes' can go inside double quotes..." alert {'...or inside curly braces'} alert {"ANY quote symbol" {can actually be used within} 'curly braces'} alert "In many cases" alert {curly braces and quotes are interchangable.}You can print a carriage return using the word "newline" or the characters ^/
print rejoin ["This text if followed by a carriage return." newline] print "This text if followed by a carriage return.^/"Clear the console screen using "newpage":
prin newpageThe "rejoin" function CONCATENATES (joins together) values:
rejoin ["Hello " "World"] rejoin [{Concatenate } {as } {many items } {as } {you } {want.}] rejoin [request-date { } request-color { } now/time { } $29.99] alert rejoin ["You chose: " request "Choose one:"] ; CASCADE return values join {"Join" only concatenates TWO items } {("rejoin" is more powerful).} print rejoin ["This text is followed by a carriage return." newline] print "This text is also followed by a carriage return.^/" prin {'Prin' } prin {doesn't } prin {print } print {a carriage return.}
11.5 More About Variables
The COLON symbol assigns a value to a word label (a "variable")
x: 10 print x x: x + 1 ; increment variable by 1 (add 1 to the current value of x) print x y: "hello" z: " world"You can use the "PROBE" function to show RAW DATA assigned to a variable (PRINT formats nice output). Probe is useful for debugging problem code:
y: "hello" z: " world" print rejoin [y z] probe rejoin [y z] print join y zThe "prin" function prints values next to each other (without a newline):
y: "hello" z: " world" prin y prin zVariables (word labels) ARE ** NOT ** CASE SENSITIVE:
person: "john" print person print PERSON print PeRsOnYou can cascade variable value assignments. Here, all 3 variables are set to "yes ":
value1: value2: value3: "yes " print rejoin [value1 value2 value3]The "ask" function gets text input from the user. You can assign that input (the return value of the ask function) directly to a variable label:
name: ask "Enter your name: " print rejoin ["Hello " name]You can do the same with values returned from requestor functions:
filename: request-file/only alert rejoin ["You chose " filename] osfile: to-local-file filename ; REBOL uses its own multiplatform syntax to-rebol-file osfile ; Convert from native OS file notation back to REBOL the-url: http://website.com/subfolder split-path the-url ; "split-path" breaks any file or URL into 2 parts
11.6 Data Types
REBOL automatically knows how to perform appropriate computations on times, dates, IP addresses, coordinate values, and other common types of data:
print 3:30am + 00:07:19 ; increment time values properly print now ; print current date and time print now + 0:0:30 ; print 30 seconds from now print now - 10 ; print 10 days ago $29.99 * 5 ; perform math on money values $29.99 / 7 ; try this with a decimal value 29.99 / 7 print 23x54 + 19x31 ; easily add coordinate pairs 22x66 * 2 ; and perform other coordiante 22x66 * 2x3 ; math print 192.168.1.1 + 000.000.000.37 ; easily increment ip addresses 11.22.33.44 * 9 ; note that each IP segment value is limited to 255 0.250.0 / 2 ; colors are represented as tuple values with 3 segments red / 2 ; so this is an easy way to adjust color values view layout [image picture effect [flip]] ; apply effects to image types x: 12 y: 33 q: 18 p: 7 (as-pair x y) + (as-pair q p) ; very common in graphics apps using coords remove form to-money 1 / 233 remove/part form to-time (1 / 233) 6REBOL also natively understands how to use URLs, email addresses, files/directories, money values, tuples, hash tables, sounds, and other common values in expected ways, simply by the way the data is formatted. You don't need to declare, define, or otherwise prepare such types of data as in other languages - just use them.
To determine the type of any value, use the "type?" function: some-text: "This is a string of text" ; strings of text go between type? some-text ; "quotes" or {curly braces} some-text: { This is a multi line string of text. Strings are a native data type, delineated by quotes or curly braces, which enclose text. REBOL has MANY other built in data types, all delineated by various characters and text formats. The "type" function returns a value's data type. Below are just a few more native data types: } type? some-text an-integer: 3874904 ; integer values are just pos- type? an-integer ; itive/negative whole numbers a-decimal: 7348.39 ; decimal numbers are recognized type? a-decimal ; by the decimal point web-site: http://musiclessonz.com ; URLs are recognized by the type? web-site ; http://, ftp://, etc. email-address: user@website.com ; email values are in the type? email-address ; format user@somewebsite.domain the-file: %/c/myfile.txt ; files are preceded by the % type? the-file ; character bill-amount: $343.56 ; money is preceded by the $ type? bill-amount ; symbol html-tag: <br> ; tags are places between <> type? html-tag ; characters binary-info: #{ddeedd} ; binary data is put between type? binary-info ; curly braces and preceded by ; the pound symbol image: load http://rebol.com/view/bay.jpg ; REBOL can even automatically type? image ; recognize the data type of ; most common image formats. a-sound: load %/c/windows/media/tada.wav ; And sounds too! a-sound/type color: red type? color color-tuple: 123.54.212 type? color-tuple a-character: #"z" type? a-character a-word: 'asdf type? a-wordData types can be specifically "cast" (created, or assigned to different types) using "to-(type)" functions:
numbr: 4729 ; The label 'numbr now represents the integer ; 4729. strng: to-string numbr ; The label 'strng now represents a piece of ; quoted text made up of the characters ; "4729". Try adding strng + numbr, and ; you'll get an error. ; This example creates and adds two coordinate pairs. The pairs are ; created from individual integer values, using the "to-pair" function: x: 12 y: 33 q: 18 p: 7 pair1: to-pair rejoin [x "x" y] ; 12x33 pair2: to-pair rejoin [q "x" p] ; 18x7 print pair1 + pair2 ; 12x33 + 18x7 = 30x40 ; This example builds and manipulates a time value using the "to-time" ; function: hour: 3 minute: 45 second: 00 the-time: to-time rejoin [hour ":" minute ":" second] ; 3:45am later-time: the-time + 3:00:15 print rejoin ["3 hours and 15 seconds after 3:45 is " later-time] ; This converts REBOL color values (tuples) to HTML colors and visa versa: to-binary request-color to-tuple #{00CD00}Try this list of data type conversion examples:
to-decimal 3874904 ; Now the number contains a decimal point to-string http://go.com ; now the web site URL is surrounded by quotes form web-site ; "form" also converts various values to string form $29.99 alert form $29.99 ; the alert function REQUIRES a string parameter alert $29.99 ; (this throws an error) 5 + 6 ; you can perform math operations with integers "5" + "6" ; (error) you can't perform math with strings (to-integer "5") + (to-integer "6") ; this eliminates the math problem to-pair [12 43] ; creates a coordinate pair as-pair 12 43 ; a better way to create a coordinate pair to-binary 123.54.212 ; convert a REBOL color value to hex color value to-binary request-color ; convert the color chosen by the user, to hex to-tuple #{00CD00} ; convert a hex color value to REBOL color value form to-tuple #{00CD00} ; covert the hex color value to a string write/binary %floorplan8.pdf debase read clipboard:// ; email attachmentREBOL has many built-in helper functions for dealing with common data types. Another way to create pair values is with the "as-pair" function. You'll see this sort of pair creation commonly to plot graphics at coordinate points on the screen:
x: 12 y: 33 q: 18 p: 7 print (as-pair x y) + (as-pair q p) ; much simpler!Built-in network protocols, native data types, and consistent language syntax for reading, writing, and manipulating data allow you to perform common coding chores easily and intuitively in REBOL. Remember to type or paste every example into the REBOL interpreter to see how each function and language construct operates.
11.7 Random Values
You can create random values of any type:
random/seed now/time ; always use this line to get real random values random 50 ; a random number between 0 and 50 random 50x100 ; left side is limited to 50, right limited to 100 random 222.222.222 ; each segment is limited to #s between 0 and 222 random $500 random "asdfqwerty" ; a random mix of the given characters
11.8 More About Reading, Writing, Loading, and Saving to and from Varied Sources
Thoughout this tutorial, you'll see examples of functions that read and write data to "local files", web sites, the system "clipboard", emails, and other data sources. If you're totally new to programming, a quick explanation of that topic and related terms is helpful here.
It may be familiar that in MS Windows, when you click the "My Computer" (or "Computer") icon on the desktop, you see a list of hard drives, USB flash drives, mapped network drives, and other storage devices attached to the computer:
Data on your computer's permanent hard drive is organized into a tree of folders (or "directories"), each containing individual files and additional branches of nested folders. In Windows, the root directory of your main hard drive is typically called "C:\". C is the letter name given to the disk, and "\" ("backslash") represents the root folder of the directory tree. The REBOL interpreter is installed, by default, in the folder C:\Program Files\rebol\view\
When you perform any sort of read, write, save, load, editor or other function that reads and writes data "on your computer", you are working with files on one of the "local" storage devices attached to the computer (as opposed to a folder on web server, email account, etc.). When using read and write functions, the default location for those files, in a default installation of REBOL, is "C:\Program Files\rebol\view\". The following image of a Windows file selector shows the list of files currently contained in that folder on the author's computer:
In REBOL, the percent character ("%") is used to represent local files. Because REBOL can be used on many operating systems, and because those operating systems all use different syntax to refer to drives, paths, etc., REBOL uses the universal format: %/drive/path/path/.../file.ext . For example, "C:\Program Files\rebol\view\" in Windows is referred to as "%/C/Program%20Files/rebol/view/" in REBOL code. Note that Windows uses backslashes (\), and REBOL uses forward slashes (/) to refer to folders. REBOL converts the "%" syntax to the appropriate operating system format, so that your code can be written once and used on every operating system, without alteration.
The list of files in the image above would be written in REBOL as below. Notice the forward slashes at the end of folder names:
%data/ %desktop/ %local/ %public/ %temp-examples/ %console_email.r %e %edit-prefs.r %r %read-email-header.r %rebol.exe %temp.txt %user.r %word-cats.r %word-defs.r %wordbrowser.rThe following 2 functions convert REBOL file format to your operating system's format, and visa versa. This is particularly useful when dealing with files that contain spaces or other characters:
print to-local-file %/C/Program%20Files/rebol/view/rebol.exe print to-rebol-file {C:\Program Files\rebol\view\rebol.exe}You can use the "change-dir" (or "cd") function to change folders:
change-dir %/c/ ; changes to the C:\ folder in Windows cd %/c/ ; "cd" is a shortcut for "change-dir"To move "up" a folder from the current directory, use "%../". For example, the following code moves from the default C:\Program Files\rebol\view\ folder, up to C:\Program Files\rebol\, and then to C:\Program Files\:
cd %../ cd %../Refer to the current folder with "%./". You can read a listing of the files in the current folder, like this:
read %./ probe read %./ editor %./You can make a new folder within the current folder, using the "make-dir" function. Here are some additional folder functions:
make-dir %./newfolder/ what-dir list-dirYou can rename, copy, and delete files within a folder, using these functions:
rename %temp.txt %temp2.txt ; change file name write %temp.txt read %temp2.txt ; copy file delete %temp2.txtThe "write" function writes data to a file. It takes two parameters - a file name to write to, and some data to be written:
write %name.txt "John Smith"The "read" function reads data from a file:
read %name.txtYou can assign variable labels to data that will be written to a file:
name: "John Smith" write %name.txt nameAssign variable labels to data read from a file:
loaded-name: read %name.txt print loaded-nameREBOL's built-in text editor can also read, write, and manipulate text data in files:
editor %name.txtYou can write data to a web site (or any other connected protocol) using the exact same write syntax that is used to write to a file. Writing to a web site "ftp" account requires a username and password:
write ftp://user:pass@website.com/folder/test.txt "Text written by REBOL"You can read data straight from a web server, an ftp account, an email account, etc. using the same format. Many Internet protocols are built right into the REBOL interpreter. They're understood natively, and REBOL knows exactly how to connect to them without any preparation by the programmer:
editor http://rebol.com ; Reads the content of the ; document at this URL. editor pop://user:pass@website.com ; Reads all emails in this ; POP inbox. editor clipboard:// ; Reads data that has ; been copied/pasted to ; the OS clipboard. print read dns://msn.com ; Displays the DNS info ; for this address. print read nntp://public.teranews.com ; (Hit the [ESC] key to stop ; this Usenet listing.)NOTE: The editor reads, AND allows you to SAVE EDITS back to the server:
editor ftp://user:pass@website.com/public_html/index.htmlTransferring data between devices connected by any supported protocol is easy - just read and write:
; read data from a web site, and paste it into the local clipboard: write clipboard:// (read http://rebol.com) ; afterward, try pasting into ; your favorite text editor ; read a page from one web site, and write it to another: write ftp://user:pass@website2.com (read http://website1.com) ; again, notice that the "write" function takes TWO parametersSending email is just as easy, using a similar syntax:
send user@website.com "Hello" send user@website.com (read %file.txt) ; sends an email, with ; file.txt as the bodyThe "/binary" modifier is used to read or write binary (non-text) data. You'll use read/binary and write/binary to read and write images, sounds, videos and other non-text files:
write/binary %/c/bay.jpg read/binary http://rebol.com/view/bay.jpgFor clarification, remember that the write function takes two parameters. The first parameter above is "%/c/bay.jpg". The second parameter is the binary data read from http://rebol.com/view/bay.jpg:
write/binary (%/c/bay.jpg) (read/binary http://rebol.com/view/bay.jpg)The "load" and "save" functions also read and write data, but in the process, automatically format certain data types for use in REBOL. Try this:
; assign the word "picture" to the image "load"ed from a given URL: picture: load http://rebol.com/view/bay.jpg ; save the image to a given file name, and automatically convert it ; to .png format; save/png %/c/picture.png picture ; show it in a GUI window: view layout [image load %/c/picture.png]"Load" and "save" are used to conveniently manage certain types of data in formats directly usable by REBOL (blocks, images, sounds, DLLs, certain native data structures, etc. can be loaded and used immediately). You'll use "read" and "write" more commonly to store and retrieve typical types of data, exactly byte for byte, to/from a storage medium, when no conversion or formatting is necessary.
All these examples and options may currently come across as confusing. If the topic is feels daunting at the moment, simply accept this section as reference material and continue studying the next sections. You'll become much more familiar with reading and writing as you see the functions in use within real examples.


11.9 Understanding Return Values and the Order of Evaluation
In REBOL, you can put as many functions as you want on one line, and they are all evaluated strictly from left to right. Functions are grouped together automatically with their required data parameter(s). The following line contains two alert functions:
alert "First function" alert "Second function"Rebol knows to look for one parameter after the first alert function, so it uses the next piece of data on that line as the argument for that function. Next on the line, the interpreter comes across another alert function, and uses the following text as it's data parameter.
Simple requester functions don't require any parameters, but like most functions, they RETURN a useful value. Try pasting these functions directly into the REBOL console to see their return values:
request-text request-date request-color request-file request-dir request-passIn the following line, the first function, with its refinements "request-pass/offset/title" requires two parameters, so REBOL uses the next two items on the line ("10x100" and "title") as its arguments. After that's complete, the interpreter comes across another "alert" function, and uses the following text, "Processing", as its argument:
request-pass/offset/title 10x100 "title" alert "Processing"IMPORTANT: In REBOL, the return values (output) from one function can be used directly as the arguments (input) for other functions. Everything is simply evaluated from left to right. In the line below, the "alert" function takes the next thing on the line as it's input parameter, which in this case is not a piece of data, but a function which returns some data (the concatenated text returned by the "rejoin" function):
alert rejoin ["Hello " "there" "!"]To say it another way, the value returned above by the "rejoin" function is passed to (used as a parameter by) the "alert" function. Parentheses can be used to clarify which expressions are evaluated and passed as parameters to other functions. The parenthesized line below is treated by the REBOL interpreter exactly the same as the line above - it just lets you see more clearly what data the "alert" function puts on screen:
alert ( rejoin ["Hello " "there" "!"] )Perhaps the hardest part of getting started with REBOL is understanding the order in which functions are evaluated. The process can appear to work backwords at times. In the example below, the "editor" function takes the next thing on the line as it's input parameter, and edits that text. In order for the editor function to begin its editing operation, however, it needs a text value to be returned from the "request-text" function. The first thing the user sees when this line runs, therefore, is the text requester. That appears backwards, compared to the way it's written:
editor (request-text)Always remember that lines of REBOL code are evaluated from left to right. If you use the return value of one function as the argument for another function, the execution of the whole line will be held up until the necessary return value is processed.
Any number of functions can be written on a single line, with return values cascaded from one function to the next:
alert ( rejoin ( ["You chose: " ( request "Choose one:" ) ] ) )The line above is typical of common REBOL language syntax. There are three functions: "alert", "rejoin", and "request". In order for the first alert function to complete, it needs a return value from "rejoin", which in turn needs a return value from the "request" function. The first thing the user sees, therefore, is the request function. After the user responds to the request, the selected response is rejoined with the text "You chose: ", and the joined text is displayed as an alert message. Think of it as reading "display (the following text joined together ("you chose" (an answer selected by the user))). To complete the line, the user must first answer the question.
To learn REBOL, it's essential to first memorize and recognize REBOL's many built-in function words, along with the parameters they accept as input, and the values which they return as output. When you get used to reading lines of code as functions, arguments, and return values, read from left to right, the language will quickly begin to make sense.
It should be noted that in REBOL, math expressions are evaluated from left to right like all other functions. There is no "order of precedence", as in other languages (i.e., multiplication doesn't automatically get computed before addition). To force a specific order of evaluation, enclose the functions in parentheses:
print 10 + 12 / 2 ; 22 / 2 = 11 print (10 + 12) / 2 ; 22 / 2 = 11 (same as without parentheses) print 10 + (12 / 2) ; 10 + 6 = 16 (force multiplication first)REBOL's left to right evaluation is simple and consistent. Parentheses can be used to clarify the flow of code, if ever there's confusion.
11.10 More About Conditional Evaluations
You've already seen the "if" and "either" conditional operations. Math operators are typically used to perform conditional evaluations: = < > <> (equal, less-than, greater-than, not-equal):
if now/time > 12:00 [alert "It's after noon."] either now/time > 8:00am [ alert "It's time to get up!" ][ alert "You can keep on sleeping." ]11.10.1 Switch
The "switch" evaluation chooses between numerous functions to perform, based on multiple evaluations. Its syntax is:
switch/default (main value) [ (value 1) [block to execute if value 1 = main value (value 2) [block to execute if value 2 = main value] (value 3) [block to execute if value 3 = main value] ; etc... ] [default block of code to execute if none of the values match]You can compare as many values as you want against the main value, and run a block of code for each matching value:
favorite-day: request-text/title "What's your favorite day of the week?" switch/default favorite-day [ "Monday" [alert "Monday is the worst! The work week begins..."] "Tuesday" [alert "Tuesdays and Thursdays are both ok, I guess..."] "Wednesday" [alert "The hump day - the week is halfway over!"] "Thursday" [alert "Tuesdays and Thursdays are both ok, I guess..."] "Friday" [alert "Yay! TGIF!"] "Saturday" [alert "Of course, the weekend!"] "Sunday" [alert "Of course, the weekend!"] ] [alert "You didn't type in the name of a day!"]11.10.2 Case
You can choose between multiple evaluations of any complexity using the "case" structure. If none of the cases evaluate to true, you can use any true value to trigger a default evaluation:
name: "john" case [ find name "a" [print {Your name contains the letter "a"}] find name "e" [print {Your name contains the letter "e"}] find name "i" [print {Your name contains the letter "i"}] find name "o" [print {Your name contains the letter "o"}] find name "u" [print {Your name contains the letter "u"}] true [print {Your name doesn't contain any vowels!}] ] for i 1 100 1 [ case [ (0 = modulo i 3) and (0 = modulo i 5) [print "fizzbuzz"] 0 = modulo i 3 [print "fizz"] 0 = modulo i 5 [print "buzz"] true [print i] ] ]By default, the case evaluation automatically exits once a true evaluation is found (i.e., in the name example above, if the name contains more than one vowel, only the first vowel will be printed). To check all possible cases before ending the evaluation, use the /all refinement:
name: "brian" found: false case/all [ find name "a" [print {Your name contains the letter "a"} found: true] find name "e" [print {Your name contains the letter "e"} found: true] find name "i" [print {Your name contains the letter "i"} found: true] find name "o" [print {Your name contains the letter "o"} found: true] find name "u" [print {Your name contains the letter "u"} found: true] found = false [print {Your name doesn't contain any vowels!}] ]11.10.3 Multiple Conditions: "and", "or", "all", "any"
You can check for more than one condition to be true, using the "and", "or", "all", and "any" words:
; first set some initial values all to be true: value1: value2: value3: true ; then set some additional values all to be false: value4: value5: value6: false ; The following prints "both true", because both the first ; condition AND the second condition are true: either ( (value1 = true) and (value2 = true) ) [ print "both true" ] [ print "not both true" ] ; The following prints "both not true", because the second ; condition is false: either ( (value1 = true) and (value4 = true) ) [ print "both true" ] [ print "not both true" ] ; The following prints "either one OR the other is true" ; because the first condition is true: either ( (value1 = true) or (value4 = true) ) [ print "either one OR the other is true" ] [ print "neither is true" ] ; The following prints "either one OR the other is true" ; because the second condition is true: either ( (value4 = true) or (value1 = true) ) [ print "either one OR the other is true" ] [ print "neither is true" ] ; The following prints "either one OR the other is true" ; because both conditions are true: either ( (value1 = true) or (value4 = true) ) [ print "either one OR the other is true" ] [ print "neither is true" ] ; The following prints "neither is true": either ( (value4 = true) or (value5 = true) ) [ print "either one OR the other is true" ] [ print "neither is true" ]For comparisons involving more items, you can use "any" and "all":
; The following lines both print "yes", because ALL comparisons are true. ; "All" is just shorthand for the multiple "and" evaluations: if ((value1 = true) and (value2 = true) and (value3 = true)) [ print "yes" ] if all [value1 = true value2 = true value3 = true] [ print "yes" ] ; The following lines both print "yes" because ANY ONE of the comparisons ; is true. "Any" is just shorthand for the multiple "or" evaluations: if ((value1 = true) or (value4 = true) or (value5 = true)) [ print "yes" ] if any [value1 = true value4 = true value5 = true] [ print "yes" ]
11.11 More About Loops
11.11.1 Forever
"Loop" structures provide programmatic ways to methodically repeat actions, manage program flow, and automate lengthy data processing activities. You've already seen the "foreach" loop structure. The "forever" function creates a simple repeating loop. Its syntax is:
forever [block of actions to repeat]The following code uses a forever loop to continually check the time. It alerts the user when 60 seconds has passed. Notice the "break" function, used to stop the loop:
alarm-time: now/time + :00:60 forever [if now/time = alarm-time [alert "1 minute has passed" break]]Here's a more interactive version using some info provided by the user. Notice how the forever loop, if evaluation, and alert arguments are indented to clarify the grouping of related parameters:
event-name: request-text/title "What do you want to be reminded of?" seconds: to-integer request-text/title "Seconds to wait?" alert rejoin [ "It's now " now/time ", and you'll be alerted in " seconds " seconds." ] alarm-time: now/time + seconds forever [ if now/time = alarm-time [ alert rejoin [ "It's now "alarm-time ", and " seconds " seconds have passed. It's time for: " event-name ] break ] ]Here's a forever loop that displays/updates the current time in a GUI:
view layout [ timer: field button "Start" [ forever [ set-face timer now/time wait 1 ] ] ]11.11.2 Loop
The "loop" function allows you to repeatedly evaluate a block of code, a specified number of times:
loop 50 [print "REBOL is great!"]11.11.3 Repeat
Like "loop", the "repeat" function allows you to repeatedly evaluate a block of code, a specified number of times. It additionally allows you to specify a counter variable which is automatically incremented each time through the loop:
repeat count 50 [print rejoin ["This is loop #: " count]]The above code does the same thing as:
count: 0 loop 50 [ count: count + 1 print rejoin ["This is loop #: " count] ]Another way to write it would be:
for i 1 50 1 [print rejoin ["This is loop #: " i]]11.11.4 Forall and Forskip
"Forall" loops through a block, incrementing the marked index number of the series as it loops through:
some-names: ["John" "Bill" "Tom" "Mike"] foreach name some-names [print index? some-names] ; index doesn't change forall some-names [print index? some-names] ; index changes foreach name some-names [print name] forall some-names [print first some-names] ; same effect as line above"Forskip" works like forall, but skips through the block, jumping a periodic number of elements on each loop:
some-names: ["John" "Bill" "Tom" "Mike"] forskip some-names 2 [print first some-names]11.11.5 While and Until
The "while" function repeatedly evaluates a block of code while the given condition is true. While loops are formatted as follows:
while [condition] [ block of functions to be executed while the condition is true ]This example counts to 5:
x: 1 ; create an initial counter value while [x <= 5] [ alert to-string x x: x + 1 ]In English, that code reads:
"x" initially equals 1. While x is less than or equal to 5, display the value of x, then add 1 to the value of x and repeat.Some additional "while" loop examples:
while [not request "End the program now?"] [ alert "Select YES to end the program." ] ; "not" reverses the value of data received from ; the user (i.e., yes becomes no and visa versa) alert "Please select today's date" while [request-date <> now/date] [ alert rejoin ["Please select TODAY's date. It's " now/date] ] while [request-pass <> ["username" "password"]] [ alert "The username is 'username' and the password is 'password'" ]"Until" loops are similar to "while" loops. They do everything in a given block, repeatedly, until the last expression in the block evaluates to true:
x: 10 until [ print rejoin ["Counting down: " x] x: x - 1 x = 0 ]11.11.6 For
The for function can loop through a series of items in a block, just like "foreach", but using a counted index. The for syntax reads like this: "Assign a (variable word) to refer to an ordinally counted sequence of numbers, begin counting on a (start number), count to an (end number), skipping by this (step number) [use the variable label to refer to each consecutive number in the count]:
REBOL [] for counter 1 10 1 [print counter] for counter 10 1 -1 [print counter] for counter 10 100 10 [print counter] for counter 1 5 .5 [print counter] haltREBOL will properly increment any data type that it understands:
REBOL [] for timer 8:00 9:00 0:05 [print timer] for dimes $0.00 $1.00 $0.10 [print dimes] for date 1-dec-2005 25-jan-2006 8 [print date] for alphabet #"a" #"z" 1 [prin alphabet] haltYou can pick out indexed items from a list, using the incrementally counted numbers in a FOR loop. Just determine the length of the block using the "length?" function:
REBOL [] months: system/locale/months len: length? months for i 1 len 1 [ print rejoin [(pick months i) " is month number " i] ] haltThis code does the exact same thing as above, using one of the alternate syntaxes instead of "pick":
REBOL [] months: system/locale/months len: length? months for i 1 len 1 [ print rejoin [months/:i " is month number " i] ] haltAs you've seen, you can pick out consecutive items from a list using counter arithmetic (pick index, pick index + 1, pick index + 2). Within a for structure that uses a skip value, this concept allows you to pick out columns of data:
REBOL [] months: system/locale/months len: length? months for i 1 len 3 [ print rejoin [ "Months " i " to " (i + 2) " are:" newline newline (pick months i) newline (pick months (i + 1)) newline (pick months (i + 2)) newline ] ] haltHere's an example that uses an "if" conditional evaluation to print only names that contain a requested string of text. This provides a functional search:
REBOL [] users: [ "John Smith" "123 Tomline Lane Forest Hills, NJ" "555-1234" "Paul Thompson" "234 Georgetown Pl. Peanut Grove, AL" "555-2345" "Jim Persee" "345 Pickles Pike Orange Grove, FL" "555-3456" "George Jones" "456 Topforge Court Mountain Creek, CO" "" "Tim Paulson" "" "555-5678" ] search-text: request-text/title/default "Search for:" "t" for i 1 length? users 3 [ if find/only (pick users i) search-text [ print rejoin [ (pick users i) newline (pick users (i + 1)) newline (pick users (i + 2)) newline ] ] ] haltTo clarify the syntactic difference between "for" and "foreach" loops, here is the same program as above, written using foreach:
REBOL [] users: [ "John Smith" "123 Tomline Lane Forest Hills, NJ" "555-1234" "Paul Thompson" "234 Georgetown Pl. Peanut Grove, AL" "555-2345" "Jim Persee" "345 Pickles Pike Orange Grove, FL" "555-3456" "George Jones" "456 Topforge Court Mountain Creek, CO" "" "Tim Paulson" "" "555-5678" ] search-text: request-text/title/default "Search for:" "t" foreach [name address phone] users [ if find/only name search-text [ print rejoin [ name newline address newline phone newline ] ] ] haltAs you can see, the for loop function is useful in almost the exact same way as foreach. It's a bit cryptic, but useful for certain common field selection algorithms which involve non-consecutive fields. You will find that both functions are used in applications of all types that deal with tabular data and lists. You'll see many use cases for each function, as this tutorial progresses - keep your eyes peeled for for and foreach.
The example below uses several loops to alert the user to feed the cat, every 6 hours between 8am and 8pm. It uses a for loop to increment the times to be alerted, a while loop to continually compare the incremented times with the current time, and a forever loop to do the same thing every day, continuously. Notice the indentation:
forever [ for timer 8:00am 8:00pm 6:00 [ while [now/time <= timer] [wait :00:01] alert rejoin ["It's now " now/time ". Time to feed the cat."] ] ]
11.12 More About Why/How Blocks are Useful
IMPORTANT: In REBOL, blocks can contain mixed data of ANY type (text and binary items, embedded lists of items (other blocks), variables, etc.):
some-items: ["item1" "item2" "item3" "item4"] an-image: load http://rebol.com/view/bay.jpg append some-items an-image ; "some-items" now contains 4 text strings, and an image! ; You can save that entire block of data, INCUDING THE BINARY ; IMAGE data, to your hard drive as a SIMPLE TEXT FILE: save/all %some-items.txt some-items ; to load it back and use it later: some-items: load %some-items.txt view layout [image fifth some-items]Take a moment to examine the example above. REBOL's block structure works in a way that is dramatically easy to use compared to other languages and data management solutions (much more simply than most database systems). It's is a very flexible, simple, and powerful way to store data in code! The fact that blocks can hold all types of data using one simple syntactic structure is a fundamental reason it's easier to use than other programming languages and computing tools. You can save/load block code to the hard drive as a simple text file, send it in an email, display it in a GUI, compress it and transfer it to a web server to be downloaded by others, transfer it directly over a point-to-point network connection, or even convert it to XML, encrypt, and store parts of it in a secure multiuser database to be accessed by other programming languages, etc...
Remember, all programming, and computing in general, is essentially about storing, organizing, manipulating, and transferring data of some sort. REBOL makes working with all types of data very easy - just put any number of pieces of data, of any type, in between two brackets, and that data is automatically searchable, sortable, storable, transferable, and otherwise usable in your programs.
11.12.1 Evaluating Variables in Blocks: Compose, Reduce, Pick and More
You will often find that you want to refer to an item in a block by its index (position number), as in the earlier 'some-items' example:
view layout [image some-items/5]You may not, however, always know the specific index number of the data item you want to access. For example, as you insert data items into a block, the index position of the last item changes (it increases). You can obtain the index number of the last item in a block simply by determining the number of items in the block (the position number of the last item in a block is always the same as the total number of items in the block). In the example below, that index number is assigned the variable word "last-item":
last-item: length? some-itemsNow you can use that variable to pick out the last item:
view layout [image (pick some-items last-item)] ; In our earlier example, with 5 items in the block, the ; line above evaluates the same as: view layout [image (pick some-items 5)]You can refer to other items by adding and subtracting index numbers:
alert pick some-items (last-item - 4)There are several other ways to do the exact same thing in REBOL. The "compose" function allows variables in parentheses to be evaluated and inserted as if they'd been typed explicitly into a code block:
view layout compose [image some-items/(last-item)] ; The line above appears to the interpreter as if the following ; had been typed: view layout [image some-items/5]The "compose" function is very useful whenever you want to refer to data at variable index positions within a block. The "reduce" function can also be used to produce the same type of evaluation. Function words in a reduced block should begin with the tick (') symbol:
view layout reduce ['image some-items/(last-item)]Another way to use variable values explicitly is with the ":" format below. This code evaluates the same as the previous two examples:
view layout [image some-items/:last-item]Think of the colon format above as the opposite of setting a variable. As you've seen, the colon symbol placed after a variable word sets the word to equal some value. A colon symbol placed before a variable word gets the value assigned to the variable, and inserts that value into the code as if it had been typed explicitly.
You can use the "index?" and "find" functions to determine the index position(s) of any data you're searching for in a block:
index-num: index? (find some-items "item4")Any of the previous 4 formats can be used to select the data at the determined variable position:
print pick some-items index-num print compose [some-items/(index-num)] print reduce [some-items/(index-num)] ; no function words are used in the block above, so no ticks are required print some-items/:index-numHere's an example that displays variable image data contained in a block, using a foreach loop. The "compose" function is used to include dynamically changeable data (image representations), as if that data had been typed directly into the code:
photo1: load http://rebol.com/view/bay.jpg photo2: load http://rebol.com/view/demos/palms.jpg ; The REBOL interpreter sees the following line as if all the code ; representing the above images had been typed directly in the block: photo-block: compose [(photo1) (photo2)] foreach photo photo-block [view layout [image photo]]For additional detailed information about using blocks and series functions see http://www.rebol.com/docs/core23/rebolcore-6.html.
11.13 REBOL Strings
In REBOL, a "string" is simply a series of characters. If you have experience with other programming languages, this can be one of the sticking points in learning REBOL. REBOL's solution is actually a very powerful, easy to learn and consistent with the way other operations work in the language. Proper string management simply requires a good understanding of list functions. Take a look at the following examples to see how to do a few common operations:
the-string: "abcdefghijklmnopqrstuvwxyz" ; Left String: (get the left 7 characters of the string): copy/part the-string 7 ; Right String: (Get the right 7 characters of the string): copy at tail the-string -7 ; Mid String 1: (get 7 characters from the middle of the string, ; starting with the 12th character): copy/part (at the-string 12) 7 ; Mid String 2: (get 7 characters from the middle of the string, ; starting 7 characters back from the letter "m"): copy/part (find the-string "m") -7 ; Mid String 3: (get 7 characters from the middle of the string, ; starting 12 characters back from the letter "t"): copy/part (skip (find the-string "t") -12) 7 ; 3 different ways to get just the 7th character: the-string/7 pick the-string 7 seventh the-string ; Change "cde" to "123" replace the-string "cde" "123" ; Several ways to change the 7th character to "7" change (at the-string 7) "7" poke the-string 7 #"7" ; the pound symbol refers to a single character poke the-string 7 (to-char "7") ; another way to use single characters print the-string ; Remove 15 characters, starting at the 3rd position: remove/part (at the-string 3) 15 print the-string ; Insert 15 characters, starting at the 3rd position: insert (at the-string 3) "cdefghijklmnopq" print the-string ; Insert 3 instances of "-+" at the beginning of the string: insert/dup head the-string "-+ " 3 print the-string ; Replace every instance of "-+ " with " ": replace/all the-string "-+ " " " print the-string ; Remove spaces from a string (type "? trim" to see all its refinements!): trim the-string print the-string ; Get every third character from the string: extract the-string 3 ; Get the ASCII value for "c" (ASCII 99): to-integer third the-string ; Get the character for ASCII 99 ("c"): to-char 99 ; Convert the above character value to a string value: to-string to-char 99 ; Convert any value to a string: to-string now to-string $2344.44 to-string to-char 99 to-string system/locale/months ; An even better way to convert values to strings: form now form $2344.44 form to-char 99 form system/locale/months ; convert blocks to nicely formed strings ; Covert strings to a block of characters: the-block: copy [] foreach item the-string [append the-block item] probe the-blockREBOL's series functions are very versatile. Often, you can devise several ways to do the same thing:
; Remove the last part of a URL: the-url: "http://website.com/path" clear at the-url (index? find/last the-url "/") print the-url ; Another way to do it: the-url: "http://website.com/path" print copy/part the-url (length? the-url)-(length? find/last the-url "/")(Of course, REBOL has a built-in helper function to accomplish the above goal, directly with URLs):
the-url: http://website.com/path print first split-path the-urlThere are a number of additional functions that can be used to work specifically with string series. Run the following script for an introduction:
string-funcs: [ build-tag checksum clean-path compress debase decode-cgi decompress dehex detab dirize enbase entab import-email lowercase mold parse-xml reform rejoin remold split-path suffix? uppercase ] echo %string-help.txt ; "echo" saves console activity to a file foreach word string-funcs [ print "___________________________________________________________^/" print rejoin ["word: " uppercase to-string word] print "" do compose [help (to-word word)] ] echo off editor at read %string-help.txt 4See http://www.rebol.com/docs/dictionary.html and http://rebol.com/docs/core23/rebolcore-8.html for more information about the above functions.
12. More Essential Topics
12.1 Built-In Help and Online Resources
The "help" function displays required syntax for any REBOL function:
help print"?" is a synonym for "help":
The "what" function lists all built-in words:
whatTogether, those two words provide a built-in reference guide for the entire core REBOL language. Here's a script that saves all the above documentation to a file. Give it a few seconds to run:
echo %words.txt what echo off ; "echo" saves console activity to a file echo %help.txt foreach line read/lines %words.txt [ word: first to-block line print "___________________________________________________________^/" print rejoin ["word: " uppercase to-string word] print "" do compose [help (to-word word)] ] echo off editor at read %help.txt 4You can use help to search for defined words and values, when you can't remember the exact spelling of the word. Just type a portion of the word (hitting the tab key will also show a list of words for automatic word completion):
? to- ; shows a list of all built-in type conversions ? reques ; shows a list of built-in requester functions ? "load" ; shows all words containing the characters "load" ? "?" ; shows all words containing the character "?"Here are some more examples of ways to search for useful info using help:
? datatype! ; shows a list of built-in data types ? function! ; shows a list of built-in functions ? native! ; shows a list of native (compiled C code) functions ? char! ; shows a list of built-in control characters ? tuple! ; shows a list of built-in colors (RGB tuples) ? .gif ; shows a list of built-in .gif imagesYou can view the source code for built-in "mezzanine" (non-native) functions with the "source" function. There is a huge volume of REBOL code accessible right in the interpreter, and all of the mezzanine functions were created by the language's designer, Carl Sassenrath. Studying mezzanine source is a great way to learn more about advanced REBOL code patterns:
source help source request-text source view source layout source ctx-viewtop ; try this: view layout [image load ctx-viewtop/13]The "word browser" script is a useful tool for finding, cross referencing, and learning about all the critical functions in REBOL:
write %wordbrowser.r read http://re-bol.com/wordbrowser.r do %wordbrowser.r12.1.1 The REBOL System Object, and Help with GUI Widgets
"Help system" displays the contents of the REBOL system object, which contains many important settings and values. You can explore each level of the system object using path notation, like this:
? system/console/history ; the current console session history ? system/options ? system/locale/months ? system/network/host-addressYou can find info about all of REBOL's GUI components in "system/view/VID":
? system/view/VIDThe system/view/VID block is so important, REBOL has a built-in short cut to refer to it:
? svvYou'll find a list of REBOL's GUI widgets in "svv/vid-styles". Use REBOL's "editor" function to view large system sections like this:
editor svv/vid-stylesHere's a script that neatly displays all the words in the above "svv/vid-styles" block:
foreach i svv/vid-styles [if (type? i) = word! [print i]]Here's a more concise way to display the above widgets, using the "extract" function:
probe extract svv/vid-styles 2This script lets you browse the object structure of each widget:
view layout [ text-list data (extract svv/vid-styles 2) [ a/text: select svv/vid-styles value show a focus a ] a: area 500x250 ]REBOL's GUI layout words are available in "svv/vid-words":
? svv/vid-wordsThe following script displays all the images in the svv/image-stock block:
b: copy [] foreach i svv/image-stock [if (type? i) = image! [append b i]] v: copy [] foreach i b [append v reduce ['image i]] view layout vThe changeable attributes ("facets") available to all GUI widgets are listed in "svv/facet-words":
editor svv/facet-wordsHere's a script that neatly displays all the above facet words:
b: copy [] foreach i svv/facet-words [if (not function? :i) [append b to-string i]] view layout [text-list data b]Some GUI widgets have additional facet words available. The following script displays all such functions, and their extra attributes:
foreach i (extract svv/vid-styles 2) [ x: select svv/vid-styles i ; additional facets are held in a "words" block: if x/words [ prin join i ": " foreach q x/words [ if not (function? :q) [prin join q " "] ] print "" ] ]To examine the function(s) that handle any of the additional facets for the widgets above, type the path to the widget's "words" block, i.e.:
svv/vid-styles/TEXT-LIST/wordsFor more information on system/view/VID, see http://www.mail-archive.com/rebol-bounce@rebol.com/msg01898.html and http://www.rebol.org/ml-display-message.r?m=rmlHJNC.
It's important to note that you can SET any system value. Just use a colon, like when assigning variable values:
system/user/email: user@website.comFamiliarity with the system object yields many useful tools.
12.1.2 Viewtop Resources
The REBOL desktop that appears by default when you run the view.exe interpreter can be used as a gateway into a world of "Rebsites" that developers use to share useful code. Surfing the public rebsites is a great way to explore the language more deeply. All of the code in the rebol.org archive, and much more, is available on the rebsites. When typing at the interpreter console, the "desktop" function brings up the REBOL desktop (also called the "Viewtop"):
desktopClick the "REBOL" or "Public" folders to see hundreds of interesting demos and useful examples. Source code for every example is available by right-clicking individual program icons and selecting "edit". You don't need a web browser or any other software to view the contents of Rebsites - the Viewtop and all its features are part of the REBOL executable. You can learn volumes about the REBOL language using only the resources built directly into the 600k interpreter!
For detailed, categorized, and cross-referenced information about built-in functions, see the REBOL Dictionary rebsite, found in the REBOL desktop folder REBOL->Tools (an HTML version is also available at http://www.rebol.com/docs/dictionary.html).
12.1.3 Online Documentation, The Mailing List and The AltME Community Forum
If you can't find answers to your REBOL programming questions using built-in help and resources, the first place to look is http://rebol.com/docs.html. Googling online documentation also tends to provide quick results, since the word "REBOL" is uncommon.
To ask a question directly of other REBOL developers, you can join the community mailing list by sending an email to rebol-request@rebol.com , with the word "subscribe" in the subject line. Use your normal email program, or just paste the following code into your REBOL interpreter (be sure your email account settings are set up correctly in REBOL):
send rebol-request@rebol.com "subscribe"You can also ask questions of numerous gurus and regular users in AltME, a messaging program which makes up the most active forum of REBOL users around the world. Rebol.org maintains a searchable history of several hundred thousand posts from both the mailing list and AltME, along with a rich script archive. The REBOL user community is friendly, knowledgeable and helpful, and you will typically find answers to just about any question already in the archives. Unlike other programming communities, REBOL does not have a popular web based support forum. AltME is the primary way that REBOL developers interact. If you want to speak with others, you must download the AltME program and set up a user account (it's fast and easy to do). Just follow the instructions at http://www.rebol.org/aga-join.r.
12.2 Saving and Running REBOL Scripts
So far in this tutorial, you've been typing or copying/pasting code snippets directly into the REBOL interpreter. As you begin to work with longer examples and full programs, you'll need to save your scripts for later execution. Whenever you save a REBOL program to a text file, the code must begin with the following bit of header text:
REBOL []That header tells the REBOL interpreter that the file contains a valid REBOL program. You can optionally document any information about the program in the header block. The "title" variable in the header block is displayed in the title bar of GUI program windows:
REBOL [ title: "My Program" author: "Nick Antonaccio" date: 29-sep-2009 ] view layout [text 400 center "Look at the title bar."]The code below is a web cam video viewer program. Type in or copy/paste the complete code source below into a text editor such as Windows Notepad or REBOL's built-in text editor (type "editor none" at the REBOL console prompt). Save the text as a file called "webcam.r" on your C:\ drive.
REBOL [title: "Webcam Viewer"] ; try http://www.webcam-index.com/USA/ for more webcam links. temp-url: "http://209.165.153.2/axis-cgi/jpg/image.cgi" while [true] [ webcam-url: to-url request-text/title/default "Web cam URL:" temp-url either attempt [webcam: load webcam-url] [ break ] [ either request [ "That webcam is not currently available." "Try Again" "Quit" ] [ temp-url: to-string webcam-url ] [ quit ] ] ] resize-screen: func [size] [ webcam/size: to-pair size window/size: (to-pair size) + 40x72 show window ] window: layout [ across btn "Stop" [webcam/rate: none show webcam] btn "Start" [ webcam/rate: 0 webcam/image: load webcam-url show webcam ] rotary "320x240" "640x480" "160x120" [ resize-screen to-pair value ] btn "Exit" [quit] return webcam: image load webcam-url 320x240 with [ rate: 0 feel/engage: func [face action event][ switch action [ time [face/image: load webcam-url show face] ] ] ] ] view center-face windowOnce you've saved the webcam.r program to C:\, you can run it in any one of the following ways:
- If you've already installed REBOL on your computer, just double-click your saved ".r" script file (find the C:\webcam.r file icon in your file explorer (click My Computer -> C: -> webcam.r)). By default, during REBOL's initial installation, all files with a ".r" extension are associated with the interpreter. They can be clicked and run as if they're executable programs, just like ".exe" files. The REBOL interpreter automatically opens and executes any selected ".r" text file. This is the most common way to run REBOL scripts, and it works the same way on all major graphic operating systems. If you want other people to be able to run your scripts, just have them download and install the tiny REBOL interpreter - it only takes a few seconds.
- Use the built-in editor in REBOL. Type "editor %/c/webcam.r" at the interpreter prompt, or type "editor none" and copy/paste the script into the editor. Pressing F5 in the editor will automatically save and run the script. This is a convenient way to work with scripts, and enables REBOL to be its own simple, self contained IDE.
- Type "do %/c/webcam.r" into the REBOL interpreter.
- Scripts can be run at the command line. In Windows, copy rebol.exe and webcam.r to the same folder (C:\), then click Start -> Run, and type "C:\rebol.exe C:\webcam.r" (or open a DOS box and type the same thing). Those commands will start the REBOL interpreter and do the webcam.r code. You can also create a text file called webcam.bat, containing the text "C:\rebol.exe C:\webcam.r" . Click on the webcam.bat file in Windows, and it'll run those commands. In Unix, you can also run scripts at scheduled times with Cron. Just enter the path to the script.
- Use a program such as XpackerX to package and distribute the program. XpackerX allows you to wrap the REBOL interpreter and webcam.r program into a single executable file that has a clickable icon, and automatically runs both files. That allows you to create a single file executable Windows program that can be distributed and run like any other application. Just click it and run... (this technique is covered in the next section).
- Buy the commercial "SDK" version of REBOL, which provides the most secure method of packaging REBOL applications.
VERY IMPORTANT: To turn off the default security requester that continually asks permission to read/write the hard drive, type "secure none" in the REBOL interpreter, and then run the program with "do {filename}". Running "C:\rebol.exe -s {filename}" does the same thing . The "-s" launches the REBOL interpreter without any security features turned on, making it behave like a typical Windows program.
12.3 "Compiling" REBOL Programs - Distributing Packaged .EXE Files
The REBOL.exe interpreter is tiny and does not require any installation to operate properly. By packaging it, your REBOL script(s), and any supporting data file(s) into a single executable with an icon of your choice, XpackerX works like a REBOL 'compiler' that produces regular Windows programs that look and act just like those created by other compiled languages. To do that, you'll need to create a text file in the following format (save it as "template.xml"):
<?xml version="1.0"?> <xpackerdefinition> <general> <!--shown in taskbar --> <appname>your_program_name</appname> <exepath>your_program_name.exe</exepath> <showextractioninfo>false</showextractioninfo> <!-- <iconpath>c:\icon.ico</iconpath> --> </general> <files> <file> <source>your_rebol_script.r</source> <destination>your_rebol_script.r</destination> </file> <file> <source>C:\Program Files\rebol\view\Rebol.exe</source> <destination>rebol.exe</destination> </file> <!--put any other data files here --> </files> <!-- $FINDEXE, $TMPRUN, $WINDIR, $PROGRAMDIR, $WINSYSDIR --> <onrun>$TMPRUN\rebol.exe -si $TMPRUN\your_rebol_script.r</onrun> </xpackerdefinition>Just download the free XpackerX program and alter the above template so that it contains the filenames you've given to your script(s) and file(s), and the correct path to your REBOL interpreter. Run XpackerX, and it'll spit out a beautifully packaged .exe file that requires no installation. Your users do not need to have REBOL installed to run this type of executable. To them it appears and runs just like any other native compiled Windows program. What actually happens is that every time your packaged .exe file runs, the REBOL interpreter and your script(s)/data file(s) are unzipped into a temporary folder on your computer. When your script is done running, the temporary folder is deleted.
Most modern compression (zip) applications have an "sfx" feature that allows you to create .exe packages from zip files. You can create a packaged REBOL .exe in the same way as XpackerX using just about any sfx packaging application (there are dozens of freeware zip/compression applications that can do this - use the one you're most familiar with).
The program "iexpress.exe" found on all versions of Windows (starting with Windows XP), is a popular choice for creating SFX files, because no additional software needs to be installed. Just click Start -> Run or Start -> Search Programs and Files, and type "iexpress". Follow the wizards to name the package, choose included files (the REBOL interpreter, scripts, images, etc.), and other options. Settings for any .exe you create with iexpress will be saved in a .sed file, which you can reload and make changes to later. This makes for quick re-"compilation" of updated scripts.
There is an explanation of how to use the NSIS install creator to make REBOL .exe's here. This is helpful if you want to adjust registry settings and make other changes to the computer system while installing your program.
To create a self-extracting REBOL executable for Linux, first create a .tgz file containing all the files you want to distribute (the REBOL interpreter, your script(s), any external binary files, etc.). For the purposes of this example, name that bundle "rebol_files.tgz". Next, create a text file containing the following code, and save it as "sh_commands":
#!/bin/sh SKIP=`awk '/^__REBOL_ARCHIVE__/ { print NR + 1; exit 0; }' $0` tail +$SKIP $0 | tar xz exit 0 __REBOL_ARCHIVE__Finally, use the following command to combine the above script file with the bundled .tgz file:
cat sh_commands rebol_files.tgz > rebol_program.shThe above line will create a single executable file named "rebol_program.sh" that can be distributed and run by end users. The user will have to set the file permissions for rebol_program.sh to executable before running it ("chmod +x rebol_program.sh"), or execute it using the syntax "sh rebol_program.sh".

12.4 Common REBOL Errors, and How to Fix Them
Listed below are solutions to a variety of common errors you'll run into when first experimenting with REBOL:
1) "** Syntax Error: Script is missing a REBOL header" - Whenever you "do" a script that's saved as a file, it must contain at least a minimum required header at the top of the code. Just include the following text at the beginning of the script:
REBOL []2) "** Syntax Error: Missing ] at end-of-script" - You'll get this error if you don't put a closing bracket at the end of a block. You'll see a similar error for unclosed parentheses and strings. The code below will give you an error, because it's missing a "]" at the end of the block:
fruits: ["apple" "orange" "pear" "grape" print fruitsInstead it should be:
fruits: ["apple" "orange" "pear" "grape"] print fruitsIndenting blocks helps to find and eliminate these kinds of errors.
3) "** Script Error: request expected str argument of type: string block object none" - This type of error occurs when you try to pass the wrong type of value to a function. The code below will give you an error, because REBOL automatically interprets the website variable as a URL, and the "alert" function requires a string value:
website: http://rebol.com alert websiteThe code below solves the problem by converting the URL value to a string before passing it to the alert function:
website: to-string http://rebol.com alert websiteWhenever you see an error of the type "expected _____ argument of type: ___ ____ ___ ...", you need to convert your data to the appropriate type, using one of the "to-(type)" functions. Type "? to-" in the REBOL interpreter to get a list of all those functions.
4) "** Script Error: word has no value" - Miss-spellings will elicit this type of error. You'll run into it any time you try to use a word that isn't defined (either natively in the REBOL interpreter, or by you, in previous code):
wrod: "Hello world" print word5) If an error occurs in a "view layout" block, and the GUI becomes unresponsive, type "unview" at the interpreter command line and the broken GUI will be closed. To restart a stopped GUI, type "do-events". To break out of any endless loop, or to otherwise stop the execution of any errant code, just hit the [Esc] key on your keyboard.
6) "** User Error: Server error: tcp 550 Access denied - Invalid HELO name (See RFC2821 4.1.1.1)" and "** User Error: Server error: tcp -ERR Login failed.", among others, are errors that you'll see when trying to send and receive emails. To fix these errors, your mail server info needs to be set up in REBOL's user settings. The most common way to do that is to edit your mail account info in the graphic Viewtop or by using the "set-net" function (http://www.rebol.com/docs/words/wset-net.html). You can also set everything manually - this is how to adjust all the individual settings:
system/schemes/default/host: your.smtp.address system/schemes/default/user: username system/schemes/default/pass: password system/schemes/pop/host: your.pop.address system/user/email: your.email@site.com7) Here's a quirk of REBOL that doesn't elicit an error, but which can cause confusing results, especially if you're familiar with other languages:
unexpected: [ empty-variable: "" append empty-variable "*" print empty-variable ] do unexpected do unexpected do unexpectedThe line:
empty-variable: ""doesn't re-initialize the variable to an empty state. Instead, every time the block is run, "empty-variable" contains the previous value. In order to set the variable back to empty, as intended, use the word "copy" as follows:
expected: [ empty-variable: copy "" append empty-variable "*" print empty-variable ] do expected do expected do expected8) Load/Save, Read/Write, Mold, Reform, etc. - another point of confusion you may run into initially with REBOL has to do with various words that read, write, and format data. When saving data to a file on your hard drive, for example, you can use either of the words "save" or "write". "Save" is used to store data in a format more directly usable by REBOL. "Write" saves data in a raw, 'unREBOLized' form. "Load" and "read" share a comparable relationship. "Load" reads data in a way that is more automatically understood and put to use in REBOL code. "Read" opens data in exactly the format it's saved, byte for byte. Generally, data that is "save"d should also be "load"ed, and data that's "write"ed should be "read". For more information, see the following REBOL dictionary entries:
http://rebol.com/docs/words/wload.html
http://rebol.com/docs/words/wsave.html
http://rebol.com/docs/words/wread.html
http://rebol.com/docs/words/wwrite.html
Other built-in words such as "mold" and "reform" help you deal with text in ways that are either more human-readable or more natively readable by the REBOL interpreter. For a helpful explanation, see http://www.rebol.net/cookbook/recipes/0015.html.
9) Order of precedence - REBOL expressions are always evaluated from left to right, regardless of the operations involved. If you want specific mathematical operators to be evaluated first, they should either be enclosed in parenthesis or put first in the expression. For example, to the REBOL interpreter:
2 + 4 * 6is the same as:
(2 + 4) * 6 ; the left side is evaluated first == 6 * 6 == 36This is contrary to other familiar evaluation rules. In many languages, for example, multiplication is typically handled before addition. So, the same expression:
2 + 4 * 6is treated as:
2 + (4 * 6) ; the multiplication operator is evaluated first == 2 + 24 == 26Just remember, evaluation is always left to right, without exception.
10) You may run into problems when copying/pasting interactive console scripts directly into the REBOL interpreter, especially when the code contains functions such as "ask", which require a response from the user before the remainder of the script is evaluated (each line of the script simply runs, as the pasting operation completes, without any response from the user, leaving necessary variables unassigned). To fix such interactivity problems when copying/pasting console code into the interpreter, simply wrap the entire script in square brackets and then "do" that block: do [...your full script code...]. This will force the entire script to be loaded before any of the code is evaluated. If you want to run the code several times, simply assign it a word label, and then run the word label as many times as needed: do x: [...your full script code...] do x do x do x .... This saves you from having to paste the code more than once. Another effective option, especially with large scripts, is to run the code from the clipboard using "do read clipboard://". This performs much faster than watching large amounts of text paste into the console.
12.4.1 Trapping Errors
There are several simple ways to keep your program from crashing when an error occurs. The words "error?" and "try" together provide a way to check for and handle expected error situations. For example, if no Internet connection is available, the code below will crash abruptly with an error:
html: read http://rebol.comThe adjusted code below will handle the error more gracefully:
if error? try [html: read http://rebol.com] [ alert "Unavailable." ]The word "attempt" is an alternative to the "error? try" routine. It returns the evaluated contents of a given block if it succeeds. Otherwise it returns "none":
if not attempt [html: read http://rebol.com] [ alert "Unavailable." ]To clarify, "error? try [block]" evaluates to true if the block produces an error, and "attempt [block]" evaluates to false if the block produces an error.
For a complete explanation of REBOL error codes, see: http://www.rebol.com/docs/core23/rebolcore-17.html.
13. Creating Web Applications using REBOL CGI
The Internet provides a fantastic scope of added potential capability to business applications. Network connectivity allows multiple users to share data easily, anywhere in the world. The "web page" interface allows users to input data and view computed output using virtually any Internet connected device (computers, phones, tablets, etc.). The "web page" paradigm and generalized workflow is already familiar to an overwhelming majority of technically savvy users.
In CGI web applications, HTML forms on a web site act as the user interface (GUI) for scripts that run on a web server. Users typically type text into fields, select choices from drop down lists, click check boxes, and otherwise enter data into form "widgets" on a web page, and then click a Submit button when done. The submitted data is transferred to, and processed by, a script that you've stored at a specified URL (Internet address) on your web server. Data output from the script is then sent back to the user's browser and displayed on screen as a dynamically created web page. CGI programs of that sort, running on web sites, are among the most common types of computer application in contemporary use. PHP, Python, Java, PERL, and ASP are popular languages used to accomplish similar Internet programming tasks, but if you know REBOL, you don't need to learn them. REBOL's CGI interface makes Internet programming very easy.
In order to create REBOL CGI programs, you need an available web server. A web server is a computer attached to the Internet, which constantly runs a program that stores and sends out web page text and data, when requested from an Internet browser running on another computer. The most popular web serving application is Apache. Most small web sites are typically run on shared web server hosting accounts, rented from a data center for a few dollars per month (see http://www.lunarpages.com - they're REBOL friendly). While setting up a web server account, you can register an available domain name (i.e, www.yourwebsitename.com). When web site visitors type your ".com" domain address into their browser, they see files that you've created and saved into a publicly accessible file folder on your web server computer. Web hosting companies typically provide a collection of web based software tools that allow you to upload, view, edit, and manage files, folders, email, and other resources on your server. The most popular of these tools is cPanel. No matter what language you use to program web apps, registering a domain, purchasing hosted space, and learning to manage files and resources with tools such as cPanel, is a required starting point. Lunarpages and HostGator are two recommended hosts for REBOL CGI scripting. Full powered web site hosting, with a preconfigured cPanel interface, unlimited space and bandwidth, and all the tools needed to create professional web sites and apps, are available for less than $10 per month.
In order for REBOL CGI scripts to run, the REBOL interpreter must be installed on your web server. To do that, download from rebol.com the correct version of the REBOL interpreter for the operating system on which your web server runs (most often some type of Linux). Upload it to your user path on your web server, and set the permissions to allow it to be executed (typically "755"). Ask your web site host if you don't understand what that means. http://rebol.com/docs/cgi1.html#section-2.2 has some basic information about how to install REBOL on your server. If you don't have an online web server account, you can download a full featured free Apache web server package that will run on your local Windows PC, from http://www.uniformserver.com.
13.1 An HTML Crash Course
In order to create any sort of CGI application, you need to understand a bit about HTML. HTML is the layout language used to format text and GUI elements on all web pages. HTML is not a programming language - it doesn't have facilities to process or manipulate data. It's simply a markup format that allows you to shape the visual appearance of text, images, and other items on pages viewed in a browser.
In HTML, items on a web page are enclosed between starting and ending "tags":
<STARTING TAG>Some item to be included on a web page</ENDING TAG>There are tags to effect the layout in every possible way. To bold some text, for example, surround it in opening and closing "strong" tags:
<STRONG>some bolded text</STRONG>The code above appears on a web page as: some bolded text.
To italicize text, surround it in < i > and < / i > tags:
<i>some italicized text</i>That appears on a web page as: some italicized text.
To create a table with three rows of data, do the following:
<TABLE border=1> <TR><TD>First Row</TD></TR> <TR><TD>Second Row</TD></TR> <TR><TD>Third Row</TD></TR> </TABLE>Notice that every
<opening tag>in HTML code is followed by a corresponding
</closing tag>Some tags surround all of the page, some tags surround portions of the page, and they're often nested inside one another to create more complex designs.
A minimal format to create a web page is shown below. Notice that the title is nested between "head" tags, and the entire document is nested within "HTML" tags. The page content seen by the user is surrounded by "body" tags:
<HTML> <HEAD> <TITLE>Page title</TITLE> </HEAD> <BODY> A bunch of text and <i>HTML formatting</i> goes here... </BODY> </HTML>If you save the above code to a text file called "yourpage.html", upload it to your web server, and surf to http://yourwebserver.com/yourpage.html , you'll see in your browser a page entitled "Page title", with the text "A bunch of text and HTML formatting goes here...". All web pages work that way - this tutorial is in fact just an HTML document stored on the author's web server account. Click View -> Source in your browser, and you'll see the HTML tags that were used to format this document.
13.1.1 HTML Forms and Server Scripts - the Basic CGI Model
The following HTML example contains a "form" tag inside the standard HTML head and body layout. Inside the form tags are a text input field tag, and a submit button tag:
<HTML> <HEAD><TITLE>Data Entry Form</TITLE></HEAD> <BODY> <FORM ACTION="http://yourwebserver.com/your_rebol_script.cgi"> <INPUT TYPE="TEXT" NAME="username" SIZE="25"> <INPUT TYPE="SUBMIT" NAME="Submit" VALUE="Submit"> </FORM> </BODY> </HTML>Forms can contain tags for a variety of input types: multi-line text areas, drop down selection boxes, check boxes, etc. See http://www.w3schools.com/html/html_forms.asp for more information about form tags.
You can use the data entered into any form by pointing the action address to the URL at which a specific REBOL script is located. For example, 'FORM ACTION="http://yourwebserver.com/your_rebol_script.cgi"' in the above form could point to the URL of the following CGI script, which is saved as a text file on your web server. When a web site visitor clicks the submit button in the above form, the data is sent to the following program, which in turn does some processing, and prints output directly to the user's web browser. NOTE: Remember that in REBOL curly brackets are the same as quotes. Curly brackets are used in all the following examples, because they allow for multiline content and they help improve readability by clearly showing where strings begin and end:
#!/home/your_user_path/rebol/rebol -cs REBOL [] print {content-type: text/html^/} ; the line above is the same as: print "content-type: text/html^/" submitted: decode-cgi system/options/cgi/query-string print {<HTML><HEAD><TITLE>Page title</TITLE></HEAD><BODY>} print rejoin [{Hello } second submitted {!}] print {</BODY></HTML>}In order for the above code to actually run on your web server, a working REBOL interpreter must be installed in the path designated by "/home/your_user_path/rebol/rebol -cs".
The first 4 lines of the above script are basically stock code. Include them at the top of every REBOL CGI script. Notice the "decode-cgi" line - it's the key to retrieving data submitted by HTML forms. In the code above, the decoded data is assigned the variable name "submitted". The submitted form data can be manipulated however desired, and output is then returned to the user via the "print" function. That's important to understand: all data "print"ed by a REBOL CGI program appears directly in the user's web browser (i.e., to the web visitor who entered data into the HTML form). The printed data is typically laid out with HTML formatting, so that it appears as a nicely formed web page in the user's browser.
Any normal REBOL code can be included in a CGI script - you can perform any type of data storage, retrieval, organization, and manipulation that can occur in any other REBOL program. The CGI interface just allows your REBOL code to run online on your web server, and for data to be input/output via web pages which are also stored on the web server, accessible by any visitor's browser.
13.2 A Standard CGI Template to Memorize
Most short CGI programs typically print an initial HTML form to obtain data from the user. In the initial printed form, the action address typically points back to the same URL address as the script itself. The script examines the submitted data, and if it's empty (i.e., no data has been submitted), the program prints the initial HTML form. Otherwise, it manipulates the submitted data in way(s) you choose and then prints some output to the user's web browser in the form of a new HTML page. Here's a basic example of that process, using the code above:
#!/home/your_user_path/rebol/rebol -cs REBOL [] print {content-type: text/html^/} submitted: decode-cgi system/options/cgi/query-string ; The 4 lines above are the standard REBOL CGI headers. ; The line below prints the standard HTML, head and body ; tags to the visitor's browser: print {<HTML><HEAD><TITLE>Page title</TITLE></HEAD><BODY>} ; Next, determine if any data has been submitted. ; Print the initial form if empty. Otherwise, process ; and print out some HTML using the submitted data. ; Finally, print the standard closing "body" and "html" ; tags, which were opened above: either empty? submitted [ print { <FORM ACTION="http://yourwebserver.com/this_rebol_script.cgi"> <INPUT TYPE="TEXT" NAME="username" SIZE="25"> <INPUT TYPE="SUBMIT" NAME="Submit" VALUE="Submit"> </FORM> </BODY></HTML> } ] [ print rejoin [{Hello } second submitted {!}] print {</BODY></HTML>} ]Using the above standard outline, you can include any required HTML form(s), along with all executable code and data required to make a complete CGI program, all in one script file. Memorize it.
14. Example CGI Applications
14.1 Form Mail
Here's a REBOL CGI form-mail program that prints an initial form, then sends an email to a given address containing the user-submitted data:
#!/home/youruserpath/rebol/rebol -cs REBOL [] print {content-type: text/html^/} submitted: decode-cgi system/options/cgi/query-string ; the following account info is required to send email: set-net [from_address@website.com smtp.website.com] ; print a more complicated HTML header: print read %template_header.html ; if some form data has been submitted to the script: if not empty? submitted [ sent-message: rejoin [ newline {INFO SUBMITTED BY WEB FORM} newline newline {Time Stamp: } (now + 3:00) newline {Name: } submitted/2 newline {Email: } submitted/4 newline {Message: } submitted/6 newline ] send/subject to_address@website.com sent-message "FORM SUBMISSION" html: copy {} foreach [var value] submitted [ repend html [<TR><TD> mold var </TD><TD> mold value </TD></TR>] ] print {<font size=5>Thank You!</font> <br><br> The following information has been sent: <BR><BR>} print rejoin [{Time Stamp: } now + 3:00] print {<BR><BR><table>} print html print {</table>} ; print a more complicated HTML footer: print read %template_footer.html quit ] ; if no form data has been submitted, print the initial form: print { <CENTER><TABLE><TR><TD> <BR><strong>Please enter your info below:</strong><BR><BR> <FORM ACTION="http://yourwebserver.com/this_rebol_script.cgi"> Name: <BR> <INPUT TYPE="TEXT" NAME="name"><BR><BR> Email: <BR> <INPUT TYPE="TEXT" NAME="email"><BR><BR> Message: <BR> <TEXTAREA cols=75 name=message rows=5></TEXTAREA> <BR><BR> <INPUT TYPE="SUBMIT" NAME="Submit" VALUE="Submit"> </FORM> </TD></TR></TABLE></CENTER> } print read %template_footer.htmlThe template_header.html file used in the above example can include the standard required HTML outline, along with any formatting tags and static content that you'd like, in order to present a nicely designed page. A basic layout may include something similar to the following:
<!DOCTYPE HTML PUBLIC "-//W3C//DTD HTML 4.0 Transitional//EN"> <HTML><HEAD><TITLE>Page Title</TITLE> <META http-equiv=Content-Type content="text/html; charset=windows-1252"> </HEAD> <BODY bgColor=#000000> <TABLE align=center background="" border=0 cellPadding=20 cellSpacing=2 height="100%" width="85%"> <TR> <TD background="" bgColor=white vAlign=top>The footer closes any tables or tags opened in the header, and may include any static content that appears after the CGI script (copyright info, logos, etc.):
</TD> </TR> </TABLE> <TABLE align=center background="" border=0 cellPadding=20 cellSpacing=2 width="95%"> <TR> <TD background="" cellPadding=2 bgColor=#000000 height=5> <P align=center><FONT color=white size=1>Copyright © 2009 Yoursite.com. All rights reserved.</FONT> </P> </TD> </TR> </TABLE> </BODY> </HTML>
14.2 A Generic Drop Down List Application
The following example demonstrates how to automatically build lists of days, months, times, and data read from a file, using dynamic loops (foreach, for, etc.). The items are selectable from drop down lists in the printed HTML form:
#!/home/youruserpath/rebol/rebol -cs REBOL [] print {content-type: text/html^/} submitted: decode-cgi system/options/cgi/query-string print {<HTML><HEAD><TITLE>Dropdown Lists</TITLE></HEAD><BODY>} if not empty? submitted [ print rejoin [{NAME SELECTED: } submitted/2 {<BR><BR>}] selected: rejoin [ {TIME/DATE SELECTED: } submitted/4 { } submitted/6 {, } submitted/8 ] print selected quit ] ; If no data has been submitted, print the initial form: print {<FORM ACTION="http://yourwebserver.com/your_rebol_script.cgi"> SELECT A NAME: <BR> <BR>} names: read/lines %users.txt print {<select NAME="names">} foreach name names [prin rejoin [{<option>} name]] print {</option> </select> <br> <br>} print { SELECT A DATE AND TIME: } print rejoin [{(today's date is } now/date {)} <BR><BR>] print {<select NAME="month">} foreach m system/locale/months [prin rejoin [{<option>} m]] print {</option> </select>} print {<select NAME="date">} for daysinmonth 1 31 1 [prin rejoin [{<option>} daysinmonth]] print {</option> </select>} print {<select NAME="time"> for time 10:00am 12:30pm :30 [prin rejoin [{<option>} time]] for time 1:00 10:00 :30 [prin rejoin [{<option>} time]] print {</option> </select> <br> <br>} print {<INPUT TYPE="SUBMIT" NAME="Submit" VALUE="Submit"></FORM>}The "users.txt" file used in the above example may look something like this:
nick john jim bob
14.3 Photo Album
Here's a simple CGI program that displays all photos in the current folder on a web site, using a foreach loop:
#! /home/path/public_html/rebol/rebol -cs REBOL [title: "Photo Viewer"] print {content-type: text/html^/} print {<HTML><HEAD><TITLE>Photos</TITLE></HEAD><BODY>} print read %template_header.html folder: read %. count: 0 foreach file folder [ foreach ext [".jpg" ".gif" ".png" ".bmp"] [ if find file ext [ print [<BR> <CENTER>] print rejoin [{<img src="} file {">}] print [</CENTER>] count: count + 1 ] ] ] print {<BR>} print rejoin [{Total Images: } count] print read %template_footer.htmlNotice that there's no "submitted: decode-cgi system/options/cgi/query-string" code in the above example. That's because the above script doesn't make use of any data submitted from a form.
14.4 Simple Interactive REBOL Web Site Console
Here's a simple but powerful script that allows you to type REBOL code into an HTML text area, and have that code execute directly on your web server. The results of the code are then displayed in your browser. This essentially functions as a remote console for the REBOL interpreter on your server. You can use it to run REBOL code, or to call shell programs directly on your web site - very powerful! DO NOT run this on your web server if you're concerned at all about security!:
#! /home/path/public_html/rebol/rebol276 -cs REBOL [Title: "CGI Remote Console"] print {content-type: text/html^/} print {<HTML><HEAD><TITLE>Console</TITLE></HEAD><BODY>} submitted: decode-cgi system/options/cgi/query-string ; If no data has been submitted, print form to request user/pass: if ((submitted/2 = none) or (submitted/4 = none)) [ print { <STRONG>W A R N I N G - Private Server, Login Required:</STRONG> <BR><BR> <FORM ACTION="./console.cgi"> Username: <INPUT TYPE=text SIZE="50" NAME="name"><BR><BR> Password: <INPUT TYPE=text SIZE="50" NAME="pass"><BR><BR> <INPUT TYPE="SUBMIT" NAME="Submit" VALUE="Submit"> </FORM> } quit ] ; If code has been submitted, print the output: entry-form: [ print { <CENTER><FORM METHOD="get" ACTION="./console.cgi"> <INPUT TYPE=hidden NAME=submit_confirm VALUE="command-submitted"> <TEXTAREA COLS="100" ROWS="10" NAME="contents"></TEXTAREA><BR><BR> <INPUT TYPE="SUBMIT" NAME="Submit" VALUE="Submit"> </FORM></CENTER></BODY></HTML> } ] if submitted/2 = "command-submitted" [ write %commands.txt join "REBOL[]^/" submitted/4 ; The "call" function requires REBOL version 2.76: call/output/error {/home/path/public_html/rebol/rebol276 -qs commands.txt} %conso.txt %conse.txt do entry-form print rejoin [ {<CENTER>Output: <BR><BR>} {<TABLE WIDTH=80% BORDER="1" CELLPADDING="10"><TR><TD><PRE>} read %conso.txt {</PRE></TD></TR></TABLE><BR><BR>} {Errors: <BR><BR>} read %conse.txt {</CENTER>} ] quit ] ; Otherwise, check submitted user/pass, then print form for code entry: username: submitted/2 password: submitted/4 either (username = "user") and (password = "pass") [ ; if user/pass is ok, go on ][ print "Incorrect Username/Password." quit ] do entry-formUpload the script to your server, rename it "console.cgi", set it to executable, and change the path to your REBOL interpreter (2 places in the script). Then try running the following example code:
print 352 + 836 ? system/locale/months call "ls -al"
14.5 Attendance
Here's an example that allows users to check attendance at various weekly events, and add/remove their names from each of the events. It stores all the user information in a flat file (simple text file) named "jams.db":
#! /home/path/public_html/rebol/rebol -cs REBOL [title: "event.cgi"] print {content-type: text/html^/} print {<HTML><HEAD><TITLE>Event Sign-Up</TITLE></HEAD><BODY>} jams: load %jam.db a-line: [] loop 65 [append a-line "-"] a-line: trim to-string a-line print { <hr> <font size=5>" Sign up for an event:"</font> <hr><BR> <FORM ACTION="http://yourwebsite.com/cgi-bin/event.cgi"> Student Name: <input type=text size="50" name="student"><BR><BR> ADD yourself to this event: " <select NAME="add"><option>""<option>"all" } foreach jam jams [prin rejoin [{<option>} jam/1]] print { </option> </select> <BR> <BR> REMOVE yourself from this event: <select NAME="remove"><option>""<option>"all" } foreach jam jams [prin rejoin [{<option>} jam/1]] print { </option> </select> <BR> <BR> <INPUT TYPE="SUBMIT" NAME="Submit" VALUE="Submit"> </FORM> } print-all: does [ print [<br><hr><font size=5>] print " Currently scheduled events, and current attendance:" print [</font><br>] foreach jam jams [ print rejoin [a-line {<BR>} jam/1 {BR} a-line {<BR>}] for person 2 (length? jam) 1 [ print jam/:person print {<BR>} ] print {<BR>} ] print {</BODY></HTML>} ] submitted: decode-cgi system/options/cgi/query-string if submitted/2 <> none [ if ((submitted/4 = "") and (submitted/6 = "")) [ print { <strong> Please try again. You must choose an event.</strong> } print-all quit ] if ((submitted/4 <> "") and (submitted/6 <> "")) [ print { <strong> Please try again. Choose add OR remove.</strong> } print-all quit ] if submitted/4 = "all" [ foreach jam jams [append jam submitted/2] save %jam.db jams print { <strong> Your name has been added to every event:</strong> } print-all quit ] if submitted/6 = "all" [ foreach jam jams [ if find jam submitted/2 [ remove-each name jam [name = submitted/2] save %jam.db jams ] ] print { <strong> Your name has been removed from all events:</strong> } print-all quit ] foreach jam jams [ if (find jam submitted/4) [ append jam submitted/2 save %jam.db jams print { <strong> Your name has been added to the selected event: </strong> } print-all quit ] ] found: false foreach jam jams [ if (find jam submitted/6) [ if (find jam submitted/2) [ remove-each name jam [name = submitted/2] save %jam.db jams print { <strong> Your name has been removed from the selected event: </strong> } print-all quit found: true ] ] ] if found <> true [ print { <strong> That name is not found in the specified event!" </strong> } print-all quit ] ] print-allHere is a sample of the "jam.db" data file used in the above example:
["Sunday September 16, 4:00 pm" "Nick Antonaccio" "Ryan Gaughan" "Mark Carson"] ["Sunday September 23, 4:00 pm" "Nick Antonaccio" "Ryan Gaughan" "Mark Carson"] ["Sunday September 30, 4:00 pm" "Nick Antonaccio" "Ryan Gaughan" "Mark Carson"]
14.6 Bulletin Board
Here's a simple web site bulletin board program:
#! /home/path/public_html/rebol/rebol -cs REBOL [title: "Jam"] print {content-type: text/html^/} print read %template_header.html ; print {<HTML><HEAD><TITLE>Bulletin Board</TITLE></HEAD><BODY>} bbs: load %bb.db print { <center><table border=1 cellpadding=10 width=600><tr><td> <center><strong><font size=4> Please REFRESH this page to see new messages. </font></strong></center> } print-all: does [ print {<br><hr><font size=5> Posted Messages: </font> <br><hr>} foreach bb (reverse bbs) [ print rejoin [ {<BR>Date/Time: } bb/2 { } {"Name: } bb/1 {<BR><BR>} bb/3 {<BR><BR><HR>} ] ] ] submitted: decode-cgi system/options/cgi/query-string if submitted/2 <> none [ entry: copy [] append entry submitted/2 append entry to-string (now + 3:00) append entry submitted/4 append/only bbs entry save %bb.db bbs print {<BR><strong>Your message has been added: </strong><BR>} ] print-all print { <font size=5> Post A New Public Message:</font><hr> <FORM ACTION="http://website.com/bb/bb.cgi"> <br> Your Name: <br> <input type=text size="50" name="student"><BR><BR> Your Message: <br> <textarea name=message rows=5 cols=50></textarea><BR><BR> <INPUT TYPE="SUBMIT" NAME="Submit" VALUE="Post Message"> </FORM> </td></tr></table></center> } print read %template_footer.htmlHere's an example data file for the program above:
[ [ "Nick Antonaccio" "8-Nov-2006/4:55:59-8:00" { WELCOME TO OUR PUBLIC BULLETIN BOARD. Please keep the posts clean cut and on topic. Thanks and have fun! } ] ]
14.7 GET vs POST Example
The default format for REBOL CGI data is "GET". Data submitted by the GET method in an HTML form is displayed in the URL bar of the user's browser. If you don't want users to see that data displayed, or if the amount of submitted data is larger then can be contained in the URL bar of a browser, the "POST" method should be used. To work with the POST method, the action in your HTML form should be:
<FORM METHOD="post" ACTION="./your_script.cgi">You must also use the "read-cgi" function below to decode the submitted POST data in your REBOL script. This example creates a password protected online text editor, with an automatic backup feature:
#!/home/path/public_html/rebol/rebol -cs REBOL [] print {content-type: text/html^/} print {<HTML><HEAD><TITLE>Edit Text Document</TITLE></HEAD><BODY>} ; submitted: decode-cgi system/options/cgi/query-string ; We can't use the normal line above to decode, because ; we're using the POST method to submit data (because data ; from the textarea may get too big for the GET method). ; Use the following standard function to process data from ; a POST method instead: read-cgi: func [/local data buffer][ switch system/options/cgi/request-method [ "POST" [ data: make string! 1020 buffer: make string! 16380 while [positive? read-io system/ports/input buffer 16380][ append data buffer clear buffer ] ] "GET" [data: system/options/cgi/query-string] ] data ] submitted: decode-cgi read-cgi ; if document.txt has been edited and submitted: if submitted/2 = "save" [ ; save newly edited document: write to-file rejoin ["./" submitted/6 "/document.txt"] submitted/4 print ["Document Saved."] print rejoin [ {<META HTTP-EQUIV="REFRESH" CONTENT="0; URL=http://website.com/folder/} submitted/6 {">} ] quit ] ; if user is just opening page (i.e., no data has been submitted ; yet), request user/pass: if ((submitted/2 = none) or (submitted/4 = none)) [ print { <strong>W A R N I N G - Private Server, Login Required: </strong><BR><BR> <FORM ACTION="./edit.cgi"> Username: <input type=text size="50" name="name"><BR><BR> Password: <input type=text size="50" name="pass"><BR><BR> <INPUT TYPE="SUBMIT" NAME="Submit" VALUE="Submit"> </FORM> } quit ] ; check user/pass against those in userlist.txt, ; end program if incorrect: userlist: load %userlist.txt folder: submitted/2 password: submitted/4 response: false foreach user userlist [ if ((first user) = folder) and (password = (second user)) [ response: true ] ] if response = false [print {Incorrect Username/Password.} quit] ; if user/pass is ok, go on... ; backup (before changes are made): cur-time: to-string replace/all to-string now/time {:} {-} document_text: read to-file rejoin [{./} folder {/document.txt}] write to-file rejoin [ {./} folder {/} now/date {_} cur-time {.txt}] document_text ; note the POST method in the HTML form: prin { <strong>Be sure to SUBMIT when done:</strong><BR><BR> <FORM method="post" ACTION="./edit.cgi"> <INPUT TYPE=hidden NAME=submit_confirm VALUE="save"> <textarea cols="100" rows="15" name="contents"> } ; ; The following line is what we want to do, but it won't work for ; HTML documents which contain <textarea>s ; ; print document_text ; ; The following line fixes the problem: ; prin replace/all document_text {</textarea>} {<\/textarea>} print {</textarea><BR><BR>} print rejoin [{<INPUT TYPE=hidden NAME=folder VALUE="} folder {">}] print {<INPUT TYPE="SUBMIT" NAME="Submit" VALUE="Submit">} print {</FORM>} print {</BODY></HTML>}
14.8 Group Note System
Earlier in the tutorial, a full featured note sharing system was presented to allow groups of users to exchange messages. This CGI program allows users to enter and display notes using the exact same data files saved by the desktop program. The desktop version of the application and this web program are 100% interoperable - messages entered with the desktop app are immediately viewable using this CGI, and vice-versa.
Notice that the "read-cgi" function is used in the fourth line. In recent versions of REBOL, that function is built-in, so it does not need to be defined in the code (it's a good idea to include the function definition, in case the script is ever used on a web server that has an older version of REBOL):
#! ../rebol276 -cs REBOL [title: "Group Notes"] print {content-type: text/html^/} submitted: decode-cgi read-cgi url: ftp://user:pass@site.com/public_html/Notes print { <center><table border=0 cellpadding=10 width=600><tr><td> } if submitted/2 <> none [ if error? try [ write/lines/append url rejoin [ "^/^/" now " (" submitted/2 "): " submitted/4 ] ] [print "ERROR: Not Saved" quit] ] print {<pre>} if error? try [notes: copy read/lines url] [write url notes: ""] display: copy {} count: 0 remove/part notes 2 foreach note reverse notes [ either note = "" [ note: {<br>} ] [ count: count + 1 note: rejoin [count ") "note] ] append display note ] print display print { </td></tr></table> <FORM ACTION="http://re-bol.com/notes.cgi"> <table border=0 cellPadding=0 cellSpacing=4 width=600> <tr><td width=10%>Name:</td> <td><input type=text size="65" name="username"></td></tr> <tr><td width=10%>Message:</td> <td><textarea name=message rows=5 cols=50></textarea></td></tr> <tr><td></td><td> <input type="submit" name="submit" value="Submit"> </td></tr></table> </FORM> </td></tr></table></center> }
14.9 Generic Form Handler
The following is a generic form handler that can be used to save GET or POST data to a text file. It's a useful replacement for generic form mailers, and makes the data much more accessible later by other scripts:
#!/home/path/public_html/rebol/rebol -cs REBOL [] print {content-type: text/html^/} read-cgi: func [/local data buffer][ switch system/options/cgi/request-method [ "POST" [ data: make string! 1020 buffer: make string! 16380 while [positive? read-io system/ports/input buffer 16380][ append data buffer clear buffer ] ] "GET" [data: system/options/cgi/query-string] ] data ] submitted: decode-cgi read-cgi print { <HTML><HEAD><TITLE>Your Form Has Been Submitted</TITLE></HEAD> <BODY><CENTER><TABLE border=0 cellPadding=10 width="80%"><TR><TD> } entry: rejoin [{[^/ "Time Stamp:" } {"} form (now + 3:00) {"^/}] foreach [title value] submitted [ entry: rejoin [entry { } {"} mold title {" } mold value {^/}] ] append entry {]^/} write/append %submitted_forms.txt entry html: copy "" foreach [title value] submitted [ repend html [ <TR><TD width=20%> mold title </TD><TD> mold value </TD></TR> ] ] print rejoin [ { <FONT size=5>Thank You! The following information has been submitted: </FONT><BR><BR>Time Stamp: } now + 3:00 {<BR><BR><TABLE border=1 cellPadding=10 width="100%">} html {</TABLE><BR>} { To correct any errors or to submit forms for additional people, please click the [BACK] button in your browser, make any changes, and resubmit the form. You'll hear from us shortly. Thank you!<BR><BR><CENTER><FONT size=1> Copyright © 2009 This Web Site. All rights reserved.</FONT> </CENTER></TD></TR></CENTER></BODY></HTML> } ] quitHere's a basic form example that could be processed by the above script. You can add as many text, textareas, and other form items as desired, and the script will save all the submitted data (the action link in the form below assumes that the script above is saved in the text file named "form.cgi"):
<FORM action="form.cgi"> Name:<BR><INPUT type="TEXT" name="name"><BR><BR> Email:<BR><INPUT type="TEXT" name="email"><BR><BR> Message:<BR> <TEXTAREA cols="75" rows="5" name="message"> </TEXTAREA><BR><BR> <INPUT type="SUBMIT" name="Submit" value="Submit"> </FORM>The script below can be used on a desktop PC to easily view all the forms submitted at the script above. It provides nice GUI navigation, message count, sort by any data column, etc.:
REBOL [title: "CGI form submission viewer"] sort-column: 4 ; even numered cols contain data (2nd col is time stamp) signups: load http://yoursite.com/submitted_forms.txt do create-list: [ name-list: copy [] foreach item signups [append name-list (pick item sort-column)] ] view center-face layout [ the-list: text-list 600x150 data name-list [ foreach item signups [ if (pick item sort-column) = value [ dt: copy "" foreach [label data] item [ dt: rejoin [ dt newline label " " data ] ] a/text: dt show a ] ] ] a: area 600x300 across btn "Sort by..." [ sort-column: to-integer request-text/title/default { Data column to list:} "4" do create-list the-list/data: name-list show the-list ] tab text join (form length? signups) " entries." ]Here's another script that removes the title columns and reduces the form data into a usable format. Possibilities with managing form data like this are endless:
submissions: load http://yoursite.com/submitted_forms.txt do create-list: [ data: copy [] foreach block submissions [append/only data (extract/index block 2 4)] datastring: copy {} foreach block data [ datastring: join datastring "[^/" foreach item block [datastring: rejoin [datastring item newline]] datastring: join datastring "]^/^/" ] editor datastring ]
14.10 File Uploader
The following example demonstrates how to upload files to your web server using the decode-multipart-form-data function by Andreas Bolka:
#! /home/path/public_html/rebol/rebol -cs REBOL [Title: "HTTP File Upload"] print {content-type: text/html^/} print {<HTML><HEAD><TITLE>File Upload</TITLE></HEAD>} print {<BODY><br><br><center><table width=95% border=1>} print {<tr><td width=100%><br><center>} read-cgi: func [/local data buffer][ switch system/options/cgi/request-method [ "POST" [ data: make string! 1020 buffer: make string! 16380 while [positive? read-io system/ports/input buffer 16380][ append data buffer clear buffer ] ] "GET" [data: system/options/cgi/query-string] ] data ] submitted: read-cgi if submitted/2 = none [ print { <FORM ACTION="./upload.cgi" METHOD="post" ENCTYPE="multipart/form-data"> <strong>Upload File:</strong><br><br> <INPUT TYPE="file" NAME="photo"> <br><br> <INPUT TYPE="submit" NAME="Submit" VALUE="Upload"> </FORM> <br></center></td></tr></table></BODY></HTML> } quit ] decode-multipart-form-data: func [ p-content-type p-post-data /local list ct bd delim-beg delim-end non-cr non-lf non-crlf mime-part ] [ list: copy [] if not found? find p-content-type "multipart/form-data" [return list] ct: copy p-content-type bd: join "--" copy find/tail ct "boundary=" delim-beg: join bd crlf delim-end: join crlf bd non-cr: complement charset reduce [ cr ] non-lf: complement charset reduce [ newline ] non-crlf: [ non-cr | cr non-lf ] mime-part: [ ( ct-dispo: content: none ct-type: "text/plain" ) delim-beg ; mime-part start delimiter "content-disposition: " copy ct-dispo any non-crlf crlf opt [ "content-type: " copy ct-type any non-crlf crlf ] crlf ; content delimiter copy content to delim-end crlf ; mime-part end delimiter ( handle-mime-part ct-dispo ct-type content ) ] handle-mime-part: func [ p-ct-dispo p-ct-type p-content /local tmp name value val-p ] [ p-ct-dispo: parse p-ct-dispo {;="} name: to-set-word (select p-ct-dispo "name") either (none? tmp: select p-ct-dispo "filename") and (found? find p-ct-type "text/plain") [ value: content ] [ value: make object! [ filename: copy tmp type: copy p-ct-type content: either none? p-content [none][copy p-content] ] ] either val-p: find list name [change/only next val-p compose [(first next val-p) (value)]] [append list compose [(to-set-word name) (value)]] ] use [ct-dispo ct-type content] [ parse/all p-post-data [some mime-part "--" crlf] ] list ] ; After the following line, "probe cgi-object" will display all parts of ; the submitted multipart object: cgi-object: construct decode-multipart-form-data system/options/cgi/content-type copy submitted ; Write file to server using the original filename, and notify the user: the-file: last split-path to-file copy cgi-object/photo/filename write/binary the-file cgi-object/photo/content print { <strong>UPLOAD COMPLETE</strong><br><br> <strong>Files currently in this folder:</strong><br><br> } folder: sort read %. foreach file folder [ print [rejoin [{<a href="./} file {">} file {</a><br>}]] ] print {<br></td></tr></table></BODY></HTML>} ; Alternatively, you could forward to a different page when done: ; ; wait 3 ; refresh-me: { ; <head><title></title> ; <META HTTP-EQUIV="REFRESH" CONTENT="0; URL=./index.cgi"></head> ; } ; print refresh-meThis variation of the upload script allows you to select the directory to which files are uploaded:
#! /home/path/public_html/rebol/rebol -cs REBOL [Title: "HTTP File Upload"] print {content-type: text/html^/} print {<HTML><HEAD><TITLE>File Upload</TITLE></HEAD>} print {<BODY><br><br><center><table width=95% border=1>} print {<tr><td width=100%><br><center>} read-cgi: func [/local data buffer][ switch system/options/cgi/request-method [ "POST" [ data: make string! 1020 buffer: make string! 16380 while [positive? read-io system/ports/input buffer 16380][ append data buffer clear buffer ] ] "GET" [data: system/options/cgi/query-string] ] data ] submitted: read-cgi if submitted/2 = none [ print { <FORM ACTION="./upload.cgi" METHOD="post" ENCTYPE="multipart/form-data"> <strong>Upload File:</strong><br><br> <INPUT TYPE="file" NAME="photo"> <br><br> <INPUT TYPE="text" NAME="path" SIZE="35" VALUE="/home/path/public_html/"> <INPUT TYPE="submit" NAME="Submit" VALUE="Upload"> </FORM> <br></center></td></tr></table></BODY></HTML> } quit ] decode-multipart-form-data: func [ p-content-type p-post-data /local list ct bd delim-beg delim-end non-cr non-lf non-crlf mime-part ] [ list: copy [] if not found? find p-content-type "multipart/form-data" [return list] ct: copy p-content-type bd: join "--" copy find/tail ct "boundary=" delim-beg: join bd crlf delim-end: join crlf bd non-cr: complement charset reduce [ cr ] non-lf: complement charset reduce [ newline ] non-crlf: [ non-cr | cr non-lf ] mime-part: [ ( ct-dispo: content: none ct-type: "text/plain" ) delim-beg ; mime-part start delimiter "content-disposition: " copy ct-dispo any non-crlf crlf opt [ "content-type: " copy ct-type any non-crlf crlf ] crlf ; content delimiter copy content to delim-end crlf ; mime-part end delimiter ( handle-mime-part ct-dispo ct-type content ) ] handle-mime-part: func [ p-ct-dispo p-ct-type p-content /local tmp name value val-p ] [ p-ct-dispo: parse p-ct-dispo {;="} name: to-set-word (select p-ct-dispo "name") either (none? tmp: select p-ct-dispo "filename") and (found? find p-ct-type "text/plain") [ value: content ] [ value: make object! [ filename: copy tmp type: copy p-ct-type content: either none? p-content [none][copy p-content] ] ] either val-p: find list name [change/only next val-p compose [(first next val-p) (value)]] [append list compose [(to-set-word name) (value)]] ] use [ct-dispo ct-type content] [ parse/all p-post-data [some mime-part "--" crlf] ] list ] cgi-object: construct decode-multipart-form-data system/options/cgi/content-type copy submitted the-file: last split-path to-file copy cgi-object/photo/filename write/binary the-file cgi-object/photo/content print { <strong>UPLOAD COMPLETE</strong><br><br> <strong>Files currently in this folder:</strong><br><br> } folder: sort read to-file cgi-object/path current-folder: rejoin at foreach file folder [ print [rejoin [ {<a href="http://site.com/"} (at cgi-object/path 28) file {">} ; convert path to URL file "</a><br>" ]] ] print {<br></td></tr></table></BODY></HTML>}
14.11 File Downloader
Here's a script that demonstrates how to push download a file to the user's browser:
#!/home/path/public_html/rebol/rebol -cs REBOL [] submitted: decode-cgi system/options/cgi/query-string root-path: "/home/path" ; if no data has been submitted, request file name: if ((submitted/2 = none) or (submitted/4 = none)) [ print "content-type: text/html^/" print [<STRONG>"W A R N I N G - "] print ["Private Server, Login Required:"</STRONG><BR><BR>] print [<FORM ACTION="./download.cgi">] print [" Username: " <INPUT TYPE=text SIZE="50" NAME="name"><BR><BR>] print [" Password: " <INPUT TYPE=text SIZE="50" NAME="pass"><BR><BR>] print [" File: "<BR><BR>] print [<INPUT TYPE=text SIZE="50" NAME="file" VALUE="/public_html/">] print [<BR><BR>] print [<INPUT TYPE="SUBMIT" NAME="Submit" VALUE="Submit">] print [</FORM>] quit ] ; check user/pass, end program if incorrect: username: submitted/2 password: submitted/4 either (username = "user") and (password = "pass) [ ; if user/pass is ok, go on ][ print "content-type: text/html^/" print "Incorrect Username/Password." quit ] print rejoin [ "Content-Type: application/x-unknown" newline "Content-Length: " (size? to-file join root-path submitted/6) newline "Content-Disposition: attachment; filename=" (second split-path to-file submitted/6) newline ] data: read/binary to-file join root-path submitted/6 data-length: size? to-file join root-path submitted/6 write-io system/ports/output data data-length
14.12 A Complete Web Server Management Application
This final script makes use of several previous examples, and some additional code, to form a complete web server management application. It allows you to list directory contents, upload, download, edit, and search for files, execute OS commands (chmod, ls, mv, cp, etc. - any command available on your web server's operating system), and run REBOL commands directly on your server. Edited files are automatically backed up into an "edit_history" folder on the server before being saved. No configuration is required for most web servers. Just save this script as "web-tool.cgi", upload it and the REBOL interpreter into the same folder as your web site's index.html file, set permissions (chmod) to 755, then go to http://yourwebsite/web-tool.cgi.
THIS SCRIPT CAN POSE A MAJOR SECURITY THREAT TO YOUR SERVER. It can potentially enable anyone to gain control of your web server and everything it contains. DO NOT install it on your server if you're at all concerned about security, or if you don't know how to secure your server yourself.
The first line of this script must point to the location of the REBOL interpreter on your web server, and you must use a version of REBOL which supports the "call" function (version 2.76 is recommended). By default, the REBOL interpreter should be uploaded to the same path as this script, that folder should be publicly accessible, and you must upload the correct version of REBOL for the operating system on which your server runs. IN THIS EXAMPLE, THE REBOL INTERPRETER HAS BEEN RENAMED "REBOL276".
#! ./rebol276 -cs REBOL [Title: "REBOL CGI Web Site Manager"] ;------------------------------------------------------------------------- ; Upload this script to the same path as index.html on your server, then ; upload the REBOL interpreter to the path above (the same path as the ; script, by default). CHMOD IT AND THIS SCRIPT TO 755. Then, to run the ; program, go to www.yoursite.com/this-script.cgi . ;------------------------------------------------------------------------- ; YOU CAN EDIT THESE VARIABLES, _IF_ NECESSARY (change the quoted values): ; The user name you want to use to log in: set-username: "username" ; The password you want to use to log in: set-password: "password" ;------------------------------------------------------------------------- ; Do NOT edit these variables, unless you really know what you're doing: doc-path: to-string what-dir script-subfolder: find/match what-dir doc-path if script-subfolder = none [script-subfolder: ""] ;------------------------------------------------------------------------- ; Get submitted data: selection: decode-cgi system/options/cgi/query-string read-cgi: func [/local data buffer][ switch system/options/cgi/request-method [ "POST" [ data: make string! 1020 buffer: make string! 16380 while [positive? read-io system/ports/input buffer 16380][ append data buffer clear buffer ] ] "GET" [data: system/options/cgi/query-string] ] the-data: data data ] submitted: read-cgi submitted-block: decode-cgi the-data ; ------------------------------------------------------------------------ ; This section should be first because it prints a different header ; for a push download (not "content-type: text/html^/"): if selection/2 = "download-confirm" [ print rejoin [ "Content-Type: application/x-unknown" newline "Content-Length: " (size? to-file selection/4) newline "Content-Disposition: attachment; filename=" (second split-path to-file selection/4) newline ] data: read/binary to-file selection/4 data-length: size? to-file selection/4 write-io system/ports/output data data-length quit ] ;------------------------------------------------------------------------- ; Print the normal HTML headers, for use by the rest of the script: print "content-type: text/html^/" print {<HTML><HEAD><TITLE>Web Site Manager</TITLE></HEAD><BODY>} ;------------------------------------------------------------------------- ; If search has been called (via link on main form): if selection/2 = "confirm-search" [ print rejoin [ {<center><a href="./} (second split-path system/options/script) {?name=} set-username {&pass=} set-password {">Back to Web Site Manager</a></center>} ] print {<center><table border="1" cellpadding="10" width=80%><tr><td>} print [<CENTER><TABLE><TR><TD>] print rejoin [ {<FORM ACTION="./} (second split-path system/options/script) {"> Text to search for: <BR> <INPUT TYPE="TEXT" SIZE="50"} {NAME="phrase"><BR><BR>Folder to search in: <BR>} {<INPUT TYPE="TEXT" SIZE="50" NAME="folder" VALUE="} what-dir {" ><BR><BR><INPUT TYPE=hidden NAME=perform-search } {VALUE="perform-search"><INPUT TYPE="SUBMIT" NAME="Submit" } {VALUE="Submit"></FORM></TD></TR></TABLE></CENTER>} {</td></tr></table></center></BODY></HTML>} ] quit ] ;------------------------------------------------------------------------- ; If edited file text has been submitted: if submitted-block/2 = "save" [ ; Save newly edited document: write (to-file submitted-block/6) submitted-block/4 print {<center><strong>Document Saved:</strong> <br><br><table border="1" width=80% cellpadding="10"><tr><td>} prin [<center><textarea cols="100" rows="15" name="contents">] prin replace/all read ( to-file (replace/all submitted-block/6 "%2F" "/") ) "</textarea>" "<\/textarea>" print [</textarea></center>] print rejoin [ {</td></tr></table><br><a href="./} (second split-path system/options/script) {?name=} set-username {&pass=} set-password {">Back to Web Site Manager</a></center>} {</BODY></HTML>} ] quit ] ;------------------------------------------------------------------------- ; If upload link has been clicked, print file upload form: if selection/2 = "upload-confirm" [ print rejoin [ {<center><a href="./} (second split-path system/options/script) {?name=} set-username {&pass=} set-password {">Back to Web Site Manager</a></center>} ] print {<center><table border="1" cellpadding="10" width=80%><tr><td>} print {<center>} ; If just the link was clicked - no data submitted yet: if selection/4 = none [ print rejoin [ {<FORM ACTION="./} (second split-path system/options/script) {" METHOD="post" ENCTYPE="multipart/form-data"> <strong>Upload File:</strong><br><br> <INPUT TYPE=hidden NAME=upload-confirm VALUE="upload-confirm"> <INPUT TYPE="file" NAME="photo"> <br><br> Folder: <INPUT TYPE="text" NAME="path" SIZE="35" VALUE="} what-dir {"> <INPUT TYPE="submit" NAME="Submit" VALUE="Upload"> </FORM> <br></center></td></tr></table></center></BODY></HTML>} ] quit ] ] ;------------------------------------------------------------------------- ; If upload data has been submitted: if (submitted/2 = #"-") and (submitted/4 = #"-") [ ; This function is by Andreas Bolka: decode-multipart-form-data: func [ p-content-type p-post-data /local list ct bd delim-beg delim-end non-cr non-lf non-crlf mime-part ] [ list: copy [] if not found? find p-content-type "multipart/form-data" [ return list ] ct: copy p-content-type bd: join "--" copy find/tail ct "boundary=" delim-beg: join bd crlf delim-end: join crlf bd non-cr: complement charset reduce [ cr ] non-lf: complement charset reduce [ newline ] non-crlf: [ non-cr | cr non-lf ] mime-part: [ ( ct-dispo: content: none ct-type: "text/plain" ) delim-beg ; mime-part start delimiter "content-disposition: " copy ct-dispo any non-crlf crlf opt [ "content-type: " copy ct-type any non-crlf crlf ] crlf ; content delimiter copy content to delim-end crlf ; mime-part end delimiter ( handle-mime-part ct-dispo ct-type content ) ] handle-mime-part: func [ p-ct-dispo p-ct-type p-content /local tmp name value val-p ] [ p-ct-dispo: parse p-ct-dispo {;="} name: to-set-word (select p-ct-dispo "name") either (none? tmp: select p-ct-dispo "filename") and (found? find p-ct-type "text/plain") [ value: content ] [ value: make object! [ filename: copy tmp type: copy p-ct-type content: either none? p-content [none][copy p-content] ] ] either val-p: find list name [ change/only next val-p compose [ (first next val-p) (value) ] ] [append list compose [(to-set-word name) (value)]] ] use [ct-dispo ct-type content] [ parse/all p-post-data [some mime-part "--" crlf] ] list ] ; After the following line, "probe cgi-object" will display all parts ; of the submitted multipart object: cgi-object: construct decode-multipart-form-data system/options/cgi/content-type copy submitted ; Write file to server using the original filename, and notify the ; user: the-file: last split-path to-file copy cgi-object/photo/filename write/binary to-file join cgi-object/path the-file cgi-object/photo/content print rejoin [ {<center><a href="./} (second split-path system/options/script) {?name=} set-username {&pass=} set-password {">Back to Web Site Manager</a></center>} ] print { <center><table border="1" width=80% cellpadding="10"><tr><td> <strong>UPLOAD COMPLETE</strong><br><br></center> <strong>Files currently in this folder:</strong><br><br> } change-dir to-file cgi-object/path folder: sort read what-dir foreach file folder [ print [ rejoin [ {<a href="./} (second split-path system/options/script) {?editor-confirm=editor-confirm&thefile=} what-dir file {">(edit)</a> } {<a href="./} (second split-path system/options/script) {?download-confirm=download-confirm&thefile=} what-dir file {">} "(download)</a> " {<a href="./} (find/match what-dir doc-path) file {">} file {</a><br>} ] ] ] print {</td></tr></table></center></BODY></HTML>} quit ] ;------------------------------------------------------------------------- ; If no data has been submitted, print form to request user/pass: if ((selection/2 = none) or (selection/4 = none)) [ print rejoin [{ <STRONG>W A R N I N G - Private Server, Login Required:</STRONG> <BR><BR> <FORM ACTION="./} (second split-path system/options/script) {"> Username: <INPUT TYPE=text SIZE="50" NAME="name"><BR><BR> Password: <INPUT TYPE=text SIZE="50" NAME="pass"><BR><BR> <INPUT TYPE="SUBMIT" NAME="Submit" VALUE="Submit"> </FORM></BODY></HTML> }] quit ] ;------------------------------------------------------------------------- ; If a folder name has been submitted, print file list: if ((selection/2 = "command-submitted") and ( selection/4 = "call {^/^/^/^/}") ) [ print rejoin [ {<center><a href="./} (second split-path system/options/script) {?name=} set-username {&pass=} set-password {">Back to Web Site Manager</a></center>} ] print {<center><table border="1" cellpadding="10" width=80%><tr><td>} print {<strong>Files currently in this folder:</strong><br><br>} change-dir to-file selection/6 folder: sort read what-dir foreach file folder [ print rejoin [ {<a href="./} (second split-path system/options/script) {?editor-confirm=editor-confirm&thefile=} what-dir file {">} "(edit)</a> " {<a href="./} (second split-path system/options/script) {?download-confirm=download-confirm&thefile=} what-dir file {">} "(download)</a> " {<a href="./} (find/match what-dir doc-path) file {">} file {</a><br>} ] ] print {</td></tr></table></center></BODY></HTML>} quit ] ;------------------------------------------------------------------------- ; If editor has been called (via a constructed link): if selection/2 = "editor-confirm" [ ; backup (before changes are made): cur-time: to-string replace/all to-string now/time ":" "-" document_text: read to-file selection/4 if not exists? to-file rejoin [ doc-path script-subfolder "edit_history/" ] [ make-dir to-file rejoin [ doc-path script-subfolder "edit_history/" ] ] write to-file rejoin [ doc-path script-subfolder "edit_history/" to-string (second split-path to-file selection/4) "--" now/date "_" cur-time ".txt" ] document_text ; note the POST method in the HTML form: print rejoin [ {<center><strong>Be sure to SUBMIT when done:</strong>} {<BR><BR><FORM method="post" ACTION="./} (second split-path system/options/script) {">} {<INPUT TYPE=hidden NAME=submit_confirm VALUE="save">} {<textarea cols="100" rows="15" name="contents">} (replace/all document_text "</textarea>" "<\/textarea>") {</textarea><BR><BR><INPUT TYPE=hidden NAME=path VALUE="} selection/4 {"><INPUT TYPE="SUBMIT" NAME="Submit" VALUE="Submit"> </FORM></center></BODY></HTML>} ] quit ] ;------------------------------------------------------------------------- ; If search criteria has been entered: if selection/6 = "perform-search" [ phrase: selection/2 start-folder: to-file selection/4 change-dir start-folder ; found-list: "" recurse: func [current-folder] [ foreach item (read current-folder) [ if not dir? item [ if error? try [ if find (read to-file item) phrase [ print rejoin [ {<a href="./} (second split-path system/options/script) {?editor-confirm=editor-confirm&theitem=} what-dir item {">(edit)</a> } {<a href="./} (second split-path system/options/script) {?download-confirm=download-confirm&theitem=} what-dir item {">(download)</a> "} phrase {" found in: } {<a href="./} (find/match what-dir doc-path) item {">} item {</a><BR>} ] ; found-list: rejoin [ ; found-list newline what-dir item ; ] ] ] [print rejoin ["error reading " item]] ] ] foreach item (read current-folder) [ if dir? item [ change-dir item recurse %.\ change-dir %..\ ] ] ] print rejoin [ {<center><a href="./} (second split-path system/options/script) {?name=} set-username {&pass=} set-password {">Back to Web Site Manager</a></center>} ] print {<center><table border="1" cellpadding="10" width=80%><tr><td>} print rejoin [ {<strong>SEARCHING for "} phrase {" in } start-folder {</strong><BR><BR>} ] recurse %.\ print {<BR><strong>DONE</strong><BR>} print {</td></tr></table></center></BODY></HTML>} ; save %found.txt found-list quit ] ;------------------------------------------------------------------------- ; This is the main entry form, used below: entry-form: [ print rejoin [ {<CENTER><strong>current path: </strong>} what-dir {<FORM METHOD="get" ACTION="./} (second split-path system/options/script) {">}{<INPUT TYPE=hidden} { NAME=submit_confirm VALUE="command-submitted">} {<TEXTAREA COLS="100" ROWS="10" NAME="contents">} {call {^/^/^/^/}</textarea><BR><BR>} {List Files: <INPUT TYPE=text SIZE="35" NAME="name" VALUE="} what-dir {"><INPUT TYPE="SUBMIT" NAME="Submit" VALUE="Submit">} { <A HREF="./} (second split-path system/options/script) {?upload-confirm=upload-confirm">upload</A> } ; leave spaces {<A HREF="./} (second split-path system/options/script) {?confirm-search=confirm-search">search</A>} {</FORM><BR></CENTER>} ] ] ;------------------------------------------------------------------------- ; If code has been submitted, print the output, along with an entry form): if ((selection/2 = "command-submitted") and ( selection/4 <> "call {^/^/^/^/}") and ((to-file selection/6) = what-dir))[ write %commands.txt join "REBOL[]^/" selection/4 ; The "call" function requires REBOL version 2.76: call/output/error "./rebol276 -qs commands.txt" %conso.txt %conse.txt do entry-form print rejoin [ {<CENTER>Output: <BR><BR>} {<TABLE WIDTH=80% BORDER="1" CELLPADDING="10"><TR><TD><PRE>} read %conso.txt {</PRE></TD></TR></TABLE><BR><BR>} {Errors: <BR><BR>} read %conse.txt {</CENTER></BODY></HTML>} ] quit ] ;------------------------------------------------------------------------- if ((selection/2 = "command-submitted") and ( selection/4 <> "call {^/^/^/^/}") and ( (to-file selection/6) <> what-dir) ) [ print rejoin [ {<center><a href="./} (second split-path system/options/script) {?name=} set-username {&pass=} set-password {">Back to Web Site Manager</a></center>} ] print { <center><table border="1" cellpadding="10" width=80%><tr><td> <center> You must EITHER enter a command, OR enter a file path to list.<BR> Please go back and try again (refresh the page if needed). </center> </td></tr></center></BODY></HTML> } quit ] ;------------------------------------------------------------------------- ; Otherwise, check submitted user/pass, then print form for code entry: username: selection/2 password: selection/4 either (username = set-username) and (password = set-password) [ ; if user/pass is ok, go on ][ print "Incorrect Username/Password. </BODY></HTML>" quit ] do entry-form print {</BODY></HTML>}
14.13 The RebolForum.com CGI Code
Here's the code for the forum CGI application at http://rebolforum.com. This is the actual code that runs the web site where you can go to ask questions about this tutorial. It's presented here in compressed format here so that the code fits nicely on this web page:
REBOL [title: "RebolForum.com"] editor decompress #{ 789CDD5BEB72E3B8B1FEAFA7C0E1D638526D648177D22B698AD79DA99DCBC676 52495C4A8A926089198AD492D4787C5C7AF7D3006FA044D9F2665395B3DC1D4B 04D18D4677E3EB4683FAEE7F2E2F4729992791A46B68B8C87AD79EFDF903BA9B F57ACB641384F11512D679BEBD1A15DDEE9374B7B95C249B51182FC9B7CBC52A 147ABD6D1AC6397A5A24714EE27C983F6EC915CAC9B77CB4CE37D13F46FB5E2F 7B08F3C51A658F594E36A3649B87499C8D801CF8FEB223593EDC907C9D2CD15D 0FC125FCFCF9E656286FE8053D87CB200FAED022D93E2241289AE6BBFB7B92D6 8D75F78775181174B74DB2300FBF92B72825C17218269500DB24CD3398C37697 737C90A8C9069E71C3D22BD86E49BCAC25E0FB2F2212A45C434D37EB357F851F 3D3A9566061D4A0015A48FC32C0745AE66BD592FDBCD37619E93E5155A9245B2 2443E8558BD0EB85F7A8EE3292D00409699655FA7A48C39C8C4AB1DFCCE797CB 79A59BF93CBB42511254EDAC31255F499A11FA90DD6779B8F8F2B84876717E85 306B02BB9300EC9727DB70413BA2BBAA09C6DA94ED7720D63D3846D1F6340EA7 37B7EF9D9FFE76B547772DA6DC0DFA1E89B359A1A9C28F400994F8EDB74D84A8 60A0A489205E62E1EDB4D6EF18A6DB3C94E021F76CB10EE29844D3AAA1799287 7944A6858FFBD495C7A3A2A9E9B224D9220D9969A6D76401FE8CB8FEE8964E34 1B8FF86E0D7114C65FA69DEB653C62CF58D73DFB5BAA426CE99729AE1FE44CC5 FD03350D069C678202864CF6D2F929E548EC7A9C926D142CC021A2A869464F17 7BF8176CB63FEC5F412450A25F7649FE2AAA3FB0A16031BE8A6A4CA9A2D78D34 A534AB431ACE5894F25F49181FACF13ED5E1681BA439EA8381BF9486E847245E E5EBB7EC76808648021B28D8D406A8452EFC11FD9CC0A25EA2F92320E6F33CC0 8E6D627440D122181C60CA8939B5B5C13D3C69E8F3199C32FAF91C4E39C0F91C BA9DE17CFA63C7E0C0A6D32500BE40FFD3565B0920FB969B1E4208EBC8E3C3BE 633ADD00C2484F83481374DFDE4F98FC0C779971D9B778B7999374B26FFB76ED 50002A030A24E08405A80C79241E946E12A48B35C4CCFB28584D62F2C023572D E388E966DFE19B25ACD5A0553F80D850344E9188D1DD1C00EF0B1F2679F06F10 75548139D704DAE481F4975D9843C8ACB290F1BBDB8F1FA6E3779EE54EC7B7EF 6F3F786DC02F9A9896C1F0D14408A29CA471901301D1CC051AB6DB285C04D434 74ACEF2110C1236AE489D03608352CBA276429A0754AEE27C265CB442C268FA6 E31113A637B63FBB7F43F3959344493AF9CEC0F4BFE9D8F13EDD7AD7F0F8D6B2 3F78689EA44BB021460B12453F07CB25A40413A9B8BDD9060B768BD6245CADF3 8988F11BF4102EF3F5C450DF501ED73069B71E04F2A09CA0AF5614AEE209B808 98AC779F2439CD99C0096F4145234A326263C36729CC784465A592536502D12E 8E08CC957C0BB33C7B8BDE14D3A4E91D9F74B4DA9FC6F4633A5E43EA352D574E B558C61FBD5B0BBDBBBDFD79E8FDE9CFEFFF3211AE3DFFDABB792720E73348F0 E97622E01FD09FAF3F4C38950A405F709B27CB4798E4824D52F8CE67177D4C1F D05E74E43DF58AE34C69993CC43405A2292149ABA4A9713FEAEF24E39D906601 249D8E834E2BAF930D11A6EFE0EF7814C0D855EF79DA386DFF332463285F9332 998054394B003D024896402070AF7598A16DB02274CE034ACBFE6D53C2BB7A21 24CD0837F004ECF1DD534F374CC7515545B10DDBB5652C62DBF36D55C78E2129 92EAE8D8561C4F95444D77345B337DDD562CD5C4A2A7C8D8B3A59EECBAA665D8 AAA4AABA6839BA6B9A9AEFF9BA62F992242BD0C5B51DDD320D49C49AE96926DC F9BAE15AAAAF1ABAAEF74C5FF434ACC8A624598E6360CB75645F543DD3B63543 9355C31225ECBAB6A299A2E462C7921CCBC1B2A79A8E645AA2DF93145DB31D5B 9754D956A1AFADFB926C2B12963CD3711DD7157D57925CC970254773B066A89A 07826098AD2A1958ED19A6EAA8A007C55145579135C7F30C184755A08F6963C3 756C0BD61A95C7760C0566EB4A9E684AA66B39B0849C9EEE69B62BAA926CF858 819EBEADB986E1CB862DBBBAE12B0A284DD5642ABA2B1A32C69AE56307882CD7 D24DDDEB29B66CA992836D4B940D4B935CDFD54D5FB2B0A7B8BE29A9A6853555 954D5FC1BA0C56901CAA3C037B86688335949E0F8259A203AA14E14307FEB2ED E9D8D56D53D425072C815D0B8BBEEC2B3EC6A6A8688A272A922F3922CC071B3D C515B1A849962F5A8A6A8B966A6153B2245FB75CD79341DBBE26DA8AAD2AB20F 36D0414596021D3CDB765445728D9EA5882228183B92070A36C13ABE221A8EA9 CA202768D0554D5B0413E8862D59AE07248EABF9BAAA0307DB36DC1EE805C404 F791B1E1AB1698DEF56547934D59D35D45F36559A1CA3545CB1035C570555BA5 082881FE0CCF56CC9EAA49BAAA582286F17D1154A483E72A3615C2F63C5083EB AA58D50C57C38664788E6459A6A6F9BEED49962E6B720FFB60041F7AE920BFE1 4BBAEED89AEA3BAA6B599AAB2BB62BDBA20F42199AA14B606B59F6B18A4D5997 1DD0A6D2336040C3F034C77764DBD66DB02DB8BDE92AA266192E78B66D82BE6D 0C8BC852650FFCDE0287D07DD5716553D5704F96757062309669FA362841D544 C7F44077A04B4705B61E2C1355577C51C79E0F1EEEBB74B18AB2694B92EA39E0 CAB0181D5F164DE08C6520F1654D35C1180EAC304BF7B1AB890A95CCC1B04A7C 132B86A2A8A00498A761383D49048FA503D9D89264CBD5C1F6A012DB335C0F0C 66F836000416C16F6DDFA4B387ABC7C30BC4050A3B7C5311325AD1F61857836D D806D3A7F1219F63E4B25515CB2EB61D8922970BCA906CC3C39E6C892A985F12 75D0B7674820B1255B8EE28387038A6892E99B3D7027C5B75C5F715DD905AF80 F91A8601EEAA508FC4BAE77B3238A62D7ABEA6C03297E91AD244BA8A5C07E0A1 674BB0D4240900D1912DC5C5BA288AB07814CB82412D579340D396EDBA580577 057015250B569668E89E02506A393D51310151557058780E2E8F154F150D0903 99EB99A2896D09A66588A20D24B60AFE0AA3586018C004589E188007C0D5B75D ECB9966B2A008200AF9E659BE04D2E60922B027B51B7B12CC12AD21559014581 88922CE91A76003B0DDF81EEB02C4C0035AA0219D8808E5415445400443D5BF6 C07764C51141C31AB83B0038AC7ECD0428B37A00B6B01281B1678120A6A61BAA E902B2C17AF13D400E0C7374240798820EA5DFCC5BB264972EC8FFBBE88B9EAA 0A19426419E649CA3B35AF85BA91E61955620432735D0AD53DAFB97631A7CCCD CB8ACE8942CF5191671966B0357A2CB601570890B6B708B639A4D68B35597CB9 42CB04545E58A2652948D4C753D4677661DBAAB252C4F590F8A244E512599E26 F16AFA3E5E24694A1639728AE1D02DF9968F47E5E34ACFADAD8513D18D30B5D5 9D6D393FCDD07C07BB9C1881EA1FC165D03C4D1E3292A23C01777944C12A08E3 CBF6E6A432DF590EC38F7FB839E4CC519BA4D9B080A6FAFD46130A787573A70D 10B846BFEDF45CE7E71F6B8367B4FA29D814AEEBC5540337EB64172DD1A7CFB7 681380927F0FEA05BF4F6186B0E3CD607385E2E401F60D306B58A359F6001BA4 B2E84557E143BA0477BF0FD32CAF2AABB447D6AB6A6AF0FF26010DB10A0BED8D FA057354ED8B692328BC5C48D5184038EB350356BE5FB57486C0E51276CC42B3 940EFC43100EEDAE75B61A65EB910FB42DC12DB3CD362279B930335A15FD3DB8 01FDCB03156BD8045FC87019A6E8CDE508601B10F8715494AD83AFE4B894C3F5 627EF4482BF6C23F0576B349E27C5DDF2D8347F6BD891B7C4909DC69D378A270 25D0BE032400C016B5F5595D40277461D62ECA9A4ADF624FF8858ED00F45F1BC 9842F560B881C801F1A85DD5E21DA48A437BF8863C64A3CF88DEBD8A4DF5B864 D6C9AB5BF09A12C42FBF3E374D85F68B01B78E3B31B5F641AFE87B245F613CE0 BA8C92387A44791046AC1ECE08EA95D52A6A4D512BC671F63F193F192600315F 34279B047C8896186A5BCE3A8F48DAE721AC7A5C0872577B4FD7F908BF829E39 2B692D34EAF220D50896629F12144AA1FA604C075C890D7185B8D933D2B39552 E60B55DB6190210FC55907B2964BB2ACD1E4449EF710843902EB5D61A9C5ED57 9579003E023AA8306D17F88EF1B6A98156984B4200B5141D006C6976FE40914B 921AA7A89F7235D0AB86BC5CE67727BA51E8E7B45E8AD2671EDE08240F98E424 DD04B406C9CB441B17579C413B8EDD5ABED1D2080D307D867EACFB482E3F95C1 DD620769183D99A50D2530B1704859B251672DBEA520ECA355C49D1DA9E059D6 FD3C198285C8AA6512A53C3D99D13F9CBB1C61F7D3AB727F7411CFB3ED0FDC71 5F37151BAC32E9D42ABE3CCF608F8AD370F4D42EBCD7569CEC1193BDA50DB040 FB5E69583F5DF065F63DEF49E84998FE5C313EBDA9A975930773D8CB74968DDB 55635C568A4DFC06A828E5723A5E1FB2BD879888B2F07FC9449DEE01DA5A3310 0774C347BBD479C59E73F9CA5FEFAAF040311FD18099E5C1663B63479B2D8EA8 B57FE0A354C5421843A4A5473FC2F3DD6897700A7D014ACFE83A2AFA8ECEEA5C 821F25A8BE9E310247353A9F6CCE08E6678D50F41DBDD4198089EEAAD15391B6 F12958D9452A572E1FCBE955C6CD3A4F407BF4DC48121D02D8837BB3A574FCF7 25FAEFFAE0CE835F4FFFF48FE173A337501B40406C29E92E88215BCBD7E9AE7E E5452894C28E8A20FCD2D95729613362BF82ADA7926ACF086603EE098F24ED6E B0D821C14957249FFC731E05CDC95FF59801D37E3618CCA808608C06A94FA026 6F56A0AFF2F4665D8BD36D73585D625EFBC8902DDBA7EA59FBA3DDB35EDB47B8 5021CBE12161BD793E88D1DCC6E985C93D8DFDCFD71F51F1C2D044A0931190E5 DCBEFFFCA985F5427BCF43AF71F1CA0F3BE75B879064C46CAE13BA734B49B64D E20CB284AF41B43B687B052BEE24B666B53F88042205F9239674677F858E366B 87A3D137AB0A4B0A1A16CA5177193DC4A4F1B073C347AF8FD566A07B04CA3600 FC2E1856CB826E04272A2C84083E303DC02BBB9D1EE71684647B4B40E232F5A4 388B92FBA2D0566EE9D81B62570DA4EE9B9DF7530398274779512394DB33DAE0 E985C2803C259583335F23DA0BAE20146E5DB1AAEE4A46C52D3AE156E311756C AAE325FD931EBE7CC042360AD8616E4ACF7FCF2D8A56FCE00F4D169A8CA27B71 BEA68C4B68E67258F7FFD525DB366814CC8780D2AD1225BD5ECA8CCFCA443A32 90EA8299B278C0B65C758C68E5B0C523C6976F3F7C7DB0BA5E1998F9EB8520CD 5FCF05EC17A47955F0E6AFDF432C6DCDE774E8E1AFA78354B94CE187312C1B54 C37C67B6FC9C917F65C8E6AFF3C3377FBD2694F3D7B112DB2DB34E8CE1B575C5 DEE76D567BB92BECDCA21F523EF5CB1DDC003C8AE3F15A206B25005DF5DBFF58 A5F6F2775BAAFDEFA9C89645D6222BBB42DD6509AE232A7A76D132D5BD45ED52 1CC785D1B428DAAFF87211ABAC105558D13A20AADE90BB3B10BCBE295E9C2E54 F3DF5B37A605D62B5EEA8E1232574446E7D1D2BA795749F988A2BBBA5CD753CB 17AD398AC141611906C99234AFE4CB0080813CA3E181A62D657995E2C612A654 16C1FAC5695414648CFFE0B008CB264C2BCDC5DB970D73BA8693EDEFBAC25CC7 F10A13AF4BD445ACE64B550081FD40A510D99B0AF4891CB52941CBFFB912F451 79B929431FD4989FA9209F2E3DD3938761B92DB22A925927C7BAD8CCD3702FBA 025DEF40E3AC7B9D9B37C98506C94BCDA515FC0B8A57EFB64F6E8DABDD42B51B 2A6EBB09B93D9D5AEFE90A0AFAE804D50BDB2F7EC072B7557C6F1551C5561155 3D5944ED812FB2779A0B94E71741B536E7736E7372B2CC5DEEEC0ACE9AFAA62E 453F57C22E4AD0DDEF7D9F7EE71B20EEDC22F41E88212C7172D69BC95A589075 DF1A8DFDC2018D903CE0E95A3432AD3FF3B92D7028B192FB5DC5D31F21A12B4F 128E47E0EAD0F5EE96AF44D76629BFD4A718ECAD8DAAF1E0D870C05EABE8F36A 280B53F47D8C221E235857255E0FEB9F48D1C4ABFE411444065A2868CC7ED0BD 750B7235732B28390DCE665D88339E7643CE0BEE35AD10B7DE0A1C88F204DBA4 AFA489464D5E4A55BCE7192E5941681BC413A9AC4794B0728EE336672FD7CEBB F77FF15CF4D1BBB9B17EF46EDAD58ACA9EB317E7C789D3485097950E67598E5F EF92B36727FA9AE99DAABBD433E986E4AA2AF36F20EED987404AB570297EBD08 D8D50B2D4D4594DEF2E3F2C825024F56C36433E73A811A4E54EBD48EFAE571F9 AB6318F25098821D52FF9A016145FD8B2CF233C7AB6AA71D03BDBA6E7ACE78E5 0B731DE3FDE6D5D597A26FA3B2A6A2DA1D7B5F55453DAD863AC64C5F5D5805EF 2C92D66EFEE542FB0DC2BF61D467A86D84E0029BC48DFC1C5E54262A70A386A2 F34FB4E9EF8CA6D73737C827F4558DF3090F7E0A03B938FD7C0D87F235DEE90D FB7C9EB2ACC6658F71B0CDC890AC53F6A336F66BAAACF828C3F1E576BD7D2B0F AFE98FAD0E6B7A3FA6C13AD8FC21AB7ECF75C6880F0F0F97EC875B9749BA1A05 AB60B84A93DD361B163349DF824F46CB492A3F6C0F47B3A2FCA377D6209B208C CA5162928FD88FC2C398350FA330CB2FD343DE1F3FBC527A9E6F2ACFA36475CC F45A46363C388B739E0671160539B95C25C92A22CC1C75E3DB753421F145164D EED38BDD84936619AEC245B0C992FB9C91D4329139896C9BBAC6050901439477 B79F1CFBC7EC273BB2EE97F1FBC7BFBBAB8B2C98FCF52281C7D540178B7C021B BE5D945FC007E4B213F102C2F3043B4EF6277DE53D58D6C516A06E322AF2F737 B2FFCB1BD965A3CDE76F246D1DC12D89E1DB220A6119C25DB22569401F6570E3 AB7F87AF6994B16E471A2BA47EA52DD8BC93CD661787F923FBC1DB215FA77A7A 16E7940C4BB6877C6E777992864144D994C87590F81E1DEBD08D496B83CCF6AF FF07541284A7EE410000 }
14.14 Etsy Account Manager
A complete tutorial about using REBOL with the Etsy API is available at http://re-bol.com/etsy_api_tutorial.html. This CGI program demonstrates how to access many of the Etsy API functions:
#! ../rebol276 -cs REBOL [Title: "Etsy"] print {content-type: text/html^/^/} print {<HTML><HEAD><TITLE>Etsy</TITLE></HEAD><BODY>} read-cgi: func [/local data buffer][ switch system/options/cgi/request-method [ "POST" [ data: make string! 1020 buffer: make string! 16380 while [positive? read-io system/ports/input buffer 16380][ append data buffer clear buffer ] ] "GET" [data: system/options/cgi/query-string] ] data ] submitted: decode-cgi submitted-bin: read-cgi if ((submitted/2 = none) or (submitted/4 = none)) [ print { <STRONG>W A R N I N G - Private Server:</STRONG><BR><BR> <FORM METHOD="post" ACTION="./etsy.cgi"> Username: <input type=text size="50" name="name"><BR><BR> Password: <input type=text size="50" name="pass"><BR><BR> <INPUT TYPE="SUBMIT" NAME="Submit" VALUE="submit"> </FORM> </BODY></HTML> } quit ] myusername: "some-user-name" mypassword: "some-password" username: submitted/2 password: submitted/4 either ((username = myusername) and (password = mypassword)) [][ print "Incorrect Username/Password." print {</BODY></HTML>} quit ] do-etsy: does [ do/args http://reb4.me/r/etsy.r context [ Consumer-Key: #<my-key> Consumer-Secret: #<my-secret> User-Store: %etsyusers Scope: [listings_w listings_r listings_d] Sandbox: true ] etsy/as "<my-user-name>" ] if submitted/6 = "sale" [ do-etsy coupon-code: submitted/8 add-or-remove: submitted/10 print "FOUND ITEMS:<br><br>" found: copy [] x: get in (etsy/listings []) 'results for i 1 (length? x) 1 [ print copy rejoin [ (get in x/:i 'title) <br> ] append found (get in x/:i 'listing_id) append found (get in x/:i 'description) append found (get in x/:i 'title) append found (get in x/:i 'state) ] print "<br><br>REPLACED ITEMS:<br><br>" foreach [lstngid dscrptn titl state] found [ either state <> "active" [ print copy rejoin [ titl { was NOT replaced (listing inactive)<br>} ] ][ etsy/api-call/with put rejoin [ %listings/ lstngid ] either add-or-remove = "add" [ [ title: rejoin ["SALE-" titl] description: rejoin [coupon-code dscrptn] ] ] [ [ title: replace titl "SALE-" "" description: replace dscrptn rejoin [ coupon-code] "" ] ] print copy rejoin [titl {<br>}] ] ] print "<br>Done<br><br>" quit ] if submitted/6 = "replace" [ do-etsy search-text: submitted/8 replace-text: submitted/10 print "FOUND ITEMS:<br><br>" found: copy [] x: get in (etsy/listings []) 'results for i 1 (length? x) 1 [ if find (get in x/:i 'description) search-text [ print rejoin [ ; {"} search-text {" found in: } (get in x/:i 'title) "<br>" ] append found (get in x/:i 'listing_id) append found (get in x/:i 'description) append found (get in x/:i 'title) append found (get in x/:i 'state) ] ] print "<br><br>REPLACED ITEMS:<br><br>" foreach [lstngid dscrptn titl state] found [ either state <> "active" [ print copy rejoin [ titl { was NOT replaced (listing inactive)<br>} ] ][ etsy/api-call/with put rejoin [ %listings/ lstngid ] [ description: ( replace/all dscrptn search-text replace-text ) ] print copy rejoin [titl {<br>}] ] ] print "<br>Done<br><br>" quit ] if submitted/6 = "create-listing" [ do-etsy itm: submitted/8 desc: submitted/10 prc: to-decimal next find submitted/12 "$" ctgry: submitted/14 print "Creating item...<br><br>" etsy/api-call/with post %/listings [ quantity: 1 title: itm description: desc price: prc category_id: ctgry who_made: "i_did" is_supply: "1" when_made: "2010_2012" shipping_template_id: "330" ] print rejoin ["CREATED: " itm ", " desc ", " prc] quit ] if submitted/6 = "delete-listing" [ do-etsy itm2del: submitted/8 print "Deleting...<br><br>" etsy/api-call/with get rejoin [%listings/ itm2del] [ method: "DELETE" ] print rejoin ["Item " itm2del " deleted."] quit ] if submitted/6 = "view-raw" [ do-etsy print {<pre>} probe copy get in (etsy/listings []) 'results print {</pre>} quit ] if submitted/6 = "get-image2" [ do-etsy photo-item-id: submitted/8 photo-list: etsy/api-call/with get rejoin [ %listings/ photo-item-id "/images" ] [] either error? try [photo-id: first get in photo-list 'results] [ print "No photo available for that item." return ][ photo-info: etsy/api-call/with get the-code: rejoin [ %listings/ photo-item-id "/images/ " photo-id ] [] ] probe either [] = the-photo: (get in photo-info 'results) [ "none" ] [ the-photo ] quit ] default-coupon-code: { ** SALE ** Enter the coupon code "982u3445" at checkout to receive 10% off your order.<br><br> } print rejoin [ {<h2>Add or Remove Sale:</h2> <FORM METHOD="post" ACTION="./etsy.cgi"> <INPUT TYPE=hidden NAME="username" VALUE="} myusername {"> <INPUT TYPE=hidden NAME="password" VALUE="} mypassword {"> <INPUT TYPE=hidden NAME="subroutine" VALUE="sale"> Coupon Code:<BR> <TEXTAREA COLS="50" ROWS="18" NAME="couponcode">} default-coupon-code {</TEXTAREA><BR><BR> Add or Remove: <select NAME="addorremove"> <option>add <option>remove </option></select><br><br> <INPUT TYPE="SUBMIT" NAME="Submit" VALUE="submit"> </FORM> <BR><HR> <h2>Replace In Description:</h2> <FORM METHOD="post" ACTION="./etsy.cgi"> <INPUT TYPE=hidden NAME="username" VALUE="} myusername {"> <INPUT TYPE=hidden NAME="password" VALUE="} mypassword {"> <INPUT TYPE=hidden NAME="subroutine" VALUE="replace"> Search Text:<BR><BR> <input type=text size="35" name="searchtext"> <BR><BR> Replace Text:<BR><BR> <input type=text size="35" name="replacetext"> <BR><BR> <INPUT TYPE="SUBMIT" NAME="Submit" VALUE="submit"> </FORM> <BR><HR> <h2>Create Listing:</h2> <FORM METHOD="post" ACTION="./etsy.cgi"> <INPUT TYPE=hidden NAME="username" VALUE="} myusername {"> <INPUT TYPE=hidden NAME="password" VALUE="} mypassword {"> <INPUT TYPE=hidden NAME="subroutine" VALUE="create-listing"> Title: <BR><BR> <input type=text size="35" name="title" value="Ring 100"> <BR><BR> Description: <BR><BR> <input type=text size="35" name="description" value="Ring 100. A very pretty ring."><BR><BR> Price: <BR><BR> <input type=text size="35" name="Price" value="$19.99"> <BR><BR> Category: <BR><BR> <input type=text size="35" name="Category" value="69150467"> <BR><BR> <INPUT TYPE="SUBMIT" NAME="Submit" VALUE="submit"> </FORM> <BR><HR> <h2>Delete Listing:</h2> <FORM METHOD="post" ACTION="./etsy.cgi"> <INPUT TYPE=hidden NAME="username" VALUE="} myusername {"> <INPUT TYPE=hidden NAME="password" VALUE="} mypassword {"> <INPUT TYPE=hidden NAME="subroutine" VALUE="delete-listing"> Listing ID #: <BR><BR> <input type=text size="35" name="listing-id"><BR><BR> <INPUT TYPE="SUBMIT" NAME="Submit" VALUE="submit"> </FORM> <BR><HR> <h2>View All Raw Listing Data:</h2> <FORM METHOD="post" ACTION="./etsy.cgi"> <INPUT TYPE=hidden NAME="username" VALUE="} myusername {"> <INPUT TYPE=hidden NAME="password" VALUE="} mypassword {"> <INPUT TYPE=hidden NAME="subroutine" VALUE="view-raw"> <INPUT TYPE="SUBMIT" NAME="Submit" VALUE="submit"> </FORM> <BR><HR> <h2>View Image:</h2> <FORM METHOD="post" ACTION="./etsy.cgi"> <INPUT TYPE=hidden NAME="username" VALUE="} myusername {"> <INPUT TYPE=hidden NAME="password" VALUE="} mypassword {"> <INPUT TYPE=hidden NAME="subroutine" VALUE="view-image"> <INPUT TYPE="SUBMIT" NAME="Submit" VALUE="submit"> </FORM> </BODY></HTML>} ] quitFor comparison, a GUI version of a program providing access to the same Etsy API functions is provided below:
REBOL [title: "Etsy"] do/args http://reb4.me/r/etsy.r context [ Consumer-Key: #<type_your_key_here> Consumer-Secret: #<typ_your_secret_here> User-Store: %etsyusers Scope: [listings_w listings_r listings_d] ; edit permissions here Sandbox: false ; change to true when approved ] coupon-text: { ** SALE ** Enter the coupon code "893894" at checkout to receive 10% off your order <br><br> } replace-items: does [ found-items/text: copy {} show found-items replaced-items/text: copy {} show replaced-items found: copy [] x: get in (etsy/listings []) 'results for i 1 (length? x) 1 [ if find (get in x/:i 'description) search-text/text [ insert head found-items/text copy rejoin [ ; {"} search-text/text {" found in: } (get in x/:i 'title) newline ] show found-items append found (get in x/:i 'listing_id) append found (get in x/:i 'description) append found (get in x/:i 'title) append found (get in x/:i 'state) ] ] foreach [lstngid dscrptn titl state] found [ either state <> "active" [ insert head replaced-items/text copy rejoin [ titl { was NOT replaced (listing inactive)^/} ] show replaced-items ][ etsy/api-call/with put rejoin [ %listings/ lstngid ] [ description: ( replace/all dscrptn search-text/text replace-text/text ) ] insert head replaced-items/text copy rejoin [titl {^/}] show replaced-items ] ] ; alert "Done" ] sale: func [add-or-remove] [ coupon-code: copy request-text/title/default"Coupon Text:" coupon-text found-items/text: copy {} show found-items replaced-items/text: copy {} show replaced-items found: copy [] x: get in (etsy/listings []) 'results focus found-items for i 1 (length? x) 1 [ insert head found-items/text copy rejoin [ (get in x/:i 'title) newline ] show found-items append found (get in x/:i 'listing_id) append found (get in x/:i 'description) append found (get in x/:i 'title) append found (get in x/:i 'state) ] foreach [lstngid dscrptn titl state] found [ either state <> "active" [ insert head replaced-items/text copy rejoin [ titl { was NOT replaced (listing inactive)^/} ] show replaced-items ][ etsy/api-call/with put rejoin [ %listings/ lstngid ] either add-or-remove = true [ [ title: rejoin ["SALE-" titl] description: rejoin [coupon-code dscrptn] ] ] [ [ title: replace titl "SALE-" "" description: replace dscrptn rejoin [coupon-code] "" ] ] insert head replaced-items/text copy rejoin [titl {^/}] show replaced-items ] ] focus replaced-items ; alert "Done" ] create-listing: does [ itm: request-text/title/default "Title:" "Item 100" desc: request-text/title/default "Description:" "Ring #100" prc: to-decimal next find ( request-text/title/default "Price:" "$19.99" ) "$" if true = request "Would you like to see a listing of category IDs?" [ categories: etsy/api-call get %taxonomy/categories cat-list: copy [] foreach category categories/results [ append cat-list reduce [ category/long_name category/category_id ] ] chosen-category: request-list "Categories" cat-list ] if unset? chosen-category [chosen-category: "69150467"] ctgry: request-text/title/default "Category ID:" form chosen-category flash "Creating item..." etsy/api-call/with post %/listings [ quantity: 1 title: itm description: desc price: prc category_id: ctgry who_made: "i_did" is_supply: "1" when_made: "2010_2012" shipping_template_id: "330" ] unview alert rejoin ["CREATED: " itm ", " desc ", " prc] ] delete-listing: does [ itm2del: request-text/title "Listing ID #:" either true = request "Really Delete?" [ flash "Deleting..." etsy/api-call/with get rejoin [%listings/ itm2del] [ method: "DELETE"] unview alert rejoin ["Item " itm2del " deleted."] ] [ return ] ] get-image: does [ found: copy [] x: get in (etsy/listings []) 'results for i 1 (length? x) 1 [ append found (get in x/:i 'title) append found (get in x/:i 'listing_id) ] photo-item-id: request-list "Select Item:" found photo-list: etsy/api-call/with get rejoin [ %listings/ photo-item-id "/images"] [] either error? try [photo-id: first get in photo-list 'results] [ alert "No photo available for that item." return ][ photo-info: etsy/api-call/with get the-code: rejoin [ %listings/ photo-item-id "/images/ " photo-id ] [] ] editor either [] = the-photo: (get in photo-info 'results) [ "none" ] [ the-photo ] ] etsy/as "<your-username>" view center-face gui: layout [ across text 80 right "If" cond1: drop-down 100 data [ "Title" "Description" "Listing ID" "Any Field" ] cond2: drop-down 150 data [ "REPLACE ALL" "Contains" "Does NOT Contain" "Equals" ] cond3: field 454 "ring" return text 80 right "Search Text:" search-text: field 720 "ring" [ replace-text/text: copy search-text/text show replace-text ] return text 80 right "Replace Text:" replace-text: field 720 "ring" return text 805 "" return box black 805x2 return text 805 "" return text 400 "Found Items:" text 200 "Replaced Items:" return found-items: area replaced-items: area return btn "List Raw Data" [editor copy get in (etsy/listings []) 'results] btn "Create Listing" [create-listing] btn "Delete Listing" [delete-listing] btn "Add Sale" [sale true] btn "Remove Sale" [sale false] btn "View Image" [get-image] btn "Replace Description" [replace-items] ]Be sure to see the following links for more insight about REBOL CGI programming:
http://re-bol.com/cgi_tutorial.txt
http://rebol.com/docs/cgi1.html
http://rebol.com/docs/cgi2.html
http://rebol.com/docs/cgi-bbs.html
http://www.rebol.net/cookbook/recipes/0045.htmlTo create web sites using a PHP-like version of REBOL that runs in a web server written entirely in REBOL, see:
http://cheyenne-server.org (binaries are available for Windows, Mac, and Linux).
http://cheyenne-server.org/docs/rsp-api.html - documentation for the "RSP" (REBOL server pages) API.
14.15 A Note About Working With Web Servers
To do any work with your web server, you'll need to know your account's FTP username, password, URL, and publicly viewable root folder. Be sure to have that info on hand before trying to accomplish any CGI programming.
The most common interface for managing web sites hosted by popular companies is a piece of software called "cPanel". Instructions for accessing and using cPanel are available all around the Internet, and will most likely be emailed by your hosting company. This author recommends lunarpages.com and hostgator.com, and those two companies are known to support REBOL CGI programming.
To begin building a web application with REBOL, you'll need to upload the REBOL interpreter to your web server. You only need to do this once for each web server (not for each program). If you do not have access to cPanel or some other web based file manager, you can use REBOL to manage the entire server setup, and all script editing, and file management operations. To upload REBOL to your server, open your local REBOL interpreter console and type the following code, but REPLACE the username, password, URL, and publicly viewable folder with your own account info. This will download a REBOL interpreter from the web, and upload it to your own server:
file: ftp://user:pass@site.com/public_html/rebol ; EDIT with your info write/binary file (read/binary http://re-bol.com/rebol276)The file transfer process above should take just a few seconds if you're on a broadband connection. Once it's done, you need to set execute "permissions" for the REBOL interpreter in your hosting account. You can use the following REBOL script to do that. Just paste this code into your local REBOL interpreter and enter your web server URL, username, password, folder, etc., when prompted:
REBOL [title: "FTP CHMOD"] website: request-text/title/default "Web Site:" "site.com" username: request-text/title/default "User Name:" "user" password: request-text/title/default "Password:" "pass" folder: request-text/title/default "Folder:" "public_html" file: request-text/title/default "File:" "rebol" permission: request-text/title/default "Permission:" "755" write %ftpargs.txt trim rejoin [{ open } website { user } username { } password { cd } folder { literal chmod } permission { } file { quit }] call/show "ftp -n -s:ftpargs.txt"If you have any problems using the above program on your operating system, you can simply run your OS's command line FTP program using the code below, and manually enter your web host account information as described:
call/show {ftp} ; run this line in the REBOL interpreter console ; Type the following command at the FTP prompt (replace your web url): open yourdomain.com ; enter your username and password when prompted ; Type the following commands (replace your folder and file names): cd public_html/ literal chmod 755 rebol quitAll the steps above only need to be completed the very first time you set up your web hosting account. Once you've got REBOL uploaded to your server, you can begin to create your first CGI program. To start editing a new web site script, type the following into your local REBOL interpreter console (again, be sure to edit the user name, password, URL, and public folder information to match your web server account settings):
editor ftp://user:pass@site.com/public_html/example.cgi ; EDIT accountType the following code into the REBOL text editor and save it (clicking "Save" in the REBOL text editor ACTUALLY SAVES/UPLOADS THE CHANGES TO YOUR WEB SERVER):
#!./rebol -cs REBOL [] print {content-type: text/html^/}Run the "FTP CHMOD" program above one more time to set the permissions for this new "example.cgi" to 755 (you'll need to set permissions to 755 for every .cgi script you create and upload to your server, so keep the above script handy). To be clear, in the ftp script above, change "rebol" to "example.cgi". Now browse to http://yourdomain.com/example.cgi , and you will see a blank page (replace "yourdomain.com" in the URL to the domain of your actual web server). If you get any errors, see the highlighted instructions below about error logs in cPanel.
14.16 WAP - Cell Phone Browser CGI Apps (deprecated)
NOTE: This section has been mostly deprecated by modern phone technology, but it's included here for potential usefulness, and to provide futher material in the study of CGI coding.
Most cell phone service providers offer data options which allow users to access information on the Internet. If you use a "smart phone", your data package likely allows you to access normal web pages using a browser program that runs on your phone (with varying degrees of rendering success). "Dumb" cell phones, however, come only with a "WAP" browser that allows you to access only very light mobile versions of web sites, and provides information in a format specifically accessible only by cell phones. Using WAP mobile sites, you can check email in Google, Yahoo, and other accounts, read news, get weather and traffic reports, manage Ebay transactions, etc. WAP versions of sites, accessible on normal cell phones are not renditions of the normal HTML sites created or interpreted by your phone, but are instead entirely separate versions of each site, created and managed on the web server by the web site creators, and simply accessed by WAP phone browsers.
You can create your own WAP CGI applications, to be accessed by any phone with a WAP browser, using REBOL. WAP scripts are just as easy to ceate as normal CGI web scripts. Instead of HTML, however, you simply need to format the output of your scripts using WAP ("Wireless Application Protocal") syntax. Reference information about WAP tags ("WML") can be found at http://www.w3schools.com/WAP/wml_reference.asp
Here's a basic WAP CGI script which demonstrates the stock code required in all your REBOL WAP scripts. The first 5 lines should be memorized. You'll need to copy them verbatim to the beginning of every WAP script you create. The last lines demonstrate some other important WAP tags. Notice that the wml tag basically replaces the html tag from normal HTML. Every WAP page also contains card tags, which basically replace the head and body tags in normal HTML. This script prints the current time in a WAP browser. Remember to set the permissions of (chmod) any WAP CGI script to 755:
#!./rebol276 -cs REBOL [] prin {Content-type: text/vnd.wap.wml^/^/} prin {<?xml version="1.0" encoding="iso-8859-1"?>^/} prin {<!DOCTYPE wml PUBLIC "-//WAPFORUM//DTD WML 1.1//EN" "http://www.wapforum.org/DTD/wml_1.1.xml">^/} ; The lines above are standard headers for any WAP CGI script. The ; lines below print out the standard tags needed to print text on a ; WAP page. Included inside the wml, card and p (paragraph) tags is ; one line that prints the current time: print {<wml><card id="1" title="Current Time"><p>} print now print {</p></card></wml>} quitThe following nearly identical script converts text data output by another script on the web site to WAP format, so that it can be read on small cell phone browsers. Because WAP syntax is a bit more strict than HTML, some HTML tags must be removed (replaced) from the source script output. You must be careful to strip out unnecessary tags and characters in text formatted for display in cell phones. Most WAP browsers will simply display an error if they encounter improperly formatted content:
#!./rebol276 -cs REBOL [] prin {Content-type: text/vnd.wap.wml^/^/} prin {<?xml version="1.0" encoding="iso-8859-1"?>^/} prin {<!DOCTYPE wml PUBLIC "-//WAPFORUM//DTD WML 1.1//EN" "http://www.wapforum.org/DTD/wml_1.1.xml">^/} print {<wml><card id="1" title="Wap Page"><p>} prin replace/all (read http://site.com/page.cgi) {</BODY> </HTML>} {} print {</p></card></wml>} quitHere's a bit more useful version of the above script which allows users to specify the file to be converted, right in the URL of WAP page (i.e., if this script is at site.com/wap.cgi, and the user wants to read page.txt in their WAP browser, then the URL would be "http://site.com/wap.cgi?page.txt"):
#!./rebol276 -cs REBOL [] submitted: decode-cgi system/options/cgi/query-string prin {Content-type: text/vnd.wap.wml^/^/} prin {<?xml version="1.0" encoding="iso-8859-1"?>^/} prin {<!DOCTYPE wml PUBLIC "-//WAPFORUM//DTD WML 1.1//EN" "http://www.wapforum.org/DTD/wml_1.1.xml">^/} print {<wml><card id="1" title="Wap Page"><p>} ; The line below joins the web site URL with the submitted page, ; reads it, and parses it, up to some indicated marker text, so ; that only the text before the marker text is displayed: parse read join http://site.com/ submitted/2 [ thru submitted/2 copy p to "some marker text" ] prin p print {</p></card></wml>} quitHere's a version of the above script that lets users select a document to be converted and displayed. This code makes use of select and option tags, which work like HTML dropdown boxes in forms. It also demonstrates how to use anchor, go and postfield tags to submit form data. These work like the "action" in HTML forms. Variable labels for information entered by the user are preceded by a dollar symbol ("$"), and the variable name is enclosed in parentheses (i.e., the $(doc) variable below is submitted to the wap.cgi program). The anchor tag creates a clickable link that makes the action occur:
#!./rebol -cs REBOL [] submitted: decode-cgi system/options/cgi/query-string prin {Content-type: text/vnd.wap.wml^/^/} prin {<?xml version="1.0" encoding="iso-8859-1"?>^/} prin {<!DOCTYPE wml PUBLIC "-//WAPFORUM//DTD WML 1.1//EN" "http://www.wapforum.org/DTD/wml_1.1.xml">^/} ; If no data has been submitted, do this by default: if submitted/2 = none [ ; Print some standard tags: print {<wml><card id="1" title="Select Doc"><p>} ; Get a list of subfolders and display them in a dropdown box: folders: copy [] foreach folder read %./docs/ [ if find to-string folder {/} [append folders to-string folder] ] print {Doc: <select name="doc">} foreach folder folders [ folder: replace/all folder {/} {} print rejoin [{<option value="} folder {">} folder {</option>}] ] print {</select> ; Create a link to submit the chosen folder, then close the tags ; from above: <anchor> <go method="get" href="wap.cgi"> <postfield name="doc" value="$(doc)"/> </go> Submit </anchor>} print {</p></card></wml>} quit ] ; If some data has been submitted, read the selected doc: print rejoin [{<wml><card id="1" title="} submitted/2 {"><p>}] parse read join http://site.com/docs/ submitted/2 [ thru submitted/2 copy p to "end of file" ] prin p print {</p></card></wml>} quitThis script breaks up the selected text document into small (130 byte) chunks so that it can be navigated more quickly. Each separate card is displayed as a different page in the WAP browswer, and anchor links are provided to navigate forward and backword between the cards. For the user, paging through data in this way tends to be much faster than scrolling through long results line by line:
#!./rebol276 -cs REBOL [] submitted: decode-cgi system/options/cgi/query-string prin {Content-type: text/vnd.wap.wml^/^/} prin {<?xml version="1.0" encoding="iso-8859-1"?>^/} prin {<!DOCTYPE wml PUBLIC "-//WAPFORUM//DTD WML 1.1//EN" "http://www.wapforum.org/DTD/wml_1.1.xml">^/} count: 0 p: read http://site.com/folder.txt print {<wml>} forskip p 130 [ ; Create a counter, to appear as each card title, then print links ; to go forward and backward between the cards: count: count + 1 print rejoin [{<card id="} count {" title="page-} count {"><p>}] print rejoin [ {<anchor>Next<go href="#} (count + 1) {"/></anchor>} ] print rejoin [{<anchor>Back<prev/></anchor>}] ; Print 130 characters in each card: print copy/part p 130 print {</p></card>} ] print {</wml>} quitThis next script combines the techniques explained so far, and allows the user to select a file on the web server, using a dropdown box, and displays the selected file in 130 byte pages:
#!./rebol276 -cs REBOL [] submitted: decode-cgi system/options/cgi/query-string prin {Content-type: text/vnd.wap.wml^/^/} prin {<?xml version="1.0" encoding="iso-8859-1"?>^/} prin {<!DOCTYPE wml PUBLIC "-//WAPFORUM//DTD WML 1.1//EN" "http://www.wapforum.org/DTD/wml_1.1.xml">^/} if submitted/2 = none [ print {<wml><card id="1" title="Select Teacher"><p>} ; print {Name: <input name="name" size="12"/>} folders: copy [] foreach folder read %./Teachers/ [ if find to-string folder {/} [append folders to-string folder] ] print {Teacher: <select name="teacher">} foreach folder folders [ folder: replace/all folder {/} {} print rejoin [ {<option value="} folder {">} folder {</option>} ] ] print {</select> <anchor> <go method="get" href="wap.cgi"> <postfield name="teacher" value="$(teacher)"/> </go> Submit </anchor>} print {</p></card></wml>} quit ] count: 0 parse read join http://site.com/folder/ submitted/2 [ thru submitted/2 copy p to "past students" ] print {<wml>} forskip p 130 [ count: count + 1 print rejoin [ {<card id="} count {" title="} submitted/2 "-" count {"><p>} ] print rejoin [ {<anchor>Next<go href="#} (count + 1) {"/></anchor>} ] print rejoin [{<anchor>Back<prev/></anchor>}] print copy/part p 130 print {</p></card>} ] print {</wml>} quitFinally, this script allows users to select a file, and enter some text to be saved in that file, using the input tag:
#!./rebol276 -cs REBOL [] submitted: decode-cgi system/options/cgi/query-string prin {Content-type: text/vnd.wap.wml^/^/} prin {<?xml version="1.0" encoding="iso-8859-1"?>^/} prin {<!DOCTYPE wml PUBLIC "-//WAPFORUM//DTD WML 1.1//EN" "http://www.wapforum.org/DTD/wml_1.1.xml">^/} if submitted/2 = none [ print {<wml><card id="1" title="Select Teacher"><p>} print {Insert Text: <input name="thetext" size="12"/>} folders: copy [] foreach folder read %./Teachers/ [ if find to-string folder {/} [ append folders to-string folder ] ] print {Teacher: <select name="teacher">} foreach folder folders [ folder: replace/all folder {/} {} print rejoin [ {<option value="} folder {">} folder {</option>} ] ] print {</select> <anchor> <go method="get" href="wapinsert.cgi"> <postfield name="teacher" value="$(teacher)"/> <postfield name="thetext" value="$(thetext)"/> </go> Submit </anchor>} print {</p></card></wml>} quit ] chosen-file: rejoin [%./Teachers/ submitted/2 "/schedule.txt"] adjusted-file: read/lines chosen-file insert next next next next adjusted-file submitted/4 write/lines chosen-file adjusted-file count: 0 parse read join http://site.com/folders/ submitted/2 [ thru submitted/2 copy p to "past students" ] print {<wml>} forskip p 130 [ count: count + 1 print rejoin [ {<card id="} count {" title="} submitted/2 "-" count {"><p>} ] print rejoin [ {<anchor>Next<go href="#} (count + 1) {"/></anchor>} ] print rejoin [{<anchor>Back<prev/></anchor>}] print copy/part p 130 print {</p></card>} ] print {</wml>} quitThis script allows users to read email messages from any POP server, on their cell phone:
#!./rebol276 -cs REBOL [] submitted: decode-cgi system/options/cgi/query-string prin {Content-type: text/vnd.wap.wml^/^/} prin {<?xml version="1.0" encoding="iso-8859-1"?>^/} prin {<!DOCTYPE wml PUBLIC "-//WAPFORUM//DTD WML 1.1//EN" "http://www.wapforum.org/DTD/wml_1.1.xml">^/} accounts: [ ["pop.server" "smtp.server" "username" "password" you@site.com] ["pop.server2" "smtp.server2" "username" "password" you@site2.com] ["pop.server3" "smtp.server3" "username" "password" you@site3.com] ] if ((submitted/2 = none) or (submitted/2 = none)) [ print {<wml><card id="1" title="Select Account"><p>} print {Account: <select name="account">} forall accounts [ print rejoin [ {<option value="} index? accounts {">} last first accounts {</option>} ] ] print {</select> <select name="readorsend"> <option value="readselect">Read</option> <option value="sendinput">Send</option> </select> <anchor> <go method="get" href="wapmail.cgi"> <postfield name="account" value="$(account)"/> <postfield name="readorsend" value="$(readorsend)"/> </go> Submit </anchor>} print {</p></card></wml>} quit ] if submitted/4 = "readselect" [ t: pick accounts (to-integer submitted/2) system/schemes/pop/host: t/1 system/schemes/default/host: t/2 system/schemes/default/user: t/3 system/schemes/default/pass: t/4 system/user/email: t/5 prin {<wml><card id="1" title="Choose Message"><p>} prin rejoin [{<setvar name="account" value="} submitted/2 {"/>}] prin {<select name="chosenmessage">} mail: read to-url join "pop://" system/user/email foreach message mail [ pretty: import-email message if (find pretty/subject "***SPAM***") = none [ replace/all pretty/subject {"} {} replace/all pretty/subject {&} {} prin rejoin [ {<option value="} pretty/subject {">} pretty/subject {</option>} ] ] ] print {</select> <anchor> <go method="get" href="wapmail.cgi"> <postfield name="subroutine" value="display"/> <postfield name="chosenmessage" value="$(chosenmessage)"/> <postfield name="account" value="$(account)"/> </go> Submit </anchor> </p></card></wml>} quit ] if submitted/2 = "display" [ t: pick accounts (to-integer submitted/6) system/schemes/pop/host: t/1 system/schemes/default/host: t/2 system/schemes/default/user: t/3 system/schemes/default/pass: t/4 system/user/email: t/5 prin {<wml><card id="1" title="Display Message"><p>} mail: read to-url join "pop://" system/user/email foreach message mail [ pretty: import-email message if pretty/subject = submitted/4 [ replace/all pretty/content {"} {} replace/all pretty/content {&} {} replace/all pretty/content {3d} {} ; prin pretty/content ; The line above often causes errors - we need to strip ; out HTML tags: strip: copy "" foreach item (load/markup pretty/content) [ if ((type? item) = string!) [strip: join strip item] ] prin strip ] ] print {</p></card></wml>} quit ]Creating WAP versions of your REBOL CGI scripts is a fantastic way to provide even more universal access to your important data.
15. Organizing Efficient Data Structures and Algorithms
The purpose of this tutorial is enable the use of a computing tool that improves productivity in business operations. Creating programs that execute quickly is an important goal toward that end, especially when dealing with large sets of data. In order to achieve speedy performance, it's critical to understand some fundamental concepts about efficient algorithmic design patterns and sensible techniques used to organize and store information effectively.
15.1 A Simple Loop Example
The example below provides a basic demonstration about how inefficient design can reduce performance. This code prints 30 lines of text to the REBOL interpreter console, each made up of 75 dash characters:
REBOL [title: "Badly Designed Line Printer"] for i 1 30 1 [ for i 1 75 1 [prin "-"] print "" ] haltEven on a very fast computer, you can watch the screen flicker, and see the characters appear as dashes are printed in a loop, 75 times per each line, across 30 lines. That inner character printing operation is repeated a total of 2250 times (30 lines * 75 characters). As it turns out, the REBOL "loop" function is slightly faster than the "for" function, when creating simple counted loop structures. So, you can see a slight performance improvement using the following code:
REBOL [title: "Slightly Improved Line Printer"] loop 30 [ loop 75 [prin "-"] print "" ] haltBut the example above does not address the main bottle neck which slows down the display. The function that really takes time to execute is the "prin" function. The computer is MUCH slower at printing items to the screen, than it is at performing unseen computations in RAM memory. Watch how long it takes to simply perform the same set of loops and to increment a count (i.e., perform a sum computation), compared to printing during each loop. This example executes instantly, even on very slow computers:
REBOL [title: "Loops Without Printing"] count: 0 loop 30 [ loop 75 [count: count + 1] ] print count haltA much more efficient design, therefore, would be to create a line of characters once, save it to a variable label, and then print that single saved line 30 times:
REBOL [title: "Well Designed Line Printer"] line: copy {} loop 75 [append line "-"] loop 30 [print line] haltThe example above reduces the number of print functions from 2250 to 30, and the display is dramatically improved. The following code times the execution speed of each of the techniques above, so you can see just how much speed is saved by using memory and processing power more efficiently:
REBOL [title: "Printing Algorithm Timer"] timer1: now/time/precise for i 1 30 1 [ for i 1 75 1 [prin "-"] print "" ] elapsed1: now/time/precise - timer1 print newpage timer2: now/time/precise loop 30 [ loop 75 [prin "-"] print "" ] elapsed2: now/time/precise - timer2 print newpage timer3: now/time/precise count: 0 loop 30 [ loop 75 [count: count + 1] ] print count elapsed3: now/time/precise - timer3 print newpage timer4: now/time/precise line: copy {} loop 75 [append line "-"] loop 30 [print line] elapsed4: now/time/precise - timer4 print newpage print rejoin ["Printing 2250 characters, 'for': " elapsed1] print rejoin ["Printing 2250 characters, 'loop': " elapsed2] print rejoin ["Counting to 2250, printing result: " elapsed3] print rejoin ["Printing 30 preconstructed lines: " elapsed4] haltThis is, of course, a trivial demonstrative example, but identifying such "bottle necks", and designing code patterns which reduce loop counts and cut down on computational rigor, is a critical part of the thought process required to create fast and responsive applications. Knowing the benchmark speed of functions in a language, and understanding how to use effecient add-on tools such as database systems, can be helpful, but more often, smart architecture and sensible awareness of how data structures are organized, will have a much more dramatic effect on how well a program performs. When working with data sets that are expected to grow to a large scale, it's important to pay attention to how information will be stored and looped through, before any production code is written and implemented.
15.2 A Real Life Example: Checkout Register and Cashier Report System
The example below is the trivial POS example demonstrated earlier in the tutorial. It saves the data for all receipts in a single text file:
REBOL [title: "Minimal Cash Register - Inefficient"] view gui: layout [ style fld field 80 across text "Cashier:" cashier: fld text "Item:" item: fld text "Price:" price: fld [ if error? try [to-money price/text] [alert "Price error" return] append a/text reduce [mold item/text " " price/text newline] item/text: copy "" price/text: copy "" sum: 0 foreach [item price] load a/text [sum: sum + to-money price] subtotal/text: form sum tax/text: form sum * .06 total/text: form sum * 1.06 focus item show gui ] return a: area 600x300 return text "Subtotal:" subtotal: fld text "Tax:" tax: fld text "Total:" total: fld btn "Save" [ items: replace/all (mold load a/text) newline " " write/append %sales.txt rejoin [ items newline cashier/text newline now/date newline ] clear-fields gui a/text: copy "" show gui ] ]This code reports the total of all items sold on any chosen day, by any chosen cashier:
REBOL [title: "Cashier Report - Ineffecient"] report-date: request-date report-cashier: request-text/title/default "Cashier:" "Nick" sales: read/lines %sales.txt sum: $0 foreach [items cashier date] sales [ if ((report-cashier = cashier) and (report-date = to-date date)) [ foreach [item price] load items [ sum: sum + to-money price ] ] ] alert rejoin ["Total for " report-cashier " on " report-date ": " sum]This whole program appears to work just fine on first inspection, but what happens after a million sales transactions have been entered into the system? In that case, the report program must read in and loop through 3 million lines of data, perform the date and cashier comparison evaluations on every single sales entry, and then perform the summing loop on only the matching sales entries. That's a LOT of unnecessary processing, and reading data from the hard drive is particularly slow.
We could simply plan to occassionally copy, paste, and erase old transactions from the sales.txt file into a separate archive file. That would solve the problem (and may be a occasionally useful maintanence objective), but it doesn't really improve performance. By changing the method of storage just a bit, we can dramatically improve performance. The example below creates a new folder, and writes every sales transaction to a separate file. The FILE NAMES of saved sales contain the date, time, and cashier name of each transaction (only the code for the "Save" button has been changed slightly in this example):
REBOL [title: "Minimal Cash Register - Efficient"] view gui: layout [ style fld field 80 across text "Cashier:" cashier: fld text "Item:" item: fld text "Price:" price: fld [ if error? try [to-money price/text] [alert "Price error" return] append a/text reduce [mold item/text " " price/text newline] item/text: copy "" price/text: copy "" sum: 0 foreach [item price] load a/text [sum: sum + to-money price] subtotal/text: form sum tax/text: form sum * .06 total/text: form sum * 1.06 focus item show gui ] return a: area 600x300 return text "Subtotal:" subtotal: fld text "Tax:" tax: fld text "Total:" total: fld btn "Save" [ file: copy to-file rejoin [ now/date "_" replace/all form now/time ":" "-" "_" cashier/text ] save rejoin [%./sales/ file ] (load a/text) clear-fields gui a/text: copy "" show gui ] ]This improved report reads the list of file names in the %./sales/ folder. Each file name is parsed into date, time, and name components, and then, only if the date and cashier items match the report requirements, the loop that computes the sum is run. This eliminates a dramatic volume of data reading (only the file list is read - not the entire contents of every file), and avoids a tremendous number of unnecessary looped computational steps:
REBOL [title: "Cashier Report - Efficient"] report-date: request-date report-cashier: request-text/title/default "Cashier:" "Nick" sum: $0 files: copy [] foreach file read %./sales/ [ parsed: parse file "_" if ((report-date = to-date parsed/1) and (report-cashier = parsed/3))[ append files file ] ] cd %./sales/ foreach file files [ foreach [item price] load file [ sum: sum + to-money price ] ] cd %../ alert rejoin ["Total for " report-cashier " on " report-date ": " sum]When working with systems that are expected to handle large volumes of data, it's essential to run benchmark tests comparing potential design options. It's a simple task to write scripts which generate millions of entries of random data to test any system you create, at volume levels exceeding potential real life scenarios. Creating a script to generate random data to test the program above, for example, is as simple as looping the "Save" button code that creates the receipt files:
REBOL [title: "Automated Test Sales Data Generator"] random/seed now/time/precise loop 10000 [ file: to-file rejoin [ ((random 31-dec-0001) + 734868) ; 734868 days between 2013/0001 "_" replace/all form random 23:59:59 ":" "-" "_" random {abcd} ] items: reduce [random "asd fgh jkl" random $100] save rejoin [%./sales/ file] items ]Try running the following report after creating the above test data, and you'll see that results are calculated instantly:
REBOL [title: "Cashier Report - Efficient"] report-date: request-date report-cashier: request-text/title/default "Cashier:" "abcd" sum: $0 files: copy [] foreach file read %./sales/ [ parsed: parse file "_" if report-cashier = parsed/3 [ append files file ] ] cd %./sales/ foreach file files [ foreach [item price] load file [ sum: sum + to-money price ] ] cd %../ alert rejoin ["Total for " report-cashier ": " sum]The method of saving structured data in separate text files, demonstrated by the simplified POS examples above, has been tested by the author in a variety of high volume commercial software implementations. The computational speed demonstrated by reports using this technique outperformed the capabilities of even powerful database systems. Other benefits, such as portability between systems (any operating system with a file structure can be used), no required DBMS installation, easy backup and transfer of data to other systems and mediums, etc., make this an extremely powerful way of approaching serious data management needs. Backing up all new data to a thumb drive is as simple as performing a folder sync. In one case, a web site reporting system was created to match a desktop POS reporting system that has tracked tens of millions of item sales. A simple REBOL script was used to upload new sales transaction files to the web server daily, and the exact same code was used to print the report as CGI script output. Users were then able to check sales online using browsers on any desktop PC, iPhone, Android, etc. Absolutely no database or machine dependent software architecture was required using this simple conceptual pattern of saving data to text files. The key to the success of this example of data organization, storage, and algorithmic report computation, is to simply engineer the system to store potentially searched data fields in the file names.
Learning to avoid wasted effort, and to pinpoint computational bottle necks, especially in loops that manage large data sets, is critical to designing fast applications. Even if you use powerful database systems to store data, it's still important to consider how you read, search, and otherwise manipulate the saved data. As a general rule, avoid reading, writing, transferring, or performing computations on anything other than the absolute smallest possible sets of values, and you'll find that performance can always be improved.
You'll see these sort of efficient design decisions applied to many applications in this tutorial. Pay particular attention to the way data is stored and reported in text files in the "RebGUI Point of Sale", "Simple POS", and "Simple POS Sales Report Printer" examples. More pointed techniques, such as the way in which messages were automatically moved to an "Archive" database in the "RebolForum" CGI application, help to dramatically improve the user experience by directly reducing the amount of data needed to present an initial display. That application has been tested in production situations, and responds instantly, even when the system contains many hundreds of thousands of messages.
It's important to consider the potential volume of data any system will be required to manage, before fully implementing the user interface and data structure in production environments. Consider and test all data fields that may be required as a system grows, and be sure your data structure and computational algorithms can handle more volume than will ever be needed. This will save you enormous headache down the road, when your software is firmly entrenched in business operations.
16. Additional Topics
16.1 Objects
Objects are code structures that allow you to encapsulate and replicate code. They can be thought of as code containers which are easily copied and modified to create multiple versions of similar code and/or duplicate data structures. They're also used to provide context and namespace management features (i.e., to avoid assigning the same variable words and/or function names to different pieces of code in large projects).
Object "prototypes" define a new object container. To create an original object prototype in REBOL, use the following syntax:
label: make object! [object definition]The object definition can contain functions, values, and/or data of any type. Below is a blank user account object containing 6 variables which are all set to equal "none"):
account: make object! [ first-name: last-name: address: phone: email-address: none ]The account definition above simply wraps the 6 variables into a container, or context, called "account".
You can refer to data and functions within an object using refinement ("/path") notation:
object/wordIn the account object, "account/phone" refers to the phone number data contained in the account. You can make changes to elements in an object as follows:
object/word: dataFor example:
account/phone: "555-1234" account/address: "4321 Street Place Cityville, USA 54321"Once an object is created, you can view all its contents using the "help" function:
help object ? object ; "?" is a synonym for "help"If you've typed in all the account examples so far into the REBOL interpreter, then:
? accountdisplays the following info:
ACCOUNT is an object of value: first-name none! none last-name none! none address string! "4321 Street Place Cityville, USA 54321" phone string! "555-1234" email-address none! noneYou can obtain a list of all the items in an object using the format "first (object label)":
first accountThe above line returns [self first-name last-name address phone email-address]. The first item in the list is always "self", and for most operations, you'll want to remove that item. To do that, use the format "next first (object label)":
next first accountTo iterate through every item in an object, you can use a foreach loop on the above values:
foreach item (next first account) [print item]To get the values referred to by individual word labels in objects, use "get in":
get in account 'first-name get in account 'address ; notice the tick markThe following example demonstrates how to access and manipulate every value in an object:
count: 0 foreach item (next first account) [ count: count + 1 print rejoin ["Item " count ": " item] print rejoin ["Value: " (get in account item) newline] ]Once you've created an object prototype, you can make a new object based on the original definition:
label: make existing-object [ values to be changed from the original definition ]This behaviour of copying values based on previous object definitions (called "inheritance") is one of the main reasons that objects are useful. The code below creates a new account object labeled "user1":
user1: make account [ first-name: "John" last-name: "Smith" address: "1234 Street Place Cityville, USA 12345" email-address: "john@hisdomain.com" ]In this case, the phone number variable retains the default value of "none" established in the original account definition.
You can extend any existing object definition with new values:
label: make existing-object [new-values to be appended]The definition below creates a new account object, redefines all the existing variables, and appends a new variable to hold the user's favorite color.
user2: make account [ first-name: "Bob" last-name: "Jones" address: "4321 Street Place Cityville, USA 54321" phone: "555-1234" email-address: "bob@mysite.net" favorite-color: "blue" ]"user2/favorite-color" now refers to "blue".
The code below creates a duplicate of the user2 account, with only the name and email changed:
user2a: make user2 [ first-name: "Paul" email-address: "paul@mysite.net" ]"? user2a" provides the following info:
USER2A is an object of value: first-name string! "Paul" last-name string! "Jones" address string! "4321 Street Place Cityville, USA 54321" phone string! "555-1234" email-address string! "paul@mysite.net" favorite-color string! "blue"You can include functions in your object definition:
complex-account: make object! [ first-name: last-name: address: phone: none email-address: does [ return to-email rejoin [ first-name "_" last-name "@website.com" ] ] display: does [ print "" print rejoin ["Name: " first-name " " last-name] print rejoin ["Address: " address] print rejoin ["Phone: " phone] print rejoin ["Email: " email-address] print "" ] ]Note that the variable "email-address" is initially assigned to the result of a function (which simply builds a default email address from the object's first and last name variables). You can override that definition by assigning a specified email address value. Once you've done that, the email-address function no longer exists in that particular object - it is overwritten by the specified email value.
Here are some implementations of the above object. Notice the email-address value in each object:
user1: make complex-account [] user2: make complex-account [ first-name: "John" last-name: "Smith" phone: "555-4321" ] user3: make complex-account [ first-name: "Bob" last-name: "Jones" address: "4321 Street Place Cityville, USA 54321" phone: "555-1234" email-address: "bob@mysite.net" ]To print out all the data contained in each object:
user1/display user2/display user3/displayThe display function prints out data contained in each object, and in each object the same variables refer to different values (the first two emails are created by the email-address function, and the third is assigned).
Here's a small game in which multiple character objects are created from a duplicated object template. Each character can store, alter, and print its own separately calculated position value based on one object prototype definition:
REBOL [] hidden-prize: random 15x15 character: make object! [ position: 0x0 move: does [ direction: ask "Move up, down, left, or right: " switch/default direction [ "up" [position: position + -1x0] "down" [position: position + 1x0] "left" [position: position + 0x-1] "right" [position: position + 0x1] ] [print newline print "THAT'S NOT A DIRECTION!"] if position = hidden-prize [ print newline print "You found the hidden prize. YOU WIN!" print newline halt ] print rejoin [ newline "You moved character " movement " " direction ". Character " movement " is now " hidden-prize - position " spaces away from the hidden prize. " newline ] ] ] character1: make character[] character2: make character[position: 3x3] character3: make character[position: 6x6] character4: make character[position: 9x9] character5: make character[position: 12x12] loop 20 [ prin "^(1B)[J" movement: ask "Which character do you want to move (1-5)? " if find ["1" "2" "3" "4" "5"] movement [ do rejoin ["character" movement "/move"] print rejoin [ newline "The position of each character is now: " newline newline "CHARACTER ONE: " character1/position newline "CHARACTER TWO: " character2/position newline "CHARACTER THREE: " character3/position newline "CHARACTER FOUR: " character4/position newline "CHARACTER FIVE: " character5/position ] ask "^/Press the [Enter] key to continue." ] ]You could, for example, extend this concept to create a vast world of complex characters in an online multi-player game. All such character definitions could be built from one base character definition containing default configuration values.
16.1.1 Namespace Management
In this example the same words are defined two times in the same program:
var: 1234.56 bank: does [ print "" print rejoin ["Your bank account balance is: $" var] print "" ] var: "Wabash" bank: does [ print "" print rejoin [ "Your favorite place is on the bank of the: " var] print "" ] bankThere's no way to access the bank account balance after the above code runs, because the "bank" and "var" words have been overwritten. In large coding projects, it's easy for multiple developers to unintentionally use the same variable names to refer to different pieces of code and/or data, which can lead to accidental deletion or alteration of values. That potential problem can be avoided by simply wrapping the above code into separate objects:
money: make object! [ var: 1234.56 bank: does [ print "" print rejoin ["Your bank account balance is: $" var] print "" ] ] place: make object! [ var: "Wabash" bank: does [ print "" print rejoin [ "Your favorite place is on the bank of the: " var] print "" ] ]Now you can access the "bank" and "var" words in their appropriate object contexts:
money/bank place/bank money/var place/varThe objects below make further use of functions and variables contained in the above objects. Because the new objects "deposit" and "travel" are made from the "money" and "place" objects, they inherit all the existing code contained in the above objects:
deposit: make money [ view layout [ button "Deposit $10" [ var: var + 10 bank ] ] ] travel: make place [ view layout [ new-favorite: field 300 trim { Type a new favorite river here, and press [Enter]} [ var: value bank ] ] ]Learning to use objects is important because much of REBOL is built using object structures. As you've seen earlier in the section about built-in help, the REBOL "system" object contains many important interpreter settings. In order to access all the values in the system object, it's essential to understand object notation:
get in system/components/graphics 'dateThe same is true for GUI widget properties and many other features of REBOL.
For more information about objects, see:
http://rebol.com/docs/core23/rebolcore-10.html
http://en.wikibooks.org/wiki/REBOL_Programming/Language_Features/Objects
http://en.wikipedia.org/wiki/Prototype-based_programming
16.2 Ports - Fine Grained Access to Files, Email, Network and More
REBOL "ports" provide a single way to handle many types of data input and output. They enable access to a variety of data sources, and allow you to control them all in a consistent way, using standard REBOL series functions. You can open ports to POP email boxes, FTP directories, local text files, TCP network connections, keyboard input buffers, and more, and also use them to output data such as sounds and console interactions. Once a port is opened to a data source, the data contained in the port can be treated as a sequential list of items which can be traversed, arranged, searched, sorted, and otherwise organized/manipulated, all using series functions such as those covered earlier in this text (foreach, find, select, reverse, length?, head, next, back, last, tail, at, skip, extract, index?, insert, append, remove, change, poke, copy/part, clear, replace, join, intersect, difference, exclude, union, unique, empty?, write, save, etc.).
In some cases, there are other native ways to access data contained in a given port, typically with "read" and "write" functions. In such cases, port access simply provides finer control of the data (dealing with email and file data are examples of such cases). In other cases, ports provide the primary interface for accessing data in the given data source (TCP sockets and other network protocols are examples).
Ports are created using the "open" function, and are typically assigned a word label when created:
my-files: open ftp://user:pass@site.com/public_html/After opening the above port, the files in the FTP directory can be traversed sequentially or by index, using series functions:
print first my-files print length? my-files print pick my-files ((length? my-files) - 7) ; 7th file from the end ; etc ...To change the marked index position in a port, re-assign the port label to the new index position:
my-files: head my-files print index? my-files print first my-files my-files: next my-files print index? my-files print first my-files my-files: at my-files 10 print index? my-files print first my-filesTo close the connection to data contained in a port, use the "close" function:
close my-filesIt is of course possible to read and write directly to/from the folder in the above examples without manually opening a port:
print read ftp://user:pass@site.com/public_html/ write ftp://user:pass@site.com/public_html/temp.txt (read %temp.txt)The difference between opening a port to the above files, and simply reading/writing them is that the port connection offers more specific access to and control of individual files. The "get-modes" and "set-modes" functions can be used to set various properties of files:
my-file: open %temp.txt set-modes port [ world-read: true world-write: true world-execute: true ] close my-fileMore benefits of port control are easy to understand when dealing with email accounts. All the email in a given account can be accessed by simply reading it:
print read pop://user:pass@site.comIf, for example, there are 10000 messages in the above email account, the above action could take a very long time to complete. Even to simply read one email from the above account, the entire account needs to be read:
print second read pop://user:pass@site.comA much better solution is to open a port to the above data source:
my-email: open pop://user:pass@site.comOnce the above port is open, each of the individual emails in the given POP account can be accessed separately, without having to download any other emails in the account:
print second my-email ; no download of 10000 emails requiredAnd you can jump around between messages in the account:
my-email: head my-email print first my-email ; prints the 1st email in the box my-email: next my-email print first my-email ; prints the 2nd email in the box my-email: at my-email 4 print first my-email ; prints the 5th email in the box my-email: head my-email print first my-email ; prints email #1 again ; etc...You can also remove email messages from the account:
my-email: head my-email remove my-email ; removes the 1st emailInternally, REBOL actually deals with most types of data sources as ports. The following line:
write/append %temp.txt "1234"Is the same as:
temp: open %temp.txt append temp "1234" close tempREBOL ports are objects. You can see all the properties of an open port, using the "probe" function:
temp: open %temp.txt probe temp close tempFrom the very important example above, you can see that various useful properties of the port data can be accessed using a consistent syntax:
temp: open %temp.txt print temp/date print temp/path print temp/size close tempThe state/inBuffer and state/outBuffer are particularly important values in any port. Those items are where changes to data contained in the port are stored, until the port is closed or updated. Take a close look at this example:
; First, create a file: write %temp.txt "" ; That file is now empty: print read %temp.txt ; Open the above file as a port: temp: open %temp.txt ; Append some text to it: append temp "1234" ; Display the text to be saved to the file: print temp/state/inBuffer ; The appended changes have NOT yet been saved to the file because the ; port has not yet been closed or updated: print read %temp.txt ; Either "update" or "close" can be used to save the changes to the file: update temp ; The "update" function has forced the appended data to be written to ; the file, but has NOT yet closed the port: print read %temp.txt ; We can still navigate the port contents and add more data to it: temp: head temp insert temp "abcd" ; Display the text to be saved to the file: print temp/state/inBuffer ; Those changes have not yet been saved to the file: print read %temp.txt ; Closing the port will save changes to the file: close temp ; Here are the saved changes: print read %temp.txt ; And additional changes can no longer be made: append temp "1q2w3e4r" ; (error)Ports can be opened with a variety of refinements to help deal with data appropriately. "Help open" displays the following list:
/binary - Preserves contents exactly. /string - Translates all line terminators. /direct - Opens the port without buffering. /seek - Opens port in seek mode without buffering. /new - Creates a file. (Need not already exist.) /read - Read only. Disables write operations. /write - Write only. Disables read operations. /no-wait - Returns immediately without waiting if no data. /lines - Handles data as lines. /with - Specifies alternate line termination. (Type: char string) /allow - Specifies the protection attributes when created. (Type: block) /mode - Block of above refinements. (Type: block) /custom - Allows special refinements. (Type: block) /skip - Skips a number of bytes. (Type: number)Several of those options will be demonstrated in the following example applications.
16.3 Console and CGI Email Apps Using Ports
The following email program opens a port to a selected email account and allows the user to navigate through messages, read, send, delete, and reply to emails. It runs entirely at the command line - no VID GUI components or View graphics are required. You can store configuration information for as many email accounts as you'd like in the "accounts" block, and easily switch between them at any point in the program:
REBOL [Title: "Console Email"] accounts: [ ["pop.server" "smtp.server" "username" "password" you@site.com] ["pop.server2" "smtp.server2" "username" "password" you@site2.com] ["pop.server3" "smtp.server3" "username" "password" you@site3.com] ] empty-lines: "^/" loop 400 [append empty-lines "^/"] ; # of lines it takes to clear screen cls: does [prin {^(1B)[J}] a-line:{-----------------------------------------------------------------} select-account: does [ cls print a-line forall accounts [ print rejoin ["^/" index? accounts ": " last first accounts] ] print join "^/" a-line selected: ask "^/Select an account #: " if selected = "" [selected: 1] t: pick accounts (to-integer selected) system/schemes/pop/host: t/1 system/schemes/default/host: t/2 system/schemes/default/user: t/3 system/schemes/default/pass: t/4 system/user/email: t/5 ] send-email: func [/reply] [ cls print rejoin [a-line "^/^/Send Email:^/^/" a-line] either reply [ print join "^/^/Reply-to: " addr: form pretty/from ] [ addr: ask "^/^/Recipient Email Address: " ] either reply [ print join "^/Subject: " subject: join "re: " form pretty/subject ] [ subject: ask "^/Email Subject: " ] print {^/Body (when finished, type "end" on a seperate line):^/} print join a-line "^/" body: copy "" get-body: does [ body-line: ask "" if body-line = "end" [return] body: rejoin [body "^/" body-line] get-body ] get-body if reply [ rc: ask "^/Quote original email in your reply (Y/n)? " if ((rc = "yes") or (rc = "y") or (rc = "")) [ body: rejoin [ body "^/^/^/--- Quoting " form pretty/from ":^/" form pretty/content ] ] ] print rejoin ["^/" a-line "^/^/Sending..."] send/subject to-email addr body subject cls print "Sent^/" wait 1 ] read-email: does [ pretty: none cls print "One moment..." ; THE FOLLOWING LINE OPENS A PORT TO THE SELECTED EMAIL ACCOUNT: mail: open to-url join "pop://" system/user/email cls while [not tail? mail] [ print "Reading...^/" pretty: import-email (copy first mail) either find pretty/subject "***SPAM***" [ print join "Spam found in message #" length? mail mail: next mail ][ print empty-lines cls prin rejoin [ a-line {^/The following message is #} length? mail { from: } system/user/email {^/} a-line {^/^/} {FROM: } pretty/from {^/} {DATE: } pretty/date {^/} {SUBJECT: } pretty/subject {^/^/} a-line ] confirm: ask "^/^/Read Entire Message (Y/n): " if ((confirm = "y") or (confirm = "yes") or (confirm = "")) [ print join {^/^/} pretty/content ] print rejoin [ {^/} a-line {^/} {^/[ENTER]: Go Forward (next email)^/} {^/ "b": Go Backward (previous email)^/} {^/ "r": Reply to current email^/} {^/ "d": Delete current email^/} {^/ "q": Quit this mail box^/} {^/ Any #: Skip forward or backward this # of messages} {^/^/} a-line {^/} ] switch/default mail-command: ask "Enter Command: " [ "" [mail: next mail] "b" [mail: back mail] "r" [send-email/reply] "d" [ remove mail cls print "Email deleted!^/" wait 1 ] "q" [ close mail cls print"Mail box closed^/" wait 1 break ] ] [mail: skip mail to-integer mail-command] if (tail? mail) [mail: back mail] ] ] ] ; begin the program: select-account forever [ cls print a-line print rejoin [ {^/"r": Read Email^/} {^/"s": Send Email^/} {^/"c": Choose a different mail account^/} {^/"q": Quit^/} ] print a-line response: ask "^/Select a menu choice: " switch/default response [ "r" [read-email] "s" [send-email] "c" [select-account] "q" [ cls print "DONE!" wait .5 quit ] ] [read-email] ]Here is a CGI version of an email program that runs on a web server and operates in the absolute simplest browsers (this app was created to run in the bare bones experimental browser that came with the first Amazon Kindle book reader):
#!../rebol276 -cs REBOL [Title: "Kindle Email"] print {content-type: text/html^/^/} print {<HTML><HEAD><TITLE>Kindle Email</TITLE></HEAD><BODY>} read-cgi: func [/local data buffer][ switch system/options/cgi/request-method [ "POST" [ data: make string! 1020 buffer: make string! 16380 while [positive? read-io system/ports/input buffer 16380][ append data buffer clear buffer ] ] "GET" [data: system/options/cgi/query-string] ] data ] submitted: decode-cgi submitted-bin: read-cgi if ((submitted/2 = none) or (submitted/4 = none)) [ print { <STRONG>W A R N I N G - Private Server:</STRONG><BR><BR> <FORM METHOD="post" ACTION="./kindle_email.cgi"> Username: <input type=text size="50" name="name"><BR><BR> Password: <input type=text size="50" name="pass"><BR><BR> <INPUT TYPE="SUBMIT" NAME="Submit" VALUE="submit"> </FORM> </BODY></HTML> } quit ] accounts: [ ["pop.server1" "smtp.server1" "username1" "password1" you@site1.com] ["pop.server2" "smtp.server2" "username2" "password2" you@site2.com] ["pop.server3" "smtp.server3" "username3" "password3" you@site3.com] ] myusername: "username" mypassword: "password" username: submitted/2 password: submitted/4 either ((username = myusername) and (password = mypassword)) [][ print "Incorrect Username/Password." print {</BODY></HTML>} quit ] if submitted/6 = "read" [ account: pick accounts (to-integer submitted/8) mail-content: read [ scheme: 'POP host: account/1 port-id: 110 user: account/3 pass: account/4 ] mail-count: length? mail-content for i 1 mail-count 1 [ single-message: import-email (pick mail-content i) print rejoin [ i {) <a href="./kindle_email.cgi?} {u=} myusername {&p=} mypassword {&subroutine=displaymessage&themessage=} ; copy/part for URI length, at 3 is a serialization trick: at (mold compress (copy/part single-message/content 5000)) 3 {">} single-message/subject {</a> <a href="./kindle_email.cgi?} {u=} myusername {&p=} mypassword {&subroutine=delete&theaccount=} submitted/8 {&thesubject=} single-message/subject {&thedate=} single-message/date {&thefrom=} single-message/from {">delete</a> <br> } single-message/from {<br>} ] ] quit ] if submitted/6 = "displaymessage" [ compressed-message: copy join "#{" submitted/8 print "<pre>" print decompress load compressed-message print "<pre>" quit ] if ((submitted/6 = "send") or (submitted/6 = "delete")) [ my-account: pick accounts (to-integer submitted/8) system/schemes/pop/host: my-account/1 system/schemes/default/host: my-account/2 system/schemes/default/user: my-account/3 system/schemes/default/pass: my-account/4 system/user/email: my-account/5 ] if submitted/6 = "send" [ print "Sending..." header: make system/standard/email [ To: to-email submitted/10 From: to-email my-account/5 Subject: submitted/12 ] send/header (to-email submitted/10) (trim submitted/14) header print "<strong>Sent</strong>" ] if submitted/6 = "delete" [ mail: open to-url join "pop://" system/user/email while [not tail? mail] [ pretty: import-email (copy first mail) either all [ pretty/subject = submitted/10 form pretty/date = submitted/12 form pretty/from = submitted/14 ][ remove mail print "<strong>Deleted</strong>" wait 1 ][ mail: next mail ] ] ] print {<hr><h2>Read:</h2>} for i 1 (length? accounts) 1 [ print rejoin [ i {) <a href="./kindle_email.cgi?} {u=} myusername {&p=} mypassword {&subroutine=read&accountname=} i {">} (first pick accounts i) {</a><br>} ] ] print rejoin [ {<BR><HR> <h2>Send:</h2> <FORM METHOD="post" ACTION="./kindle_email.cgi"> <INPUT TYPE=hidden NAME="username" VALUE="} myusername {"> <INPUT TYPE=hidden NAME="password" VALUE="} mypassword {"> <INPUT TYPE=hidden NAME="subroutine" VALUE="send"> From Account #: <select NAME="account">} ] for i 1 (length? accounts) 1 [prin rejoin [{<option>} i]] print { </option> </select><br><br> To: <BR><input type=text size="35" name="to"><BR><BR> Subject: <BR><input type=text size="35" name="subject"><BR><BR> <TEXTAREA COLS="50" ROWS="18" NAME="contents"></TEXTAREA><BR><BR> <INPUT TYPE="SUBMIT" NAME="Submit" VALUE="submit"> </FORM> </BODY></HTML> } quit
16.4 Network Ports - Transferring Data and Files with HTTP
One important use of ports is for transferring data via network connections (TCP and UDP "sockets"). When writing a network application, you must choose a specific port number through which data is to be transferred. Potential ports range from 0 to 65535, but many of those numbers are reserved for specific types of applications (email programs use port 110, web servers use port 80 by default, etc.). To avoid conflicting with other established network applications, it's best to choose a port number between 49152 and 65535 for small scripts. A list of reserved port numbers is available here.
Network applications are typically made up of two or more separate programs, each running on different computers. Any computer connected to a network or to the Internet is assigned a specific "IP address", notated in the format xxx.xxx.xxx.xxx. The numbers are different for every machine on a network, but most home and small business machines are normally in the IP range "192.168.xxx.xxx". You can obtain the IP address of your local computer with the following REBOL code:
read join dns:// (read dns://)"Server" programs open a chosen network port and wait for one or more "client" programs to open the same port and then insert data into it. The port opened by the server program is referred to in a client program by combining the IP address of the computer on which the server runs, along with the chosen port number, each separated by a colon symbol (i.e., 192.168.1.2:55555).
The following simple set of scripts demonstrates how to use REBOL ports to transfer one line of text from a client to a server program. This example is intended to run on a single computer, for demonstration, so the word "localhost" is used to represent the IP address of the server (that's a standard convention used to refer to any computer's own local IP address). If you want to run this on two separate computers connected via a local area network, you'll need to obtain the IP address of the server machine (use the code above), and replace the word "localhost" with that number:
Here's the SERVER program. Be sure to run it before starting the client, or you will receive an error:
; Open network port 55555, in line mode (this mode expects full lines ; of text delineated by newline characters): server: open/lines tcp://:55555 ; Wait for a connection to the above port: wait server ; Assign a label to the first connection made to the above port: connection: first server ; Get the data which has been inserted into the above port object: data: first connection ; Display the inserted data: alert rejoin ["Text received: " data] ; Close the server close serverHere's the CLIENT. Run it in a separate instance of the REBOL interpreter, after the above program has been started:
; Open the port created by the server above (replace "localhost" with ; an IP address if running these scripts on separate machines): server-port: open/lines tcp://localhost:55555 ; Insert some text into the port: insert server-port "Hello Mr. Watson." ; Close the port: close server-portTypically, servers will continuously wait for data to appear in a port, and repeatedly do something with that data. The scripts below extend the above example with forever loops to continuously send, receive, and display messages transferred from client(s) to the server. This type of loop forms the basis for most peer-to-peer and client-server network applications. Type "end" in the client program below to quit both the client and server.
Here's the server program (run it first):
server: open/lines tcp://:55555 ; Open a TCP network port. print "Server started...^/" connection: first wait server ; Label the first connection. forever [ data: first connection ; Get a line of data. print rejoin ["Text received: " data] ; Display it. if find data "end" [ close server ; End the program if the print "Server Closed" ; client user typed "end". halt ] ]Here's the client program. Run it only after the server program has been started, and in a separate instance of the REBOL interpreter (or on a separate computer):
server-port: open/lines tcp://localhost:55555 ; Open the server port. forever [ user-text: ask "Enter some text to send: " insert server-port user-text ; Transfer the data. if user-text = "end" [ close server-port ; End the program if the print "Client Closed" ; user typed "end". halt ] ]It's important to understand that REBOL servers like the one above can interact independently with more than one simultaneous client connection. The "connection" definition waits until a new client connects, and returns a port representing that first client connection. Once that occurs, "connection" refers to the port used to accept data transferred by the already connected client. If you want to add more simultaneous client connections during the forever loop, simply define another "first wait server". Try running the server below, then run two simultaneous instances of the above client:
server: open/lines tcp://:55555 ; Open a TCP network port. print "Now start TWO clients..." connection1: first wait server ; Label the first connection. connection2: first wait server ; Label the second connection. forever [ data1: first connection1 ; Get a line of client1 data data2: first connection2 ; Get a line of client2 data print rejoin ["Client1: " data1] print rejoin ["Client2: " data2] if find data1 "end" [ close server ; End the program if the print "Server Closed" ; client user typed "end". halt ] ]Here's an example that demonstrates how to send data back and forth (both directions), between client and server. Again, run both programs in separate instances of the REBOL interpreter, and be sure to start the server first:
; Server: print "Server started...^/" port: first wait open/lines tcp://:55555 forever [ user-text: ask "Enter some text to send: " insert port user-text if user-text = "end" [close port print "^/Server Closed^/" halt] wait port print rejoin ["^/Client user typed: " first port "^/"] ] ; Client: port: open/lines tcp://localhost:55555 print "Client started...^/" forever [ user-text: ask "Enter some text to send: " insert port user-text if user-text = "end" [close port print "^/Client Closed^/" halt] wait port print rejoin ["^/Server user typed: " first port "^/"] ]The following short script combines many of the techniques demonstrated so far. It can act as either server or client, and can send messages (one at a time), back and forth between the server and client:
do [ either find ask "Server or client? " "s" [ port: first wait open/lines tcp://:55555 ; server ] [ port: open/lines tcp://localhost:55555 ; client ] forever [ insert port ask "Send: " print join "Received: "first wait port ] ]The following script is a complete GUI network instant message application. Unlike the FTP Chat Room presented earlier, the text in this application is sent directly between two computers, across a network socket connection (users of the FTP chat room never connect directly to one another - they simply connect to a universally available third party FTP server):
view layout [ btn "Set client/server" [ ip: request-text/title/default trim { Server IP (leave EMPTY to run as SERVER): } (to-string read join dns:// read dns://) either ip = "" [ port: first wait open/lines tcp://:55555 z: true ; server ] [ port: open/lines rejoin [tcp:// ip ":55555"] z: true ] ] r: area rate 4 feel [ engage: func [f a e] [ if a = 'time and value? 'z [ if error? try [x: first wait port] [quit] r/text: rejoin [form x newline r/text] show r ] ] ] f: field "Type message here..." btn "Send" [insert port f/text] ]Here's an even more compact version (probably the shortest instant messenger program you'll ever see!):
view layout [ across q: btn "Serve"[focus g p: first wait open/lines tcp://:8 z: 1]text"OR" k: btn "Connect"[focus g p: open/lines rejoin[tcp:// i/text ":8"]z: 1] i: field form read join dns:// read dns:// return r: area rate 4 feel [engage: func [f a e][if a = 'time and value? 'z [ if error? try [x: first wait p] [quit] r/text: rejoin [x "^/" r/text] show r ]]] return g: field "Type message here [ENTER]" [insert p value focus face] ]And here's an extended version of the above script that uploads your chosen user name, WAN/LAN IP, and port numbers to an FTP server, so that that info can be shared with others online (which enables them to find and connect with you). Connecting as server uploads the user info and starts the application in server mode. Once that is done, others can click the "Servers" button to retrieve and manually enter your connection info (IP address and port), to connect as client. By using different port numbers and user names, multiple users can connect to other multiple users, anywhere on the Internet:
server-list: ftp://username:password@yoursite.com/public_html/im.txt ;edit view layout [ across q: btn "Serve" [ parse read http://guitarz.org/ip.cgi[thru<title>copy p to</title>] parse p [thru "Your IP Address is: " copy pp to end] write/append server-list rejoin [ b/text " " pp " " read join dns:// read dns://" " j/text "^/" ] focus g p: first wait open/lines join tcp:// j/text z: 1 ] text "OR" k: btn "Connect" [ focus g p: open/lines rejoin [tcp:// i/text j/text] z: 1 ] b: field 85 "Username" i: field 98 form read join dns:// read dns:// j: field 48 ":8080" return r: area rate 4 feel [engage: func [f a e][if a = 'time and value? 'z [ if error? try [x: first wait p] [quit] r/text: rejoin [x "^/" r/text] show r ]]] return g: field "Type message here [ENTER]" [insert p value focus face] tabs 181 tab btn "Servers" [print read server-list] ]If you want to run scripts like these between computers connected to the Internet by broadband routers, you'll likely need to learn how to "forward" ports from your router to the IP address of the machine running your server program. In most situations where a router connects a local home/business network to the Internet, only the router device has an IP address which is visible on the Internet. The computers themselves are all assigned IP addresses that are only accessible within the local area network. Port forwarding allows you to send data coming to the IP address of the router (the IP which is visible on the Internet), on a unique port, to a specific computer inside the local area network. A full discussion of port forwarding is beyond the scope of this tutorial, but it's easy to learn how to do - just type "port forwarding" into Google. You'll need to learn how to forward ports on your particular brand and model of router.
With any client-server configuration, only the server machine needs to have an exposed IP address or an open router/firewall port. The client machine can be located behind a router or firewall, without any forwarded incoming ports.
Another option that enables network applications to work through routers is "VPN" software. Applications such as hamachi, comodo, and OpenVPN allow you to connect two separate LAN networks across the Internet, and treat all the machines as if they are connected locally (connect to any computer in the VPN using a local IP address, such as 192.168.1.xxx). VPN software also typically adds a layer of security to the data sent back and forth between the connected machines. The down side of VPN software is that data transmission can be slower than direct connection using port forwarding (the data travels through a third party server).
16.4.1 Peer-to-Peer Instant Messenger
The following text message example contains line by documentation of various useful coding techniques. For instructions, see the help documentation included in the code.
REBOL [Title: "Peer-to-Peer Instant Messenger"] ; The following line sets a flag variable, used to mark whether or not ; the two machines have already connected. It helps to more gracefully ; handle connection and shutdown actions throughout the script: connected: false ; The code below traps the close button (just a variation of the routine ; used in the earlier listview example). It assures that all open ports ; are closed, and sends a message to the remote machine that the ; connection has been terminated. Notice that the lines in the disconnect ; message are sent in reverse order. When they're received by the other ; machine, they're printed out one at a time, each line on top of the ; previous - so it appears correctly when viewed on the other side: insert-event-func closedown: func [face event] [ either event/type = 'close [ if connected [ insert port trim { ************************************************* AND RECONNECT. YOU MUST RESTART THE APPLICATION TO CONTINUE WITH ANOTHER CHAT, THE REMOTE PARTY HAS DISCONNECTED. ************************************************* } close port if mode/text = "Server Mode" [close listen] ] quit ] [event] ] view/new center-face gui: layout [ across at 5x2 ; this code positions the following items in the GUI ; The text below appears as a menu option in the upper ; left hand corner of the GUI. When it's clicked, the ; text contained in the "display" area is saved to a ; user selected file: text bold "Save Chat" [ filename: to-file request-file/title/file/save trim { Save file as:} "Save" %/c/chat.txt write filename display/text ] ; The text below is another menu option. It displays ; the user's IP address when clicked. It relies on a ; public web server to find the external address. ; The "parse" command is used to extract the IP address ; from the page. Parse is covered in a separate ; dedicated section later in the tutorial. text bold "Lookup IP" [ parse read http://guitarz.org/ip.cgi [ thru <title> copy my-ip to </title> ] parse my-ip [ thru "Your IP Address is: " copy stripped-ip to end ] alert to-string rejoin [ "External: " trim/all stripped-ip " " "Internal: " read join dns:// read dns:// ] ] ; The text below is a third menu option. It displays ; the help text when clicked. text bold "Help" [ alert { Enter the IP address and port number in the fields provided. If you will listen for others to call you, use the rotary button to select "Server Mode" (you must have an exposed IP address and/or an open port to accept an incoming chat). Select "Client Mode" if you will connect to another's chat server (you can do that even if you're behind an unconfigured firewall, router, etc.). Click "Connect" to begin the chat. To test the application on one machine, open two instances of the chat application, leave the IP set to "localhost" on both. Set one instance to run as server, and the other as client, then click connect. You can edit the chat text directly in the display area, and you can save the text to a local file. } ] return ; Below are the widgets used to enter connection info. ; Notice the labels assigned to each item. Later, the ; text contained in these widgets is referred to as ; <label>/text. Take a good look at the action block ; for the rotary button too. Whenever it's clicked, ; it either hides or shows the other widgets. When in ; server mode, no connection IP address is needed - the ; application just waits for a connection on the given ; port. Hiding the IP address field spares the user some ; confusion. lab1: h3 "IP Address:" IP: field "localhost" 102 lab2: h3 "Port:" portspec: field "9083" 50 mode: rotary 120 "Client Mode" "Server Mode" [ either value = "Client Mode" [ show lab1 show IP ][ hide lab1 hide IP ] ] ; Below is the connect button, and the large action block ; that does most of the work. When the button is clicked, ; it's first hidden, so that the user isn't tempted to ; open the port again (that would cause an error). Then, ; a TCP/IP port is opened - the type (server/client) is ; determined using an "either" construct. If an error ; occurs in either of the port opening operations, the ; error is trapped and the user is alerted with a message - ; that's more graceful and informative than letting the ; program crash with an error. Notice that the IP ; address and port info are gathered from the fields above. ; If the server mode is selected (i.e., if the "mode" button ; above isn't displaying the text "Client Mode"), then the ; the TCP ports are opened in listening mode - waiting ; for a client to connect. If the client mode is selected, ; an attempt is made to open a direct connection to the IP ; address and port selected. cnnct: button red "Connect" [ hide cnnct either mode/text = "Client Mode" [ if error? try [ port: open/direct/lines/no-wait to-url rejoin [ "tcp://" IP/text ":" portspec/text] ][alert "Server is not responding." return] ][ if error? try [ listen: open/direct/lines/no-wait to-url rejoin [ "tcp://:" portspec/text] wait listen port: first listen ][alert "Server is already running." return] ] ; After the ports have been opened, the text entry field ; is highlighted, and the connection flag is set to true. ; Focusing on the text entry field provides a nice visual ; cue to the user that the connection has been made, but ; it's not required. focus entry connected: true ; The forever loop below continuously waits for data to ; appear in the open network connection. Whenever data ; is inserted on the other side, it's copied and ; appended to the current text in the display area, and ; then the display area is updated to show the new text. forever [ wait port foreach msg any [copy port []] [ display/text: rejoin [ ">>> "msg newline display/text] ] show display ] ] ; Below are the display area and text entry fields. Notice ; the labels assigned to each. The "return"s just put each ; widget on a new line in the GUI (because the layout mode ; is set to "across" above). return display: area "" 537x500 return entry: field 428 ; the numbers are pixel sizes ; The send button below does some more important work. ; First, it checks to see if the connection has been made ; (using the flag set above). If so, it inserts the text ; contained in the "entry" field above into the open TCP/IP ; port, to be picked up by the remote machine - if the ; connection has been made, the program on the other end ; is waiting to read any data inserted into that port. ; After sending the data across the network connection, ; the text is appended to the local current text display ; area, and the display is updated: button "Send Text" [ if connected [ insert port entry/text focus entry display/text: rejoin [ "<<< " entry/text newline display/text] show display ] ] ] show gui do-events ; these are required because the "/new" ; refinement is used above.
16.5 Transferring Binary Files Through TCP Network Sockets
These 2 scripts based on http://www.rebol.net/cookbook/recipes/0058.html, by Carl Sassenrath (edited and condensed here), demonstrate how to transfer binary files directly between any two networked computers (across a TCP socket connection), using ports. Sending binary files is different from sending text in that the length of the file must be transmitted before sending the file. That must be done so that the receiving code knows when the complete file has been transmitted. The sending script below appends the file length information, and the file name, to the data being sent. The receiving script searches for that information, then receives the specified amount of binary data and saves it to a file when complete:
REBOL [Title: "Server/Receiver"] p: ":8000" ; port # print "receiving" data: copy wait client: first port: wait open/binary/no-wait join tcp:// p info: load to-string copy/part data start: find data #"" remove/part data next start while [info/2 > length? data] [append data copy client] write/binary (to-file join "transferred-" (second split-path info/1)) data insert client "done" wait client close client close port print "Done" halt REBOL [Title: "Client/Sender"] ip: "localhost" p: ":8000" ; IP address and port # print "sending" data: read/binary file: to-file request-file server: open/binary/no-wait rejoin [tcp:// ip p] insert data append remold [file length? data] #"" insert server data wait server close server print "Done" haltHere's a more compact example that demonstrates how to create and send an image from one computer to another:
; server/receiver - run first: if error? try [port: first wait open/binary/no-wait tcp://:8] [quit] mark: find file: copy wait port #"" length: to-integer to-string copy/part file mark while [length > length? remove/part file next mark] [append file port] view layout [image load file] ; client/sender - run after server (change IP address if using on 2 pcs): save/png %image.png to-image layout [box blue "I traveled through ports!"] port: open/binary/no-wait tcp://127.0.0.1:8 ; adjust this IP address insert file: read/binary %image.png join l: length? file #"" insert port fileThe following program is a walkie-talkie push-to-talk type of voice over IP application. It's extremely simple - it just records sound from mic to .wav file, then transfers the wave file to another IP (where the same program is running), for playback. Sender and receiver open in separate processes, and both run in forever loops to enable continuous communication back and forth. As it stands, this is a MS Windows only application. The code which handles the sound recording is discussed in more detail in the section of this tutorial about DLLs:
REBOL [Title: "Intercom (VOIP Messenger)"] write %wt-receiver.r { REBOL [] print join "Receiving at " read join dns:// read dns:// if error? try[c: first t: wait open/binary/no-wait tcp://:8000][quit] s: open sound:// forever [ d: copy wait c if error? try [i: load to-string copy/part d start: find d #""] [ print "^lclient closed" close t close c close s wait 1 quit ] remove/part d next start while [i/2 > length? d] [append d copy c] write/binary (to-file join "t-" (second split-path i/1)) decompress to-binary d insert s load %t-r.wav wait s ] } launch %wt-receiver.r lib: load/library %winmm.dll mciExecute: make routine! [c [string!] return: [logic!]] lib "mciExecute" if (ip: ask "Connect to IP (none = localhost): ") = "" [ip: "localhost"] if error? try [s: open/binary/no-wait rejoin [tcp:// ip ":8000"]] [quit] mciExecute "open new type waveaudio alias buffer1 buffer 4" forever [ x: ask "^lPress [ENTER] to start sending sound (or 'q' to quit): " if find x "q" [close s free lib break] ; if (ask "^lPress [ENTER] to send sound ('q' to quit): ") = "q"[quit] mciExecute "record buffer1" ask "^l*** YOU ARE NOW RECORDING SOUND *** Press [ENTER] to send: " mciExecute join "save buffer1 " to-local-file %r.wav mciExecute "delete buffer1 from 0" data: compress to-string read/binary %r.wav insert data append remold [%r.wav length? data] #"" insert s data ]Here's a more compact version of the above application, with hands-free operation enabled (several obfuscated versions of this script can be found at the end of this tutorial - likely the most compact VOIP programs you'll find anywhere):
REBOL [title: "VOIP"] do [write %ireceive.r {REBOL [] if error? try [port: first wait open/binary/no-wait tcp://:8] [quit] wait 0 speakers: open sound:// forever [ if error? try [mark: find wav: copy wait port #""] [quit] i: to-integer to-string copy/part wav mark while [i > length? remove/part wav next mark] [append wav port] insert speakers load to-binary decompress wav ]} launch %ireceive.r lib: load/library %winmm.dll mci: make routine! [c [string!] return: [logic!]] lib "mciExecute" if (ip: ask "Connect to IP (none = localhost): ") = "" [ip: "localhost"] if error? try [port: open/binary/no-wait rejoin [tcp:// ip ":8"]] [quit] mci "open new type waveaudio alias wav" forever [ mci "record wav" wait 2 mci "save wav r" mci "delete wav from 0" insert wav: compress to-string read/binary %r join l: length? wav #"" if l > 4000 [insert port wav] ; squelch (don't send) if too quiet ]]
16.6 Transferring Data Through UDP Network Ports
"UDP" is a multicast network protocol used to transmit data to any listening program attached via a network port. Where TCP/IP programs require a server program to have a known IP address, to which all client programs connect, UDP programs simply broadcast messages to an open network port. Any program listening for UDP data on that port can receive the messages. The following program is a perfect example of UDP functionality. There's no need to connect to a central server to exchange messages. Any number of users can connect to a local network and broadcast messages to any/all others who are running this program. This enables a functional office "text intercom" system:
REBOL [Title: "UDP Group Chat Program"] net-in: open udp://:9905 ; This is UDP, so NO known IP addresses required net-out: open/lines udp://255.255.255.255:9905 set-modes net-out [broadcast: on] svv/vid-face/color: white name: request-text/title "Your name:" prev-message: "" gui: view/new layout [ a1: area wrap rejoin [name ", you are logged in."] across f1: field btn "Save Chat" [write request-file/only/save/file %chat.txt a1/text] btn "?" [alert "Press [CTRL] + U to see who's online."] at 0x0 key #"^M" [ if f1/text = "" [return] insert net-out rejoin [name {, } now/time {: } f1/text] ] at 0x0 key #"^u" [ insert net-out rejoin [name {, } now/time {: Who's online?}] ] ] forever [ focus f1 received: wait [net-in] if not viewed? gui [quit] if find (message: copy received) "Who's online" [ insert net-out rejoin [name " is online."] ] if message <> prev-message [ insert (at a1/text 1) message show a1 attempt [ insert s: open sound:// load %/c/windows/media/ding.wav wait s close s ] ] prev-message: copy message ]The following set of programs are used in the author's music lesson business to alert teachers when their students have arrived for an appointment. UDP is used because any number of teachers can be notified by the central "server" program, and the server program doesn't need to know the IP addresses of any of the potential instructors' computers. It just transmits the messages to whoever is connected and listening:
REBOL [Title: "UDP Signin Client Alarm"] if error? try [net-in: open udp://:9905] [ alert { This program is already running. If you want to start a new instance, please close the currently open program. If you have any problems, close "rebol" in the task manager or just restart your computer. } quit ] svv/vid-face/color: white name: request-list "Your name:" [ "alex" "brian" "chad" "chris" "david" "dorian" "doug" "emerald" "jarrod" "josh" "kevin" "kyle" "lindsey" "mark" "nick" "peter" "ryan_gaughan" "stef" "steve" ] previous-signin: [] attempt [ insert s: open sound:// load %/c/windows/media/ding.wav wait s close s ] gui: view/new center-face layout [ a1: area 600x400 wrap rejoin [name ", you are logged in."] across btn "Save History" [ write request-file/only/save/file (to-file now/date) a1/text ] btn "Quit" [quit] ; at 0x0 key #"^M" [if a1/text = "" [return]] ] arrive-sound: load %/c/windows/media/ding.wav forever [ received: wait [net-in] if not viewed? gui [quit] if find (message: copy received) name [ teacher: first parsed: parse copy message none student: at (find/match copy message teacher) 2 ; erase newline insert (at a1/text 1) rejoin [ now/time {, } now/date {: } uppercase teacher ", your student has arrived: " uppercase student ] show a1 attempt [insert s: open sound:// arrive-sound wait s close s] ] wait 1 ]This is the server required to run the program above:
REBOL [Title: "UDP Signin Server"] net-out: open/lines udp://255.255.255.255:9905 set-modes net-out [broadcast: on] svv/vid-face/color: white previous-signin: [] write/append %last-signin.txt "" gui: view/new center-face layout [ a1: area wrap "Server started" across btn "Quit" [quit] ; at 0x0 key #"^M" [if a1/text = "" [return]] ] forever [attempt [ if not viewed? gui [quit] if previous-signin <> current-signin: load %last-signin.txt [ insert net-out rejoin [current-signin/1 " " current-signin/2] previous-signin: current-signin insert (at a1/text 1) rejoin [ "Last signed in student: " current-signin/2 newline "Last signed in teacher: " current-signin/1 newline ] show a1 write/append %alarm_history.txt rejoin [ now { student: } current-signin/2 { teacher: } current-signin/1 newline ] attempt [ insert s: open sound:// load %/c/windows/media/ding.wav wait s close s ] ] wait 1 ]] quit {%last-signin.txt contents should be 2 strings "nick" "john smith"}For more information on ports, see http://www.rebol.com/docs/core23/rebolcore-14.html, http://stackoverflow.com/questions/1291127/rebol-smallest-http-server-in-the-world-why-first-wait-listen-port, and http://www.rebol.net/docs/async-ports.html.
16.7 Parse (REBOL's Answer to Regular Expressions)
The "parse" function is used to import and convert organized chunks of external data into the block format that REBOL recognizes natively. It also provides a means of dissecting, searching, comparing, extracting, and acting upon organized information within unformatted text data (similar to the pattern matching functionality implemented by regular expressions in other languages).
The basic format for parse is:
parse <data> <matching rules>Parse has several modes of use. The simplest mode just splits up text at common delimiters and converts those pieces into a REBOL block. To do this, just specify "none" as the matching rule. Common delimiters are spaces, commas, tabs, semicolons, and newlines. Here are some examples:
text1: "apple orange pear" parsed-block1: parse text1 none text2: "apple,orange,pear" parsed-block2: parse text2 none text3: "apple orange pear" parsed-block3: parse text3 none text4: "apple;orange;pear" parsed-block4: parse text4 none text5: "apple,orange pear" parsed-block5: parse text5 none text6: {"apple","orange","pear"} parsed-block6: parse text6 none text7: { apple orange pear } parsed-block7: parse text7 noneTo split files based on some character other than the common delimiters, you can specify the delimiter as a rule. Just put the delimiter in quotes:
text: "apple*orange*pear" parsed-block: parse text "*" text: "apple&orange&pear" parsed-block: parse text "&" text: "apple & orange&pear" parsed-block: parse text "&"You can also include mixed multiple characters to be used as delimiters:
text: "apple&orange*pear" parsed-block: parse text "&*" text: "apple&orange*pear" parsed-block: parse text "*&" ; the order doesn't matterUsing the "splitting" mode of parse is a great way to get formatted tables of data into your REBOL programs. Splitting the text below by carriage returns, you run into a little problem:
text: { First Name Last Name Street Address City, State, Zip} parsed-block: parse text "^/" ; ^/ is the REBOL symbol for a carriage returnSpaces are included in the parsing rule by default (parse automatically splits at all empty space), so you get a block of data that's more broken up than intended:
["First" "Name" "Last" "Name" "Street" "Address" "City," "State," "Zip"]You can use the "/all" refinement to eliminate spaces from the delimiter rule. The code below:
text: { First Name Last Name Street Address City, State, Zip} parsed-block: parse/all text "^/"converts the given text to the following block:
[" First Name" " Last Name" " Street Address" " City, State, Zip"]Now you can trim the extra space from each of the strings:
foreach item parsed-block [trim item]and you get the following parsed-block, as intended:
["First Name" "Last Name" "Street Address" "City, State, Zip"]
16.8 Using Parse to Load Speadsheet CSV Files and Other Structured Data
Parse is commonly used to convert spreadsheet data into REBOL blocks. In Excel, Open Office, and other spreadsheet programs, you can export all the columns of data in a worksheet by saving it as a CSV formatted ("comma separated value") .csv text file. People often put various bits of descriptive text, labels and column headers into spreadsheets to make them more readable:
; TITLE DESCRIPTION Header1 Category1 data data data Notes... data data data data data data data data data Header2 Category2 data data data Notes... data data data data data data data data data Header3 Category3 data data data Notes... data data data data data data data data dataThe following code turns the exported CSV spreadsheet data into a nice useable REBOL block, with group heading data added to each line:
; Read and parse the CSV formatted file: filename: %filename.csv data: copy [] lines: read/lines filename foreach line lines [ append/only data parse/all line "," ] ; Add headers from sections of the spreadsheet to each line item: info: copy "" foreach line data [ either find "Header" line/1 [ info: line/1 ][ append line info ] ] ; Remove the unwanted descriptive header lines: remove-each line data [find "Header" line/1/1] remove-each line data [ (line/3 = "TITLE") or (line/3 = "DESCRIPTION") ]
16.9 Using Parse's Pattern Matching Mode to Search Data
You can use parse to check whether any specific data exists within a given block. To do that, specify the rule (matching pattern) as the item you're searching for. Here's an example:
parse ["apple"] ["apple"] parse ["apple" "orange"] ["apple" "orange"]Both lines above evaluate to true because they match exactly. IMPORTANT: By default, as soon as parse comes across something that doesn't match, the entire expression evaluates to false, EVEN if the given rule IS found one or more times in the data. For example, the following is false:
parse ["apple" "orange"] ["apple"]But that's just default behavior. You can control how parse responds to items that don't match. Adding the words below to a rule will return true if the given rule matches the data in the specified way:
- "any" - the rule matches the data zero or more times
- "some" - the rule matches the data one or more times
- "opt" - the rule matches the data zero or one time
- "one" - the rule matches the data exactly one time
- an integer - the rule matches the data the given number of times
- two integers - the rule matches the data a number of times included in the range between the two integers
The following examples are all true:
parse ["apple" "orange"] [any string!] parse ["apple" "orange"] [some string!] parse ["apple" "orange"] [1 2 string!]You can create rules that include multiple match options - just separate the choices by a "|" character and enclose them in brackets. The following is true:
parse ["apple" "orange"] [any [string! | url! | number!]]You can trigger actions to occur whenever a rule is matched. Just enclose the action(s) in parentheses:
parse ["apple" "orange"] [any [string! (alert "The block contains a string.") | url! | number!]]You can skip through data, ignoring chunks until you get to, or past a given condition. The word "to" ignores data UNTIL the condition is found. The word "thru" ignores data until JUST PAST the condition is found. The following is true:
parse [234.1 $50 http://rebol.com "apple"] [thru string!]The real value of pattern matching is that you can search for and extract data from unformatted text, in an organized way. The word "copy" is used to assign a variable to matched data. For example, the following code downloads the raw HTML from the REBOL homepage, ignores everything except what's between the HTML title tags, and displays that text:
parse read http://rebol.com [ thru <title> copy parsed-text to </title> (alert parsed-text) ]The following code extends the example above to provide the useful feature of displaying the external ip address of the local computer. It reads http://guitarz.org/ip.cgi, parses out the title text, and then parses that text again to return only the IP number. The local network address is also displayed, using the built in dns protocol in REBOL:
parse read http://guitarz.org/ip.cgi [ thru <title> copy my-ip to </title> ] parse my-ip [ thru "Your IP Address is: " copy stripped-ip to end ] alert to-string rejoin [ "External: " trim/all stripped-ip " " "Internal: " read join dns:// read dns:// ]The following example downloads and parses the current (live) US Dollar exchange rates from http://x-rates.com. The user selects from a list of currencies to convert to, then performs and displays the conversion from USD to the selected currency. The first half of the script is the simple Calculator GUI example taken from the first part of the tutorial. All of the parsing occurs when the "Convert" button is clicked:
REBOL [title: "Currency Rate Conversion Calculator"] view center-face layout [ origin 0 space 0x0 across f: field 200x40 font-size 20 return style btn btn 50x50 [append f/text face/text show f] btn "1" btn "2" btn "3" btn " + " return btn "4" btn "5" btn "6" btn " - " return btn "7" btn "8" btn "9" btn " * " return btn "0" btn "." btn " / " btn "=" [ attempt [f/text: form do f/text show f] ] return btn 200x35 "Convert" [ x: copy [] html: read http://www.x-rates.com/table/?from=USD&amount=1.00 html: find html "src='/themes/bootstrap/images/xrates_sm_tm.png'" parse html [ any [ thru {from=USD} copy link to {</a>} (append x link) ] to end ] rates: copy [] foreach rate x [ parse rate [thru {to=} copy c to {'>}] parse rate [thru {'>} copy v to end] if not error? try [to-integer v] [append rates reduce [c v]] ] currency: request-list "Select Currency:" extract rates 2 rate: to-decimal select rates currency attempt [alert rejoin [currency ": " (rate * to-decimal f/text)]] ] ]Here's a useful example that removes all comments from a given REBOL script (any part of a line that begins with a semicolon ";"):
code: read to-file request-file parse/all code [any [ to #";" begin: thru newline ending: ( remove/part begin ((index? ending) - (index? begin))) :begin ] ] editor codeFor more about parse, see the following links:
http://www.codeconscious.com/rebol/parse-tutorial.html
http://www.rebol.com/docs/core23/rebolcore-15.html
http://en.wikibooks.org/wiki/REBOL_Programming/Language_Features/Parse
http://www.rebolforces.com/zine/rzine-1-06.html#sect4.
16.10 Responding to Special Events in a GUI - "Feel"
REBOL's simple GUI syntax makes it easy for widgets to respond to mouse clicks. As you've seen, you can simply put the block of code you want evaluated immediately after the widget that activates it:
view layout [btn "Click me" [alert "Thank you for the click :)"]]But what if you want your GUI to respond to events other than a mouse click directly on a widget? What if, for example, you want the program to react whenever a user clicks anywhere on the GUI screen (in a paint program, for example), or if you want a widget to do something after a certain amount of time has passed, or if you want to capture clicks on the GUI close button so that the user can't accidentally shut down an important data screen. That's what the "feel" object and "insert-event-func" function are used for.
Here's an example of the basic feel syntax:
view layout [ text "Click, right-click, and drag the mouse over this text." feel [ engage: func [face action event] [ print action print event/offset ] ] ]The above code is often shortened using "f a e" to represent "face action event":
view layout [ text "Mouse me." feel [ engage: func [f a e] [ print a print e/offset ] ] ]You can respond to specific events as follows:
view layout [ text "Mouse me." feel [ engage: func [f a e] [ if a = 'up [print "You just released the mouse."] ] ] ]This example demonstrates how to combine full screen mouse detection with normal mouse clicks on widgets. To do this, an invisible box the same size as the screen, with a feel event attached, is used for full screen detection. Then, other widgets are simply placed on top of it, starting over at the window origin:
print "Click anywhere in the window, then click the text." view center-face layout [ size 400x200 box 400x200 feel [ engage: func [f a e] [ print a print e/offset ] ] origin text "Click me" [print "Text clicked"] [print "Text right-clicked"] box blue [print "Box clicked"] ]You can also assign timer events to any widget, as follows:
view layout [ text "This text has a timer event attached." rate 00:00:00.5 feel [ engage: func [f a e] [ if a = 'time [print "1/2 second has passed."] ] ] ]Here's a button with a time event attached (a rate of "0" means don't wait at all). Every 0 seconds, when the timer event is detected, the offset (position) of the button is updated. This creates animation:
view layout/size [ mover: btn rate 0 feel [ engage: func [f a e] [ if a = 'time [ mover/offset: mover/offset + 5x5 show mover ] ] ] ] 400x400Here's a little shooting game that uses a timer event to automate the movement of GUI graphics around the screen, check for collisions, and control other game operations:
REBOL [title: "VID Shooter"] score: 0 speed: 20 fire: false do game: [ view center-face layout [ size 600x440 at 270x0 text join "Score: " score at 280x440 x: box 2x20 yellow at (as-pair 0 (random 300) + 30) y: btn 50x20 red "Enemy" at 280x420 z: btn 50x20 blue "Player" box 0x0 #"l" [z/offset: z/offset + 10x0 show z] box 0x0 #"k" [z/offset: z/offset + -10x0 show z] box 0x0 #" " [ if fire = false [ fire: true x/offset: as-pair z/offset/1 440 ] ] box 0x0 rate speed feel [ engage: func [f a e] [ if a = 'time [ y/offset: y/offset + 5x0 if y/offset/1 > 600 [ y/offset: as-pair -10 ((random 300) + 30) ] show y if fire = true [x/offset: x/offset + 0x-20] if x/offset/2 < 0 [ x/offset/2: 440 fire: false ] show x if within? x/offset y/offset 50x25 [ alert "Kablammmm!!!" score: score + 1 speed: speed + 5 fire: false unview do game ] ] ] ] ] ]By updating the offset of a widget every time it's clicked, you can enable drag-and-drop operations:
view layout/size [ text "Click and drag this text" feel [ ; remember f="face", a="action", e="event": engage: func [f a e] [ ; first, record the coordinate at which the mouse is ; initially clicked: if a = 'down [initial-position: e/offset] ; if the mouse is moved while holding down the button, ; move the position of the clicked widget the same amount ; (the difference between the initial clicked coordinate ; recorded above, and the new current coordinate determined ; whenever a mouse move event occurs): if find [over away] a [ f/offset: f/offset + (e/offset - initial-position) ] show f ] ] ] 600X440Feel objects and event functions can be included right inside a style definition. The definition below allows you to easily create multiple GUI widgets that can be dragged around the screen. "movestyle" is defined as a block of code that's later passed to a widget's "feel" object, and is therefore included in the overall style definition (the remove and append functions have been added here to place the moved widget on top of other widgets in the GUI (i.e., to bring the dragged widget to the visual foreground)). You can add this "feel movestyle" code to any GUI widget to make it drag-able:
movestyle: [ engage: func [f a e] [ if a = 'down [ initial-position: e/offset remove find f/parent-face/pane f append f/parent-face/pane f ] if find [over away] a [ f/offset: f/offset + (e/offset - initial-position) ] show f ] ] view layout/size [ style moveable-object box 20x20 feel movestyle ; "random 255.255.255" represents a different random ; color for each piece: at random 600x400 moveable-object (random 255.255.255) at random 600x400 moveable-object (random 255.255.255) at random 600x400 moveable-object (random 255.255.255) at random 600x400 moveable-object (random 255.255.255) at random 600x400 moveable-object (random 255.255.255) text "This text and all the boxes are movable" feel movestyle ] 600x440The "detect" function inside a feel block is useful for constantly checking events. The following program constantly checks for mouse movements, and if the mouse is ever positioned over the button, the button is moved to a random position. This technique can be useful, for example, in video games controlled by mouse movement:
view center-face layout [ size 600x440 at 270x209 b: btn "Click Me!" feel [ detect: func [f e] [ ; The following line checks for any mouse movement: if e/type = 'move [ ; This line checks if the mouse position is within the ; coordinates of the button (i.e., touching the button): if (within? e/offset b/offset 59x22) [ ; If so, move the button to a random position: b/offset: b/offset + ((random 50x50) - (random 50x50)) ; Check if the button has been moved off screen: if not within? b/offset -59x-22 659x462 [ ; If so, move back to the center of the window: b/offset: 270x209 ] ; Update the screen: show b ] ] ; When using the detect function, always return the event: e ] ] ]To handle global events in a GUI such as resizing and closing, "insert-event-func" is useful. The following example checks for resize events:
insert-event-func [ either event/type = 'resize [ alert "I've been resized" none ; return this value when you don't want to ; do anything else with the event. ][ event ; return this value if the specified event ; is not found ] ] view/options layout [text "Resize this window."] [resize]You can use that technique to adjust the window layout, and specifically reposition widgets when a screen is resized:
insert-event-func [ either event/type = 'resize [ stay-here/offset: stay-here/parent-face/size - stay-here/size - 20x20 show stay-here none ; return this value when you don't want to ; do anything else with the event. ][ event ; return this value if the specified event ; is not found ] ] view/options layout [ stay-here: text "Resize this window." ] [resize]To remove an installed event handler, use "remove-event-func". The following example captures three consecutive close events, and then removes the event handler, allowing you to close the GUI on the 4th try:
count: 1 evtfunc: insert-event-func [ either event/type = 'close [ if count = 3 [remove-event-func :evtfunc] count: count + 1 none ][ event ] ] view layout [text "Try to close this window 4 times."]For more information about handling events see http://www.rebol.com/how-to/feel.html, http://www.codeconscious.com/rebol/view-notes.html, and http://www.rebol.com/docs/view-system.html.
16.11 2D Drawing, Graphics, and Animation
With REBOL's "view layout" ("VID") dialect you can easily build graphic user interfaces that include buttons, fields, text lists, images and other GUI widgets, but it's not meant to handle general purpose graphics or animation. For that purpose, REBOL includes a built-in "draw" dialect. Various drawing functions allow you to make lines, boxes, circles, arrows, and virtually any other shape. Fill patterns, color gradients, and effects of all sorts can be easily applied to drawings.
Implementing draw functions typically involves creating a 'view layout' GUI, with a box widget that's used as the viewing screen. "Effect" and "draw" functions are then added to the box definition, and a block is passed to the draw function which contains more functions that actually perform the drawing of various shapes and other graphic elements in the box. Each draw function takes an appropriate set of arguments for the type of shape created (coordinate values, size value, etc.). Here's a basic example of the draw format:
view layout [box 400x400 effect [draw [line 10x39 322x211]]] ; "line" is a draw functionHere's the exact same example indented and broken apart onto several lines:
view layout [ box 400x400 effect [ draw [ line 10x39 322x211 ] ] ]Any number of shape elements (functions) can be included in the draw block:
view layout [ box 400x400 black effect [ draw [ line 0x400 400x50 circle 250x250 100 box 100x20 300x380 curve 50x50 300x50 50x300 300x300 spline closed 3 20x20 200x70 150x200 polygon 20x20 200x70 150x200 50x300 ] ] ]Color can be added to graphics using the "pen" function. Shapes can be filled with color, with images, and with other graphic elements using the "fill-pen" function. The thickness of drawn lines is set with the "line-width" function:
view layout [ box 400x400 black effect [ draw [ pen red line 0x400 400x50 pen white box 100x20 300x380 fill-pen green circle 250x250 100 pen blue fill-pen orange line-width 5 spline closed 3 20x20 200x70 150x200 polygon 20x20 200x70 150x200 50x300 ] ] ]Gradients and other effects can be easily applied to the elements:
view layout [ box 400x220 effect [ draw [ fill-pen 200.100.90 polygon 20x40 200x20 380x40 200x80 fill-pen 200.130.110 polygon 20x40 200x80 200x200 20x100 fill-pen 100.80.50 polygon 200x80 380x40 380x100 200x200 ] gradmul 180.180.210 60.60.90 ] ]Drawn shapes are automatically anti-aliased (lines are smoothed), but that default feature can be disabled:
view layout [ box 400x400 black effect [ draw [ ; with default smoothing: circle 150x150 100 ; without smoothing: anti-alias off circle 250x250 100 ] ] ]16.11.1 Animation
Animations can be created with draw by changing the coordinates of image elements. The fundamental process is as follows:
- Assign a word label to the box in which the drawing takes place (the word "scrn" is used in the following examples).
- Create a new draw block in which the characteristics of the graphic elements (position, size, etc.) are changed.
- Assign the new block to "{yourlabel}/effect/draw" (i.e., "scrn/label/draw: [changed draw block]" in this case).
- Display the changes with a "show {yourlabel}" function (i.e., "show scrn" in this case).
Here's a basic example that moves a circle to a new position when the button is pressed:
view layout [ scrn: box 400x400 black effect [draw [circle 200x200 20]] btn "Move" [ scrn/effect/draw: [circle 200x300 20] ; replace the block above show scrn ] ]Variables can be assigned to positions, sizes, and/or other characteristics of draw elements, and loops can be used to create smooth animations by adjusting those elements incrementally:
pos: 200x50 view layout [ scrn: box 400x400 black effect [draw [circle pos 20]] btn "Move Smoothly" [ loop 50 [ ; increment the "y" value of the coordinate: pos/y: pos/y + 1 scrn/effect/draw: copy [circle pos 20] show scrn ] ] ]Animation coordinates (and other draw properties) can also be stored in blocks:
pos: 200x200 coords: [70x346 368x99 143x45 80x125 237x298 200x200] view layout [ scrn: box 400x400 black effect [draw [circle pos 20]] btn "Jump Around" [ foreach coord coords [ scrn/effect/draw: copy [circle coord 20] show scrn wait 1 ] ] ]Other data sources can also serve to control movement. In the next example, user data input moves the circle around the screen. Notice the use of the "feel" function to update the screen every 10th of a second ("rate 0:0:0.1"). Since feel is used to watch, wait for, and respond to window events, you'll likely need it in many situations where animation is used, such as in games:
pos: 200x200 view layout [ scrn: box 400x400 black rate 0:0:0.1 feel [ engage: func [face action event] [ if action = 'time [ scrn/effect/draw: copy [] append scrn/effect/draw [circle pos 20] show scrn ] ] ] effect [ draw [] ] across btn "Up" [pos/y: pos/y - 10] btn "Down" [pos/y: pos/y + 10] btn "Right" [pos/x: pos/x + 10] btn "Left" [pos/x: pos/x - 10] ]Here's a very simple paint program that also uses the feel function. Whenever a mouse-down action is detected, the coordinate of the mouse event ("event/offset") is added to the draw block (i.e., a new dot is added to the screen wherever the mouse is clicked), and then the block is shown:
view layout [ scrn: box black 400x400 feel [ engage: func [face action event] [ if find [down over] action [ append scrn/effect/draw event/offset show scrn ] if action = 'up [append scrn/effect/draw 'line] ] ] effect [draw [line]] ]A useful feature of draw is the ability to easily scale and distort images simply by indicating 4 coordinate points. The image will be altered to fit into the space marked by those four points:
view layout [ box 400x400 black effect [ draw [ image logo.gif 10x10 350x200 250x300 50x300 ; "logo.gif" is built into the REBOL interpreter ] ] ]Here's an example that incorporates the image scaling technique above with some animation. IMPORTANT: In the following example, the coordinate position calculations occur inside the draw block. Whenever such evaluations occur inside a draw block (i.e., when values are added or subtracted to a variable coordinate position, size, etc.), a "reduce" or "compose" function must be used to evaluate those values. Notice the tick mark (') next to the "image" function. Function words inside a reduced block need to be marked with that symbol to evaluate correctly:
pos: 300x300 view layout [ scrn: box pos black effect [ draw [image logo.gif 0x0 300x0 300x300 0x300] ] btn "Animate" [ for point 1 140 1 [ scrn/effect/draw: copy reduce [ 'image logo.gif (pos - 300x300) (1x1 + (as-pair 300 point)) (pos - (as-pair 1 point)) (pos - 300x0) ] show scrn ] for point 1 300 1 [ scrn/effect/draw: copy reduce [ 'image logo.gif (1x1 + (as-pair 1 point)) (pos - 0x300) (pos - 0x0) (pos - (as-pair point 1)) ] show scrn ] ; no "reduce" is required below, because no calculations ; occur in the draw block - they're just static coords: scrn/effect/draw: copy [ image logo.gif 0x0 300x0 300x300 0x300 ] show scrn ] ]Here's another example of a draw block which contains evaluated calculations, and therefore requires "reduce"d evaluation:
view layout [ scrn: box 400x400 black effect [draw [line 0x0 400x400]] btn "Spin" [ startpoint: 0x0 endpoint: 400x400 loop 400 [ scrn/effect/draw: copy reduce [ 'line startpoint: startpoint + 0x1 endpoint: endpoint - 0x1 ] show scrn ] ] ]The useful little paint program at http://rebol.org/cgi-bin/cgiwrap/rebol/view-script.r?script=paintplus.r consists of only 238 lines of code. Take a look at it to see how efficient REBOL's draw code is:
url: http://rebol.org/cgi-bin/cgiwrap/rebol/download-a-script.r? script: "script-name=paintplus.r" do rejoin [url script] paint none []
The paint program above is actually a really useful tool. You can load images on which to paint, and save edits to be reloaded later:
paint load %myimage.png load %edits.txtTake a look at the 100 draw examples script to see many more bits of useful draw code.
For more information about built-in shapes, functions, and capabilities of draw, see http://www.rebol.com/docs/draw-ref.html, http://www.rebol.com/docs/draw.html, http://translate.google.com/translate?hl=en&sl=fr&u=http://www.rebolfrance.info/org/articles/login11/login11.htm (translated by Google), http://www.rebolforces.com/zine/rzine-1-05.html, http://www.rebolforces.com/zine/rzine-1-06.html (updated code for these two tutorials is available at http://mail.rebol.net/maillist/msgs/39100.html). A nice, short tutorial demonstrating how to build multi-player, networked games with draw graphics is available at RebolFrance (translated by Google). Also be sure to see http://www.nwlink.com/~ecotope1/reb/easy-draw.r (a clickable rebsite version is available in the REBOL Desktop -> Docs -> Easy Draw).

16.12 3D Graphics with r3D
The "r3D" modeling engine by Andrew Hoadley is built entirely from native REBOL 2D draw functions. It demonstrates the significantly powerful potential of draw. It was demonstrated earlier in the tutorial with useful a 3D plotting script. The examples below show some more of what you can accomplish with r3D:
do http://www.rebol.net/demos/BF02D682713522AA/i-rebot.r do http://www.rebol.net/demos/BF02D682713522AA/histogram.r do http://www.rebol.net/demos/BF02D682713522AA/objective.rThe r3D engine is small. Here's the entire module in compressed, embeddable format (this is all just standard REBOL code compressed into a more compact format). To enable 3D graphics in your REBOL programs, just include this text in your code (paste it, or "do" it from a file). If you'd like to read and learn from the pure REBOL code that makes up this module, see the examples above (the r3D module is included in those examples as regular text code):
do to-string decompress 64#{ eJzFWluP2zYWft5/weYl9gSOTUm2x0a2i23aAQq0m0VTZMcWhEAjcTJqdKskq2P/ +j28UxSVmXR3sQHGEs/147lQpJRffvju3U9h1PjpIktJ2WXdeY9C/HqFVtbfV9CY uZo0bU2SLuvJHt2fyiRMw5QkWRHn30RR2JD0lJBne3LJLFHKvDF3XROXbR530tmt dnbQt8cnINwOABwG7o6jaTLHbRLnX+/0djSjw4hydM2aO22qDqZ6O3YbhW1WUga9 wHSSSoz5DVC+EHghPFsw7du5pLOR5D4F6iBAHWxQBwHqICwdFKiDBCUYyukwAfJe 4DvMNeZx8CxUR4HqaKM6ClRHYemoUB2HqI7C7XEQFqX27N5goO7jhCzSrKH9UZUC 2/fvbsK7vEo+fxOdanm3hEuco8f4MWvRmf1e6G8UssseUXNl1cCUspYgsMFlbQYd JU3VtnVTwaw6dKpRCsLnZwkrszImbLDEXB2uF3Gls+Q8T/A8wfMMni94vuD505Gq Ibw0Rovq7jeIlggVH3yUTBksOf7YVR/zqvr8Me4mIwpTimjI+dzfn+5gBYGZOkwg yxv6DyNPww7R/y9H3gIJlKk82JLeZFZsSd+doyJ4LAKRmQLLOKPCs0LekPaUd3QN pFfaaPU5jO6rhsTJQxijO5SgFPRwGNc1KVOhIGc+i9EVGF3i+avZHb9dw23Cb3dw mwoBfy5lPS270bJ4ZQgHStjXwltDGBvCayUcaOFrQ9gzhDdziA+fswhT78swqSj1 E0HqSFHDvYzSUzGTIRNqg5j1KmQ9C0jC7mC2oBllZb/4Yy/kZ/y5KozAHF2JUGwM dpg6+qKY9zwxf0KMQmpId2pKZAdzETdNfBYh7UnTZQlpZTyLwBlZROXI40QVCi5S xpyVqACgIpD2ojHGpCqgdchCN0fcNdkjNHo3kfSkCBY5gQcC/HzqHv6GtAbK7pFg o7+iVSjdGTu3QZEYqpCogTIOh1hh7oybIU9JYRUf1eGozpLPJiKuIyc8mj7bklkB eGJFEPEtAHGxXMPfDv4whBmKqFhu6GBFfwL4odQtHVBZTIUp9ZoOqDDe8MUJSgp2 ok9iQHWcNS3kk5YgbaCUAC5GNGHRkqe2uZcr6RlQjeiBQV8jrRuwaY3EfU02pQ2y adCPFFIFbzZjcJdcky53fByw8VaN12x8PZ8vpIZnafiWxkZqDBXWSmBrKQiYpg9s qVxbKjvbh+9U0CBFhEwfgROWoeLZTjaWxs6tsTWcrC0VMdcRsK0dLs+Kr2/FNxhF y7Ny6Fs5DLQLUS5WtHxrYsEo6dgKlm/Py/ARODU8O1imE98Jy7NjZThZWxoCxkjF N7xsLJ2dGxioRHZHc4DXbPW4EiuKZ9E2irZFUoO1riW3VjQtp2naytpsXvGA0QuP s5txYJUCXlu1ALuNUW4Dq+IMpY1SsnR8K714VOkDT9jWura1diNP/oROYOd44CmY wBfYaTZdbWyl3ZTSetTieNQLDoTr0bSwHWNdh8LVauzKqFUpY+Uba0c7t87Ojic2 /GxtcHJKNrqd9rO1ochY2evSziwIbMv4bnQrY/HCNrq1pSPRmqHbTcGzMwDwInic 72eiFWWrsRVDNKWieYzmD2g+owUDWjCnJuWLKNIh937yUas495KzR7AK6vPI2NCZ OydzR5VWnTgXyj2vPm31T522hL8esyD0/BwFI4+PPD7y+cifR/ZR9E+7DA0vPqRP e/HmxgBzFpaCxsDjLE8KOjabfMMsMT4LF2p/P8UNWTRV1c1mPXfGo8Jd8ZhwfOzh QR39PU2Fl1h6ubPcZXCkmT7scjZWW/wYuc+7M7bdjpk4LWg6uuMjx/zlC4z/A7bF U9h+hpuszs82tlK/jPvfobtCpQPS91kPp6avAoTSrLdBwbGKncZer8J/NlnZoRfc MLo7owtpKhR39HjbkfSFPMPGEdiR60aJ/vy0KJzxxNSrpCdagZ0ydeOgHpGseyDN TJwv53KmofHKJxq1Nu2aJUVOu0Xd+fzOdSauaZgch7EodLzTYMKKEPFhZNhR71P6 kR1Ecohqz22wgdL/BUJLGqH5R9XkqdRO4oI0qhxg4fuNv6HV/LKP2/fZhbCjoX2G ZOs2fR/A7zzY1lUpyfkvcwSMLC4/5aS1S0kxJIFj+ZEfX3mu9FkWcS6SkwUuf1mH +HyYR6b0jpHpgVqB2Gtx/jowqfKqMaV99DOVfsucmK8ABqC4yX+JecGEP8DUlbR8 PcOlJACJO07oTDnLY8Mfy/uKK7+N8+REv+XcAPkfrKBb7YDrygiP3ekk6PzJXbYK MtPideClv0rqos2KOicqe9yTBId09lXQzLS1VdMtG8JDoz3JFEmKZoX3WZ5TMycI vqTC1sf5zukl0GZaAZ5J+DXsfSK3MBVcAANpDUvypcIzpCsc3hTDn2IEjn535XLi hR2LtvvlTErq7qGnZdBj2AKg3kd9V9SY/cIwqVEeN59IO3psKE17Y0a98QTDlmbP 321JRIy+pJ6cDOrfyRCoeE228pMCxSuQ2hyfMZN6P37xb83P/lBAp8zTsKzK/Kxe bupI7NECr+AfLN3wmGL7rG8lL1QylE4fY3TL5eR7gu9P8IEuK0tnSSZDvi+1ssiX 8HH7vWftJ8qDNSFkqyDphy9VimzPyTUaevUt7dWwO4H10ZpNn8+yFXpeFhkAe0RV k33KSiibU8kXnYtdXFxiPzMWhit4Tq7n94NiFwChoIxqpNSMUj3uAbYEyFGb9Jdn XVScYVpAk0aFgM4CZwvrfPCKegELRw6AW4bMQoYZGb1Bq9AMiZyq8XlBRUt6Urh5 3KihsBdoHFkUYi6LYqMjIv8Kxe2C5pBuy9l2nCX7ApXN8wESq9fYZWkmkw4JYaJz R7OYCoMvNT9Vcbp4d3Mjvzbe36dxF09/TmjFk6I8FR/YEG5uJOWHFFqBifG8Aonp QFC6h6xlNNEvqIDjIjwwL3RNjcK/QFaEb5j/m2/RS8AkNjQvvqNgUAYuqg7FJQIW XezJC74GwzZHotkrIx51Lh69kuZTGqEYNU0eOmXye25GLKBcnw/UOsA+iEMt5WrE srxHa7BVk5gHSkUoNNPBQyhfyYFOVy3ERpzveQUubnJenJ+QoFU+Ly5PS0FBCZSS wtY6yIJjpSseGe/s5J0Z7+LkXYTNNypAoY6UsurmSrtu7iUSsZWFxdcMWWE3VfMr VBitRNGNwwAIZai1mcyLoQJN5s0HeeJFLg/1GMI1EftpHvh6lgRkxk4N1XDAjOwT ie7HmWyrhYoemE1Od7CDZvvjMGT/D0b8V42IDRZqtHAMB6Liz9DDQz080GPfy8Ej tMQGdNAGeVHowWVLL1uovdCHyzW9XKMgCgO4rOlljXAUXgNvQy8bSsTIowoY+SAZ Rf8G28Udt8glAAA= }Here's a simple example that demonstrates the basic syntax and use of r3D. Be sure to do the code above before running this example:
Transx: Transy: Transz: 300.0 ; Set some camera Lookatx: Lookaty: Lookatz: 100.0 ; positions to ; start with. do update: does [ ; This "update" function is where world: copy [] ; everything is defined. append world reduce [ ; Add your 3D objects inside this "append". reduce [cube-model (r3d-scale 100.0 150.0 125.0) red] ] ; A red 'cube' 100x150x125 pixels is added. camera: r3d-position-object reduce [Transx Transy Transz] reduce [Lookatx Lookaty Lookatz] [0.0 0.0 1.0] RenderTriangles: render world camera r3d-perspective 250.0 400x360 probe RenderTriangles ; This line demonstrates what's going on ] ; under the hood. You can eliminate it. view layout [ scrn: box 400x360 black effect [draw RenderTriangles] ; basic draw across return slider 60x16 [Transx: (value * 600 - 300.0) update show scrn] slider 60x16 [Transy: (value * 600 - 300.0) update show scrn] slider 60x16 [Transz: (value * 600) update show scrn] slider 60x16 [Lookatx: (value * 400 - 200.0) update show scrn] slider 60x16 [Lookaty: (value * 400 - 200.0) update show scrn] slider 60x16 [Lookatz: (value * 200 ) update show scrn] ]R3D works by rendering 3D images to native REBOL 2D draw functions, which are contained in the "RenderTriangles" block above. R3D provides basic shape structures and a simple language interface to create and view those images in a REBOL application. It automatically adjusts lighting and other characteristics of images as they're viewed from different perspectives. To see how the rendering of images is converted into simple REBOL draw functions, watch the output of the "probe RenderTriangles" line in the REBOL interpreter as you adjust the sliders above. It displays the list of draw commands used to create each image in the moving 3D world.
In the example above, slider widgets are used to adjust values in the animation. Those values could just as easily be controlled by loops or other forms of data input. In the example below, the values are adjusted by keystrokes assigned to empty text widgets (use the "asdfghqwerty" keys to move the cube):
Transx: Transy: Transz: 2.0 Lookatx: Lookaty: Lookatz: 1.0 do update: does [ world: copy [] append world reduce [ reduce [cube-model (r3d-scale 100.0 150.0 125.0) red] ] Rendered: render world r3d-position-object reduce [Transx Transy Transz] reduce [Lookatx Lookaty Lookatz] [0.0 0.0 1.0] r3d-perspective 360.0 400x360 ] view layout [ across text "" #"a" [Transx: (Transx + 10) update show scrn] text "" #"s" [Transx: (Transx - 10) update show scrn] text "" #"d" [Transy: (Transy + 10) update show scrn] text "" #"f" [Transy: (Transy - 10) update show scrn] text "" #"g" [Transz: (Transz + 10) update show scrn] text "" #"h" [Transz: (Transz - 10) update show scrn] text "" #"q" [Lookatx: (Lookatx + 10) update show scrn] text "" #"w" [Lookatx: (Lookatx - 10) update show scrn] text "" #"e" [Lookaty: (Lookaty + 10) update show scrn] text "" #"r" [Lookaty: (Lookaty - 10) update show scrn] text "" #"t" [Lookatz: (Lookatz + 10) update show scrn] text "" #"y" [Lookatz: (Lookatz - 10) update show scrn] at 20x20 scrn: box 400x360 black effect [draw Rendered] ]The r3D module can work with models saved in native .R3d format, and the "OFF" format (established by the GeomView program at http://www.geom.uiuc.edu/projects/visualization/. See http://local.wasp.uwa.edu.au/~pbourke/dataformats/oogl/#OFF for a description of the OFF file format). A number of OFF example objects are available at http://www.mpi-sb.mpg.de/~kettner/proj/obj3d/.
To understand how to create/import and manipulate more complex 3D shapes, examine the way objects are designed inside the "update" function in each of Andrew's three examples. Here's a simplified variation of Andrew's objective.r example that loads .off models from the hard drive. Be sure to do the r3D module code above before running this example, and then try downloading and loading some of the example .off files at the web site above:
RenderTriangles: [] view layout [ scrn: box 400x360 black effect [draw RenderTriangles] across return slider 60x16 [Transx: (value * 600 - 300.0) update show scrn] slider 60x16 [Transy: (value * 600 - 300.0) update show scrn] slider 60x16 [Transz: (value * 600) update show scrn] slider 60x16 [Lookatx: (value * 400 - 200.0) update show scrn] slider 60x16 [Lookaty: (value * 400 - 200.0) update show scrn] slider 60x16 [Lookatz: (value * 200 ) update show scrn] return btn "Load Model" [ model: r3d-load-OFF load to-file request-file modelsize: 1.0 if model/3 [modelsize: model/3] if modelsize < 1.0 [ modelsize: 1.0 ] defaultScale: 200.0 / modelsize objectScaleX: objectScaleY: objectScaleZ: defaultscale objectRotateX: objectRotateY: objectRotateZ: 0.0 objectTranslateX: objectTranslateY: objectTranslateZ: 0.0 Transx: Transy: Transz: 300.0 Lookatx: Lookaty: Lookatz: 200.0 modelWorld: r3d-compose-m4 reduce [ r3d-scale objectScaleX objectScaleY objectScaleZ r3d-translate objectTranslateX objectTranslateY objectTranslateZ r3d-rotatex objectRotateX r3d-rotatey objectRotateY r3d-rotatez objectRotateZ ] r3d-object: reduce [model modelWorld red] do update: does [ world: copy [] append world reduce [r3d-object] camera: r3d-position-object reduce [Transx Transy Transz] reduce [Lookatx Lookaty Lookatz] [0.0 0.0 1.0] RenderTriangles: render world camera r3d-perspective 250.0 400x360 ] update show scrn ] ]Like most REBOL solutions, r3D is a brilliantly simple, compact, and powerful design that doesn't require any external toolkits. It's pure REBOL, and it's really amazing!
16.13 Several 3D Scripts Using Raw REBOL Draw Dialect
The following short script is a compacted version of Gregory Pecheret's "ebuc-cube" (from http://www.rebol.net/demos/download.html). It demonstrates some simple 3d techniques using only native REBOL draw functions (no 3rd party library required). It's relatively easy to understand, manipulate, and use to create your own basic 3D graphics:
z: 10 h: z * 12 j: negate h c: as-pair z * 5 z * 5 l: z * 4 w: z * 20 img: to-image layout [box effect [draw [pen logo.gif circle c l]]] q: make object! [x: 0 y: 0 z: 0] cube: [[h h j] [h h h] [h j j] [h j h] [j h j] [j h h] [j j j] [j j h]] view center-face layout [ f: box 400x400 rate 0 feel [engage: func [f a e] [ b: copy [] q/x: q/x + 5 q/y: q/y + 8 q/z: q/z + 3 repeat n 8 [ p: reduce pick cube n ; point zx: (p/1 * cosine q/z) - (p/2 * sine q/z) - p/1 zy: (p/1 * sine q/z) + (p/2 * cosine q/z) - p/2 yx: (p/1 + zx * cosine q/y) - (p/3 * sine q/y) - p/1 - zx yz: (p/1 + zx * sine q/y) + (p/3 * cosine q/y) - p/3 xy: (p/2 + zy * cosine q/x) - (p/3 + yz * sine q/x) - p/2 - zy append b as-pair (p/1 + yx + zx + w) (p/2 + zy + xy + w) ] f/effect: [draw [ fill-pen 255.0.0.100 polygon b/6 b/2 b/4 b/8 image img b/6 b/5 b/1 b/2 fill-pen 255.159.215.100 polygon b/2 b/1 b/3 b/4 fill-pen 54.232.255.100 polygon b/1 b/5 b/7 b/3 fill-pen 0.0.255.100 polygon b/5 b/6 b/8 b/7 fill-pen 248.255.54.100 polygon b/8 b/4 b/3 b/7 ]] show f ]] ]Here's a version that reshapes and moves the 3D cube in, out and around the screen:
g: 12 i: 5 h: i * g j: negate h w: 0 v2: v1: 1 ; sizes/positions img: to-image layout [box 200.200.200.50 center logo.gif] q: make object! [x: 0 y: 0 z: 0] cube: [[h h j] [h h h] [h j j] [h j h] [j h j] [j h h] [j j j] [j j h]] view center-face layout/tight [ f: box 500x450 rate 0 feel [engage: func [f a e] [ b: copy [] q/x: q/x + 3 q/y: q/y + 3 ; q/z: q/z + 3 ; spinning repeat n 8 [ if w > 500 [v1: 0] ; w: xy pos v1: xy direction if w < 0 [v1: 1] either v1 = 1 [w: w + 1] [w: w - 1] if j > (g * i * 2) [v2: 0] ; j: z pos (size) v2: z direction if j < g [v2: 1] either v2 = 1 [h: h - 1] [h: h + 1] j: negate h p: reduce pick cube n ; point zx: p/1 * cosine q/z - (p/2 * sine q/z) - p/1 zy: p/1 * sine q/z + (p/2 * cosine q/z) - p/2 yx: (p/1 + zx * cosine q/y) - (p/3 * sine q/y) - p/1 - zx yz: (p/1 + zx * sine q/y) + (p/3 * cosine q/y) - p/3 xy: (p/2 + zy * cosine q/x) - (p/3 + yz * sine q/x) - p/2 - zy append b as-pair (p/1 + yx + zx + w) (p/2 + zy + xy + w) ] f/effect: [draw [ image img b/6 b/5 b/1 b/2 fill-pen 255.0.0.50 polygon b/6 b/2 b/4 b/8 fill-pen 255.159.215.50 polygon b/2 b/1 b/3 b/4 fill-pen 54.232.255.50 polygon b/1 b/5 b/7 b/3 fill-pen 0.0.255.50 polygon b/5 b/6 b/8 b/7 fill-pen 248.255.54.50 polygon b/8 b/4 b/3 b/7 ]] show f ]] ]And here's a little 3D game, with sound, based on the above code:
REBOL [title: "Little 3D Game"] beep-sound: load to-binary decompress 64#{ eJwBUQKu/VJJRkZJAgAAV0FWRWZtdCAQAAAAAQABABErAAARKwAAAQAIAGRhdGEl AgAA0d3f1cGadFQ+T2Z9jn1lSjM8T2uNsM/j7Midc05PWGh4eXVrXE5DQEZumsTn 4M2yk3hiVU9fcX+GcFU8KkNmj7rR3+HYroJbPUpfdoqAbldBP0ZWbpW62OvRrohk WlleaHB2dW9bRzo1WYWy3OHbyrKObVNCVGp/jXpgRC48Vnievtfm6MCUaUVLWW1/ fXNkUkdCRlN7ps3r3cSkgm1fWFhmdH2AaVA6LElwnMja4dzNpHtXPUxje45/aVA5 PUtif6TG3uvMpHtXU1lkcnd2cGVURT0+ZJC84+HUvaGCZ1NIWm6AinVaQCtAX4Wu yt3k37aJYEBKXXOHf3FdSEJET2KJsdPr1reUcGJbW2FsdXl2YUs5MFF7qdPe3tO+ mHNUP1Bnfo59ZEkyPFFukbTR5OvGm3BMTVlpent1aVpMQ0FJcZ3I6uHMsJB2YlZR YXJ/hW5UOypEaJK90+Dg1qyBWjxKYHeLgG1WPz9HWXKYvNnr0KyFYVhZX2pydnVu Wkc7N1yHtN3h2sivjGxTRFZrgI15X0MtPVh7osHZ5ua+kmdES1tvgn5zY1BGQ0hW fqjO69vBoX9rXllaaHV9fmhPOi1Lcp/K2+DayaF4Vj1NY3uNfmhONjxLZIKnyODr yqJ4VFFYZHN3dm5iUUM9QGaTv+Th0rqdf2VTSltvgIl0WT4rQGCIssze5N60iF8/ Sl10h39vW0ZBRFFljLPU69W1kG1gWlxiYHkWb1ECAAA= } alert { Try to click the bouncing REBOLs as many times as possible in 30 seconds. The speed increases with each click! } do game: [ speaker: open sound:// g: 12 i: 5 h: i * g j: negate h x: y: z: w: sc: 0 v2: v1: 1 o: now img1: to-image layout [backcolor brown box red center logo.gif] img2: to-image layout [backcolor aqua box yellow center logo.gif] img3: to-image layout [backcolor green box tan center logo.gif] cube: [[h h j][h h h][h j j][h j h][j h j][j h h][j j j][j j h]] view center-face layout/tight [ f: box white 550x550 rate 15 feel [engage: func [f a e] [ if a = 'time [ b: copy [] x: x + 3 y: y + 3 ; z: z + 3 repeat n 8 [ if w > 500 [v1: 0] if w < 50 [v1: 1] either v1 = 1 [w: w + 1] [w: w - 1] if j > (g * i * 1.4) [v2: 0] if j < 1 [v2: 1] either v2 = 1 [h: h - 1] [h: h + 1] j: negate h p: reduce pick cube n zx: p/1 * cosine z - (p/2 * sine z) - p/1 zy: p/1 * sine z + (p/2 * cosine z) - p/2 yx: (p/1 + zx * cosine y) - (p/3 * sine y) - p/1 - zx yz: (p/1 + zx * sine y) + (p/3 * cosine y) - p/3 xy: (p/2 + zy * cosine x) - (p/3 + yz * sine x) - p/2 - zy append b as-pair (p/1 + yx + zx + w) (p/2 + zy + xy + w) ] f/effect: [draw [ image img1 b/6 b/2 b/4 b/8 image img2 b/6 b/5 b/1 b/2 image img3 b/1 b/5 b/7 b/3 ]] show f if now/time - o/time > :00:20 [ close speaker either true = request [ join "Time's Up! Final Score: " sc "Again" "Quit" ] [do game] [quit] ] ] if a = 'down [ xblock: copy [] yblock: copy [] repeat n 8 [ append xblock first pick b n append yblock second pick b n ] if all [ e/offset/1 >= first minimum-of xblock e/offset/1 <= first maximum-of xblock e/offset/2 >= first minimum-of yblock e/offset/2 <= first maximum-of yblock ][ insert speaker beep-sound wait speaker sc: sc + 1 t1/text: join "Score: " sc show t1 if (modulo sc 3) = 0 [f/rate: f/rate + 1] show f ] ] ]] at 200x0 t1: text brown "Click the bouncing REBOLs!" ] ]
16.14 Sprite Sheets
"Sprite sheets" are large images that consist of many smaller images, each intended to be used independently. Here's an example that demonstrates how to crop and use individual images from sprite sheets (in this case, random images from a sheet of smileys):
REBOL [title: "Random Smileys 'Sprite Sheet'"] code: [ rows: 4 cols: 3 x: 64 y: 64 random/seed now update-pic: does [ z: as-pair (random rows) * x - x (random cols) * y - y img/effect: [crop z] show img ] view layout [ backdrop white img: image 61x61 pic #"^M" [update-pic] ]] pic: load to-binary decompress 64#{ eJyUu2dQE94TLpzQAkhv0ouEkiCoCEjvJQk1IXRQpAkISFcQkd6khlClkwChCUgX 6b1JCR2kg1SlSfGnvv7nnTv3832+7s6zZ8/s7uyenfN3/u8agAGhDdcGAP/hLvAu APB3CaABoCAjpyAno6AgpwCBKCipGaipqaioWejoaRhus7Cz32ZhY+PkEeLj5BLk ZmPjv8svKCwCgUI4+MTvi4veFxKFiP6PBAgCgagpqZmpqZlFOdk4Rf+f8bcTwEgJ 6AD8JQXeAZAwAkkZgX97ATwAAAkJ6b/TAv4PKEDklABSMhIg1T+xFgMASEpKQkZK Tv7PCRIQAAAkIf3nDSNAAMT0QI0Z+ZSS5Y5XKKukekohm+BDlB0G7B1We1vDp65L atLYPjx1/cfJPxpOIOB/RgD/F2Tk/4gAFP9kMoz/TJCQkVCSk5ECSP8n+ydh/KfA JPBADcn81Cs0pbD2BwXLna5JQcn1E1Z11EO7ur+LABrSf6SM/zRVAPUh2GQWOKhQ 5dC349OriOaZtKX0SNk5D1XJTbiZGMPAmfKu2h9ky14y7Mu42PLZRpxf7XOCSn1a H6TR2gwWD/w1MHPKMZBFFr9JIeOXy/vO9YFa2GY8akvc0HTfoudLPRazhor6b5yb JjEWyuOVw/tGXFUhu85Yimn5UiJ7UcDaLKHHBJVL09ZXyti/po2U3bbqAjen/Le0 2bKknfgD0U1LeDG1LV9DJQF9vm9xsWCVnzxR+etGqINpRZMwgwAj6j1/K9MKc9uN sveuNyhsCCEsY1bUZEk9KVShDouXNFmerkezqPkyJF6ODZVJJvAVjX/ai8OoolhS h+Fdg0P9vjyb43Xxv6hbVeVR4g9dfLElNqVPOtydO7ebyo1mfysFW8CGANfJXtvF n+zjmV0kn6pvcN3vlbPSbIYMnwgM9i+YKu+d9VOO78FWkfqPmZ/fnrkTujG7kGsW Qezf7UsmffAu4RWBKtF4cBPODkcNIbub2Dmzao+GbZxSfI0rfHeQQj568jnayuzt Ci6LGlT9VmKIiSId38TMrx4SGc6JKZOl7V/6VGHIUIN0G43Rwv70tMYaljRcGAvl IP8l2cvZ32Z/2Ex3Pf9cPaGXgFAHZwheYl08eENShxdOQWT2dVEU6lF3KRJdiK0h 9RwUZZrs0tlU7S8G/dtiiN8m8yqsUZfv9GI/VfCNFjery8ghT8Gk4Qk5+p8iC92z HmRdtlaWMjPlMtBkrD4eYueJNp4ukaTiTFrvy3nvKja9n/T69xeksrh24CUUudoD P1z0/xdYIZ4ypI+OmQZTUdgxTennX+dQQa8bv/nHsr6OcySLIoZuEUDgvF6a0sGD vbWExLXReeNSxcDPwq+HLZOyBFSDs2Paj36Nt/jIHxGEHRlLTB/Km1isLW0Bk5d9 tyEwBUfVZ2SbXOk8lWJ3J+488u5g0rIBRK/EYNLnwgJgZLTDAT41HOMUD/AfVh0N bKv3J0XxRxqRREup5lErM0fXRQICyZjp6uUlgY3PX2FiqaHYDQLOPX7r8Z2XZ8gl 706vxwd1yzBmq9JiarfU0I0CgGJj5/ew4sbPM80u6IrVC+j5UnUQ7EWhuOSMVPoT Xdu39L2raYpLycAdMAY4TZX9mrJYOEvcAC0Y1XabVSoafeoVvsF0v0jHOuFc8iSi FiTjYVfJmZ1djC6chaTsTm01Qbn2dl12vtw3+gtY5g6jWwuju0mZ8QwVOr715LBf ormCrnlv+xbSKOK4Myf/bnze3gEm13xNjYMrvLRS+V1UT0IWRQ0Kocf5q/D11x+4 hfNzeIX8xsqbx9zmXtPj/6UdRTSmtMgJvgkZHFp+3nrcLGD5c/lmDG5daydjqrr/ cQIciFHlLdX9xInZUNqNMTt97/FRAHPg8mq91dqaiQum4ru2rVO95QcdbTu1ZHoe kj0fY63aNpBkQrglj9n5Fg4AORFErr8qyHw4jU+MePb4C3kV6I98x+JM9BezXaIN augCwh+czV/8VX+WmuedVnVJzs4tn9zo4aVYJRZs2quc0jIhgH3w+33tnQxJ8c/o FF3nDiNXsYrECe4+DzKmZFBQGTDxxvz3Zgy/GLyKKdmZ9uutpZThDHf0AZYDMi9B dnHo1XQfnHo6SPRtXWVo9sBcuJX8aLRaGdIrkJaUB6EK5EMkvQNaPXAH+WGmbzyE 7iiZ7hDQFlZfJCxdBi2zxCwTdetg3TkWnVdoGACg9o0b6jOn9vkd10tq9Y9AM1on 1vKpVpdHfhzleGqjFA6dNI3jqgZ73yol9ajAl/PxYXSlF9b3YEyv9P0aAhYTRI3w sunlxNmfbiT+EB4AOIevuzj0R1mpKUkS8p0JvrfMeEV3Yqs+I9tLiSUNoHY+f35U mt6kvyLD47ZnThASpn25z7vVDEkf47jJ9bC8o+7s0ZA7dIgNbRGp4RBBMW1J04lN 4eXTN+vCNhNF14T4HTCvAUB5I8sH3BtaQY+bSBFSsuMQFmqf4nUqEAVieqIspUbp wSrgQMdGFz5aHiJcNBm88uhwESNazaW9VIot0rymeVW3jDoZXGTwv2Um6YndSnRY w+DCac2bqghm3HGSfGWrrGVVhCHkM7PHLufY31v1TPPuCI4VZX5BMnv7ouy0DotI 9+WyEu17M4LLdz5zfO52Ku7VKJQ79kwT4QlIVmCApbF19AQqLQl/Kxz4MPppB9Id x/j0qbvyuuJaED/tEGjDlCQROE+THXAPDnKtZbTRW7RWeA8PN2qYtC4dxU59pYo1 MqbT0nXd9jKEzLA0MlXFioB/T1S9/GzUfghnOYNXPwpE7UiVLkSLCGvEqJIHM/cI 9AHU9uEcAmQkqu9lpu7Amqs+/SxbYXOfn2Zlc2WnUHghtN28SZZGdohPaAkRAclB hoTK+6Dh8qs41HPn8in3J6/LTVwJ/Penlt1hGi78KTniCH7miTxcaHYubd1jBC7w wkwzU2pm/QuDaNOROAoigUU407+KOiatTN1RwP00mr/hDnEsz2CaqJioYg/SbHxX U5GgeL5bJMotcWcWzWS8xRhmvMw8EVoh0POrhGfbtbtKjbvsjaxXA3d6DhcEtBXI uxa+arm03ORJ5TbKrtRADTc4b1/v/gtwfhUeuJKU59skOmmL8WYYkRWDnKPiDL8o Bz41EZRGlupGigjF3q1KO83hNQHj1n7KipgcL6SaGn4cTlOV7L1mZaW6FT22GZER gjR4BGLn4AHKO1i36UQ+X6bEz64ZutwDV99NZ+LTGCTdAJOOUsoNbisHdM1hO/x2 PVgn9h1iuH4/uL4oMgIYNNyiy/KeJCRD/G4pp/oOFlfGaVksiNdzweUM5dFyYakR h7lJol2D1ML+Wmxa1En8Jg5FNqaFQkMfv8K6WfZ/UKPo14EQGKgukGZNrbbvHdRI QPpqSInSj05Gp3AHNrve+w6uk/aIhlysSSyn98ZNSnz7WNB33sU9he8mRflXBVpq UW/Mu6foMVv5beqRSlRusePj72zV3bNlqjmnjRt06GSDLhsKit9+4o5I3ibCtNKf gDITkSHrBUwcCcmKEeAU58ZEggKcH03QoZt7nDQQSYvDyfXnGg+WkSKDTMkqDwtu Mlir5dM8kqhD1X8pC8HXiC7SMqa6PRByOIzf1ofE0+SMM7KUtf15sS9DCgGs/bXB lsNtUJ7Ywbtg98FRs/nb1IK/ljDKxhX9jKmGCc2kjqbiuLWlnFNqyCVR/z5uuniW CfDQrvEUIy+kJZilopFyPkV3WTiEn5aNfoBwlMrO8c9zxKYmX8FuIQ1V0QVUSj9P px8uDCGeUBydtm297lZTVtcIeT4RpFh4uk0lCZxuI+XpzSo8TkYVwOKY26opo+Mx pTMaX4zd2d0be/2nWEpFEPxgIXAIHA5wiGfZFSTba8NfH/omN4l6HRvwP4Fm/6r6 TLL5To6c/eqdMr+6SV4vk4q47xNmaOPYmXtPwezXcMMPQ373hC2ZhdJzoXA4wiQS DNFdEbCl2QLGM5yAlJ3OtrNVnjxeMtxpIYX68BAGS6WrDG6+ucw3bWmK3T9aLJGH EAw1UR1TRmug35ZxgaVvG4tU1m+s/5QcuNn+cQGdTzV5VsIyKc/4smckHo0noC/T GyCbuwWPHE9k4FvRDp1hhv8NpZmuwK7xbXwjqm2Wsb1QfWqumQoMjd94Zoy7Gk4I Bi4TxVib3g4dBpLyn9GadER/sFYhUPE8O5F+kensXnXbK0KteimNK+D4KUpPGr1B zr+uVdyMaGUOD5NfD5h88vF376ekSGKGw90WKPv9PPAW5usQ+FKInCxf0hcCJWpa Rrb/54JgublroYdVRDfxSuBEoMhr0XxrwIPp9/O/XWW0XECKsWVn9FkubX8BNdMd UbN5sfoFgwyvhwQnSFctbApKqHjP/yPuslE2v4p1shS7KiSv/qBUJ2PJRSaTuoMp KNApm2uXa4uw9N18JJzys02l/ufgpe2OydjeKPPN83Tdlp/YHB6FJg8h8d2ae2Fe FyLaacJPTdZ0Q+UacX1+QhmLIvxhwK7+tbUwecZkHftKLzfd7Q9MlMmZ0qbvR+PI yi3m6vNke1pcZozc60pmKbEBRp2qt573fAuIQZKRSKqBGYvLWZ1NXYZzkpOohujx eEHf5kUbS6PaHRYs3uJbQJ3M1EUee5QFC3ElQ6BJbWAh+CKC5e2P6yh6gb0QipWz 9qTNwrKUrASOeskeUV33xtAQbGgI4BAAcNZ7zuG0hytM2Hl2ZPnQo8DR5E5pdF70 8Uhrimsn04ExKaXFtjsVuYH8BzDOIzA+L1wQ7Cpz00aYfcPhs69LbUF+VwcOfPFh MADYaKiqHBLt+edrvhnhz8LjMjqTfEBXTO0P9edlAiJFTYPjm4Sr2G5Tc2q3ZWsm xp7sJIFLlUD+UmvC6lSJBOevR6S+CI0TGzvy/tgHNgkPMMvpnW4EiYitNZK8zRNw 2IPw3QW7WoER1w/u4+ChIl0IIL81Ms1RRQvfc8EJCQQ/goqjueO7S6UWXFqoVcXU DdGRfoC/gO+7+LmPB9F/JJ98e3ElZvxOdi/5euD38Fzxlfs5Qdf939i3KnJE2lrz yaFQQDvxc4GI4vZH/cY1eas0LzRnaRr4OD12JO7aLfkNi99Y7zdpavEECfeP1rkI rTv8l6/iC4uGdG1pxEShIqR8r7loW3efsGHp2ZrtolUieHKqbnwoJpPmOFM3yk3E om+LwYbMmuWrPq2D/wI2NTcu8e9LstfsRwcWa1w4MPogy5dvGTka9hpiiTIe2db9 GoU3XrTDzlthaVIULGpkdMgkSXlXsz+SS/HNwTOh1rjBfmonY2IavWG0vNUPs4RR S2LM+a10hYrS+2jBkUQS7AQSHClyAoDLcSVmytdg8wQtZvxRh1zpWO+Hg4cR9bsz twQ09qX6/hNe2byv8/QnNHSG2gZ9VehiZv+r2BdR1RsWEOG0J7RmaD9cQ/HGr0rc xoxcqZnFgGda9BzbzKOzhNB1P6PtQvt3yoFAntqqSvVfcoMX0T+xW5+yE0MoAjT7 icWnMHB+wdS7OO63OOF3krlO4tfSoAlL5neOjQsgO1x4JCtw2hbYNdRP526bPvZd pD6/3uw2+nlG9G2bS58ZfDWqzFt00jETE6qeXEQR8M583L9/+GBUCfZtTXBnduPN qqMPnw/yoV1BhcNaKSAAsxTz5beSv6dyNkRRttSHRuF+ueXvgESmt7UQIqvA6GuT rh+GJ4IQCft2wXsffpbq3v8U8ReA8SvBkAAU/Hh+O5dmCSR//KznmfbWdvl2WsFf wPFKKNK6bM+0T08unkExhFLlgHOhP9Bhbq9+JCw+rLWKBJa5iKKCujGg78uv4aED yYLtTSeLsfLh1qUndGFzMc2xjPvxIi9YE0OfbeehXg50BoL37UK9uqqn5vOBa408 HKBC+HEaXa+voNrG4aengfeymajy/gh2fLeyxN9rtNoQVeJ+WSvmrF79WmumXXUI 7SQE5r1CxSD/rHjoML4Srby75MXQ3lYS91Vn60GZwm7EfejpSq56cpxvNJXlPEpy OPb4QevDVUASvxTglYJ36q+MPYOCcxRYNEzxz3H+0mb6C8EHj40HJ0bq/ITvuAxw xS8/KoG4FlqNZ/E7ksfQ1KGDWuJCbzaRprmIl4z3HL82mKuzsOtlouevocup43VF FLAhOD8wNakHv2zAOyV+TRl82fxUEptcSHeHWMp9Pk4S8hcA9dnSzh0n8k9DXLZ+ bA48LUBRblPCuEjo1m78juZ0veLR8l/U3Ki+4LpiNkDy0OHetJ0ndHzZ9Jsr7gyH M6qI6ATp3gKaYyZKpMq9CPoLWoVXSC2bjp73wdk3CD7XO+h9yi7dd8NE5Tgkn77Z O7pUkXeKhloGxlC2FQEXVHi4Y7J3+uDeaBFJzGFK+JLMtL7na8Fnrlxmx/J5q/sR nwMkWr0PpXAKumxz9bQ9wMNHvGtxxPmtc+MYMsYzsHxw+JcnrzZVvTdqVy81bwt3 mqcPoyTRAAE4z9kwnLQFNgniraJqGAbLb7ez/lLT8ByKZ5As5ZqvArxUIAEFMV41 0Ns/njguF/NeRFklJzMLVLsR8JuF50pqx0pqQF45j+2GqXuLzPU/k2o5TX8+vcdf /xJflXXEbFNsnBVrHTLjLJWMHbzHlsfvu6NYTq3cTHYJ/l40eaRwK0N4HsO6JSzC l3/vjzR5Lx2zKkHxNypaPM6+fCSx7niUmVgm6pG4daiTzGmDWNf62hMJKa27eS1O EF/7C/DGvNVXaOyvXFU19Uwd3Dv4WXnbaZ/GMW/YyVSpFEpXh9RpEtT2TMhJBbeC blDYv4CVggPl0icbT5ghF7eiLLebDMzakgG6biFqCFRKzY6RwetkDFyW6PcoUtoP 9lR6KBki6veUSvcDeXOdAQCh1h17usPpZ+WLMMlFPIAMCorkzpmqeU2BviJPeaI6 /b8n11q7YCUtbXdQES41B7ll73RBbDVofuqF3uEN51lH/T+ePOKQksvVLCuaoFjQ Fl2JUkbZCN6zIZYejPeDSOgC4hly3xtORJ0qseJWtIxlm4K7m0QPzBYezG3AMSnY iATsbjpAkXCGakvUairVSDIo7Y+kKiA6jwmlvzfULOQHA08BtC9Czd/rvv1wKfak 71mMfFpLmgK13glce2XTpPiJ56k6QcsGsm3vUCaK3boh9P5mCmoQMX1nXkJ0QB99 5FTFqG8b4yobM9iYmLhdOunvxKGS1chFsDyJcNGNi7x3i0NZunDKzDCwhmcOmWKy V+o8AwJ+yGLofvfV88AWk6htaPNt3rVSptESG+4KIRHsB57L+X9BIqj75069+Z29 2jsCGhXR7cPvRZ/s5V6hse9+X8VulVk+UjBMJNhBHQRVpurFyIIto96/trnwNm+o vE5BNDKVb3ZR8QZFxP9mCdbRYZ5y6vYrwX3m0WWnv69qSW+krcanTqlEOQFe4ixF QbUeX1SpsFqxZVLZZwaIZdhfGLRdfErvaOkN0VEcGHwzxttozUl1ynrr2SRh+sWu iqvrSHN1zNjtWYY85xRPVarxzjJWEgAMJreU+cyAXOGgsMJuBWf5I40zgUXydthm nJCBrI46nudLEF24COAZ6sWwhsswEZR87Kv0+8voJ1FwaEGuImCCrlx4cR5/X7sh LTtVat8tC2PKNC1OcFVWJTH8JiV0mEu+B2n1gMO7S+G6MBWiXI4Pb5aXSsqEGZPY tER5r5X8ojpuBLNv9ENtnsFn2ND2wWjxBNkNj8V76oUEZ0v0/l3DhAfvu5e3u7y6 vRtS9osMFGjoFn8+oZuHLmAOwk0CUZXwCTSXIe0vl4Aj7mjIpLgVAQuxi0Wr51Fx ReUMPNox+pcHFZpT71gRVlXk+MG6BVQAxpslspSDN4KHZQUNaxL6ZFSMBj4okbJE kvqmTmoQGSgvSGF0PHNOViYih7oFV37QwLg7ssWhAnmEbZHqpST9Roj8yIYCa+ui B9eKwk+f41+zpgiOOl5p65I+f5ohRjAOf3VgLAaqC4UInoEsfU828CkGJlMrwcZT 9hM7DNnhk5Z0ULFcUjwPgrVJ5hFIxFtVafCnj7Ro5WiTxNXDtTa55L1EVcFJOCr0 t9Rp/9EjNzzxZLXshDV8DJKGLU/m/DkioXzmVocptTZSZ5JPYw5ReVgBeJPLju/x 9ht71RdJVTi6Mc2FBf7xuwsIjkam2+Sq+39zrdXSnH4xPfRg25BfTmnN3wtCBdN1 EYQsZaa0KOAfBvi/00bvX7nPvqLe4TQeodSXLWhckcxgu0P5Y6MuSmeIH/hn0dpT juLbZkLwBh8L7C5BvFneR4y2+AxhLb+18XnfrvcXG8Z0G2VLG1FPjQ2p+hja8WAc wPU9/27zlYA9F++w693GCWjdzPeHdGrbSADFqXxEPP3dM8Y5mDJXrdVTMwOPqk+y +ZxPY5tTaEqjzoPPYAFpjftMjbPU6EiAeig7f+Ja4uKHl0m3nv90RGi9iGpJNfDT 8hYdVux9O032n8YgCYs8na3n3ccfH2f1T+0j2MCc6EgCSFKPs5w4Lmb8n4l2pbRE ivTH4U1DGTxZRfO8A18m50aFWPTMszkJ3fqJmyHU7HQfXjQPhwc75Es+rJD2XKzn ShCQXlTk2KIzKl1ApKf8hvbrTCSAPoQuK1rlDDfVBCYLw0hP6VxUrmSM2g4JMCWd hRJ7VguGDZJPWmYfbWqOBhQDFRkl7AxQODxi28x+dH1pR9JP+sXCywxWobrf+nRG R/Vlsmni4Nsgu4gc1goeFs+UFq5DNy3SaNOE9n0b3NIER4AIxM/5xBp+jjrVmfj2 Sbs2un6qVR2RNqatT3fxK7GUHwjZIqOOaBS9Lx6oyzJsLJCZQJsoiS+7QCV5B/3J s3w/1w1kVwj/AEj2rJqevw7k4VEzHRN8ldLtMlT52dfzaEuj8m4aPKSIiVj0Evxs nSyv8AmVwhbPyIhFeRXQFq+uRkDE6SXsl9b25nu9GXbc1s2A5QB1y7wwJUS6XmxK Dl8K2Uv5Hcm7l1a9XBg0Bb22PTHHkXSCPwf4DcBZP1POI/GJRadyusjQwQMLd5Qg y3+Q7PlGOwz8Qzd6ikfMpDWCyVsDla/6Z6IGNOGi1sVBDXXRetjJo7iH8ZLulU2u nqziL549fO2K2On2W5i5y8BL/kKufYDaFHA6yL9p5TLxXVlMPpPojCixOpD1t8dF ERW2zcmf3aCUn3G9Y9ZeN0nS8VWgWwqzBgkYhvOH7yiqV/KlJ0wlR0TgAMn3AewA 5yjPfqsnMAKqJff5I6/bpnkJ/EKKUVjBntdMqU+RZNQodFOOAMqxOWVDuUY+n1/S M6VmaB8O7rGonOYk+YgIvutZdRuNM3Pfu5PmW5toQSUkmgzopLP3VJ0XA7nHCLK7 PZcmI+EnhlNomdAvlY9VPJBa+pMkkX8/6I4ubMQjdBngqZMFF5xwDVRhdEYxsKw4 QdUOd6xUMCEzUWWdsai4shn2eN34jrbpI3yv2A4l/ze2wq53JD7lXiN+UbNVg093 LWDXQtSAYEvYX0DPz8SK+xyvZc5K3DbGGwVUxZoCjYmvUtXjIpnRGsOHmd/ERLZU B3a0IxerVoI00lvfpOphlr0DbDI/jgzSn8lNcvmTlf08nYks8QzsKmnOsF9Cmtaf X6Y1X/2ZYym8cd4AOwkMuMdUNvbQJqJlFklQKVuAeVoX99DFpZxJkeqW/ywutdHd OiYSVxrdi2/pC7NuGb23Tk7U2U4JSSE2zitEbNHklfMzhwBoxpw+GkBsnEJkCT2B fr8MX/RZRJoltFkclW647SqWsgvJrXKQ8XRxbf0FWFRXl6daVX2VEbxn/F3e7qsO xEMJWX+VIOtVg5wX5Y3gNbGXI/teeKMUOO+lm6pfPlvFkRhkKE2iPjGVtiOnxn5D n14dftj4S8zl58SBLhnkFgAXPh9ey0lZ/iOqt1y+FLxkNFE8txK3mTRUl3Lj8vZq FoXIxjIPDqQTbds9Q7iBqj6X0uYH0ktPS42F3xh88Dd44Z+qrL7sDr3YAdh/C7ac 02g5fh1lPOn+jUlkFu+NI1DueAjaO+CpfpWRKhA0SQLPQaaWt8lfvWWc2PQ/0DVa pYcFEH+j8Mlvxbmn9pIhSE1XNPtEMWky0R+zqHYNBlbQKBVX1H2c+3DCOwZv93y7 CVTC4tYuQUi3YdZfhUS0hDSmPqyoXluEQK0S8EXalweU5XsgnS1LOWGkmUqonHhz 8mZKXOgBm06S/AcR5/pm2ImD8uunggXzx54yskPss4kij+kWiWWj0+zMEpzv2w/0 Yxc8uB0RfyLCqBT8ACk5kWIy9eU8k49LiGJ9tyO7dNQLTXGVhRKwE9bN+sUaan9a AMU6PwNFj4kYICJ3TA+9ZGZz7b3c/U7S2op84LQs/jMV6gkGMLTtpSpVBDKiNDr9 XvC2fn90ssO5WkLY7A5qezRQXJrRUswfxYWE++IYGHISM2UHV8HP+uSjTRrtJ8Vd c7UITdwHYXdnn9ZcB3W6VKa14YNZRXkGfMN85kj3q6aqfuLm27QKh8t6ivX9PB9H fY84gyOHuJKp2SjNjF5+b+QXfTaiCLVHiLVehb/2PLbhuWqSep0XjY4X0vS3VsXg thx4USyU5Aqpq56UgnrVXCd1CX4qnLQmkZOudQBxmZu60XgMKGqdFJysSkaTG4qc sdngWfllYRxTNjFpgJveLAFTwi2MHAv/G1aC7xsWcG2CTztUJTwvo3729rJVeOOU wNty1q+qIQik0b4MyiQ8YUrHyO/9F3zmWH9Q6ENTBPU510z3/1+WcS/JPrTGuVbP z4WXe1exChk5Ygw/S1F4ol8iqThABEB4q8Fjy5lbt4BwImcRBoUw2GgIU+tuMrTf /uZH+moF+1o+W3jOMQr1cXgEzj3e/mFbXXvrWIniJf/z7Uufro9VhLS4GFTyxLY7 Lj/2km7IXRn3R0OkQF7HhuGYvXoCOgNaeBHzkgU3EFPKxDYDiY9vXERTUnPv7Zg+ vKzxwZShum29pDvRRzOvvbR9RFPU6oWmIBIefHebJDwNHV+R2/9rreDw62/q7/01 ysbRz6Nj5xJ4iygR71Op7k/RpyCow4Jxz48ue7k+RmVYusBbs1rQWPL20dZXz7sG yUhwDHD+8Np5xhTCTcOJ26qifDP0tlYzM6qwUPwz7X/RnF6uEDeBCRIMdT/lfDx3 2IOUFb/+S04/kxCKkizcE4a1O8WuJ1BWV0YVEqhbY0nO+QkGLrKdlNf6re2x/3u0 U1JvtnrV3vghsbcij+tPYYBisVc7jGdw5pFCKch3V/YoX4nF0gxBiGEpH9ZXX0iu AXd5Yhjo+vqTTJc5wCybSnQ6+k97nz+0Kay4icQThWBGKBYgGXcYvTpdo+vnedah /yTbii0esfQhGvdBUgHjfOtb6+Kp80zqsEOYIJXpLLOpC7E1uZ6DolyNgtapqGKm 1a9DLxBvkTkKE6epmqMDFZAS/rd1qpnd79MWh2ZAC4387vbGL+b69fFgkiUN/wIS b4wmIdK8d5QrptbiFov5Wa2IFq4CUf3Kt1cB3AQdUGH3S44rr3H59N7yZioC+vFt /Fre6zsJvKk6ZssVpt1huXyj05BVnu5ENV7L8wqKw/cnM1cZFhI8JyQPkSil+w9z SZYbdIfFtY0ZX6XHmpjvZl15OusGZK5ONTQu5TT/KcxX4vM8fbNuXldS/Uk485n8 YqpBmYaAiydLMjdKtbO7thE4H5asvd7hixNR7Lwcr2bWaNh3DJ7kb+j7WaysIylo xjQcHj6jiQGVwWeHX9x2JZJrGzIQkH9GMZUPHhff7WAcO8EAwb5K9DJLIrq77u+D Z+DB3zN0syythjVbE9Bw7HTSmmj9tP5apRBUzfidLLkqwEDdYnbGIIGaR33uA5LA ggsZiXO9o76u76oe7t6aEAqooFLssU/4gjTzMB15Ojiq0NF6WJBZ8lkmCJHD5jSN axAWHKJ2n8WypCXd17Hxd20iLATRf7Kw9usQ7qpQGt6ECjkxlzZ/T6bQ8QMzeOPC 3PReLr2JWnF08SplYonERZKTSFIqdfGc29MXrQP7R8PR/1sLr1ZbYMyjWRckv7pH ccKtEpsLsAVADLq4BvBSfg8MZjIA7BsQSnllcb/Xzf3TdN7Am+60RETk4iv5NsTG 5PgoFYIFWwDuSENIDrximVfy1Uu446IPQtT7s5lFEhWYm1etLoe0RPv+a8b2CFeT OvzG+iaCdKDSlQadHL7FMo9KIj4zKSk2zkf96FN3y4I4kzVmWKPCbd2Ykg0ApAXs pPr3nmlXwxviRsVc67IVoPEZYJg1EiykpgoWElIlZzBpGe88moh/bOFO7tDJagu1 qwp+pIUp1NpwnD0bnC9yfHCP5pphD86XMvem8IhP+W4h52HEijq/Yvs1LS9zQQCB 7DT1G7XXAc7kTcuYmatoRQatJswTLuEn4cNr9wY+NEdRb7A05mv2za/WC1UdaOUH 5Z7F93huZoHIRVrRdOsagnbAZdcXaONoMx6PTmsuTLa1P3cL3UAKZfjgL32KYayh naJNWkKMkprRI8ulyu5mZ8/y86Ygc9QSnUxxLU+MYC0Zg44dJRGvZoVmZAkj2HgL e1l+q+qxkyKwvDqeJsCwJ+71hAYBCew6mNC9SUCodkLArDS0LF4U2LIp5/pPcXrv St6LG3y6wzXBaTwmteRA2CFOqIdSG7vMM0cytszH/2gMk1Bm7ccuRMTVVpQXxUoW v1quFjgvS4jhF+uBgUW5maTlfNTK4XoHmO3WjalUtlvJLK16QU3rrPksogqjAbFU sO0uckEOBZc7J2KSDYU9tyhkwKeMeDcuaxKZogq6mfoyzwXCom+/heYOah+MaZAt IZJEsaxDAWF0MkcpKdUGAgv+ueOMwjvuzacMeZp6ul0ZJIGnaTwxXGsMXqnxDvsd K0H2FcNxM9AZsWJksVQ6B4R/0JIJwD3ynwKwzlPnjMd9LV5BYr3c1JAJX7eVpz3H uHCWPmG6fyLZ7rD9xMfOZ47nXFDWZDNuz9oTd5X3F+BUaQ1jIJt+TFzPjSUxa5v8 mmRc9uhEsgXFLCRe5ot0J+df+94xEd7+SQtvWGz43mt5JovZSZHkceY+CdNSwAKE VKBxIDjPYb/JS6siWOg3ymPE+K29lJWen+Sel2JX/RlLGQa2s7MKDnBP4PAsjWsQ ZZUlvktE7EzhRCUz8hXHdZCyZGXHyNQwOs9HIDfu7z8qeguaMxDXCfHeoCf0xpY1 V4hQEnp5+c36B2xp6m1VFzJZvtHvf3x1jhTSZyUJTyGSe4fOR+YrqVQNV0gP08pX sDP0zh8Nqor8K12VfMicN9Lm3xN13W/blKXGSavnuXpyqPgrEMwlpPL5EYiQbw+a jEvvffx0kNI1EuDBhMa2zYsM3WtOuQFIDZCMitcx8/PQI5m3HEzNBPfzpBl9Kn42 JdQvakRIZLj1s4osqfihMkLmBccgAhr7CgdP2O2hBGh8q1iCnK/RVy3Tu7fpIdgJ U7aIXcIwE4xDEMDtQ+uyXvFVhUk2V3zqVknRNMcx06Jpyg39tNalOEmSt4ae5RaF Y32kj4wJlvBxJ42EJXWfcmpUh/X69bzKAW/qd8v0xdEEUZK2L1QvOCtuiwe+bEVP MIGn83zrbojJAPfZB+PoHO//lFT7Yf114tVHR5x/AQTDqCPIO2xNjF57ohlDOnPU imVgoiMAEbjGdx+uuT/WYI8q1ikjWsVPwyEO8DeG7QVwWQO4l4YIKQfA1g0wcTgO UTygk9Oor4a+c+HQGIkrsfJ8i6gpCi5w5eur/mA14rZMxZl3/xk8dMcVNYwKLjZp X6v1sKSZ6S9D7gSJAGctjasq/SFGZNzXbkGdCq7+A+v6PT66hp+1AtMMAGnD2CH4 Xg2CjqUoOLz6N/DZVHOLjxkUGg5vEKAqOP1VmV3s1la8hZUbhl+TVm+dPMbrbfsf 17uyDAptDzy0QAbUN6dBoHDFAgeWMgYWw25Punj/A7ZvwemaZ2R8QJW84bWoZyao 6j/BG0VTJq5fY6x7awouJApH0cbhYUwfW5NRMIgKg2JpAalpcXgG9Hice3Lf+/aX +zLmmKKXxlUYjCGh0+ymPmVDY6hc8x2vlharVXAzntO3m3mMzmhIPQBDYfSSK/Fp JInBw6JVBwi1zTtzR511jyK0kuR0wF+AO1fE56mPQvy8D+p/ehI5uC820c0vBDiJ u5w2JsEtrvNjlVHQOr3yEHjXg6yrOMNkJAg0Jqh1W99oYg+56qKvE5NFe/8swvb+ IpGBhaITgBcBHzKnLiHGRU13pmRbPE34ZTKcUEdGZWvxePAghwXPD7aiNxSx4u8X 5yoWDqVNW/j1jSevnYSLDsTFtTQ2ESkR8TQpNf0gY2JovOKGKSVTSkme9BhAS3R3 elJmBGf58fmPI8QFndUxkYPQWoKU1jU1FqIDBGkB7udtMYdRSH5f38/xnBHW8Ubs SZp++aQgRH4Lg5PCtghij0njAN/DYND/LMTg1gZ1bt928tU0b26snjyEBGxsIk9q dD3kMEwK3mFKftxz9cblQRlHvVEGwVtTaBUp2z/ZVZtzc6MOLpncQ6SdPOVGWPCQ lHGQ1UMzoxRe96KVOS1/+9QNSHl0SwfjwH0bdx0VJhbcln1pcDi3XYZpc3UsxUeO dJERRvsWNoEdu1RgtEYXXlaZ6SASAhSUpYbO25IfflW0SUKIJc5IKsgNOkuaNGGw Jqln7DfO6bFHJJiQuAvWp7YehyJAsr+AFAf7X4ll+14OS1HDaok6NjJ5b5auwh2i fPSmnX67pj4pHmncf1jYIFEwyZjtt4XvXpNTx2C8PQvk/bo4E34+bf5aPp84JcLK gdWJR7G8pOXGkp4KuJAOCSK4pn49i72VoNYkCmXGtS3oLQCVH6qJgEszhPiBrS2N HEtB4W+fResFi5+QMGumW3t55KMyiKDf+7NXrJ/SY8UVCuX7sz3/1esGrV5RJwNi 1+aMnY18n9SiqT6qRagVbUtHZw0WC16AGX2xK/CzPh7nMeVrhJhku3NavdCMFzAR IBRlWPlVlvYhYFcTuNOcUkH+fEVl2WaNNvR6vJlK+HemVf5zqIYLREXjz8325oFk uaJiCjXpqNDuYzdC6RONx2IucvysDHT0kP63dLHtvfqfR9womXsvMisnYuHSFmWz tHPmmZkTZawMRZ6mZ9Qu9TcEXQD9F/mGZdE69pqqDp9djQsOarrR5GRVVG0IdjfY SJIiEGNA4Ul299fiyQerH+WMePPv4j/edn0SH5xCqcd5ohAhXyR09GMmqcpPRIHv mJjXzq1M0kOUiwXlbzFqQ7xzYt2ARO12sMnkZKL0TPCPjcW2FUlXZI5dYUh+UFxB 9L+MEeOPtLX1oCK11Q4RfK2MtEy/DW0wCpSV+4FZZICdQlfPSfeK+uT6CAPp0h/V S0ibFIfaZZTe+r89qYZm0BxnE0GrG+T7Vvi6xdxAVqE8TRYAnFxTRIG+N835tRWN OU3kaOzJjz99NrrPXmX/cvnsbNBS7r/FLu4zXcCuL3APlOkNHbeG8OeIElTvvd8A 047fbP/0zvlNsdNaCfEguETspdF8IOjcRyQRIXjbl6ikNySv5aymjU1TvQgd1Dkl tznyHElKWdAYbYorGJwsxyElfm0tO/4k6choIDxHNw7XCgrSQa7uLxpOaz7dehAj 5xbpxKF5chP1p7S9hagr0C1LTAI5loRSHzVt5chpEJSrjVeKc0QDebX4ys4m6Fkq JLnXWbO70xHljj44Ub72jna1c6hvfian8qaj3IHypd15/OJy8YzFL/lqrIgQOCS5 LTDkwX78s42pz1GsrzxrWV5F3psTb0rHSYWPOuiAt4q/lO39V+BnNJNXx3bZIflh EZ26UBT9F4DcgBpVHm1zdV2uIz47ffomzCR2vtrIZbnXbWxn7DKIfJHjE5pwlvi0 8Y/ly+VZtO7PD0w2bCEreK2ndavyi1TB5oMCWhFrglyJdtV2lCKyAMWWT04zcl+N SGrc8a3eBfr8fnPwsN8GpUw0mmmw5G8ugIDU+P+iUa+BpYNrVc1YAOHCUdTPyKs2 v1S4ddNIlFvJ0Rjiu5fGWREKe67CFf1lAyBU//1ENLQpX1/4Sa/pAfldEnxuhE6S CXuO3IRjIDXdz+iy0p/lOT23yGcLIWJy37hRUfQTzBczmLVccd9g1iXkYzJZu2gi 5YrQlHXXBffVjGlt1WI081WRlip+51aRltpsopUGhN8bfLPG73e2TOL3iun/vki6 lPC5nzYOOh+DztSW7ylETAnH7c4r+rRDDBLRMxxOeD6VJGyQ+dmK65/pD43iM8pV Zq2iafBbTng2qyj5HhfgXbErR0F2MMDgelxNbvl5xyJdpHTE1IdyZkc/TirlHxEJ K/Hw8TcUJvngKp3GtsULahv/u65j0jMs8nJhcNIU8y5qnhjwUX764pns72aXPkVj Advng0mDJWwc1gYoP97gsZeT4pbSnKidjzwoqEfeM5FRs/ibL1kWe6cw0mkjk2yb xcMtqPQJr+AHVraN35lzAp1DVMPY4tA58MGK03+lvf5cSLZY6HsKzVluRDsrxfQo aI76dAAyVVTY6zisH2kSQGyR5/peFKhKJaIYg6q5D5JkKVJw2GxMX1j8qlydHJt/ A/iBdlYLhSSyFkfiKC97zgzKV1qot4oeUm+5Z3lPTcAxi3JsGQAO42feuZekYH+5 CUhqLzUZRZkhUsD6vJH7jduQVSj0Za9urPJ96HBHXJEaV+plks2r57FCzPcyJKOL p+VMaMGHeAAXyluFOgeQdMYDs26YT9OGxLhuZGgFuwnpu0kxqL+nIjsTxZWJkW2S PUuz6Y+rDbwZslCdOCNLCGvkDAdZptWP9KzK4t9sMv7Sja63CvTZM7HxGYPVR0a+ blWnRkkqYOCDSwLm45KP/wyjG7rXUzE5BuTqPknFMxCqF3+2xGCc+HYxswgrp69+ +2mWVp26+QLde4P71B1p/KxihHmabdmZycY9RvcbFmpNxpiJLF3RLyhAvyFBDnyd +sEmGhflw0OELz7aP8c3aYhlybmMY63VKHFe+6tZkHp26WErbN9ZCAofyWobXjtk DB8I2nvel8dk/M034OKGJeP907C0curpcSaWgtThtjDAzjiliEdrwMnURPDhR8Se dXeDnqd+BPIybnoGcJ0yfRPmy+G6XNMc7gRLuotv+uqIdKqXMXaFQMCkEzzE1PN9 OqzdfvDY+WOp4FyS6Ke/wpktLQvvgRtfrsOaFaGfXIXZS9SSpJkW79U1OkmSTJFQ yaIwhSEbkpQgr+IlndD9UID1I2IUrXhyxpthMbxWJ4yPKxwAzMlDwXn60xvQK/48 sB70DZZkKm3tE69GQuOaEYBAxvCIyuD1f/y8mdxfVjM0zsMRgR1GJnIw8fRbA1jc BaiFN/tcvEoCLE6hVojGpFJk5+ismSjPv1hd/CSoWdp6auXOyvIUviMgCIVfhYzD qdg5RGwNUtNgDHbtZec3GYsvQNQMjeYoLtOhLvhjFm9EalhKqxpZeOMdIY+19NKp PkSp0JvHW1bDKtIebx+WPKO9cpSRNpB+vKUu+JDj6U4xK7m4KwgC7e/iX9uUA9uG LluN/BRnQG9EnG68rjB1nz0NgZX0dXhM3m01fhfKWnZA66QZyYSvIAWn8Zyk5NAA t8tUHGHH6IpHCf371Eih88YFQQ9HiMHdN8AXZxOX7BINLTxsK9zi+/Gn6e/c6RzJ ytZESFtjAfR3gvrzrYXqUx3NiTeIGseQx9jaZuPhFXOlzgX+SypO4x8XnwqpW4KG M74kF52wCpFJJnJNmNULSGWnvfNJHeF9j77bXiAv8417YDtq8CZB6Hvp1tSrmQfD neiYe3KjSQFAuDHCjXEY/SAiNQSkjnk4J/Mhxn/6UWS+cWE7rmD4xaUBY/JSrADM bFCU5jo+8QbxY79+xjL9iPCy56lf4IO7SrxWLj5ZkCtUASX/2lNw/E8lFilTcIOl qE3EDsBRcS0LdLSqYVWM/y0X3l1AkD6ASL2v2scGysEisDqJ+5wS8td0fwG0gmCe Cepo/bpgno+Rs2MHZrn/usaznw3ilMBrXXe1LB3SDU2/IDGll51cuWdFQ+lhe9Jb y2x62W+E7Swp/R9OMjVX4/41CeQfG/cNfvkPjR5aff0LuPStnHTPIhgNBkpdGkXS 36c2aZozqe87TI+/Ps3TiV6sPqro7LcoUYyR/qiX2BvYQzuiTmKTXKYWfCdkRU1x jeb6Ba6D+6kJ5OfqJ5N7iCpElZF5EkUaVclG4zUUaL2nCkUBRMprMaA3/tZmF7s8 4T/TDIiNmYJXsRLwZJXhNG9cvh4PzY+fJspVnrrlOlqo2rv8+P0LvYgzsQJ33E92 EVsKioEyzqlddscS9MET9KtXR+vC5TPZszVpLgfrOjJ+EJkVggF+G9z/7DKOh3oI asGbM2yqJEXfHeKh4tzaYPJ5czrTh3o/z5aU/9mcmOCW30Kf2Myn4JgNQdlUpR9G nSDP1x/+K/5A6Dyb/PAxAXtR6gR1V8M/MqnADvqJ8TG7hwRJVcxRQ5W6TOn1xa68 Z/ogLxOPPyg5ZD9kQlkhLAw250scXd/T1eqlGRJ0NDNRRlZ++GMW+l+8awldgIQL pGxCz63wqJlI06oB8BBOqqgRXy+55fn2FoG0RGZnAMLjleO683wdEM/TNVeOUo/g IcCEhLXQz1EXqeaY6QP/mdj7awoCzkaYD/eZvDBB11jlN1LjJlaQHSC5csDgJM90 13vhTa8XHXAGx3ve5+RX4LwtnCPZDTa1YE4p66iuY2W2AvLiGm2J/O8a9Ov5F5sg +el9bIXoNt9gyajdZ/bIIkO3N+UyTUGovRizz0TBRtxfwIjbWfPbKUkdIi1Jg/C3 jfqLqSpzjwF86oiwPQ7P//aMRRIwsMaBvODoKQk//AtwQOXQDdm5I12WqZL+4/8L SAPyJ2mklOQq01i6obVKB+zumvYzjIhHCAgOggEUsXWdR0cGb5erO/pQuyxeW1iw I4/V1cQcrZurY6RHUa4++cCs+jbCCPiiJbF0kC7En9cBoyedPSaH96vqn9pnScNB qMkYtNVAZYIm4XFtQpVLTE8q5tUuv+2//MpTUo9I4wkqN5REPUJ54mmbAJuekuK8 H03+3SsjHoFGOZjtkqbiCGUJ4jNkvXD3HG4WcFlZ6B+86G+DFr8gj+Pbi4+s3gVX wJz1THfQ3pa++dIQ2R2VHZDutfIYW/eyUNyYCy5v2BgxMJfsqkrqmjNtok/fGsXj eAviMoXZUFswH394OvQXcE5rYASZI18yiaVI4NVccJcULBTlu6VvmxSr41C6YboV 2jFiGpZ0eOCk7iknPYzX5TtdTWYI/wtYQhgelOTSReoWqOshxJWl2Dt3e54C+fMf JpYSt/YlcQesC0nU1Ou3aQXNk1n+a5CGfoYAmRxxDEwP82k5Vjn6Dfo0SVQ7gWmV goIgyy6IrMrL2tPzmfKGj7A8Uc/+UrbGo9We5UdoUxOZ3BrNypw0YA34ArIk4qne +rkhu3yCDZNGRVGZxpJlcGEm2qZXqrcb+tgFTfimmKSTGb4eSVcMdj81Yr+Y/RJY 2Vh0xCZULF3kHW2lno3kLWBSLvhj+XqlUajpJX/wBMp+2JcO3S4ZjVIMjxUwPx9X kvqYezjnqrifQYe3iKP6ci9msfsNBTJ/NFfQFDCIFM8EhRIDw3f1UmMxAr1DOzR8 n4EmFY8Ck7VQn1ULBxRYH6TJJanuvk0BabjbkEjOIP7NKZZV+kYnwopp8pvlpHbY 3HFJT0oqrtzL6fSswxXnfj+x9zIfpEg/ufrR4p8ooyODNV0Kny+y3DKVzGoiPCgk pxF3NrA2/4PPITxB+X2SVYBNGunwA0BNsd+lTTagK7WgLMnXzfTUFj+MIzysMH8B zsdzZBUJywTaNJ+Yth5vk4lmtS5B23+D3d5C5axLDQM/auqZsQX+3u1Xtp/Sdqq5 np4Ytm4AB9eujMHAkDTeYVLb4mSd7sp4lsYGDuvy3sIpHLHcMMpuwFByJgw+BABQ bGFUAQ4YVa5cL0CMNH+yg4kr/oRj33oG9cLccNJ1LEhMzO3q+anpI37eXkeRMlPp 2Qs6YrVsC5LrWW7PaMP0Nlt37D4aK5ah/Ixj+rORqKJmQ4FexeT7VGor+JsIXbdX CYUa/JFgTJg23YDCpirrk2e3lI2HvWmy6wGBMktDXpBrH1zFmbz2Dtm8hU3rMNX2 obHMyUOOx6ompCUzH8u2BoPJVAtbvN3CaoKfIrr+a+Dy9IKSaU9ShKx2DMm6l2Sq 6UKUSFRJ32qGdmROU9z+aFI91b09IyYJ+E/AnZ8vj8Fwy3ewXvb180WRvHBYYm+8 7dBjm1fXiX5MqsqqoXsEbcpIUeh6d/Pu7+y6WusidjfBDz4IOuYfcXhUZZO/FyvZ IJkcZ863VUHfDJBmKPHR7hwXbn6FTsVvutjG3eqMdLKkLaTsWDZlXSXPTQhKtv6E pJ05zNMrl3FvCsVEYlyDd0UiR6vGnAo9XmOSnk/r3Zz/fKpl0GXAnVZxjUrBFH8D yq9vkC8xjTbZEPQQq75lD9nE3vZiTtsPXA5ajj09gbJKUpgMOxOP9z9XM4KH0Blf n15P3ynA1nLUQ2qWTTtVRmvQPs0gspTRp7qIR+XE938m1BvMtSSmwkkk0wOQMp9E utxyNrkJQxxHaaR7ZVmKWhu49+mFiEKd4pm8kGq4bihrMKmHQ1jiS5bcLrLAZK+c ZzaX5J1xDRDxomiXMdwVhV7grWoWIncMUGA2BMCPJakvoDk9pvOfXSQ12imabrjL MbVHDHz/YuaZnostQhwcgT37aWFBCd1PTqZQ7Sq0xFF+bW3h96q+xJta4FdMXa2x +3D3siErCdmUFlGyMlnV8aFp154NpU+BkcJp4voGL4TmJXWifr06+LEVBvLGqH4P L2jtI//SILSUKtxxbzmDrRaWJR4sOLbuAKF+LOlZMjg0tO1LmkNLfxK3audSii5L yXM69LbkjIXe6dEsA5dlsNZ0Ilgj3xyGAPu1a0zW1G+kE95cmxlS18qPQV4J9OJX DmFFy1S6t5VkWdpzyKKn6CHmpLYF/kZcDmEysrRV7DRzps/DKpDR8NLPMgRIZgoH 97jiaTcqZd9w+6DqJasda4fWe5PyNo5I1rrNd+c8AJ4hWcBLMC0Ecn4WkP5dWVh2 FHrLQUG3eNhTIMpKxW/uVBU1uExaA5ojqZZN781OFi55u2FiuQHVoTuyMIEtQFjl Di5hpTOKPVldOwCQeaPsZ8FNE+2x6K0lvfYaZUfLvIInjVXeRRAsgghhmkod7tEs 5ae99gbwA3M/1nzR1z4JPM11WizPRZRWu83l0DT8aoA0xpKdfeDaJAU4OCRLUX9g MWUgYzajnHKF7K+ylZl7+1GvNtuL+Alnny685vutH3tOJWIsY8b67ZG06tSqXpx0 gEgaej9OUYS6DWPQe+NWfTV1Z2JD/LGSX9zn38o/fqB2Ja3ihi1jkw60QffPYV++ GIotfinwoosZ3hYSmqnPEECbA2TnBbOg8OPU5ACDAaVEyuLm6BFRUFR0DIFyrEGy IcLBdk+oe2TxA6wlw3Z1/CpNu99lhpxJs/GyE6oEB6zljlOqMFzltjpE4m0hwmqV g3E/qOBdK0pJ6Q3tB25STY8trVwABF0kEPKvkhl0AlfNfyXUjCS21TcOA1HEIgCM FIzxB9AKCQ35xAFvIs6Jluv/6cTZ98UtEo+ewk3lsNhE23mjTi7f5TBJueeU//s0 KpjRp1K/o0DdWajf8tUZW23sSqPh/lhr280wCBgmz+NqsbFVw/bkI8FFIarliZ/9 RNmh4chjxVt5TVQMopNaqe51iUYazuhdJpVb7jispPwx3NRTldPiK1sDSYJ5NG8t CbYJ33jQ79735I3humLzCekrGBI6T1J5mppbLzJGYssTFHzhVj/o/YIdotFrrYtq nlhu4PG4v8cb6QAObv3W1NwHDy7L1lohsamykAVmh/yeOvWUs+lkV3YAvGb+/wLr GRTmpW2pTJC66BaVWepETkCUu0Kq/a0VLxUcKeYcIcSgjA3SQDuVAaPnnG7jP7Hc UaZEFScClQpjGQzLAG6mVHdt0Dco643wUnGsV3/RH6tfX+anJNOYEEAjcHX3VfLU uCqcJrri2pdMtcy1Zp5aXUnesfcAIUewGQCOgyFDAJAsHo9p1LqQtBkGqEQYNZpU cYqkWblsanOgGJImvylg9FLZaJbB88KWFfNI8tNfVeOLUyXxAraotrJS2xa7pccq hZcdK5RwPd2kthRIG3MeU9N8ADmlwSgiYq7JhaSRMGtdE4oO8N6T+zdYpsmeGF+H SJKXUNNuMEnlQ64ogIKNk5wdsZAAyZ237v4kXlFky6OzbFGjsSFR1tS/HefQoAKw SAEkEKBBAwQQdDdr0KNfFPeYrdZgvFtxBkwIbLjbiAN8KLoC05OBkJG2Qk5OQ16R DjUaI4xDQEpcdU8spASCo+QHQBISkDslIHbQibhSUfXvRr1q2XP0TKfTqoZdmcXY CS4h60KokblrkeaWfRJyEg/M60UjjlCj1hyj31Sn7fqTSkoW4lwSGASAocyk7pyC CNiANyRo0cleul1c1lxqjKclrQ1KxOXPEd1IIcUplLZSc7dW0qBO25GOh1AvAJzV 3yJUQE1D8Vq6msxq9X6Y7/hoTcYU6Sno44w6p0vIPkVK5Qe4SSMhQJsXFd8eMy7j HiICseWRnVPb2rsuTHYiVSiVanUFUhlqfIejlJCOYFSWx0Jwk4IOD07jVvIEqNMp 8eXCdQ5EebS4y62cpUggEEehBGtrYrUCtfE1nfIabUltozA365NV34lzapdF91Wf ShIXBtNxqK2mMnmd8VagZDjaSCCtKQUjYkYChuNH9JqTTkOFDEibJdfiPPNvzWvD f8MLSnCklKSD8adykEhIJyd9L3glXm5dIqB8KUuXNqEiZIeDKvDStZBwV9CcAHAz jIzjOu2s3EINUu6trOWqRCbhM5OynVAuEfUraSflpXdPlTqmxw/oeZoAk7Ut6DaV 0z+Ilp1OBTpjkV4U6U1OQ2Sw22hpoHmXjlHKEKBSTk4wAcjJdwscTb/G5VLQeWI3 PqdLZSTs22Sl1tI+ZQrHqdPrhdTzSuHVtQ158Runs8+eoUUBSh+ZOq71NLyLhvq4 KeguSKNciJzaU/jDCleInPkUqUT8tN3nA2Ao8x56VaacHFta6LW7euVQxTm/Fp09 zs0h4oLbivJIcQEk9ufUM3U0yqpUaJOUtt9KPGb5HC2XY6tuZKgQQQrmScHIwD+I aXvF7jBUzdrlOhCNKtF2K0VxFtAicy62lalFZHMk4UQCCOUpyQSCNRsiRLjWpLdS +pyq2fNCYslQwX4quUBKvQoVuPJI9dLcStc5DgO+nfwPjof4qFDjXXf8FNh1yg3Z bbHgrgvhLyEqJLqVFRPMokkk5WlSiSTzDy1amlzWKlTYs6IvnjymkvtK/mSoBQP5 EarDxckz5VoSnkRIxpS0NELU8fFOSlQUE8uAArAwVZOCdtsuT2fZa5vCC3HHSSpD TjO/ZLbq0JH5JGtsKcWu3+syQakGRUFxEIu/ibQrNWeekwGvtiqI7OkKw00rzGSC UnqFA9RoS42WzNrlwQ4pddqlZqji26bD5iiJTYyAPEfXjcrPMnJO3xYAPKASKxZb TnEzidVpjrbSWpTEXxHFBIbQ2hSTknYD4Un6aY4W0tSX0BBUpAAcABJSdwM+XfSj EsWNtdED/XTviaJbbzJoH4ecKbfstcaahCptbaBzNdJGCUkHkQDgDBI3ycE76YZd x0ONcinvI61Ke67682/iTjysyjJopLMV1qeO+5/PWpTo0HVriDa9HcUifXYKHAcF ttzxVpPkUoyR9RqHN/WvcbZhUy6zBkLOEuIAZWT2CS8gpPyAzrLobpwZyk5ecGPS rAJGk1x8faEqpWomtwSpqr0RwSmXm9lhAIKgD6YCwe3L6nTT4aXILusek1v4Q7JZ AeSnol1JKXAPTmSrHpjSSuGt3BaBXAvGS3WrZqSVxRUUsht6OVJIw4lOxGM9BkgE g5HKSD2Rpi3eH9RjOEkR6irlB/ClTbZwPrzH669n8PdIlgoUcydwRtB4dx4HnQdy AFaVP8cJsiaxQ7Kprq2pVySSy+4j7zcRsBTxHzGBjoRzDU5UanHtqHBpFEpb82SG QiLT4uE8raQAFLWogNoGwyo5J2AJ20K1FYm+0ihLm6abb3M2D2Wt3BI+aVY144y8 Qf2GpLTsCM2/V53MhkrTlKEIxzLVjcgFYAGRuo+oNMSuVLuk2yBJ5e+qqtphOau+ bF4gVtotv1GkW3GUcEwgqXICf5edYSkH1A21z0u3rPtWrQ6YzCaqVwzVFa3pnLIl LSBlbzi1A8qQB1GAVYABJ0EcQabU7csWNcd33hcNTlTVNNtwaXITCY51pK+UqCTl ICVbhIJwNhnIjuBtRp02935tIiSYiZUB1EhmQ8JBC21tEKDvKkkELGxGc56gDFbu 0fat1uKUNBsNJ7TvUoIUoAUy6zb9sXLV58GKymm3BTEtuJnwkhl9hTgJSoKGCoYB yDkdRsd9R9PvafQXEUviLCWyppQS1W2mSqHI7JUogfulHuDgA5OwxpeX5cLSuKVV ntV5Ftro8duE3JRHU+qY6TzlDiBnLY+IEkHHKNiSkaL6fxBqNPgRH70pbf2RMADN dphL0J0HYc6T8TedwQRnOQUjB0uXZXSrdLhTnSQDE/UNOHby17ONapKM0EwaKeJl vMXnZU2AkIcfKPHhuAggOgEpIPkQSknyUdbPZ3u126OHkdE1wrqFMX7k8VH4lJSk FtR75KSASepSTrupTUWFTmGKfyiGAVMpQQUpSSSAnG3KM4AGwGANgNLr2dHhC4nc QaU1tHU8XkJHQBDywMfRY/LRHwxcElxidBqPv9qm7aygKpncaLlftiw5b9OUftSY 4mDCCevjOHAI9QApQ9UjQRKaYsPhtHpUMgu/u45UDguvOKAWsnrvlR9AMDoNdPHi UFXrw5guH/DqmvSVJPQqbCOU/TmV+euPiJTpFetp6PAUkTmXESY/McAuIOQCfUcw 8t9Pbx2FBs1vhzRjpomD6a0pKu/Np0Ni9DUDTnBIciUdlhkLcl+GoBxTqiQA1nKc bnJ6bEk6o/G6gyaSHqsH4c9CMrjobU4HFf0KG2D/AFEY6ZOM6g4sqG3bbdBve150 2lpfXLhqjuBqTDWskuIGSkKSSVHIV36HAI73WE3XOt2JTaCKLatCUXGWnSFuvqJz lShkdcnAUrJJJO4AhZt+iGu3jRHQXqrhSikwTuRpHOezhvUpP4lyYdApVdlUGS3T JanA9h0FxkcwDagkgAhQ5j27b7jI/WOKDtcq8Cg0DxqS5NkNx3J01vCmQogZSgZ3 36n9PvAl4iURVy267CaXyvBQcQfUahpFxsTKzCrNxWEJd3Q0tpTMTNU2w6tH3XFN AZyDggcqug32GMbYsL+pehHvvrS5t7sQlkFQPIag923OuGNQW6Vd1ati4pciouur VCEpbq1eMlbYfQpSVKICgkbEdFAY89SPDDiDPs2wbsospIkz7eeQuMlROFNLfDaw O+ApXMP+oOw1yUeFW6vezldrrRaCFqfKlAJL7ykcgwnJIQhGwzvsOu5102K8IftK BtASWqhEU26k7j+Dz4I+bSTre2dBeKRsdffdWF/bZGEqUNU6Hr0/Ok99DtgUKv8A vFWo0WqMxKfT6opqY0OYP/AoZCcDHKrkxuduU/I+62xJrFrX7TIoU5UGayqcplIy pxk4KcDvskkD+keY0bcSY5sDiyK6oFFv3IkNyVgfCzISOp8s9d+oU4fw6hLno0tm 4VVq2JrTNTYaHjJJCkuNHOEupG4HwnBx0T2IBAFyVNXJmADBBjSQRv75UjJjejdP H+149nxnYfvEmumOlCKalhYIewBylWOXlz3BJI6DO2oThtSZdMtpS6wCajUX3Jst KxvzOY2UPPABI7EkahYL11zng6KTQqO64QF1JSStRzsChJwSTkYBJBzo1Y5KbTUi VMU4hlJU5JkrAJ7kqOwAyegwANhgDQ2J3ynkBsQNeBn0/uqlU7Us6vQaVRqsqMld szY7ZK40OuSHWFRMnm5UqSpPiNcxJ5VZAJONyoqi61Uoj1PcojVXZlPVeaJFarOO WOhRIPIlWMfhGANsDG2SElFZ4jUCQ6YcGnyK+8k7IajhSM/MjJ+YSR666rerFQra nYFUtBVNoymlBan1hKQMfdKClOc+nTrq5ubgNgvJMJ11IHfG56h41MmNagOMLMMU Z19mbLU0pLQajpklUcq2AIT0+6Cdtj1676fvAWA5TeEVtsvDClsKkY9HHFOJ/RQ1 Uy1qNMvK54Fo011blOTNcUHRvyMBW6yemAkKI81Kx3Gr1xGGocVmNHbS2wyhLbaB 0SkDAA9AANOrJgsNZCZqyQQNaq5Jpqx7SVQos50/Zr077VMdR+B9wMlxskd+VSjt 02OmXU71lwHi07aNyuqB2VGZaeSr1CkuH9cH00J+1Pa8huRSbypq32VxSmLLeYzz tJ5stuDBG4UpSc5G5SMjUtw6braYPvNWuZutw320qjckdKcJO/MVYBJI2wem++de c+IWEpWH1wRERqNeojTx5UxtAVjKK0VS9bzlNKFvWLLSsjZ2ovoRj5thQJ/uGlfc rt5PLW/xGj1pFIJAUITiEx2wTgFaW88wz3Uc/M7aelepMGuR0sVND7jAJPhokOtB Wf5ghSc/XONB0/hlSSw6mhzanSHVpKf3Epa21ZGCFIUo8wPcZGdLLDEbVgglASec EnxzGO5NFqt3AZGvbEeEfellVLKYhRk1GgKS4EpDiAr94haSMgKScggjv650O3bR oqqVErdMZDDElAU4yOiFZwQPkdv/AObnPDSooXbTMSS6A4wpSAlZxtk7b+Xl5Eah 77DDVLi0OmEPOvOqQ0lJzkuOc3KPkTj6jXsUuKC4J2PlTN+2ZXbF0JABTMdekR6H npU1RJMuZ7P1ZFdW45HbUUwlu7kpBRyAE7kBzKR+XQaZ3slQFxuHc6W4kpEuorU2 T+JKUITn+4KH00meJlYrFbq1Os6BEU222tplplLiVLkr+6hSsEhI7gHoDzHti21i 2+zato0qiMEFMNkIWsDAWs7rV9VEn66zwptSW1OqAGc5gBwBj+683dEBQR/yIpY3 S59j+0bTX3MhmsUVUZKjsC4halEfklP5jUtf8KkVChSk1sIabfaML3spBMcOKSAr J6DnS2T2yBnYE68+0Nb0uoWxDr9GGavbr/vrWBklsYLgx3xypUR3CSO+tNt3DT7v ttmW2ltyPJbKHo7gCgk4wptQOx64weoIPQ6Q/ELC2bhF2mY0BjgR/HpW1mA4koqA pja5dhJsniPQanNEHCIc6mo8ZLqE7NqSoH92sA4+MAEdepGpPh/atOtpqU5BiGIp 3CAy48HXG0jf94obFw5BUE/CAEgZ5eY8j1jUKOAluTVIkMkJEdqpvNsEk4CQnm2y TgAEdcDRHTosWlwm4cBlEeM0CEtoGAMnJJ7kkkkk7kkk6BxHGl3TAaB330ifM+FF MWWReYik5f1nxJ961KLVpzVJFTdRKp9SkJJYUoJIcZcUPuqOcgnskeexvchpVA4R xuHdt1NivVqaj3dCWFpXyhbviOPLCSQ2gcxxk+XXBOtt8JQ47ECamzCeePghqdH8 aHJ3yELScAKz90hQUdx8WMCPg23WHCGJcij0qGpYU+zRYxZVKSPwqWfiSOxxuRkZ Gc6Z2uO5LVKVRmAgTPDTaNe4weMViuxJcMbd1ENjwpdAsunQKo6lcmI0pKlJOQBz EpGfRJSPpoY9mBP2ped7V8D9y4sJQSOviOLXj6BKfzGuTjHdyaTQXYMZf+OmhTSQ k7pSdlK9MDIHqfQ6avAe0HLO4fRI0xst1GYozJSFDBQtQACD5EJCQR5g63+HWFkO XbggrP8AfnXYiUoysjh7FBvtNNrj1CyKx91hiY7FWryLgSR+iFflqFjXb/gKxUJe BEpaA0vlO7rvKFK+X3kJA81HPbDe4u2n+2lhVKlNBJmhIfiEnGHkbpGe3MMpJ7BR 1U6gOSKzZlx0BRIq7kgSQ06eVS1BSeYEHGDlJGD3wNtN7xkLIWezzrTDbghCmUjX Ujw29KZFqU6pXZGp8uVd0mHJm1JMXwoJbLDKFwjJQkJKSSoK+A5V1Ch10VQrJvUz KgxBuSlVFEN8R1KnwVNKJLTbmR4asdHAN/LQ4itcPJbkJ+s2tPhVUyzKmNCmLKlK 8IpCEqQN0AlJGCMlPMRknMpR6zbcGRUnoFvXEtuVIDzQcfMRttAbbRykKdBO6VHP KfvAdAANlItwPqAihW13hV9GYnvqao1k3JVVSvf7jhQxHfLC0wIHMVEAElK3FqA6 43T1B0N1Sh0eDTqDIrF+1iA/Ogma+Vy2EJQkNpICUBAyStaQE7kgHHTI7Y93W7Fi SGJNkzZrDjjjq1suszlAuKKj8Kl52KvLtrjgcQeHVINNfjUqemfChuRDERSg24+p QbypX4c5b6kk/Edc2hj/AEAqHnLsH9QqHiKWjd0VOXQJzqJ5eqFHLUhuQhBbEhlY AUhaSADjO5xgkAjP3jPcDUKrnHZE5BLiIcV19Slbkgthvc+eXdCVZffj0Os1GosL iP1RLMOLFcOVtsNpCRzbD8KUjcDPLnG+nl7K1nuUi15VwTmyiTVikMAjcR05wfTm JJ9QlJ76qw2jOVo229PvW9286lhLTm5gmeqQPER5U1bxtmnXfbsuj1dsuRn+igQF NqH3VpPYg/nuDkEg1UrCbq4QS5VLnxmZcGU4DGqLqVFtwBISNxkghKQC2dxjbIwT crXBVadCqsB2DVIrEuI6OVbLyAtKh6g7a3dZQ8nK4JFK6qXRqk1DfsaEqotSoDa3 UrdQrKA54aktj0wVkAHHbYY2J7qon2xVFP3HMRGtqGApEfxeQPuYyVOK2wBnAGc7 E7Z3Jbp9m+3qg6p6g1GXSVrOfCUPeGvoCQofVR0ITPZwuWQtKF3NCkst7JLwdyke iTzAfQ6WOYYSsLQuDrw5kmRyOsVXL11qRd0CLDU3bMKNHprZKTMeT4LBI/lSMFfq SUj1OgGsVW4b3rLdEosuVU1PnHu0ZkMtncbnfJSOpUs4HXPfTgo3s2MqcbXclyyp aEADwozXJgDoApalbfJI05rStGgWjCMW3qczEQsgLWnKnHSP5lnKj3xk4HbGt7fD mmFZ9z16nxP2ioCYMk0LcGOGkfh/R1KfU3IrksD3qSkbJA3DaM78oPU7FR3OAAAz NZrNMKvXHU4EWp0+RBnsofiSGy060sZStJGCD9NVnrdKrnBqpOcjciqWQ+4VNPJ3 ciEn7quwO/fCVbEFKiRq0mtD7Lchpxl9tLrawUqQsAhSSMEEHYg+Wsbi3buEFt0S DWjTqmlZ0HWkhQrup1bjh2nS2pAxkpSeVxP+ZJ3H1GpNVSRj7q/0/wDfXm7eANr1 WQqZRHZNBl/e/wAKctA+YQd0/JKkj00KPcDb2YVyQL68VkbAvF1Bx8uZX++vLvfC 6SqWl6df8U6axduP1Ea9VC9y2Sr7TmVGg1RFPYkKLr7MhsKbSo7qUk9geuMbeeMA ByJcKiVFIozzlxXM8fBZeS2S2yTthtIzzq3wMZG/zBbkb2dqjPcQu6bwkymwclpl tSj9FLUQP7Tps2Lw4tqykc9Ep6RLI5VTHz4jyx3HMegPcJAHpp1b2DiUBD7mYcoj xO59zQj2IJOjKY7STHYNhQPwM4Vv248u5brPjXHJCihtRCvdQrqSehcIOCRsBkDq dOzWazTMADQUsJnU18IBBB3B1W++7LrHDWtyrksyKZltyVeJNpqM5jnqVJAzhI3I IB5RsRyjIsjrNUdaQ8gocEg1dC1NqCkmCKqtbd7wrq4hQsvlMViApURp4cp95UQF EjoVBBIGCdubHU6HuIUniGq45giiqop6XD7t9nhXIW87FRRuVY683fOMDGnte/BO 0bnfXKSw5Sqg4eYvwSEBZ81IIKSc7kgAnudBD3A+8YRCKNfrq2Pwpf8AFbwPLAUo f7aTf4cMuhxgJIiIUNtZkHr7KMN4HEw5I1nShaxnriqdHrEO/GnjQzGOXZ7fhuA9 9yASAMnmOcFIwdRlJ4oIpljQGX1rm1kJU0E5PQKISVq7HlA8yfrnRungFcVTSE3L e7rsfIy02hx0Hf8AqUAPng6ZNicILUs6Q3KixFzak38SZcwhxaD5pAASk+oGfXUp wVtwlT4EEgwkQBAjz47bCrfPluOj4CJPvh30veD/AAzqFYrDF53/AB1IkIIXDhuD BJG6VrSfugfhSd87noM2J1hGRvrykcu3btp2lISIG1L1KKjJ3r1qu/HnhDJqMt66 7PaUaifjmQ2vhU6QN3W8fj80j73Ub5CrEazU1wJBkVRW36tIeT4DtxVJl8HlVGdK UkEbEAqBzv22PpohlNNyWg3KT46RjPi/Fn1PnqxV98K7VvZSpFTglicof+tiENun 57EK8viBI7Y0q5/s6VWMT9h3eoM9mpLKk8o+aVEH+0aXvWJUrMgx76q9HY48hhGR 5ueuZ8jPvhS9ap0KPIS/GjNMvJyApocp3+XX664a1c1TpalmPWUrJ6RnGwsp+o3A +f66ZEb2drjlKxVLuZQyeoZbcdJ+hUkaPbM4EWjbzrcmY27WZiSCFzcFtKvNLYGD /q5sahuyMy4Z8/Wr3WPtqb6O3by9cx5CJ79OqlFwo4Z1fiFU2K9dvjN0FtQUlLgK TLxvyoHZvzV3GwyclNtGWkMMobZbShCAEoQkBIAAwAB2AHbW0JCQABgAYAHbXrTA AJECvNrcU4oqWZJr/9l+BsVcgFoAAA== } do code
16.15 Multitasking
"Threads" are a feature of modern operating systems that allow multiple pieces of code to run concurrently, without waiting for the others to complete. Without threads, individual portions of code must be evaluated in consecutive order. Unfortunately, REBOL does not implement a formal mechanism for threading at the OS level, but does contain built-in support for asynchronous network port and services activity. See http://www.rebol.net/docs/async-ports.html, http://www.rebol.net/docs/async-examples.html, http://www.rebol.net/rebservices/services-start.html, and http://www.rebol.net/rebservices/quick-start.html for more information.
The following technique provides an alternate way to evaluate other types of code in a multitasking manner:
- Assign a rate of 0 to a GUI item in a 'view layout' block.
- Assign a "feel" detection to that item, and put the actions you want performed simultaneously inside the block that gets evaluated every time a 'time event occurs.
- Stop and start the evaluation of concurrently active portions of code by assigning a rate of "none" or 0, respectively, to the associated GUI item.
The following is an example of a webcam viewer which creates a video stream by repeatedly downloading and displaying images from a given webcam URL. To create a moving video effect, the process of downloading each image must run without stopping (i.e., in some sort of unending "forever" loop). But for a user to control the stop/start of the video flow (by clicking a button, for example), the interpreter must be able to check for user events that occur outside the forever loop. By running the repeated download using the technique outlined above, the program can continue to respond to other events while continuously looping the download code:
webcam-url: http://209.165.153.2/axis-cgi/jpg/image.cgi view layout [ btn "Start Video" [ webcam/rate: 0 webcam/image: load webcam-url show webcam ] btn "Stop Video" [webcam/rate: none show webcam] return webcam: image load webcam-url 320x240 rate 0 feel [ engage: func [face action event][ if action = 'time [ face/image: load webcam-url show face ] ] ] ]Here's an example in which two webcam video updates are treated as separate processes. Both can be stopped and started as needed:
webcam-url: http://209.165.153.2/axis-cgi/jpg/image.cgi view layout [ across btn "Start Camera 1" [ webcam/rate: 0 webcam/image: load webcam-url show webcam ] btn "Stop Camera 1" [webcam/rate: none show webcam] btn "Start Camera 2" [ webcam2/rate: 0 webcam2/image: load webcam-url show webcam2 ] btn "Stop Camera 2" [webcam2/rate: none show webcam2] return webcam: image load webcam-url 320x240 rate 0 feel [ engage: func [face action event][ if action = 'time [ face/image: load webcam-url show face ] ] ] webcam2: image load webcam-url 320x240 rate 0 feel [ engage: func [face action event][ if action = 'time [ face/image: load webcam-url show face ] ] ] ]Unfortunately, this technique is not asynchronous. Each piece of event code is actually executed consecutively, in an alternating pattern, instead of simultaneously. Although the effect is similar (even indistinguishable) in many cases, the evaluation of code is not concurrent. For example, the following example adds a time display to the webcam viewer. You'll see that the clock is not updated every second. That's because the image download code and the clock code run alternately. The image download must be completed before the clock's 'time action can be evaluated. Try stopping the video to see the difference:
webcam-url: http://209.165.153.2/axis-cgi/jpg/image.cgi view layout [ btn "Start Video" [ webcam/rate: 0 webcam/image: load webcam-url show webcam ] btn "Stop Video" [webcam/rate: none show webcam] return webcam: image load webcam-url 320x240 rate 0 feel [ engage: func [face action event][ if action = 'time [ face/image: load webcam-url show face ] ] ] clock: field to-string now/time/precise rate 0 feel [ engage: func [face action event][ if action = 'time [ face/text: to-string now/time/precise show face ] ] ] ]One solution to achieving truly asynchronous activity is to simply write the code for one process into a separate file and run it in a separate REBOL interpreter process using the "launch" function:
write %async.r { REBOL [] view layout [ clock: field to-string now/time/precise rate 0 feel [ engage: func [face action event][ if action = 'time [ face/text: to-string now/time/precise show face ] ] ] ] } launch %async.r ; REBOL will NOT wait for the evaluation of code in async.r ; to complete before going on: webcam-url: http://209.165.153.2/axis-cgi/jpg/image.cgi view layout [ btn "Start Video" [ webcam/rate: 0 webcam/image: load webcam-url show webcam ] btn "Stop Video" [webcam/rate: none show webcam] return webcam: image load webcam-url 320x240 rate 0 feel [ engage: func [face action event][ if action = 'time [ face/image: load webcam-url show face ] ] ] ]The technique above simply creates two totally separate REBOL programs from within a single code file. If such programs need to interact, share data, or respond to interactive activity states, they can communicate via tcp network port, or by reading/writing data via a shared storage device.
16.16 Using DLLs and Shared Code Files in REBOL
"Dll"s in Windows, "So" files in Linux, and "Dylib" on Macs are libraries of functions that can be shared among different programming languages. Shared code libraries are used to extend the capabilities of a language with new functions. They allow you to accomplish goals which aren't possible (or which are otherwise complicated) using the native functions built into the language. Most of the executable code, and all the potential capabilities, of most operating systems is contained in such files. Third party code libraries are also available to make easy work of complex tasks such as multimedia programming, 3d game programming, specialized hardware control, etc. To use Dlls and shared code files in REBOL, you'll need to download version 2.76 or later of the REBOL interpreter (rebview.exe). If you're using any of the beta versions from http://www.rebol.net/builds/, use either rebview.exe or rebcmdview.exe to run the examples in this section.
Using the format below, you can access and use the functions contained in most DLLs, as if they're native REBOL functions:
lib: load/library %TheNameOfYour.DLL ; "TheFunctionNameInsideTheDll" is loaded from the Dll and converted ; into a new REBOL function called "your-rebol-function-name": your-rebol-function-name: make routine! [ return-value: [data-type!] first-parameter [data-type!] another-parameter [data-type!] more-parameters [and-their-data-types!] ... ] lib "TheFunctionNameInsideTheDll" ; When the new REBOL function is used, it actually runs the function ; inside the Dll: your-rebol-function-name parameter1 parameter2 ... free libThe first line opens access to the functions contained in the specified Dll. The following lines convert the function contained in the Dll to a format that can be used in REBOL. To make the conversion, a REBOL function is labeled and defined (i.e, "your-rebol-function-name" above), and a block containing the labels and types of parameters used and values returned from the function must be provided ("[return: [integer!]]" and "first-parameter [data-type!] another-parameter [data-type!] more-parameters [and-their-data-types!]" above). The name of the function, as labeled in the Dll, must also be provided immediately after the parameter block ("TheFunctionNameInsideTheDll" above). The second to last line above actually executes the new REBOL function, using any appropriate parameters you choose. When you're done using functions from the Dll, the last line is used to free up the Dll so that it's closed by the operating system.
Here are some examples:
REBOL [] ; The "kernel32.dll" is a standard dll in all Windows installations: lib: load/library %kernel32.dll ; The "beep" function is contained in the kernel32.dll library. ; We'll create a new REBOL function called "play-sound" that ; actually executes the "beep" function in kernel32.dll. The ; "beep" function takes two integer parameters (pitch and ; duration values), and returns an integer value: play-sound: make routine! [ return: [integer!] pitch [integer!] duration [integer!] ] lib "Beep" ; (Beep returns a value of zero if the function does not complete ; successfully. Otherwise it returns a nonzero number). ; Now we can use the "play-sound" function AS IF IT'S A NATIVE ; REBOL FUNCTION: for hertz 37 3987 50 [ print rejoin ["The pitch is now " hertz " hertz."] play-sound hertz 50 ] free lib haltThe following example demonstrates how to record sounds (with the microphone attached to your computer) using the Windows MCI API. When complete, the recorded sound is played back using a native REBOL sound port:
; Various mci functions are included in the winmm.dll library. ; We'll create a new REBOL function called "mciExecute" that ; allows us to run MCI functions in winmm.dll. This function ; function takes one string parameter (a text string written ; in MCI function syntax), and returns an integer value (true ; if the function is successful, false if it fails): lib: load/library %winmm.dll mciExecute: make routine! [ command [string!] return: [logic!] ] lib "mciExecute" ; Get a file name from the user, which will be used to save the ; recorded sound: file: to-local-file to-file request-file/save/title/file "Save as:" { } %rebol-recording.wav ; Open an MCI buffer and begin the recording: mciExecute "open new type waveaudio alias buffer1 buffer 6" mciExecute "record buffer1" ask "RECORDING STARTED (press [ENTER] when done)...^/" ; Stop recording and save the sound to the wave file selected above: mciExecute "stop buffer1" mciExecute join "save buffer1 " file ; Close the DLL: free lib print "Recording complete. Here's how it sounds:^/" ; Play back the sound: insert port: open sound:// load to-rebol-file file wait port close port print "DONE.^/" haltThe next example demonstrates how to play AVI video files, again using the Windows API "mciExecute" from winmm.dll. A demo video is downloaded from the Internet and played two times - once with default settings, and a second time at a given location on screen at twice the original recorded speed. The video codec in the demo video is MS-CRAM (Microsoft Video 1), and the audio format is PCM. For more information about mciExecute commands, Google "multimedia command strings" and see http://msdn.microsoft.com/en-us/library/dd743572(VS.85).aspx:
; These lines open the winmm.dll and define the "mciExecute" function ; in REBOL: lib: load/library %winmm.dll mciExecute: make routine! [c [string!] return: [logic!]] lib "mciExecute" ; These lines download a demo video: if not exists? %test.avi [ flash "Downloading test video..." write/binary %test.avi read/binary http://re-bol.com/test.avi unview ] video: to-local-file %test.avi ; The lines run the mciExecute function with the commands needed to ; play the video: mciExecute rejoin ["OPEN " video " TYPE AVIVIDEO ALIAS thevideo"] mciExecute "PLAY thevideo WAIT" mciExecute "CLOSE thevideo" mciExecute rejoin ["OPEN " video " TYPE AVIVIDEO ALIAS thevideo"] mciExecute "PUT thevideo WINDOW AT 200 200 0 0" ; at 200x200 mciExecute "SET thevideo SPEED 2000" ; play twice a fast mciExecute "PLAY thevideo WAIT" mciExecute "CLOSE thevideo" ; These lines clean up: free lib quitThe next example uses the "dictionary.dll" from http://www.reelmedia.org/pureproject/archive411/dll/Dictionary.zip to perform a spell check on text entered at the REBOL command line. There are two functions in the dll that are required to perform a spell check - "Dictionary_Load" and "Dictionary_Check":
REBOL [] check-me: ask "Enter a word to be spell-checked: " lib: load/library %Dictionary.dll ; Two new REBOL functions are created, which actually run the ; Dictionary_Load and Dictionary_Check functions in the DLL: load-dic: make routine! [ a [string!] return: [none] ] lib "Dictionary_Load" check-word: make routine! [ a [string!] b [integer!] return: [integer!] ] lib "Dictionary_Check" ; This line runs the Dictionary_Load function from the DLL: load-dic "" ; This line runs the Dictionary_Check function in the DLL, on ; whatever text was entered into the "check-me" variable above: response: check-word check-me 0 ; The Dictionary_Check function returns 0 if there are no errors: either response = 0 [ print "No spelling errors found." ] [ print "That word is not in the dictionary." ] free lib haltThe following example plays an mp3 sound file using the Dll at http://musiclessonz.com/mp3.dll. Of course, that Dll could be compressed and embedded in the code to eliminate the necessity of downloading the file:
REBOL [] write/binary %mp3.dll read/binary http://musiclessonz.com/mp3.dll lib: load/library %mp3.dll ; the "playfile" function is loaded from the Dll, and converted ; to a new REBOL "play-mp3" function: play-mp3: make routine! [a [string!] return: [none]] lib "playfile" ; Then an mp3 file name is requested from the user, which is played ; by the "playfile" function in the Dll: file: to-local-file to-string request-file play-mp3 file print "Done playing, Press [Esc] to quit this program: " free libThe next example uses the "AU3_MouseMove" function from the Dll version of AutoIt, to move the mouse around the screen. AutoIt contains a wide variety of functions to programatically push buttons, type text, select menu items, choose items from lists, control the mouse, etc. in any existing program window, as if those actions had been performed by a user clicking and typing on screen. Learning the other functions in the AutoIt language can be very helpful in customizing and automating existing Windows applications:
REBOL [] if not exists? %AutoItDLL.dll [ write/binary %AutoItDLL.dll read/binary http://musiclessonz.com/rebol_tutorial/AutoItDLL.dll ] lib: load/library %AutoItDLL.dll move-mouse: make routine! [ return: [integer!] x [integer!] y [integer!] z [integer!] ] lib "AUTOIT_MouseMove" print "Press the [Enter] key to see your mouse move around the screen." print "It will move to the top corner, and then down diagonally to" ask "position 200x200: " for position 0 200 5 [ move-mouse position position 10 ; "10" refers to the speed of the mouse movement ] free lib print "^/Done.^/" haltThis example uses Dll functions from the native Windows API to eliminate the default 'REBOL - ' text at the top of the GUI window:
REBOL [] ; First, load the necessary dll: user32.dll: load/library %user32.dll ; Then define the Windows API functions you'll need: get-focus: make routine! [return: [int]] user32.dll "GetFocus" set-caption: make routine! [ hwnd [int] a [string!] return: [int] ] user32.dll "SetWindowTextA" ; Next, create your GUI - be sure to use 'view/new', so that it doesn't ; appear immediately (start the GUI later with 'do-events', after you've ; changed the title bar below): view/new center-face layout [ backcolor white text bold "Notice that there's no 'Rebol - ' in the title bar above." text "New title text:" across f: field "Tada!" btn "Change Title" [ ; These functions change the text in the title bar: hwnd: get-focus set-caption hwnd f/text ] btn "Exit" [ ; Be sure to close the dll when you're done: free user32.dll quit ] ] ; Once you've created your GUI, run the Dll functions to replace the ; default text in the title bar: hwnd: get-focus set-caption hwnd "My Title" ; Finally, start your GUI: do-eventsHere's a slightly more versatile version of the above script. You can add it to the top of any existing GUI script, and it will remove the default "REBOL -" text from all GUI title bars, including alerts and requestors:
title-text: "My Program" if system/version/4 = 3 [ user32.dll: load/library %user32.dll get-tb-focus: make routine! [return: [int]] user32.dll "GetFocus" set-caption: make routine! [ hwnd [int] a [string!] return: [int] ] user32.dll "SetWindowTextA" show-old: :show show: func [face] [ show-old [face] hwnd: get-tb-focus set-caption hwnd title-text ] ]The following application demonstrates how to use the Windows API to view video from a local web cam, to save snapshots in BMP format, and to change the REBOL GUI window title:
REBOL [] ; First, open the Dlls that contain the Windows API functions we want ; to use (to view webcam video, and to change window titles): avicap32.dll: load/library %avicap32.dll user32.dll: load/library %user32.dll ; Create REBOL function prototypes required to change window titles: ; (These functions are found in user32.dll, built in to Windows.) get-focus: make routine! [return: [int]] user32.dll "GetFocus" set-caption: make routine! [ hwnd [int] a [string!] return: [int] ] user32.dll "SetWindowTextA" ; Create REBOL function prototypes required to view the webcam: ; (also built in to Windows) find-window-by-class: make routine! [ ClassName [string!] WindowName [integer!] return: [integer!] ] user32.dll "FindWindowA" sendmessage: make routine! [ hWnd [integer!] val1 [integer!] val2 [integer!] val3 [integer!] return: [integer!] ] user32.dll "SendMessageA" sendmessage-file: make routine! [ hWnd [integer!] val1 [integer!] val2 [integer!] val3 [string!] return: [integer!] ] user32.dll "SendMessageA" cap: make routine! [ cap [string!] child-val1 [integer!] val2 [integer!] val3 [integer!] width [integer!] height [integer!] handle [integer!] val4 [integer!] return: [integer!] ] avicap32.dll "capCreateCaptureWindowA" ; Create the REBOL GUI window: view/new center-face layout/tight [ image 320x240 across btn "Take Snapshot" [ ; Run the dll functions that take a snapshot: sendmessage cap-result 1085 0 0 sendmessage-file cap-result 1049 0 "scrshot.bmp" ] btn "Exit" [ ; Run the dll functions that stop the video: sendmessage cap-result 1205 0 0 sendmessage cap-result 1035 0 0 free user32.dll quit ] ] ; Run the Dll functions that reset our REBOL GUI window title: ; (eliminates "REBOL - " in the title bar) hwnd-set-title: get-focus set-caption hwnd-set-title "Web Camera" ; Run the Dll functions that show the video: hwnd: find-window-by-class "REBOLWind" 0 cap-result: cap "cap" 1342177280 0 0 320 240 hwnd 0 sendmessage cap-result 1034 0 0 sendmessage cap-result 1077 1 0 sendmessage cap-result 1075 1 0 sendmessage cap-result 1074 1 0 sendmessage cap-result 1076 1 0 ; start the GUI: do-eventsFor more information about DLLs and the Windows API, see:
http://rebol.com/docs/library.html
http://en.wikipedia.org/wiki/Dynamic_Link_Library
http://www.math.grin.edu/~shirema1/docs/DLLsinREBOL.html
http://www.borland.com/devsupport/borlandcpp/patches/BC52HLP1.ZIP
http://www.allapi.net/downloads/apiguide/agsetup.exe
http://www.activevb.de/rubriken/apiviewer/index-apiviewereng.html
http://msdn.microsoft.com/library/Remember, whenever you use any Dll or code created by another programmer, be absolutely sure to check, and follow, the licensing terms by which it's distributed.
16.17 A Multiple Network Security Camera App Using The Window's Webcam DLL
This application uses several of the DLL routines from the previous section to demonstrate how to build a security camera monitoring application. This application relies on the common ability of IP cameras to upload a stream of images to an FTP server. This application simply provides an interface to monitor, store, and review frames from up to 24 cameras, to effectively save, browse, search each video stream. Video from a local web cam can be used as a source to test the program.
REBOL [title: "Camera Manager"] svv/vid-face/color: white tt: "Camera Manager" do set-title: {user32.dll: load/library %user32.dll gf: make routine![return:[int]]user32.dll"GetFocus" sc: make routine![hw[int]a[string!]return:[int]]user32.dll"SetWindowTextA" so: :show show: func[face][so[face]hw: gf sc hw tt]} make-dir %./history/ write %view1cam.r rejoin [{ REBOL [] cam: first parse (first system/options/args) "." tt: uppercase form cam } set-title { blank-image: to-image layout/tight [box black 640x480] file: to-file first system/options/args gui: view/new center-face layout [ across i1: image (blank-image) return btn "Stop" [flag: false] btn "Start" [flag: true] box 0x0 [] ] flag: true forever [ wait .15 if not viewed? gui [quit] show gui if flag = true [ attempt [i1/image: (load file) show i1] ] ] }] write %viewhist.r rejoin [{ REBOL [] svv/vid-face/color: 230.230.230 change-dir %./history/ cam: to-file first system/options/args tt: uppercase form cam } set-title { files: read %./ if cam <> %all [ remove-each file files [ cam-in-file: to-file (first parse (last parse file "_") ".") cam <> cam-in-file ] ] last-file: length? files counter: 0 blank-image: to-image layout/tight [box black 640x480] update-screen: does [ attempt [ i1/image: (load cf: pick files counter) show i1 t1/text: rejoin [ "Current file: " form cf { (} counter {/} last-file {)} ] show t1 ] ] gui: view center-face layout [ across i1: image (blank-image) return btn "Reverse" feel [engage: func [f a e] [ if find [down over away] a [ counter: counter - 1 if counter < 1 [counter: 1] update-screen ] ]] btn "Forward" feel [engage: func [f a e] [ if find [down over away] a [ counter: counter + 1 if counter > last-file [counter: last-file] update-screen ] ]] btn "Select" [ selected-file: to-file request-list "Select An Image:" files if selected-file = %none [return] counter: index? find files selected-file update-screen ] btn "Save" [ save/png request-file/only/save/file (pick files counter) i1/image ] t1: text bold 370 { Select image, or scroll forward/back (arrow keys work) } key keycode [left] [ counter: counter - 1 if counter < 1 [counter: 1] update-screen ] key keycode [right] [ counter: counter + 1 if counter > last-file [counter: last-file] update-screen ] key keycode [up] [ counter: counter - 20 if counter < 1 [counter: 1] update-screen ] key keycode [down] [ counter: counter + 20 if counter > last-file [counter: last-file] update-screen ] ] }] write %localcam.r { REBOL [title: "Local Camera Test Streamer"] avicap32.dll: load/library %avicap32.dll user32.dll: load/library %user32.dll find-window-by-class: make routine! [ ClassName [string!] WindowName [integer!] return: [integer!] ] user32.dll "FindWindowA" sendmessage: make routine! [ hWnd [integer!] val1 [integer!] val2 [integer!] val3 [integer!] return: [integer!] ] user32.dll "SendMessageA" sendmessage-file: make routine! [ hWnd [integer!] val1 [integer!] val2 [integer!] val3 [string!] return: [integer!] ] user32.dll "SendMessageA" cap: make routine! [ cap [string!] child-val1 [integer!] val2 [integer!] val3 [integer!] width [integer!] height [integer!] handle [integer!] val4 [integer!] return: [integer!] ] avicap32.dll "capCreateCaptureWindowA" gui: view/new center-face layout/tight [ at -10x-10 b1: box 0x0 pic1: image 320x240 ] hwnd: find-window-by-class "REBOLWind" 0 cap-result: cap "cap" 1342177280 0 0 320 240 hwnd 0 sendmessage cap-result 1034 0 0 sendmessage cap-result 1077 1 0 sendmessage cap-result 1075 1 0 sendmessage cap-result 1074 1 0 sendmessage cap-result 1076 1 0 counter: 1 flag: true forever [ wait .05 if not viewed? gui [ sendmessage cap-result 1205 0 0 sendmessage cap-result 1035 0 0 free user32.dll quit ] show b1 if flag = true [ sendmessage cap-result 1085 0 0 filename: rejoin ["cam" counter ".png"] sendmessage-file cap-result 1049 0 filename counter: counter + 1 if counter > 24 [counter: 1] ] ] } blank-image: to-image layout/tight [box black 160x120] gui: view/new center-face layout/tight [ across btn "Stop" [flag: false] btn "Start" [flag: true] btn "Test With Local Camera" [launch %localcam.r] text "View History: " drop-down data [ "cam1" "cam2" "cam3" "cam4" "cam5" "cam6" "cam7" "cam8" "cam9" "cam10" "cam11" "cam12" "cam13" "cam14" "cam15" "cam16" "cam17" "cam18" "cam19" "cam20" "cam21" "cam22" "cam23" "cam24" "all" ] [call/show join "rebol -s %viewhist.r " value] t1: text blue "Updating Camera: 000" return i1: image (blank-image) [call/show "rebol -s %view1cam.r cam1.png"] i2: image (blank-image) [call/show "rebol -s %view1cam.r cam2.png"] i3: image (blank-image) [call/show "rebol -s %view1cam.r cam3.png"] i4: image (blank-image) [call/show "rebol -s %view1cam.r cam4.png"] i5: image (blank-image) [call/show "rebol -s %view1cam.r cam5.png"] i6: image (blank-image) [call/show "rebol -s %view1cam.r cam6.png"] return i7: image (blank-image) [call/show "rebol -s %view1cam.r cam7.png"] i8: image (blank-image) [call/show "rebol -s %view1cam.r cam8.png"] i9: image (blank-image) [call/show "rebol -s %view1cam.r cam9.png"] i10: image (blank-image) [call/show "rebol -s %view1cam.r cam10.png"] i11: image (blank-image) [call/show "rebol -s %view1cam.r cam11.png"] i12: image (blank-image) [call/show "rebol -s %view1cam.r cam12.png"] return i13: image (blank-image) [call/show "rebol -s %view1cam.r cam13.png"] i14: image (blank-image) [call/show "rebol -s %view1cam.r cam14.png"] i15: image (blank-image) [call/show "rebol -s %view1cam.r cam15.png"] i16: image (blank-image) [call/show "rebol -s %view1cam.r cam16.png"] i17: image (blank-image) [call/show "rebol -s %view1cam.r cam17.png"] i18: image (blank-image) [call/show "rebol -s %view1cam.r cam18.png"] return i19: image (blank-image) [call/show "rebol -s %view1cam.r cam19.png"] i20: image (blank-image) [call/show "rebol -s %view1cam.r cam20.png"] i21: image (blank-image) [call/show "rebol -s %view1cam.r cam21.png"] i22: image (blank-image) [call/show "rebol -s %view1cam.r cam22.png"] i23: image (blank-image) [call/show "rebol -s %view1cam.r cam23.png"] i24: image (blank-image) [call/show "rebol -s %view1cam.r cam24.png"] ] previous-files: read %./ remove-each file previous-files [%.png = suffix? file] flag: true forever [ wait .05 show i1 if flag = true [ current-files: read %./ new-files: exclude current-files previous-files foreach file new-files [ if not viewed? gui [quit] show i1 if flag = true [ do process-image: [ loaded-file: load file if error? try [ rename file to-file rejoin [ %./history/ now/year "-" now/month "-" now/day "_" replace/all form now/time ":" "-" "_" file ] ] [ ; print "error deleting" do process-image ] ] camnum: replace replace form copy file "cam" "" ".png" "" t1/text: join "Updating Camera: " camnum show t1 do rejoin [ "i" camnum "/image: " loaded-file " show i" camnum ] wait .05 ] ] ] ]
16.18 REBOL as a Browser Plugin
REBOL interpreters exist not only for an enormous variety of operating systems, but also as plugins for several popular browsers (Internet Explorer and many Mozilla variations, including Opera). That means that you can embed the REBOL interpreter directly into a web page, and have complete, complex REBOL programs run right inside pages of your web site (in a way similar to Flash and Java, and useful like Javascript code). This provides a nice alternative to CGI programming for any type of application that runs appropriately in the stand-alone view.exe interpreter (i.e., for games, multimedia applications, and rich graphic/GUI applications of all types). Since the browser plugin runs typical REBOL code in the same way as the downloadable view.exe interpreter, you can run code directly on your web pages, without making any changes.
To use the plugin on a web page, just include the necessary object code on your page, as in the following example. Be sure to change the URL of the script you want to run, the size of the window you want to create, and other parameters as needed. You can download the rebolb7.cab file, upload it to your own site, and run it from there, if you prefer (be aware that there are several different versions: "http://www.rebol.com/plugin/rebolb5.cab#Version=0,5,0,0", "http://www.rebol.com/plugin/rebolb6.cab#Version=0,6,0,0", and "http://www.rebol.com/plugin/rebolb7.cab#Version=1,0,0,0" - use version 7 unless you have a specific reason not to). If you use your own copy, be sure to change the URL of the cab file in the following example:
<HTML><HEAD><TITLE>REBOL Plugin Test</TITLE></HEAD><BODY><CENTER> <OBJECT ID="REBOL" CLASSID="CLSID:9DDFB297-9ED8-421d-B2AC-372A0F36E6C5" CODEBASE="http://www.rebol.com/plugin/rebolb7.cab#Version=1,0,0,0" WIDTH="500" HEIGHT="400"> <PARAM NAME="LaunchURL" VALUE="http://yoursite.com/test_plugin.r"> <PARAM NAME="BgColor" VALUE="#FFFFFF"> <PARAM NAME="Version" VALUE="#FFFFFF"> <PARAM NAME="BgColor" VALUE="#FFFFFF"> </OBJECT> </CENTER></BODY></HTML>Here's an example script that could be run at the "http://yoursite.com/test_plugin.r" link referenced in the code above. You can replace this with any valid REBOL code, and have it run directly in your browser:
REBOL [] view layout [ size 500x400 btn "Click me" [alert "Plugin is working!"] ]You can see the above example running at http://re-bol.com/test_plugin.html. The above script must be run in Internet Explorer on MS Windows. In order to use the plugin in Mozilla based browsers (Firefox, Opera, etc.), the following code must be pasted into your HTML page:
<HTML><HEAD><TITLE>REBOL Plugin Test</TITLE></HEAD><BODY><CENTER> <OBJECT ID="REBOL_IE" CLASSID="CLSID:9DDFB297-9ED8-421d-B2AC-372A0F36E6C5" CODEBASE="http://re-bol.com/rebolb7.cab#Version=1,0,0,0" WIDTH="500" HEIGHT="400" BORDER="1" ALT="REBOL/Plugin"> <PARAM NAME="bgcolor" value="#ffffff"> <PARAM NAME="version" value="1.2.0"> <PARAM NAME="LaunchURL" value="http://re-bol.com/test_plugin.r"> <embed name="REBOL_Moz" type="application/x-rebol-plugin-v1" WIDTH="500" HEIGHT="400" BORDER="1" ALT="REBOL/Plugin" bgcolor="#ffffff" version="1.2.0" LaunchURL="http://re-bol.com/test_plugin.r" > </embed> </OBJECT> <script language="javascript" type="text/javascript"> var plugin_name = "REBOL/Plugin for Mozilla"; function install_rebol_plugin_mozilla() { if (navigator.userAgent.toLowerCase().indexOf("msie") == -1) { if (InstallTrigger) { xpi={'REBOL/Plugin for Mozilla':'http://re-bol.com/mozb2.xpi'}; InstallTrigger.install(xpi, installation_complete); } } } function installation_complete(url, status) { if (status == 0) location.reload(); } function is_mozilla_plugin_installed() { if (window.navigator.plugins) { for (var i = 0; i < window.navigator.plugins.length; i++) { if (window.navigator.plugins[i].name == plugin_name) return true; } } return false; } if (!is_mozilla_plugin_installed()) install_rebol_plugin_mozilla(); </script> </CENTER></BODY></HTML>You can see the above script working at http://re-bol.com/test_plugin_mozilla.html.
For more information about the REBOL plugins, see http://www.rebol.com/plugin/install.html and http://home.comcast.net/~rebolore/plugin-guide.pdf.
16.19 Using Databases
Databases manage all the difficult details of searching, sorting, and otherwise manipulating large amounts of data, quickly and safely in a multiuser environment. MySQL is a free, open source database system used in many web sites and software projects. ODBC is a common interface that allows programmers to connect to many other types of databases. The most recent releases of REBOL, along with all commercial versions, have built-in native access to MySQL, ODBC, and other database formats. You can also download a free MySQL protocol module that runs in every free version of REBOL, from http://softinnov.org/rebol/mysql.shtml. A free module for the postgre database system is also available at that site.
To explore database concepts and techniques in this section, we'll use the open source MySQL module above because it provides access to a powerful and popular database solution which works even in old and unusual versions of REBOL.
Most web hosting accounts come with MySQL already installed. See your web host account instructions to learn how to access it (you need a web address, database name, user name, and password). To get a free, simple-to-install web server package for Windows that includes MySQL, go to http://www.uniformserver.com. That program enables you to easily install a web server with MySQL pre-configured on your local computer. It's useful if you don't have access to a web server on the Internet, or if you want to create multiuser applications which use MySQL on a local network.
To use the REBOL MySQL module above, unpack the compressed "rip" file available at the link above. This step only needs to be done the first time you use the package on a given computer:
do mysql-107.ripEvery time you access a MySQL database, you need to "do" the module that was unpacked in the step above:
do %mysql-r107/mysql-protocol.r ; At the time of this writing, 1.07 was the most current version of ; the mysql module. Update the numbers in the previous two lines ; of code to reflect the current version number you've downloaded.Next, enter the database info (location, username, and password), as in the instructions at http://softinnov.org/rebol/mysql-usage.html:
db: open mysql://username:password@yourwebsite.com/yourdatabasenameIn MySQL and other databases, data is stored in "tables". Tables are made up of columns of related information. A "Contacts" table, for example, may contain name, address, phone, and birthday columns. Each entry in the database can be thought of as a row containing info in each of those column fields:
name address phone birthday ---- ------- -------- -------- John Smith 123 Toleen Lane 555-1234 1972-02-01 Paul Thompson 234 Georgetown Place 555-2345 1972-02-01 Jim Persee 345 Portman Pike 555-3456 1929-07-02 George Jones 456 Topforge Court 1989-12-23 Tim Paulson 555-5678 2001-05-16"SQL" statements let you work with data stored in the table. Some SQL statements are used to create, destroy, and fill columns with data:
CREATE TABLE table_name ; create a new table of information DROP TABLE table_name ; delete a table INSERT INTO table_name VALUES (value1, value2,....) INSERT INTO Contacts VALUES ('Billy Powell', '5 Binlow Dr.', '555-6789', '1968-04-19') INSERT INTO Contacts (name, phone) VALUES ('Robert Ingram', '555-7890')The SELECT statement is used to retrieve information from columns in a given table:
SELECT column_name(s) FROM table_name SELECT * FROM Contacts SELECT name,address FROM Contacts SELECT DISTINCT birthday FROM Contacts ; returns no duplicate entries ; To perform searches, use WHERE. Enclose search text in single ; quotes and use the following operators: ; =, <>, >, <, >=, <=, BETWEEN, LIKE (use "%" for wildcards) SELECT * FROM Contacts WHERE name='John Smith' SELECT * FROM Contacts WHERE name LIKE 'J%' SELECT * FROM Contacts WHERE birthday LIKE '%72%' OR phone LIKE '%34' SELECT * FROM Contacts WHERE birthday NOT BETWEEN '1900-01-01' AND '2010-01-01' ; IN lets you specify a list of data to match within a column: SELECT * FROM Contacts WHERE phone IN ('555-1234','555-2345') SELECT * FROM Contacts ORDER BY name ; sort results alphabetically SELECT name, birthday FROM Contacts ORDER BY birthday, name DESCOther SQL statements:
UPDATE Contacts SET address = '643 Pine Valley Rd.' WHERE name = 'Robert Ingram' ; alter or add to existing data DELETE FROM Contacts WHERE name = 'John Smith' DELETE * FROM Contacts ALTER TABLE - change the column structure of a table CREATE INDEX - create a search key DROP INDEX - delete a search keyTo integrate SQL statements in your REBOL code, enclose them as follows:
insert db {SQL command}To retrieve the result set created by an inserted command, use:
copy dbYou can use the data results of any query just as you would any other data contained in REBOL blocks. To retrieve only the first result of any command, for example, use:
first dbWhen you're done using the database, close the connection:
close dbHere's a complete example that opens a database connection, creates a new "Contacts" table, inserts data into the table, makes some changes to the table, and then retrieves and prints all the contents of the table, and closes the connection:
REBOL [] do %mysql-protocol.r db: open mysql://root:root@localhost/Contacts ; insert db {drop table Contacts} ; erase the old table if it exists insert db {create table Contacts ( name varchar(100), address text, phone varchar(12), birthday date )} insert db {INSERT into Contacts VALUES ('John Doe', '1 Street Lane', '555-9876', '1967-10-10'), ('John Smith', '123 Toleen Lane', '555-1234', '1972-02-01'), ('Paul Thompson', '234 Georgetown Pl.', '555-2345', '1972-02-01'), ('Jim Persee', '345 Portman Pike', '555-3456', '1929-07-02'), ('George Jones', '456 Topforge Court', '', '1989-12-23'), ('Tim Paulson', '', '555-5678', '2001-05-16') } insert db "DELETE from Contacts WHERE birthday = '1967-10-10'" insert db "SELECT * from Contacts" results: copy db probe results close db haltHere's a shorter coding format that can be used to work with database tables quickly and easily:
read join mysql://user:pass@host/DB? "SELECT * from DB"For example:
foreach row read rejoin [mysql://root:root@localhost/Contacts? "SELECT * from Contacts"] [print row]Here's a GUI example:
results: read rejoin [ mysql://root:root@localhost/Contacts? "SELECT * from Contacts"] view layout [ text-list 100x400 data results [ string: rejoin [ "NAME: " value/1 newline "ADDRESS: " value/2 newline "PHONE: " value/3 newline "BIRTHDAY: " value/4 ] view/new layout [ area string ] ] ]For a more detailed explanation about how to set up MYSQL, how to us the SQL language syntax, and other related topics, see http://musiclessonz.com/rebol_tutorial.html#section-27.
16.19.1 SQLite
Here's an example that demonstrates how to use the popular SQLite DBMS, using sqlite.r by Ashley Trutter:
REBOL [title: "SQLITE Example"] unless exists? %sqlite3.dll [ write/binary %sqlite3.dll read/binary http://re-bol.com/sqlite3.dll ] unless exists? %sqlite.r [ write %sqlite.r read http://re-bol.com/sqlite.r ] do %sqlite.r db: connect/create %contacts.db SQL "create table contacts (name, address, phone, birthday)" SQL {insert into contacts values ('"John Doe"', '"1 Street Lane"', '"555-9876"', '"1967-10-10"') } data: [ "John Smith" "123 Toleen Lane" "555-1234" "1972-02-01" "Paul Thompson" "234 Georgetown Pl." "555-2345" "1972-02-01" "Jim Persee" "345 Portman Pike" "555-3456" "1929-07-02" "George Jones" "456 Topforge Court" "" "1989-12-23" "Tim Paulson" "" "555-5678" "2001-05-16" ] SQL "begin" foreach [name address phone bd] data [ SQL reduce [ "insert into contacts values (?, ?, ?, ?)" name address phone bd ] ] SQL "commit" SQL ["DELETE from Contacts WHERE birthday = ?" "1967-10-10"] results: SQL "select * from contacts" probe results disconnect db haltTo use SQLite in REBOL, see http://www.dobeash.com/sqlite.html.
16.19.2 Other DBMSs
To use ODBC in REBOL, see http://www.rebol.com/docs/database.html.
For a useful open source SQL database system created entirely in native REBOL, see http://www.dobeash.com/rebdb.html.
The following additional database management systems ("DBMS"s) are also available for REBOL:
http://www.tretbase.com/forum/index.php
http://www.fys.ku.dk/~niclasen/nicomdb/
http://www.rebol.net/cookbook/recipes/0012.html
http://www.cs.unm.edu/~whip/
http://www.garret.ru/dybase.html
http://www.rebol.org/view-script.r?script=sql-protocol.r
http://www.rebol.org/view-script.r?script=db.r http://www.rebol.org/view-script.r?script=couchdb3.rBe sure to search rebol.org for more information and code related to databases.
16.20 Menus
One oddity about Rebol's GUI dialect is that it doesn't incorporate a native way to create standard menus. Users typically click buttons or text choices directly in REBOL GUIs to make selections. The "request-list" function and the GUI "choice" widget are short and simple substitutes which provide menu-like functionality.
The example below demonstrates how to stylize the choice widget to create normal looking menus. Use "editor decompress #{compressed code}" to examine how it works. Otherwise, just follow the menu format in the example, fill in your own GUI code, and paste the compressed chunk into your own script:
REBOL [title: "Choice Button Menu Example"] menu: [[ "File" [] "_________________________^/" [] "File Option 1" [alert "File Option 1"] "File Option 2" [alert "File Option 2"] "File Option 3" [alert "File Option 3"] "_________________________^/" [] "About" [do-face b1 1] ][ "Edit" [] "_________________________^/" [] "Edit Option 1" [alert "Edit Option 1"] "Edit Option 2" [alert "Edit Option 2"] "Edit Option 3" [alert "Edit Option 3"] ][ "Preferences" [] "_________________________^/" [] "Preferences Option 1" [alert "Preferences Option 1"] "Preferences Option 2" [alert "Preferences Option 2"] "_________________________^/" [] "Preferences Option 3" [alert "Preferences Option 3"] ]] gui: [ a1: area wrap with [colors: [254.254.254 248.248.248]] b1: btn "About" [alert "These menus are just a choice button widgets"] ] do decompress #{ 789C5553DBAE9B30107CE72B567929E911C12149A5F2D20F41A87260093E3536 B24D427A947FEFDA26093542D87B19CFEC2E9D36C89B1E0618504D502540AB5B 8C0252EEC875D842352989D64227544BF6CD6FBF36500965D138E89107B3CF86 4D5D2775D248534237A906AA8E3758C74FEE7076647F6E6DBE07B0BDBE05539D 781659A3A5A6E4E270DA154746EF8962AED7FC2ADA2C643E034E87DDF22616DD 34968B006C2F5882D20ABD18451756D6DDE5CB667BDEEADBF314D02CC5B01D3D 44DE438CDCF0D2EB6BD1E71F6756BF230DB6538350BDD942B127B205912D4E5E FD197D11331F5082E4773D39B84C2259D78BCE5069232E4241C1E623AB133E8E A8164FA07146A96F71A76760F39E854350030375ACE9B5202AFB9F6C2E1848EC 1CAC58DD84EB219426A42D97B19905B85560CA6D36726160453CB7E22FE63371 DB866CDE184D23B046013B523FC29644CFD9A8A93A2C3138224D8E203EEAE2FA 5FEBE11A54094E6767A99B3F54C84F4D50D1E3D717A53DE04926000261BFDC41 73CB1D8794A6C7F026CACD1F74D91714DB15945FAD26F512FF8FBA7239F9B64B 1386EE95503FC236F6DF6BA7114BD31FF0FD25A313C63A1805310F8AC4163E68 0A637916F591F34704889DF3FFCCA0E09BBD5B8743ACE5BBD1834AEA7FEAF212 1C87030000 } view center-face layout guiThe example below demonstrates a useful menu widget by Cyphre (shown earlier in the presentation section of this tutorial), which makes it easy to add nice looking menus to your GUIs. This example also includes Cyphre's Tab Panel widget, which is a great way to maximize screen real estate in programs with large GUIs. The code demonstrated here is the author's preferred way to add menus to REBOL programs:
REBOL [title: "Cyphre's Menu and Tab Panel Example"] ; Menu Widget: do load decompress #{ 789CB51B6B73DAB8F67B7E85BA3B770237430CE4D12EDD6EC6109A92266D499A B629E3CE1810C6606C6A9BE074BBFFFD9E23C9B66CCB84A477C384C8B2747474 5E3A0FE5EF5118D516D45DB5C8C29C53E20D6774143E23839D6F357B615A3468 119F8E5723CABABED55EE260329C5B646D875342C71665FD8E678EC9F1E1EF7F DB9FDAEFAFD6F5B76796A7C3CFBBEB9B69F7C68256BB87CFD71DFD161F3EFFF0 8EBE6047FB6CDCFE78D3D5F58BB3F7930FE1D5CE7C0DBD9DF6ECFAF5F93B787D 7CDED775AB77A9EB1F5C0D5EE8C7F07AFC11BEDE2F11ECB103E35F37F7BE7CFF EADE20C09DE6DCE9F63F5D1DBA67172F34ED85A6FFB8D1FB7A27B27A33FFD38B BDABAFE7DF17E1B43B5B4DA7B06AD7BABE3A773AEFDAD7FE7BC07074D5DDB1E7 776BC4D25B2EDB00BBFBEE1656F7ACC08AACAF67572BBDD9A6BDC6E7B6ADEB6F BAD6FCC5E91B5B3F8F2EBFF6FBD142BFA6D6E71D58EDEAF8C7CDF2EB25ECA0D3 D1DFBEE95E754EEFDF74FA7AB7FBEEA67376DFD1BF9FDDF6FBFA69FBEEF6D68F AE7A17BADEEB0DDB9DE69DFEFEEDCE17EB6BEFB6F7767D7EEE0125EF69AF1FE8 EDB61E5993FAE5349AF5828B4B86E17A31E97FBC9E863F7AFACDFBFACCBA38EF 996DA0FBCE6D70F5E58D7DE67EE94CFBFDD7A3D3C6C58B8B2BFDB2DB7D7D7C7A AD03B5FBB7FAC5DC72BF1EDE6B07EDBECE5873F3E9FDD5DBA3CE6DAFF7EA1F89 D9A3291DCD413CFCF9969CD6D9578F73FAB47BFAFCF8E2DFE1F44D3DE6F4F97C 4FDFEBAE7AB0F41A609DBE99CED7FDB6A5B7EDFECAB4AE0F7B20017A74DBB7EC B707CF3F009C7EFFEDF4F38ED75D74901A97D7AF7FD43B9FDAC8ACB3CBCE9ED5 EDB65FB70F6F75ABDFEF358EEE74EB3540EEEA7BF3E0CB878F079ED6EE3292ED E46966C06F10DE3BF60FAA2DCC20A4BED01BAE6313131489290EEFFD561B798E E7B788EBB954F44C3C3714DA88CD64643276E898A379D2E94D26018509F5A89E F4055373ECAD33500DF117155640C7A6043D009C5BA41135F2EB359E37F71BC7 2FF61B4707DF6A39706BCF1F838948A18CCDD0240397AE356CC18E6D3F08894B A39098BE15A42D2399623ACBA92981F856C3E9ACB7305F1A04066A42827BA0F1 421BAE6C678C2B52F22769366AE7A65B6BD6EB8719A839C8CDA323522324E9C9 8C34A4A70C62793C8C1C41BC498617410838B5083029E5376C8A711824A236C9 304960164F9E50EAC492004D69333EE5DC9AACDC11190019E069CF90374B41C8 40F896A6ED9F90898603C84034B4A895B4C81E9F0C2D79CFF1D078603C4C1E13 4CBD35991428912388EDDA612B2BC42D62BAF764C0C48B6D3F850A2C75BD90F0 57032180CD83E3FDE6C1C17EB3719C8E5C9A2E6037F2960029ED659445B5497B 3C9F9A2350389B0C0DC2C553DA84ED06D40F4968DA0E419082DCE688E6642704 D6B7889DE9E3CA243130A337857E3835F93BE9503DFC63BF513FDE6FFCF13C47 098EBB1B1666ACA73688393302C5D1B1B8A0DD301DDB725B64D7A193303B7269 FAA618894D80E99BCB13344F4E003E806F5B364C6C46F5EC342E1087D1214883 45C35AC84408D7B271C5CCD8D82C813E64FAB9551812FCC9625F2AEC02E01DF5 5381378967E44730E9311D986A82D4C2C628500F39A9312DCCF571F55300E1B6 5A0315A321CC4184156354C0346F19DA9E1B2858BF6152B85872ABA10629E858 59DBAE202AE873153850A9470DF25FA19F553065F5E870DB353927033AF2DC31 0940EE4FD4AB732563D695D9AB7887822E894CEE7285CDC2803EB28BD231D1D8 41B6CB0D7D7610EB33B6C55B9C29654CE1164931B130B6B8E244136ABBB4C1DB 9968A9B292E2527C47B91992B62AA6E4ACA51A0DEA5AA6456531A70A090DC083 008B661674842998B776952FF2241547139A5BC50B0500159756CB92B5401555 3AA81E0C16C99BE715945963DB1DD3088413FEAA5E8324536722AC066F0F5468 E2671BAD8E1905F82C574B0D740EC8A9996BF35E2956ADD2D342FE240AFECBBA 2C84447DEAC89FB2132823289B7549880C3B53F2C63D4356738426A1852702B0 2B4B27D079F6B67476A981798C7979BC71119C2E5A41C4A7743CC8346C50B89C 77365D935D90135CA9A63CB232847CE078933F78368E1C2FA0357A077B41FF9A 3D96EF84CF015FC61ED393C47C2003180483B75FF1270D1F1E82B5F4BD110D82 9AB70A1128C74405F90138F8B3721D00C59578B080839C84F68212148D3B5471 D198D37BC2AC5730F23DC7A93936F84302E5F07E097230454C986A3E843EFEB0 990F8C7B900CDEB236A6211D852DE0E153362F1C71C11B92CE7E5004721018F9 64B128210DF723C980A3B8C51AC6D698288542DAD2368BFD0243CADF95BD3118 D56ADC8E174EDFF8B336EDB0FCDC509E9ACC53564E508129F6E57BB2CFF293DC 16A74888274623AAC3895129F1C6C12456AB85D0EC5BEDE543364F0C38AED7A3 669A504093A5F1A093B0539687E5B17DE6FD6C621232C47F172B27B485E5636D 49DA26B643333665E8CC334A0516973957D04F1A393165ECE087184B49719460 A4927859B40C96AA81AF8470311AEC7510FAECAF961E7C136F38C3497C804FC3 95EFB22DB3C050E107A003844A9E49E70C672067312A22E152879F887D8B7E1E 69C638705459582D7248299ECC0B49CEEFF8EC640F041E44EF24CE56404BF42D CD702A3A97A2C55D23DE74BC91E9B0E65D92E0F55760C4590BED329F0381E842 38D7E355DC0A5643DE630727AC319ACE79C35E58ECEFD0F44547B8607FC1F2B3 BF3402591CF377AE07E6920F172C8D43C9241309188340C95CC1E76C5200D8C0 3616B305741942DC847004B605C76BE0C1793440C0102F7B2EA960536BE0C304 1CB49F04BD4614C2219066FE8C543818EC010055783FB79706093D42DD315F98 E076EC30E16192DB40DA275282BB0CB2181B29E15BE4203A48C99BA65114C1F0 D843E72476C2B82E9818976C769D779937B28B001F31CBC41457925254052DBF 860E07F92884A84C3D2E982AF7BCE03C6F4CC0629E2A3172D4013700F52A753B 8DE4D478446E67DBAC4E2E7768A4CA9718F0ACDDFFEDF237C277AE2529B08CD0 81AEC7B2561766881D29A9962BD4834AF95DAE278951455A0C7641D1CDA14349 0535BE45427F45AB06A3D380E5F976E1B4421B205E8136EDD6E21E768E560D31 1CB50C8C0419B0D2D33318892704FE45FC9FC5C376C180900A5A91643536335C A0D5B45DEB191FF73BEB46B75274C7F3C144910A33300900AEFB0916C21211BE 6134093F992D90314DED81412AD2A1C3625926B43CAB08946F908A8864719DAA 34384E59A1809C24CBB22E84CF90348C814853E26C8E471604235AE674147C67 843C89896A89A3125A598783BD0A3D5EF293B5466887E553EA92547738DC1683 4B2713748F4129C08B4A8A08E09B3051355E368E23396F9BF568004D9040ED1E 629383FC0EA4CC2CB7EC04F896D169F2127A588D0A9F732E15FAC580557C1CC9 9B15B86379536BBC64E2CEAB214390217349FE634D2216E2EF2F5D2B373BDEEE C85B2CC117073F3B0AC1E813166B8283432A65468347A8CDA323A3CA13DCE835 958E96B2E3D5BCB7581EDE97E606D4E97289090119A439DB20DCCE218599A886 1B3807E4D7F27975C2EB8A63EAD80BB057BE9A710058BD6DA91EB5EDEE13574B AA6E091396E6A9C18F06A7B774DF19F73B9F9FE1C6281F156448554A146EB213 B2E06306B6A047B19F5724C2450E4975E2DDF73CF42A73DA90398B44A089669C 0C061299659283319226955720BC7C098208F649B3B5E653EA12982B83238599 1730331008E51444442251B31819C11191A90E31A9111A1D47EA92C92C0820D3 796D4CE9920CC6BEB9164715BA4360E2175695D4F741C3F7EB464E81F2A0C462 780A2AC2EF0C6C0CF184B16A9680572C80BE65410FCAB51A04741C0903B14C82 03C1D6C79666088F20C88C848B25FE7AF815E0976D902C150B68C3A0B2F89A1F 6A35FA7D653A2719416AC822AACC673C2ABFFFA40C7F31CA57E6FCE532154FBE A36A663CDB3809FA0A5E025BD4099AF2792D3EAD300742928A0A12F4CFD2AA73 EE4D5C3F75B96CB08045890FC12F803303ADCB5BD9FCCE2B0E78F8E1F484235A 257FBE2249975B65647193DD6FCCAC7307AE74048421C9415D0107074C638DF9 C2E2C89D79109E0C7621F0406292DD4CEE1A3D6003F1C97B5CD98F4F594ED30C 057166A52319756AA5D4512D414A324A55456745D127EC4CD6A1243CBC050AB3 9D95E4FF4AD3829BC98E32A3F1B43F999448221B97C4C9998D0D54BD6011D5DD 6A188AF594F42A2D5DA1D92AABA115B44E594C2D8CDA504A2D8C55153F846F28 46F3334B7889E8472A0AADEA19B19F5A26CF42602A251B65374614EF44910B5E 436CC7E3F624F89732B0E08F6385AB4AFE22F50D69676081642294B44410F994 60414C3DB55993463063A95C406B8AE23BDBF231D90CC756C249A8B261726C60 6D7ECBA9049B8D3B4DB8868800B2B68CB91DF3ED2FF2105F1E5824DE285BA526 AF524B567900403AA7C5FD8274261279E3EC8DE51625F03DEE76D41E02BCF12D 1792ADF6C7252E4563C3E027D432CAB7AF7205124A3C412CCB5040B5E47BE492 C4BF379A3C38DB376A7A2AFD4F117C99E319A1378781E7AC42CAE4E0D1A4FE05 8A72992B5FF297CE8F47B24B5C87C983528EDED2C9D85CB7FA3F5E6099C49536 F022CA2E9EB03B26E25E49DEE530480A41EDBCB15B1D83CDA3B62FD32519371E 3DE7E6C57724A452D79DE9AC681C28452C32F5E154264A874DE5A2257EADCAB3 D9E0EA32D7B6D4DB85D80FFDDDE28D8D2D02CE38B0F35CE75E89166C92DF81D6 3077A118C0D3CF6C448953C4CA354A09CEE5A6B39F48DC39DDDD63E96783D1BB 126189870B2344A31313738CD047067B301206D57082610CA04FE970E3E72789 5AB9B21082C0B250E90CAC16A9B550949054CAA85415520119C92F14D7DAD574 5CC48A9248E12F887D2E1988B9F6C7E602C14AF9E1681516135F49EA2BAE0FA6 9FF20CE813EFB666925752112549812B2EDC6E4838F2DC5C116F6EEB9B8AD414 922E5FBC493FE2F0B96FF174791EF55C82262DC6AA39086B15B0CE7172B3FD79 98ABA6EFC3E153CE52F67E6BA696D239CEDD0DF87AF5FDE7F00B1FE27BEC5CF8 A3C0E64285E25FA474194DE3320FC6DFAEA1222DB7A18CBE3CA9A04CCCB14A13 D697E25889D79AF68863825F961FAD28A8F0407412B00B0149448A28629A9B9D 1808B25E128C4A858A5D9E5E4DF5261B84A605906DEEB6F0DB9095B20CAEB44C 55B67D80774148784D32D7C9CA5DB93E5E8FCC750A4615FA45ED30D39B629231 F0F11E25C3CEBBC41D92F412C30EBBE4C13204995B1EE9058FF45E867C3323BD 1921DFCDE0D1C84E725067FE312577BBE0A1A23262A03552BB943AED99FFA7B0 852B5B6902F7D81278B735E3D8DAB21F2B7BEF7238920BA3EEF3C3EFE597B082 ACA8316A33B194FC0F4EDCEB9C891B73123B8BC7D62C1358A4898F38807E8040 79F1CE5F8A5253AAD26477BA18373653EE49BB44B5891369E93EE37F084A7659 93B0D222BC8C7CA8DC1378B5CCE66E41B81A99A54D01B8042696F69F80E28B52 24C4202067732BD6487628BE646727D7B20587528E714B85025B2DAAB6505CE9 F69674D5077ACCF13873A72BBDFD1697FB714A72A52D003F4943CBA2C141A2A1 B30D5E5D6C99F9D04301C9244363202209FC77431B040804940CD96F930C307B 8BB782C12732E21B663C8F5D82914872B36B38325AB011E325D6BFBD0989FF97 78E79FFF0120649CE6573C0000 } ; Tab Panel Widget: do load decompress #{ 789CBD586973E2B816FDCEAF50577FE86428C7989824506F2695349DADB37496 4E4FA09C2A63CBE0C6D8C4368DC9BCF9EFEF5E495E65B2CCAB9AA4005BBAD2DD 8E8EAEF45714AF3CF799AA33338A6948868D47253647CADCF4A9D7238E6951B2 74E309EBE05D6648CD1E999953CABB79CFA312384E44E31E6925ED9668A2F698 0A517CCC441F1577666297179836890365E4FA66B82236B582D93CA4514476F4 8F7F35E8D973D8FF76F8DC69FEB8D56767E387ABBED63D39383B884FC79713EB E4B8D38F2EEF9ED4A3969BCCFBBF76AE7E9E2E4757ABB079D3D28FADC99F8DDB 6F0FA77BB3FBF1D3D199F7703C0906B3BEDEBCE99EFE6A1F8EBFF6EFC70F27EE FDF2E2707C39681F5EDF256A337A1ADCEB874FB7CF897DF2E5E2A9D171EFBA4D 4775FC78767D6D1E4D6EA6D6F5D765D4D793E3D9E0AC3B4816E777E7CFA74F17 9FA7AD9B2FC9F27C104C8F0E7FBA17DD4B6B7BFAE3B6D1FC71393BD8BB9AF447 30CF73D3695D7C3B595EDEDE3C58BB5F4EA3CF5DB77564FF79D78CC0BC643038 39F8BAFB5DBB3EBF98B9FDD1FDFC9BAD37BE3E07CBF3D3D5C21B3C75CD8BE6F7 B3B63538BE9C3E9CF8FABDF7BDD554E943AB75A21FDF6996EA6DDF5F7DFEDE3A 38D8D54E0F9AD303F8FBBDF17716F40812DD237AA293ACC90ABC20EC113FF0A9 6833C4AF4311003CCDF058C85DA3F4F3A884D40ECD258065E15B64E8109350A3 200E30000001B61C750ED8F1630561A38E82D0A6E17E4910B4AA0814953A0EB5 004B08872002E0D024A6BECD6CDF7054748428446B6D12E600BE6E94A767ED91 AA6D1A85F98D3A6525EF8B1110225553C6A169BBA00780AE9176A7BDC53F3A69 EBFA565BDFDE6A6FEFBDC72CA31478235D67754B8C27B0038ABB6996023F4E25 E1B1104D9159ADDDDA129F0A0E34AD92F1F5AB5546493A0998F266DC507FCC16 7D012744F502CBF448E43965C844403AD60444CA19B383A55F690259CFE955C0 55789685D594C55464B91E89A8071926A227620F4E602D229E06D7B769B24F1C F84D65945190B0C1A016463B151DAE039E0D51D6B46237F071587956E335ABD4 BA900BD949B064B3A15CA9CFA805B1F1D2425D9300173B7F279F98AE72BCDF11 6D474DF78499EBE3982012DFCDCA0C76E0C495A12200E868BA684A1282544A61 0593DF902D09409C50D4558FB4DB521777013B5B521F2EB9D4D091675A531908 68433DD5F129EAE84EB5299D9321268B0CE7D4271BC5286C82739EA7D4B4839F B820BB408C2DD88535A30AB35A3E0B8305C44AEBEC6D693B5DF874C876755CF9 DD581FBF8C97EAE227C7568A1F0063A71AE6F706B166C914FDAEF39720A7831D 8CD2351DD8927F8023E1977F5E89C98B4BAF48ED9C373323855B3D12870BDE52 A01EA4A31EB1CDD864CF0864781D99D31E31C33058463D22A257D9C83826C0D9 8F436C3320313B5B6D0DF6A64E879BB104BD28202C441D64E8D3A5CAB5396E18 C5C4876D17348DA3FC2975C90F84E97C54E686637A00AA5C927FBBBECB20375F 91D94ABCA5AA33C7E4FD2E2F2AF524470F9205EE3C850D2DA6F348CC3FCCC33F 33936C9BCA85EB2386FF7C3B28CF62E4560A0B916786D2BE6B14048B2572FA0A 254C757B2D0DC92320DE7213380ACA66C1A2F08398E4CC372CC0464BA5B84340 FB0B0C6A668AD050988BA79F238B29C2868A2E16373214E15B4EDC98A6120BE4 11C80AF9657A0B1223563C73455C3B210EB32E9ECD59260AD49136959323529B 271BE60087F28255184367F378B52FEC2EAC3DD854C016A9192012CCA8C41DA6 0F21057C71BBE1812D8B0F063E7237A23874FDF107D6802E0D47B05F4E3F90FF 9260F413F8049FC4986C32EEF2279610836C485C042EE0907D3E217CF5C8984F 2FF335C8328D4561F80A166BE4A151CD0F62552A65F3A1AF741FECE3B891444A 0C04E1AF1158F8E8279F41EAAE752255CA025DA733CB0278B05E234ABC4D2182 841D13EA94E5D8038AE0894B9B306A061AC10F194DA2ED25DBDB6FD109168680 1AD3F5186F67CB0E57417D6E11DAD80B4A5E9B2EAF61320E2A170B355E426F8F 540B2B116DDCAF7161B5B014635C8F4D0AC37C8187418F5AA0BAF41578888843 04AB343A6CB1F4C806FE6CCA9E3E2AC5FE9A6E991BDF1F711622B613088F7051 41DDE999515C0EE127B45D9A8E510F9258136F24E6A61B6629D4B228BD3C2791 AA844DE08768EACEDF502CA4A501E7119C2D63CD824CAA34DFDBCA19CE02C1FA 36D83CBF112D81A3729328DA0E948505695828305C4DC81F8443A202A4628899 9B69D9C139282DEEE0A83B86A8BC8848D30A8328AA348A81DB499B4473445C95 B1983EA2ED26DA2ED910956E7B937814F2149A31253B35D067DB51E54099FE3B FC52EB8DA74511232493093581B2F30305475A9D0AAC364B5250DC626D5B697D 6524AF72CAEF2F42B36A9A844501323CD265B23522AF2FBDEAFB9A24416E27FF 284BFF384788D37D5EABBE3751B5E156FEFF704B50A8B3EEDF499451A60385E8 AD44694B65025FE26B2E205E3EDBD4DFFD08C190724EE2B70FC4618CD324A5D3 A438D463C8F7457FF5CA2E3D6AA64F901026A816CB06E9A28FAB6682EBC89785 5B722F33BE7A7512A45727B083BFE9EA846354A14F0BD34322C16A1B7FE45A75 E2DA9438B51E48875B474D2959EAB20332C26B104715672EDCB91CB0AC7A6355 719D252271E33581023FC4A583949BF42AA2974AD4F5BF78DFCA6A222CCA3476 67E4517F1C4F8AB42BEE71B212B5519C3FBB421348CB2F8AA1469124D3E9544D 45B4AAFC7EB2A24BED6185F6895D3C56EC6681E0D19722F1E2222A0808FD42AE DCDCCE9B5352AD9F242DF8D39BF1F202AF8C29121C96803E1D2343D7788D3775 6AB266B86033AC6DD8D628F1617D8E44D4AA550C141EFF917995973065A7A088 D1BB50C4D45CE2554CABB36AED18F94E614D8C15A87813FC7A43452753A4D130 FEFE1F50628086731B0000 } insert-event-func [ either event/type = 'resize [ mn/size/1: system/view/screen-face/pane/1/size/1 my-tabs/size: system/view/screen-face/pane/1/size - 15x30 show [mn my-tabs] none ] [event] ] view/options center-face layout [ across space 0x0 origin 0x0 mn: menu with [ size: 470x20 data: compose/deep [ " File " [ "Open" # "Ctrl+O" [request-file] "Save" # "Ctrl+S" [request-file/save] bar "Exit" [quit] ] " Options " [ "Preferences" sub [ "Colors" [alert form request-color] "Settings" [request-text/title "Enter new setting:"] ] "About" [alert "Menu Widget by Cyphre"] ] ] ] below at 10x25 my-tabs: tab-panel data [ "Fields" [ h1 "Tab Panel by Cyphre" field field area area btn "Ok" ] "Data List" [ t1: text-list 400x430 data system/locale/months [alert value] ] ] ] [resize]For full blown menus with all the bells and whistles, animated icons, appropriate look-and-feel for various operating systems, and every possible display option, a module has been created to easily provide that capability: http://www.rebol.org/library/scripts/menu-system.r. Here's a minimal example demonstrating it's use:
do-thru http://www.rebol.org/library/scripts/menu-system.r menu-data: [edit: item "Menu" menu [item "Item1" item "Item2"]] simple-style: [item style action [alert item/body/text]] view center-face layout/size [ at 2x2 menu-bar menu menu-data menu-style simple-style ] 400x500Here's a typical example that demonstrates the basic syntax for common menu layouts:
REBOL [] ; You can download the menu-system.r script to your hard drive: if not exists? %menu-system.r [write %menu-system.r ( read http://www.rebol.org/library/scripts/menu-system.r)] ; If you're packaging your program into an .exe file, be sure to ; include the menu-system.r script in your package: do %menu-system.r ; Here's how to create a menu layout: ; The "menu-data" block contains all the top level menus. ; Items in each of those menus go into separate "menu" blocks. ; Submenus are simply items with their own additional "menu" blocks. ; Use "---" for separator lines: menu-data: [ file: item "File" menu [item "Open" item "Save" item "Quit"] edit: item "Edit" menu [ item "Item 1" item "Item 2" <ctrl-q> --- item "Submenu..." menu [ item "Submenu Item 1" item "Submenu Item 2" item "Submenu Item 3" menu [ item "Sub-Submenu Item 1" item "Sub-Submenu Item 2" ] ] --- item "Item 3" ] icons: item "Icons" menu [ item "Icon Item 1" icons [help.gif stop.gif] item "Icon Item 2" icons [info.gif exclamation.gif] ] ] ; Each menu selection can now run any code you want. ; Just use the "switch" structure below: basic-style: [item style action [ switch item/body/text [ ; put any code you want, in each block: case "Open" [ the-file: request-file alert rejoin ["You opened: " the-file] ] case "Save" [ the-file: request-file/save alert rejoin ["You saved to: " the-file] ] case "Quit" [ if (request/confirm "Really Quit?") = true [quit] ] case "Item 1" [alert "Item 1 selected"] case "Item 2" [alert "Item 2 selected"] case "Item 3" [alert "Item 3 selected"] case "Submenu Item 1" [alert "Submenu Item 1 selected"] case "Submenu Item 2" [alert "Submenu Item 2 selected"] case "Submenu Item 3" [alert "Submenu Item 3 selected"] case "Sub-Submenu Item 1" [alert "Sub-Submenu Item 1 selected"] case "Sub-Submenu Item 2" [alert "Sub-Submenu Item 2 selected"] case "Icon Item 1" [alert "Icon Item 1 selected"] case "Icon Item 2" [alert "Icon Item 2 selected"] ] ]] ; The following lines need to be added to eliminate a potential problem ; closing down: evt-close: func [face event] [either event/type = 'close [quit] [event]] insert-event-func :evt-close ; Now put the menu in your GUI, as follows: view center-face layout [ size 400x500 ; use this stock code: at 2x2 menu-bar menu menu-data menu-style basic-style ]The demo at http://www.rebol.org/library/scripts/menu-system-demo.r shows off many more advanced features of the module.
Below is an intermediate example with explanations of the most important features. It also includes some stock code to display menus with a standard MS Windows style (OS specific appearance). The menu module has been compressed and embedded directly into the script, using "compress read http://www.rebol.org/library/scripts/menu-system.r" (so that the module does not need to be downloaded or included as a separate file):
REBOL [Title: "Menu Example"] ; The following line imports the compressed menu module. do decompress #{ 789CED7DED761B3792E8EFEBA740343F24AD4D5352EC24C3331E1F59A213258E E548B233191EDE735A64536A9B6433ECA64566BD8F71DFF7A2AAF0D9F8E82645 27D9DD602672B31B28140A8542A150285C745F9CBF62BD078CA78BECE6B62C3A 8CFD27FE847492CF567378CDF606FBECE8E0E0293BB99D6745992553D69D16E9 58653D1E8F19662DD83C2DD2F9C774F8F881FA7A910E79A97976BD28B37CCA92 E9902D8A94655356E48BF920C537D7D93499AFD8289F4F8A47EC2E2B6F593EC7 7FF345C914AC493ECC46D92001488F58324FD92C9D4FB2B24C876C36CF3F6643 FE50DE2625FF937268E3717E974D6FD8209F0E3328546858507A92961D8DE9FF AB225BB07C24B11CE4439E7F5194BC8D65C2B1871A92EBFC237C12A45290789A E66536481FF16C59C1C61C28C032F08056DB48F29A07E3249BA4F3C7319478D5 06B5244ABCF5C30547D38315DB165A8C5A6D821BE683C5249D9689ECDB36EFB6 9C679AB34952A6F32C1917BA67B05F01BAD922ABB1AFD30C0B43A6693249013B 78D68DB9CDC7439E619AEB4C9C266561B5923788E0E7F38223B262D729301D6F 5ACED2E990BF4D81BF386293BC4C19118FC3E09033CEBD16AC11CF44E42AF251 79076C23F9B298A503E0470E2003769D03274E89278B02DBA6205D7D7776C92E CF5F5EFD7C7CD165FCF9CDC5F9BBB3D3EE297BF10BFFD86527E76F7EB938FBF6 BB2BF6DDF9ABD3EEC5253B7E7DCADFBEBEBA387BF1F6EAFCE252C1DA39BEE410 7630C3F1EB5F58F75F6F2EBA9797ECFC829DFDF8E6D51907CA6BB9387E7D75D6 BD7CC4CE5E9FBC7A7B7AF6FADB478C0362AFCFAF74035F9DFD7876C5F35F9D3F 422CDCF2ECFC25FBB17B71F21DFF79FCE2ECD5D9D52F58F1CBB3ABD750E94B5E AB1605ECCDF1C5D5D9C9DB57C717ECCDDB8B37E7975D060D3E3DBB3C79757CF6 63F7F431C787E3C0BAEFBAAFAFD8E577C7AF5E55DAAFA09DFFFCBA7B01AD32A9 C05E7439D6C72F5E75B16A68FFE9D945F7E40A1AAA9F4E386D39C2AF1E697097 6FBA2767F0A6FBAF2E6FE6F1C52F8F04F0CBEE4F6F796EFE919D1EFF78FC2D6F F55E53AAF17E3C797BD1FD115AC34975F9F6C5E5D5D9D5DBAB2EFBF6FCFC143B E5B27BF1EEEC840315E9F4F8EA18ABE6653919D57B4E86F38B5F000A341049FD 88FDFC5D97BFBF00AA21198EA17D979C1C275766360E8D53C7C0513780BDEE7E FBEAECDBEEEB932E643B07703F9F5D76F779CF9C5D42060E1BE8F8F331AFFC2D 36037AE42DEF3BDD172F6D167E841DC8CE5EB2E3D3771CD8A92CC5BBFCF24CF0 09D2E3E43B41D4C73BAC2E6175FFF5A0FFE0C1A05CB6B86459F059094673BA2C F95CF5C0CA57DC26C3FCAE954D929BB483934A0FE69F92E19BBE98DB20E1EB0E 2B5645994EDAF90C655D9BC468EB3A29B44C0B67E9B0AF9EA86CA2CE719E0CF9 EBBFFDE783ECDD8BF38BBB831FBEBDC98F797A7DF9F6B6FBF6863FBD809FC73F 9D1CFF02FF8EBE69FFFD161E5E4CBE7F7571F0D371FBEEB47DFCE6E1CD838F49 7A051F4EFEF5E2ECE77FFDC89F0AF8FDAA7BD73D9ECCEEB0F48B2F2FBEBF7AFB F6BBC39F7E7A7BF2DB2FDFAEDE24C9F827FEE1ECF5F70F2EBA2FDFA6AFE7C383 5FBBE777EF8FDFBE181E9F9E9E7D7F7AF64BF2EF9FDFBCFF7E74F9EFC5717E74 FD53B6BAFEE1877FBF9AFCFAF6B78B41F7F0EADFE70FDF7ED91D3D78F3F4EFA7 776F57DF9DDCFDF0EDAF372FF2C1CB7CF1F0EED5CDEDEDACFCE1DDE9FBF7DFFE 38FB707EFDD5ABF4F8CDCDC9AFBF7DDF3DBC7C77F9E4E3FBEF6F2E0E8BE3F70F 7EFEF7F7B7C7CB9BF7DF1497072F3ECE9E941F3EBE990C96CBB47BD25EFDB67A F26A79F8F1F8F8E555FBFCB7BF1F5FBE6FBFBC3DCDAEFFF5DD3552A83B7EF9E0 EAC3E5E2A7C9C9C983FF6AD41FD8AB7697E0AF3EF1C92029789F8F16D301EB7D 4CC68B14DEA405E78B820BF0019F8956B3F479FB2E9F0F59C7CC40C581E55A45 F65BFA5C02D9B948CBC51C2649364A06E96E817918E481D9E46079C0391CBEB0 5E7EFD3E1D945FF4597B9C0F9231E5E1F82EC625AF5F8F2A78DFC1326D7854EF D59B0E3B3CE069897F6B878F7F3C8911C0EBEE60852D441BAAF0D567E141C504 55154024758536AFCF5F775B45324AE92B02E323349F978345B9432F590FFFF9 82CFDED3F48BBE394293E98AF512AE48521603481F08DB7750981665321DA4AD 7C2451D0D3A3ECA7AB8BB75D968DF8945F66E58A65A8CFCDD35F17D99C4FF25C AB290AB6078893CA729715E9FEE31D054714939D29B016E57AC0375F08BC8C76 40134CF58151E9E7029AF5691799E519BB01993595F5ED025F5AF946F9623A7C CE461957CE9050950202A3BEC04D9575A8E6658DA6090B4CD3BBD61014E0B13B 2AA66C31CDA65C911CF36E1B72A52C9D30CAFB78C7ECEB49F2219503FB6396DE F13F43F8AF4563675DBC3061C33B04FA9A8FB90F5F704EE2150864FB9BC04C87 20E307F9389F77583A1AF16E94FFF2AA801B9AC1B1D96134A2B908071B676DBB A7D3742C5A8143127E57F8091267DF7972277B809A28204B89038DEF7B8A4282 6F1DD135ED19D768A765CB120756E691CC299A1E000AC9CAD861B36CF0A15A18 B9E21FFFC47FDB30C1B7930157D38953ABFFD9F37D90B6D8D135A4530F1C1F44 8E6887E8A41F3905AAC4E2ED063D3F9B3EA7EF6D415FBE286AD1E3736A0CB604 C59D4B18DD4A408733799195FA253EF9CB60765E2BACBA7C991025EB6DDF18F6 86FC3619C5CABF73CABFE0A8850A1AE866350969A1273E41ADDE2CC9E65F68DC 883B2D44B8202F531A66BA093D374B47FD44BEEA1DB1C33ED5FACCCB4D95C254 CD4355F8A02F7A0EDFB30A8FD9AC00F9841CA8BEE66B47BEDE2BB3B468231D31 5BD1EE2058174AC695D9B6D01E235020DB63CC56034A0EB5FB81BACE87ABF688 ABD91D16C30AB23D866C11088A4E7108ED1A3A213C2E9A920618413617C287B4 D2243F049E2DD0240940F77C14405D8B009CD5A030387F83683A725E57014036 7F619B858385EB1A8279EAF9CEC81681658289C00A83A9CAEC695EB274322B57 CF231C43C32124AF91F72466837C32CB8BB43D4CD35960E603111B991449A1DD 4EDA4B8A1648547660A00A734F7BC55A6CAF48C19467EAE7B5441034DD676D76 B41FD509F79A82F242E93B6FFB81E90B92F543B02D6ABE9E91E915405C094C06 1FFC6A9FCB8638DB4237B626C9FC8398CB08CEBAA9022F99CFF3BB4DE11913B9 42CE525CF4744BC07BE56236AEACAC1452505AB1B5BB4EB1F3B9030D12AC8F43 3AA55E9069306C779E0CB33C32381A0C2F93045C9F48A76C0F5BBBCF1744E371 CB7C31C8E68371CABE5E7EC3BE74190E49CA7CAC1869C0E036057D617B0D8866 311B33CEA669EB2E1B96B7EC887E0C92192B7E5D80091A7FBFCF613380AB82E3 2850C8CBBEE434F96A7978C80E8F964FB59EE5FBCF5E2F6A36DE9CF5B07813DE 2B16D72ED3DD5B02477966968F5737F9342EFAA4D8355A835277C9A52EFBC679 BD0269CA3F1DD648D41858DE5521B04F3E07D887B5F2FFFE44A859DCE1F24872 590C9535D2CE3B002AD69D7B435CF364E56EC16EF38F7C714533165FFDD84C6D 2C442AF345712BE5F9E6A962A0B15EE19ACFBF60EBC227D912C043B4840F1A34 959BB62B488126B5A7E9DD3D90F7266504CA26937498719A8E57B473067866D3 9BFBAF2FFF4A0D53DFB163A0C0DD661552566F0B1E28ED7A31EE482130B509F3 A769369CE5B3166E617BA78E7ECFB51A89DD651800FED902B815C7120E12A891 CFC0D3A11CF26BB5BB5F5305FEBA6715768BA382659C261FD32D08575B26BD02 A81EE9BA98A27C4D87C2EE027E0583319FC65D99E5015BD130EE87677F7BAC6F 2149BB15B2BBE403E9FED854F5AEEF9F418C69D1370FDCC022CE51F90DF36E51 D5B502EAF906AA39171AF968A40C6B6A45105BE6DA393BAC9C2FFC16655F8A82 2D3A86810F467C7B964CC3B047F93C4D06B7ACC8AEC7E0C182206A146F29256B 113689292BD805C45A5E3B6D35C922C2025E5F9DA2EACD3C5FCCF466910024FA 123F468105A4910737AB1347C9B8A8EF456469B3B8BBD8673ECD4FB572FDB597 C36E6A0E89AC5F0DBD4EFEAA0C38AFE685032F19A08F131ADE6D761543729E73 0CF89CC47B89D73E2FC1D348F09E8D4D608216153C63BB1C024D794ABAD81364 3F2AC05DEA8EC876B2F6BA7DED75B24BF048E7892D0E25E6FC03C26596E0AC0E 963FDCA9296EB351793F8D073AD3943A882CBCD4CDE6AFBD8D835CE62C00BF9B 12C69D1B54817A3A6423BFB54F30D6BDE831CC8D49A80F1E88C36865196D2BB1 DD221D8F02EBA5980110F8BFA2CD78F6B1F1C7753207F8E606A0FA6D307DB198 C1C24A7D521F404F11DBB98E30B0D0B037D3B04DB4CBE5B57908AB256E37693E 22DB7A6817D46AA0264868CB524A1E2CDB501930048B516F4CC6422E216377B9 9A3A6D95790B57A935659AEF78421AE58345D19EE62D3504FC23CC1D073652D6 66604C67F9DC88621D23C28E234592095C3B6A752893E0A845C729AE0AD6ED19 43AA33C343AA54DA9CA2BCB513703DB65B1BD7ED36E982462DF66B1B1EB902E9 F7B1BAD880EB4D26751A4388369BA4ED2FE97FFF353B4963EFD25D73143672AF EAC5B1CF1EB2BD83E521FB0F9129FB2DDD6FD4D0BA65BEF41BF9AC1845ECF790 C06B0B80783C1985CB56C23B852FD6154EE8B1156DB7E9C5051AE130990FDBE4 C165CF43E49965BB66A90553DF193BB019DCDCB72A9EA09A6DC2DB76FA98D076 FCB6F003C74EDEC7E8F5209C4CD4EAE8CF4001AF47DD9F03354C8A587F342281 A495EDED908D5466AD2DDF370D9332D9668772C1B855FE206B1A78447518380C 74D88794FF11BB9BEB57046628F043C7A3571B4EC7CEEC414892BCD4EEB6AC87 361EC2722D932835D702B5A1499512116E7BF0B00B62F01C0AC9FE5A1F035A48 B2E04479BDC8C6436BAA549F775EC037E530F98895F94D8AAA091E6B03854CE9 85300D1686FEE6B167EF24A8D2C0971DE38023CCBF958C70CC0DDFC303429AA7 4536044BFA545781C718C8295D3AAAEFC8021C2B9E7F5A66A32C9DEB221C046F 204DC9827E6611F83CCFF0E00595118674AB556DA21569287CA9EF1AB295AED3 61D63A09DFD3040858DBEF499000062E400DCB303ED8C54D3989E348BAF0BBEB 7461B0E818C04D43869B5F398057F24B0767772743F884BA55086380AF88E1B5 C9CBF55C35897228647C3994B365C7AE36ECC6A9FD297D45BC6E89A603580053 E921D9A9345FBEF7345F7A41FA8AF8D1B0BD238D6E190AE73BDF6E0B328BE1FC EAB568B9E4D2C508C770310B57CC66B8A57A8B39FEA8AA94A047B0945B974113 6F29CB55D42A5A35B80597E1243087191CF07517D04A66920013D9B42F80CA48 87100CC9B743C784313F9745E23B40F1CB22E5F7EF5F7DB88B0F01DB66571447 96890061A3C02114AC0F5575CCAE99B4DCC3AF8F1E1F7EF5CDE3C3A75F8668D8 2C5167EAF30DC8D8F73401D0211476B83C723A58A02F5611A6AE1EB0DA2A23AD CB30B0FCDD1D27AB7C51B66843A4CA27AFF0235959CC89D39E0FFD3317BEAD9C 2BA0E37C3859EA4E12B37FCFE4BA2215C06C84F389CFC805D4EEED0ACE619FD8 EE7582FFB45AAD3EDB8BD0D94A519356C71E51F694594DF67E6807B666784B2B AF6BCC685404952825340BA5D2A24AECAED3CD640E828A94F196719DCC3E3162 11EAB47C56C2AF16A9327BC17A31B7702614C737CB9C5129FCE947D9EFE3063D BB4B26BE608590CC2EC2ECD2B2429C4A68586A8B2F6DA1DF109978DF4905ABA6 FF20ADDB8790FC8484BEDC2DC6C8BBCD49290A0031C5E35FE4C4E4AFC7FB32BC C50B498F2F88BC31BD898D2C485AC5219B1296DD801774BD65D2AC525075A84E 3E9C25B29B56DFDB15FB911A0FA1057C725EF56BB0F3EF746E4E9ADE2EA8F030 7FC0BF45DF40489E93FE24E4D927705BC6DFB3A4BC857F3743D95A55C0F97859 5F140A24C2834E1E47A4AB990865D6C320090DCB8876F71A66276AB0DE306F5A 81D4011B648F7F15478D10DEF318A11B1037DE4DE4FEDE000CA4BD08ACFDF8D7 3F1CFE7DBA234A4221C22379EAC5927970731340FB7EA92D04011E1103498040 FCA2408A002912EE270AAC65FB5AA2609371BD81F8587F6CAF293C7E2751103F 70584DF16EBA9F2830607986AAF9F50F87BF4D51609130200ACC4E6235B131B4 6A141007E691C8C34DF46761173484C02E2EC43E9165D718F3750A95F0FCA3CD 788245A09E894125D81F0C88EB5155DA34054137558276A5D9B44163FFB0B62A 2BAB1A807B08693F0C26D26234791ACD6DD8BC8AA93268A51436A2E0F79AAE52 751986CA908D52EE5285BEB3CDD9028C99F72112194B8336D91891B0EA358824 ECB221936C8C4858D5E64402746B26830DB9CD26E6E7E7B8F08C700F6EB01BF1 F93922DC08BF9CC0A67136F8CC5DD86820C7C7F11FDD818D86597C94DDABFBC2 BAFB2E9AE17FD7C94B458EAA99C58C2D20DFC64F8060D81E42C09FEE6504EA89 53479FC481813ABA24B3993C45D1A62867BB9345B948C6F5A76DCCA2782484CA 3714ECE6C9927C345AB3D1587FD41E0769371FB11E98BBE9F88EB5EA1B67C202 DE788CE843427526A938DE950EABAD7C379F42A15D38EE850F2BAE437FC2D35F EC5383D2A31114C27346F000BE579F1A1C3BEAAF4316D1917229B97D298EE66A 08526C1B191B682BE4E930CAE66A05BE7122270C7099127B6DE423415BA7AAB2 C0618C4AFA4B63D72D361B3ACC8AE47A8C9C9A4EE1A9914A2AF88F803C63124A C45864A6863B03A1E334FA496D268A09ED41ED10C20CC9F0FDA2103BB7EE16FF 317E65D24B496CF062DC120A273E17BEC6655ECA48A860EF5E4CD221BB5E395B BE543EB6B9AB1998A2F5E03B30A56342A51813A8569828088F6A8F8481119210 063D010C7A0218F4C461D003C2A0471521B5C199CA5052F57734021D8D4147A3 D05138740C24ECD091F2C42B524610D0420D43F1D1213B2014D208C88300FB72 118FA7BA22D9EC435DAEDB4E8BE27E70DCAC4FA05208A4D5E373773FCE063772 0E1A1AC76C7DD39241C6C3AF96875FB9390CEA4E92A5F19B1E45FCDBDAE05966 40BDC3469DEDA262F42EA2A2198EA9905E1D2F7341F620D789B3126ADF8EF5BE 5A3E610F8D58C6F88DCB551553370226ECD6A45A5F73A87A9D3864CD48A99313 99A59AAAB155ADC2EE17F78D1E77D8475A16E0A36017412BB96BE9A138FF2408 1E72658DB2ADF382661431D28C00701D37AB44133E928AC15B924D1693160642 A68D6D2F91D48068AFCC3A0C88EEFCE32121695F0203333610B4D6DB32418B20 B63121EDC12080923829B4A2AE35280AA18C0CA4318491CB46D4921810270E92 871791C6514CCC5E4020767B2231F3C2F2537A16F5D8BDBCB6EB6B234F8E90BC D6624E341A73DB51D015F8EDF3454500EB32347CAB2835A7BB3938CDDE7CC844 70C6CA1468026810EF18492163487399E2D168DA4B43A7682FA1359236F84BB5 157F491AE10F2D8DF0A7F60AFC932818C66831085191459AEACB8E4915DE20E2 9ECFA78468C9B1F40B38359E971DB357C2A303321A1DE69DA45446B3335D1E32 23B679B10B9141B54C907B5955F054D37406BB0027BD411A7F6B8DB2162CC1BF 32D49C9F0246610B9860F750614B8E43610B182F6C9077CD89B9D9D8AF889575 457804850AEFC7917DEA10B5716A82747C263065ADEE0A6DB837BAE3CB268557 6661359756253ACDA851FA9B12A663CB1F3545D8AA50DF95C6F2CC112DB84DF8 F843BB3C46EE5348E84205E11A899AF38EBA59045F3AD72B28BF54AF3BBCB08D 0A8BAAD13D5666F2A69499D18952A28A97ED14E321AF976C4DED126FE782771D 89E8E1D1C1F2F09B3EC37C151A19F4305D40232708ACD6ABEFE2ADF76C157DAB 9EAE62D1F355025EF08415F39DB1A242B15356CC77CE4A15734E5A550C1E9C80 557B83E1826C7ACC228ECA61B6C27456E76258D70FD3FC5A925C9CD0984BC682 6F22B6EBCA642F2AC327684E42A57DED8E53CE49E4719BA2953E9F1355DBF0D4 07C00A82385A5039C1E58FA6AEFD275622964AAFF79471A6EA7DC39EF6112E18 D4A0520BC326F1BB03516363D162DDCC91E8B12A602A22240431A8F1D89C7620 386CB0548B7DC94B0582B4064B3DDCA8941743CF590F56E12A8013BA89E3FF40 060AB6431C871C062F9E07E2E8205673349DA29B3FE5C5B7C6AD25F6B3E627E0 AFC750DA137E0FABFE5CC90C2B62C614C34AAD306262A801A69EEB478C202A9C C5CBCC7B26850E27C568E22D42A153B8D8C9C7543F8268DADDEE3C867A493218 A4EAB455E8829F36E5124D51906E52C2B683873FE869304E93B978C6CBBEC4F3 9F2862C0DA49F3C6321DDC271CA7D5073B976959C02564181D106605DC6B28D8 5EF6387D8C752D4AFE136F3115ABACDD42DEAC8741382D789E73C8BAAE2B3561 E6C0CE2C9FDA1170C073132E7E01FF4D9A2C335ECD4D3A87F9F20D7C848262A9 974C5777B7299F2C304E92B857B59CA7691525445D4CBE045BCFA83B27F051B4 72E83650E3E7B97F06D1D0BC5E352BDADE9D8405FCD5E7FEE157657F8A17C204 E83E370882871A087BF8EB292448D5B890D3146923A192B827098F9E7C66DC3C BE10E27596F315EBF1CA647FD15917DF1C093371E5804DB59C2D4C5C18428530 8EDAA8F35B6E71EB97405C5CF3719B262AC610142FDAF314C35011059D7A8739 D9213AE6602093431DCA728755C8B036709C7A49F501D0A818D54B043C6FE40F 3A755C96C9E03655D10680B23866D2255CC13CBD41B255224F6100CAAA7A5B49 7AF0426ECFB865FE91ABF4DDEAF885C7215EAC6B45C5AA8EDECA5D7A7EDC7E04 BCF2B98E42C4A7FD39EFDD95D8D04E87C640C66EC7FD4771D59CB8F519DF8B6B 832B446A5FA760C8623B67487A11D44BBC448D9C2EF485B5D6027B3887C3CAF0 2C258F1BD72B1941F8B10A4C7A69839C71799112D01DFC11868967D01C98D43E 71D79B6A1FDB1BA6A364312ECD4064EDC4BE10194E363B4B979F61B170BD6277 B7D900FB749E8E00EB5C459AC093DA31D909CB2CD55B05FB98CDC139C710A6CE ACA2C40E8D4E0C96698E268AA28ADF604462F8E43EE58B08BEEA11C040F043C1 339EF9B622CB1079D74E459C6217C7106795E2C031AAA1F202486223F8DBC7B6 55841F7E70EB14ECA5EA9CE2DD9D9E3A81A39C3A89CDE0AFB74EFC60D7D916DC 14B20EF62C49AB0F4BC668D777FB4A38136CD64F84BC0B1952B58FAE133E5369 7A19B486AFEB92DB20DB56A8166A49EC36243FC96484936774ADAD12B85E8C22 F7F820116A5DD74C1B9FBC85541BC6372B2AAC9AC1C235DE1618BB0131EF80B0 AB5C91CA5FC53D88AC0EF29F20F6DCE0DA180A75B4D41801418216478AF2F8A2 E738C4097E09D1BBA6878528EFC8320DF0ECC84252A00B3D4CBC65E1B33090FE EADC353BB7492857E18758150A6CE775FB78A7B9CCA94EAF162550584742F39B F21E52A030E608A3209CD090732D6279364D89EF02B79EA615CD1A43AE2A65CA 7458CB4A9F82DD64552C181F407FEEA57183056DDD7AB14E07ABD8CF3C2B2D9D 462A30785DF8050F1CB05A95C68CADE1E879121B77E4B4420C23273E8D55ADB1 C1832169C0E6845DE663141D2255C4251999D15137E38BDFCF5A62868373AC25 A8F88B85AF752F538869221C62C56EF38C452474F13F97D06410B23677344A40 E80E7B07CDBA2F9D2DBB4288CE348CC2A4FE9F26FC22E4135828027A68E7D28F 26F520FD7A83A41C54EC6FF730D5DCCF50F359CC34B4655C6FA4F9CB38F3A730 CE8406825F5D263BA7A32CC7D7E0B689860608762FB48219024AEC3A783471D1 875E48F40D60358124BAD30B09BF21520D20C9F5BA1F5221B3D541F21DB278A0 7FBA920678E23A99DB3B65C6DE19EF072D91E8C212E3ABFE666BB855326D96DC D9610FC4043EE5D3F16ABF66B6A8C2136D35833A4A9906AF6B670A264DD1FD10 9B0B50B2FB906052F0CB6A24284F8A4DA79FC738FF97C4FF4BE263FA5398E371 67138EDE0536CACA5B383685220AF707BF901400162FE1220FB87A9AA9BD3B31 E4387D8AE92E9F7126B3713A819B55866C95965FEC0444A74CBFCF0C4642627B F398056F0BB399056F0B739A0D6FE399AD492C605F52B39EE91554B910069C3A F0335C8FD24AEE12D3FA5C9D0E71856FCC83E6955C95C50EDE469AF88471C5BD 41DCD0D20357A8F86C83B68CB1BCDB4BBEABF81CE1D75051E997E62F4A5F8365 653C677F59339AB3674A33E7B66C48ABC4E796F71F3A1C55B7FB21BA7D367D2E BC9104A9CCCB6A9449CE3EBCE19F5465C52D58CA35A8DDBF15A13D98CCB6300D C61D6BC1CB3D8D43D2E1EFD5BA087DB36C3B527943A51112DC8F645FF716A64D 40ECD5212C7CCF827778A1E9AD87CBEEC58CA13285BE67784E635CB6F00B3CC0 4597E840D61A67702745A32BCEFC1472A9E47F835105FCC00D6F166A8185BC81 281DC86B84ACB6CDDB174046ADF53A3BDDFF18CC1CD9D0DA9C4A067719E7BB11 93ED2E17D8CE09DDE72C82BBEFC17A008619BAFDEF8A58DEBB4AF12CF66BEE80 B7857245CDD912CE12A6BCBE6F0B2970371B72015DAEA81FD19B213464550E83 7914A2768E6DE0DD34393E6AE13BDD02DB8A8B29DE9928DDEF7FFF24D7996A1B DFF6949DA66BA266C20B1222D2C99E7D0A488B29FACECB2EEFE98E37F08DEDD9 6523333BEBD957555627ABE83C8477316E5B60BC03A0855EA13C0275906EE8C6 350E2C5F9040359242A48A1657BF928DA4EACD8392943482C54DADD1C9769C26 1FD76524234520CFF96C20BCC42B7B7B565EC15ACE461B36A794B765EA4B369B 2B25D834753EE915FC12BD88753E12915C78AF55BAC4B8ACBE7A9DA0B8ACB863 92F9BE8C563BC23419A8B7E810DE66294A31A1283867BA00C35DB13AA47589D7 F91F56911FFD07FCE49ADD1AE8D7F334F9D026631CB3C7B6499B8E230322C224 D63CF430F6B58F5C8F85ADC266065F1BD591E2CA66B1B7DDD1A3B8160590DF82 ECAD756D4EE4D60C4254785A021FB37C51F81B23393B5D96F384E5A07956DB67 FDC07CC2A051D50C881F9342699631D915AEC2A2A7765B43462A527204AFFABC 20F691515747F508A2F124FCE375FB412C5D8FE50A458872206BC7D39B0694A9 184861281667504F3556A121D9FD28DC2BF1AFC7090FDF6F27795607A67CC3BE 7372DCDD66E3D08226BC04B661C36CA7492A877AD3358FDD057E2CB1796E2744 D6E7C6D465D81BF02D8EE2107E7E3948EDB4FB3CD4326F8AC946187A41A982E3 F2F7912856C7F5D7171CEBCA0A2BFD2538FED70B0E7346FB33CA0D1CA75B901B 516B1EC9A6B5958BBB7932633B3FC3DFA4944A6399CFF0566E1F5F193AA150A5 632B9550CF7828197605DF40DF88E227D33D353DB7373CE442FAF642DA572F24 44EF63D815ECB6D68CF079D9203CB36F830FFEBB747D659A0C31C51A5D6F77F9 E036991BFD6E957299006E20A7FD55BC54180AB33D4EB3D7E7AFBBFBA6C30FA4 0ABB60E61EFCB557DEDAA9BA6AAA249F6C4198680F89AC0DBAD7E51C116B04E4 016D15C323B9FA56A0B82EE0A1B9CCEF696EF7496DCC2A6CD82832BD4598D19F BF342F4DF373E1AF8B64FC9C2D3851E6B87F83BDA67FDA203CD787540D553239 63E33EC24AB07EC87C019F3758E4C7A686DF67C52F950CA76157176FBB58235C 4D3A1EAF644E5728DB56C66A7B41AB8C6C59627BAB3184D4EF7FB003B75FEB52 03B856AC222674B4C1389BC957D5E4A51DD8905B60A0B6776D4D527870E16DEA DB20201ECC5A201E1A6DB4DB40BBE2F44ED7720B7B9E6B23FACF67AC252A42B7 091FD06DA0FE8F676CCFE900910FE08B57FB7D97F0A2664FD5B658371637D416 0EE0798825110D2308A5F34E354293250249461473DFF1572E811B0C938E8FC5 1B40D27B1E5670A02A7F3BBC19ECDF2091A9DB6A892C49E310A6E5F47EA43190 ABB6316A08346ECCD6B8C5ED992AA02061BC3CE3725F0C1E66A38841DE0D0020 CC1A4CA146FD7A74BC2F43B8E220D066DDEEDA11E3C2F46386191A51B01127EA F1850E187E3A5238A62059637E2EB863FA4C0008DB011AD3A728D399FF1247BD 3050A2226CDB909C80F9F584249409CFA746AB0C850656BE8D56B7D66CB542B5 61AB71C6F4B75A11B0766DE5AB0A9295CBDCE2E65A418515D54FDA4B0DADC6E0 5BA1DC6DD9DEF54AF02D7ABC82FBF084AF1652AEFD26937C312DF982089C2C93 F9AA6E7166AB8D2AA7DC9CB71139CDC17F165B0495F225C2F42635EF48F0B8FE 0ED371993090220CBA38B4E6C36C143918F21AC2078B194C12B665CA7B3B7C2A FB01D7CDB00E12E816B705D7FD325515D74DCCC46B0DD3CA00A98E0DD190CF3A C22181575B83A18FE4FD4790BCF58EB955FA362D20E6A0DAEC2D66CE629B19F9 D712385BEDBFCD6415A406FDE70B26452AA4D7DD874BB0B05B9F95DC997692CC 5A1FD255DCE23401B3CC9075DF755F5FB57FE8FE127790161EA3F88F362EF14A 426206EB27174B339768367D80D86C5CB67AE4089646112342D6802F276EA9F1 7F6FF3494A7FD011155FE3135899F87F7D7454451F4F3BF5AB187AD4158B9076 F44624892F7A23D9CC50C0D3550FFEE6CA388EFE0BFFC4E68C6184F3DEE6A094 64E44DD1D362CBC4EB32EABC88847ED99D630CDF672C7E27A13499119A51BF46 A78584379C0999B795B7574DBC18F412AA38472AABAD7A5F0BA3ADE9A67DA0C8 6B3B68D093E92EE1F97BE1701EEBD8A1FFB6C3A4771B519A0528B0F7B79DFFFB E38E9173BFA6536AACEB9084AD573B92C6B343AAF61BF39B79CDD4E05E240B2A 0C3381FE2E1FE161E76755C1567A222D06C98C8257A89EF076C4EE381D954C67 DC0F76D92E04AF2866C920555DA6D94EBB83FBF1D945A966E2D3ABF22CB2AB67 F3025204B0949D8D019BAE5131C008731D8CC58E286D6D4500A3445F07B0D85F AB05ACE78B75003720054C3F6B612CF7976A3A4F1FEB0A323D4663174E96B65F A56E81D887222450C07BD1432881FB4ED7DDFF6C7266EC816C3C9C8A368E88C1 AB96081C2DF39A07A2E193FAE01E988193BF7466C67F6298144C3C1AA74FDC30 ABA4473B90A7CD2CC38875B44240081886E8AC726087AD9225229D9D7C55F162 7D6C68535054D17ECCFC5530ABB8D170972BFC830FAD326FE1DCE06417AEFFB5 6622B92CB7286B7B5275C478519F6DF7CD8E9485213DD847C9B5D3EFAA3FFB17 D95225C63989CB5FFE7FD2DB50A8E1633FA07A43F27F71CE11FC795574F3849C C52E145ADE7AE5B055E58A0FB82503BA2A72F7065DBD01996CAF8B688C73FFAD 1B58444464EBB9027F344E6E78AEDE284BC7C30AA224199947F64152D124521D 2AC2FC6E23436757E92C29DD3E8BB70617E635D1FC199DC43B7261E2D882AD1F 683FECB027EC0F4B36FF92B78245EF7B5D76B6E564D3EE36E163A383F7ABF03E A65D1BB2CD098B1CEE3FFC6131EF29E29F0C6EB81D98B2CDEA8E08160A546A32 AB773F0212DE20D911505BF8CBAFF08BB3D73D3EB1A4785A71769B4C1663F6E5 5113D3BBE8A1A64807D1AD698DC43298C1EE91A06A35D61166482639C4146245 5DDA115E56095BB186155D9E35EBB5359BA39A458322D62C82680FFF70DB20AD BBA08444E3727DFAF6ABFFB91A32DDEE63CE4CEAB3BE10890C52182651C47701 34AA57292B2DC4BAB108CAF242C6DDE04C7899552E2EAA46B6D3B72599971611 F6955D09CC651CAC37541C6A99487212B6EF696ACB09C832CEE0179AB498BEE7 C8A21F15366632156F5C4C68EA74AE68BDF1DCAE14767622E93A89C066E46321 87443240D217A79B55411514C229485F8205C1D4904D6F3A6E41F12558E3D0C0 D4AE714898060AD2D6B0AF207C89145431339C8274C99448EEC208FCCCC8EE5A 2190F12558505D04EF1494D7D8070AD2FD53BE1AE94BB046E37AE80EBBDFB4AD E1A966DC1F9E71E7F256F04378706517D2CA2494FAE22794BCEA8B686C16945F 021446B83C7FE2AF11BE846B54E59C1AE14B888B7CA3457DC197A125EE3D0488 77E6F4C88BDECD3C196620CA0E97877092A3843BEAC71F7D07563C52E36879D4 4446980B1E70CB1C26F3611B4FD0230D7A74992E0726A77F4241A933BBD7102D 2A80912D55BE7AD2448460439B888BE051E08A74902A088E091F518F9E3E7DFC D513FEFF3E0BE61184F7ECDEBA52C5AA50900B9FE14F00822B5E22F9D6101B91 A1D6A0365B0884590547754FDE5F7CB43CE0D37176C37B8A4CEC1FE5AF016D35 487249425D8F213634FDE5B45FE19FBE5A4E44C8660B9B3F2182B6500B238852 AA97CFB39B8CE3F1940FB74932C7E76C3A4405077C3BC00AFE1CEA8B90434BC2 CF5DDB268284695162D017F91886E1E1DF8FE03F63B830C5EC56E6DD0CE50E33 7FF4E3766B6B3828DF03A1A6DB6B77081A4CC110BD41838DD8D6F8790F9AB98F EA7D49D1348B72354ED1CE0662C4D0A9D9304BC0B0F638A490EF9C52065AE240 D41D84553C624959CEB36BB8EFED11AE0F08C1425C2D5A0975B5F3421EE7B0A2 2F1776D4C8D0A282A3714C66277C0DCD13D52032462D89B04DB3DC88938999F8 E84853B39DF8DB68E8B1994F85074F448078D1ECC7DE9B5331278515D75ABDEA 3EC39827AE4B67B16BE48DEBD12D6A884868F44C77FE86927F21A4977BD42271 65AC89A1B9A0A92C525C9ECD042FB09EB8A5020122F97E7F33587555A703D955 DAE189626714095C1AABF5025F21A14F790BD192CC251E1F1F9C5569AC6DA5DD 90FCA67CBA8765577077EEBDDF13F3D10A09788C7859440EFDC4CAC56C0C8BFA BDA095C24B2BBC7849018B5A46A826AEEAC8CAE3861442082E418966F57F712F A9FDC4FFDB954B59A3FD2AFAED2746411BD7A080D27EF156455E9880AE83114E 54063ABB38BB7C22130BFF578AAEBDF0C6A774A2A4239B0487C03C13741644EC C81991CFB4112B966F1C09EB94EFD3DA6DEEA16BC39083E23F7771F0F47D1C39 CAC64802CCB156BF88C1FAB938931063BD719E0C9BE4A706484E363E6C87A985 6127C24492A2E3AC6CC967C558DBE02BBF362A933F34A9B09F115C71B736EBED E1EFFD90E3804B02BB5A24081DF06B280B8B46A36F2B83AFD998B3567742015D 5FAC0893D49FB16D4ABB763A7D9D16E2F2CA685E7D73AA78182BCDAA70B3BF47 C8EF836B2C10BD70954D6AFD6EC545D4FD1B4DEBB570A3B19AF51B2D9681C146 23D8F51B0D284504F8069C1024CC16B8C16D846AC8FABD1744740B3DE847D41D 83887ADC8F774B5DA0074E7CDCFCC11DA0593DCEE95B247F632DF18F50120DC3 8C97205A49F4835A4716883D1A4D0AB12BDB5C004A83EE3A6228169B0996771D EB0D5F0CA4D3E84D66C2CE439124D416A8BDEC34EE488C5D8BE8B12E599F1E58 996209331977232A4FA6637C57A87B29B85681260CEBD2167A198DE2E0ACDAD7 5BB6D7AEC05D9A88D6683A570818722BADA51766A0FBE8F06898CF6077C9BF78 2E0DB8CBA64338A3E31CE0B309472628610EDA66DA793347D3E0755A30BA168D F32BA7E6D4B857651D7889BAEDE0FEB8D961FF772ED2A29C670315AF08BE6A42 4E922599C8CCCB16E028880670CE9B055D00E74304DD2DAE9D4CD2619694E978 55DB66153B5C41B7050859DBE8DE61CB9487264DC453381509B35ED57E677CED B027CB2D38C04902C9D07E925E4409A475DFE275856A277C476A4548C9B3F41D 7D9A58FC3E5C1EB0FFD020DB4BF6904F298747216CC11FBA85C790C99485C7F5 EE91AAF0F0E0DD3D92473ACBBD1DD8B8D83C697872BBA2480739C403E772EA79 456C3585A74F4F2E3B951ADA4B9F74956DC157C48B66FB3CDD6E9530223798AC 60BD0958CF5CD632C34899014FEE951EB23D4157986090279F1B04D8DF00DE91 60F050CBDAABFDCA54F2D01CE6D5E3A4FF5423B65D55B68DC106B1203ABE8821 1DB64A0BB754252E8659C7FD53AB86A87513696B1322FAC0F8C9EABB76C7A4A2 43C1695E43C02A4FEAAA98B9A3571D01F17838460D0139ABC31375EA29B6EFC0 E52FBCFDA3672F376C0B53AE6D3A3252A78A8D37A64F9F3970CD3026EB403562 8CF43D1B2CA6B03266210DC91E706106F2A88EA59836C385D64EC9763539E792 866DC0847657AF6492156C060F6620F82BFB54F83C09A560DD64B799BC2C69B3 BF5979AF280922A9C057674E99BCA1152A0B9D502C5C940A89113B451709C5D5 71AB33A03C14E1C04C02EB284A5283681FCA2F6D76E40A6882C727097680CF9E 0C91C5B0A929F42BC3548F4F63C4FAEE141B593D21F8E49FA6DACA7FAFC7ECA6 4621478BAFE94BA3E94BBB5B44BD2D0F13DB048903B65BD132DB18A06BBF4299 954599558532EB4A2CB3BF6D38266EBED3539F031B0392CB2BF0CE02EECED59E 6945B5E6899BDD9DDAAD498897A98BA8D64C070B6A028E12618F19A93E1B63CE 582FF2596D96CF16B3B6200A5E77888B1DB1D65D2BB937FCA8AAE46D427C15DD 13F10BE4B15CDB76D2C8CEE44B644F29577044AE3D498AD20A6D8E8BC86BB8C6 134F47603CDB4A7050FBC09BF92974620E00DA39A55BBFE39B48A7049CD70D0E AEA2A38CA7289D3C810398A34DC8E524E4929B74ABD72CED5C828B94B830B5C4 9B3DC78BB4607BE9321D804B181BE4C354DEA5BA5B488F64BC9CCDE104E7DAE1 3E732F1AE60A1799A4F08867462629B86ED007116BD7AE5D27F053A03674B1B2 0FD57AA25E4172A277F47B0177D68E3C3C4BB645BAAC065A277C41A0991DF8C7 292DA6A274322B57CF290C72E0D25C48C39C5D83575DC7A435DB05C6F1E6C7C1 EB8FD91B084C8CBE938BEB36D8AA343658DF5A7670AF7FE5E1D7DF3C3EFCE6E0 F1E1DF0FAB1195D5360FF9C94E93091F4B3B57C96D3E497698B0211D4A0F70F2 8395F210C36290DD25EC0F6B9C9D330F5219A750552CEAEAF004060571E21000 A52BA51E1787F2FC10753F522F99DF14FAC9EFA3DE122E750041488886102A87 ABA770B19A8B25ED1A5070644FA8996D0B1F41C55075F2C0F1A05CD2ED8DA855 CB200DEEF0924790DDFCE2627B9FCA8DAE24E4D5097DD2D7FE8AFC97F05774CA 61B00BDA46923302DEEA5DE840DFD28A4BB116F063283A919EA582A353380402 4A7E18C10914894BB871F9C231127E3C7BF84E9E9FC7EFA21FFA61E34BF043C4 594665513B6F1A0972B8896FA242125D82F79CAB28ED420AC0D13DF2076EA444 504916267535093540C590879F7541D8AB8976C5744F372A84D78F33DC15246A C5B785CD244F19C8FADADE1350BE241DF2EBDCF11B2B6CDA6FFF89F2DB4711AA 1CF61B818AFBC9C9E44A0CDE781C8D4EBC82CD2A31195111976672397DE1BC08 F7C5BBF1E0AB69838106297C0F86998CF156CEB3E94D6CABDB4C883F283EB19D 6E33C56DB5B8F98EB3DF1A5BEF0E3E345D0AEA8B56A1CC6A0E82AB2A1D669E93 683E9C94AA639E076E52D093E2D48AF34BF0E33A11C782CA5CCBB76B6326EB22 85C08D0926C0B6DC111C32E0276144C6D28651392A44E5048DE050F2A8A73649 96BA907F0622EA516EC1546185FB26DC2F16E5CC1A8C30A7724FD3C87B9F0E73 B369425B3B8074699A26B533E7D990268B7199C9D857F0EC212D7830CBB522AE A9AFC71F425DC03B6F96E151B40FEC30D24D38ADD00847C768526979A986446A 12016C031343DCB4005EE8D2DB056C073EE3026AEBBEF53FAD510E0E964787D5 7BF0F4EAC67714F0ABD869BF3E0BAD85CCF38336B50CEF2BE7F81B1C28350381 C88551706D66F8B619AA829AE8D5FC7F74B47C5A59D5E9A86B95806B32C9B867 06EB71D59ACD72AE56E34237C8832440A6640292AEDB38053D2734E9554C90E8 6C1D6269A31CC1FDC73FC10E968C31FE859F6F0392D746907AFC1E5842791755 FDB639BEEE38033382116E2A604DB043D6AA9EA25078B1BE2AF810E2D30B640E 37120D3C8D028C8A6B8E1001DD56D65B4CC710A0AC057352BF7A41395E6F1E97 1503AE04F011418312AC77F882EAA1906562E9175F0EC9DAC2734E1840EEBF98 D94C14D9B925884028D6A35CAF568A88D1B79C844446BC2D8CF52A2F3A54650D 2921E9827C79D5D9127521D5531852E47C58B88AB8533324C98332D21D445D6E C0BA9084E89CA66DF2388DA38F16DB5A98B020C2CBBCD261469C6F50940CB552 4036A9F4DE8A68035152D14D70A65DD3DE6658DAEE6368A3597CAB86366578C2 6A7C8627F810303C25D3C16D2E8309852684901989E20F218488BD498C725A39 3E67142F84168582B3E9155F124C9810A4683EDAD9091DC0AA2A2E14AA62958E C77C983E6418D302C35A043097E1B4508AB761F5C776AFCBD880AA865A3B7C82 BE7DAC073EAB078FF9FF409D1DB7F4CF593E5EDDE453F674F935579BF89F6F96 87315F76A1277DBD3CFC3A2CABAD2580B1FDCB5AECE860D972AFD753D069588A 6D675A449B0B58010BF82508433AADC7C58E2F44AA838DF457960218EE606C89 0D4381A3E1FCC0F64C6710FA00FE457B075CABB4E8B0CF0971E889FF22536399 125D064012EB8107FDFF0F1217899678240100 } ; Note that there are two menus in the following ; block. The "file" menu is indented and spread ; across several lines. The edit menu is all on ; one line. Notice that you can place action blocks ; after each menu item, to be performed whenever the ; menu item is selected - as with the [print "You ; chose Item 1"] block below: menu-data: [ file: item "File" menu [ new: item "Item 1" [print "You chose Item 1"] open: item "Item 2" ; icons [1.png 2.png] --- recent: item "Look In Here..." menu [ item "WIN A PRIZE!" item "Try door number two" ] --- exit: item <Ctrl-Q> "Exit" ] edit: item "Edit" menu [item "copy" item "paste"] ] ; Most of the style definition below is totally optional. ; It's designed to look like a native Microsoft menu. The ; example at ; http://www.rebol.org/library/scripts/menu-system-demo.r ; contains many more examples of menu styles and options. ; The only part that's required in the example below is ; the action block in the "item style" section. Everything ; else serves only to adjust the cosmetic appearance of the ; menu: winxp-menu: layout-menu/style copy menu-data xp-style: [ menu style edge [size: 1x1 color: 178.180.191 effect: none] color white spacing 2x2 effect none item style font [name: "Tahoma" size: 11 colors: reduce [ black black silver silver]] colors [none 187.183.199] effects none edge [size: 1x1 colors: reduce [none 178.180.191] effects: []] action [ ; Change the lines below to fit your needs. ; You can use the action block of each item ; in the switch structure to run your own ; functions. "item/body/text" refers to the ; selected menu item. This does the exact same ; thing as including a code block for each item ; in the menu definition above (i.e., you can ; put the [quit] block after the "exit" item ; above, and it will perform the same way - ; just like the "[print "You chose Item 1"]" ; block after the "new" item above). switch/default item/body/text [ "exit" [quit] "WIN A PRIZE!" [alert "You win!"] "Try door number two" [alert "Bad choice :("] ] [print item/body/text] ; default thing to do ] ] ; The following function traps the GUI close event. This ; must be included whenever the menu module is used, or a ; portion of the application will continue to run after being ; shut down. evt-close: func [face event] [ either event/type = 'close [quit] [event] ] insert-event-func :evt-close ; And finally, here's the user interface: window: layout [ size 400x500 ; The line below shows the winxp style menu: at 2x2 app-menu: menu-bar menu menu-data menu-style xp-style ; THE LINE BELOW SHOWS THE SAME MENU, WHENEVER THE BUTTON ; IS CLICKED: at 150x200 btn "Menu Button" [ show-menu/offset window winxp-menu 0x1 * face/size + face/offset - 1x0 ] ] view center-face windowThe popular REBOL GUI tool called RebGUI (covered in a later section of this tutorial) also has a simple facility for creating basic menus, which can be useful.
16.21 Creating Multi Column GUI Text Lists (Data Grids) From Scratch
REBOL's built-in "text-list" GUI widget is very simple to use, but it can only display one column of data:
view layout [text-list data (system/locale/months)]REBOL does have a built-in "list" widget for multiple column "data grid" displays, but it's a bit more complex to use than the text-list widget. Earlier in this text, Henrik Mikael Kristensen's listview module was introduced as a simple solution for creating multiple column data grid displays. It works well, but requires you to include a third party module. With a little knowledge and practice, you'll find that REBOL's built-in list widget can be very powerful and easy to use. In it's simplest form, the native list widget takes a size parameter, and 2 additional block parameters:
list (size) [GUI widget layout block] data [block(s) of data to display]The "(size)" parameter is an XxY pair indicating the pixel size of the overall list widget. The "[GUI widget layout block]" is a layout of standard VID widgets used to display each row of data in the grid. The GUI elements in this block are replicated to display each consecutive row of data in the grid. The GUI layout block typically contains the word "across" (because these widgets are used to display rows of data), and it typically includes size parameters for each widget. The "data" block is made up of rows of information to be displayed in the grid. Each row of data is contained in a separate interior block:
view layout [ list 220x100 [across text 100 text 100] data [ ["row 1, column 1" "row 1, column 2"] ["row 2, column 1" "row 2, column 2"] ["row 3, column 1" "row 3, column 2"] ["row 4, column 1" "row 4, column 2"] ] ]The GUI block can contain other standard facet modifiers such as colors and spacing:
view layout [ list 200x100 [across space 0 text red 100 text blue 100] data [ ["row 1, column 1" "row 1, column 2"] ["row 2, column 1" "row 2, column 2"] ["row 3, column 1" "row 3, column 2"] ["row 4, column 1" "row 4, column 2"] ] ]The GUI block does not need to be comprised of only text fields. You can display the rows of data on widgets of any type:
view layout [ list 304x100 [across space 0 button 150 button 150] data [ ["row 1, column 1" "row 1, column 2"] ["row 2, column 1" "row 2, column 2"] ["row 3, column 1" "row 3, column 2"] ["row 4, column 1" "row 4, column 2"] ] ]IMPORTANT: You can make widgets in the list perform actions, just like in any other "view layout" code:
view layout [ list 304x100 [ across space 0 button 150 [alert face/text] ; When clicked, alert the text button 150 [alert face/text] ; contained on the button's face. ] data [ ["row 1, column 1" "row 1, column 2"] ["row 2, column 1" "row 2, column 2"] ["row 3, column 1" "row 3, column 2"] ["row 4, column 1" "row 4, column 2"] ] ]This means that creating user editable cells is very simple - just reassign the text of the clicked face, then update the display:
view layout [ list 304x92 [ across space 0 btn 150 [face/text: request-text/default face/text show face] btn 150 [face/text: request-text/default face/text show face] ] data [ ["row 1, column 1" "row 1, column 2"] ["row 2, column 1" "row 2, column 2"] ["row 3, column 1" "row 3, column 2"] ["row 4, column 1" "row 4, column 2"] ] ]Unintentional visual artifacts can be caused by the caret (cursor) in text widgets. To eliminate them, simply focus and unfocus the widget after updating the display:
view gui: layout [ list 304x84 [ across space 0 text 150 [ face/text: request-text/default face/text show gui focus face unfocus face ] text 150 [ face/text: request-text/default face/text show gui focus face unfocus face ] ] data [ ["row 1, column 1" "row 1, column 2"] ["row 2, column 1" "row 2, column 2"] ["row 3, column 1" "row 3, column 2"] ["row 4, column 1" "row 4, column 2"] ] ]Notice that the number of rows contained in the data block does not affect the number of rows displayed. The list always shows as many rows as will fit in the overall pixel size of the widget (we'll attend to this issue later...):
view layout [ list 304x100 [across space 0 button 150 button 150] data [ ["row 1, column 1" "row 1, column 2"] ] ] view layout [ list 304x100 [across space 0 button 150 button 150] data [ ["row 1, column 1" "row 1, column 2"] ["row 2, column 1" "row 2, column 2"] ["row 3, column 1" "row 3, column 2"] ["row 4, column 1" "row 4, column 2"] ["row 5, column 1" "row 5, column 2"] ["row 6, column 1" "row 6, column 2"] ["row 7, column 1" "row 7, column 2"] ] ]You can resize lists to stretch and fit resizable GUI windows:
insert-event-func [ either event/type = 'resize [ li/size: gui/size - 40x40 t1/size: t2/size: as-pair (round (li/size/1 / 2)) 19 show li unview view gui none ][event] ] view/options gui: layout [ li: list 220x110 [across t1: text 100 t2: text 100] data [ ["row 1, column 1" "row 1, column 2"] ["row 2, column 1" "row 2, column 2"] ["row 3, column 1" "row 3, column 2"] ["row 4, column 1" "row 4, column 2"] ] ] [resize]Here's one way to stretch and/or shrink all the cells to fit inside a resizable list:
gui-size: 220x110 li-size: 100x19 gui-block: [ li: list li-size [ across text first (li-size / 2) ; (1/2 the width of the list widget) text first (li-size / 2) ] data [ ["row 1, column 1" "row 1, column 2"] ["row 2, column 1" "row 2, column 2"] ["row 3, column 1" "row 3, column 2"] ["row 4, column 1" "row 4, column 2"] ] ] insert-event-func [ either event/type = 'resize [ li-size: gui/size - 40x40 unview view/options gui: layout gui-block [resize] none ][event] ] view/options gui: layout gui-block [resize]Of course, you can assign a label to any properly formatted data block, and display it later in a list widget:
x: [ ["row 1, column 1" "row 1, column 2"] ["row 2, column 1" "row 2, column 2"] ["row 3, column 1" "row 3, column 2"] ["row 4, column 1" "row 4, column 2"] ] view layout [list 220x100 [across text 100 text 100] data x]That allows you to build and display multi-column lists very easily:
x: copy [] for i 1 12 1 [ some-info: copy [] append some-info (pick system/locale/months i) append some-info (pick system/locale/days i) append/only x some-info ] view layout [list 220x240 [across text 100 text 100] data x]Here's a resizable version of the script above, which has user editing enabled for the first column only:
x: copy [] for i 1 12 1 [ some-info: copy [] append some-info (pick system/locale/months i) append some-info (pick system/locale/days i) append/only x some-info ] gui-size: 220x110 li-size: 100x19 gui-block: [ li: list li-size [ across text first (li-size / 2) [ face/text: request-text/default face/text ; enable user edit show face focus face unfocus face ] text first (li-size / 2) ] data x ] insert-event-func [ either event/type = 'resize [ li-size: gui/size - 40x40 unview view/options gui: layout gui-block [resize] none ][event] ] view/options gui: layout gui-block [resize]You can collect the entire block of user-edited data using the following code:
editor second second get in (list-widget-label) 'subfuncFor example:
view layout [ the-list: list 304x100 [ across space 0 info 150 [face/text: request-text/default face/text show face] info 150 [face/text: request-text/default face/text show face] ] data [ ["row 1, column 1" "row 1, column 2"] ["row 2, column 1" "row 2, column 2"] ["row 3, column 1" "row 3, column 2"] ["row 4, column 1" "row 4, column 2"] ] btn "Display Current Data" [ editor second second get in the-list 'subfunc ] ]This can be used to save and load all data in the list to files, or otherwise put to use. That makes the widget very useful for data management of all types! Take a look at this script to see one way to save and load data:
x: copy [ ["row 1, column 1" "row 1, column 2"] ["row 2, column 1" "row 2, column 2"] ["row 3, column 1" "row 3, column 2"] ["row 4, column 1" "row 4, column 2"] ] do qq: [view layout [ the-list: list 304x100 [ across space 0 info 150 [face/text: request-text/default face/text show face] info 150 [face/text: request-text/default face/text show face] ] data x across btn "Save" [ save to-file request-file/save second second get in the-list 'subfunc show the-list ] btn "Load" [ x: copy load to-file request-file unview do qq ] ]]16.21.1 The "Supply" Function
To enable more versatile list displays, the "data" block can be replaced with a "supply" function. "Supply" works much like a "for" loop that iterates through each row of widgets in the displayed GUI list. The "supply" function automatically creates 2 new variables which are automatically incremented each time through the rows in the list:
- "count": the current ROW in the list
- "index": the current COLUMN in the current row
You can use the "count" and "index" variables to select sequential values from a block of data, using the "pick" function (in the same way as in a for loop). Typically, this is used to set the "/text" property of each widget in every row.
In the following example, every row in the list contains a single text widget. The supply function runs through each row, and sets the text property of the widget's face to be one item from the "x" block (a list of months). The loop automatically increments the "count" variable to display each of the months:
x: copy system/locale/months view layout [ list 200x300 [text 200] supply [ face/text: pick x count ] ]This example loops through a list of files read from the current directory:
x: read %. view layout [ list 200x400 [text 200] supply [face/text: pick x count] ]You can use the "count" variable to change properties of each widget face. In this example, the color property of alternate rows is changed (one color is assigned to even counted rows, another to odd rows):
x: read %. view layout [ list 200x400 [text 200] supply [ either even? count [face/color: white][face/color: tan] face/text: pick x count ] ]You can apply actions to any widget in a list, just as you can with any other widget. Clicking on any file name in the list below will open that file in the editor:
x: read %. view layout [ list 200x400 [ text 200 [editor to-file face/text] ] supply [ face/text: pick x count ] ]You can use the "count" variable in the supply function to build multi-column lists from 2 or more separate data blocks (multi column grids are the whole point of learning to use the list widget):
x: copy system/locale/months y: copy system/locale/days view layout [ list 250x400 [across t1: text 50 t2: text 100 t3: text 100] supply [ t1/text: count t2/text: pick x count t3/text: pick y count ] ]The next example uses both the "count" and "index" variables to loop through a block with 2 columns of data. Understanding this format is the basis for all the most complex list layouts you'll need. Take special notice of the first line in the supply block. Once all the data from the "x" block has been looped through, if there are more rows in the list display, the index value will go past the length of the data block, and cause an error. To avoid this, you simply check if the picked value is "none", and apply a value of none to the face/text, then exit the loop:
x: copy [] for i 1 12 1 [ append/only x reduce [ pick system/locale/months i pick system/locale/days i ] ] view layout [ list 400x400 [across text 200 text 200] supply [ if none? q: pick x count [face/text: none exit] face/text: pick q index ] ]To help clarify the above format, here's the same example with a third row added:
x: copy [] for i 1 12 1 [ append/only x reduce [ i pick system/locale/months i pick system/locale/days i ] ] view layout [ list 250x300 [ across text 50 text 100 text 100 ] supply [ if none? q: pick x count [face/text: none exit] face/text: pick q index ] ]Here's an example of the directory reading example from earlier, but with two columns of data displayed (file name and size). Clicked file names still bring up the editor:
y: read %. x: copy [] foreach i y [append/only x reduce [i (size? to-file i)]] view layout [ list 300x400 [ across text 200 [editor to-file face/text] text 100 ] supply [ if none? q: pick x count [face/text: none exit] face/text: pick q index ] ]The following example demonstrates how to add a slider to scroll through items in a large data block:
x: copy [] for i 1 397 1 [append x i] slider-pos: 0 view layout [ across the-list: list 240x400 [text 200] supply [ count: count + slider-pos face/text: pick x count ] slider 16x400 [ slider-pos: (length? x) * value show the-list ] ]Here's the above slider technique applied to the earlier directory reading example:
x: read %. slider-pos: 0 view layout [ across the-list: list 300x400 [ text 200 [editor to-file face/text] ] supply [ count: count + slider-pos face/text: pick x count ] slider 16x400 [ slider-pos: (length? x) * value show the-list ] ]Here's the 2 column version of the directory reading script, with a slider attached. Be aware that clicking on any file name still reads and edits that file:
y: read %. x: copy [] foreach i y [append/only x reduce [i (size? to-file i)]] slider-pos: 0 view layout [ across the-list: list 300x400 [ across text 200 [editor to-file face/text] text 100 ] supply [ count: count + slider-pos if none? q: pick x count [face/text: none exit] face/text: pick q index ] slider 16x400 [ slider-pos: (length? x) * value show the-list ] ]Here's another refinement of the above script, with a third column added. The look of this display is changed by adding a line between each row (the line is drawn using a box widget), and by changing the color and font of the text:
y: read %. c: 0 x: copy [] foreach i y [append/only x reduce [(c: c + 1) i (size? to-file i)]] slider-pos: 0 view layout [ across space 0 the-list: list 400x400 [ across 0 space 0x0 text 50 purple text 250 bold [editor read to-file face/text] text 100 red italic return box green 400x1 ] supply [ count: count + slider-pos if none? q: pick x count [face/text: none exit] face/text: pick q index ] slider 16x400 [ slider-pos: (length? x) * value show the-list ] ]This example by Carl Sassenrath demonstrates a basic 4 column display:
REBOL [] db: [ [ "000" "Ian Fleming" "ian" 31-Dec-2003 ] [ "007" "James Bond" "jb" 1-Jan-2004 ] [ "001" "M" "m" 2-Jan-2004 ] [ "ABC" "Miss Moneypenny" "missm" 3-Jan-2004] [ "008" "Pierce Brosnan" "pb" 4-Jan-2004 ] [ "009" "George Lazenby" "gl" 5-Jan-2004 ] [ "010" "Roger Moore" "rm" 6-Jan-2004 ] ] sld-cnt: 0 view lst1: layout [across space 0x0 style text text [alert form face/user-data] list 406x100 [ across space 0x0 text 36 text 100 text 120 text 150 ] supply [ face/text: none face/user-data: none count: count + sld-cnt record: pick db count if not record [exit] n: pick [1 2 3 4] index face/text: pick record n face/user-data: record ] scl1: scroller 16x100 [ value: to-integer value * length? db if value <> sld-cnt [sld-cnt: value show lst1] ] ]The following example demonstrates how to enable users to add and remove data from a list display. Notice that after adjusting the content of your original data block and then "show"ing the list, the displayed grid is automatically updated with the new data:
x: copy [] for i 1 10 1 [ append/only x reduce [form random 1000 form random 1000] ] slider-pos: 0 view layout [ across the-list: list 220x240 [across text 100 text 100] supply [ count: count + slider-pos if none? q: pick x count [face/text: none exit] face/text: pick q index ] slider 16x240 [ slider-pos: (length? x) * value show the-list ] return btn "Remove" [remove head x show the-list ] btn "Add" [ insert/only head x reduce [form random 1000 form random 1000] show the-list ] ]To save user-edited contents of a GUI list created with the "supply" function, you need to use the following "set-it" code when iterating through the supply function with "count" and "index" (the "second second get in (list-widget-label) 'subfunc" trick only works for lists created using the "data" function):
x: copy [ ["row 1, column 1" "row 1, column 2"] ["row 2, column 1" "row 2, column 2"] ["row 3, column 1" "row 3, column 2"] ["row 4, column 1" "row 4, column 2"] ] do qq: [view gui: layout [ the-list: list 304x100 [ across space 0 info 150 [face/text: request-text/default face/text show gui] info 150 [face/text: request-text/default face/text show gui] ] supply [ either count > length? x [face/text: "" face/image: none] [ the-list/set-it face x index count ] ] across btn "Save" [ save to-file request-file/save x ] btn "Load" [ x: copy load to-file request-file unview do qq ] ]]In this example, columns can be sorted by clicking the headers. Individual values at any column/row position can be edited by the user (just click the current value). Entire rows can be added, removed, or moved to/from user-selected positions. The data block can be saved or loaded to/from file(s). Scrolling can be done with the mouse, arrow keys, or page-up/page-down keys. Several resizing concepts are also demonstrated:
REBOL [title: "List Widget Example"] x: copy [] random/seed now/time ; generate 5000 rows of random data: repeat i 5000 [ append/only x reduce [random "asdfqwertyiop" form random 1000 form i] ] y: copy x Alert help-txt: {Be sure to try the following features: 1) Resize the GUI window to see the list automatically adjust to fit 2) Click column headers to sort by field 3) Use the arrow keys and page-up/page-down keys to scroll 4) Use the Insert, Delete and "M" keys to add, remove and move rows (by default, at the currently highlighted row) 5) Click the small "r" header button in the top right corner to reset the list back to its original values 6) Click any individual data cell to edit the selected value.} sort-column: func [field] [ either sort-order: not sort-order [ sort/compare x func [a b] [(at a field) > (at b field)] ] [ sort/compare x func [a b] [(at a field) < (at b field)] ] show li ] key-scroll: func [scroll-amount] [ s-pos: s-pos + scroll-amount if s-pos > (length? x) [s-pos: length? x] if s-pos < 0 [s-pos: 0] sl/data: s-pos / (length? x) show li show sl ] resize-grid: func [percentage] [ gui-size: system/view/screen-face/pane/1/size ; - 10x0 list-size/1: list-size/1 * percentage list-size/2: gui-size/2 - 95 t-size: round (list-size/1 / 3) sl-size: as-pair 16 list-size/2 unview/only gui view/options center-face layout gui-block [resize] ] resize-fit: does [ gui-size: system/view/screen-face/pane/1/size resize-grid (gui-size/1 / list-size/1 - .1) ] insert-event-func [either event/type = 'resize [resize-fit none] [event]] gui-size: system/view/screen-face/size - 0x50 list-size: gui-size - 60x95 sl-size: as-pair 16 list-size/2 t-size: round (list-size/1 / 3) s-pos: 0 sort-order: true ovr-cnt: none svv/vid-face/color: white view/options center-face gui: layout gui-block: [ size gui-size across btn "Smaller" [resize-grid .75] btn "Bigger" [resize-grid 1.3333] btn "Fit" [resize-fit] btn #"^~" "Remove" [attempt [ indx: to-integer request-text/title/default "Row to remove:" form to-integer ovr-cnt if indx = 0 [return] if true <> request rejoin ["Remove: " pick x indx "?"] [return] remove (at x indx) show li ]] insert-btn: btn "Add" [attempt [ indx: to-integer request-text/title/default "Add values at row #:" form to-integer ovr-cnt if indx = 0 [return] new-values: reduce [ request-text request-text (form ((length? x) + 1)) ] insert/only (at x indx) new-values show li ]] btn #"m" "Move" [ old-indx: to-integer request-text/title/default "Move from row #:" form to-integer ovr-cnt new-indx: to-integer request-text/title "Move to row #:" if ((new-indx = 0) or (old-indx = 0)) [return] if true <> request rejoin ["Move: " pick x old-indx "?"] [return] move/to (at x old-indx) new-indx show li ] btn "Save" [save to-file request-file/save x] btn "Load" [y: copy x: copy load request-file/only show li] btn "Read Me" [alert help-txt] btn "View Data" [editor x] return space 0x0 style header button as-pair t-size 20 black white bold header "Random Text" [sort-column 1] header "Random Number" [sort-column 2] header "Unique Key" [sort-column 3] button black "r" 17x20 [if true = request "Reset?"[x: copy y show li]] return li: list list-size [ style cell text t-size feel [ over: func [f o] [ if (o and (ovr-cnt <> f/data)) [ovr-cnt: f/data show li] ] engage: func [f a e] [ if a = 'up [ f/text: request-text/default f/text show li ] ] ] across space 0x0 col1: cell blue col2: cell col3: cell red ] supply [ either even? count [face/color: white] [face/color: 240.240.255] count: count + s-pos if none? q: pick x count [face/text: copy "" exit] if ovr-cnt = count [face/color: 200.200.255] face/data: count face/text: pick q index ] sl: scroller sl-size [s-pos: (length? x) * value show li] key keycode [up] [key-scroll -1] key keycode [down] [key-scroll 1] key keycode [page-up] [key-scroll -20] key keycode [page-down] [key-scroll 20] key keycode [insert] [do-face insert-btn 1] ] [resize]Be sure to see http://www.rebol.org/view-script.r?script=list-supply-how-to.r, http://www.rebol.org/view-script.r?script=vid-usage.r, http://www.rebol.org/view-script.r?script=list-scroll-demo.r, and http://www.pat665.free.fr/gtk/rebol-view.html#sect19. for more about lists.
16.21.2 Creating Home Made Multi Column Data Grids
As it turns out, it can actually be easier and more versatile to roll your own data grids using native VID components, than it is to use the "list" widget. The following examples are based on the concept at http://www.rebol.org/view-script.r?script=presenting-text-in-columns.r. In every example, a forskip loop is used to build a visual grid of GUI widgets. The loop inserts individual text items from a data block onto each widget's face. For large lists, these example run slowly, but they can be useful for creating reasonably small displays.
The first example creates a random block of two columns of data, labeled "x". Then, a forskip loop is used to assemble a layout block of field widgets, with each row of fields containing 2 consecutive text items from the data block. That GUI block is then displayed on a pane inside a box widget, which is itself displayed inside the layout of the main window. A scroller widget is added to scroll the visible portion of the grid layout. This is accomplished by adjusting the offset of the pane which contains the whole layout of field widgets. IMPORTANT: notice that each cell in this grid is user editable (simply because each cell is displayed using a standard VID field widget). Also notice that the data is converted to a string with the "form" function, because fields can only display text.
x: copy [] for i 1 179 1 [append x reduce [i random "abcd"]] grid: copy [across space 0] ; the GUI block containing the grid of fields forskip x 2 [append grid compose [field (form x/1)field (form x/2)return]] view center-face layout [across g: box 400x200 with [pane: layout/tight grid pane/offset: 0x0] scroller [g/pane/offset/y: g/size/y - g/pane/size/y * value show g] ]The next example demonstrates how to take two columns of data (blocks) and combine them into a single block that can be displayed using the layout above. First, the size of the longest block is determined using the "max" function, and a for loop is run to add consecutive items from each of the source blocks, in groups of 2, to the destination block. If either column runs out of data, blank strings are added to the rest of the destination block as column place holders.
x: copy [] block1: copy system/locale/months block2: copy system/locale/days for i 1 (max length? block1 length? block2) 1 [ append x either g: pick block1 i [g] [""] append x either g: pick block2 i [g] [""] ] grid: copy [across space 0] forskip x 2 [append grid compose [field (form x/1)field (form x/2)return]] view center-face layout [across g: box 400x200 with [pane: layout/tight grid pane/offset: 0x0] scroller [g/pane/offset/y: g/size/y - g/pane/size/y * value show g] ]The next example demonstrates how to change the look of the grid layout, and how to obtain a block containing all the data displayed in the grid, including user edits. To clarify visual separation of row data, an alternating color is assigned to each row in the grid. This is handled using a "remainder" function to check for even numbered rows. For every 4 pieces of text in the data block (every 2 displayed rows), the color is set to white. Otherwise, it's set to wheat. The most important part of this example is the line which collects all the data contained in each face of the displayed grid, and builds a block ("q") to store it.
x: copy [] for i 1 179 1 [append x reduce [i random "abcd"]] grid: copy [origin 0x0 across space 0x0] forskip x 2 [ color: either (remainder ((index? x) - 1) 4) = 0 [white][wheat] append grid compose [ field 180 (form x/1) (color) edge none field 180 (form x/2) (color) edge none return ] ] view center-face layout [ across space 0 g: box 360x200 with [pane: layout grid pane/offset: 0x0] scroller[g/pane/offset/y: g/size/y - g/pane/size/y * value / 2 show g] return box 1x10 return ; just a spacer btn "Get Data Block (INCLUDING USER EDITS)" [ q: copy [] foreach face g/pane/pane [append q face/text] editor q ] ]The next example demonstrates a number of features that really make the grid malleable and useful for entering, editing, and storing columns of data. First, the look is adjusted by changing the edges of each field style. To enable all the new features, an "update" function is created to run the line of code from the previous example which creates the "q" block of data from text displayed in every cell of the grid. In every case, the data is collected and stored in the variable "q", and the desired operation is performed on that block (adding and removing rows or data, extracting vertical columns of data, saving and loading the data to/from files on the hard drive, etc.). After the data block has been changed by an operation, the entire layout is unviewed and rebuilt using the new data (i.e., the "q" data is reassigned to the initial "x" block). The code is rerun by labeling the entire script "qq" and using the "do" function to re-evaluate it. The final button demonstrates how to collect and display a history of user edits.
x: copy [] for i 1 179 1 [append x reduce [i random "abcd"]] update: does [q: copy [] foreach face g/pane/pane [append q face/text]] do qq: [grid: copy [across space 0] forskip x 2 [append grid compose [ field (form x/1) 40 edge none field (form x/2) 260 edge [size: 1x1] return ]] view center-face gui: layout [across space 0 g: box 300x290 with [pane: layout/tight grid pane/offset: 0x0] slider 16x290 [ g/pane/offset/y: g/size/y - g/pane/size/y * value show g ] return btn "Add" [ row: (to-integer request-text/title "Insert at Row #:") * 2 - 1 update insert at q row ["" ""] x: copy q unview do qq ] btn "Remove" [ row: (to-integer request-text/title "Row # to delete:") * 2 - 1 update remove/part (at q row) 2 x: copy q unview do qq ] btn "Col 1" [update editor extract q 2] btn "Col 2" [update editor extract/index q 2 2] btn "Save" [update save to-file request-file/save q] btn "Load" [x: load to-file request-file do qq] btn "History" [ m: copy "ITEMS YOU'VE EDITED:^/^/" update for i 1 (length? q) 1 [ if (to-string pick x i) <> (to-string pick q i) [ append m rejoin [pick x i " " pick q i newline] ] ] editor m ] ]]This final example clarifies how to add additional columns, how to use GUI widgets other than fields to display the data (text widgets, in this case), how to make the widgets perform any variety of actions, and how to get data from the grid when not every widget has text on its face. It also demonstrates some additional changes to the look of the grid.
x: copy [] for i 1 99 1 [append x reduce [i random 99x99 random "abcd"]] grid: copy [origin 0x0 across space 0x0] forskip x 3 [ append grid compose [ b: box 520x26 either (remainder((index? x)- 1)6)= 0 [white][beige] origin b/offset text bold 180 (form x/1) text 120 center blue (form x/2) [alert face/text] text 180 right purple (form x/3) [face/text: request-text] return box 520x1 green return ] ] view center-face layout [ across space 0 g: box 520x290 with [pane: layout grid pane/offset: 0x0] scroller 16x290 [ g/pane/offset/y: g/size/y - g/pane/size/y * value / 2 show g ] return box 1x10 return ; just a spacer btn "Get Data Block" [ q: copy [] foreach face g/pane/pane [ if face/style = 'text [append q face/text] ] editor q ] ]These examples are useful for lists that contain ~1000 or fewer rows of data. For displays with grids larger than that, one of REBOL's other listview options should be used.
16.22 RebGUI
REBOL's VID dialect ("view layout []"), is one of the language's most attractive features. The ability to create GUI windows on multiple operating systems, with as little as 1 line of code, is practical for creating many sorts of applications. "RebGUI" is a third party GUI toolkit built on REBOL/View which replicates many of the basic components in VID, and upgrades/adds to the concept with many desirable features:
- Modern look and feel.
- Many powerful and useful new widgets and built-in functions: resizable tables (data grids) with automatic column sorting, trees, menus, tab and scroll panels, group boxes, tool-bars, spreadsheet, pie-chart and chat widgets, new requestors, native undo/redo, spellcheck, and translate functions (with many provided language dictionaries) for text widgets, etc.
- Simple and elegant syntax (similar to VID).
- Full documentation and demo code for all widgets.
- Super simple notation to handle automatic alignment and layout of widgets in resized windows.
- Config file to easily manage user settings for global UI sizes, colors, behaviors, and effects of all widgets. A built-in native requestor is also provided to adjust all these settings.
- Automatic handling of window close events.
- User assignable function key actions.
- Easy, automatic handling of multiple user languages.
- Well designed object structure to access every widget, function, and feature (and containing all necessary help information, built in).
- The entire system compresses to just over 30k.
VID is great for building quick scripts, and many of the features found in RebGUI have been created elsewhere as VID add-ons. The menu system and listview widget described earlier in this text, for example, are more powerful than those found in RebGUI. Close events and spell checking can also be handled in other ways described earlier in this text. But for most types of applications, RebGUI provides a single, simple, integrated way to build applications with all the most commonly needed user interface features. It uses a simple, consistent language structure, and provides a clean, modern looking visual design.
RebGUI is available at http://www.dobeash.com/download.html, and several tutorials are available at http://www.dobeash.com/rebgui.html. A mirror of the required files in version 117 is available at http://musiclessonz.com/rebol_tutorial/rebgui.zip. You can also download RebGUI directly within REBOL, using the built in Viewtop. To open the Viewtop, type "desktop" into the REBOL interpreter, then click REBOL -> Demos -> RebGUI. That will download the main "rebgui.r" include file, along with the "RebDoc.r" help program, the "tour.r" demo program, and some supporting graphic images. The downloaded package will automatically run tour.r, which demonstrates many of RebGUI's features. Be sure to click the "RebDOC" button to view all the documentation necessary to use RebGUI.
All you need to use RebGUI is %rebgui.r. Copy it to an accessible folder and include the line "do %rebgui.r" (with its path, if necessary), and then you can use all the built in widgets and functions in RebGUI. A quick and dirty way to do this in Windows is to run the "request-file" function in REBOL, then click Public -> www.Dobeash.com -> RebGUI, right click rebgui.r and paste it into a folder of your choice. You can also use the following script to copy it to any folder:
write to-file request-file/file/title/save %rebgui.r "Save As:" { } read view-root/public/www.dobeash.com/RebGUI/rebgui.rIf you're going to use RebGUI regularly, it's a good idea to copy it directly into your main REBOL install directory (the default folder is c:\program files\rebol\view).
To build your first RebGUI interface, after running the RebGUI demo, try the following code:
do view-root/public/www.dobeash.com/RebGUI/rebgui.r display "Test" [button "Click Me" [alert "Clicked"]] do-eventsNotice that "view layout" has been replaced with "display". This function always requires some title text. Notice also that "do-events" must be included after your RebGUI code to activate the GUI.
Once you've included %rebgui.r, you can try any of the built-in widgets and functions:
display "" [area] do-events ; the "area" widgetNotice that the area widget above has built-in undo/redo features using [CTRL]-Z and [CTRL]-Y (REBOL's native "view layout [area]" does not have any undo/redo capability). A built-in spellchecker can also be activated using [CTRL]-S! To use the spellchecker, you need to download a dictionary from http://www.dobeash.com/RebGUI/dictionary, and unzip it into %view-root/public/www.dobeash.com/RebGUI/dictionary/ (or in the /dictionary subdirectory of wherever rebgui.r is located).
Take a look at a few of the other great widgets built into RebGUI:
do %rebgui.r ; be sure to include the path, if necessary display "Pie Chart" [pie-chart data ["VID" yellow 19 "RebGUI" red 81]] do-events display "Spreadsheet" [ sheet options [size 7x7] data [a1 "very " a2 "cool" a3 "=join a1 a2"] ] do-events display "Chat" [ chat data ["Nick" blue "I like RebGUI" yellow 20-sep-2009/1:00]] do-events display/maximize "Menu" [ menu data [ "File" [ "Open" [request-file] "Save" [request-file] ] "About" ["Info" [alert "RebGUI is great!"]] ] ] do-eventsYou can run the RebDoc.r program to see the syntax required to use any of the other RebGUI widgets, requestors and functions.
The "/close" refinement of the "display" function lets you set any action(s) you want to run when a GUI window is shut down. This can help avoid data loss from accidental window closure, and provides a way to automatically process data or run other applications when a window is closed:
display/close "" [area] [question "Really Close?"] do-eventsBe sure to try the "request-ui" requestor function. It lets you easily adjust the global settings for the overall look and feel of layouts created with RebGUI on your machine. Settings are saved in the file %ui.dat, in the current working directory.
request-uiRebGUI includes a variety of "span directives" to easily automate resizing of widgets:
These directives automatically set the initial size of a widget: #L - align the right hand edge of the widget with the adjacent edge #V - align the base edge of the widget with the adjacent edge #O - align the left hand edge of the widget with the adjacent edge ("adjacent edge" is the edge of the adjacent widget, or the edge of the GUI, if there is no adjacent widget.) These directives automatically adjust the size and position of a widget when the GUI is resized: #H - stretch or shrink the widget to fit the window height #W - stretch or shrink the widget to fit the window width #X x - move the widget x number of pixels to the right #Y y - move the widget y number of pixels downwardHere's an example of an area widget that stretches and shrinks to fit a resized GUI window:
display "" [area #HW] do-eventsHere's a fully functional, resizable text editor application, with built-in undo/redo, spell checking, and close event handling:
do %rebgui.r display/maximize/close "Text Editor" [ menu #LHW data [ "File" [ "Open" [x/text: read to-file request-file show x] "Save" [write to-file request-file/save x/text] ] ] return x: area #LHW ] [question "Really Close?"] do-eventsNow that's a lot of program for just a little code!
This example demonstrates how to use tab panels and a variety of useful techniques:
display "Tab Panel" [ main-screen: tab-panel data [ "Spreadsheet" [ x: sheet data [ A1 32 A2 12 A3 "=a1 + a2" A4 "=1.06 * to decimal! a3" ] a: area reverse button -1 " Show Data " [x/save-data set-text a x/data] button -1 " Quit! " [quit] ] "VID style" [ style -1 data [text bold "Back to Spreadsheet" [ main-screen/select-tab 1 ]] ] action [wait .2 face/color: 230.230.230] "Text" [ text "Tabs are a great way to maximize screen real estate." ] action [wait .2 set-focus z] "Fields" [ y: field z: field "Edit me" ] ] ] do-eventsTo really get to know RebGUI, explore its main object "ctx-rebgui":
? ctx-rebguiThe "ctx-rebgui" object is set up much like REBOL's built-in "system/view/vid" object. You can explore it using path notation. Notice that built-in help is included in the "tip" path of each widget:
? ctx-rebgui/widgets/tree/tipHere's a quick and dirty way to view help for all the RebGUI widgets:
foreach i (find first ctx-rebgui/widgets 'anim) [ do compose/deep [print rejoin[i" - "(ctx-rebgui/widgets/(i)/tip)"^/"]] ]Be sure to read the main RebGUI user guide at http://www.dobeash.com/RebGUI/user-guide.html, and the cookbook at http://www.dobeash.com/RebGUI/cookbook.html. Then read through all the info in RebDoc.r, examine the code in tour.r, and get to know your way around ctx-rebgui. You'll likely find that RebGUI is the best choice for GUI layout in many situations.
16.23 RebGUI Apps - Spreadsheet, Rolodex, Member Manager, Editor, POS system
RebGUI contains a spreadsheet widget. Here's a useful spreadsheet application the demonstrates how to use save, load, print and data view features:
do %rebgui.r display "Spreadsheet" [ x: sheet options [size 3x3 widths [8 8 10]] data [ A1 32 A2 12 A3 "=a1 + a2" A4 "=1.06 * to-integer a3" ] return button "Save" [ x/save-data save to-file request-file x/data ] button "Load" [ x/load-data load to-file request-file ] button "View" [ x/save-data alert form x/data ] button "Print" [ save/png %sheet.png to image! x browse %sheet.png ; or call %sheet.png ] ] do-eventsThe example below is similar to the "Parts Database" program presented earlier, using RebGUI instead of VID. It should provide a number of practical insights into how to use RebGUI. Notice that the GUI is resizable, the text fields have undo/redo and spellcheck capabilities, requestors are modal, and all the other features of RebGUI are available:
REBOL [title "RebGUI Card File"] do load-thru http://re-bol.com/rebgui.r write/append %data.txt "" database: load %data.txt display "RebGUI Card File" [ text 20 "Select:" names: drop-list #LW data (sort extract copy database 4) [ marker: find database pick names/data names/picked set-text n copy first marker set-text a copy second marker set-text p copy third marker set-text o copy fourth marker ] after 2 text 20 "Name:" n: field #LW "" text 20 "Address:" a: field #LW "" text 20 "Phone:" p: field #LW "" after 1 text "Notes:" o: area #LW "" after 3 button -1 "Save" [ if (n/text = "") [alert "You must enter a name." return] if find (sort extract copy database 4) copy n/text [ either true = question "Overwrite existing record?" [ remove/part (find database n/text) 4 ] [return] ] database: repend database [ copy n/text copy a/text copy p/text copy o/text ] save %data.txt database set-data names (sort extract copy database 4) set-text names copy n/text ] button -1 "Delete" [ if true = question rejoin ["Delete " copy n/text "?"] [ remove/part (find database n/text) 4 save %data.txt database set-data names (sort extract copy database 4) set-values face/parent-face ["" "" "" "" ""] ] ] button -1 "New" [ set-values face/parent-face ["" "" "" "" ""] ] ] do-eventsHere's a useful RebGUI text/code editor:
REBOL [] unless exists? %ui.dat [ write %ui.dat read http://re-bol.com/ui-editor.dat ] do load-thru http://re-bol.com/rebgui.r ; Build#117 ; do %rebgui.r filename: %temp.txt make-dir %./edit_history/ backup: does [ if ((length? x/text) > 0) [ write rejoin [ %./edit_history/ last split-path filename "_" now/date "_" replace/all form now/time ":" "-" ] x/text ] ] ctx-rebgui/on-fkey/f5: does [ backup write filename x/text launch filename ] display/maximize/close "RebGUI Editor" [ tight menu #LW data [ "File" [ " New " [ if true = question "Erase Current Text?" [ backup filename: %temp.txt set-text x copy "" ] ] " Open " [ filetemp: to-file request-file/file filename if filetemp = %none [return] backup set-text x read filename: filetemp ] " Save " [ backup write filename x/text ] " Save As " [ filetemp: to-file request-file/save/file filename if filetemp = %none [return] backup write filename: filetemp x/text ] " Save and Run " [ backup write filename x/text launch filename ] " Print " [ write %./edit_history/print-file.html rejoin [ {<}{pre}{>} x/text {<}{pre}{>} ] browse %./edit_history/print-file.html ] " Quit " [ if true = question "Really Close?" [backup quit] ] ] "Options" [ " Appearance " [request-ui] ] "Help" [ " Shortcut Keys " [ alert trim { F5: Save and Run Ctrl+Z: Undo Ctrl+Y: Redo Esc: Undo All Ctrl+S: Spellcheck } ] ] ] return x: area #LHW ] [ if true = question "Really Close?" [backup quit] ] do-eventsHere's a user management script, inspired by the tutorial at http://snappmx.com:
REBOL [title: "RebGUI User List Demo"] do load-thru http://re-bol.com/rebgui.r ; Build#117 ; do %rebgui.r unless exists? %snappmx.txt [ save %snappmx.txt [ "user1" "pass1" "Bill Jones" "%bill--site--com" "Bill LLC" "user2" "pass2" "John Smith" "%john--mail--com" "John LLC" ] ] database: load %snappmx.txt login: request-password found: false foreach [userid password name email company] database [ either (login/1 = userid) and (login/2 = password) [found: true] [] ] if found = false [alert "Incorrect Login." quit] add-record: does [ display/dialog "User Info" [ text 20 "User:" f1: field return text 20 "Pass:" f2: field return text 20 "Name:" f3: field return text 20 "Email:" f4: field return text 20 "Company:" f5: field reverse button -1 #XY " Clear " [clear-fields] button -1 #XY " Add " [add-fields] ] ] edit-record: does [ display/dialog "User Info" [ text 20 "User:" f1: field (form pick t/selected 1) return text 20 "Pass:" f2: field (form pick t/selected 2) return text 20 "Name:" f3: field (form pick t/selected 3) return text 20 "Email:" f4: field (form pick t/selected 4) return text 20 "Company:" f5: field (form pick t/selected 5) reverse button -1 #XY " Delete " [ t/remove-row t/picked save %snappmx.txt t/data hide-popup ] button -1 #XY " Save " [ t/remove-row t/picked add-fields save %snappmx.txt t/data hide-popup ] ] ] add-fields: does [ t/add-row reduce [ copy f1/text copy f2/text copy f3/text copy f4/text copy f5/text ] save %snappmx.txt copy t/data ] clear-fields: does [ foreach item [f1 f2 f3 f4 f5] [do rejoin [{set-text } item {""}]] ] table-size: system/view/screen-face/size/1 / ctx-rebgui/sizes/cell display/maximize "Users" [ t: table table-size #LWH options [ "" left .0 "" left .0 ; don't show the first 2 fields "Name" center .33 "Email" center .34 "Company" center .34 ] data database [edit-record] reverse button -1 #XY " Add " [add-record] ] do-eventsHere is a point of sale system (sales checkout, receipt printer, and data storage system) written using RebGUI. Note that the username and password info in the posp.db file should be created and read using a separate method, and encrypted. The example posp.db file is created here as a demonstration. Note also that the first field in the layout is designed to accept input from a keyboard wedge bar code scanner, with data in the format: item (space) booth (space) price (inserted [ENTER] key character). Using this format, and the automatic refocus upon entry, the user can continually scan multiple items into the system:
REBOL [title: "POINT OF SALE SYSTEM"] write %posp.db {["username" "password"] ["username2" "password2"]} ; etc. make-dir %./receipts/ write/append %./receipts/deleted.txt "" ; create file if not exists unless exists? %scheme_has_changed [ write %ui.dat decompress #{ 789C9552CB92A3300CBCE72BBCDCA18084995A7E652A078115F08EB129592C33 7FBFC24E32CC2387A5EC2A49ED6EB56C267845E5BB3FD8F32FF57250F2CD3060 ABEAA629E23E95B1CAF8C6AD7A3A1571A5D28813E6D60CA32055752AAAE67751 97CF3B5003BDB6EA5817CF821E9B8804067E484BE04F34BFB035EE4EACCB5371 DD9FE044AD8E4FC5751FCE6AFA3E648FD6B62A51516F035731BE78B7B9AAEF49 3EE2D5693A3CC02CCD63B8F5DB8CC464021A8CBB49066B3492901EB4879E8D77 B92C74BC1D7CD1E467992DB0D8319CA28B41ABE53D42583D691566E31C521438 7F9161E844241276780F84BCC117DF2F410E480E7BFCBDB7A697FA407E99F3CE BF493787568511919588E631DF5146131F602FFA1F8645B1437D35A2BA85D93B F5317A8C9810BF5DC240E6A1F0CF374CE4D790B31F507E45B9E10BD8801122D0 6633DEEC5E3CFB8BA4C14176AF6D936540066CA6B2DE2F649094C35532361386 EC0B270D18660B61CC355A78BFFD53ECBD6533DF8A655BCA4AD08A9D366E905E 4C4B72B71AA7FDDA2AE71D1ECEFF004BE40F38A0030000 } ] do http://re-bol.com/rebgui.r do login: [ userpass: request-password if (length? userpass) < 2 [quit] posp-database: to-block read %posp.db logged-in: false foreach user posp-database [ if (userpass/1 = user/1) and (userpass/2 = user/2) [ logged-in: true ] ] either logged-in = true [] [ alert "Incorrect Username/Password" do login ] ] calculate-totals: does [ tax: .06 subtotal: 0 foreach [item booth price] pos-table/data [ subtotal: subtotal + to decimal! price ] set-text subtotal-f subtotal set-text tax-f (round/to (subtotal * tax) .01) set-text total-f (round/to (subtotal + (subtotal * tax)) .01) set-focus barcode ] add-new-item: does [ if ("" = copy f1/text) or ("" = copy f2/text) or (error? try [ to-decimal copy f3/text ]) [ alert trim/lines {You must enter a proper Item Description, Booth Number, and Price.} return ] pos-table/add-row/position reduce [ copy f1/text copy f2/text copy f3/text ] 1 calculate-totals ] print-receipt: does [ if empty? pos-table/data [ alert "There's nothing to print." return ] html: copy rejoin [ {<html><head><title>Receipt</title></head><body> <table width=40% border=0 cellpadding=0><tr><td> <h1>Business Name</h1> 123 Road St.<br> City, State 98765<br> 123-456-7890 </td></tr></table><br><br> <center><table width=80% border=1 cellpadding=5> <tr> <td width=60%><strong>Item</strong></td> <td width=20%><strong>Booth</strong></td> <td width=20%><strong>Price</strong></td></tr>} ] foreach [item booth price] pos-table/data [ append html rejoin [ {<tr><td width=60%>} item {</td><td width=20%>} booth {</td><td width=20%>} price {</td></tr>} ] ] append html rejoin [ {<tr><td width=60%></td><td width=20%><strong>SUBTOTAL: </strong></td><td width=20%><strong>} copy subtotal-f/text {</strong></td></tr>} ] append html rejoin [ {<tr><td width=60%></td><td width=20%><strong>TAX: </strong></td><td width=20%><strong>} copy tax-f/text {</strong></td></tr>} ] append html rejoin [ {<tr><td width=60%></td><td width=20%><strong>TOTAL: </strong></td><td width=20%><strong>} copy total-f/text {</strong></td></tr>} ] append html rejoin [ {</table><br>Date: <strong>} now/date {</strong>, Time: <strong>} now/time {</strong>, Salesperson: } userpass/1 {</center></body></html>} ] write/append to-file saved-receipt: rejoin [ %./receipts/ now/date "_" replace/all copy form now/time ":" "-" "+" userpass/1 ".html" ] html browse saved-receipt ] save-receipt: does [ if empty? pos-table/data [ alert "There's nothing to save." return ] if allow-save = false [ unless true = resaving: question trim/lines { This receipt has already been saved. Save again? } [ if true = question "Print another copy of the receipt?" [ print-receipt ] return ] ] if resaving = true [ resave-file-to-delete: copy "" display/dialog "Delete" compose [ text 150 (trim/lines { IMPORTANT - DO NOT MAKE A MISTAKE HERE! Since you've made changes to an existing receipt, you MUST DELETE the original receipt. The original receipt will be REPLACED by the new receipt (The original data will be saved in an audit history file, but will not appear in any future seaches or totals.) Please CAREFULLY choose the original receipt to DELETE: }) return tl1: text-list 150 data [ "I'm making changes to a NEW receipt that I JUST SAVED" "I'm making changes to an OLD receipt that I've RELOADED" ] [ resave-file-to-delete: tl1/selected hide-popup ] return button -1 "Cancel" [ resave-file-to-delete: copy "" hide-popup ] ] if resave-file-to-delete = "" [ resaving: false return ] if resave-file-to-delete = trim/lines { I'm making changes to a NEW receipt that I JUST SAVED } [ the-file-to-delete: saved-file ] if resave-file-to-delete = trim/lines { I'm making changes to an OLD receipt that I've RELOADED } [ the-file-to-delete: loaded-receipt ] if not question to-string the-file-to-delete [return] write %./receipts/deleted--backup.txt read %./receipts/deleted.txt write/append %./receipts/deleted.txt rejoin [ newline newline newline to-string the-file-to-delete newline newline read the-file-to-delete ] delete the-file-to-delete alert "Original receipt has been deleted, and new receipt saved." resaving: false ] if true = question "Print receipt?" [print-receipt] saved-data: mold copy pos-table/data write/append to-file saved-file: copy rejoin [ %./receipts/ now/date "_" replace/all copy form now/time ":" "-" "+" userpass/1 ".txt" ] saved-data splash compose [ size: 300x100 color: sky text: (rejoin [{^/ *** SAVED ***^/^/ } saved-file {^/}]) font: ctx-rebgui/widgets/default-font ] wait 1 unview allow-save: false if true = question "Clear and begin new receipt?" [clear-new] ] load-receipt: does [ if error? try [ loaded-receipt: to-file request-file/file/filter %./receipts/ ".txt" "*.txt" ] [ alert "Error selecting file" return ] if find form loaded-receipt "deleted" [ alert "Improper file selection" return ] if error? try [loaded-receipt-data: load loaded-receipt] [ alert "Error loading data" return ] insert clear pos-table/data loaded-receipt-data pos-table/redraw calculate-totals allow-save: false ] search-receipts: does [ search-word: copy request-value/title "Search word:" "Search" ; if search-word = none [return] found-files: copy [] foreach file read %./receipts/ [ if find (read join %./receipts/ file) search-word [ if (%.txt = suffix? file) and (file <> %deleted.txt) [ append found-files file ] ] ] if empty? found-files [alert "None found" return] found-file: request-list "Pick a file to open" found-files if found-file = none [return] insert clear pos-table/data ( load loaded-receipt: copy to-file join %./receipts/ found-file ) pos-table/redraw calculate-totals allow-save: false ] clear-new: does [ if allow-save = true [ unless (true = question "Erase without saving?") [return] ] foreach item [barcode f1 f2 f3 subtotal-f tax-f total-f] [ do rejoin [{clear } item {/text show } item] ] clear head pos-table/data pos-table/redraw allow-save: true ] change-appearance: does [ request-ui if true = question "Restart now with new scheme?" [ if allow-save = true [ if false = question "Quit without saving?" [return] ] write %scheme_has_changed "" launch %pos.r ; EDIT quit ] ] title-text: "Point of Sale System" if system/version/4 = 3 [ user32.dll: load/library %user32.dll get-tb-focus: make routine! [return: [int]] user32.dll "GetFocus" set-caption: make routine! [ hwnd [int] a [string!] return: [int] ] user32.dll "SetWindowTextA" show-old: :show show: func [face] [ show-old [face] hwnd: get-tb-focus set-caption hwnd title-text ] ] allow-save: true resaving: false saved-file: "" loaded-receipt: "" screen-size: system/view/screen-face/size cell-width: to-integer (screen-size/1) / (ctx-rebgui/sizes/cell) cell-height: to-integer (screen-size/2) / (ctx-rebgui/sizes/cell) table-size: as-pair cell-width (to-integer cell-height / 2.5) current-margin: ctx-rebgui/sizes/margin top-left: as-pair negate current-margin negate current-margin display/maximize/close "POS" [ at top-left #L main-menu: menu data [ "File" [ " Print " [print-receipt] " Save " [save-receipt] " Load " [load-receipt] " Search " [search-receipts] ] "Options" [ " Appearance " [change-appearance] ] "About" [ " Info " [ alert trim/lines { Point of Sale System. Copyright © 2010 Nick Antonaccio. All rights reserved. } ] ] ] return barcode: field #LW tip "Bar Code" [ parts: parse/all copy barcode/text " " set-text f1 parts/1 set-text f2 parts/2 set-text f3 parts/3 clear barcode/text add-new-item ] return f1: field tip "Item" f2: field tip "Booth" f3: field tip "Price (do NOT include '$' sign)" [ add-new-item set-focus add-button ] add-button: button -1 "Add Item" [ add-new-item set-focus add-button ] button -1 #OX "Delete Selected Item" [ remove/part find pos-table/data pos-table/selected 3 pos-table/redraw calculate-totals ] return pos-table: table (table-size) #LWH options [ "Description" center .6 "Booth" center .2 "Price" center .2 ] data [] reverse panel sky #XY data [ after 2 text 20 "Subtotal:" subtotal-f: field text 20 " Tax:" tax-f: field text 20 " TOTAL:" total-f: field ] reverse button -1 #XY "Lock" [do login] button -1 #XY "New" [clear-new] button -1 #XY "SAVE and PRINT" [save-receipt] do [set-focus barcode] ] [question "Really Close?"] do-events
16.24 Creating PDF files using pdf-maker.r
PDF is a standard file format used to display and print document content in exactly the same way on different computer platforms. In Windows and other operating systems, the PDF reader by Adobe is often installed by default. Other free PDF readers such as Foxit, Sumatra, and PDF-Xchange allow you to view and print PDF documents. Openoffice can be used to create, convert, and save various document formats (i.e. MS Word and other word processor formats) to PDF, so that they are viewable/printable in the exact same visual layout, on any computer.
Gabriele Santilli has created a REBOL pdf-maker script that generates universally readable and printable PDF files directly from REBOL code. The official documentation is available at http://www.colellachiara.com/soft/Misc/pdf-maker-doc.pdf (the REBOL source used to create that PDF document is available at http://www.colellachiara.com/soft/Misc/pdf-maker-doc.r). Pdf-maker.r is a complete, self contained multi-platform solution for creating PDFs. No other software is required to create PDFs with REBOL.
The basic functionality of pdf-maker.r is very simple. Import pdf-maker.r with the "do" function (or simply include it directly in your code). Next, run the "layout-pdf" function, which takes one block as a parameter, and write its output to a .pdf file using the "write/binary" function. Inside the block passed to the "layout-pdf" function, a variety of formatting functions can be included to layout text, images, and manually generated graphics. Here's a basic example of the format, with one simple text layout function:
do http://www.colellachiara.com/soft/Misc/pdf-maker.r write/binary %example.pdf layout-pdf [[textbox ["Hello PDF world!"]]] ; To open the created document in your default PDF viewer: call %example.pdfHere's a more complex example that creates a multi-page PDF file and demonstrates many of the basic capabilities of pdf-maker.r. Separate page content is contained in separate sub-blocks. All coordinates are written in MILLIMETER format:
REBOL [title: "pdf-maker example"] do http://www.colellachiara.com/soft/Misc/pdf-maker.r write/binary %example.pdf layout-pdf compose/deep [ [ page size 215.9 279.4 ; American Letter Size!!! textbox ["Here is page 1. It just contains this text."] ] [ textbox 55 55 90 100 [ {Here's page 2. This text box contains a starting XxY position and an XxY size. Coordinates are in millimeters and extend from the BOTTOM LEFT of the page (this box extends from starting point 55x55 and is 90 mm wide, 100 mm tall). *** NOTE ABOUT PAGE SIZES - IMPORTANT!!! *** All the following page sizes are the default ISO A4, or 211×297 mm. That is SLIGHTLY SMALLER than the standard American Letter page size. If you are printing on American Letter sized paper, be sure to manually set your paper size, as is done on the first page of this example.} ] ] [ textbox 0 200 200 50 [ center font Helvetica 10.5 {This is page 3. The text inside this box is centered and formatted using Helvetica font, with a character size of 10.5 mm.} ] ] [ apply rotation 20 translation 35 150 [ textbox 4 4 200 20 [ {This is page 4. The textbox is rotated 20 degrees and translated (moved over) 35x150 mm. Graphics and images can also be rotated and translated.} ] ] ] [ textbox 5 200 200 40 [ {Here's page 5. It contains this textbox and several images. The first image is placed at starting point 50x150 and is 10mm wide by 2.4mm tall. The second image is 2x bigger and rotated 90 degrees. The last image is placed at starting point 100x150 and is streched to 10x its size. Notice that this ENTIRE layout block has been evaluated with compose/deep to evaluate the images in the following parentheses.} ] image 50 150 10 2.4 (system/view/vid/image-stock/logo) image 50 100 20 4.8 rotated 90 (system/view/vid/image-stock/logo) image 100 150 100 24 (system/view/vid/image-stock/logo) ] [ textbox [ {This page contains this textbox and several generated graphics: a line, a colored and filled box with a colored edge, and a circle.} ] line width 3 20 20 100 50 ; starting and ending XxY positions solid box edge width 0.2 edge 44.235.77 150.0.136 100 67 26 16 circle 75 50 40 ; starting point 75x50, radius 40mm ] ] call %example.pdfThe compose/deep evaluation is very important when using computed values in PDF layouts. Take a look at the following example that uses computed coordinates and image values:
do http://www.colellachiara.com/soft/Misc/pdf-maker.r xpos: 50 ypos: 200 offset: 5 size: 5 width: (10 * size) height: (2.4 * size) page1: compose/deep [[ image (xpos + offset) (ypos + offset) (width) (height) (system/view/vid/image-stock/logo) ]] write/binary %example.pdf layout-pdf page1 call %example.pdfHere is a program that I wrote for guitar students. It prints out fretboard note diagrams that can be cut out, wrapped around, and taped directly to guitar fretboards of specific varied sizes. The pdf-maker script is included in compressed, embedded format:
REBOL [title: "Guitar Fretboard Note Overlay Printer"] chosen-scale: none view center-face layout [ h1 "Fretboard length:" text-list "25.5" "27.67" "30" [ chosen-scale: join "scale" value unview alert rejoin [ "Now printing " value " inch scale fretboard overlay to 'notes.pdf'" ] ] ] notes: [ [{F}{C}{ }{ }{ }{F}] [{ }{ }{A}{E}{B}{ }] [{G}{D}{ }{F}{C}{G}] [{ }{ }{B}{ }{ }{ }] [{A}{E}{C}{G}{D}{A}] [{ }{F}{ }{ }{ }{ }] [{B}{ }{D}{A}{E}{B}] [{C}{G}{ }{ }{F}{C}] [{ }{ }{E}{B}{ }{ }] [{D}{A}{F}{C}{G}{D}] [{ }{ }{ }{ }{ }{ }] [{E}{B}{G}{D}{A}{E}] ] scale25.5: [ 36.35 70.66 103.05 133.62 162.47 189.71 215.41 239.67 262.58 284.19 304.59 323.85 342.03 359.18 375.38 390.66 405.09 418.70 431.56 443.69 455.14 465.95 476.15 485.77 ] scale27.67: [ 39.45 76.68 111.82 144.99 176.30 205.85 233.74 260.07 284.92 308.38 330.51 351.41 371.13 389.75 407.32 423.91 439.56 454.34 468.28 481.45 493.87 505.60 516.67 527.11 ] scale30: [ 42.77 83.14 121.24 157.20 191.15 223.18 253.43 281.97 308.91 334.34 358.34 381.00 402.38 422.57 441.62 459.60 476.57 492.59 507.71 521.99 535.46 548.17 560.17 571.50 ] x: 40 line-width: 30 text-width: 4 height: 5 make-overlay: does [ page1: copy [ textbox 40 0 4 6 [center font Helvetica 5 "E"] textbox 45 0 4 6 [center font Helvetica 5 "B"] textbox 50 0 4 6 [center font Helvetica 5 "G"] textbox 55 0 4 6 [center font Helvetica 5 "E"] textbox 60 0 4 6 [center font Helvetica 5 "A"] textbox 65 0 4 6 [center font Helvetica 5 "E"] ] output: copy [] for i 1 10 1 [ y: do compose [pick (to-word chosen-scale) i] notes-at-fret: pick notes i append page1 compose/deep [ line width 4 (x) (y) (x + line-width) (y) textbox (x) (y - 10) (text-width) (height + 1) [ center font Helvetica (height) (notes-at-fret/1) ] textbox (x + 5) (y - 10) (text-width) (height + 1) [ center font Helvetica (height) (notes-at-fret/2) ] textbox (x + 10) (y - 10) (text-width) (height + 1) [ center font Helvetica (height) (notes-at-fret/3) ] textbox (x + 15) (y - 10) (text-width) (height + 1) [ center font Helvetica (height) (notes-at-fret/4) ] textbox (x + 20) (y - 10) (text-width) (height + 1) [ center font Helvetica (height) (notes-at-fret/5) ] textbox (x + 25) (y - 10) (text-width) (height + 1) [ center font Helvetica (height) (notes-at-fret/6) ] ] ] append/only output page1 write/binary %notes.pdf layout-pdf output alert "Done" ] do to-string load to-binary decompress 64#{ eJztvWmzosyWKPy9I/o/eOrEjao6Rh0GJ6jo0ydABRRUBESxum4EM8goo3r7/vc3 Qd3isHfVc3q4/eH1edxqkrly5co151DCmFxwrR8///mf/vmf9CjMzEPW+vHP/9QC r8DMEldPv7f8SDVahqlHQZyYadrqd//8f85Vqpc5PWWhHEjISl0fcGiwwsu46HK7 eC+tlB126ASqyUz7h5M0XJiuM5rLSCbNfWJpzCTsSKs3SF3F21iHDYERa8wx4XKs HpyhfRyjCjeH1fmsZ2KRoVkiZ3prQ/QEue1Ya5/d9nonfVd0wxsk3IjCfQ9qG5sQ SjdQbFlsmCHaZrcvU6YT7HDMCx1E5znIRLENfihwPONQTyJXR9819vsbpHC627tM ziQZ1rVV77Q5FT1Gi7Keh9BFuIYGiTGyujmOQINQ6nQ6AxwVoN4UfEMHUHug3SAN +lJRFPwChf1DxCeFBB6LQxNrI/hmdOhEZj7Ng4GA8BsqtEpeUzJdMgaYAW2zqQSd 2jdIcddYF/5BG+wST4tz2BCQ47aDjVCU20w2JsRYSFKs+HyRz/P9gELCG8RtBfEG CVrn2Qzqd3ornvG77WxAtVUH7XZFih04ctLJJoPM32+3XLcvhWm84srTSElzvi8t 90nagW6QertBjq5dqQ/N4O0s5/eDgYgHVCB2OUIrtkW8iadWxPdQvBeh+xDLZ4gd 2tRA2wz0Tm7mN0gelOqn/XQC7zTmqEjbaOee1G04FMfaaQvZWyo4HT0aCop5EEI7 JE/bgYLhx00Xk4zyoNI3SPlytFMCbKyMZJtzeytF7aGsGrT9w6qnzGIHctxC2hpC NlT4lDM3Qy2FyKJwecbjrKk/uUEau9quN1SmWLf0EteUvczdtY1wwg8nEMttR3rh 9wYzI0/FXi4x815Kerird+ksilcQOYtukKglT3rswRnRZbA9OLOuJy5KYbcNlsdZ ik6lWafc0ZqUr5OVu1spkN0RO/Fu3tbMsTUcdBpzl6961hpyIWaypK3penSakJzN oEQhBZMRb3dJfE+MjmiE9x2pra17WMEOJMecjE+d42yhsjdIO4HLvaXHj/wOLEFc m2wTXpeQ7MWCiMvQJk2i1yX93YmUNa8ds7alcOjEjXYpJhLhaXe8QRq2ybAcm+0N JdswoWO9sCB2XbIgRhhR2HNs2LEtjBzY3DJPJWrAR5vOhEtJfp5hudbdYzdIrMUG xyIbDgpeFHfuWqLnEzxni8VmIujktiQ2hKkT/fJQTlcWUCTxJqM2sSh3j/Nj2xbK GyQGIhSMHJUER7A5EXRHmk2tCT1tY5MoDKP53OgCYFudREpqQ4xTQinTVSAKkyhd rVWpwQUTb7Vmtemkjax3Vjc2N+WwJg1iE6N1uPGHQ4dZjrzh0aGWu4g8ktPqoyR7 SzsSYKJ3g0SkkbCa9AndFvC9tlAX+zxOO8meLqKJ2fGGOYF3R4w9MQlSIY1y3CE0 ndiXI99mLA+bWQ1IBkZYNomRkL3G+P5wTjPQdG5AxLg71PhUESHwNlPp+l4ZY5GN YxFOxKgIdP8GKenxnY0yLPIFLCoAXHHY6soA3WyoVd/u2/LBSNmQnfR3ZgTvs0Uk 7Wd33xv8dC31UkraMdhwtuBnfDkpu1gJEbsR4CSM1QDziK5gkxOBndLk2B1HnjI9 Kvvd5gaJDnEKcjESt2nasJaSaZUUBph7gg2ZDr/C94UnYESnGn/HpgFnIRbSZ1al kmEH3EdXN0htVbTHXdYchpHT5wJ72+XWJNeZlt3BJDJ0ijfZWGpLS2tF86QEr/Dx aLnfj4zVHs+97JDdIC02Pgdze3u7ogckh5DzfVs42HDPQMKlsaI2pAwDjSJFZk9C J21CK4k2MShHFpH1ChRhmRukoDekmU3sEETYl5CK5IrkT9t2u79b5YyiSjjVddOp hE9Rd+AIWXy0B4Khx3uvJxjKPrhBWh1EI8pNWObmqBr1lnqXVccDUY8WyzEjmtFi zIzEZcpaKbQRunNSkKmCaO8zmcrj/WA1aNhg3JjmbUbRRrofdPZLxFOkTl+IjXmy VMeL3UiB0fn1u9HpkB2D8qHeEGbm5KkUG3QabvYSlVprz7Z9lvQ0VvB08DbA2wRv C7xtyrQXPTki5WnGTvVZODXBezmLpmJTZ07XyMQ2unaJWx5MIKRfygbVEWSYlEmx y85gn8t8WiPnXcIi5hhZAFEYQY5KMr4AUz7Z0L6lWLVcwNM+1d87gOUP8IkbFeR4 ghf+KBZ0a3XI5+1se9jjdJsy6B3ZH/CZt8I2W/Z0aMzdBhdVYJaVDnfKerTvTbeE KmGHBSYicdzl9ZksbpdHyJdmvWA5pNYUOoGVjbKZ7KaO7Og3SO6M7q0tWliF0o5a nLblcD7GCaF8T28pMCtO+znJl0RIaFukYTn1LYU623i9F/z+ur1apSszhg9HaYJG 9HSFCSOmg8OKS/dlb7BMtRGDjnq2mo96nczZdxsUxwOv6PD9HnrCT+3TusMPtKWL nDi22z7hBUotoBEAgC2osj+ATCO3MNvHpqEGtTUUx5u+SpIVlm6lcoZDFIH3ytHA pbc0RnD2Iif63WFiD9fibq3TFG5Ay8AzFh7ahjECL2meWGKNuRuVoPI0J9AuqdnM hpjtR6KHp7t5OdwQhk7Klfqeb7lI3AzSjUjDjsHKRxuPNuIYtvGGvZuD0nAjwHCK T+dHE2cW260RIN6mR+GCpciobNTfEVRaa3jC5hvZyriVfFrCKHwwGhRXtqS0iNee Ly+VQOcm1FgNZiOW8sRgJtGUN3TnEj0Nh0dSoHu+39XWUB9jDp1wBsSszRY3SFnK YzNc0qIusbMpHsWcUl/zQ8Y6ddSsz8Dz/vGw6KzGrLEoZRQjUJMtTEQ/9n1kOu3N Fw1piZHZIvbhWRzI0iLiU02zjv0oFxB0EeRytEa3+6mLo2sPP8pOmMWedVqAXvzx HAeOZGPuFvM93+krEoTIC9UEYit08Q6CsF48nQ8WUG+D7/V53wvi6X6peuw+23v9 csvsbNbSIZtr2mCemAHD2iV39mhBgDEWtqjwrEZbBCUcumRoj3LicDF5lEIW5WxB nLoMQ0wrcU4a+gkoUl4HNpHsEMBMFvZkQfDl/CIgDBCQnCC6pDFcUJtdXjIWse+S iU3mxLE7SuwGF+QEW2azzOm0XT3HwrAoT5nT5mYndSocxsBMyuJ0kZDOjGbU9e64 ONAycDHtgHUpzgD+3Q3STPR0p+9OId4Jyg4zydrSaIjpzjJi8cW6N1oOypJxJ4XG HcUFZgQ9kze2EJ8cMXNcLqSGvSNp39qOvOUun1FYUKLMxJzlsavp5rjLZQzwxhhx mo+7LiusF7O+zWujOe+cmJijBPB73ODMET8FhD20yZzmOyI25wZUsoSYdN3uJJLF Z1G+IRewlE0tjre32JoT27gw2ChHBxb9ScMT26jDvgweLZ31ghlP+YBrj0fcEu0v M3myg33Yn0+4fm+S9LsFAkI2azxcr3MyQmPJYqN1Q1om1nogY8eNJnoFkXaHXMUM GHBU3eMKyrbCUsAkftyX0ymy5iWLMlna8FZ8Ea+0pclCjWjDPKJUOTn0JIlEhuPT xB9S3tEhjtulu51FwoxescFoQcHxxDfTkz6iBysmcwI2Jj2RQcN5Q1qSyczWPRU4 lRNjssZEJ0Tzk2bjZY/moh20mh+Z7g5e9fpMd5TKCDvvkewgVCfrkqSkodfwxKLt qpwSLE1NyOUxtkViNWM3uOAdMXbhFpG9H53stDtFkzkxQjVqOVkf24jiKvvl1Ou6 yg2SPQRepH2YzLxhQe3EmUsyiW8PFXqRo5Vf3le4REG6RGgvTMJQiHFxAMgsijE/ UUlv3NDjwZJiy3E+o/W1slLK7WHrCgXwvMgp5UpuGPj0dMGa6krxunEvXrq4rRiD uTHpu5zNLYhhU+5ONkMTfKKL0SaZHshNm02pGw5Ee5ypo+0oPQTqySBTJ1BO82nu oMvTXAx33A2SQVLHcksGUyWKhWR2CKKOoE0OoP5Si/Bw7ngFWrCMlMzm2sQ/DMZq Hx/ODdOhC97eGXHDzzzGyGrM8cpuKUd94KjocsR6W2m2jfbrDtfvTon2gl3yozwY OXo3leWhsycc6rhMTVPDdg0r1bG8gdLHOtPxYRBsNX5vWkBsxv2hQfMnpu8aFL9j Bq6aklx4iqVoARxJ21fHwGT1fKbB4w65iVx1NLCdLme6u8hWSXlpzBjHkgXHEyfb o71bHrztMXWWQqQcZ7EIPsrxVlxGE3i8bfhPejxZjdXhzJUUa6+SHD3bwwlRQDk5 7KkbJuBTlMKp4366RycBQqHRPhksNkcxLwsCMhs8biX6aTNVRpk5GKCQPS5m9EJs m6sJRFt4OmEoStPhKTagZN7ombp9QPsqR2od/ZR1dGjWiKjVYpXGduDkvb46j2MZ 4cxksVf26WAWb6BQNqVOXMimvmZEEJ5zXZQDBkWTBgo2CE7hqOFnrvThhucwkckY os8oo1ERIUKucbhDQ3ogQGt9KW0iypvPtzRJe4gdSWuTjzucMcBSlW5EZQVjarha ROm4VJ2cnCESOyFG+mDdF+HM2EtZeASB3NExhiUuhhNaPJXsYjLNJTwcmH6/oX31 9dAxSFc47O1w5DvlvNffhhA1cwfQ4gR32DBuD8awF3pe1wtXdt/TD8SUl/ux2elh e77B46utudvuQtWPA/Wo5WMkXujySh3QOjTE4+Jwmgl+3uULFkKOnfl+ceh4+xNE J4E+mNDWCr1BwlKxnRc6kndkOxsFnV0a9ziMBhGVfMJn63jnJ9bKTAdqiDCJZNoR rhXLKa4IfSQ8zrfCDVK/15ktghhnZ8hyOkOXi1naVxOYYrR1G7TqLIIEXxKWBqCR DPhrbaRVO+qpo3ZsnhipGUuB0g7oboHGuNBHLSTLlqGEowifzAuO2e/59TAvmBnu JHzG7xJofvQ6c8pZ9Ch4kvsNKwVHvpe5bIwcs+zU062N0u8zow0Ha9pMHpvZAAUu cHDc0XobW821sKcNRA4zswvOfAOnTWeuObCi6f0s6nCmeCJGaoHqsBllCBImw7BQ 0slBjv39DtELhNmj7QlzCqnlvI+PBbPBT+ZCRstD7vlWseq1d/lCItv4ocNji6Ek dGeklEIapMZWF2esxAr5zRbr5j1niM11oCIbMQKD0YlxlIphgeCi38ePR0elMTMx Ovjs0M/5ABrttc3UWUX4ZoCAn+sOWjDRJh/RgtyGGrG5IhwLK5hmOnfqR+bCU1G/ vW6TvQRAOKjyTmizG4JPifJwIkcHiwX6it4NJjNZyjbADNo3SFIhTcqency9fTc7 jk77eV+BGMEakCeEMubOOlRwOg8JknIXwA/i4t3YCzQd6emFRvWmjTydMS35THCn c8YW+B3CrFmNCPb0ZOu6Lq3EkeOyaqQAozuf0FsdO7X3ILb11x3BLkjSZhqje8yb mMP5Udp2ZITycGOJZLbomcpyJcgO6ZACtZ5wvb0kbWSZms/nhtzgzBUMI4gsSBsF 2jFwMWCp/oDwYTEDinqTxxvfnFv4Zpqe2u01G/usSonhaovQhpDIqiyGTQm+ldbf 5Wifzkqf9slhIsxZkiXHhBePo/GSFiPRFohovyfDJKPcEUJBcoPHV5CHCRZwZ4c8 QQKfG56LEEIwE0jJOAbzPVSWzQgbsokrZl427faBZy5zogUsiST0GrpAIHry2mSG c3k7XFIceE+HSxl8yuDTnw6R4R5C3X0KtTmPWzGJHSuUvAxdYqUEJDNuUPyk5iLu y1Oin3uOvBEPpBo5yyExdw+IkEGFZFTZiAh4h20bIiRD6G9oQ23LQ6I9JXq7RrTB oF1r0/VGHg2dpoHdW+redOGBD4WlvYOygqb9YoeENGFI+W6euqysxdDRjU7uMNuJ aiPaIIFPDIP5zqIVEDDTJwYW3J0q+Wa8ygID4zfDDIQnRemYuYDhsylDdA6dubFb ezmAn8A3SFp35Wko7bGSaamMvNuZ40KCIR/qAddnldtgVApjTtUVhjE5zcazCERI caBLE0I1Z5tGjnVFS8d83j/ZgjqkSo5l6ZlIb7mJy0r9TsDNjn1jXpCl6iEcxeyN me4d5+oC52BcbaczZtmIOVEn7zKxstqPEzdkSQ1LqEL0QAi11ZFpYTBIEQnqwPd1 Y9uGBiDwc/ComuyuZUDhonODxLeXYnt2yiwQlZtoD0LanSLnURZtQy6xbndJ5DBK dzrhlyBIlqu4mORiIV60WXYvZ0bDwyh491CnFQLCSIljRLp+JMMTrhGbpz485XB3 vVjCvsVSqINPJHG8iiB2jja0Cs5IIrzyoCmO6jjDKlu8CqcRCnc2WxkVrPq7X4fT Mdu21qVjbb1cDXqHOUWnZkOC55OA7XvoSUl5uFNITtvsdsNBtjhQeOZAfrjnDIZY 6UTcPvm8pfdwZUypY9UvUHreUb2GTydOA7rYRKMjuYU6Wi6uTJyt4+Lc9+A08Dws SLfUFHK5Db7xt8jCjI/I8MCgpyoLHzT0ONzZiykWR/MTqnbaoRA7p/2izR0PBtWG RqrRZvGj6M7CI8RHbbMnerGQKiHEQzgXFGOvGQEZ67FMzkVJCSeiNlyRpJzg8N4m Zhh5KkGcSi+IWXe4s4cLgivHQdHzyE1n5I1NYtoFTmUj5jQJp0tQNmURg+5oZOsY 4ZS0SRTltE3g5ahDbHRCLQnIngC9YwPlo9kgSl4rJFqC6sQNEjpZLa18M7FS4NLS OUF3RzUD7LtEQozzAcOr81MSaBY/4GAqnpwiPQmPmJXJ7X4wyRpxCzNHOqkwVZfe Nj2O+b21bA8X5MKYnzq6wmvt3mGJoq5oxBSet61xOhin0WHmKMx0xlDltJHrGUzQ KZgchRnigXMA5mCnC9BYTJiBv/R2IJZmJ5GXINBmMXAmB2Psd5wDbakmzy4cA+s2 /IJDwoRp3970qG2IA3fcj9b8SrclWBkXOexZ8XEH7VE3GZxQm44OI9628nnmGcfI AwHFtKHptHgSUX1Vnw4ThnFXyvSER4ltC6lATeV5zOvbUsO68xTN+G1/guv5DOYP yZjSXcobG0qDnzjHDvuyOdK1kmnH1Co6bU+7lQ/pZMoeXG+kdpXOFvIKXtiFLLT3 RBAi27NI75RKbzguGrpA7fd7w5HNVTmPKkBDR4s9esilBOF1Yx61rYXkmEEwNxXC 0L3VLBdZejMda+p6PcsmccOaH5Z9hB4jiZAtVFgTgvkQKSQUGW4LwetAh2JA4vIk 8H1BRgaIEJ+wpR71mdvqTkOr3NZ5RGtZxFreYTj0YGn0Up6o0URcrSasw3L+0Ni5 Qxq82MlEAa/IdhzfFhsUbx+Xgh4snRWTUyE5TfejzW5ciOrgaOa+Dhyco9BfLoH7 hJQ7ZjuauXE4J8ZH9DDdCyzW0HRaf90LtGjDzvcILag6OS79gkXhFFHaBDuJM1Zb UvFRDEJeTQaddTKs1hwYFAyPRgklvUEq+a66ACpJYDeYj7fHRy6PFN1AlGP7hPTI tGscGDrm5nDe07E1WhgCVVLAndLJXjlKRo3svx1E3GbXplla8sYSdxzSGy+Sx2Jn TU08l5o67nIrO9IWXggcX0IjuzdylvquLKcazm6njWwIsamC8K1CDE7TDdCNSBoM M8NJHrNqB2ftwv7AGSaUPe+bafc4L51Aasgdt+pnRE8hc2yn0F0y6TDrkXrsnXpV 6iwnWORYkoWrQ3zJtgnrvLLBmSS+HGbWMG5mHhalf9KskW/DaNSZcC6yLDML4hEg 8RY3kuCCyYm8SwxsckNoidBbtfsQCJjXESOTxy7byNPBLDcLlCU8y4KluBYVYbKd bhfzeZSPCVlUbNHetkUPvCPwTsHb3kLgN8S6BwOnFw0PAzrxsjfH8p2udo9TbaWO 9s4OhqLuge+3J8s2v6d5qb3bcYJj7FVkqImE3dngM/wASZBuNDwMqEP5Ae/RC+1E 74VrbhEQqEv4NttZzdk+e/A3Qj6MVBne7PaBo8dbI2aKziYd9hujs2NBlMdrbmBn fW7hOhFhDmV7PU8CSGwPNbavB8N1h9PyPekvBVkW1zK3ktcscKZXvso2dipQ1Nrf D/dyJLRlThWPjiyi3ixarzJ/yPrFRGf8IF1ZKL9drVl+bBHSKo9mCoVwLkEHZoML CooVVixFubMdKx3MDiH3RyC0GVGe5rLlqEgMKJluT+Vy6erDk2z2tdWhPMYaZAy6 48m4AQlfCf5souJ93o3c9nHLocFOzCGI6h0GB84Lbb5i0CFjEyZwVUYFtZiVy3lM QuUsOujrhqarFkD7XdK35+JxcwqOnS7nyCd6uuWgNOnkp13aXk6TWCDGiIaK+HFO TaL1IFTW9pzpIKNRI5ZCdGsYhGbMrKWD11HnQajG9Fpy9og1D5ggmKDRbLhIZ71d AIRJSHYhpXSLIpm54wweNyyC6oho/8iFWZSlmKH38nbaz09pz9hw+95cmu63vMTP 8liI9C7extQ8t4rewijs42l24DqNmNOM2dMxsDvpdm+5xnqZdqj9mqG6I8nbTDGy zYgOtNusu9kGSSGaLtIhZKAgrE5BlMsVw4YuYJC0n3FTSHN2pBOOkpnCZd3CTNEd vluGhEo68j4+DIcTa9t36OGkDNS5sWB6ZlQc1jDbyNnjJ8OiNYIr3EzuLWfhVuth p32vNEqrW06XiE0p/SVvjj1778+ZiUXGI/jEexFn7YiVvG/sClA5nWdwd7Ifu/Tc tENMoUco29EZyNrR4cmOSXLjLCGdwWYMk+hdq63Bq1664Gn2ZNCjxug02Dr1zNnc Qw9dPxTsE6Sss2654Icamg3YPD0ebS3SjVrnCjrRK5mQmG55H5e4XRw0/Ew0DV11 mQZM1luZkqmsqKxkRiPZs+1jiPeIeCan7WDOyozOJlt/qMJbDc+WgWwDLpXnTU2H TZBV2+kusn4xWBP3me1wN9rb6MZz1H6CDhJb4yayRuVaW6UpRHEk4Kg1eLxe7xvz 1XpfB9uFb+sce2I6bOuqHE5GOnnx64l1SfKO6iVl1GeP9rDLNThzeIrCPbNL5pPJ gaHGzsSNx8JkPdmTQxCxF2Q4FkOxM+wf2C2ncvE49jI7t53lMsV8zC8bed/TcZMX RDkYQIa6lvu4bVJZPhUOmpGMOhTNaNsCqvaLLIlJr8i5yVQn2iU1IA7lcDD1Tg39 tIDGKqYFHbs0fW0yVh3AdxAGkyAMU0FwvRJjSmTlyV5Y7X2R9VbsduUmRsi4UyVd mbOGX6AA28y1yV05xr0EOKikO5nxM46YlCVWpsRuNDoNy3FadIilxpdUd/i2h8Ue yZNdY3S4t6O0reBMBX/tBWOfllVREVdbOeBIsui7e2U37LqlGIXkSA6cURQOR+pI 2Hgrz55EzSwkOZyI7tgGpdREhA1lcZhaFHXMoLzTJfrpAdtqA7Gv9xKpXW75PruL cmleCgYVCgZMyQ2dKZfLbLiOnaEIyWKWnibqwVcDmMVwnd3n1GYy1jarCF47vaK3 o5V21ANOy0KlTm4bTiOl4dNtFJmTge6QNQemxJ7hrLJN12DlPpvSIBCed8y+G8i+ nJZ+jqPLftIpRs5OIITleD/0yUbuEAxrKJOiHe0Jg1LQ7XZneLizTWzc6XM9HGhA EFz1R115r2yVvsuPDy6/TVHgq/usI3ANrwcjbMhcpjN4S/QZmQ2X7RgWSW1YCrra iSawGwWUEkyd0sCIKTIsiylU8mYpTg+jRE39hs6MS0Y9Og6fH502XAxO483YwAc4 roIYfeBLY7XfhsEcrS0mgSKm15f5bMezp+FG29j9yaQhd1Cy3LjHIlnOZWwexiWC JLwCXLcwp5CTv6aTCb9AVt1juF72jxtR7IvSSXcFKYIWqtk2GpoOh44GxB8yb7Ja Q2w0H6N2OMZhON6ZFtxzBG2/YEGgMVpMBV0ZWNy+07NSJMVFBYcdu2zs69HiwFus 9bGkL/ZDOBIDgYBlWXKg2XqqeaflnA5KVJA1rG0MI1IcxkWqjePOnOkKDGMUjfW7 tmEegfWgO5DS1/Gj0B2SyyDseEcm3A2ncRsVR6ZuHCyXWXlLY+ET6/HSDrYejE8o +0Q15K5bumocLU1B47ztIILm+TbMiynb3vu7La3Fa0YNNqO2GpoBvDWCbWp5Gvho Ry65PYSIc4O07e1H1EYNRLE72bcPs7nSN1xpPNO43gRazN31KKBD0yvQdlZMg8UO nQalPtS3KQvNRgBkc7/KdILPgM/WNY29gXRP0RS3iXhzirZLiiq3CEYBd7/hgwfE dIMGuDX3EWLRkRqZ0YMR2YeFxhbHMTVQQmKmk6sBUi68dZGmlJszCq32vABah0G6 0+IRTvJjrDc99VFiux005M4yjITtB+rYWEzdRTA+DbkxREtHmBF8ufBKe4PG2yPe nS6m0CR329HMBC5Q3J/QjuzRciPaoMPLYveAGOZjz8hLtEvKNsMRc1Rc9QvdtBvh emwDIR0vhwxBxLBsjJv5J3PFhCS5ElbEvMB6Xbd7qDUiCBE2RB/ZEbLbntLHYX88 pyl32BsbQ9odHijDXdieyZ4auqBgNkMHYoMoOaIls5yP5f4EG7Nj6shiKRvwEhHh vTQN/KVyjIjVRCXGQ0zkl0s66kcM28iGzLOUGIvlcjx8fk9puDc77IUDG2crYjE8 wfUeuKwcxTYtk5nUPjb4qZmzAEQguvgK3hym2/S0XvTsbY6x/nTTU9CVGTiHeUfS R8xmLJRtJMf0XrBrWClMOM0VS9uI7W2khF0VwxdKiGnYfKGGMwk3YHexL1bLhMHz 0yyM3uzKaXJE2kLRWCszl3hJdYbMtt8ljD0/30bSgp7Mu31FWhxipjs+9Y1M8/ab taxlCCptl5vNSaOzbm+717150+sxZjKtbtG9Zu4D1U86EykwjrmMxCSG9kc9Rpr5 HKLZ1ARZHC1iNRrA+HbXgSkBOjozqMFPqJTRFqrxdjTjkmRjyaZSMpgEQiWfKrTl dGhaUj7Yiz5JIDE6EeQMcyRe5DTc20f9eUM/bZ1TGEWLEdXrOCeKIfyTAOItfeHP MvxAlgcl6iozYLaD4Zw+keNdL7KF05oj4L6MZwuikdXuklub0YjZghgpUyHs+yt+ QKzQNjPiMCDwKIkBHsLKw0I8WOPgMBgZCyymNgajLob4eNnwerZ9mxZKCuVlVorl +dGT0aUxUYEXMogP8RGVcN7o7vHTadLrnBi10uOSqKqSNDS3/nHR0Cp03Nl0uNzP 2w2PfbTRrn46Yybz7kaMukmiAi2jD7Sj6gIF5ByVHkIZjfwTTrmItT5hiogzkxOM lV1Di/dh+9BOQrFrhe5+o3Klj6aUIKP7di6RPhOgajyMvELq8o1VXI9fHCPqhMKo aZY7lYqFfT9ezRj/MJblPCFm+2lwHJT+dGluxkrHlRh3w+8yRCV9gW/jjf0q2iEU VuJB3/VXe3Ls8i658zG7nEmueZBnqDza6oKzGveKySkip/390ewszb3iS/iGkybr xiqJ6ix7B2qGkKXR28d0XsoLIyOSaD46yamaTw4ZNQn3ydaacIc9C8/DfYRAui9v NwxnslGD4gTOzoh1SC8osU27zA4eqWtd3QvcIYfVaa+HRuzUORkyxmDHI+8BP3ha Eu7o4O9XXFHsGlaKTPiEyGEpI60tavkIy88TotMloXoFZuhMqfY8QqUoFvy+qmzN YE9vtrnr05t4i5E9ozl3mS8gx42J71fDZE9CMDUTAwXW9FLmGHrfNSe7HHbDo5hH mzBzVi4icDanS0smj+1Rg05e2smHVYp3xBN0Tgj7sHu/x3d9wtfxdmfRx3A/jzTr xDBsLu8W6yUEXJzuDZIL9KrUjgZEGhf7EusRToQXndLfcH1O05k0WZcPe2tGG3Xt cjMd4UAw2qATPDhEJL1N9AxGpgGKq0oOBSMWEWNfjfVjxHGj8ZaOTWGGcnvGE+Y6 NlxrUj6k4tSwVo39vl6bYCNyH6I5Nk+Ajdv1q53KlAy5XBb35Llj4fsdslyzh87I QlGy6LkUStMTRtEURbEbFHcyx3FJlF4lgZYeZEGfsMPxodrHSoxJBbfZvrpdoYdD f9RnGHtmHhOPsX2FojemFOpWc190pXxnjCmDOIRCd/7coW2e5rLjWlT2W4eQxyeb FVVJnUTzzhGZmLi0dtqmBHzxeAh3GzFCGHAHQ8IwfnCYaLMZy7DMZDje0AZnC5Tk uoSH2UlUWKuR3R0td2lms7ulsqIpIV6p1LBhparSrTBSu5EVJiqNE6Nys+ikwFFA lmBYwBYWCxalsJGI9RI4YWUs7K1cZx9QuMrz48Z+X98i0GjRBfVkilizwDM8IMGK B3Gh5XfqXbFTNSKAQ51QwmywZqcnrgwnw5myM0bb+NSI8gvLnPY6aT7L+gRwMjGb NuDuqECNjtN19FmUyou578LwUCJNZbCj1UmHpIMZ4gSJ6SX75nrwaEpQqUcbulj6 K2HCR5Q8QQqECvvK1kGpiWwcnOUq1ubC/sAeO5tc33Eh9iYHDctZScTqiE9ZE2sv g3K3HO2G3HBB8LNJOsEIogxhnVe0PheIUVvljLkiCtyKKNu5Pw+bepxSMjj3lSI2 KE615mKQHFeU2/bLVRYPcPZIafORjc6UVbCeS2iWCgcTw7Q2vp5rp0UkNvynkXuC XQ6JA1ZXDwZ22KzjA+Zv0hVSYIOVwKi+5SapYLhaKp6QfKqepEBvQ5tB3Ie8Xrth zUcat0T8vR7AbTtcndKAZtr79qxHt+F9AKEHV+wDRVAiuHaIE5gYdn03wcrOgNts D5oFNXaZzDtrRj7NaTNa0KOBQUPQifd6OJSHcRTGruVupnBxtKVeoK+2/ibYdgaL zQxvr7ATD1Hdhg0+DsRZmu5FL6GOandAKyKUOxiH7cY8Mx53dsNidnKNuTlOPEQc LTpZAGR+Z/TmbcsVebOhVSQio2YT2JDkIZBJIxZ7/eNx3k8IfM1JVNxjUhZDT+Tg qBU9OoyXHXuGIrgzwKA5HbpqY0fsSt+2PT7Yaks+Q6Adj42YXTGbTaNUCNaOTy3W 86lB7bbyCGNNP1DXY8ApvZNP05472y4aKxL+aqcniDu2FNLZbyNt2Bsl7BJmaSHC A1/MTjnvgqDDWzAa0MDdzdYr5lQE/Blku4EMomE5DWopYPtSnRyH5HQIrxhWE44z eH0yUnYZILY5owVu6WvhUpqdlEwrCS2zMqRoQ729ocONaOM0aEsoOwAxvNlu87zG dnXeSmJ4sHB0Y0724l7on1bKeo+yVmAridbNRHS/cEusOMa7ZYML3KMCn0yDXRsD HQwu0aBtb4rucsnidupW7Gw0Jl7wfACCje1h5bsLJBt1QFAa7pU8cNDGjn27111g JwUEsFDIqFmG4SyMLg4nSZmpuDyRqRI5hDEGD7r2fG7PJubpVKxHc/CXO5y23UbM 2TsgSCe2w3g/g3fafNo5HQdh2/TDjqWqVq/T6Yty3BvzZoBs4fYU0+aJdxqJVqBn UtdJGrG5NRku1STjPXy4To5uKJ4KCy7K3l5EOVax4v58YQ7TDjGdBYMpDnNYZx64 WIeYGG3W2BUNTyydIytlp0sYSqAdHUqpfLVbcTNKWYsdmEZPg9gabUY4CuJDzRkm 69NA6c+nxTR0QrjH76cN2wLjBdoRuJ0AbzeWcIq6AUwbjC84+Pggd7fhQtDURIf9 PiLoZLRCcDtD4HQd2PvlDo8b+QIF7klKVzik5no426ZIEB64cV/XiO4RnvmzHRbv l4ckUXqnkD2N4WCLUo4kKSPRwIM4zxv6KUegzv5kbKydCYcWOxh0T4VH6hvo0J56 q6nl9mCSIP72t3OL/3v+iA3rW5oB8n5vffpf/Ij6hvy187+hT7eHZmhUj/7XeEFd Sq0oCb4Zpu6CQOR7y8pD/XpctHqFedD6Af5oZvKnn40Eix/pqt9Ks6SVunbYsvxI zVpu3LIuuzl/NoG4VutkJtHfz9ASM8uTsKVH8bH1Cf7UgFqB+t4y3cwxk1Zo2mrm Fual1a3WBa3vLVVLqy/3Tz59+3QrAFh8uusgS763AtUzq29uaP+phcJ3Y/1ek6MV 5H7mxv6xFUclQAWBz9iY53F+b2XRNzfMTBs88yP7W/Uc4AhKL3S8R8uNAVhgS7L7 YgsU10RIPUC4CkBDf7thaiYZZOTx/fAu5TGY4vsHt4fP5R8B/N3293XeZv7jypep PHPHv7RgMB3wXz89zsrj68+AK95/+g1pfTtDfGegLwZovSh7xi1TXR9UBejVhQ8Y PmN1bvqt5ZuhnTl/v+sFsLzq+xdIrX/9G4B/7elW/ecjW1+Ie/mo8akI/edPf/10 5hIrfhz6PXdfhK+pDCo+/1aovmtU7BbEvhmYYdbSHTVJzaz16cvXf2voh4r9r1rg k1AfJc+iFtAkn1oARm62oCgEcnGR/8RMgaS0AuBEVH/QuwGdHz7KW69/RyQNAPL+ 3vp+Bv5IDqtlBnF2/Pul73vV8ePnIxOB+jV2Py4EvKD36cdjRTBKU9Wdlnkhxsve 35mQC9Arsc70uAL686fWA5M89HzhujOaYA5C22xpqu7dwf70s5KRxAyi4vnpA8AL Sc7PXrIFoEo12e8R+QLAMVWjdU+3xDRy/SVZ/vzpywsJvUqUGxpPvHcl8adqZH/+ 9G/goy55Bfvr+yS8H9a5g3e5554JHjGOK/6HKiF9d/bTKHhZXr0qnv9+rvE01koU vre+/ErR1lr8buLfBOl106+viv/9ikqlH37Z5ytWrqajBgIhv93vzw+5/EUnT7P6 W4x7sae3Kb60ajot5/m7b+emaW6+bPVUO4h841LxTnseEtP6Xt+jUf2qb9IIs/R7 68//5/9WV2tUhdXEl1FipN9bDzdtVK9I2z37UzV+xv1vQ80ad2a8ZxRqYlZI1Vo8 ArxrmGbc+vHFNb6Cv8AstkFVwzz8/Vz1ivHXnx9MzrXSB7IO+PkTsF5gNMCRfFN7 NdKtT/8bAg7l+dHvyCyQElMN/mdS5c0W1SP7Uf39fj/c/0Q6Pj9+6+kyjvf0zp// 5V9aEFe7EK0vV1eiwu5r68//+q+/FNTqBWbtPBEvEbmne6MNmOlrsz806UBGbfP3 5lx9LHADG1jzCsCfHgZy9UBsDThasfPfySqgz+8VZhD48oB/hcn52QNSj3j8NzOM dIyB67ZZaDtT/8DBh8Rcy+qqk4rmH1Rcu0bFgNVIU/dkQoeXtulSmTFd28katY8f 1R5GfpSIsQqoAo3MwtVNgSY/qE+6WcqbybAiQ1g5YdgHlSeA7Ekc+VUwlyWv/I+3 quJMTb3WF7ViD7glfFDzURwBX7wzwP8cEX3iu0uTPySh1etXkqH+F9sW9f/n8SuP 04l6/H/A5CNTjwxAV6QFfxCRP3F4rd3+S3n8hf68NPpH7NDPq8tW5aG+xaphmMbV JBVVvubOaBR1JuziLN6KmyHSLZ1yH9+GdZ4AfNzSAsXZRb1zLqs2384epqOmrR+A uWsB/Nzy1TSzEtM8Z4zqb3qe3KEHKn+/F7GGhxUBrOpQoJbnRiBRgweOqm+qyZtb W73eOvr+1vn3ViMtlpixWSX3WrF7jURr2N/QR3G8BIAAXxCOgJBYz8413fdD63P4 /Ab085uyAEAgpPU5fAw0XoF6CzyvFKvSLT8a43JBsxo89P06RAipip9h3Ujg/jbO dT7iB9yy3o+Kmv7QmYOqKX+tGT9VUP83BAPVWCneKx+d+/pUeeENLm6MGqla9Hu9 Tq9lte6Eojnbl9SHm5nBBeQH7tL7SFavJhoVPDBhNQ5w9QKfdRkKvvyup/hbPX/K ElDBTJ6A/o61qC2FCPRz68sTbd/RZ5AQRRmYiZc+wJOye2CBWsmBMP88pQ8IN+1q Nd7QLH03NJ9oc/mo0nWfa80BRnpRXmlsgr915PKnn3fCcRb0qt/HsmetcSH8m8V+ W0a4VTGillYlduoO3fAW+7Y+A1Fv9PGm2hrdVvLR1J73/sFlXeJBU8fAOKe3ADxP TQPMbh2CX8uqn98SM43yRG/WrdEHeN5KDNNScz/7FtehyItgvTLZoDqKIC0UHzQm MbIsQPfvlXg3LWQSZWrmRuGdprwlCX7cz9y1+6pXLTq8xECrH/wAAoQMWggO8Oh3 7uQWjDVUA4DlZ8b0CzNzdfXh8XkQ3b+ijeW2Sp/VdAOwQ+A6tKo/zfSHeri0awyk 4kJL1bMIKHLkr8j9A6f2dL7XgB768Z2nYtMCVZNzC/ih+pW2jXIrN4HtrWgBdWob alUZ9rr9rVKZqHFsJlXa5ZrFbn/7t6Z0hdG3qtLfK3SabA4YIFEfSgPgAAGi7vI0 c62GD1ZxN2AjVQeGHeD41949GbTcauSHqlc1o/cleuXmVW3Bfw9jvzy6pxYweglg oG/Hb7WNh+9hf7tSvlFejedbZe+/txr4ZVGlIr4DoTXTRy34gXLcPxd9qacC+Xr5 gr7QkecnnWuV7legt1vr1oulIVJ6ggcU4LWVZLS+VMP82hpLz22X90UvXbzq4ypq 1cS9FnVgPsK08o0fqZ/qqv9UWAv6c1XPLJ8m70n6694uU1G7eZcM/nMKvrFSctbl 9wsl1es+nf35Ya5c6zauDxYymhnZq3WtLBtQOrf2UPM72vqsB7/I9loXKv3Bjl+b Wz1KgXRdITa+v65+WZhttrmHUA0ODOGXIcnzoGp++INjqttAZ5Kev6NXDH7dH2Cq Pzx3WbWEBOLBqjH08BNtIb/X+dUpjOrY+WaZfw+ZcyvozOkf9vPkA1y5efkrcbat 11bzY6F7rf8evZ8HLytTda/hS+Spc40UMweYgp9vy4uX9dl6fa5+cm6h5dm1gQr+ D4/fqnTDn362tOYvAOb7NaMcR/EVV8AGIfA2L8ueZ+A/AMTaaFx+Py0M1sXXVEzt fxmRngCv9YpH7Uvdb8loutoXd+mRUmBeAQP9ypk+p12Gaqb6kf1aRiEZGGvgLLUg 5K/dd6os8qyyqmkLfT/ZBvHVOFpf6uG8k5R75ZA/D+spdH0YzhWbd/AYRjmQMfgf 7b3zqvcfED+iQP8Vg59TU8NfhpOXj7AyRoXqI/Vf9HsrA27m91YtMzcbBX5+MwP3 jSnqJY2HbToV74F69ywOwENvKqEGWhuqhmgCaXknjAMPocdE4G2F4dKokgjgxX07 O1A3jCtsv1Xz0Cx85bxXG3d0p/YlyyppB9SBZybAOY8Tszh7icCprB228vJRbwVy w8vGiJtHeW/TawwKMznWUfaVchW8JyN+AXzVzOcOgCI6Z4ZqHB7ms0a7Tqqckb5g WwWFjQ1GVcP7djVS5zF9r79HVfrjiTneqj7hfl088Z4GcQ4Q66E89HlOsXjXxA6k q0An1MhXlK5Rr1F9uY5eDdR7Ln+xJF13fTXqXusVFR+E4t0OX4jnc0+/0cGLSQN/ wCT9N0xd/fj3pu4/PkPnUf13ztMdxGqn038h+R9J25yFNwm/1Yn8c/BX5xXg2o2q Nq80F7Mfnv587OESgtSe//N8XXeI1fPy8axVu4pe83mNAtT5/vbt9QRenqJv9VAQ VHsfE/pcEXlrUhEXeVnnvvvnael0XjbrnlXyyxmqJudbklfh2I/zRNXqvfXlberq KgApTf/a+verIm8+//Onv3+qnjagXrT8PeCr6n8Nu9m6ygdcmt4P6Ee9DagJvQUc vdsgAIJ1jbeCB1pHcXbX+vnpj4oFLhjW5Pta93AproI/YPGhKpPR+lvrs5p+cwHP 3Wr/vFuoexxTnUT5fst3mOlTMuhap/7+oo6mXx3YJ4j194p3Gt1q6V31K8DGj4cG Se0fBGpiu+Frt/5Kgzpj9C//evlxyzL9Sv3U9WvH4mrBb+C+PUMDQZVkvFg+eKz4 /YbVr5y56lWneN/cnrPq8EFcZqWv9Md50i8JvPOixzNGl71PdUTx7T69/NB5Pdkg 2Kk564z2W7rvoa+/tN6en/OEz9FsVeFbUS9FgRG8j5il+unHOAFgAMLdnL6G+MJO 3aYVNPkscR921IQPeN15QOMl2M/SXx60W+lmIJS+CeQLRC+5xvdSIE1uf13jSSbP UvbtUUNfXxfnoCG+rX99zS5vo7WagH9R+X3yfJzrab7qNlX698pczfxrC7rD/bNU /hogcpXbO0B/aXQENYf4WdI/hvnB+vg7j17a7Ovr/yGB/8vH/Vz8oqhO6r+HONB4 DdVZ+XVX7F/X/5g4ANofUeLV61mRAyC/NS7drLZf/PGBgWl5Z9/v/6DB1Uj/Q2rr BbCLn/KfAO2DbUg3gr2ZrOfw9m0SLnPztgD15AQ8LEW9NX65jla9ziH1B33/TjRS vX4dkVSvOw+taSbgX5DoitwbX53zGdXa7WU7WLV3/7M0fTSadxuM7mKgq8fxocd2 8REaTsfFwMMv1efvew2/Z64/QB9MRWU6XmP/FoheDcp1ARaIMQLD8HtzV0VLzV+/ 1/5iv29Eui5wXmLhO4j/8reGUmlo+r+9Q9Lq2MytPVp5Wu8aoxcuVqNt9x7Q+ZzO i81dL3RBY0NVDbXOd9+BrmOdRskLV+eZ+d+iiWZD8LMRarwD5tm7eg2kfvZxbFGL 1WUKL8mJv58zKADMO4R+kYOrKfeLibnR7pzeOnfyuklYCcR7/bwT2jR0ZM1e32oG /HbHgL+R+HkLcd7NVTxlB94Gar2g4SX5ehvRuxz22xR6msCPyPU+bd6pezMX99L/ C57+bbZ9jzUf6PJke35hd151fX123QX3jmF6jvSfDdNjJNxcGLiuwdXrI+ckaJm8 OEL5dmbwvEpgHtznI3OxD9Coz37VlS77rl6c3nuYK/DtIRD+aPbqrMMlE1Yn8+oc 1s+WbVYK9Pqv8TZAVNt73slqXHfxVMr5LkHx1vABlZdi19xElYfVityt5B2wvxCk 165DFn1LTAuU1ociP8QTWORXwno/6ioN+RGZXrRAP5as1/kK6LY15y3fcP71gpgP Db43qv8jNHuto3XUaMAFqu6hAH0s6LQ+Jy+WYT/2l6/uRZWPbiw/3yMKXD/gQtSa 8+7BS0476+PbjuF7UN8eAp1fLg78hzzUh5+XhULzoPu5YV423bgZKPzTJcsM9MpV Pm4Lg+dUwjVZ/Lbx7Hlv69ui4rWHu1PXF/j/WAjwm6r2drT1caX0+qpzyq857j+c aX4N9suzGXl/OL8+cFpToz6e+5aWvyBd/a6WBK5K/cstDnnE7d0FdaAVL3smz0an 1ltPWvVeIwHv404v3Wuf762bDrquer8FP2/bRYJqX8FzHw/bAp/LgC96bvvQ8G7X 4JvxapS+gPU+iNa/NoLj7t1YzNCIn+OkK7dc910+LVnWXqD6yOWNqLBu/rbH8b5a JYmh0Yjt3naqwK0vl5XJ+/bVHsOfrRcW/vXG0J+PQ6wrgeC7kp7PVd8/PseA0z5X xTbQDM5PwG2AElc+q1yXmwJpDP5zVdr6chfJVX1/PQvmZ6B4Kj1Rbel4O1ny5U4B 3ba+VpVujA2wMaLwc/ZOF0cz/Xo3qluOJb0OrATG4A7ZOv3x+VzrhtflUphLF+d9 vjUuDVTOKb5fNL1sDm60/dlA7kLye8ewhvLjumW36umMI9C7dtjo+O33JSf37xeN 9fPxoHw1a688v3prcNXb7WFDN9WK8cnnu9Kz+eDfLxNb0/ZzpaKAobqmpGuqn5dR 3qPR/V7kOzJX1vPLH8xf3fNAraSM+rT759rHfEOi6vZP15/oDaerfjzXqp41Wd43 VaOCVavfJiNd1Mh7LNTYW/7ISB9T53FX+uPi1IfMddk93cSztkuAVayKZ+rZeZPw 9D0cGqCanZ0/jEQtL7ubfjwL9oPGvSmjYzPUuvhor8zvPQueN4LdXW+B1MeGnlze hqt3lqgXTm4zAqsqvQqVr9tHL8HUIXsXXD2Q92P/px6rP3/EmQW28wnjy+MrhwJ/ uXHyDzQw3MI1ziv29VlA+GcL7fUaXHJx728zl+XAn7tO/OVpUw0Xl50fP85CD5y5 6rCG//PKWa9Z6GLy6gdPtu3q8r7dRFVXqzL8107fjOmzHX7FOu8sQTbU3ufnResn tAA+kg68Nql8lVh4nuQm+KcDF89bmp6B3Nvky3ma510Zr25uuaq5e738ueEnXnr7 el/jPJv3ZVdn4L70qlKeSyuVeF/6phKeKz+FkP9+50m87vPBQfpZoXgdE2CKe31k W4e02hz/we0lWp5VJ01aCXArjWprVbrP1QRQuRG6AeDV7jS4pZlFZXrQ1508zc7n OinyQgyuW1RrQQTsXf5sGgEdODQN619hWNv6CsPqyxnDJ9t+A3pJvNyP/iJJzaCx 2ekuanouPz7XY77rth78P9jr7p1ez70AC1pB+DWdZnd0MtT0aXvE5zSq90fdWv74 WS0RGj+/PvHTuTM3zKLLzqbr/X8vPIEHTOqH90DvJbbm7StHnNVjXfSz9aRdb6Cr FMfZ9rTevqK3r503HZjqb3u73vppAvos0G91rV/VTey3ui91TB211hh3b/R4jwku 6F9QP6N9/ugCVjKf2eBSUukjQKZr77WRuhOsasrOI/l5Q/axxdkV+0W79FVD07Cf G55LL83Bb+sekO4muv9C7G8E6/yaYM9W/0LC9h31ALe9SLG/rFottcF/7fXQa/mL 1fbXFd/m7Qrw3R4f6gGd9Vz12xn2X651/nAn3/6xYT02RF9i91j1HWxfdPKrcX37 TeJ9+4h4/9E+2n98XO/xnQ4Cmncd0Xsprs7rfMuiKiiqj+7UMUUWNWT88rSW0/un QCpjNXOu4vQZ/H6ten5f2VzVWhPu2WNqdlab3FqUmxJd6Q1Hjc171fFWcifw1UAu Q2+g/K71uKH8Ofj59aUPV0G8kOsPQvQfDd0/jNiD/6iZJ7fabP4Gpv9Hp6T+6J0/ +oDm73Xx+Q7bPz7zxbuArSQK/kOgj0+gdb9KxTXtqfORV3A+IfTMQi9SLJ8vXn8N /BLwv3tc6XwS6u680rX5j8c0c+2OvKTC5aLOt9TKxVG5JV2uSuW9fMvT3hQwlc3g 5YF4wNH3j68uc6xOI1YDfH7ycNjrvrd3iFOfG7ujzTk+/fGA7tdX03Ceiss54Wqp 5KUgVf01Dlzf5XUaA75ep/DC160gXA9hv9e8OmlbHzt5D4XL0e5321cnb99v7F3P 1z20/XmeyDvurZt8r4503qbkUTZqLd/07N5bj/lDIvk5eJRKv/VZfGTyn69VwB02 t26x9xy16vWRs1a9HtH7oNY7urD+GJw/sNriis9AHpn1cYBAXBue7Zsvf6ebxCf9 dY6X6tbpL5uTz+rvbDibLZtG9Lf6vsBIfwfIMwZplkTePQY1t97s+8dIWK7vt74U 9XnSz9ZFBVj6LQYozPBbZBi3On/5+vPMyO/3U1V9WCKs109Aizc45Pvq5o9EIy9x JP/yWoQ/QPbJrrnx1UN7A7u+Ltw8dbiuiPJxF9UlV4+91Fde/k8yAPWI1ewfVfJ1 83q7x2+p6HcZ4GwIjH/UTPyjar6RADpfRlqxmevXn/UayVP6pya7VT+8Jterv9/r zT/Vt1f7aqwa6H19P1KNdxs8b8as9/PUONYpJsCCdQLr0ySwP73ddvVQ6UVG/8ah 91t5zvw6il4g82z23tXL985fdZr/2fH7cndDQY3qM7dW5YBZX1ras0DWNV45kTUz PrHRc4Kr5ox6Af+agq8bvNQNz17MZadikz/rS6OeuAy0vuzb/02crhv3P8SquTHk zkt5mIAkNS8XZt1uFbu/crCqcr776xIpXnSafR8IXuPd6g6Kyz6z+gybe3/RwPdW 4xqI8wb5+7u8bk+va0v1cmNjt9oHl9bdg3pnU1oNz61SoMIHG8ffrsa4vxj1mfur ax2+uF9/44JSKgp/63bSqvY7G3friqSamhWs1pfngX109eg41COjPlK1dkMiTN1r wTuY/8Ztno8E/A4Ie3dYuHk5xB2j1Ero1RVuDRV1K6zZ6lp45lT3xZ13D0Cfeem8 n6eu9vNOGX7AVA9A3+GqM+D/NK66uAGAr77UFK0+q6KPfPo3+qO/Qf8gQOO3XU5B 8PO2hyaoTjZ8GaDVqaTeX7tfm1MQ383A25UErpG2AtNw1dpprq9obcWucTdDVaVX l5DG1Ya5L1U+7mqkLpe8tJv3cF4nsNbq8a+mrEboOk8vJ+WK7ffG+ip8JkoN/nyT L/JUgj4elr/ca/88rkecLmR5I/OXM2jka7357fbrS6PLs6qHXpeiX1tPtzs9XOdU V//dO50uCP7+nU7/xeqS//iOZl6tdq61vsS/vqV7Vk02WSV+vlzn/b3NinV94Xx/ WH3b0Jvp/vhS5wuJr8L6MT7Cmy4Bw32/3nmYSaSLwA/ofAyzen25rPZfNnY8GEPg LP14Y77aFtXE/nJfrf63BF5uw/ygp0cNed/V5V7uc28PVX/d3Usr9O6Dn4+XLlWv C2Nf5+YdzvtyrvbH/8WTD3XuHxWRD8TjQTTeu6GKrXTfjy+VCnyPyS+3WH25V7gv evzgitvmIG8m/7Z3pvXZV49RnjVurL21uLu79lZ8MSexfRnbCwsf34/8XHhzDl8+ OZv4J0iX6Xhwdc9T9PDATr837F/TG2k4vLf6zYvYqsb3p/Pf7vG9x6BJujgxASH0 t4T1I/3Ouyhe/Ot8Lwj7tKn4vaT4/VSf9xFebtV6MDJ14vuMw3sXtf58IOsZs9eJ 7+qSuy+vToF+rRc4EQzBrqelHzcwN8NN0CX4//8Dw8SJGQWrAAA= } make-overlaySeveral articles about pdf-maker are available at rebolfrance.info: first translated by Google, second translated by Google.
16.25 Bar Codes
Bar codes are used in many business applications to speed data entry and to reduce input errors. It would be foolish to build a point of sale system or an inventory management system without using bar code technology.
Reading bar code data into the computer is extremely easy. USB scanners (hardware devices) work just like keyboards. Plug them into the computer, and anything they read from a bar code will be entered as plain text into your application, just as if the text was typed by hand.
Insert a field widget into your GUI, focus it automatically if necessary, and you're in business with bar codes. Add some error checks, save to a file, select from a data block, etc., as needed:
REBOL [title "Bar Code Reader"] view layout [ text "Plug in your scanner and scan:" f1: field [ if f1/text <> "" [ write/append %barcodes.txt rejoin [ copy f1/text newline ] ] if "recall" = select ["123456" "ok" "234567" "recall"] f1/text [ alert "That item has been recalled!" ] f1/text: copy "" focus f1 ] do [focus f1] btn "View Scanned Bar Codes" [editor %barcodes.txt] ]Printing bar codes requires some more code. The scripts at http://www.rebol.org/view-script.r?script=code39.r and http://www.rebol.org/view-script.r?script=ean13.r demonstrate how to print several common bar code formats to images.
The following program takes a given string and XxY coordinate (in millimeters), and outputs a PDF file containing a printable bar code at the given position. The bar code algorithm is derived directly from Bohdan Lechnowsky's "code39.r", and the PDF is generated using Gabriele Santilli's "pdf-maker.r". This script was created because images output by the original code39.r script would become blurred when inserted and resized by pdf-maker.r. Here, the bars are rendered as lines, directly in pdf-maker dialect. The images generated are crisp and easily scan-able:
REBOL [title: "PDF Bar Code Generator"] text-string: "item2342" x-offset: 10 ; millimeters from the left edge of the page y-offset: 257 ; millimeters from the bottom edge of the page create-pdf-barcode: func [barcode-string xshift yshift] [ barcode-width: .3 barcode-height: 12 code39: first to-block decompress #{ 789C5D93490EC2400C04EF794514C10504D8EC1CD9F77D07F1FF6F30C9C4E3F6 200529E54EA91D866F92BA4FC699BB989828FF6277EB793BE7EE3EE69D322F03 E15D9F27629BEFA9DFE4FBEA377C103CC520F021F684FC087B0227EC037C2C9E F209E113F1447C1AF6F503E1B3D2CF517E1EFC36BF087ECB97E221BBEF0A7B42 7E8D3D816FB00FF0AD7A8A89F09D7A0CDFC3BEF940F841FD267F847D317F827D 919FC3BE6C3C17E889F92BF4447E833EC8EFDE43A212FE28F2C4317F4A9EED79 7E95F9F83CBFD56FF21FF51BDE081EFBFB36B127E453EC09BC867D80578447E7 B3051CDF4F5DFB185ED5FF9DE7C9EF0F6518AA1B22040000 } convfrom: rejoin ["*" barcode-string "*"] pdf-dialect-out: copy [] x: 0 foreach char convfrom [ pattern: select code39 form char foreach bit pattern [ x: x + 1 if bit = #"1" [ append pdf-dialect-out compose [ line width (barcode-width) line ( (x * barcode-width) + xshift ) ( yshift ) ( (x * barcode-width) + xshift ) ( yshift + barcode-height ) ] ] ] x: x + 1 ] return pdf-dialect-out ] do http://www.colellachiara.com/soft/Misc/pdf-maker.r barcode-layout: copy [] current-barcode-page: copy [page size 215.9 279.4 offset 0 0] append current-barcode-page create-pdf-barcode text-string x-offset y-offset ; The following block is not necessary. It just adds human readable text ; to the printout: append current-barcode-page compose/deep [ textbox (x-offset - 9.5) (y-offset - 8) 56 8 [ center font Helvetica 3 (mold text-string) ] ] append/only barcode-layout current-barcode-page write/binary %labels.pdf layout-pdf barcode-layout call %labels.pdf ; This line is unnecessary - it just lets you read the pdf dialect output: editor barcode-layoutHere's an function from the Merchants' Village software which prints vendor bar codes on pages of Avery Label paper (30 labels per page), with the option to start printing on any chosen label position on the first page inserted into a printer (to allow continued printing on partially used pages). This example is taken out of a larger RebGUI application, and requires the .PDF module. Even though it's taken out of context, the logic is useful for anyone who wants to print pages of bar code labels:
print-bar-codes: does [ bar-code-data-to-print: copy [] bar-code-human-readable-to-print: copy [] either true = question "Print bar codes from vendor order file?" [ if error? try [ barcode-order: request-file/only barcode-order-data: load barcode-order temporary-barcode-data: copy second barcode-order-data ] [alert "Not a valid bar code order file."] ] [ temporary-barcode-data: (copy pos-table/data) ] temporary-barcode-data-build: copy [] foreach [booth item price] temporary-barcode-data [ new-price: to-decimal copy price if new-price < .01 [ new-price: request-value/type rejoin [ "Enter Price for " booth ", " item ": " ] decimal! ] append temporary-barcode-data-build reduce [booth item new-price] ] display/maximize/dialog "Bar Codes" [ barcode-pos-table: table (table-size) #LWOH options [ "Booth" center .25 "Item" center .55 "Price" center .20 ] data (copy temporary-barcode-data-build) [ ; on-click, change the selected line price (request-text) ; probe barcode-pos-table/picked new-price: request-value/type rejoin [ "Enter Price for " pick barcode-pos-table/selected 1 ", " pick barcode-pos-table/selected 2 ", " pick barcode-pos-table/selected 3 ": " ] decimal! if new-price = none [return] barcode-pos-table/alter-row barcode-pos-table/picked reduce [ pick barcode-pos-table/selected 1 pick barcode-pos-table/selected 2 pick barcode-pos-table/selected 3 new-price ] barcode-pos-table/redraw ] return button "Print" #XYO [ all-the-barcode-data: copy barcode-pos-table/data hide-popup ] ] unless value? 'all-the-barcode-data [return] if all-the-barcode-data = none [return] foreach [booth item price] all-the-barcode-data [ bar-code-data: copy "" bar-code-human-readable: copy "" temp-booth: copy booth booth-name-to-print: copy temp-booth append bar-code-human-readable rejoin [ "booth " temp-booth ", item: " ] if error? try [booth-index: to-integer copy temp-booth] [ booth-index: 0 ] append bar-code-data booth-index append bar-code-data select [ 1 " " 2 " " 3 "" ] (length? bar-code-data) temp-item: copy item append bar-code-human-readable join temp-item ", " if error? try [item-index: index? find items temp-item] [ item-index: 0 ] append bar-code-data item-index append bar-code-data select [ 4 " " 5 " " 6 " " 7 " " 8 "" ] (length? bar-code-data) temp-price: to-decimal price temp-price-nodot: to-integer (price * 100) append bar-code-human-readable rejoin ["$" temp-price] append bar-code-data form temp-price-nodot append bar-code-data-to-print bar-code-data append bar-code-human-readable-to-print bar-code-human-readable ] ; probe bar-code-data ; Avery Address Label Edges: left - 5 75 145 right - 71 141 211 ; tops/bottoms - 13 38.5 64 89.5 115 140 165.5 191 216.5 241.5 267 barcode-label-positions: [ 5 267 75 267 145 267 5 241.5 75 241.5 145 241.5 5 216.5 75 216.5 145 216.5 5 191 75 191 145 191 5 165.5 75 165.5 145 165.5 5 140 75 140 145 140 5 115 75 115 145 115 5 89.5 75 89.5 145 89.5 5 64 75 64 145 64 5 38.5 75 38.5 145 38.5 ] current-barcode-pos: request-value/default/type "Position on page to begin printing: " "1" integer! if current-barcode-pos = none [return] if current-barcode-pos = "" [return] if current-barcode-pos = -1 [return] current-barcode-pos: (to-integer current-barcode-pos) * 2 - 1 barcode-counter: 1 barcode-list-index: 1 barcode-layout: copy [] current-barcode-page: copy [page size 215.9 279.4 offset 2 -17 ] loop (length? bar-code-data-to-print) [ append current-barcode-page compose/deep [ (create-pdf-barcode (pick bar-code-data-to-print barcode-list-index) (pick barcode-label-positions current-barcode-pos) (pick barcode-label-positions (current-barcode-pos + 1)) ) textbox (pick barcode-label-positions current-barcode-pos) ((pick barcode-label-positions (current-barcode-pos + 1)) - 10) 56 8 [ font Helvetica 3 (mold pick bar-code-human-readable-to-print barcode-list-index) ] ] barcode-counter: barcode-counter + 1 barcode-list-index: barcode-list-index + 1 current-barcode-pos: current-barcode-pos + 2 if current-barcode-pos > 60 [ current-barcode-pos: 1 append/only barcode-layout current-barcode-page current-barcode-page: copy [ page size 215.9 279.4 offset 2 -17 ] ] ] append/only barcode-layout current-barcode-page make-dir %./barcodes/ write/binary %./barcodes/labels.pdf layout-pdf barcode-layout current-barcode-file-name: to-file rejoin [ "./barcodes/labels--booth_" booth-name-to-print "_" booth-number-login/text "--" now/date "_" replace/all copy form now/time ":" "-" ".pdf" ] write/binary current-barcode-file-name layout-pdf barcode-layout either pdf-choice = "none" [ if error? try [call %./barcodes/labels.pdf] [ write %pdf-choice.txt "SumatraPDF.exe" call rejoin [ (to-local-file %SumatraPDF.exe) " " (to-local-file %./barcodes/labels.pdf) ] ] ] [ call rejoin [ (to-local-file read %pdf-choice.txt) " " (to-local-file %./barcodes/labels.pdf) ] ] ]Third party DLLs and other tools such as http://sourceforge.net/projects/openbarcodes/files/ provide useful solutions to printing bar codes of all types.
16.26 Creating .swf Files with REBOL/Flash
Flash is a ubiquitous multimedia format used to deliver graphics, sound, video, games, and entire web sites on the Internet. Flash is already installed on over 90% of all computers connected to the Internet. It is available as a small free plugin for every major web browser, at http://get.adobe.com/flashplayer. There are a variety of other flash players available which can display Flash formatted ".swf" files on mobile devices, on desktop operating systems, and on the web. Flash's ubiquity, power, and comprehensive multimedia features makes it a popular platform for rich media development, especially online.
Flash was originally created by the Macromedia company, and is now owned by Adobe. Adobe's Flash CS4 development package is an expensive and heavy development environment with a significant learning curve, and it requires proficiency in the "Actionscript" language. There are many other commercial and open source offerings that can be used to create flash .swf files, but many of those are oriented to creating simple animations with moving text effects, graphic sweeps, pans, fades, etc.
CS4 is a fantastically powerful tool (the industry standard), but for many Flash development needs, you'll be happy to learn that you don't need to venture outside the REBOL world. REBOLers have their own Flash creation tool available, which is freely downloadable and which does not require any additional languages or development tools to create rich multimedia .swf files. Just do the REBOL/flash script at http://box.lebeda.ws/~hmm/rswf/rswf_latest.r, and you've got a powerful Flash development system at your fingertips.
Using REBOL/flash is simple. The following 3 lines demonstrate the basic process of installing the dialect (DOing the REBOL/flash script file), compiling a downloaded REBOL/flash source code file, and then viewing the compiled .swf file in your browser:
do http://box.lebeda.ws/~hmm/rswf/rswf_latest.r ; install REBOL/flash make-swf/save/html http://tinyurl.com/yhex2cf ; compile the source browse %starfield1.html ; view the created .swfTo begin working with REBOL/flash in earnest, you'll want to save a copy of the REBOL/flash dialect to your hard drive:
write %rswf.r read http://box.lebeda.ws/~hmm/rswf/rswf_latest.rThe file above is a native REBOL program, created by David 'Oldes' Oliva, which takes input in the REBOL/flash dialect (a REBOL mini-language created by Oldes), and which directly outputs Flash .swf files. No other tools (besides the REBOL interpreter) are required to build very powerful Flash applications that you can use on your web site, in desktop presentations, etc.
Here are a few demo examples to download:
examples: [ http://box.lebeda.ws/~hmm/rswf/examples/swf5/swf5-eyeball.rswf http://box.lebeda.ws/~hmm/rswf/examples/swf5/swf5-snow.rswf http://box.lebeda.ws/~hmm/rswf/examples/swf5/swf5-starfield2.rswf ] foreach file examples [write (to-file last split-path file) (read file)]Those are just several of the 175 code examples at http://box.lebeda.ws/~hmm/rswf. That large collection of code examples represents the full existing documentation for the REBOL/flash dialect. Reading and experimenting with them will help you become familiar with the REBOL/flash API, and will demonstrate how to use the essential building blocks required to accomplish many necessary REBOL/flash development tasks. Note that Oldes' previous REBOL/flash web site is still available at http://oldes.multimedia.cz/swf. That site has a downloadable zip file of all the code examples and some additional older tools such as a swf-to-exe compiler (that site is no longer updated).
After downloading/doing the script at http://box.lebeda.ws/~hmm/rswf/rswf_latest.r, you can compile REBOL/flash source code files into working .swf files using the "make-swf" function. The /save and /html refinements of that function are most typically used, as they generate the HTML needed to insert the Flash object in your own web pages. The make-swf/save/html function creates a fully functional .swf Flash file and the necessary container HTML file in the same folder as rswf.r. Here's a simple script I use to compile REBOL/flash source files, and then view the compiled results in the browser:
REBOL [title: "Compile and View Flash Files"] my-rswf-folder: %./ ; my-rswf-folder: %/C/12-2-09/My_Docs/WORK/rswf/ ; choose your own change-dir my-rswf-folder do %rswf.r ; assuming you've already saved it to your hard drive make-swf/save/html to-file request-file/filter "*.rswf" browse to-file request-file/filter "*.html"Go ahead and try it now - use the above script to compile the source files downloaded earlier. The compile-run process is unbelievably simple! This next script is a build tool that helps to automate the process of creating, editing, and compiling REBOL/flash source files, viewing the results, and then re-doing the entire process repeately to debug and complete projects quickly:
REBOL [title: "REBOL/flash Build Tool"] ; The following folder should be set to where you keep your REBOL/flash ; project files: my-rswf-folder: %./ ; my-rswf-folder: %/C/12-2-09/My_Docs/WORK/rswf/ change-dir my-rswf-folder do %rswf.r current-source: to-file request-file/filter/file "*.rswf" %test.rswf unset 'output-html do edit-compile-run: [ editor current-source if error? err: try [make-swf/save/html current-source] [ err: disarm :err alert reform [ "The following compile error occurred: " err/id err/where err/arg1 ] either true = request "Edit/Compile/Run Again?" [ do edit-compile-run quit ] [ quit ] ] unless value? 'output-html [ output-html: to-file request-file/filter "*.html" ] browse output-html if true = request "Edit/Compile/Run Again?" [do edit-compile-run] ]Reading and adjusting the 175 online code examples is an essential part of learning to write your own REBOL/flash scripts. Try this example, derived from http://box.lebeda.ws/~hmm/rswf/examples/swf5/swf5-soundstream.rswf:
write %mp3.rswf { REBOL [ type: 'swf5 file: %mp3.swf background: 200.200.200 rate: 12 size: 1x1 ] mp3Stream http://re-bol.com/example.mp3 finish stream end }Notice that I've adjusted the original file name, changed the .mp3 file to a URL link, changed the graphic size and background color, and trimmed off some of the header. I compiled this script with make-swf/save/html, added some text to the generated HTML file, and uploaded both files to http://re-bol.com/examples/mp3.html, all with the script below:
REBOL [title: "Generate from source and upload SWF and HTML to web site"] ; You can edit these file names and FTP info for your own use: source-file: %mp3.rswf output-html: %mp3.html output-swf: %mp3.swf inserted-html: {<center><h1>MP3 Example!</h1></center>} insert-at: {<BODY bgcolor="#C8C8C8">} my-ftp-info: ftp://username:password@site.com/public_html/folder/ destination-url: http://re-bol.com/examples/mp3.html do http://box.lebeda.ws/~hmm/rswf/rswf_latest.r ; do %rswf.r make-swf/save/html source-file content: read output-html insert (skip find content insert-at length? insert-at) inserted-html write output-html content write (join my-ftp-info form output-html) (read output-html) write/binary (join my-ftp-info output-swf) (read/binary output-swf) browse destination-urlThat's a fully REBOL-based Flash development and deployment system in just a few lines of code, and it requires only a few hundred kilobytes of simple to use, stand-alone development tools. Incredible! Think for a moment about the possibility of automatically creating and deploying custom .swf files right on your web server, in real time, using scripts as simple as this...
Now take a look at http://box.lebeda.ws/~hmm/rswf/example/swf5-3dtext. Notice that the source code for this example (http://box.lebeda.ws/~hmm/rswf/examples/swf5/swf5-3dtext.rswf) imports some assets from a separate included file, stored on the web server (at %includes/fnt_euromode_b.swf). Files such as images and other binary resources are often included in REBOL/flash code, so they can be compiled into the final .swf file. If you want to compile this source code on your local machine, you must download the included files, as well as the source code (TRY THIS EXAMPLE!):
; Notice the folder which contains the included resource. By ; saving downloaded resources to the same folder structure, you ; don't need to alter the original code at all: make-dir %./includes/ web-resource: http://box.lebeda.ws/~hmm/rswf/includes/fnt_euromode_b.swf local-resource: %./includes/fnt_euromode_b.swf write/binary local-resource read/binary web-resource source: http://box.lebeda.ws/~hmm/rswf/examples/swf5/swf5-3dtext.rswf do %rswf.r make-swf/save/html source ; Notice the output file name in the header of the source code file: browse %3dtext.htmlThe code example above is complex, but you should notice that much of it is in standard REBOL format (colons are used to create variables, code is contained in square bracketed blocks, functions and structures such as the "for" loop are formatted in standard REBOL syntax, etc.). You'll see many words and phrases in this example that are used in other examples: ImportAssets, EditText, sprite, place, at, "show 2 frames", doAction, "goto 1 and play", showFrame, end, etc. To understand how to use the dialect, start with simpler examples and look for the common words, study their syntax, and experiment with adjusting their parameters. Below are a few examples which demonstrate the basics of using text, images, graphics, sounds, and animation techniques in REBOL/flash. First, a rectangle:
REBOL [ type: 'swf file: %shape.swf background: 230.230.230 rate: 40 size: 320x240 ] a-rectangle: Shape [ Bounds 0x0 110x50 fill-style [color 255.0.0] box 0x0 110x50 ] place [a-rectangle] at 105x100 showFrame endHere's some text:
REBOL [ type: 'swf file: %text.swf background: 255.255.255 rate: 40 size: 320x240 ] fnt_Arial: defineFont2 [name "Arial"] some-text: EditText 'the-text 110x18 [ Color 0.0.0 ReadOnly NoSelect Font [fnt_Arial 12] Layout [align: 'center] ] place [some-text] at 105x100 doAction [the-text: "Hello world!"] showFrame endTry altering all the above examples (copy/paste and edit them directly with the "REBOL/flash Build Tool" provided earlier). They should provide enough basic understanding to begin reading through the API examples at http://box.lebeda.ws/~hmm/rswf.
To see just how powerful REBOL/flash is, take a look at http://machinarium.net/demo/. Machinarium is an absolutely beautifully designed, commercially successful game (see the reviews), created using REBOL/flash. A number of complete, complex Flash web sites have also been created with REBOL/flash. See the links at http://oldes.multimedia.cz/swf and http://miss3.cz for a few examples.
16.27 Printing With REBOL
REBOL is a cross platform solution that runs on over 40 operating systems. As each operating system requires varied OS interfaces to printing (shared libraries, Dlls, and other frameworks), it's important to devise universal approaches that enable printing output onto paper hard copies.
16.27.1 Printing to Images
A quick way to layout simple printed page content is to save a GUI as an image, and then print the image using default or installed system software. REBOL's GUI capabilities provide quick and concise methods for positioning text and images, specifying fonts, etc. on screen. Simply layout the content you want to print, save it using the "save/png" and "to-image" functions, and use the "call/show" function to open it for printing using the default system viewer. This example resizes and positions an image, and sets the font size for a block of formatted text:
REBOL [title: "Simple Print Example"] some-text: copy {} repeat i 10 [append some-text rejoin ["This is line #: " i newline]] save/png %printout.png to-image layout/tight [ backdrop white area 640x480 white font-color red font-size 40 some-text at 400x150 image logo.gif 200x100 pink ] call/show %printout.pngYou can also open the generated image for printing in the system browser:
browse %printout.pngPrograms such as Irfanview enable batch processing, automated print sizing, and other features that can be helpful in automating repetitive printing tasks. Just Print the Image prints images files directly to printer without popping up any GUI interface.
16.27.2 Printing to HTML
Makedoc.r, explored earlier in this tutorial, provides a simple way to create HTML output for documentation content. Using any browser, that content can be printed, and often with a variety of layout choices and features. To force a printed page break in printed documentation, insert the following code:
<p style="page-break-before: always"></p>Using free third party printer drivers such as CutePDF, HTML files can easily be saved to PDF and other formats. This is a quick and effective tool chain for creating high quality printable books and documentation that can be viewed across all common operating systems.
HTML can also be used to create more specific layouts for direct printing. Just concatenate together the HTML code and data you need, save it to an .html file, and open with the browser to print. HTML tables are especially useful for printing rows and colomns of data. To see a practical example, examine the print function in the Nano-Sheets spreadsheet app shown earlier in the tutorial.
To force a page to print automatically, append the Javascript "printthispage()" function to the head and body tags of your HTML document:
REBOL [title: "Automatic HTML Printing"] write %autoprint.html { <html> <head> <title>Automatically Printed Page</title> <script type="text/javascript"> <!-- function printthispage() { window.print(); } //--> </script> </head> <body onload="printthispage()"> This Page Will Print Automatically. </body> </html> } browse %autoprint.html16.27.3 Guitar Chord Diagram Printer
The program below creates, saves, and prints collections of guitar chord fretboard diagrams. It was developed to help guitar students print chord diagram charts, in the author's music instruction business. The code demonstrates some common and useful file, data, and GUI manipulation techniques, including the drag-and-drop "feel" technique, used here to slide the pieces around the screen. It also demonstrates the technique of printing output to HTML, and then previewing in a browser (to be printed on paper, uploaded to a web site, etc.):
REBOL [Title: "Guitar Chord Diagram Printer"] ; Load some image files which have been embedded using the "binary ; resource embedder" script from earlier in the tutorial: fretboard: load 64#{ iVBORw0KGgoAAAANSUhEUgAAAFUAAABkCAIAAAB4sesFAAAACXBIWXMAAAsTAAAL EwEAmpwYAAAA2UlEQVR4nO3YQQqDQBAF0XTIwXtuNjfrLITs0rowGqbqbRWxEEL+ RFU9wJ53v8DN7Gezn81+NvvZXv3liLjmPX6n/4NL//72s9l/QGbWd5m53dbc8/kR uv5RJ/QvzH42+9nsZ7OfzX62nfOPzZzzyNUxxh8+qhfVHo94/rM49y+b/Wz2s9nP Zj+b/WzuX/cvmfuXzX42+9nsZ7OfzX4296/7l8z9y2Y/m/1s9rPZz2Y/m/vX/Uvm /mWzn81+NvvZ7Gezn8396/4l2/n+y6N/f/vZ7Gezn81+tjenRWXD3TC8nAAAAABJ RU5ErkJggg== } barimage: load 64#{ iVBORw0KGgoAAAANSUhEUgAAAEoAAAAFCAIAAABtvO2fAAAACXBIWXMAAAsTAAAL EwEAmpwYAAAAHElEQVR4nGNsaGhgGL6AaaAdQFsw6r2hDIa59wCf/AGKgzU3RwAA AABJRU5ErkJggg== } dot: load 64#{ iVBORw0KGgoAAAANSUhEUgAAAAoAAAAKCAIAAAACUFjqAAAACXBIWXMAAAsTAAAL EwEAmpwYAAAAFElEQVR4nGNsaGhgwA2Y8MiNYGkA22EBlPG3fjQAAAAASUVORK5C YII= } ; The following lines define the GUI design. The routine below was ; defined in the section about "feel": movestyle: [ engage: func [f a e] [ if a = 'down [ initial-position: e/offset remove find f/parent-face/pane f append f/parent-face/pane f ] if find [over away] a [ f/offset: f/offset + (e/offset - initial-position) ] show f ] ] ; With that defined, adding "feel movestyle" to any widget makes it ; movable within the GUI. It's very useful for all sorts of graphic ; applications. If you want to pursue building graphic layouts that ; respond to user events, learning all about how "feel" works in REBOL ; is very important. See the URL above for more info. gui: [ ; Make the GUI background white: backdrop white ; Show the fretboard image, and resize it (the saved image is ; actually only 85x100 pixels): currentfretboard: image fretboard 255x300 ; Show the bar image, resize it, and make it movable. Notice the ; "feel movestyle". Thats' what enables the dragging: currentbar: image barimage 240x15 feel movestyle ; Some text instructions: text "INSTRUCTIONS:" underline text "Drag dots and other widgets onto the fretboard." across text "Resize the fretboard:" ; "tab" aligns the next GUI element with a predefined column spacer: tab ; The rotary button below lets you select a size for the fretboard. ; In the action block, the fretboard image is resized, and then the ; bar image is also resized, according to the value chosen. This ; keeps the bar size proportioned correctly to the fretboard image. ; After each resize, the GUI is updated to actually display the ; changed image. The word "show" updates the GUI display. This ; needs to be done whenever a widget is changed within a GUI. Be ; aware of this - not "show"ing a changed GUI element is an easily ; overlooked source of errors: rotary "255x300" "170x200" "85x100" [ currentfretboard/size: to-pair value show currentfretboard switch value [ "255x300" [currentbar/size: 240x15 show currentbar] "170x200" [currentbar/size: 160x10 show currentbar] "85x100" [currentbar/size: 80x5 show currentbar] ] ] return ; The action block of the button below requests a filename from the ; user, and then saves the current fretboard image to that filename: button "Save Diagram" [ filename: to-file request-file/save/file "1.png" save/png filename to-image currentfretboard ] tab ; The action block of the button below prints out a user- ; selected set of images to an HTML page, where they can be ; viewed together, uploaded the Internet, sent to a printer, ; etc. button "Print" [ ; Get a list of files to print: filelist: sort request-file/title "Select image(s) to print:" ; Start creating a block to hold the HTML layout to be printed, ; and give it the label "html": html: copy "<html><body>" ; This foreach loop builds an HTML layout that displays each of ; the selected images: foreach file filelist [ append html rejoin [ {<img src="file:///} to-local-file file {">} ] ] ; The following line finishes the HTML layout: append html [</body></html>] ; Now the variable "html" contains a complete HTML document that ; can be written to the hard drive and opened in the default ; browser. The code below accomplishes that: write %chords.html trim/auto html browse %chords.html ] ] ; Each of the following loops puts 50 movable dots onto the GUI, all at ; the same locations. This creates three stacks of dots that the user ; can move around the screen and put onto the fretboard. There are three ; sizes to accommodate the resizing feature of the fretboard image. ; Notice the "feel movestyle" code at the end of each line. Again, ; that's what makes the each of the dots dragable: loop 50 [append gui [at 275x50 image dot 30x30 feel movestyle]] loop 50 [append gui [at 275x100 image dot 20x20 feel movestyle]] loop 50 [append gui [at 275x140 image dot 10x10 feel movestyle]] ; The following loops add some additional dragable widgets to the GUI: loop 6 [append gui [at 273x165 text "X" bold feel movestyle]] loop 6 [append gui [at 273x185 text "O" bold feel movestyle]] view layout gui16.27.4 Directing Print to Either the Default System Browser or Installed Apps
As demonstrated earlier, you can open and print constructed HTML documents using your system default browser:
browse %example.htmlThird party browsers such as Off By One provide consistent output and provide command line options such as automatic printing, so that files are printed without any apparent third party interface.
The code below enables users to print with either the system default browser, a chosen browser, or if there are errors using those applications, it falls back to using a browser app included via the "binary embedder" script (Off By One, in the example below). If your chosen browser supports it, you can add commands line options to the "call" function to suppress the third party application interface from appearing:
REBOL [title: "HTML printing"] unless exists? %/OB1.exe [ write/binary %/OB1.exe to-binary decompress {compressed file} ] unless exists? %html-choice.txt [ write %html-choice.txt "none" ; or for example "%OB1.exe" ] browser-choice: read %browser-choice.txt view layout [ btn "Choose HTML Browser Application" [ html-choice-file: to-file request-file/filter "*.exe" "*.exe" write %html-choice.txt html-choice-file html-choice: to-local-file to-file read %html-choice.txt ] btn "Print" [ either browser-choice = "none" [ if error? try [browse current-file] [ write %browser-choice.txt "OB1.exe" call/show rejoin [ "OB1.exe file:/// " (to-local-file current-file) ] ] ] [ call/show browser-string: rejoin [ (to-local-file browser-choice) " file:///C:/" (replace current-file "./" "") ] ] ] ]Be sure to examine the "POINT OF SALE SYSTEM" RebGUI application presented earlier to see another example of HTML printing. That example prints nicely formatted cash register receipts for customers.
16.27.5 Printing to PDF
You've already seen how PDF files can be used to layout printed documents. The PDF dialect explored earlier is primarily useful when positioning needs to be exact, upon a given size piece of paper. Millimeter measurements and exact root and relative positions on the paper can be specified with perfect certainty, for situations that require filling pre-printed third party forms (checks, government documents, etc.), for creating exactly sized paper cutout patterns, etc.
As demonstrated earlier, you can open and print created documents using your system default PDF viewer:
call %example.pdfThird party readers such as Foxit reader are fast and provide command line options such as automatic printing, so that files are printed automatically. Sumatra PDF is a free, small, open source PDF reader that can be compressed and embedded directly in REBOL code. You can download it here.
The code below enables users to print with the system default PDF viewer, or if there are errors using that application, it falls back to using a PDF app included using the "binary embedder" (Sumatra, in the example below). Add command line automation options as needed:
REBOL [title: "PDF printing"] current-file: %file.pdf unless exists? %SumatraPDF.exe [ write/binary %SumatraPDF.exe to-binary decompress {compressed file} ] unless exists? %pdf-choice.txt [ write %pdf-choice.txt "none" ; or for example "%SumatraPDF.exe" ] pdf-choice: read %pdf-choice.txt view layout [ btn "Choose PDF Application" [ pdf-choice-file: to-file request-file/filter "*.exe" "*.exe" write %pdf-choice.txt pdf-choice-file pdf-choice: to-local-file to-file read %pdf-choice.txt ] btn "Print" [ either pdf-choice = "none" [ if error? try [call current-file] [ write %pdf-choice.txt "SumatraPDF.exe" call/show rejoin [ (to-local-file %SumatraPDF.exe) " " (to-local-file ) ] ] ] [ call/show rejoin [ (to-local-file read %pdf-choice.txt) " " (to-local-file current-file) ] ] ] ]16.27.6 Printing to Text
When printing the simplest formatted text data, it's sometimes best to just rejoin the text, save it to a text file, and call a text editor program to send the file to a printer using a monospaced font. The following cash register program does just that. Pay attention to the "saveprint" function:
REBOL [title: "Simple POS"] make-dir %./receipts/ make-dir %./inventory/ make-dir %./users/ write/append %./inventory/sales.txt "" ; Here's some sample data to use for testing the program. ; Edit the printed %header.txt file. Log in to the program using ; "user"/"user" as username/password. Enter "11111111" and "22222222" ; as bar code items. ; -------------------------------------------------------------------- write/binary %./users/users compress trim {"user" "user" "" ""} save %./inventory/inventory.txt [ ; barcode description price taxable cost date qty (8 blank fields) "11111111" "Item 1" $1.00 "y" $5.00 "24-jun-2011" 40 "" "" "" "" "" "" "" "" "22222222" "Item 2" $1.00 "y" $.50 "23-jun-2011" 999 "" "" "" "" "" "" "" "" ] write %header.txt rejoin [ "Company Name" newline "1234 Street Road" newline "Townsville, PA 98765" newline "800-833-7273" ] ; -------------------------------------------------------------------- users: load decompress read/binary %./users/users if not find users user: request-pass [alert "Incorrect Login" quit] database: load %./inventory/inventory.txt divider: " | " blank-line: "___________________________________________________________________" pad: func [strng lngth] [ insert/dup tail strng " " lngth copy/part strng lngth ] display-qty: does [ if error? try [idx: index? find database f1/text] [ alert "barcode error" focus f1 return ] qty: pick database (idx + 6) alert join "Quantity: " qty ] submit: does [ either f1/text <> "" [ if error? try [idx: index? find database f1/text] [ alert "barcode error" focus f1 return ] item: pick database (idx + 1) price: pick database (idx + 2) taxable: pick database (idx + 3) f2/text: copy form item f3/text: copy form price ] [ if ((f2/text = "") or (f3/text = "") or (error? try [to-money f3/text])) [ alert "Data Entry Error" focus f1 return ] item: f2/text price: f3/text taxable: either true = request "Taxable?" ["y"] ["n"] ] insert head a1/text rejoin [ (pad form item 25) divider (pad form f1/text 15) divider (pad form price 10) divider taxable newline ] recalculate-totals focus f1 show gui ] recalculate-totals: does [ my-items: copy [] my-lines: parse/all (copy a1/text) "^/" f7/text: copy form length? my-lines foreach line my-lines [ current-line: parse/all line "|" foreach item current-line [ append my-items trim item ] ] subtotal: $0 tax: 0 total: $0 foreach [item barcode price taxable] my-items [ subtotal: subtotal + to-decimal (replace form price "$" "") if taxable = "y" [ tax: tax + ((to-decimal replace form price "$" "") * .06) ] total: to-money subtotal + tax ] f4/text: form subtotal f5/text: form tax f6/text: form total show gui ] saveprint: does [ x: now y: now/time write to-file filename: rejoin [ %./receipts/ x/year "-" x/month "-" x/day "_" y/hour "-" y/minute "-" to-integer y/second "_" user/1 ".txt" ] rejoin [ (read %header.txt) newline newline newline "Item: Barcode:" " Price: Tax:" newline blank-line newline newline a1/text newline blank-line newline newline "Subtotal: " f4/text " (" f7/text " items) Tax: " f5/text " TOTAL: " f6/text newline blank-line newline newline newline "Receipt: " (replace copy filename "./receipts/" "") " Payment Type: " d1/text " $" f8/text " -" f9/text newline a2/text ] write to-file rejoin [ %./inventory/sales-- x/year "-" x/month "-" x/day "_" y/hour "-" y/minute "-" to-integer y/second "_" user/1 ".txt" ] read %./inventory/sales.txt write/append %./inventory/sales.txt rejoin [x newline a1/text] f1/text: copy "" f2/text: copy "" f3/text: copy "" f4/text: copy "" f5/text: copy "" f6/text: copy "" f7/text: copy "" a1/text: copy " " a2/text: copy "" f8/text: copy "" f9/text: copy "" show gui replace a1/text " " "" show gui ; eliminate area bug call filename ; call/show join "metapad " filename ; specify editor ] delete-item: does [ my-items: copy [] my-lines: parse/all (copy a1/text) "^/" foreach item my-lines [append item newline] a1/text: form copy at my-lines 2 show a1 recalculate-totals ] tend: does [ f9/text: form ((to-money f8/text) - (to-money f6/text)) show f9 if (to-money f9/text) < $0 [ alert "Not enough money tendered to pay for items!" ] ] svv/vid-styles/area/colors: [240.240.240 255.255.255] svv/vid-styles/field/colors: [240.240.240 255.255.255] svv/vid-styles/area/font/name: "courier" svv/vid-styles/area/font/size: 12 svv/vid-styles/field/font/size: 20 svv/vid-face/color: white insert-event-func [ either event/type = 'close [ if true = request "Really close the program?" [quit] ] [event] ] view center-face gui: layout [ size 1024x550 across style txt text bold right 90x35 font-size 14 middle style fld field 100x35 box black 984x2 return txt 70 "Barcode:" [display-qty] f1: fld 120 txt "Description:" f2: fld 200 txt "Price:" 50 f3: fld 100 loc: at txt 10 "" btn 130x35 font-size 14 "Delete Item" [delete-item] btn 145x35 font-size 14 "Save and Print" [saveprint] return box black 984x2 return text "Description:" pad 280 text "Bar Code:" pad 180 text "Price:" pad 100 text "Taxable:" return a1: area 984x300 [recalculate-totals] return loc2: at txt "" (loc/1 + 20) txt "SubTotal:" f4: fld 160 return txt "" (loc/1 + 20) txt "Tax:" f5: fld 160 return txt "" (loc/1 + 20) txt "Total:" f6: fld 160 return at loc2 a2: area 400x70 "" font-size 12 text "" 75 loc3: at txt "Item count: " 100 f7: fld 50 at (loc3 + 20x50) d1: drop-down 138 "Cash" "Credit" "Check" "Other" at (loc2 + 0x80) txt 70 "Tendered:" font-size 12 f8: field 120 [tend] txt 60 "Change:" font-size 12 f9: field 120 key #"^M" [if form system/view/focal-face/var = "f1" [submit]] do [focus f1] ]One benefit to this printing option is that the data in the saved printable documents is structured, and can be used to create reports. This program prints sales reports based on receipts created with the system above:
REBOL [title: "Simple POS Sales Report Printer"] nl: newline start-date: request-date if start-date = none [quit] start-time: to-time request-text/title/default "Start Time:" "12:01am" if ((start-time = none) or (start-time = 0:00)) [quit] end-date: request-date if end-date = none [quit] end-time: to-time request-text/title/default "End Time:" "11:59pm" if ((end-time = none) or (end-time = 0:00)) [quit] flash "Processing..." files: read %./receipts/ files-within-timeframe: copy [] foreach file files [ if (%.txt = suffix? file) and (file <> %deleted.txt) and (file <> %deleted--backup.txt) [ parsed-filename: parse file "_." the-date: to-date first parsed-filename the-time: to-time replace (second parsed-filename) "-" ":" username: third parsed-filename if (the-date > start-date) and (the-date < end-date) [ append files-within-timeframe file ] if (the-date = start-date) and (the-date < end-date) [ if the-time > start-time [ append files-within-timeframe file ] ] if (the-date > start-date) and (the-date = end-date) [ if the-time < end-time [ append files-within-timeframe file ] ] if (the-date = start-date) and (the-date = end-date) [ if (the-time > start-time) and (the-time < end-time) [ append files-within-timeframe file ] ] ] ] total-items: 0 total-sales: $0 total-tax: 0 total-sales-plus-tax: $0 total-taxable: 0 total-nontaxable: 0 total-cash: $0 subtotal-cash: $0 tax-cash: 0 total-credit: $0 subtotal-credit: $0 tax-credit: 0 total-check: $0 subtotal-check: $0 tax-check: 0 total-other: $0 subtotal-other: $0 tax-other: 0 a-line: copy {} loop 67 [append a-line "_"] items-sold: to-string rejoin [ {REPORT PERIOD: } start-date {, } start-time { to } end-date {, } end-time nl nl a-line nl ] foreach file files-within-timeframe [ sale: read/lines join %./receipts/ file items-start: copy next next find sale a-line items-end-index: (index? find items-start a-line) - 2 items-in-sale: copy/part items-start items-end-index either items-in-sale <> [] [ num-of-items: length? items-in-sale totals: parse (pick items-start (items-end-index + 4)) none other-info: parse (pick items-start (items-end-index + 8)) none subtotal: totals/2 current-tax: totals/6 receipt-grand-total: totals/8 filename: other-info/2 parsed-filename: parse file "_." the-date: to-date first parsed-filename the-time: to-time replace (second parsed-filename) "-" ":" username: third parsed-filename payment-type: other-info/5 append items-sold "^/--------------------------------------------" append items-sold rejoin [ nl the-date ", " the-time ", " username ", " payment-type ] append items-sold "^/--------------------------------------------" foreach i items-in-sale [ append items-sold rejoin [nl i] ] total-items: total-items + num-of-items total-sales: total-sales + (to-money subtotal) total-tax: total-tax + to-decimal current-tax ; (to-decimal replace (to-string current-tax) "$" "") total-sales-plus-tax: total-sales-plus-tax + (to-money receipt-grand-total) switch payment-type [ "Cash" [ total-cash: total-cash + (to-money receipt-grand-total) subtotal-cash: subtotal-cash + (to-money subtotal) tax-cash: tax-cash + (to-decimal current-tax) ] "Credit" [ total-credit: total-credit + (to-money receipt-grand-total) subtotal-credit: subtotal-credit + (to-money subtotal) tax-credit: tax-credit + (to-decimal current-tax) ] "Check" [ total-check: total-check + (to-money receipt-grand-total) subtotal-check: subtotal-check + (to-money subtotal) tax-check: tax-check + (to-decimal current-tax) ] "Other" [ total-other: total-other + (to-money receipt-grand-total) subtotal-other: subtotal-other + (to-money subtotal) tax-other: tax-other + (to-decimal current-tax) ] ] ] [ if true = request rejoin ["Delete empty receipt " file "?"] [ delete rejoin [%./receipts/ file] ] ] ] total-taxable: total-tax / .06 total-nontaxable: (to-decimal replace (to-string total-sales) "$" "") - total-taxable items-sold: rejoin [ items-sold nl nl a-line nl nl " Subtotal: " total-sales " (" total-items " items)" nl nl " Taxable: $" total-taxable nl " Non-Taxable: $" total-nontaxable nl nl " Tax: $" total-tax nl a-line nl nl " GRAND TOTAL: " total-sales-plus-tax nl a-line nl nl " Cash Subtotal: " subtotal-cash nl " Cash Tax: $" tax-cash nl " Cash Total: " total-cash nl nl " Credit Subtotal: " subtotal-credit nl " Credit Tax: $" tax-credit nl " Credit Total: " total-credit nl nl " Check Subtotal: " subtotal-check nl " Check Tax: $" tax-check nl " Check Total: " total-check nl nl " Other Subtotal: " subtotal-other nl " Other Tax: $" tax-other nl " Other Total: " total-other ] unview ; editor items-sold write %temp.txt items-sold call/show rejoin ["notepad " to-local-file what-dir "\temp.txt"] wait 1 delete %temp.txt16.27.7 CUPS, Crystal Reports and Other Solutions
Below are several links to scripts on rebol.org which help create printed documents. Learning to use other operating system specific libraries and toolsets typically requires additional work, but eliminates the need for third party software interfaces such as image, HTML, and PDF viewers:
16.28 A Remote Check Printing Application
The application below allows workers at a site to draft checks. The owner or manager can approve checks remotely (online), and then the workers can download and print them out locally. This system uses RebGUI, the PDF framework, and the "verbalize" function demonstrated earlier in this text. Exact print positions are stored in the check-positions string (this could be loaded from a text file for easier editing):
REBOL [title: "Remote Check Writer"] do %rebgui.r do %pdf-maker.r bank-balance: 1000000 write/binary %bank-balance compress copy to-string bank-balance default-amount: 99 check-memo-text: "Sales 12-1-2012 to 12-31-2012" signature-bmp: to-binary decompress 64#{ eJztyrERQGAMgNGgt4LOmUKhN4X1jGEaS0T4d1C9l/suRbLt9xyftVqqaYg4anc1 r7Pu19jq22tkZgAAAAAAAAAAAMAfHpszCALqJgAA } ftp1: ftp://user:pass@site.com/folder/ booths: [ "1" "John Smith" "1" "1 Street Rd. Larville, PA 98765" "123-555-1212" "john@site.com" {Notes about John.} "2" "Paul Jones" "2" "2 Road Pl. Bonville, PA 87654" "234-555-2323" "paul@site.net" {Notes about Paul.} "3" "Tim Maul" "3" "3 Lane Rd. Panville, PA 76543" "345-555-3434" "tim@site.org" {Notes about Tim.} ] check-positions: do { check-date-position-x: 135 check-date-position-y: 228 check-payable-position-x: 30 check-payable-position-y: 228 check-amount-position-x: 175 check-amount-position-y: 228 check-amount-text-position-x: 25 check-amount-text-position-y: 215 check-notes-position-x: 25 check-notes-position-y: 190 check-signature-position-x: 130 check-signature-position-y: 205 } verbalize: func [a-number] [ if error? try [a-number: to-decimal a-number] [ return "** Error ** Input must be a decimal value" ] if a-number = 0 [return "Zero"] the-original-number: round/down a-number pennies: a-number - the-original-number the-number: the-original-number if a-number < 1 [ return join to-integer ((round/to pennies .01) * 100) "/100" ] small-numbers: [ "One" "Two" "Three" "Four" "Five" "Six" "Seven" "Eight" "Nine" "Ten" "Eleven" "Twelve" "Thirteen" "Fourteen" "Fifteen" "Sixteen" "Seventeen" "Eighteen" "Nineteen" ] tens-block: [ { } "Twenty" "Thirty" "Forty" "Fifty" "Sixty" "Seventy" "Eighty" "Ninety" ] big-numbers-block: ["Thousand" "Million" "Billion"] digit-groups: copy [] for i 0 4 1 [ append digit-groups (round/floor (mod the-number 1000)) the-number: the-number / 1000 ] spoken: copy "" for i 5 1 -1 [ flag: false hundreds: (pick digit-groups i) / 100 tens-units: mod (pick digit-groups i) 100 if hundreds <> 0 [ if none <> hundreds-portion: (pick small-numbers hundreds) [ append spoken join hundreds-portion " Hundred " ] flag: true ] tens: tens-units / 10 units: mod tens-units 10 if tens >= 2 [ append spoken (pick tens-block tens) if units <> 0 [ if none <> last-portion: (pick small-numbers units) [ append spoken rejoin [" " last-portion " "] ] flag: true ] ] if tens-units <> 0 [ if none <> tens-portion: (pick small-numbers tens-units) [ append spoken join tens-portion " " ] flag: true ] if flag = true [ commas: copy {} case [ ((i = 4) and (the-original-number > 999999999)) [ commas: {billion, } ] ((i = 3) and (the-original-number > 999999)) [ commas: {million, } ] ((i = 2) and (the-original-number > 999)) [ commas: {thousand, } ] ] append spoken commas ] ] append spoken rejoin [ "and " to-integer ((round/to pennies .01) * 100) "/100" ] return spoken ] print-check: does [ unless ["admin" "admin"] = request-password [return] display/dialog "Write Check" [ after 1 text (join "Bank Account Balance: $" (to-string bank-balance)) text "Pay To:" check-payable-list: drop-list "" 50x5 data ( sort (extract/index (copy booths) 7 2) ) [ set-text check-payable pick check-payable-list/data check-payable-list/picked ] check-payable: field text "Amount:" check-amount: field (join "$" (default-amount)) [ set-text check-amount-text ( verbalize replace (copy check-amount/text) "$" "" ) ] text "Amount (text, written out):" check-amount-text: field (verbalize copy total-f/text) text "Check Date:" check-date: field (form now/date) text "Check #:" check-number: field text "Notes:" check-notes: field (check-memo-text) text "" after 2 reverse button "Cancel" [hide-popup return] button "Print" #Y [ if (find reduce [ check-payable/text check-amount/text check-amount-text/text check-date/text check-number/text ] "" ) [alert "Every field must be filled." return] bank-balance: to-decimal decompress read/binary %bank-balance new-bank-balance: ( bank-balance - ( to-decimal (replace/all check-amount/text "$" "") ) ) if new-bank-balance < 10.00 [ alert "Bank account balance too low to write this check!" return ] write/binary %bank-balance compress copy to-string new-bank-balance bank-balance: to-decimal decompress read/binary %bank-balance make-dir %./checks/ current-check: to-file rejoin [ %./checks/ check-number/text ".pdf" ] if exists? current-check [ either true = trim question { This check # already exists. Overwrite? } [ either true = question {Are you sure?} [ write/binary (to-file (rejoin [ %./checks/ check-number/text "_overwritten_" now/date "_" (replace/all (to-string now/time) ":" "-") ".pdf" ])) read/binary to-file rejoin [ %./checks/ check-number/text ".pdf" ] delete to-file rejoin [ %./checks/ check-number/text ".pdf" ] ] [return] ] [return] ] error-uploading: false if error? try [ write/binary ( the-ftp1: rejoin [ ftp1 (to-string second split-path current-check) ] ) the-current-pdf: layout-pdf entire-check-layout: compose/deep [[ page size 215.9 279.4 textbox (check-date-position-x) (check-date-position-y) 75 10 [font Helvetica 3 (check-date/text)] textbox (check-payable-position-x) (check-payable-position-y) 90 10 [font Helvetica 3 (check-payable/text)] textbox (check-amount-position-x) (check-amount-position-y) 75 10 [font Helvetica 3 (check-amount/text)] textbox (check-amount-text-position-x) (check-amount-text-position-y) 90 10 [font Helvetica 3 (check-amount-text/text)] textbox (check-notes-position-x) (check-notes-position-y) 70 20 [font Helvetica 3 (check-notes/text)] image (check-signature-position-x) (check-signature-position-y) 75 12.5 (load signature-bmp) ]] ][ alert { *** ERROR *** Check NOT saved!!! Check the Internet connection and try again. } error-uploading: true ] save to-file (replace copy current-check ".pdf" ".un") the-compressed-check: compress to-string the-current-pdf if error? try [ save rejoin [ ftp1 to-string second split-path (to-file (replace copy current-check ".pdf" ".un")) ] the-compressed-check: compress to-string the-current-pdf ] [ alert { *** ERROR *** Check NOT saved!!! Check the Internet connection and try again. } error-uploading: true ] hide-popup if error-uploading = false [ alert "Saved (awaiting approval)" ] ] ] ] publish-checks: does [ current-approved-check-list: copy {Approved Checks:^/^/} if error? try [ approved-checks: to-block load http://site.com/register.txt ] [ alert "*** ERROR: Check the Internet connection and try again." return ] foreach file read %./checks/ [ if %.un = suffix? file [ current-check-un: join %./checks/ file current-check: to-file replace copy current-check-un ".un" ".pdf" current-check-conf-num: to-integer second split-path to-file replace copy current-check-un ".un" "" if find approved-checks current-check-conf-num [ unless exists? current-check [ append current-approved-check-list rejoin [ current-check newline ] write/binary current-check to-binary decompress load current-check-un ] ] ] ] current-approved-check-list-file: to-file rejoin [ "./checks/" now/date "_" replace/all copy form now/time ":" "-" ".txt" ] write current-approved-check-list-file current-approved-check-list attempt [call current-approved-check-list-file] ] view-checks: does [ check-to-view: to-file request-file/file/filter %./checks/1.pdf "*.pdf" "*.pdf" either pdf-choice = "none" [ if error? try [call check-to-view] [ write %pdf-choice.txt "SumatraPDF.exe" call rejoin [ "SumatraPDF.exe " (to-local-file check-to-view) ] ] ] [ call (to-local-file check-to-view) ] ]
16.29 Creating Apps on Platforms That Don't Support GUI Interfaces
Open source REBOL is currently being ported to many platforms that don't yet provide GUI support. Often, CGI applications can be run in the default Internet browsers on most new operating systems, without any changes. Many of the REBOL CGI programs in this tutorial have been running in commercial environments on iPhone and Android browsers since the earliest inceptions of those platforms.
On systems which don't currently have the REBOL GUI system ported, and for programs which aren't appropriately designed as CGI scripts, core console interactions can be used to provide a practical user interface. The script below is a simple replacement for GUIs that collect text input from fields and drop down lists. Just specify a block of labels, and a block of default values for each field ('answers). If the 'answers block contains a nested block, the values in that block will be used as items in a list selector (so that users don't need to type a long response and/or can select from a pre-defined list of options - similar to a GUI text-list or drop-down selector). This scripts works in all versions of REBOL, both R2 and R3, with only minimal console support:
REBOL [title: "Textual User Interface"] ; ------------------------------------------------------------------------ labels: ["First Name" "Last Name" "Favorite Color" "Address" "Phone"] answers: copy ["" "" ["Red" "Green" "Blue" "Tan" "Black"] "" ""] ; ------------------------------------------------------------------------ ; if system/build/date > 1-jan-2011 [ newpage: copy {} loop 50 [append newpage "^/"] ; ] if (length? labels) <> (length? answers) [ print join newpage "'Labels and 'answers blocks must be equal length." halt ] len: length? labels lngth: 0 spaces: " " foreach label labels [ if (l: length? label) > lngth [lngth: l] ] pad: func [strng] [ insert/dup tail str: join copy strng "" " " lngth join copy/part str (lngth) spaces ] forever [ prin newpage repeat i len [ either ((answers/:i = "") or ((type? answers/:i) = block!)) [ ans: "" ][ ans: answers/:i ] prin rejoin [i ") " pad labels/:i "|" spaces ans newline] ] prin rejoin [newline (len + 1) ") SUBMIT"] choice: ask {^/^/} either error? try [num: to-integer choice] [] [ either block? drop-down: answers/:num [ print "" repeat i l: length? drop-down [ prin rejoin [i ") " pad form drop-down/:i newline] ] prin rejoin [(l + 1) ") " pad "Other" newline] drop-choice: ask rejoin [{^/Select } labels/:num {: }] either error? try [d-num: to-integer drop-choice] [] [ either d-num = (l + 1) [ if "" <> resp: ask rejoin [ {^/Enter } labels/:num {: } ] [answers/:num: resp] ][ chosen: pick drop-down d-num if ((chosen <> none) and (chosen <> (l + 1))) [ answers/:num: chosen ] ] ] ][ if ((num > 0) and (num <= (len + 1))) [ either num = (len + 1) [ prin newpage probe answers halt ; END ROUTINE ][ either answers/:num = "" [ ans: "" ][ ans: answers/:num ] write clipboard:// ans line: copy {} loop ((length? labels/:num) + 1) [append line "-"] answers/:num: ask rejoin [ newpage labels/:num ": " ans "^/" line "^/^/" ] ] ] ] ] ]Here's a console version of the "Group Notes" program, redone so that no GUI is required. You'll see that all data output is handled by printing text to the console, and all data entry and program flow control is handled using the "ask" function. Just as in the "FTP Chat Room" program, all input and output is executed within a "forever" loop, which endlessly asks the user for some input, and prints some output based upon the user's response. The user can type a decimal number to erase a selected message, the word "all" to erase all messages, or the word "name" to switch user names:
REBOL [title: "Group Notes (Console)"] u: ftp://user:pass@site.com/public_html/Notes if "" = form url: to-url ask join u ": " [url: u] name: copy ask "^LName: " forever [ if error? try [notes: copy read/lines url] [write url notes: ""] display: copy {} count: 0 foreach note reverse notes [ either note = "" [ note: "^/" ] [ count: count + 1 note: rejoin [count ") "note] ] append display note ] message: ask rejoin [newpage display "^/Message: "] case [ message = "" [] not error? try [indx: to-integer message] [ remove/part at notes (3 * indx - 2) 3 write/lines url reverse notes ; write/lines/append join url "-bak" reverse notes ] message = "erase" [write url ""] message = "name" [name: copy ask "^LName: "] message = "url" [ u: url if "" = form url: to-url ask rejoin ["^L" u ": "] [url: u] ] true [ if error? try [ write/lines/append url rejoin [ "^/^/" now " (" name "): " message ] ] [print "ERROR: Not Saved" quit] ] ] ]Console applications tend to be shorter to code than GUI apps which are functionally equivalent. Running simple console scripts on mobile devices and other machines with low powered processors can provide quicker performance than loading and updating GUI displays for simple text input and output. The beginnings of complex GUI desktop apps often start life as simple console scripts, and you'll find that when creating functional data management utilities which don't require pretty graphic displays, console scripts are quick to write, and provide all the interactivity required to perform most types of useful business input and output. And of course, even when a program doesn't sport a nice looking GUI interface, all the fundamentally useful data processing power enabled by the core programming language is still available. Try converting some of the other GUI apps in this tutorial, so that they run as console apps.
16.30 Encryption and Security
In order to keep data secure from prying eyes, REBOL has a number of industrial strength encryption features. For simple situations when only basic security is required, the "encloak" and "decloak" functions can be used to encrypt strings and binary data with a password:
REBOL [title: "Simple Encrypt"] view layout [ across f1: field btn "Select File" [f1/text: request-file/only show f1] return f2: field "(enter password)" btn "Encrypt" [ save request-file/only/save/title/file "Enter encrypted file save name:" "" to-file f1/text to-binary encloak read to-file f1/text f2/text alert "Saved" ] btn "Decrypt" [editor to-string decloak load to-file f1/text f2/text] ]For cases in which data needs to be kept truly secure, REBOL provides symmetric key encryption (Blowfish and Rijndael/AES), RSA public key encryption, DSA digital signature algorithm, DH (Diffie Hellman) key exchange, and SSL/HTTPS/TLS access for secure data transfer over TCP network connections. OAuth Support for various web site APIs has also been implemented.
The script below, by Carl Sassenrath, demonstrates all the basic encryption techniques explained in the how-to article here.
REBOL [title: "Encryption"] request-key: has [pass] [ pass: request-text/title "Enter a pass-phrase:" if pass [checksum/secure pass] ] crypt: func [ "Encrypts or decrypts with compression. Returns result." data [any-string!] "Data to encrypt or decrypt" akey [binary!] "The encryption key" /decrypt "Decrypt the data" /binary "Produce binary decryption result." /local port ][ port: open [ scheme: 'crypt direction: pick [encrypt decrypt] not decrypt key: akey padding: true ] if not decrypt [data: compress data] insert port data update port data: copy port close port if decrypt [ data: decompress data if not binary [data: to-string data] ] data ] if none? op: request ["Select action:" "Encrypt" "Decrypt" "Cancel"][quit] action: pick ["Encrypt" "Decrypt"] op if none? files: request-file/title join "Select Files to " action action [ quit ] if none? key: request-key [quit] foreach file files [ data: read/binary file data: either op [crypt data key][crypt/decrypt/binary data key] write/binary file data ] alert join "File has been " pick ["encrypted." "decrypted."] opThis script, also by Carl Sassenrath, demonstrates how to send encrypted data by email. Notice that the same "crypt" function as in the example above, is used here:
REBOL [title: "Send Encrypted Email"] crypt: func [ "Encrypts or decrypts with compression. Returns result." data [any-string!] "Data to encrypt or decrypt" akey [binary!] "The encryption key" /decrypt "Decrypt the data" /binary "Produce binary decryption result." /local port ][ port: open [ scheme: 'crypt direction: pick [encrypt decrypt] not decrypt key: akey padding: true ] if not decrypt [data: compress data] insert port data update port data: copy port close port if decrypt [ data: decompress data if not binary [data: to-string data] ] data ] view layout [ style lab label right 80x24 across space 0x4 vh2 "Send Encrypted Email File:" return lab "To:" f-to: field return lab "Subject:" f-sub: field return lab "Key:" f-key: field hide return lab "File:" f-file: text 200x24 white black middle "click to pick" [f-file/text: request-file/keep] return lab button "Send" [unview] button "Close" [quit] ] dest: to-email f-to/data file: to-file f-file/data key: checksum/secure f-key/data subject: f-sub/data msg: enbase/base crypt read/binary file 64 send/subject email msg subjectThis example demonstrates how to decrypt secure data emailed by the program above:
REBOL [title: "Decrypt Secure Email"] crypt: func [ "Encrypts or decrypts with compression. Returns result." data [any-string!] "Data to encrypt or decrypt" akey [binary!] "The encryption key" /decrypt "Decrypt the data" /binary "Produce binary decryption result." /local port ][ port: open [ scheme: 'crypt direction: pick [encrypt decrypt] not decrypt key: akey padding: true ] if not decrypt [data: compress data] insert port data update port data: copy port close port if decrypt [ data: decompress data if not binary [data: to-string data] ] data ] view layout [ style lab label right 80x24 across space 0x4 vh2 "Decrypt Email File:" return lab "Key:" f-key: field hide return lab "File:" f-file: text 200x24 white black middle "click to pick" [f-file/text: request-file/keep] return lab "Data:" f-data: area return lab button "Decrypt" [unview] button "Close" [quit] ] file: to-file f-file/data key: checksum/secure f-key/data data: f-data/data data: debase/base data 64 write/binary file crypt/decrypt/binary data keySee the links below for more information related to encryption and security:
http://www.rebol.com/how-to/encrypt.html
http://www.rebol.com/docs/encryption.html
http://www.rebol.net/cookbook/recipes/0023.html
http://www.rebol.net/cookbook/recipes/0050.html
http://www.rebol.com/docs/ssl.html
http://www.ross-gill.com/page/OAuth_and_REBOL
http://www.ross-gill.com/page/Twitter_API_and_REBOL
http://www.rebol.org/view-script.r?script=rc4.r
http://www.rebol.org/view-script.r?script=arcfour.r
http://www.rebol.org/view-script.r?script=encrypt.r
http://www.rebol.org/view-script.r?script=sha1.r
http://www.rebol.org/view-script.r?script=md5.r
http://www.rebol.org/view-script.r?script=steganography.r
http://www.rebol.org/view-script.r?script=rugby4.r
http://www.rebol.org/view-script.r?script=my-http.r
http://www.rebol.org/view-script.r?script=s-field.r
http://www.rebol.com/docs/services/security.html
http://www.rebol.com/security.html
http://www.rebol.it/power-mezz/#section-5.13
http://www.rebolforces.com/zine/rzine-1-04.html#sect5.
http://stackoverflow.com/questions/3434164/rebol-and-oauth-how-to
16.31 Rebcode
REBOL provides speedy performance for most common scripting tasks. For situations where higher performance computations are required (for image processing, large looping mathematical evaluations, etc.), REBOL's "rebcode" VM acts as a sort of native cross-platform assembly language which can dramatically improve the processing speed of CPU intensive tasks that benefit from low level optimization. Rebcode uses a syntax similar to typical REBOL block/function code, and allows you to access variables used outside the Rebcode context, but it is not intended for beginner programmers. Rebcode is structured similarly to assembly language, with some additional benefits such as the ability to use built-in math functions, loops and conditional evaluations, embedded documentation, and the ability to run identically on all processors. Low level Rebcode typically improves performance speed by 10x-30x. Using Rebcode is beyond the scope of this tutorial. For more information, see http://www.rebol.com/docs/rebcode.html and http://www.rebol.net/rebcode/, and search the mailing list at rebol.org. Be sure to see the the examples at http://www.rebol.net/rebcode/docs/rebcode-demos.html:
To use rebcode, you must use a version of REBOL downloaded from http://www.rebol.net/builds/, in the section marked "Download Directories" (others don't contain the rebcode VM). Get the most recently dated version available (for Windows, at least rebview1361031.exe). Once you've downloaded a rebcode enabled interpreter, try this example:
do http://www.rebol.net/rebcode/demos/dot-flowers.r
16.32 Useful REBOL Tools: XML, Zip, Database, Network, Web Server, and More
Here are some web links containing free code modules and various programs that can help you accomplish useful programmatic tasks in REBOL:
http://www.hmkdesign.dk/rebol/list-view/list-view.r - a powerful listview widget to display and manipulate formatted data in GUI applications. Perhaps the single most useful addition to REBOL's built in "VID" GUI language.
http://www.dobeash.com/rebdb.html - a database module written entirely in native REBOL code that lets you easily store and organize data. This is the same web site where you'll find the REBOL sqlite module and RebGUI (covered earlier): http://www.dobeash.com/rebgui.html
http://www.rebol.org/cgi-bin/cgiwrap/rebol/view-script.r?script=rebzip.r - a module to compress/decompress zip formatted files.
http://www.colellachiara.com/soft/Misc/pdf-maker.r - a dialect to create pdf files directly in REBOL (covered earlier).
http://softinnov.org/rebol/mysql.shtml - a module to directly manipulate mysql databases within REBOL (covered earlier). A module for postgre databases is also freely available at the same site.
http://www.rebol.org/cgi-bin/cgiwrap/rebol/view-script.r?script=menu-system.r - a dialect to create all types of useful GUI menus in REBOL (covered earlier).
http://softinnov.org/rebol/uniserve.shtml - a framework to help build client-server network applications.
http://softinnov.org/cheyenne.shtml - a full featured web server written entirely in native REBOL. It enables inline, PHP-like server scripting.
http://www.rebol.net/demos/BF02D682713522AA/i-rebot.r http://www.rebol.net/demos/BF02D682713522AA/objective.r and http://www.rebol.net/demos/BF02D682713522AA/histogram.r - these examples contain a 3D engine module written entirely in native REBOL draw dialect. The module lets you easily add and manipulate 3D graphics objects in your REBOL apps (covered earlier).
http://web.archive.org/web/20030411094732/www3.sympatico.ca/gavin.mckenzie/ - a REBOL XML parser library.
http://earl.strain.at/space/rebXR - a full client/server XML-RPC implementation for REBOL (contains the parser library above). Tutorials (translated from French by Google) are available here and here.
http://box.lebeda.ws/~hmm/rswf/ - a dialect to create flash (SWF) files directly from REBOL scripts (covered earlier).
libwmp3.dll - the easiest way to control full featured mp3 playback in REBOL. http://www.rebol.org/view-script.r?script=mp3-player-libwmp.r demonstrates how to use it in REBOL.
http://www.rebolforces.com/articles/tui-dialect/ - a dialect to position characters on the screen in command line versions of REBOL.
http://www.rebol.net/docs/makedoc.html - converts text files into nicely formatted HTML files. This tutorial page is written and maintained entirely with makedoc (you can see the makedoc source at http://re-bol.com/rebol.txt).
http://www.rebol.org/cgi-bin/cgiwrap/rebol/view-script.r?script=layout-1.8.r - a simple visual layout designer for REBOL GUI code. Not stable enough for commercial use, but helpful for quickly laying out simple GUI designs.
http://www.crimsoneditor.com/ - a source code editor for Windows, with color highlighting especially for REBOL syntax. Quick start instructions are available at http://www.rebol.net/article/0187.html.
http://www.rebol.org - the official REBOL library - full of many additional modules and useful code fragments. The first place to look when searching for REBOL source code.
16.33 6 REBOL Flavors
This tutorial covers a version of the REBOL language interpreter called REBOL/View. REBOL/View is actually only one of several available REBOL releases. Here's a quick description of the different versions:
- View - free to download and use, it includes language constructs used to create and manipulate graphic elements. View comes with the built-in dialect called "VID", which is a shorthand mini-language used to display common GUI widgets. View and VID dialect concepts have been integrated throughout this document. The "layout" word in a typical "view layout" GUI design actually signifies the use of VID dialect code in the enclosed block. The VID dialect is used internally by the REBOL interpreter to parse and convert simple VID code to lower level View commands, which are composed from scratch by the rudimentary display engine in REBOL. VID makes GUI creation simple, without the need to deal with graphics at a rudimentary level. But for fine control of all graphic operations, the full View language is exposed in REBOL/View, and can be mixed with VID code. View also has a built-in "draw" dialect that's used to compose and alter images on screen. Aside from graphic effects, View has built in sound, and access to the "call" function for executing command line applications. As of version 2.76, REBOL/View contains many capabilities that were previously only available in commercial versions (dll, database, encryption, SSL, and more - see below). The newest official releases of View can be download from http://rebol.com/view-platforms.html. The newest test versions are at http://www.rebol.net/builds/. Older versions are at http://rebol.com/platforms-view.html.
- Core - a text-only version of the language that provides basic functionality. It's smaller than View (about 1/3 to 1/2 the file size), without the GUI extensions, but still fully network enabled and able to run all non-graphic REBOL code constructs. It's intended for console and server applications, such as CGI scripting, in which the GUI facilities are not needed. Core is also free and can be downloaded from http://rebol.com/platforms.html. Newest versions are at http://www.rebol.net/builds/. Older versions are at http://rebol.com/platforms-core.html.
- View/Pro - created for professional developers, it adds encryption features, Dll access and more. Pro licenses are not free. See http://www.rebol.com/purchase.html. NOTE: STARTING IN VERSION 2.76, THESE FEATURES ARE AVAILABLE IN THE FREELY DOWNLOADABLE VERSIONS OF REBOL!
- SDK - also intended for professionals, it adds the ability create stand-alone executables from REBOL scripts, as well as Windows registry access and more to View/Pro. SDK licenses are not free.
- Command - another commercial solution, it adds native access to common database systems, SSL, FastCGI and other features to View/Pro. NOTE: STARTING IN VERSION 2.76, THESE FEATURES ARE AVAILABLE IN THE FREELY DOWNLOADABLE VERSIONS OF REBOL!
- Command/SDK - combines features of SDK and Command.
Some of the functionalities provided by SDK and Command versions of REBOL have been enabled by modules, patches, and applications created by the REBOL user community. For example, mysql and postgre database access, dll access, and stand-alone executable packaging can be managed by free third party creations (search rebol.org for options). Because those solutions don't conform to official REBOL standards, and because no support for them is offered by REBOL Technologies, commercial solutions by RT are recommended for critical work.
16.34 Bindology, Dialects, Metaprogramming and Other Advanced Topics
On the surface, REBOL presents itself as a simple, practical, and useful tool. Many developers tend to dismiss it because of it's simple appearance, small file size, and atypical language syntax. Those who stick with REBOL, however, eventually discover that it has some truly deep and powerful language features, not immediately apparent. Several great articles have been written which cover those topics well. Be sure to read http://blog.revolucent.net/search/label/REBOL. The bindology article at http://www.rebol.net/wiki/Bindology, and other pages at http://www.fm.vslib.cz/~ladislav/rebol provide more understanding. Be sure to also see all the additional links in the last section of this tutorial. If your interests run deeper than simple scripting and user application development, REBOL offers unique food for thought.
16.34.1 Metaprogramming
Metaprogramming has been defined as "the writing of computer programs that write or manipulate other programs (or themselves) as their data, or that do part of the work at compile time that would otherwise be done at runtime. In many cases, this allows programmers to get more done in the same amount of time as they would take to write all the code manually, or it gives programs greater flexibility to efficiently handle new situations without recompilation".
Many REBOLers tend to use metaprogramming techniques intuitively as a result of the design of the language. A primary concept in REBOL is that data is code, and code is data. You can easily create blocks and strings that can be executed simply with the "do" function:
REBOL [] function: ask "'print' or 'editor': " text: ask "Enter some text: " do compose [(to-word function) (text)] haltThe task above could also be completed by "DO"ing a concatenated string:
do rejoin [function { "} text {"}]Understanding "reduce", "compose", and related functions are key to the above concept, along with understanding how to build and manipulate strings and blocks which can be executed (series functions really are the bedrock of the language). Search this tutorial for examples that contain "compose", "reduce", and "rejoin" functions, and you'll see many simple but useful "do compose [some (generated) code]" and "do rejoin [{some } generated { } code]" examples. Also, look at the "Voice Alarms" and "VOIP" scripts, as well as the final webcam program in the "multitasking" section. Those examples run separate .r scripts using the "launch" function, which have been created dynamically by a main script. Similarly, it's common to use the "browse" function to view dynamically created HTML, as in the "Guitar Chord Diagram Maker", "Point of Sale System", "Guitar Chords", and other examples in this text. This technique is often used to create printable documents in REBOL.
Another common technique is to write code which is capable of building dynamically changeable GUI layout blocks. Here's a simple example:
view center-face layout [ text "Select a button width, in pixels:" d: drop-down data [250 400 550] text "Enter any number of button labels (text separated by spaces):" f: field 475 btn "Generate GUI" [ created-buttons: copy compose [ style new-btn btn (to-integer d/text) [ alert join "This button's label is: " face/text ] ] foreach item to-block f/text [ append created-buttons compose [ new-btn (form item) ] ] view/new center-face layout created-buttons ] ]The entire VID "layout" function is actually a metaprogramming tool. To use VID, you compose blocks, which are evaluated by the layout function, and the generated native REBOL/view code is then run by REBOL's lower level compositing engine. RebGUI works the same way. In this manner, many REBOL dialects are metaprogramming tools. Dialects ("DSL"s) tend to rely heavily on the use of the "parse" function to (re)organize the meaning of input given in a specified syntax. There's a short introductory article which might be helpful in relation to this topic at http://computer-programming-languages.suite101.com/article.cfm/how_to_createa_rebol_dialect . REBOL/flash and pdf-maker.r are powerful examples of REBOL metaprogramming tools that are productive outside the realm of REBOL coding. Both those tools use dialects as input, and they actually output interpreted formats (REBOL/flash creates SWF files, and pdf-maker creates PDF files). That could be considered "multi-level" metaprogramming. If you want to know more about metaprogramming with dialects, study parse, contexts, and bind, and examine the various dialect tools created by the REBOL community. To get an idea of just how powerful this concept can be, take a look at the beautifully designed game "Machinarium", which was created using the REBOL/flash dialect.
17. REBOL on Android, Open Source R3 (Saphirion Builds), and RED
17.1 Open Source
Carl Sassenrath released REBOL3 as an open source project on 12-12-2012, so the code base is now free to be altered, improved, ported, forked, and used by any developer who wants to adjust how the interpreter works. The project was released under the Apache 2.0 license, so it can be used freely for commercial purposes, but is still compatible with GPL and other common open source project licenses. The source code is available at https://github.com/rebol/rebol,
One of the great benefits of the open source release is that REBOL can forever be ported to new platforms (new hardware, new operating systems, etc.), and the productive REBOL language can continue to keep up with changes and advances in modern technology, interface with new code libraries, new language constructs, new data formats, etc. Unfortunately, version 2.xx of the REBOL interpreter ("R2") is encumbered by commercial licenses, contracts with investors, and other restrictions, so it will likely never be released as an open source project (although the binary interpreter continues to be freely available, occasionally updated, and usable for commercial work on existing desktop platforms, at rebol.com). The long history of R2 tools and code donated by the community also continues to be maintained at rebol.org and other user web sites. For mobile phones, tablets, and other new platforms, REBOL version 3 ("R3") is the way forward.
At the time of its release, R3 was a fresh new design, aimed at solving problems encountered over a decade of broad commercial REBOL development experience. The design of R3 is intended to be better suited for development of larger software projects, so there are some changes in the R3 language, most instantly evident in the default GUI dialect. Many of the built in "bells and whistles" of REBOL 2 are also not immediately available in the new version, but R3 is already quite usable for commercial work. Users have ported it to Raspberry PI and various embedded systems, and mainstream development is being actively pursued by the Saphirion group, under the name "Saphir R3". New working Saphirion releases for Android, Windows, Mac, Linux, and other common platforms are available at:
http://development.saphirion.com/experimental/builds/
Currently, Saphirion's releases are the most featured packed versions of REBOL3, with a powerful working GUI system that is enabled even on Android. With the advent of Android OS's popularity everywhere (it is by far the most pervasive mobile platform), this release has become important for REBOL developers. You can download Saphirion's small R3 interpreter to your phone, tablet, or other Android device, and build powerful console and GUI applications just as easily as you can on desktop PCs. Existing documentation for the Saphirion version of REBOL is available at http://development.saphirion.com/rebol/r3gui/. Source code for the Saphirion GUI is at https://github.com/saphirion/r3-gui, and new documentation is at https://github.com/saphirion/documentation. The GUI dialect changes may appear confusing at first, but that's mostly because there are only a few examples, all written in a particular style that may be unfamiliar to R2 users. The basics of using Saphirion's R3 GUI are actually very simple and immediately approachable by R2 coders, and the overwhelming majority of the REBOL core language works almost exactly as you'd expect. This section provides an essential introduction, to help get started quickly, using Saphirion's R3 GUI dialect. The focus here is on using the Android environment, since it's the most prevalent new platform.
17.2 Creating an Android Working Environment - Necessary Tools
First, download and install Saphirion's version of the R3/Droid APK File (go to this link using your Android web browser). Click on the downloaded file and accept the default install options. It only takes a few seconds. After the installation, you'll see an app icon for "R3/Droid" on your Android device. You can click on the icon to run the REBOL console. Just as in R2, you can find help and source code listings for built in functions, examine system objects, and even run simple scripts directly from the console command line. Try running a few examples:
print "hello world" cd %./sdcard/ list-dir help ? system help write source load-gui write %r3-gui.r3 read http://development.saphirion.com/resources/r3-gui.r3You'll see that most of the core functions and syntax you're familiar with in R2 are exactly the same in R3. Explore "help" and "source" for any function you need, and you'll quickly get up to speed with new options and changes. For the most part, if you've done any R2 coding, you'll find yourself immediately comfortable in Saphirion's R3/Droid core environment.
A good text editor is essential for writing REBOL scripts productively on Android. This author's current favorite Android text editor app is "Jota", available for free in the Android app stores. You can find the Jota editor in Google Play at https://play.google.com/store/apps/details?id=jp.sblo.pandora.jota&hl=en. Any text editor will work, but Jota provides seemless integration with the REBOL interpreter, so that scripts can be run automatically from the editing environment. Jota also provides fantastic viewing and editing controls such as easy font sizing and word wrap options, fine navigation controls, undo/redo, an adjustable toolbar, and other features that make it a pleasant environment in which you can type code quickly.
It's suggested that you set up the Jota toolbar to include these buttons: Save, Open App, Word Wrap, Undo, Redo, Save As, Font-, Font+, Search, End, Home, Up, Down, Left, Right (click Menu -> Preferences -> Toolbar Settings to adjust the toolbar layout). This will provide quick access to many of the functions required while editing scripts.
Jota's "Open App" feature can also be found by clicking Menu -> File -> Open by Application. This feature allows you to run the currently edited REBOL script file using the installed REBOL interpreter app. To enable this capability, be sure to save your scripts with file names that end in a .r3 extension (i.e., "myscript.r3"). Try pasting the following script into the Jota editor on your Android device:
REBOL [] load-gui view [text "Hello Android!"]Save the code with a file name such as hello.r3 (any file name ending in ".r3"), then click Menu -> File -> Open by Application (or click the "Open App" toolbar button, if you've set up that button), and select "R3/Droid" (when prompted with "Complete Action Using:"). You'll see the program run, with a small GUI, and text displaying "Hello Android!". You can also run any script that ends in ".r3" by clicking its file icon in a file manager.
The simple routine of editing with Jota, saving, and opening with R3/Droid, can be performed in seconds, if you set up Jota's toolbar with the "save" and "open app" buttons readily available. The File -> History menu is another option that can be used to quickly move between recently edited scripts. Together with the help system available in the R3/Droid console, this setup provides a fast and complete tool set to handle Android coding mechanics.
Several other useful Android tools include ES File Explorer and Wifi File Transfer. ES File explorer is a file manager that allows you to copy/move/delete/execute/etc files on your Android device. It has built in capabilities that allow you to save files to network shares and FTP servers, as well as transfer via email, text message, and other connections. Wifi File Transfer is the most efficient app this author has found to share files back and forth between desktop machines and Android devices. No cables or special network setup steps are required for either app, and both apps are free, fast and reliable.
You can download desktop versions of Saphirion's R3 build, and edit/run scripts on your home computer, then use Wifi File Transfer or ES File Explorer to copy them to your Android device, edit, run, and send files back and forth between each platform quickly. These tools provide a tremendous productivity boost when sharing/moving work between your desktop and Android work environments.
17.3 R3 GUI Basics
Notice the "load-gui" function in the example above. If you type "source load-gui" in the R3 console, you'll see that all it does is download and run the file at http://development.saphirion.com/resources/r3-gui.r3. It's recommended that you download and save that file in the same folder as the scripts you create, and use the following code to enable GUI functionality in R3 scripts:
REBOL [] do %r3-gui.r3 view [text "Hello Android!"]The "do %r3-gui.r3" line above does the exact same thing as the built-in load-gui function, without requiring the GUI library to be downloaded every time you run the script. This improves speed and eliminates the need for an Internet connection every time you run your script(s). You could also potentially paste the code at http://development.saphirion.com/resources/r3-gui.r3 directly into any of your scripts, if you want to eliminate the need for any additional imported library files (that's not recommended).
Notice in the example above that the single word "view" is used in R3 to replace R2's two words "view layout". Another important difference is that R3 uses the "on-action" actor to enable widgets to perform actions. So this code in R2:
REBOL [] view layout [ text "First Name:" f1: field text "Last Name:" f2: field btn "Submit" [ write/append %cntcts.txt rejoin [ mold f1/text " " mold f2/text newline ] ] a1: area btn "Load" [a1/text: read %cntcts.txt show a1] ]Looks like this in Saphirion's R3:
REBOL [] do %r3-gui.r3 ; or use load-gui view [ text "First Name:" f1: field text "Last Name:" f2: field button "Submit" on-action [ write/append %cntcts.txt rejoin [ mold get-face f1 " " mold get-face f2 newline ] ] a1: area button "Load" on-action [set-face a1 to-string read %cntcts.txt] ]Notice also the use of the "get-face" and "set-face" functions (for example, "get-face f1" instead of "f1/text"). In the R3 GUI dialect, this is the preferred syntax used to get and set text and data in GUI widgets. For the most part, as you can see, the basics of creating GUI layouts are just as simple, familiar, and friendly in R3/Droid, as they are in R2.
Some GUI properties can be set using the "view/options" refinement. Here's how you set the title text of a GUI window:
REBOL [] do %r3-gui.r3 view/options [text-list] [title: "My Title"]The following code does the same things as above:
REBOL [title: "My Title"] do %r3-gui.r3 view [text-list]You can access specific properties of any widget with the "get-facet" function:
REBOL [] do %r3-gui.r3 view [t1: text-list on-action [probe get-facet t1 'atts]]You can see the facets (and all the other properties) of any widget using the "debug" keyword (use CTRL+C to stop the console scrolling output). This is perhaps the most important tool to get comfortable with while learning Saphirion's R3 GUI dialect. Along with the source and help functions, it provides an indispensable reference to help learn about the new GUI properties:
REBOL [] do %r3-gui.r3 view [text-list debug]Here's a script that allows you to scroll through and view all the built in widget styles:
REBOL [title: "View All Styles"] do %r3-gui.r3 all-styles: find extract to-block guie/styles 2 'clicker view [ title "Pick a style:" text-list all-styles on-action [ style-name: pick all-styles get-face face view/modal reduce [ 'title reform ["Example of a" style-name "style:"] style-name ] ] ]Much more information about faces, facets, actors, and other GUI options can be found at http://development.saphirion.com/rebol/r3gui/faces/index.shtml and http://development.saphirion.com/rebol/r3gui/actors/index.shtml. These texts provide more complete information about what you've learned here, about basic features of the R3 GUI dialect.
17.4 Simple Requestors
One thing you'll notice currently missing in Saphirion's R3/Droid build is a broad set of native requestor dialogues. The "request" function in R3/Droid is powerful. In it's simplest form, you can use it like the R2 "alert" function:
REBOL [] do %r3-gui.r3 view [ button "Click me" on-action [request "Ok" "You clicked the button."] ]The /ask refinement is helpful for getting responses to yes/no questions:
REBOL [] do %r3-gui.r3 x: request/ask "Question" "Do you like this?." either x = false [print "Boo!"] [print "Yay!"]The /custom refinement let's you choose alternate text for the buttons:
REBOL [] do %r3-gui.r3 x: request/custom "" "Do you like this?" ["Yay" "Boo"] either x = false [print "Boo!"] [print "Yay!"] haltThis request/custom example is taken from Cyphre's demo code, built into R3/Droid:
REBOL [] do %r3-gui.r3 site: http://development.saphirion.com/experimental/ view [ button "Tile Game" on-action [ request/custom "Downloading files..." [ title "Loading game..." when [enter] on-action [ game: load/all site/tile-game.r unview/all gui-metric/set 'unit-size 1x1 do game ] ]["" "Close"] ] ]For situations where you need to collect more information or provide specially selectable choices, custom text requestors and other basic input and output dialogues are simple to create, as needed. For example, this script contains a simple dialogue that requests text from the user, when a button is clicked (in this case, a file name used to save the note text). Notice the use of the view/modal refinement. This keeps the dialogue on top of the main layout, until it is closed:
REBOL [title: "Tiny Text Editor"] do %r3-gui.r3 view [ text "Notes:" a1: area button "Save" on-action [ view/modal [ text "File Name:" f1: field "notes.txt" button "Submit" on-action [ write (to-file get-face f1) (get-face a1) unview ] ] ] button "Load" on-action [set-face a1 to-string read %notes.txt] ]Here's an example with 2 different file requestors, using text-list widgets that allow the user to select from any file in the current folder, to save and load text:
REBOL [] do %r3-gui.r3 view [ text "Notes:" a1: area button "Save" on-action [ files: read %./ view/modal [ text "File Name:" t1: text-list files button "Submit" on-action [ write (to-file pick files get-face t1) (get-face a1) request "" "Saved" unview ] ] ] button "Load" on-action [ files: read %./ view/modal [ text "File Name:" t2: text-list files button "Submit" on-action [ set-face a1 to-string read(to-file pick files get-face t2) unview ] ] ] ]You could combine both load and save dialogue routines into a single "request-file" function, like this:
REBOL [title: "request-file"] do %r3-gui.r3 request-file: func [opt] [ files: read %./ view/modal [ text "File Name:" t1: text-list files button "Submit" on-action [ either opt = "save" [ write (to-file pick files get-face t1) (get-face a1) request "" "Saved" ][ set-face a1 to-string read(to-file pick files get-face t1) ] unview ] ] ] view [ text "Notes:" a1: area button "Load" on-action [request-file "load"] button "Save" on-action [request-file "save"] ]As you can see, rolling your own requestors is simple enough, using R3's easy native GUI capabilities.
17.5 Layout
R3's GUI dialect introduces some changes in layout syntax, which are intended to improve resizing, positioning, and other common problems encountered in R2 development. The default placement of items is vertical, as in R2. Horizontal and vertical layout containers are used throughout the R3 documentation, and have become the default syntax for arranging groups of items on screen:
REBOL [] do %r3-gui.r3 view [ vpanel [ f1: field hpanel [ button "Reset" on-action [set-face f1 ""] button "Clear" on-action [set-face f1 ""] ] ] ]Notice that the "return" word still functions as in R2, in an "hgroup":
REBOL [] do %r3-gui.r3 view [ hgroup [ f1: field return button "Reset" on-action [set-face f1 ""] button "Clear" on-action [set-face f1 ""] ] ]Notice that many layout and resizing options are handled automatically (try resizing this grid, and notice the automatic sort and display features of the text-table widget):
REBOL [] do %r3-gui.r3 view [ text-table ["1" 200 "2" 100 "3"][ ["asdf" "a" "4"] ["sdfg" "b" "3"] ["dfgh" "c" "2"] ["fghj" "d" "1"] ] ]Because Android and other new devices come with a huge variety of screen resolutions, some provisions have been added to R3 to enable graceful handling of these options, with little code required for simple scripts, and additional detailed control options available to help build more complex applications. The "gui-metric" function is important to explore (type "help gui-metric" in the R3 console to see its options). In the following code, take a look at how the gui-metric function is used, along with the "max-hint" option. This example layout fits nicely on a small screen phone in portrait mode:
REBOL [title: "Edit Downloaded File"] do %r3-gui.r3 gui-metric/set 'unit-size (gui-metric 'screen-dpi) / 96 view/options [ hgroup [ button "Load" on-action [ set-face a to-string read http://rebol.com ] button "Open" on-action [ view [ text "File:" f: field button "Submit" on-action [ file: get-face f set-face a (to-string read file) unview ] ] ] return button "New" on-action [ set-face a "" ] button "Save-As" on-action [ view [ text "File:" f: field button "Submit" on-action [ file: get-face f write file (get-face a) unview ] ] ] button "Quit" on-action [ unview/all ] ] a: area "" on-key [ do-actor/style face 'on-key arg 'area if arg/type = 'key [ if arg/key = 'f5 [try load face/names/tb/state/value] ] ] ][ max-hint: round/floor (gui-metric 'work-size) - gui-metric 'title-size ]For more information about R3 layout and resizing, see http://development.saphirion.com/rebol/r3gui/layouts/index.shtml and http://development.saphirion.com/rebol/r3gui/resizing/index.shtml.
17.6 Styles
"Styles" are the R3 synonym for "widgets" in other languages. The "stylize" function allows you to create your own widget variations, or even entirely new widget definitions, using draw commands. Default facets, actors, and other properties of a existing style can be set and given a new widget name. Here, a "blue-button" style is created:
REBOL [title: "Blue Button"] do %r3-gui.r3 stylize [ blue-button: button [ facets: [bg-color: blue] ] ] view [blue-button]Here is an R3 version of the simple GUI calculator presented earlier in this text. The "btn" style is set to a given size, and a default action is defined (the face text of a clicked button is appended to the face text of the field widget):
REBOL [title: "CALCULATOR"] do %r3-gui.r3 stylize [ btn: button [ facets: [init-size: 50x50] actors: [on-action:[set-face f join get-face f get-face face]] ] ] view [ hgroup [ f: field return btn "1" btn "2" btn "3" btn " + " return btn "4" btn "5" btn "6" btn " - " return btn "7" btn "8" btn "9" btn " * " return btn "0" btn "." btn " / " btn "=" on-action [ attempt [set-face f form do get-face f] ] ] ]You can create your own widget styles using draw commands:
REBOL [title: "Blue Button"] do %r3-gui.r3 stylize [ circle: [ draw: [ fill-pen blue circle 50x50 30 ] ] ] view [circle circle circle]See http://development.saphirion.com/rebol/r3gui/styles/index.shtml for more information about creating styles.
17.7 Some More Simple Examples
Here are some more examples converted from R2 VID scripts earlier in this text. You can see that the required code adjustments are quick and straight forward. First, A little math test for kids:
REBOL [title: "Math Test"] do %r3-gui.r3 random/seed now x: does [rejoin [random 10 " + " random 20]] view [ f1: field (x) text "Answer:" f2: field on-action [ either (get-face f2) = (form do get-face f1) [ request "Yes!" "Yes!"][request "No!" "No!" ] set-face f1 x set-face f2 "" focus f2 ] ]A small sliding tile game:
REBOL [title: "Sliding Tile Puzzle"] do %r3-gui.r3 stylize [ p: button [ facets: [init-size: 60x60 max-size: 60x60] actors: [ on-action: [ t: face/gob/offset face/gob/offset: x/gob/offset x/gob/offset: t ] ] ] ] view/options [ hgroup [ p "8" p "7" p "6" return p "5" p "4" p "3" return p "2" p "1" x: box 60x60 white ] ] [bg-color: white]A minimal cash register app:
REBOL [title: "Minimal Cash Register"] do %r3-gui.r3 stylize [fld: field [init-size: 80]] view [ hgroup [ text "Cashier:" cashier: fld text "Item:" item: fld text "Price:" price: fld on-action [ if error? try [to-money get-face price] [ request "Error" "Price error" return none ] set-face a rejoin [ get-face a mold get-face item tab get-face price newline ] set-face item copy "" set-face price copy "" sum: 0 foreach [item price] load get-face a [ sum: sum + to-money price ] set-face subtotal form sum set-face tax form sum * .06 set-face total form sum * 1.06 focus item ] return a: area 600x300 return text "Subtotal:" subtotal: fld text "Tax:" tax: fld text "Total:" total: fld button "Save" on-action [ items: replace/all (mold load get-face a) newline " " write/append %sales.txt rejoin [ items newline get-face cashier newline now/date newline ] set-face item copy "" set-face price copy "" set-face a copy "" set-face subtotal copy "" set-face tax copy "" set-face total copy "" ] ] ]A little data storage and retrieval app:
REBOL [title: "Parts"] do %r3-gui.r3 write/append %data.txt "" database: read/lines %data.txt clear-fields: does [ set-face n copy "" set-face a copy "" set-face p copy "" set-face o copy "" ] view [ text "Parts in Stock:" name-list: text-list (extract database 4) on-action [ if none = marker: get-face face [return none] marker: (marker * 4) - 3 set-face n pick database marker set-face a pick database (marker + 1) set-face p pick database (marker + 2) set-face o pick database (marker + 3) ] text "Part Name:" n: field text "Manufacturer:" a: field text "SKU:" p: field text "Notes:" o: area hgroup [ button "Save" on-action [ if "" = get-face n [ request "Error" "You must enter a Part name." return none ] if find (extract database 4) get-face n [ either false = request/ask """Overwrite existing record?"[ return none ] [ remove/part (find database (get-face n)) 4 ] ] append database reduce [ get-face n get-face a get-face p get-face o ] write/lines %data.txt database set-facet name-list 'list-data (extract copy database 4) ] button "Delete" on-action [ if not (false = request/ask "?" (rejoin [ "Delete " get-face n "?" ])) [ remove/part (find database (copy get-face n)) 4 write/lines %data.txt database clear-fields set-facet name-list 'list-data (extract copy database 4) ] ] button "New" on-action [clear-fields] ] ]
17.8 Additional Essential Resources
At this point, you should be able to create basic R3 GUI data entry forms that are useful in utility scripts and simple business apps. Be sure to check out the following examples to see more fundamentally useful code for R3/Droid and the Saphirion R3 builds. Pay particular attention to the tile game and draw test scripts by Cyphre to see how graphics, screen layout, event handling, and other useful facilities are implemented:
http://development.saphirion.com/experimental/demo.r
http://development.saphirion.com/experimental/tile-game.r
http://development.saphirion.com/experimental/draw-test.r
https://raw.github.com/angerangel/r3bazaar/master/builds/windows/editor.r
17.9 RED
Before Carl Sassenrath released REBOL as an open source project, Nenad Rakocevic ("Doc Kimbel") set out to build an open source replacement for the REBOL language, based on its best merits. That language, now called "Red" is still in it's infancy, but shows signs of tremendous future potential for REBOL developers. One of the great benefits of the Red language is that it cross-compiles directly to native executables for each target platform, so small, quick, native binary programs can be produced with a simple and small tool chain familiar to REBOLers. An interpreted console is also available for quick work and code testing, and a professional IDE is planned. Together with "Red/System", Red's goal is to provide a complete cross platform toolkit that can be used to produce everything from low-level/high performance system drivers, to high level user applications, all using a tiny and extraordinarily productive toolkit that has absolutely no dependencies on C or other historically bloated tool chains. Red is already working to a degree on all popular operating systems (including mobile), and steady work is being accomplished regularly by its creator. Red has already been used to create at least one commercial application, and the community is working to make R3 tools cooperate with it nicely. Keep your eyes on it at http://www.red-lang.org/. It will likely be an important part of the future of all REBOL-related language development.
18. Implementing Multi-User Data Management Applications with Rebol
A stand-alone copy of this tutorial topic, with many screen shot images, is available at http://re-bol.com/rebol-multi-client-databases.html. This topic may be easier to follow with the addition of those screen shot images.
18.1 Multi-User Database Systems In Rebol
Trivial single-user Rebol apps typically make use of saved block structures for persistent data storage. The routine is simple: create a block, manipulate the block in memory as needed by your app (append values, search, sort, remove values, etc.), using native series functions, and then use the 'save function to store the block to a text or binary file. This article demonstrates how to extend the use of simple blocks so they can operate with similar functionality in multi-user network based data management applications. In many cases, the need for third party DBMSs such as MySQL can be eliminated.
18.2 The Typical REBOL 101 Example
Below is an example of a trivial single-user data management app. New Rebolers can learn to write this sort of code within a few days:
rebol [title: "Single User Contacts App"] do %rebgui.r ; http://re-bol.com/rebgui.r if not exists? %contacts [write %contacts ""] display/close "Contacts" [ t: table 78x34 options [ "Name" left .3 "Address" left .4 "Phone" left .3 ] data (load %contacts) [set-texts [n a p] t/selected] f: panel data [ after 2 text 18 "Name:" n: field text 18 "Address:" a: field text 18 "Phone:" p: field reverse button " Submit " [ attempt [t/remove-row (index? find t/data t/selected) + 2 / 3] t/add-row/position reduce [ copy n/text copy a/text copy p/text ] 1 set-texts [n a p] "" ] button " New " [set-texts [n a p] "" t/redraw] button " Delete " [ t/remove-row (index? find t/data t/selected) + 2 / 3 set-texts [n a p] "" ] ] ] [save %contacts t/data alert "saved" quit] do-eventsIn this app, data is read from a file and loaded into memory, manipulated, and saved when user operations are complete (when the GUI is closed). This sort of application model is trivial, but in-memory series containing 1 million+ data values can be manipulated in a fraction of a second, so performance when dealing with even significant mid sized volumes of information can be quite fast (GUIs need to be tuned to only display portions of large volumes of data, but managing lists themselves in memory is fast).
Working with strings, directory listings, emails, network connections, widgets in GUIs, graphics, sounds, and even basic code structures in Rebol programs requires managing series, so proficiency with series manipulation is strengthened by constant use throughout most sorts of coding activities. Because native series operations are so pervasive in Rebol, it's natural for Rebol developers to "roll their own" series data structures and manipulation techniques, and to use saved blocks as a simple method for persistent storage (as opposed to using 3rd party RDBMSs), especially in small apps and utilities.
There's generally no problem with the application and data model above, if only a single user ever runs the application on a single machine.
18.3 Multi-User Databases
If several people need to edit the above contacts database simultaneously, then the model above will not operate properly. For example, if User1 runs the script and makes some changes to the loaded data, while at the same time User2 opens the same file and makes some changes, when each user saves their data file, one of the users will overwrite the other user's changes. Because each user never gets a chance to load the other's edited data before saving their own changes, each user's loaded data never gets a chance to include the other's concurrent edits, and that data is lost.
Also, for example, if User2 needs to search the database for a piece of information, while User1 is in the process of adding data, the changes made by User1 will not appear in User2's search until User1 saves his unique version of the data.
Additionally, allowing multiple users to write to the same file simultaneously can result in data write errors. To see a real example of this, try running the following script (10 instances of a program, all writing data to a file concurrently), and you'll see that file write errors actually do occur multiple times. This can't ever be allowed to occur in production code:
rebol [title: "Test for concurrent file write errors"] x: copy [] insert/dup x 0 10000000 write %testdata.txt x write %concurrent-file-write-errors.r { rebol [title: "Test for concurrent file write errors"] script-name: form now repeat i 25 [ probe i write/append %testdata.txt a: rejoin [script-name " " i newline] if not find read %testdata.txt a [ alert rejoin ["Error: " script-name ", " i] ] ] print "Done" halt } loop 10 [launch %concurrent-file-write-errors.r]Other issues, such as secure data storage, password access, etc., also can't always be handled appropriately if all potential users have direct access to every file in which data is stored.
The simple solution to all these problems is to hand over management of the data to a server script, which each of the client user apps connects to via a network connection. The server script loads the data series into memory, and performs data management operations in the exact same way, and with the same speed, as in the single user version of the app. A network server port (just a few lines of Rebol code), is opened by the server, to accept data management expressions from each of the client users. When each client script needs to perform an operation upon the series data, the necessary code (or some representation of that code) is sent to the server to evaluate and return results.
Here's an example of a server which loads the %contacts file, as in the GUI example above. The network loop loads a string of code sent from a client, evaluates the code with 'do, and returns the molded results of the 'do evaluation back to the client. Some printed feedback is also presented in the server console, so the server administrator can watch any activity (the 'probe functions can be removed to improve performance):
rebol [title: "Simple Data Server"] if not exists? %contacts [write %contacts ""] contacts: load %contacts print "waiting..." port: open/lines tcp://:55555 forever [ probe commands: load data: first wait connect: first wait port probe result: mold do commands insert connect result close connect ]Here's an example of a client script which sends some code to the server above, to be executed. The server evaluates the code with 'do and returns the result (the last expression in the line of code, which in the case below is just the number 1). As long as the server is running and the client is able to connect over the network, the data block ["Jim" "" ""] will be appended to the 'contacts block loaded in the server memory, the updated 'contacts block will be saved to the %contacts file on the server, and the integer value 1 will be sent back to the client script. When the client receives the response, if it's the integer 1, the client script prints a success message, then the connection to the server is closed:
rebol [title: "Simple Client 1"] print "sending..." serverip: "localhost" port: open/lines rejoin [tcp:// serverip ":55555"] insert port {append contacts ["Jim" "" ""] save %contacts contacts 1} data-response: load first connect: wait port [ either 1 = data-response [print "Success"] [print "Failure"] close connect close port haltThe following client script extends the idea above, sending 3 blocks of data to the server. Notice that because the 'contact variable label in the 'foreach loop only exists in the context of the client script (not anywhere in the server memory), the values it represents on each iteration of the loop must be concatenated (rejoined) into the string sent to the server. You'll need to do this in any client code which sends data represented by a local variable:
rebol [title: "Simple Client 2"] print "sending..." serverip: "localhost" foreach [contact] [ ["Jim" "" "123-1234"] ["Bob" "" "234-2345"] ["Joe" "" "345-3456"] ] [ port: open/lines rejoin [tcp:// serverip ":55555"] insert port rejoin [ {append contacts } mold contact { save %contacts contacts 1} ] if 1 = data-response: load first connect: wait port [print "Success"] close connect close port ] haltThe idea above can be extended to create a generalized 'server-exec function which sends any string of code to a server, and receives the server response. Notice that because the server port is opened in /lines mode, the 'trim/lines function is used to remove all carriage returns from the code string (/lines mode is a clean and simple way to transfer molded data - just always be sure to remove all line breaks using that 'trim/lines function). This 'server-exec function also handles errors, writes the current time and date, the sent code string, and the error information to a file, and alerts the client if ever a network error occurs:
server-ip: "localhost" server-exec: func [strng] [ commands: trim/lines strng if error? err: try [ port: open/lines rejoin [tcp:// serverip ":55555"] insert port mold commands data-response: first connect: wait port close connect close port return data-response ] [ err: disarm :err write/append %net-err.txt rejoin [ now newline commands newline err newline newline ] alert "** Network Connection Error ** Try Again" return none ] ]Here's a slightly more robust generalized server script, with similar error handling:
REBOL [title: "Server"] print "waiting..." port: open/lines tcp://:55555 forever [ if error? er: try [ probe commands: load data: first wait connect: first wait port probe result: mold do commands insert connect result close connect true ] [ er: disarm :er net-error: rejoin [ form now newline mold commands newline er newline newline ] write %server-error.txt net-error print net-error close connect ] ]As an example, we can send commands from the client GUI script presented earlier, to be processed by the generalized server script above. All we need to do is load the contacts data in the server app, and use the generalized 'server-exec function to send any changes to be made to the contacts data, from the client to the server. In the example below, the 'save operation (which occurs when the GUI window closes) and all changes made when the client user clicks any buttons in the GUI, are sent across the network to be processed by the server. This code looks hairy, but it's just a copy of the 'server-exec function, and then a copy of the contacts GUI, with those few 'server-exec operations added:
rebol [title: "Network Contacts"] serverip: "localhost" server-exec: func [strng] [ commands: trim/lines strng if error? err: try [ port: open/lines rejoin [tcp:// serverip ":55555"] insert port mold commands data-response: first connect: wait port close connect close port return data-response ] [ err: disarm :err write/append %net-err.txt rejoin [ now newline commands newline err newline newline ] alert "** Network Connection Error ** Try Again" return none ] ] do %rebgui.r contacts: load server-exec {to-block load %contacts} display/close "Contacts" [ t: table 78x34 options [ "Name" left .3 "Address" left .4 "Phone" left .3 ] data contacts [set-texts [n a p] t/selected] f: panel data [ after 2 text 18 "Name:" n: field text 18 "Address:" a: field text 18 "Phone:" p: field reverse button " Submit " [ server-exec rejoin [{ remove/part find contacts } mold t/selected { 3 insert contacts [} mold copy n/text { } mold copy a/text { } mold copy p/text {] to-block contacts }] attempt [t/remove-row (index? find t/data t/selected) + 2 / 3] t/add-row/position reduce [ copy n/text copy a/text copy p/text ] 1 set-texts [n a p] "" ] button " New " [set-texts [n a p] "" t/redraw] button " Delete " [ server-exec rejoin [{ remove/part find/skip contacts } mold t/selected { 3 3 to-block contacts }] t/remove-row (index? find t/data t/selected) + 2 / 3 set-texts [n a p] "" ] ] ] [ if 1 = load server-exec {save %contacts contacts 1} [alert "Saved"] quit ] do-eventsHere's the particular variation of the server we'll use to handle the client script above. The only difference between it and the generalized server is that the %contacts file is loaded into memory:
rebol [title: "Contacts Data Server"] if not exists? %contacts [write %contacts ""] contacts: load %contacts print "waiting..." port: open/lines tcp://:55555 forever [ if error? er: try [ probe commands: load data: first wait connect: first wait port probe result: mold do commands insert connect result close connect true ] [ er: disarm :er net-error: rejoin [ form now newline mold commands newline er newline newline ] write %server-error.txt net-error print net-error close connect ] ]Run the server above, then run as many different instances of the client script, all on different machines if you'd like, and they will all work well together.
The model above is useful for handling a wide variety of data management activities, and it can handle many concurrent users, because all network requests are naturally queued by the server. That's a result of the inherent synchronous nature of the server code loop. Only one connection can be opened at any given instant and only one operation is ever being performed at a time to the data. So at any given instant, each network request is working only with the most current data block maintained in the server memory. This ensures that all users have concurrent access to the most up-to-date data at any given instant they perform a data manipulation operation, that multiple users never overwrite changes made by others who are working simultaneously with the data, that the system never experiences concurrent data write errors, etc.
Other features such as secure password management are easy to add, because none of the client users ever need to have access to the server file system. Just move any such code to the server script. (If you really need to be secure, then the next level of defense is to encrypt the client script and all data sent across the network, so that the potential for code injection attempts is reduced).
Data manipulation operations occur quickly in this model, because the entire database is still managed in the memory of the server machine. The only additional performance overhead is in the transfer of request and result values across the network. Requests are typically comprised of very small packets of code and data, and results tend to be limited to response codes and/or small subsets of fields or rows of values selected from the database, so the performance of the network model tends to stand up well in most typical applications. The full gamut of series functions, along with looping structures, conditional expressions, parse, math, and other native language features in Rebol enable all the data manipulation capabilities typically provided by an SQL DBMS (and more).
Notice that very few changes need to be made to the code of the single-user GUI script. The data manipulation operations are just wrapped in the 'server-exec function, and the user interface is kept in the client code, which can be executed on any number of client machines simultaneously. Aside from this separation of code between client and server, and the small addition of some network communication code (the generalized 'server-exec function is all you need), the program is still basically the same as the single-user script.
You can treat this tiny native client-server 'framework' as a replacement for heavier RDBMS tools such as MySQL. Because it's all native Rebol code, you have complete control of every operation. Any code that can be run in a simple single-user app can be sent to the server, using the 'server-exec function. You can choose which code to put in your client app, and which code to move to the server script, which security features to include, how to optimize performance, how to improve readability, etc. - it's all just pure simple Rebol code.
18.4 A Longer Example
Below is a more detailed example of a network enabled client-server database application. It allows multiple groups of users to work with shared data in different ways. The first client app allows users to enter work order information using a tabbed GUI panel (just a generalized GUI form in this example). The second client app allows a separate group of users to view a table of entered work orders which are meant to be monitored and completed. Various levels of password protection are built in to ensure that only correct users are allowed access in each area of the different applications.
Here's some common code used by both client applications:
REBOL [title: "Common Functions and Code"] ; FOLDER, FILE, AND VARIABLE INITIALIZATION ============================== unless exists? %serverip.txt [write %serverip.txt "localhost"] serverip: read %serverip.txt ; FUNCTIONS ============================================================== server-exec: func [strng] [ commands: trim/lines strng if error? err: try [ port: open/lines rejoin [tcp:// serverip ":55555"] insert port mold commands data-response: first connect: wait port close connect close port return data-response ] [ err: disarm :err write/append %net-err.txt rejoin [ now newline commands newline err newline newline ] alert "** Network Connection Error ** Try Again" return none ] ] change-adminpw: func [/dlt] [ if error? try [ old-userpass-block: copy load server-exec {get-old-userpass-block} ] [return] alert rejoin [ "Current Usernames and Passwords:^/^/" (mold old-userpass-block) ] title-text: either dlt [ "Remove username/password: " ] [ "New username/password: " ] new-userpass: request-password/verify title-text: copy system/script/header/title show main-screen if any [ new-userpass = none new-userpass/1 = "" new-userpass/2 = "" ] [ alert "Changes NOT SAVED (both fields must be completed)." return ] either dlt [ if error? try [ server-exec rejoin [ {delete-adminpw } mold old-userpass-block { } mold new-userpass " true" ] ] [ alert "Admin username/password NOT removed." return ] alert "Admin username/password removed." ] [ if error? try [ server-exec rejoin [ {add-adminpw } mold old-userpass-block { } mold new-userpass " true" ] ] [ alert "New Admin username/password NOT saved." return ] alert "New admin username/password saved." ] ] ; LOGIN ================================================================== do %rebgui.r if error? try [admin-database: load server-exec {get-admin-database}] [ quit ] do login: [ userpass: request-password if any [userpass = none find userpass ""] [quit] logged-in: false foreach [user pass] admin-database [ if (userpass/1 = user) and (userpass/2 = pass) [ logged-in: true break ] ] either logged-in [] [alert "Incorrect Username/Password" do login] ]Here's the server app:
REBOL [title: "Work Order Server"] ; FOLDER, FILE, AND VARIABLE INITIALIZATION ============================== unless exists? %adminpw [ save %adminpw to-binary encloak mold ["admin" "password"] "1234" ] unless exists? %superpw [ save %superpw to-binary encloak mold ["super" "secret"] "1234" ] make-dir %./history/ if not exists? %orders-data.txt [write %orders-data.txt ""] orders: load %orders-data.txt if not exists? %ordernum.txt [save %ordernum.txt 1] ; FUNCTIONS ============================================================== get-super-pass: does [load decloak to-string load %superpw "1234"] get-admin-database: does [load decloak to-string load %adminpw "1234"] get-old-userpass-block: does [load decloak to-string load %adminpw "1234"] delete-adminpw: func [old-userpass-block new-userpass] [ save %adminpw to-binary encloak ( mold admin-database: head remove/part find/skip old-userpass-block new-userpass/1 2 2 ) "1234" ] add-adminpw: func [old-userpass-block new-userpass] [ save %adminpw to-binary encloak ( mold admin-database: append old-userpass-block new-userpass ) "1234" ] ; SERVER LOOP ============================================================ print "waiting..." port: open/lines tcp://:55555 forever [ if error? er: try [ probe commands: load data: first wait connect: first wait port probe result: mold do commands insert connect result close connect true ] [ er: disarm :er net-error: rejoin [ form now newline mold commands newline er newline newline ] write %server-error.txt net-error print net-error close connect ] ]Here's the first client application, which allows users to enter work orders:
REBOL [title: "New Work Orders"] ; FUNCTIONS ============================================================== save-order: func [order-data] [ server-exec rejoin [{ order-data: } mold order-data { write to-file rejoin [ %./history/ now/year "-" now/month "-" now/day "_" replace/all form now/time ":" "-" "_" "orders-data.txt" ] read %orders-data.txt append orders order-data save %orders-data.txt orders order-transaction: rejoin [ form now " - Saved Order:" newline mold order-data newline newline ] write/append %order-history.txt order-transaction print order-transaction true }] ] submit-all: does [ submitted: copy [] repeat i 2 [append submitted get-values main-screen/pane/:i] replace/all submitted 1 "Yes" replace/all submitted 2 "No" insert head submitted get-values customer-panel if any [ find submitted none find submitted "" ] [ if not question "Submit incomplete data?" [return] ] insert head submitted now unless next-inv: server-exec { ordernum: load %ordernum.txt ordernum: ordernum + 1 save %ordernum.txt ordernum ordernum } [return] insert head submitted next-inv either save-order submitted [alert "Saved"] [return] ] do %common.r ; GUI ==================================================================== ctx-rebgui/on-fkey/f3: make function! [face event] [submit-all] display/maximize/close/min-size copy system/script/header/title [ main-screen: tab-panel #LVHW data [ action [wait .2 set-focus name-field] " Customer " [ after 1 customer-panel: panel 87 data [ after 2 text 23 "Name:" name-field: field text 23 "Address:" field text 23 "City, State:" field text 23 "Zip code:" field ] text ; placeholder after 2 text 28 "Drop Down 1:" drop-list data ["aaa" "bbb" "ccc"] text 28 "Drop Down 2:" drop-list data ["ddd" "eee" "fff"] text 28 "Edit List 1:" edit-list data ["111" "222" "333"] text 28 "Edit List 2:" edit-list data ["444" "555" "666"] text 28 "Yes/No 1:" radio-group 30x5 data ["Yes" "No"] text 28 "Yes/No 2:" radio-group 30x5 data ["Yes" "No"] ] action [wait .2 face/color: 244.241.255] " Order Info " [ after 3 text 28 "Date 1:" day-field1: field text "..." [set-text day-field1 request-date] text 28 "Date 2:" day-field2: field text "..." [set-text day-field2 request-date] after 2 text 28 "Area1:" area text 28 "Area2:" area text text bar text text 44 button 35x15 " Submit All Entries " [submit-all] ] action [ if error? try [ unless ( load server-exec {get-super-pass} ) = request-password [ main-screen/select-tab 1 ] ] [main-screen/select-tab 1 return] wait .2 face/color: 240.255.240 ] " Options " [ after 1 text bold "Add New Admin Username/Password" [ change-adminpw ] text bold "Remove Admin Username/Password" [ change-adminpw/dlt ] bar text bold "Version" [ alert form system/script/header/version ] ] ] ] [question "Really Close?"] (system/view/screen-face/size / 4) set-focus name-field do-eventsHere's the second client application, which allows users to view selected work orders:
REBOL [title: "Order Viewer"] ; FUNCTIONS ============================================================== extract-table-data: does [ if error? try [ ordrs: load server-exec {to-block load %orders-data.txt} ] [ quit ] gui-table-data: copy [] forskip ordrs 16 [ append gui-table-data reduce [ ordrs/1 ordrs/3 ordrs/2 ordrs/7 ordrs/9 ordrs/11 ordrs/13 ] ] gui-table-data ] do %common.r ; GUI ==================================================================== screen-size: system/view/screen-face/size cell-width: to-integer (screen-size/1) / (ctx-rebgui/sizes/cell) - 16 cell-height: to-integer (screen-size/2) / (ctx-rebgui/sizes/cell) table-size: as-pair cell-width (to-integer cell-height / 1.21) extracted-table-data: extract-table-data display/maximize/close/min-size copy system/script/header/title [ main-screen: tab-panel #LVHW data [ action [ wait .2 ] " Orders " [ orders-table: table table-size options [ "Order #" left .1 "Name" left .3 "Date" left .2 "Info 1" left .1 "Info 2" left .1 "Info 3" left .1 "Info 4" left .1 ] data extracted-table-data ] action [ if error? try [ unless ( load server-exec {get-super-pass} ) = request-password [ main-screen/select-tab 1 ] ] [main-screen/select-tab 1] wait .2 face/color: 240.255.240 ] " Options " [ after 1 text bold "Add New Admin Username/Password" [ change-adminpw ] text bold "Remove Admin Username/Password" [ change-adminpw/dlt ] bar text bold "Version" [ alert form system/script/header/version ] ] ] ] [question "Really Close?"] (system/view/screen-face/size / 2) do-events
18.5 Obtaining Dynamically Assigned Server Addresses
A TCP server needs to be found at a known IP address (i.e., 192.168.1.10). If the network router is set up to assign IP addresses using DHCP (the default option for most off-the-shelf routers), then the IP address to which clients connect may need to be changed in the client program, potentially any time the server computer is restarted.
One solution is to configure your server machine with a static IP address in the router. This setup step is different for every router manufacturer, it's often beyond the technical ability of the client app user, the router may not be accessible due to security concerns in an enterprise environment, etc.
Another solution is to upload the server's current IP address to a server at a known URL (web server, FTP, etc. managed off site), but this just extends the problem to another network server, requires an Internet connection, etc.
Another potential solution is to save the server IP address to a file on a mapped network drive, but this still requires some configuration which may be out of the user's capability (mapping network drives to a folder on the server machine, on each client computer, may not be possible in corporate environments, on the OS running the client script, etc.).
A crude solution for simple applications is just to manually enter the IP address of the server (i.e., Joe yells to John down the hall "the server IP address is 192.168.1.10").
The code below demonstrates a consistently usable solution for all TCP apps, which requires no router or external network configuration. It creates two separate scripts which run on the client and server, to manage all server IP address updates. The %send-ip.r script runs on the server machine and continuously broadcasts the IP address over UDP. The %receive-ip.r script runs on the client, receives the current IP and writes it to a file. Because UDP is a broadcast protocol, no known IP addresses are required for this to work. Once the server script is running, the clients can all simply start and receive the current IP address being broadcast. This example includes a separate TCP chat app which simply reads the saved IP address and connects to the server. No other network configuration is required. To implement this routine in any TCP application, just run the %send-ip.r script on any server, run the %receive-ip.r script on any client(s), and you can read the %local-ip.r file in your client apps to connect to the current IP address of the server:
REBOL [title: "UDP Communicate Server IP"] write %receive-ip.r {rebol [] net-in: open udp://:9905 print "waiting..." forever [ received: wait [net-in] probe join "Received: " trim/lines ip: copy received write %local-ip.r ip wait 2 ]} launch %receive-ip.r write %send-ip.r {rebol [] net-out: open/lines udp://255.255.255.255:9905 set-modes net-out [broadcast: on] print "Sending..." forever [ insert net-out form read join dns:// read dns:// wait 2 ]} launch %send-ip.r write %tcp-chat.r {rebol [title: "TCP-Chat"] view layout [ across q: btn "Serve"[focus g p: first wait open/lines tcp://:8 z: 1]text"OR" k: btn "Connect"[focus g p: open/lines rejoin[tcp:// i/text ":8"]z: 1] i: field form read %local-ip.r return ; read join dns:// read dns:// r: area rate 4 feel [engage: func [f a e][if a = 'time and value? 'z [ if error? try [x: first wait p] [quit] r/text: rejoin [x newline r/text] show r ]]] return g: field "Type message here [ENTER]" [insert p value focus face] ]} wait 2 launch %tcp-chat.r launch %tcp-chat.r
18.6 Serving Clients HTML Form Interfaces
Another useful solution in some multi-user environments is to create a server app which serves HTML forms and processes data returned by users from those forms. This can be useful when collecting input from users who connect to your network using various ad hoc mobile devices. Clients can input data with any device (iPhone, Android, netbook, etc.) to enter information into the server app, as long as the device has a basic web browser and Wifi (or other network) connectivity. This is practical in environments where customers, clients, students or other walk-in groups of users need to interact with the server app in your local environment. Because mobile devices with Wifi and browsers are so pervasive, it's often a viable and convenient method for users off the street to interact immediately with your server app, without having to provide any public hardware access, and without requiring the users to install any software. Also, this option can be useful in environments where many in-house users need to be outfitted with inexpensive devices to input data. Various Android devices, for example, are available in the $50 - $70 price range. They can be carried easily, used without a desk, mouse or keyboard, etc., so they're great for situations in which employees are moving around a job site, stocking inventory, etc.
The example below provides a short code framework to enable this possibility. Just edit the HTML form example, and do what you want with the 'z variable data block returned by the user(s). Beyond the essential network port code and server loop, the 'decode-cgi and 'write-io functions do most of the work. The 'decode-cgi function processes the incoming data submitted by the HTML form. The 'write-io function sends the HTML string to the client, through the network port:
REBOL [title: "HTML Form Server"] l: read join dns:// read dns:// print join "Waiting on: " l port: open/lines tcp://:80 browse join l "?" forever [ connect: first port if error? try [ z: decode-cgi replace next find first connect "?" " HTTP/1.1" "" prin rejoin ["Received: " mold z newline] my-form: rejoin [ {HTTP/1.0 200 OK^/Content-type: text/html^/^/ <HTML><BODY><FORM ACTION="} l {">Server: } l {<br><br> Name:<br><INPUT TYPE="TEXT" NAME="name" SIZE="35"><br> Address:<br><INPUT TYPE="TEXT" NAME="addr" SIZE="35"><br> Phone:<br><INPUT TYPE="TEXT" NAME="phone" SIZE="35"><br> <br><input type="checkbox" name="checks" value="i1">Item 1 <input type="checkbox" name="checks" value="i2">Item 2 <input type="radio" name="radios" value="yes">Yes <input type="radio" name="radios" value="no">No<br><br> <INPUT TYPE="SUBMIT" NAME="Submit" VALUE="Submit"> </FORM></BODY></HTML>} ] write-io connect my-form (length? my-form) ] [print "(empty submission)"] close connect ]The code below demonstrates a useful app created from the Form Server script above. On each run, it generates a unique HTML form based on user specs (any number of check, radio, and text entry items), and starts a server to receive survey responses from the audience (they all connect to the LAN server using phones or any other Wifi Internet device). The survey responses are all saved to a user-specified file and an included demo report displays all submitted entries, plus a total list of all check items and radio selections. Then it presents a bar chart displaying the survey's check and radio results:
REBOL [title: "Room Poll (HTML Survey Generator for LANs)"] view center-face layout [ style area area 500x100 across h4 200 "SURVEY TOPIC:" h4 200 "Response File:" return f1: field 200 "Survey #1" f2: field 200 "survey1.db" below h4 "SURVEY CHECK BOX OPTIONS:" a1: area "Check Option 1^/Check Option 2^/Check Option 3" h4 "SURVEY RADIO BUTTON OPTIONS:" a2: area "Radio Option 1^/Radio Option 2^/Radio Option 3" h4 "SURVEY TEXT ENTRY FIELDS:" a3: area "Text Field 1^/Text Field 2^/Text Field 3" btn "Submit" [ checks: parse/all a1/text "^/" remove-each i checks [i = ""] radios: parse/all a2/text "^/" remove-each i radios [i = ""] texts: parse/all a3/text "^/" remove-each i texts [i = ""] title: join uppercase f1/text ":" response-file: to-file f2/text unview ] ] write response-file "" write %poll-report.r rejoin [{ rebol [title: "Poll Report"] view center-face layout [ btn 100 "Generate Report" [ all-checks: copy [] all-radios: copy [] print newpage print {All Entries:^/} foreach response load %} response-file {[ x: construct response ?? x if find first x 'checks [ either block? x/checks [ foreach check x/checks [ append all-checks check ] ][ append all-checks x/checks ] ] if find first x 'radios [ either block? x/radios [ foreach radio x/radios [ append all-radios radio ] ][ append all-radios x/radios ] ] ] alert rejoin [ "All Checks: " mold all-checks " All Radios: " mold all-radios ] check-count: copy [] foreach i unique all-checks [ cnt: 0 foreach j all-checks [ if i = j [cnt: cnt + 1] ] append check-count reduce [i cnt] ] radio-count: copy [] foreach i unique all-radios [ cnt: 0 foreach j all-radios [ if i = j [cnt: cnt + 1] ] append radio-count reduce [i cnt] ] bar-size: to-integer request-text/title/default "Bar Chart Size:" "40" g: copy [backdrop white text "Checks:"] foreach [m v] check-count [ append g reduce ['button m v * bar-size] ] append g [text "Radios:"] foreach [m v] radio-count [ append g reduce ['button gray m v * bar-size] ] view/new center-face layout g ] btn 100 "Edit Raw Data" [ alert "Be careful!" editor %} response-file { ] ] }] launch %poll-report.r poll: copy "" repeat i len: length? checks [ append poll rejoin [ {<input type="checkbox" name="checks" value="} i {">} checks/:i {<br>} newline ] ] append poll {<br>} repeat i len: length? radios [ append poll rejoin [ {<input type="radio" name="radios" value="} i {">} radios/:i {<br>} newline ] ] append poll {<br>} repeat i len: length? texts [ append poll rejoin [ texts/:i {:<br><INPUT TYPE="TEXT" NAME="text} i {" SIZE="35"><br>} newline ] ] append poll {<br><INPUT TYPE="SUBMIT" NAME="Submit" VALUE="Submit">} l: read join dns:// read dns:// print join "Waiting on: " l port: open/lines tcp://:80 browse join l "?" responses: copy [] forever [ q: first port if error? try [ z: decode-cgi replace next find first q "?" " HTTP/1.1" "" if not empty? z [ append/only responses z save response-file responses print newpage entry-received: construct z ?? entry-received ] d: rejoin [ {HTTP/1.0 200 OK^/Content-type: text/html^/^/ <HTML><BODY><FORM ACTION="} l {">} title {<br><br>} poll {</FORM></BODY></HTML>} ] write-io q d length? d ] [] ;[print "(empty submission)"] close q ] haltMixing Rebol and HTML is a simple way to extend the reach and possibilities of your multi-user data management applications. Learn to use the 'write/custom, 'decode-cgi, and 'write-io, and you can create servers which work with both web based and pure Rebol clients. You can see more about this at http://www.rebol.com/docs/quick-start6.html. Pay particular attention to the 'send-server function in that tutorial.
18.7 Simplicity
The example code presented here provides everything you need to build network enabled multi-user data management apps. The general model of using the 'server-exec function and a bit of server code to process requests, provides a basis for handling all necessary client-server code separation. The entire framework consists of just a few dozen lines of entirely native Rebol code. There's no need to deal with third party software installation and support problems, upgrade challenges, compatibility issues, or other maintenance dilemmas. The client and server machines can consist of any mix of hardware and OS platforms which have Rebol installed. Because any software created using this design is purpose-built to handle only the operations required, it is absolutely no more complex or heavyweight than needed to complete its purpose, and it is as malleable and capable as needed to satisfy its functionality. And because the code and all parts of the system are built purely from native Rebol language constructs, the code can be simplified even further by the development of dialects, if that becomes a worthwhile endeavor (for example, if a developer's API were needed to interface with a more complex distributed system). The complications associated with integrating third party data models and APIs are all completely eliminated. It's all just basic Rebol. Anything that can be accomplished in a simple single user script can be easily divided into multi-client components (and multi-server components ... but that's a topic for a whole other article), by applying the simple concepts demonstrated here.
19. Building Mobile and Web Apps with jsLinb & Sigma Visual Builder
A stand-alone copy of this tutorial topic, with many screen shot images, is available at http://re-bol.com/jslinb/. This topic in partictular may be much easier to follow with the addition of those screen shot images.
A video which demonstrates parts of this topic can also be found at https://youtu.be/6yrDNluQSwo
19.1 What are the jsLinb Library and Sigma Visual Builder?
To build GUI client apps for operating systems which R2/View and R3-GUI don't support, a simple solution is to use the toolkit at http://sourceforge.net/projects/ajaxuibuilder/ (6Mb). That download contains a JavaScript library called "jsLinb", and the "Sigma Visual Builder" IDE which can be used to create jsLinb GUI apps by clicking & dragging. The library and the visual IDE are both lightweight yet strikingly powerful. Not only do the created client apps run in virtually any JavaScript enabled browser (from Firefox 1.5 and IE6 to just about every modern mobile and desktop browser in existence), but the entire IDE, documentation tools, and everything needed to create apps, also run on all those same platforms.
That means you can use any version of iPhone, iPad, Android phones and tablets, Blackberry devices, Windows phones and tablets, or any version of any old or new desktop operating system, to create GUI front end apps which connect to Rebol server code. The created client apps can then immediately run on any other operating system, or on your web site, without any changes to the front end GUI code. You can also use the jsLinb/Sigma IDE to easily connect and move data between back-end server applications written in any other language. The whole system is totally server agnostic, using standard http:// protocols and Ajax methods to transfer data in plain text, JSON, XML, and other common data formats. The jsLinb library and Sigma builder IDE are both exhaustively documented, they're free to use for commercial projects (licensed LGPL), and with the help of 3rd party tools such as Cordova, Phonegap Build, Node Webkit, or others, you can easily package the created browser-based client UIs into stand-alone apps for distribution in the app stores of any modern OS platform.
The jsLinb library can be used entirely on its own, via JavaScript code on any web page. No other tools are required beyond pure handwritten jsLinb API code (just distribute a copy of the jsLinb JavaScript runtime file(s) with your code). The Sigma Visual Builder software is an optional browser based IDE, created using jsLinb, which makes life easier by visually generating even the most complex jsLinb code. It can help you get started writing jsLinb API code, improve general productivity, and help reduce syntax errors by visually laying out jsLinb user interfaces, even after you become thoroughly familiar with the API. The code for any jsLinb/Sigma app can be contained entirely in a single text file, and the syntax is extraordinarily simple to read and write manually, with or without the visual IDE.
You don't need previous JavaScript experience to use the Sigma IDE, or the jsLinb code API. This text will explain how to start using the visual builder, along with the basic code constructs needed to connect with Rebol server apps. You can get started creating useful browser based clients to Rebol server data management apps in one sitting of about an hour.
19.2 Installing Sigma Builder on a Web Server
In order to use the Sigma Visual builder, the contents of the zip package above need to be unzipped into a publicly viewable folder on any web server (for example, in .../www/ , or .../htdocs/ , etc.). You can install it on any web server with which you're familiar, on any operating system, as long as PHP and Rebol CGI scripts can run there. To use all the features of the Sigma Visual IDE, your server should have minimum PHP4+ running (PHP5+ is recommended). You don't need to know anything about PHP to use jsLinb or the Sigma builder, and your created apps will have absolutely no dependencies on PHP whatsoever. You won't see or use any PHP code while developing jsLinb apps. The PHP code in the Sigma builder simply provides some file management features in the IDE.
The examples in this tutorial have been tested using inexpensive LAMP shared hosting accounts at Lunarpages and HostGator, on Android devices using the KSWeb server app, and on Windows desktop machines using the Uniserver WAMP package: http://sourceforge.net/projects/miniserver/files/Uniform%20Server/3.3/ (that old version works just fine, and is chosen here for demonstration because of its small 6Mb download size). Several other LAMP and WAMP packages on various OSs have been tested by this author, and they all work out of the box, with every single browser tested (from IE6 and Firefox 1.5, to the default browsers that come with Android 2.2 and the very first iPhone, along with a wide assortment of various new and old desktop and mobile browsers).
For the sake of this tutorial, here's a quick explanation of how to install jsLinb/Sigma builder in the Uniform Server on Windows:
Actually, no real installation is required - just unpack the Uniform Server package above into any folder on your hard drive, and then unpack the Sigma Builder zip file into some subfolder of wherever you unpacked .../UniformServer/udrive/www/ . You may want to rename the .../UniformServer/udrive/www/sigma-visual-builder-2.0.2_full/ folder to something shorter (for this tutorial, we'll rename it to .../UniformServer/udrive/www/sigma/). Click the Server_Start.bat file in the UniformServer folder, then open your browser to http://localhost/sigma/. There you will see the sigma visual builder home page. Click the "Try it now" link, or go directly to http://localhost/sigma/VisualJS/index.html in your browser, and you will see the Sigma Visual Builder app. Click the "Normal View" tab, and you can edit the jsLinb API code which makes up your current app. Switch back over to the "Design View" tab, and any changes you've made in the code will appear in the Visual Builder, and visa-versa. The code of your app can be created/edited manually from scratch, or created/edited entirely visually using click-drag operations and property/event checkbox settings in the IDE. You can go back and forth between fully visual development and fully code based development, or mix either of the two approaches, at any point in the development process.
19.3 Basic jsLinb Code and Sigma IDE Examples
The minimal boilerplate code which appears by default in the "Normal View" code editor tab of the Sigma IDE is:
/* * The default code is a com class (inherited from linb.Com) */ Class('App', 'linb.Com',{ Instance:{ //base Class for this com base:["linb.UI"], //requried class for this com required:[], properties:{}, events:{}, iniResource:function(com, threadid){ }, iniComponents:function(com, threadid){ }, iniExComs:function(com, hreadid){ } } });Replace that code with the following (copy/paste this code directly into the Normal View tab):
Class('App', 'linb.Com',{ Instance:{ base:["linb.UI"], required:[], events:{ onReady:'_onready' }, _onready:function(){ alert("hi"); } } });Notice that the events:{} block in the code above now contains an onReady event, which fires the "_onready" function beneath. Notice also that the _onready() function runs an alert() function, which displays the message "hi".
Now click the "Run" button in the IDE, and you will see the created app open up and run in a new browser tab. Next, paste the following code into the IDE Normal View tab (completely replace the previous code):
Class('App', 'linb.Com',{ Instance:{ base:["linb.UI"], required:["linb.UI.Button"], events:{ }, iniComponents:function(){ var host=this, children=[], append=function(child){children.push(child.get(0))}; append((new linb.UI.Button) .host(host,"button1") .setLeft(70) .setTop(110) .setCaption("Say Hi") .onClick("_button1_onclick") ); return children; }, _button1_onclick:function (profile,e,src,value){ alert ("Hi"); } } });Notice that the iniComponents() function above now contains an append() function. That append() function is used to add every possible widget in the jsLinb library to any user interface layout. Notice that the appended button widget is labeled "button1", the position and caption properties are set, and the onClick event is set to fire the "_button1_onclick" function. Notice that the _button1_onclick() function below simply runs an alert() function which pops up the message "Hi". Note that because this is a JavaScript toolkit, function parameters are enclosed in parentheses, and lines end with a semicolon.
Now click back over to the Design View tab, and you'll see that a button with the text "Say Hi" has appeared on the visual builder canvas. With your mouse, select the new button in the visual builder, and then click the "properties" drop down tree on the right side of the screen. You'll see that the .properties settings in the pasted app code are reflected exactly in those visually editable properties settings.
If you edit the properties in the visual IDE settings, the changes will be immediately reflected in the code, whenever you switch back to the Normal View tab - and visa versa. If you make changes to the code, they will be immediately reflected in the the visual layout and the listed properties tree. For example, try changing the caption or the position of the button, in both the code and the visual editor, and you'll see those changes echoed back and forth between the code and the visual editor. You can work with every aspect of any jsLinb application in this way - move round trip, back and forth between code and visual editing, using whichever approach you prefer for a given task. The visual editor can often produce error proof code much more quickly than you could type it by hand.
Now click the "events" drop down tree on the right side of the screen, and double-click the "onClick" event. You'll see a code editor pop up, with the code to be executed for that event. This is the exact same code that you see in the Normal View tab, in the _button1_onclick() function. Click the "Run" button on the top of the screen, and you'll see the created application open up and run in a new tab. Try clicking the button.
19.4 Connecting jsLinb Apps to Rebol CGI Server Applications
To learn the basics of using Rebol on a web server, with the CGI interface, see http://business-programming.com/business_programming.html#section-14 . To use Rebol with the Uniform Server we installed earlier, a copy of the Rebol/Core interpreter (rebol.exe) needs to be placed in the .../UniformServer/udrive/usr/bin/ folder. If you're using any other web server, just put the Rebol/Core interpreter, for the operating system on which you're running the web server, into a folder your web server software can use to process CGI requests (check your server software documentation if you're unsure where this should be). Be sure to point the first line of each Rebol CGI script to the location of your Rebol interpreter.
Now copy this Rebol CGI script to a file named echo.cgi, in the cgi-bin folder of your web server (.../UniformServer/udrive/cgi-bin/ in Uniserver - check your server's documentation if you're unsure where CGI apps can be located in your server software):
#!/usr/bin/rebol.exe -cs REBOL [] print "content-type: text/html^/" data: decode-cgi raw: read-cgi save %data.txt raw prin data/2Notice a few things about the code above. First, the shebang line points to the location of the Rebol interpreter, described above. The first four lines of the script are just some standard boilerplate code for Rebol CGI apps. The two lines after that save the submitted data to a text file (data.txt), and then print out the submitted data value. So, what this app does is echo back any text which is submitted to it. You can test it by submitting a GET request string directly as a URL in your browser: http://localhost/cgi-bin/echo.cgi?data=Hello!
When you have the Rebol CGI script above set up, paste the following code into the Sigma IDE codeview tab:
Class('App', 'linb.Com',{ Instance:{ base:["linb.UI"], required:[ "linb.UI.Label", "linb.UI.Button", "linb.UI.Input", "linb.UI.Tag" ], properties:{}, events:{}, iniResource:function(com, threadid){}, iniComponents:function(){ var host=this, children=[], append=function(child){children.push(child.get(0))}; append((new linb.UI.Input) .host(host,"input1") .setLeft(30) .setTop(40) .setWidth(550) .setHeight(150) .setMultiLines(true) .setValue("6ct7y6g78u8hi9o0") ); append((new linb.UI.Button) .host(host,"button1") .setLeft(30) .setTop(210) .setCaption("button1") .onClick("btn6c") ); append((new linb.UI.Input) .host(host,"input2") .setLeft(30) .setTop(250) .setWidth(550) .setHeight(130) .setMultiLines(true) ); return children; }, btn6c:function(){ var self=this; linb.Ajax( "http://localhost/cgi-bin/echo.cgi", ('data=' + self.input1.getUIValue()), function(s){ self.input2.setUIValue(s); } ).start(); } } });If you find that the top of the Sigma IDE is no longer visible after pasting or editing longer bits of code, just reduce the zoom in your browser window several times ([CTRL] + [-] in most desktop browsers, or pinch+sqeeze on mobile screens), and then reset the zoom to 100% ([CTRL] + [0] in desktop browsers, or pinch+stretch on mobile devices). In most browsers, you can also click and scroll with the mouse back to top of the IDE.
Notice in the code above that 3 widgets have been appended to the canvas layout: a text input, a button, and an additional text input. Both input widgets have the multiline property set to true, and the default value displayed in the first widget has been set to "6ct7y6g78u8hi9o0".
IMPORTANT: Notice that the onClick event of the button widget has been set to run the "btn6c" function. That function is the most important part of this example. It runs the linb.Ajax method, which is what we'll use throughout the rest of this tutorial to connect with Rebol code running on a server. Notice that the first argument of the linb.Ajax function is the URL of the Rebol echo.cgi script we installed above. The second argument is the data which we're sending to that CGI script. In this case, were sending some concatenated text, 'data=' plus self.input1.getUIValue(), which is the value displayed in the input1 widget. The third argument is an action that can be taken with the data returned by the Rebol server script, in this case that data is labeled "s". That returned data is displayed in the input2 widget, using the jsLinb API code "self.input2.setUIValue(s)".
That basic linb.Ajax construct is the main thing which needs to get learned in order to get data back and forth between your jsLinb GUIs and your Rebol server apps. Note that the linb.Ajax method is meant to be used only for user interfaces which originate from a server at the same domain as the CGI server app. For example, if your jsLinb code is served from http://localhost , it would not connect with a Rebol server script hosted at http://yourdomain.com . There are other jsLinb API calls which handle cross domain calls, but in most cases, your jsLinb user interfaces and your Rebol CGI scripts will be served from the same server (i.e., from the same domain), so we'll deal with cross domain Ajax methods later in the tutorial.
Click the run button in the Sigma builder and run the script above. You'll see that any text entered into the input1 widget is submitted to the Rebol server script, processed, and then the echoed data is returned to the jsLinb app, and displayed in the input2 widget. You can check that this is the case by looking at the data.txt file in the cgi-bin folder on your web server (remember, the echo.cgi script contained 1 line of code which saved the submitted data to the data.txt file).
As you play with the above app, you may notice a little problem. The returned data doesn't contain any line breaks entered into the input1 widget.
If you check the data.txt file in your server's cgi-bin folder, you'll see that the raw data was submitted without line breaks. To fix that, replace the code above with the following:
Class('App', 'linb.Com',{ Instance:{ base:["linb.UI"], required:[ "linb.UI.Label", "linb.UI.Button", "linb.UI.Input", "linb.UI.Tag" ], properties:{}, events:{}, iniResource:function(com, threadid){}, iniComponents:function(){ var host=this, children=[], append=function(child){children.push(child.get(0))}; append((new linb.UI.Input) .host(host,"input1") .setLeft(30) .setTop(40) .setWidth(550) .setHeight(150) .setMultiLines(true) .setValue("6ct7y6g78u8hi9o0") ); append((new linb.UI.Button) .host(host,"button1") .setLeft(30) .setTop(210) .setCaption("button1") .onClick("btn6c") ); append((new linb.UI.Input) .host(host,"input2") .setLeft(30) .setTop(250) .setWidth(550) .setHeight(130) .setMultiLines(true) ); return children; }, btn6c:function(){ var self=this; linb.Ajax( "http://localhost/cgi-bin/echo.cgi", ('data=' + _.serialize(self.input1.getUIValue())), function(s){ self.input2.setUIValue(_.unserialize(s)); } ).start(); } } });The only difference in the code above is found in the linb.Ajax call. Notice that the self.input1.getUIValue() function has been wrapped in the _.serialize() function. This function is part of the linb API, and it ensures that all data gotten from the input1 widget is properly packaged up before being sent off to the server. Notice that the _.unserialize() function is used to unpack the data from the server (held in that 's' variable), before it is displayed back in the input2 widget. Using the _.serialize() and _.unserialize() functions will save you headaches when sending data back and forth between jsLinb UIs and server apps.
The simple code constructs you've seen so far are enough to begin building many sorts of useful data management apps. You can use the GUI widgets in jsLinb/Sigma to get data from users, send it to Rebol server scripts to do the dirty work of data processing, permanent storage, etc., and then send results back to be displayed in the user's browser. The jsLinb Ajax API provides everything needed to exchange data back and forth with your Rebol server code. Using the visual builder to lay out GUI widgets, you already know enough to create some basic CRUD apps. The next section contains a few example apps.
19.5 Example Apps made with jsLinb and Rebol CGI Code
This section demonstrates some simple apps created using the jsLinb/Sigma features you've seen so far. Several additional jsLinb widgets and methods will be explained along the way.
19.5.1 To-Do List
Save the following Rebol script to a file named todo.cgi, in the cgi-bin folder of your web server:
#!/usr/bin/rebol.exe -cs REBOL [] print "content-type: text/html^/" data: decode-cgi raw: read-cgi save %todo.log raw either data/2 = "loaddata" [ either error? try [ sv: read %todo.txt ][prin "[]"] [prin sv] ][ write %todo.txt data/2 prin "Saved!" ] quitPaste the code below into the Normal View tab of the Sigma IDE:
Class('App', 'linb.Com',{ Instance:{ base:["linb.UI"], required:["linb.UI.List", "linb.UI.Button", "linb.UI.Input"], properties:{}, events:{"onReady":"_onready"}, iniResource:function(com, threadid){}, iniComponents:function(){ var host=this, children=[], append=function(child){children.push(child.get(0))}; append((new linb.UI.List) .host(host,"list1") .setTips("double-click to remove item") .setLeft(20) .setTop(20) .setWidth(460) .setHeight(190) .onDblclick("_list1_ondblclick") ); append((new linb.UI.Input) .host(host,"input1") .setLeft(20) .setTop(230) .setWidth(460) .onBlur("_input1_onblur") ); append((new linb.UI.Button) .host(host,"button1") .setLeft(360) .setTop(270) .setHeight("22") .setCaption("Save To Server") .onClick("_button1_onclick") ); return children; }, iniExComs:function(com, hreadid){ }, _list1_ondblclick:function (profile,item,src){ this.list1.removeItems([item.id]) }, _input1_onblur:function (profile){ this.list1.insertItems([{ id : this.input1.getUIValue(), caption : this.input1.getUIValue() }],null,false) this.input1.setUIValue("") }, _button1_onclick:function (profile,e,src,value){ linb.Ajax( "http://localhost/cgi-bin/todo.cgi", ('savedata=' + _.serialize(this.list1.getItems())), function(s){ alert(s); } ).start(); }, _onready:function (com,threadid){ var self=this linb.Ajax( "http://localhost/cgi-bin/todo.cgi", 'loaddata=loaddata', function(s){ self.list1.setItems(_.unserialize(s)); } ).start(); } } });Now switch over to the Design View tab in Sigma IDE and click the Run button. You can test the app by typing some entries into the text input field. Press the [ENTER] key after each text entry (or the "go" option on Android's popup keyboard, or you can also click anywhere outside the text widget to submit each entry, if you're using a mobile device which doesn't provide some sort of go/enter keyboard option). You'll see each of the submitted entries get added to the list widget. To delete any item in the list widget, double-click the item. When you're done adding/removing items, click the "Save to Server" button. Close the app in your browser and run it again (or just refresh the app's browser page), and you'll see that your saved data is automatically loaded from the server and displayed in the list widget.
Open the todo.txt file in the cgi-bin folder on your web server, and you'll see that the data has been saved to that file on the server (it's just some simpe Json).
Now let's take a closer look at both the jsLinb GUI code, and the Rebol CGI server code. You can see, both in the Sigma visual builder and in the pure jsLinb code, that there are three widgets (a list, input, and button) appended to the canvas. Here's the relevant jsLinb widget code from the example above. This was all created by dragging widgets onto the canvas in the Design View tab of the Sigma IDE (the visual builder), and then visually clicking/editing properties of the added widgets, using the visual properties tree:
append((new linb.UI.List) .host(host,"list1") .setTips("double-click to remove item") .setLeft(20) .setTop(20) .setWidth(460) .setHeight(190) .onDblclick("_list1_ondblclick") ); append((new linb.UI.Input) .host(host,"input1") .setLeft(20) .setTop(230) .setWidth(460) .onBlur("_input1_onblur") ); append((new linb.UI.Button) .host(host,"button1") .setLeft(360) .setTop(270) .setHeight("22") .setCaption("Save To Server") .onClick("_button1_onclick") );Notice that each of those widgets handles some onXX event (onDblclick, onBlur, onClick). Each of those event handlers, and the empty function skeletons, were created by clicking on the visual event tree in the Design view. When one of those events occurs on any of the widgets, the appropriate function is called. So far, no code in this app has been written by hand. The entire process was accomplished with just a couple minutes of dragging widgets and clicking/editing properties. We just need to add some code to each of the functions to do something useful for our purposes:
_list1_ondblclick:function (profile,item,src){ this.list1.removeItems([item.id]) }, _input1_onblur:function (profile){ this.list1.insertItems([{ id : this.input1.getUIValue(), caption : this.input1.getUIValue() }],null,false) this.input1.setUIValue("") }, _button1_onclick:function (profile,e,src,value){ linb.Ajax( "http://localhost/cgi-bin/todo.cgi", ('savedata=' + _.serialize(this.list1.getItems())), function(s){ alert(s); } ).start(); },When the onDblclick event occurs on the list widget, the .removeItems() method is called on the selected item (referred to by the [item.id] property). This process deletes the currently selected item in the list widget.
When the onBlur event occurs on the text input widget (when focus moves away from that widget), the .insertItems() method is called on the list widget. The data inserted into the list is gotten using the .getUIValue() method of the text input widget. Finally, the value displayed in the text input widget is erased (set to "") using the .setUIValue() method. This process adds the submitted text entry to the list widget.
When the onClick event occurs on the button widget, a linb.Ajax request is sent to the Rebol todo.cgi script on the server. Notice that the 'savedata=' key is set to the data gotten using the .getItems() method of the list widget. This list of items is serialized and sent to the server app. This process saves the list data to the server. The data returned from the CGI app (s) is alerted to the user. In the case of a successful save, the returned data is the text "Saved!", which is alerted to the user.
Next, the visual editor is used to add an onReady event to the app canvas. This event is activated when the app has been fully loaded in the user's browser. That event fires the automatically created _onready() function. We just need to add some code there to make the function do something useful. For our purposes, we'll run a linb.Ajax method that submits the value "loaddata" to the todo.cgi server app, and gets a list of data in return (s). That data is then unserialized, and set to be displayed in the list1 widget, using the .setItems() method. The end effect of this code is that the saved data is loaded from the server and displayed in the list widget, whenever the browser app is loaded:
_onready:function (com,threadid){ var self=this linb.Ajax( "http://localhost/cgi-bin/todo.cgi", 'loaddata=loaddata', function(s){ self.list1.setItems(_.unserialize(s)); } ).start(); }That covers all the custom parts of the jsLinb GUI app which are not just stock boilerplate code.
Now if you look at the todo.cgi server script, you'll see how it handles each of the 2 possible requests from the browser code above. It starts off with 4 normal lines of CGI boilerplate code. Then it evaluates whether or not the "loaddata" value was submitted from the browser. If so, it tries to read the local todo.txt file. If an error occurs during that process (presumably because the app has never been run, and that file does not yet exist) it prints out an empty block to display back in the browser list widget. Otherwise, it prints out the data list read from the saved file on the server:
either data/2 = "loaddata" [ either error? try [ saved-data: read %todo.txt ][prin "[]"] [prin saved-data] ]...If the submitted data value is not "loaddata" (i.e., a save request has been sent by the browser), then the submitted data value (the serialized list of items from the list widget) is written to the local todo.txt file, and the "Saved!" message is sent back to the browser, to be alerted to the user.
... [ write %todo.txt data/2 prin "Saved!" ]That's it. Just a handful of lines of custom code are required in both the GUI app and the server code. Everything else is created automatically by the builder, or is stock boilerplate code. This takes just a few minutes to create, once the routine is understood. The coding process is similar to that required to assemble much more complicated data management interfaces. In more complex apps, you'll just use more widgets and layouts to get input from the user, and to display data output. And of course, the data manipulations which occur on the server can encompass any computing work you require or imagine. All the beloved productivity of Rebol can be put to work there, with results displayed in jsLinb widgets.
19.5.2 Image Gallery
Save the following Rebol code to a file named gallery.cgi in the cgi-bin folder of your web server:
#!/usr/bin/rebol.exe -cs REBOL [title: "Image Gallery"] print "content-type: text/html^/" data: decode-cgi raw: read-cgi folder: data/2 count: 1 json: copy "[" files: read to-file join "../www/" folder foreach file files [ if find [%.jpg %.gif %.png %.bmp] suffix? file [ append json rejoin [ "{" {"id" : "} count {", "caption" : "} count " -- " file {", "image" : "http://localhost/} folder file {"} "}," ] count: count + 1 ] ] append json "]" prin json quitPaste the following jsLinb code into the Normal View tab of the Sigma IDE:
Class('App', 'linb.Com',{ Instance:{ base:["linb.UI"], required:[ "linb.UI.Gallery", "linb.UI.Label", "linb.UI.Input", "linb.UI.Button" ], properties:{}, events:{"onReady":"_onready"}, iniResource:function(com, threadid){}, iniComponents:function(){ var host=this, children=[], append=function(child){children.push(child.get(0))}; append((new linb.UI.Label) .host(host,"label1") .setLeft(10) .setTop(10) .setWidth("60") .setHeight("20") .setCaption("Folder:") ); append((new linb.UI.Input) .host(host,"input1") .setLeft(80) .setTop(10) .setWidth("220") .setValue("someimages/") ); append((new linb.UI.Button) .host(host,"button1") .setLeft(310) .setTop(10) .setCaption("Submit") .onClick("_button1_onclick") ); append((new linb.UI.Gallery) .host(host,"gallery1") .setLeft(10) .setTop(50) .setWidth("700") .setHeight("400") .setItemWidth("auto") .setItemHeight("auto") .setImgWidth("auto") .setImgHeight("auto") ); return children; }, iniExComs:function(com, hreadid){}, _button1_onclick:function (profile,e,src,value){ var self=this linb.Ajax( "http://localhost/cgi-bin/gallery.cgi", ("data=" + self.input1.getUIValue()), function(s){ self.gallery1.setItems(_.unserialize(s)); } ).start(); } } });Create a folder .../www/someimages/ on your web server, and copy a few random image files into it. Then click the Run button in the Sigma IDE and you'll see an app displaying a plain layout.
Click the Submit button, and if you've added some images to the someimages/ folder, then you'll see them all appear in a scrolling gallery widget in the app:
Let's take a look at the jsLinb code first. As you can see, 4 widgets have been added to the canvas. As in previous examples, this was all done using the visual builder. The generated code is easy to read, with properties echoed directly from the visually edited settings:
append((new linb.UI.Label) .host(host,"label1") .setLeft(10) .setTop(10) .setWidth("60") .setHeight("20") .setCaption("Folder:") ); append((new linb.UI.Input) .host(host,"input1") .setLeft(80) .setTop(10) .setWidth("220") .setValue("someimages/") ); append((new linb.UI.Button) .host(host,"button1") .setLeft(310) .setTop(10) .setCaption("Submit") .onClick("_button1_onclick") ); append((new linb.UI.Gallery) .host(host,"gallery1") .setLeft(10) .setTop(50) .setWidth("700") .setHeight("400") .setItemWidth("auto") .setItemHeight("auto") .setImgWidth("auto") .setImgHeight("auto") );Notice that an onClick event was added to the button1 widget. The custom code we need to create for that function is a linb.Ajax method which sends the text of the input1 widget to the server CGI app. The data returned from the server is unserialized and set to be displayed in the gallery widget:
var self=this linb.Ajax( "http://localhost/cgi-bin/gallery.cgi", ("data=" + self.input1.getUIValue()), function(s){ self.gallery1.setItems(_.unserialize(s)); } ).start();That's all there is to the jsLinb code. It's similar in many ways to all the other examples you've seen so far.
The Rebol gallery.cgi code starts off by assigning the label 'folder to the value submitted from the browser (the folder name which the user typed into the input1 widget). A 'count variable is set to 1, a string labeled 'json is created, and the files from the submitted folder are read:
folder: data/2 count: 1 json: copy "[" files: read to-file join "../www/" folderNext, a 'foreach loop iterates through each of the file names in the folder. If the file is some image type (jpg, gif, png, or bmp), then some text is appended to the 'json string. The appended text is simply some concatenated characters, in the format required by the gallery widget "items" property, to display images. If you click the Gallery widget in Sigma visual builder, and look at its "items" property, you'll see that the item list requiers this format: [{"id" : "id text", "caption" : "caption text", "image" : "url"},]. The 'count variable is also updated in each iteration of the 'foreach loop (and included in the image caption text). When the loop is done, the final 'json string is printed back to the browser, where that returned list of items is displayed in the gallery widget:
foreach file files [ if find [%.jpg %.gif %.png %.bmp] suffix? file [ append json rejoin [ "{" {"id" : "} count {", "caption" : "} count " -- " file {", "image" : "http://localhost/} folder file {"} "}," ] count: count + 1 ] ] append json "]" prin json quitThat's the entire gallery app. At this point you should be getting a good sense about how jsLinb UIs and Rebol server apps interact to form complete client-server applications.
19.5.3 Days Between 2 Dates
Here's a simple app which calculates the number of days between 2 dates. This is strictly a jsLinb app (there is no Rebol server needed). Paste the following code into the Sigma code editor:
Class('App', 'linb.Com',{ Instance:{ base:["linb.UI"], required:["linb.UI.Button", "linb.UI.DatePicker"], properties:{}, events:{}, iniResource:function(com, threadid){}, iniComponents:function(){ var host=this, children=[], append=function(child){children.push(child.get(0))}; append((new linb.UI.DatePicker) .host(host,"datepicker1") .setLeft(10) .setTop(10) ); append((new linb.UI.DatePicker) .host(host,"datepicker2") .setLeft(250) .setTop(10) ); append((new linb.UI.Button) .host(host,"button") .setLeft(170) .setTop(190) .setCaption("Calculate") .onClick("_button_onclick") ); return children; }, iniExComs:function(com, hreadid){}, _button_onclick:function (profile,e,src,value){ alert( linb.Date.diff( this.datepicker1.getUIValue(), this.datepicker2.getUIValue(), 'd' ) ); } } });You can see that 2 Datepicker widgets and 1 button are added to the canvas. When the button is clicked, the difference between the user-selected dates is calculated, using the linb.Date.diff() method. That result is alerted to the user. That's all there is to the entire app.
19.5.4 Tip Calculator
Here's another simple jsLinb app (no Rebol server needed). The code looks long, but nearly all of it was created using the visual builder:
Class('App', 'linb.Com',{ Instance:{ base:["linb.UI"], required:["linb.UI.Label", "linb.UI.Input", "linb.UI.Button"], properties:{}, events:{}, iniResource:function(com, threadid){}, iniComponents:function(){ var host=this, children=[], append=function(child){children.push(child.get(0))}; append((new linb.UI.Label) .host(host,"label1") .setLeft(20) .setTop(30) .setWidth(70) .setCaption("Price ($):") ); append((new linb.UI.Label) .host(host,"label2") .setLeft("20") .setTop(70) .setWidth(70) .setCaption("Tip (%):") ); append((new linb.UI.Input) .host(host,"input1") .setLeft(100) .setTop(30) .setValueFormat( "^-?(\\d\\d*\\.\\d*$)|(^-?\\d\\d*$)|(^-?\\.\\d\\d*$)" ) .setValue("100") ); append((new linb.UI.Input) .host(host,"input2") .setLeft(100) .setTop(70) .setValueFormat( "^-?(\\d\\d*\\.\\d*$)|(^-?\\d\\d*$)|(^-?\\.\\d\\d*$)" ) .setValue(".20") .onBlur("_button1_onclick") ); append((new linb.UI.Button) .host(host,"button1") .setLeft(100) .setTop(110) .setCaption("Calculate Tip") .onClick("_button1_onclick") ); append((new linb.UI.Input) .host(host,"input3") .setLeft(100) .setTop(150) ); return children; }, iniExComs:function(com, hreadid){}, _button1_onclick:function (profile,e,src,value){ this.input3.setUIValue( this.input1.getUIValue() * this.input2.getUIValue() ) } } });Notice that the .valueFormat properties for the first two input fields were both set using visual selectors in the IDE. This requires the user to type in numerical values. There are a number of other default valueFormat options (and these regex options can be manually edited in the code).
The only custom code required for this entire app is in the _button1_onclick function. It multiplies the numerical values in the price and tip input widgets, and displays the result of that calculation in the input3 widget:
this.input3.setUIValue( this.input1.getUIValue() * this.input2.getUIValue() )Finally, notice that an .onBlur event has been added to the input2 widget, which also runs the above function. That way, the user can either click the button, or just press [ENTER] after typing the tip value, and the calculation will run.
19.6 Saving and Deploying your jsLinb Apps in Sigma IDE
The Sigma Builder IDE provides several options for saving code and deploying finished apps. One nice thing about jsLinb is that the code for entire apps can be saved as a single contiguous text file (there are interesting options for separating code into multiple files, and dynamically loading remote code, but those topics are saved for another tutorial). As you've already seen, all of the layout and logic/action code in a complete jsLinb app can be copied and pasted directly to/from the Normal View code tab in Sigma IDE. You can move code around in this way, edit your code in any preferred local text editor, IDE, etc. and copy/paste back an forth between files, web pages, other text displays, and the Sigma IDE, without using any of the Sigma save/load features. By pasting examples from this web page, for example, you've seen that the single file, pure code nature of jsLinb apps can keep the mechanics simple. You may also find this feature useful, for example, when working on small mobile devices, where a native code editor app may be easier to work with than the Sigma IDE code tab.
If you click the "Load" button at the top right corner of the Sigma IDE, you'll see that files can be loaded from any URL location (i.e., http://localhost/myapp.js).
The load button also allows you to browse and load any of the code snippet demo apps which ship with the Sigma IDE. Those demo code examples are really helpful when learning how to use all the widget and UI features in the jsLinb library (we'll cover more about the code snippets library later).
By simply saving your code files to an accessible web server, you can load them back directly into the IDE from any other location, no matter what type of operating system is available, wherever you are. This feature helps improve productivity if you move around regularly between development machines and devices.
If you click the "Save" button at the top right corner of the Sigma IDE, you'll see that there are four options available for saving and deploying your application code.
The first save option allows you to save your jsLinb application code file directly back to where it was opened, if you've loaded it from a drive on your local machine.
The second save option allows you to download the entire application code to your local machine, as a single .js file (that is, it allows you to simply download the contents of the Normal View code tab in the Sigma IDE). This is the most likely method you'll use to regularly save your work.
The third save option allows you to package your code into an HTML file, for deployment to a server. This option wraps your code in all the necessary HTML, including code which loads the jsLinb runtime and skin (appearance) files (CSS, images, etc.). You can upload the jsLinb runtime files just one time, to a single folder on your deployment server, and then simply upload any new single page HTML wrapped apps, and that's all which is needed to deploy. This is really helpful when you're creating numerous apps which run from a single server.
The fourth save option creates a fully self contained zip file, with all your application code, the HTML wrapper document, and the full jsLinb runtime, with skin files - absolutely everything required to run your created jsLinb application. For most apps, the size of the zip file is approximately 200k (.2 Mb - tiny). You can simply unpack the zip file to a folder on any web server, point a browser to the URL of the created .html file, and your app is up and running. Note that absolutely no other server technologies are required to run your jsLinb app. Neither PHP, nor any other server languages or deployment environment are required at all. Remember, the PHP files in the Sigma builder app are only used to provide file management features for the IDE (wherever you run the Visual Builder IDE, to create your apps). JavaScript in your user's browser is the only requirement to run the created jsLinb apps. In fact, the created apps don't even need a web server to run. You can unzip the zip file to a folder on your hard drive, SD card, etc., open the HTML page directly from its file location, and it will run without problems.
The zip files produced by Sigma IDE can also be uploaded directly to app packagers such as Phonegap build. The zip package contains everything needed for those packagers to produce stand alone apps which can be distributed to iTunes, Google Play, Blackberry World, and other app stores.
NOTE: the zip file format produced by Sigma IDE does not unpack properly with some versions of the Windows extraction wizard, and a similar problem has occurred when using the unzip tool in Lunarpages cPanel (not all of the skin files unpack properly). Tugzip and several other various zip applications do, however, work without problems. If you run into this difficulty with your deployment server, try a different zip application - all of the necessary files are included in the zip file. Another option is to simply copy the jsLinb runtime files to your deployment server manually, repackage them into a zip file with your app files manually, etc.
19.7 Some Data Grid Examples
Data grids are useful in many types of apps. This section of the tutorial explains how to use the jsLinb Treegrid widget with Rebol server back ends.
The following example code is found in ...\sigma\Samples\comb\GridEditor\App\js\index.js:
Class('App', 'linb.Com',{ Instance:{ //base Class for linb.Com base:["linb.UI"], //requried class for the App required:["linb.UI.Block", "linb.UI.TreeGrid", "linb.UI.Div"], iniComponents:function(){ // [[code created by jsLinb UI Builder var host=this, children=[], append=function(child){children.push(child.get(0))}; append((new linb.UI.Block) .host(host,"block1") .setLeft(70) .setTop(50) .setWidth(540) .setHeight(270) ); host.block1.append((new linb.UI.TreeGrid) .host(host,"tg") .setTabindex("2") .setHeader([]) .setRows([]) .onDblClickRow("_tg_ondblclickrow") ); append((new linb.UI.Div) .host(host,"div9") .setLeft(70) .setTop(10) .setWidth(270) .setHeight(30) .setHtml("DblClick row to open edit dialog!") ); return children; // ]]code created by jsLinb UI Builder }, _changeRow:function(v1,v2,v3){ var cells=this._activeRow.cells; if(cells[0]!=v1) this.tg.updateCell(cells[0],{value:v1}); if(cells[1]!=v2) this.tg.updateCell(cells[1],{value:v2}); if(cells[2]!=v3){ this.tg.updateCell(cells[2],{value:v3}); } }, _tg_ondblclickrow:function (p,row, e, src) { this._activeRow = row; var self=this; linb.ComFactory.newCom('App.Dlg' ,function(){ this.$parent=self; this .setProperties({ fromRegion:linb([src]).cssRegion(true), col1:row.cells[0].value, col2:row.cells[1].value, col3:row.cells[2].value }) .setEvents('onOK', self._changeRow); this.show(linb([document.body])); }); }, events:{ onReady:'_onready' }, _onready:function(){ var self=this; linb.Ajax("data/data.js",'',function(s){ var hash=_.unserialize(s); self.tg.setHeader(hash.header).setRows(hash.rows); }).start(); } } });This code is a simplified version of the code above, which demonstrates only the parts needed to use a Treegrid widget, along with the code needed to fill the grid with data from a Rebol CGI server app:
Class('App', 'linb.Com',{ Instance:{ base:["linb.UI"], required:["linb.UI.TreeGrid"], iniComponents:function(){ var host=this, children=[], append=function(child){children.push(child.get(0))}; append((new linb.UI.TreeGrid) .host(host,"tg") .setHeader([]) .setRows([]) ); return children; }, events:{ onReady:'_onready' }, _onready:function(){ var self=this; linb.Ajax(" http://localhost/cgi-bin/readjsonfile.cgi", '', function(s){ var hash=_.unserialize(s); self.tg.setHeader(hash.header).setRows(hash.rows); } ).start(); } } });Notice in the code above that the linb.Ajax call is made to a Rebol readjsonfile.cgi script in the cgi-bin folder on the web server. Paste the following code into a text file, and save it as readjsonfile.cgi in your server's cgi-bin folder:
#!/usr/bin/rebol.exe -cs REBOL [] print "content-type: application/json^/" prin read %data.jsThe code above does only one thing. It prints the contents of the data.js file. Paste the following data into a text file, and save it as data.js in your server's cgi-bin folder (you can find this original file in the jsLinb/Sigma zip package, in ...\sigma\Samples\comb\GridEditor\App\js\index.js):
{ header: [ { "id" : "col1", "caption" : "col1", "type" : "input", "width" : 50 }, { "id" : "col2", "caption" : "col2", "type" : "number", "format":"^-?\\d\\d*$", "width" : 80 }, { "id" : "col3", "caption" : "col3", "type" : "checkbox", "width" : 40 }, { "id" : "col4", "caption" : "col4", "type" : "label", "width" : 40 } ], rows: [ { "id" : "row1", "cells" : ["cell11",1,true,'label1'] }, { "id" : "row2", "cells" : ["cell21",2,true,'label2'] }, { "id" : "row3", "cells" : ["cell31",3,false,'label3'] }, { "id" : "row4", "cells" : ["cell41",4,false,'label4'], "sub" : [ { "id" : "row5", "cells" : ["in51",5,false,'label5'] }, { "id" : "row6", "cells" : ["in61",6,false,'label6'] }, { "id" : "row7", "cells" : ["in71",7,false,'label7'] }, { "id" : "row8", "cells" : ["in81",8,false,'label8'] } ] }, { "id" : "row9", "cells" : ["cell91",9,false,'label9'], "sub" : [ { "id" : "row10", "cells" : ["in101",10,false,'label10'] }, { "id" : "row11", "cells" : ["in111",11,false,'label11'] }, { "id" : "row12", "cells" : ["in121",12,false,'label12'] }, { "id" : "row13", "cells" : ["in131",13,false,'label13'] } ] } ] }Now run the jsLinb example code above, and you'll see the following grid of data displayed.
The code format of the data file should make sense when looking at the data display. Notice that the header block in the data file describes the format of the header bar displayed in the data grid. Notice also that the structure of the displayed grid data, including sub-tree grids, are echoed in the hierarchical structure of the code in the data file. Here is a Rebol script which produces a similar data file:
rebol [title: "Create jsLinb json grid data"] data: [1 2 3 4 5 6 7 8 9 10 11 12 13 14 15 16 17 18 19 20 21 22 23 24] cols: 4 header: copy "{header: [" repeat i cols [ append header rejoin [ "{" {"id" : "col} i {", "caption" : "col} i {"} "}," ] ] append header {],} griddata: copy "rows: [" repeat i ((length? data) / cols) [ append griddata rejoin [ "{" {"id" : "row} i {", "cells" : [} ] for j cols 1 -1 [ append griddata rejoin [ {"} form data/(i * cols - j + 1) {",} ] ] append griddata "]}," ] append griddata "]}" editor join header griddataNotice that each 'for loop above concatenates a list of values, together with the proper formatting characters required to form the data structure used by the Treegrid widget. One loop creates the header data structure, and the other loop creates the row data structure. Run that code in your desktop Rebol interpreter and you'll see some output which is not pretty formatted for human viewing, but the data syntax follows the rules demonstrated in the original demo data file above (note that the data set is slightly simplified, without any sub-rows).
We can convert the code above to run as a CGI script, just by adding the proper CGI boilerplate, and using 'prin to output the final data structure. Save the following code as createjson.cgi in the cgi-bin folder of your server:
#!/usr/bin/rebol.exe -cs REBOL [] print "content-type: application/json^/" ; text/html^/" submitted: decode-cgi submitted-bin: read-cgi data: [1 2 3 4 5 6 7 8 9 10 11 12 13 14 15 16 17 18 19 20 21 22 23 24] cols: 6 header: copy "{header: [" repeat i cols [ append header rejoin [ "{" {"id" : "col} i {", "caption" : "col} i {"} "}," ] ] append header {],} griddata: copy "rows: [" repeat i ((length? data) / cols) [ append griddata rejoin [ "{" {"id" : "row} i {", "cells" : [} ] for j cols 1 -1 [ append griddata rejoin [ {"} form data/(i * cols - j + 1) {",} ] ] append griddata "]}," ] append griddata "]}" prin join header griddata quitNow run the following jsLinb code in the Sigma IDE:
Class('App', 'linb.Com',{ Instance:{ base:["linb.UI"], required:["linb.UI.Block", "linb.UI.TreeGrid", "linb.UI.Div"], iniComponents:function(){ var host=this, children=[], append=function(child){children.push(child.get(0))}; append((new linb.UI.TreeGrid) .host(host,"tg") .setHeader([]) .setRows([]) ); return children; }, events:{ onReady:'_onready' }, _onready:function(){ var self=this; linb.Ajax( "http://localhost/cgi-bin/createjson.cgi", '', function(s){ var hash=_.unserialize(s); self.tg.setHeader(hash.header).setRows(hash.rows); } ).start(); } } });Notice that the linb.Ajax call in the code above gets its data from the Rebol CGI script we just saved to the server. That CGI script sends back the formatted data, which is labeled "s" in the code here, as in previous examples. And, as in previous examples, the _.unserialize() function is used to unpack the returned data structure, and that unpacked data is stored in the variable "hash". The header of the datagrid display, labeled "tg" in this example, is assigned the hash.header data, and the rows are set to display the hash.rows data. Notice that all this occurs in a function fired by the onReady event, when the page finishes loading in your browser.
If you change the code in the Rebol createjson.cgi, and then refresh the running jsLinb app, you'll see the grid display update to show the new data output by the CGI script. Try changing the line "cols: 6", in the createjson.cgi file, to "cols: 3". Refresh the jsLinb app running in your browser, and you'll see the number of columns updated in the grid display.
One thing to be aware of is that you can choose to either put the header layout info in the data returned by the server, as in the examples above, or you can set it directly in your jsLinb code. As you saw in the examples above, the grid will (re)configure itself to display data as instructed, if the data file contains header information. To simplify data output, you can specify the header layout in your jsLinb code (or by adjusting the grid settings in the Visual IDE), and simply output data from the server script which fits that format. Save the following code as createjson2.cgi in your cgi-bin folder:
#!/usr/bin/rebol.exe -cs REBOL [] print "content-type: application/json^/" data: [1 2 3 4 5 6 7 8 9 10 11 12 13 14 15 16 17 18 19 20 21 22 23 24] cols: 4 griddata: copy "[" repeat i ((length? data) / cols) [ append griddata rejoin [ "{" {"cells" : [} ] for j cols 1 -1 [ append griddata rejoin [ {"} form data/(i * cols - j + 1) {",} ] ] append griddata "]}," ] append griddata "]" prin griddata quitCompare the code above with the createjson.cgi script shown earlier. There is only one loop, which is used to create the row data displayed in the Treegrid. Look a bit closer and you'll see that the data format above is also a bit simpler than in the previous example (there are fewer key identifiers, only the "cells:" blocks are labeled). Here's a desktop version of the script above, which you can use to play with the data format:
REBOL [title: "simpler jsLinb treegrid data format"] data: [1 2 3 4 5 6 7 8 9 10 11 12 13 14 15 16 17 18 19 20 21 22 23 24] cols: 4 griddata: copy "[" repeat i ((length? data) / cols) [ append griddata rejoin [ "{" {"cells" : [} ] for j cols 1 -1 [ append griddata rejoin [ {"} form data/(i * cols - j + 1) {",} ] ] append griddata "]}," ] append griddata "]" editor griddata quitNow paste the following jsLinb app code into the Sigma IDE:
Class('App', 'linb.Com',{ Instance:{ base:["linb.UI"], required:["linb.UI.TreeGrid", "linb.UI.Button"], properties:{}, events:{"onReady":"_onready"}, iniResource:function(com, threadid){ }, iniComponents:function(){ var host=this, children=[], append=function(child){children.push(child.get(0))}; append((new linb.UI.TreeGrid) .host(host,"treegrid1") .setDock("none") .setWidth(370) .setHeader(["col1", "col2", "col3", "col4"]) ); return children; }, iniExComs:function(com,threadid){ }, _onready:function (com,threadid){ self=this; linb.Ajax( "http://localhost/cgi-bin/createjson2.cgi", '', function(s){ var hash=_.unserialize(s); self.treegrid1.setRows(hash); } ).start(); } } });Note that the code above also uses a simplified data format to layout the grid header. Only the column headers are named. You can include more description, as in the previous example, but it's not required. If you switch to the Design View tab in Sigma IDE, select the Treegrid widget on the visual canvas, and then click the "header" property on the right, you'll see that the data structure has been fully filled in by jsLinb.
Now run the jsLinb code above to see the grid display.
The Treegrid widget provides important functionality for data management apps which deal with columns of information. You'll find that it's useful in virtually every type of business application, and in any sort of app which deals with collections/lists of organized data (that's potentially any type of app for which computers and devices are used to manage useful info). You'll find that the other features of the Treegrid widget (various display, edit, sort options, etc.) will likely become an integral part of your app design routine in jsLinb/Sigma.
It's beyond the scope of this tutorial, but the makers of jsLinb/Sigma have created a completely stand alone Grid library and API which has many powerful and useful features (printing to PDF, Excel, and other formats, filtering, many advanced display options, server interaction capabilities, etc.). That tool is also freely usable for commercial work (LGPL), it's very well documented, and worth a look if you expect to do lots of data grid work. It's the subject of a whole other tutorial:
19.8 Powerful Layout Widgets
After that quick look at the Treegrid widget, you may have started to get a sense that the jsLinb library is quite powerful. Next, we'll take a quick look at a handful of the other interesting widgets in jsLinb, which make it simple to layout lots of information and controls on a single screen, in ways which are intuitive and easily controlled by the user, and also fast and simple to layout with the Sigma IDE, or with pure jsLinb API code.
If you look at the Tools Box in the Design View (visual editor tab) of the Sigma IDE, you'll see that the widgets and tools are divided into 6 categories:
- Data
- Form Elements
- Containers
- Navigators
- Schedules
- Medias
Open the Containers accordion and drag a ButtonViews widget onto the visual canvas.
Set the "barLocation" property to "left" in the IDE properties tree.
Set the "barSize" property to "120".
Click the "items" property and edit the key/value pair as follows:
[{ "id" : "a", "caption" : "item a", "image" : "img/demo.gif" }, { "id" : "b", "caption" : "item b", "image" : "img/inedit.gif" }, { "id" : "c", "caption" : "item c", "image" : "img/app.gif" }]Drag a few random widgets into each of pages of the ButtonViews widget, just to see that each of the pages does actually contain a totally different layout.
Run the app and look at each page of the ButtonViews widget.
You can see that a multi page layout takes just a few moments to create. Here's the code for the above layout example:
Class('App', 'linb.Com',{ Instance:{ //base Class for this com base:["linb.UI"], //requried class for this com required:[ "linb.UI.ButtonViews", "linb.UI.Button", "linb.UI.ProgressBar", "linb.UI.DatePicker" ], properties:{}, events:{}, iniResource:function(com, threadid){ }, iniComponents:function(){ // [[code created by jsLinb UI Builder var host=this, children=[], append=function(child){children.push(child.get(0))}; append((new linb.UI.ButtonViews) .host(host,"buttonviews6") .setItems([ {"id":"a", "caption":"item a", "image":"img/demo.gif"}, {"id":"b", "caption":"item b", "image":"img/inedit.gif"}, {"id":"c", "caption":"item c", "image":"img/app.gif"} ]) .setBarLocation("left") .setBarSize("120") .setValue("a") ); host.buttonviews6.append((new linb.UI.Button) .host(host,"button13") .setLeft(10) .setTop(10) .setCaption("button13") , 'a'); host.buttonviews6.append((new linb.UI.ProgressBar) .host(host,"progressbar3") .setLeft(10) .setTop(10) , 'b'); host.buttonviews6.append((new linb.UI.DatePicker) .host(host,"datepicker1") .setLeft(10) .setTop(10) , 'c'); return children; // ]]code created by jsLinb UI Builder }, iniExComs:function(com, hreadid){ } } });Here's another little example which demonstrates some additional widgets and their properties. Open the Containers accordian and drag a Layout widget onto the visual canvas.
Set the "type" property to "horizontal" in the IDE properties tree.
Click the "items" property, and edit the key/value pairs as follows (remove the 3rd layout separator):
[{ "id" : "before", "pos" : "before", "min" : 10, "size" : 20, "locked" : false, "hide" : false, "cmd" : true, "caption" : "before" }, { "id" : "main", "min" : 10, "caption" : "main" }]Drag a Tabs widget into the right (larger) section of the layout widget.
Click and drag the layout divider bar to the right, to provide more room on the left side of the layout widget.
Drag a gallery widget into the left side of the layout widget.
Click the "Dock" property, and select "Left". This will force the gallery widget size to stretch and fit along the entire left hand wall of its layout container.
Set the "itemHeight" and "itemWidth" properties to 250 and 200 (or any other size you'd like).
Click the "items" property and edit the key/value pairs to the following (or any other captions and images you prefer):
[{ "id" : "a", "caption" : "Nick Guitar", "image" : "http://guitarz.org/www/jscript/uploads/collection_vaa.jpg" }, { "id" : "b", "caption" : "Nick's Dog", "image" : "http://guitarz.org/www/jscript/uploads/dew_electric3.jpg" }]Resize the gallery widget and the layout divider so the images fit well.
Now drag a few random widgets into each of the tabs of the tab widget, just to see that each of the tab pages has different content.
Run the app, and play with the layout features. You can close, open, and resize the left side of the layout widget.
View the contents of each tab page in the tab widget.
Adjust the browser screen size, and watch all the widgets resize/realign appropriately.
Here's the code for the above layout example:
Class('App', 'linb.Com',{ Instance:{ //base Class for this com base:["linb.UI"], //requried class for this com required:[ "linb.UI.Layout", "linb.UI.Tabs", "linb.UI.Button", "linb.UI.List", "linb.UI.ComboInput", "linb.UI.DatePicker", "linb.UI.Gallery" ], properties:{}, events:{}, iniResource:function(com, threadid){ }, iniComponents:function(){ // [[code created by jsLinb UI Builder var host=this, children=[], append=function(child){children.push(child.get(0))}; append((new linb.UI.Layout) .host(host,"layout3") .setItems([ {"id":"before", "pos":"before", "min":10, "size":237, "locked":false, "hide":false, "cmd":true, "caption":"before"}, {"id":"main", "min":10, "caption":"main"} ]) .setType("horizontal") ); host.layout3.append((new linb.UI.Tabs) .host(host,"tabs2") .setItems([ {"id":"a", "caption":"item a", "image":"img/demo.gif"}, {"id":"b", "caption":"item b", "image":"img/demo.gif"}, {"id":"c", "caption":"item c", "image":"img/demo.gif"}, {"id":"d", "caption":"item d", "image":"img/demo.gif"} ]) .setValue("a") , 'main'); host.tabs2.append((new linb.UI.Button) .host(host,"button10") .setLeft(30) .setTop(30) .setCaption("button10") , 'a'); host.tabs2.append((new linb.UI.List) .host(host,"list3") .setItems([ {"id":"a", "caption":"item a", "image":"img/demo.gif"}, {"id":"b", "caption":"item b", "image":"img/demo.gif"}, {"id":"c", "caption":"item c", "image":"img/demo.gif"}, {"id":"d", "caption":"item d", "image":"img/demo.gif"} ]) .setLeft(30) .setTop(30) .setValue("a") , 'b'); host.tabs2.append((new linb.UI.ComboInput) .host(host,"comboinput6") .setLeft(30) .setTop(30) .setItems([ {"id":"a", "caption":"item a", "image":"img/demo.gif"}, {"id":"b", "caption":"item b", "image":"img/demo.gif"}, {"id":"c", "caption":"item c", "image":"img/demo.gif"}, {"id":"d", "caption":"item d", "image":"img/demo.gif"} ]) .setValue("a") , 'c'); host.tabs2.append((new linb.UI.DatePicker) .host(host,"datepicker2") .setLeft(30) .setTop(30) , 'd'); host.layout3.append((new linb.UI.Gallery) .host(host,"gallery2") .setItems([ {"id":"a", "caption":"Nick", "image":"http://guitarz.org/www/jscript/uploads/collection_vaa.jpg"}, {"id":"b", "caption":"Nick's Dog", "image":"http://guitarz.org/www/jscript/uploads/dew_electric3.jpg"} ]) .setDock("left") .setWidth(230) .setItemWidth("200") .setItemHeight("250") .setValue("a") , 'before'); return children; // ]]code created by jsLinb UI Builder }, iniExComs:function(com, hreadid){ } } });These are just a few quick extemporaneous examples to encourage experimentation with some of the jsLinb layout widget features. As you get used to using the Sigma builder, screen layouts with much greater complexity than this often take just a few minutes to create. You can fit an enormous number of pages, and a tremendous number of widget layouts all into a single page application, quickly and easily using jsLinb's layout features. Learning how to manipulate and edit the properties of each of the available widgets is the biggest part of learning how to use the entire jsLing/Sigma toolkit. The next section of the tutorial will explain how to explore all the features of the library and the Visual builder, using the included documentation features.
19.9 jsLinb and Sigma Builder Documentation Features
The jsLinb library and the Sigma Visual IDE are expertly documented. Everything you need comes in the little 6Mb zip file which you've already installed. With your Uniform Server running, go to http://localhost/sigma in your browser (or any other URL where you have jsLinb/Sigma installed, on the web, on your local network, on your local machine, etc.). Click the "Manual" link, and you'll find a quick overview of the Sigma IDE.
Now go back to the main http://localhost/sigma page and click the "More Samples >>" and "More sample & materials >>" links, or go directly to http://localhost/sigma/Samples/all-samples.html. This page contains a number of complex example applications (the Sigma IDE is actually one of those!), which you can inspect to see how features of the jsLinb API can be put together to create "real world" apps. Pay special attention to the examples which demonstrate how to accomplish specific tasks with jsLinb, such as CSS styling, IO (including cross domain Ajax calls and file uploads), GUI drag and drop techniques, distributed UI techniques, etc. There is a gold mine of useful code fragments in the examples which you can copy and paste directly into your own apps. Several of the apps themselves are actually useful documentation and productivity tools which enhance the Sigma IDE suite.
Another goldmine of useful jsLinb code is found in the code snippets app. On the examples page, click the "Code Snippets" link, or go directly to http://localhost/sigma/CodeSnip/index.html . This collection of code examples demonstrates the main features of all the jsLinb widgets. You'll use these examples extensively as you explore the most commonly used properties, methods, and code constructs used to implement jsLinb widgets in your user interface layouts. The code for each of the widget examples is displayed, and a link at the top right corner of the example allows you to open any of the snippets directly in the Sigma IDE, so that you can manipulate and experiment with it, use it immediately in your own apps, etc.
The examples in the CodeSnip library are also integrated directly into the Sigma visual builder. Just click the Open button at the top right corner of the IDE, and select "Open from Samples".
Finally, and most importantly, on the examples page, click the "Sigma Linb API" link, or go directly to http://localhost/sigma/API/index.html. That is an API viewer for the jsLinb library, which can be run as a standalone app. This app is also integrated directly into the Sigma visual builder.
The API viewer app provides detailed explanations and reference documentation about every single feature in the jsLinb library. It also contains thousands of short code examples which succinctly demonstrate the required syntax needed to use each property, event, and feature of the jsLinb library. The code examples can be clicked and run inline, directly within the API viewer. This is a tremendous time saver when searching for and learning to use any API call.
The API viewer is also integrated directly into the Sigma IDE. You can double-click any property or event in the tree on the right side of the screen, and the API viewer will open direcly to that item, so you can see exactly how to use it, with detailed description, parameter reference, code examples, etc.
Together, the documentation tools and examples provide every bit of documentation needed, not just for complete reference, but also for guidance about how larger apps can be assembled, as well as some creative inspiration. Learning to use the documentation features is an enjoyable and productive process, and should provide everything you need to make full use of jsLinb and the Sigma IDE, once this introductory tutorial is completed.
19.10 Using the jsLinb Databinder to Collect and Set Form Data
The jsLinb Databinder allows you to easily collect multiple pieces of information entered into forms, and serialize them into a single Json string (and visa-versa). You can drag a databinder object onto the canvas from the Tools bar.
The object won't show up on the visual layout, but you can see it appended in the code.
Paste the following code into the Normal View tab in Sigma IDE. Notice that a Databinder labeled "myformdata" has been added to the canvas, and that the .setDataBinder() and .setDataField() properties have been set to "field1" and "field2" respectively, for the input1 and input2 widgets. Notice also that the this.myformdata.getValue() and this.myformdata.resetValue() methods have been used in the onClick functions below to collect and set the data in those widgets:
Class('App', 'linb.Com',{ Instance:{ base:[], required:[ "linb.DataBinder", "linb.UI.Input", "linb.UI.Button" ], events:{}, iniComponents:function(){ var host=this, children=[], append=function(child){children.push(child.get(0))}; append((new linb.DataBinder) .host(host,"myformdata") .setName("myformdata") ); append((new linb.UI.Input) .host(host,"input1") .setDataBinder("myformdata") .setDataField("field1") .setLeft(21) .setTop(20) ); append((new linb.UI.Input) .host(host,"input2") .setDataBinder("myformdata") .setDataField("field2") .setLeft(21) .setTop(51) ); append((new linb.UI.Button) .host(host,"button1") .setLeft(21) .setTop(80) .setCaption("Get Values") .onClick("_button1_onclick") ); append((new linb.UI.Input) .host(host,"input3") .setLeft(21) .setTop(150) .setValue("{field1:'1234', field2:'adsf'}") ); append((new linb.UI.Button) .host(host,"button2") .setLeft(21) .setTop(181) .setCaption("Set Values") .onClick("_button2_onclick") ); return children; }, _button1_onclick:function (profile, e, value) { var data=this.myformdata.getValue(); if(!data) alert('Ensure all the fields are valid first!'); else alert(_.serialize(data),true); }, _button2_onclick:function (profile, e, value) { this.myformdata.resetValue( _.unserialize(this.input3.getUIValue()) ); } } });When you run the code above, you'll see that the top two text input widgets are empty. Click the "Get Values" button and you'll see the empty data content alerted as a list of Json values {"field1":"","field2":""}.
Now type some text into the input1 and input2 widgets, click the "Get Values" button again and you'll see the new collected data values alerted as a Json object.
Click the "Set Values" button and you'll see that the values you entered into the input1 and input2 widgets have been replaced with the values represented by the Json string in the input3 widget.
Manually edit the Json string in the input3 widget, click the "Set Values" button again, and you'll see the edited data values displayed appropriately back in the input1 and input2 widgets.
You can add as many databinders as you want to your jsLinb apps, each serializing/deserializing any chosen values from/to any set of widgets anywhere on the canvas. This allows for really simple data entry, editing, and collection and/or presentation of multiple pieces of data using any variety of jsLinb widgets. Take a look at the jsLinb example apps and API viewer for more Databinder code examples. It is one of the most helpful features of the jsLinb library.
19.11 A Larger Example App
This app demonstrates a number of additional features and techniques which are commonly useful. Notice these features in the code and visual layout:
- Two databinder objects are added to collect and set data in the 2 separate forms.
- A layout widget is used to fit all the entries in an especially large form onto a single page (the account profile form). The layout presented fits nicely on a small phone screen, without scrolling.
- Data in the account profile form is saved, not only to the server, but also to local browser cookies. When the app starts, if the user has saved profile information on the local machine, it is loaded from cookies, and then displayed. The user can also create and save new account profiles, as well as load, update, and switch between existing profiles stored on the server (type in an existing username/password, click the "load" button, edit, then click the "save" button).
- The server code demonstrates one way to parse data in the saved serialized format submitted from the forms, along with the logic needed to save and load existing profile data, to compare usernames and passwords, etc.
- Several other pieces of data are loaded from the server and the results are displayed on startup. A checkbox in the "data layout" page is checked, based on a true/false value saved in a text file on the server (.../www/checkbox.txt). Some text in a label widget in the data layout page is read from a text file and displayed in the user interface (.../www/text.txt). The first page of the buttonviews widget is also focused and displayed on startup.
- Icons in the the buttonviews widget are taken from a single image map file (the collection of images found in /img/widgets.gif). Pay special attention to the syntax in the "items" property of the buttonviews widget, to see how this is accomplished (each icon in this image set is 16 pixels across).
- A few other simple layout ideas are demonstrated. Some text is displayed in divs, using HTML formatting. Some group widgets are also displayed, one of which can be opened and hidden by clicking separate buttons, or by clicking directly on the group widget.
- Notice that the widgets in the forms, and the data included in the databinders to which they are attached, include items such as date and time pickers, as well as password fields, multiline fields, etc. All of this graphically represented information can be serialized and unserialized, included in the databinder, etc. just as easily as any text field.
It should be noted that the Sigma IDE provides a number of tools for visually duplicating, aligning, and otherwise creating perfectly spaced and neatly layed out multiple widgets.
Class('App', 'linb.Com',{ Instance:{ base:["linb.UI"], required:[ "linb.UI.ButtonViews", "linb.UI.Div", "linb.UI.Label", "linb.UI.Input", "linb.UI.Group", "linb.UI.DatePicker", "linb.UI.Tabs", "linb.UI.Stacks", "linb.UI.TextEditor", "linb.UI.Button", "linb.UI.TimePicker", "linb.UI.Pane", "linb.UI.Layout", "linb.DataBinder", "linb.UI.CheckBox" ], properties:{}, events:{"onReady":"_onready", "onRender":"_onrender"}, iniResource:function(com, threadid){}, iniComponents:function(){ var host=this, children=[], append=function(child){children.push(child.get(0))}; append((new linb.DataBinder) .host(host,"databinder1") .setName("databinder1") ); append((new linb.DataBinder) .host(host,"databinder2") .setName("databinder2") ); append((new linb.UI.ButtonViews) .host(host,"buttonviews1") .setItems([ {"id":"1", "caption":"MultiPage Form", "image":"img/widgets.gif", "imagePos":"-192px top"}, {"id":"2", "caption":"Text Layout", "image":"img/widgets.gif", "imagePos":"-48px top"}, {"id":"3", "caption":"Data Layout", "image":"img/widgets.gif", "imagePos":"-64px top"}, {"id":"4", "caption":"Form", "image":"img/widgets.gif", "imagePos":"-96px top"}, {"id":"6", "caption":"Groups", "image":"img/widgets.gif", "imagePos":"-112px top"} ]) .setBarLocation("left") .setBarSize("130") .setValue("a") ); host.buttonviews1.append((new linb.UI.DatePicker) .host(host,"datepickerWriteYourOwn") .setDataBinder("databinder2") .setDataField("requestdate") .setLeft(20) .setTop(170) .setCloseBtn(false) , '4'); host.buttonviews1.append((new linb.UI.Pane) .host(host,"pane8") .setLeft(10) .setTop(10) .setWidth("469") .setHeight(320) , '1'); host.pane8.append((new linb.UI.Layout) .host(host,"layout3") .setItems([ {"id":"before", "pos":"before", "min":10, "size":318, "locked":false, "hide":false, "cmd":true, "caption":"before"}, {"id":"main", "min":1, "caption":"main"} ]) ); host.layout3.append((new linb.UI.Label) .host(host,"label213") .setLeft(230) .setTop(20) .setCaption("Notes:") .setHAlign("left") , 'main'); host.layout3.append((new linb.UI.Label) .host(host,"label212") .setLeft(10) .setTop(20) .setCaption("Birthdate:") .setHAlign("left") , 'main'); host.layout3.append((new linb.UI.DatePicker) .host(host,"datepicker19") .setDataBinder("databinder1") .setDataField("birthdate") .setLeft(10) .setTop(40) , 'main'); host.layout3.append((new linb.UI.Group) .host(host,"groupProfile") .setLeft("10") .setTop("10") .setWidth(450) .setHeight(270) .setCaption("Account Info:") .setToggleBtn(false) , 'before'); host.groupProfile.append((new linb.UI.Label) .host(host,"labelLastName") .setLeft(10) .setTop(100) .setWidth(80) .setCaption("Last Name:") ); host.groupProfile.append((new linb.UI.Label) .host(host,"labelCity") .setLeft(10) .setTop(160) .setWidth(80) .setCaption("City:") ); host.groupProfile.append((new linb.UI.Label) .host(host,"labelAddress") .setLeft(10) .setTop(130) .setWidth(80) .setCaption("Address:") ); host.groupProfile.append((new linb.UI.Label) .host(host,"labelPassword") .setLeft(10) .setTop(40) .setWidth(80) .setCaption("Password:") ); host.groupProfile.append((new linb.UI.Label) .host(host,"label1") .setLeft(10) .setTop(10) .setWidth(80) .setCaption("Username:") ); host.groupProfile.append((new linb.UI.Label) .host(host,"labelZip") .setLeft(10) .setTop(220) .setWidth(80) .setCaption("Zip Code:") ); host.groupProfile.append((new linb.UI.Label) .host(host,"labelFirstName") .setLeft(10) .setTop(70) .setWidth(80) .setCaption("First Name:") ); host.groupProfile.append((new linb.UI.Label) .host(host,"labelState") .setLeft(10) .setTop(190) .setWidth(80) .setCaption("State:") ); host.groupProfile.append((new linb.UI.Input) .host(host,"inputUsername") .setDataBinder("databinder1") .setDataField("username") .setLeft(110) .setTop(10) .setWidth(320) ); host.groupProfile.append((new linb.UI.Input) .host(host,"inputPassword") .setDataBinder("databinder1") .setDataField("password") .setLeft(110) .setTop(40) .setWidth(320) .setTabindex("2") .setType("password") ); host.groupProfile.append((new linb.UI.Input) .host(host,"inputFirstName") .setDataBinder("databinder1") .setDataField("firstname") .setLeft(110) .setTop(70) .setWidth(320) .setTabindex("3") ); host.groupProfile.append((new linb.UI.Input) .host(host,"inputLastName") .setDataBinder("databinder1") .setDataField("lastname") .setLeft(110) .setTop(100) .setWidth(320) .setTabindex("4") ); host.groupProfile.append((new linb.UI.Input) .host(host,"inputAddress") .setDataBinder("databinder1") .setDataField("address") .setLeft(110) .setTop(130) .setWidth(320) .setTabindex("5") ); host.groupProfile.append((new linb.UI.Input) .host(host,"inputCity") .setDataBinder("databinder1") .setDataField("city") .setLeft(110) .setTop(160) .setWidth(320) .setTabindex("6") ); host.groupProfile.append((new linb.UI.Input) .host(host,"inputState") .setDataBinder("databinder1") .setDataField("state") .setLeft(110) .setTop(190) .setWidth(320) .setTabindex("7") ); host.groupProfile.append((new linb.UI.Input) .host(host,"inputZipCode") .setDataBinder("databinder1") .setDataField("zipcode") .setLeft(110) .setTop(220) .setWidth(320) .setTabindex("8") ); host.layout3.append((new linb.UI.TextEditor) .host(host,"texteditor39") .setDataBinder("databinder1") .setDataField("notes") .setLeft(230) .setTop(40) .setWidth("230") .setHeight(150) .setTabindex("10") .setBorder(true) , 'main'); host.layout3.append((new linb.UI.Label) .host(host,"label58") .setLeft("176") .setTop(290) .setWidth("120") .setCaption("(more)") .setHAlign("center") , 'before'); host.buttonviews1.append((new linb.UI.Tabs) .host(host,"tabs") .setItems([ {"id":"a", "caption":"One", "image":"img/run.gif"}, {"id":"b", "caption":"Two", "image":"img/run.gif"} ]) .setValue("a") , '3'); host.tabs.append((new linb.UI.Stacks) .host(host,"stacks1") .setItems([ {"id":"1", "caption":"1"}, {"id":"2", "caption":"2"}, {"id":"3", "caption":"3"}, {"id":"4", "caption":"4"} ]) .setValue("a") , 'a'); host.stacks1.append((new linb.UI.CheckBox) .host(host,"checkbox1") .setLeft(20) .setTop(20) .setCaption("checkbox1") , '1'); host.stacks1.append((new linb.UI.Label) .host(host,"label26") .setLeft(20) .setTop(50) .setWidth(340) .setCaption( "This checkbox value is loaded from the server" ) .setHAlign("left") , '1'); host.tabs.append((new linb.UI.Label) .host(host,"labelGetFromServer") .setLeft(20) .setTop(20) .setWidth(410) .setBorder(true) .setCaption("Data Page 2") .setHAlign("left") .setVAlign("middle") , 'b'); host.tabs.append((new linb.UI.Label) .host(host,"label27") .setLeft(20) .setTop(50) .setWidth(410) .setCaption( "The text above was loaded from a" + "plain text file on the server." ) .setHAlign("left") , 'b'); host.buttonviews1.append((new linb.UI.Group) .host(host,"groupShare") .setLeft(20) .setTop(120) .setWidth(400) .setHeight(250) .setCaption("Text Entry Group") .setToggle(false) , '6'); host.groupShare.append((new linb.UI.TextEditor) .host(host,"texteditorShare") .setLeft("20") .setTop("10") .setWidth(360) .setHeight(170) .setVisibility("visible") .setBorder(true) ); host.groupShare.append((new linb.UI.Button) .host(host,"buttonShareSubmitText") .setLeft(260) .setTop(190) .setVisibility("visible") .setCaption("Submit") ); host.buttonviews1.append((new linb.UI.Div) .host(host,"divText1") .setLeft(40) .setTop(89) .setWidth(390) .setHeight(160) .setHtml( "Here's some info about this app: " + "<br><br>1) Item 1 <br>2) Item 2 <br>3) Item 3" ) , '2'); host.buttonviews1.append((new linb.UI.Div) .host(host,"divText2") .setLeft("20") .setTop(10) .setWidth(310) .setHeight(60) .setHtml("<font size=20>Some Text</font>") , '2'); host.buttonviews1.append((new linb.UI.Button) .host(host,"buttonLoadDatabinder") .setLeft(350) .setTop(370) .setCaption("Load") .onClick("_buttonloaddatabinder_onclick") , '1'); host.buttonviews1.append((new linb.UI.TimePicker) .host(host,"timepickerWriteYourOwn") .setDataBinder("databinder2") .setDataField("requesttime") .setLeft(230) .setTop(170) .setWidth(220) .setCloseBtn(false) , '4'); host.buttonviews1.append((new linb.UI.Div) .host(host,"div24") .setLeft("20") .setTop(20) .setWidth(430) .setHeight(20) .setHtml("Submit text, date, and time:") , '4'); host.buttonviews1.append((new linb.UI.TextEditor) .host(host,"texteditorMakeaRequest") .setDataBinder("databinder2") .setDataField("requesttext") .setLeft(20) .setTop(50) .setWidth(430) .setHeight(100) .setBorder(true) , '4'); host.buttonviews1.append((new linb.UI.Button) .host(host,"buttonWriteYourOwn") .setLeft(320) .setTop(340) .setCaption("Submit") .onClick("_buttonwriteyourown_onclick") , '4'); host.buttonviews1.append((new linb.UI.Group) .host(host,"groupShareText") .setLeft(20) .setTop(20) .setWidth(400) .setHeight(70) .setCaption("Button Group") .setToggleBtn(false) , '6'); host.groupShareText.append((new linb.UI.Button) .host(host,"buttonShareUploadText") .setLeft(20) .setTop(10) .setWidth(170) .setCaption("Open Text Entry Group") .onClick("_buttonshareuploadtext_onclick") ); host.groupShareText.append((new linb.UI.Button) .host(host,"buttonShareReadTexts") .setLeft(200) .setTop(10) .setWidth(180) .setCaption("Close Text Entry Group") .onClick("_buttonsharereadtexts_onclick") ); host.buttonviews1.append((new linb.UI.Button) .host(host,"buttonSubmitDatabinder") .setLeft(350) .setTop(340) .setTabindex("9") .setCaption("Save") .onClick("_buttonSubmitDatabinder_onclick") , '1'); return children; }, iniExComs:function(com, hreadid){ }, _buttonshareuploadtext_onclick:function (profile,e,src,value){ this.groupShare.setToggle(true); ; }, _onready:function (com,threadid){ this.buttonviews1.setValue('1',true); }, _buttonSubmitDatabinder_onclick:function (profile,e,src,value){ var data=this.databinder1.getValue(); if(!data) alert('Ensure all the fields are valid first!'); else var cookie1 = linb.Cookies; cookie1.set('profile',_.serialize(data)); linb.Ajax( "http://localhost/cgi-bin/generic-profile.cgi", ( "f=saveprofile&user=" + this.inputUsername.getUIValue() + "&pass=" + this.inputPassword.getUIValue() + "&d=" + cookie1.get('profile') ), function(s){ alert(s); } ).start(); }, _onrender:function (com,threadid){ self=this; var cookie1 = linb.Cookies; this.databinder1.resetValue( _.unserialize(cookie1.get('profile')) ); linb.Ajax( "http://localhost/text.txt", "", function(s){ self.labelGetFromServer.setCaption(s); } ).start(); linb.Ajax( "http://localhost/checkbox.txt", "", function(s){ self.checkbox1.setValue(s); } ).start(); }, _buttonwriteyourown_onclick:function (profile,e,src,value){ var data=this.databinder2.getValue(); if(!data) alert('Ensure all the fields are valid first!'); else linb.Ajax( "http://localhost/cgi-bin/generic-form.cgi", ( "f=submitrequest&user=" + this.inputUsername.getUIValue() + "&d=" + _.serialize(data) ), function(s){ alert(s); } ).start(); }, _buttonsharereadtexts_onclick:function (profile,e,src,value){ this.groupShare.setToggle(false); ; }, _buttonloaddatabinder_onclick:function (profile,e,src,value){ self=this linb.Ajax( "http://localhost/cgi-bin/generic-profile.cgi", ( "f=loadprofile&user=" + this.inputUsername.getUIValue() + "&pass=" + this.inputPassword.getUIValue() ), function(s){ alert(s); self.databinder1.resetValue(_.unserialize(s)); } ).start(); } } });Here's the Rebol generic-profile.cgi file:
#!/usr/bin/rebol.exe -cs REBOL [] print "content-type: text/html^/" data: decode-cgi raw: read-cgi save %log.txt raw make-dir %./profiles/ if data/2 = "loadprofile" [ either error? try [ sv: read rejoin [%./profiles/ data/4 ".txt"] parse sv [thru {"password":} copy pass to {,}] if not ((mold data/6) = pass) [ prin "Incorrect username/password" quit ] ][prin "That user profile does not exist"] [prin sv] quit ] if data/2 = "saveprofile"[ if exists? existing-file: rejoin [%./profiles/ data/4 ".txt"] [ sv: read existing-file parse sv [thru {"password":} copy pass to {,}] if not ((mold data/6) = pass) [ prin "Incorrect username/password" quit ] ] write rejoin [%./profiles/ data/4 ".txt"] data/8 prin "Your profile info has been saved in local cookies" prin ", and in .../cgi-bin/profiles/" ] quitThe Rebol generic-form.cgi script:
#!/usr/bin/rebol.exe -cs REBOL [] print "content-type: text/html^/" data: decode-cgi raw: read-cgi save %log.txt raw if data/2 = "readrequest" [ either error? try [ sv: read %request.txt ][prin "Error Reading!"] [prin sv] quit ] if data/2 = "submitrequest"[ write/append %request.txt join "^/^/" mold data/4 write/append %request.txt join "^/^/" data/6 prin "Your form data has been saved in " prin ".../cgi-bin/request.txt on the server!" ] quitThe contents of the plain .../www/text.txt file:
This text was loaded from .../www/text.txtAnd the contents of the .../www/checkbox.txt file:
trueThe code in this example should be reusable in many types of applications.
19.12 Connecting to Stand-Alone Rebol Server Apps
The tutorial at http://re-bol.com/rebol-multi-client-databases.html explains how to build multi-user network based apps entirely in Rebol. In those sorts of app, Rebol client and server apps connect directly across a network. No 3rd party web server is required (i.e., no Apache stack such as Uniform Server is used), no CGI boilerplate is needed, and even the application's data model is created entirely using pure Rebol code (native data structures and series functions, as opposed to a 3rd party DBMS) to perform data manipulation operations, permanent storage, etc. The performance of such a server can be tuned to live up to the challenges of common production traffic situations. We can extend that stand-alone Rebol server idea to be used in combination with jsLinb front end user interfaces.
The following code was taken directly from the tutorial above. It prints out a form to the user's browser, and processes the data submitted back by the form (this script does some parsing and decoding, then prints the submitted object result):
REBOL [title: "HTML Form Server"] l: read join dns:// read dns:// print join "Waiting on: " l port: open/lines tcp://:80 browse join l "?" forever [ connect: first port if error? try [ z: decode-cgi replace next find first connect "?" " HTTP/1.1" "" prin rejoin ["Received: " mold z newline] my-form: rejoin [ {HTTP/1.0 200 OK^/Content-type: text/html^/^/ <HTML><BODY><FORM ACTION="} l {">Server: } l {<br><br> Name:<br><INPUT TYPE="TEXT" NAME="name" SIZE="35"><br> Address:<br><INPUT TYPE="TEXT" NAME="addr" SIZE="35"><br> Phone:<br><INPUT TYPE="TEXT" NAME="phone" SIZE="35"><br> <br><input type="checkbox" name="checks" value="i1">Item 1 <input type="checkbox" name="checks" value="i2">Item 2 <input type="radio" name="radios" value="yes">Yes <input type="radio" name="radios" value="no">No<br><br> <INPUT TYPE="SUBMIT" NAME="Submit" VALUE="Submit"> </FORM></BODY></HTML>} ] write-io connect my-form (length? my-form) ] [print "(empty submission)"] close connect ]For our purposes here we don't need to print the user an HTML form, because we're using jsLinb to submit data instead. So, we'll adjust the code above slightly to just process the Json formatted data sent by a jsLinb app. Run this code directly in a Rebol console on your computer (notice that this server is running on port 55555, so that it doesn't interfere with Uniform Server's port 80):
REBOL [title: "jsLinb Server"] l: read join dns:// read dns:// print rejoin ["Waiting on: " l ":55555"] port: open/lines tcp://:55555 forever [ connect: first port if error? try [ z: decode-cgi replace next find first connect "?" " HTTP/1.1" "" prin rejoin ["Received: " mold z newline] r: rejoin [ ; {HTTP/1.0 200 OK^/} {content-type: text/html^/^/} "{" {"data" : "Saved!"} "}" ] write-io connect r (length? r) ] [] ;[print "(empty submission)"] close connect ]After the server above is running, paste the following jsLinb code into the Sigma IDE code tab. Notice that this layout collects some data from the user via 2 input widgets, which both have a "myformdata" databinder attached . When the button is clicked, the form data is serialized to a Json string using the myformdata.getValue() method, and then that string is submitted to the server using a linb.Ajax request (you've seen that routine a few times by now):
Class('App', 'linb.Com',{ Instance:{ base:[], required:[ "linb.DataBinder", "linb.UI.Input", "linb.UI.Button" ], events:{}, iniComponents:function(){ var host=this, children=[], append=function(child){children.push(child.get(0))}; append((new linb.DataBinder) .host(host,"myformdata") .setName("myformdata") ); append((new linb.UI.Input) .host(host,"input1") .setDataBinder("myformdata") .setDataField("field1") .setLeft(21) .setTop(20) ); append((new linb.UI.Input) .host(host,"input2") .setDataBinder("myformdata") .setDataField("field2") .setLeft(21) .setTop(51) ); append((new linb.UI.Button) .host(host,"button1") .setLeft(21) .setTop(80) .setCaption("Send Form Values") .onClick("_button1_onclick") ); return children; }, _button1_onclick:function (profile, e, value) { var data=this.myformdata.getValue(); if(!data) alert('Ensure all the fields are valid first!'); else linb.Ajax( "http://localhost:55555", ("data=" + _.serialize(data)), function(s){ alert(s); } ).start(); }, } });Run the jsLinb code above to see it interact with the pure Rebol coded server.
Rebol's native network IO features make it easy to send data back and forth with jsLinb apps.
19.13 CrossUI
It should be noted that the jsLinb library and Sigma IDE are precursors of a more recent product called CrossUI. Most of the jsLinb library and Sigma IDE features work exactly the same in the CrossUI toolkit. The Sigma Toolkit explored in this tutorial is actually quite mature, and contains much of what makes CrossUI appealing. Cross UI does offer a number of new widgets and features, including drawing widgets and animation features, as well as beefed up versions of many jsLinb widgets. The CrossUI project manager is also more mature than the one that comes with Sigma IDE. It features direct integration with Phonegap Build, so that your created GUIs can be automatically converted into mobile apps which can be submitted to app stores for virtually every modern platform. The project manager can also produce desktop applications for Windows, Mac, and Linux (32 and 64 bit versions of each OS), using Node-Webkit, and it does that cross platform packaging from any desktop OS to any other (i.e., you can create Mac and Linux applications from Windows, Windows apps on a Mac, etc.)
The 'prototyping' feature in the newest versions of CrossUI is a complete no-code development solution which allows users to create powerful application logic without writing a single line of jsLinb code. It goes far beyond the properties/events settings of the Sigma visual builder, and fully encapsulates all the features of the jsLinb API, as well as variable creation, conditional expression creation, and other fundamental code structures, all managed by clicking on selection lists in a wizard interface which creates any required application code automatically. This is a truly unique and deep feature, which is quite practical for users such as graphic designers who work on UI design, but who aren't interested in diving deeply into code.
The new features of CrossUI do come with a price. Although the "xui" library (the new version of jsLinb found in the CrossUI toolkit) is licensed LGPL, the IDE is licensed commercially. It must be purchased if you use it to create commercial applications (this is NOT the case with Sigma IDE).
It should be noted that the CrossUI tools also come as a single install package for Windows, Mac, or Linux. You don't need to install any separate web server such as Uniform Server. This can be both helpful and detrimental. One great benefit of the Sigma IDE is that it can be run from anywhere, on any operating system, using any web server with PHP (accessible either on a local machine, on a local intranet, or on the web). This means it can be hosted virtually anywhere, and the IDE can run on just about any desktop machine or mobile device that has a web browser. That is one of the absolutely killer features of the toolkit. It is totally portable between any location and any device, and it works exactly the same everywhere, from machines with outdated browsers to the newest mobile devices. In that regard, there really is nothing like the Sigma IDE, anywhere (and it's totally free - it doesn't get much better than that).
If you want commercial support for the toolkit you use, then take a look at CrossUI. You're on your own if you choose to use the Sigma IDE. Future upgrades and support will presumably only be made for the CrossUI product line.
19.14 A Powerful Addition to the Rebol Toolkit
The combination of jsLinb/Sigma IDE and Rebol server code forms a very productive and powerful, modern, and totally portable development toolkit for the absolutely widest possible variety of modern and legacy operating systems. JsLinb UI apps can connect to Rebol CGI code running on even the least expensive Apache shared hosting accounts, or to pure Rebol coded network apps, running on your own dedicated server on your own network, or on the web. This allows both the server apps, and the front ends to be created virtually anywhere, on any type(s) of available operating system(s), and to run anywhere too. It's easy to learn, really productive, and free to use for commercial work. It's a great addition to the Rebol toolkit - definitely worth the time investment required to learn how to use it.
20. REAL WORLD CASE STUDIES - Learning To Think In Code
At this point, you've seen most essential bits of REBOL language syntax, but you're probably still saying to yourself "that's great ... but, how do I write a complete program that does ______". To materialize any working software from an imagined design, it's obviously essential to know which language constructs are available to build pieces of a program, but "thinking in code" is just as much about organizing those bits into larger structures, knowing where to begin, and being able to break down the process into a manageable, repeatable routine. This section is intended to provide some general understanding about how to convert human design concepts into REBOL code, and how to organize your work process to approach any unique situation. A number of case studies are presented to provide insight as to how specific real life situations were satisfied.
20 A Generalized Approach Using Outlines and Pseudo Code
Software virtually never springs to life in any sort of initially finalized form. It typically evolves through multiple revisions, and often develops in directions originally unanticipated. There's no perfect process to achieve final designs from scratch, but certain approaches typically do prove helpful. Having a plan of attack is what gets you started writing line 1 of your code, and it's what eventually delivers a working piece of software to your user's machines. Here's a generalized routine to consider:
- Start with a detailed definition of what the application should do, in human terms. You won't get anywhere in the design process until you can describe some form of imagined final program. Write down your explanation and flesh out the details of the imaginary program as much as possible. Include as much detail as possible: what should the program look like, how will the user interact with it, what sort of data will it take in, process, and return, etc.
- Determine a list of general code and data structures related to each of the 'human-described' program goals above. Take stock of any general code patterns which relate to the operation of each imagined program component. Think about how the user will get data into and out of the program. Will the user work with a desktop GUI window, web forms that connect to a CGI script, or directly via command line interactions in the interpreter console? Consider how the data used in the program can be represented in code, organized, and manipulated. What types of data will be involved (text types such as strings, time values, or URLs, binary types such as images and sounds, etc.). Could the program code potentially make use of variables, block/series structures and functions, or object structures? Will the data be stored in local files, in a remote database, or just in temporary memory? Think of how the program will flow from one operation to another. How will pieces of data need to be sorted, grouped and related to one another, what types of conditional and looping operations need to be performed, what types of repeated functions need to be isolated and codified? Consider everything which is intended to happen in the imagined piece of software, and start thinking, "_this_ is how I could potentially accomplish _that_, in code...".
- Begin writing a code outline. It's often easiest to do this by outlining a user interface, but a flow chart of operations can be helpful too. The idea here is to begin writing a generalized code container for your working program. At this point, the outline can be filled with simple natural language PSEUDO CODE that describes how actual code can be organized. Starting with a user interface outline is especially helpful because it provides a starting point to actually write large code structures, and it forces you to deal with how the program will handle the input, manipulation, and output of data. Simple structures such as "view layout [button [which does this when clicked...]]", "block: [with labels and sub-blocks organized like this...], "function: (which loops through this block and saves these elements to another variable...)" can be fleshed out later with complete code.
- Finally, move on to replacing pseudo code with actual working code. This isn't nearly as hard once you've completed the previous steps. A language dictionary/guide with cross referenced functions is very helpful at this stage. And once you're really familiar with all the available constructs in the language, all you'll likely need is an occasional syntax reminder from REBOL's built-in help. Eventually, you'll pass through the other design stages much more intuitively, and get to/through this stage very quickly.
- As a last step, debug your working code and add/change functionality as you test and use the program.
The basic plan of attack is to always explain to yourself what the intended program should do, in human terms, and then think through how all required code structures must be organized to accomplish that goal. As an imagined program takes shape, organize your work flow using a top down approach: imagined concept -> general outline -> pseudo code description / thought process -> working code -> finished code.
The majority of code you write will flow from one user input, data definition or internal function to the next. Begin mapping out all the things that need to "happen" in the program, and the info that needs to be manipulated along the way, in order for those things to happen, from beginning to end. The process of writing an outline can be helped by thinking of how the program must begin, and what must be done before the user starts to interact with the application. Think of any data or actions that need to be defined before the program starts. Then think of what must happen to accommodate each possible interaction the user might choose. In some cases, for example, all possible actions may occur as a result of the user clicking various GUI widgets. That should elicit the thought of certain bits of GUI code structure, and you can begin writing an outline to design a GUI interface. If you imagine an online CGI application, the user will likely work with forms on a web page. You can begin to design HTML forms, which will inevitably lead to specifying the variables that are passed to the CGI app. If your program will run as a simple command line app, the user may respond to text questions. Again, some code from the example applications in this tutorial should come to mind, and you can begin to form a coding structure that enables the general user interface and work flow.
Sometimes it's simpler to begin thinking through a development process using console interactions. It tends to be easier to develop a CGI application if you've got working console versions of various parts of the program. Whatever your conceived interface, think of all the choices the user can make at any given time, and provide a user interface component to allow for those choices. Then think of all the operations the computer must perform to react to each user choice, and describe what must happen in the code.
As you tackle each line of code, use natural language pseudo code to organize your thoughts. For example, if you imagine a button in a GUI interface doing something for your user, you don't need to immediately write the REBOL code that the button runs. Initially, just write a description of what you want the button to do. The same is true for functions and other chunks of code. As you flesh out your outline, describe the language elements and coding thought you conceive to perform various actions or to represent various data structures. The point of writing pseudo code is to keep clearly focused on the overall design of the program, at every stage of the development process. Doing that helps you to avoid getting lost in the nitty gritty syntax details of actual code. It's easy to lose sight of the big picture whenever you get involved in writing each line of code.
As you convert you pseudo code thoughts to language syntax, remember that most actions in a program occur as a result of conditional evaluations (if this happens, do this...), loops, or linear flow from one action to the next. If you're going to perform certain actions multiple times or cycle through lists of data, you'll likely need to run through some loops. If you need to work with changeable data, you'll need to define some variable words, and you'll probably need to pass them to functions to process the data. Think in those general terms first. Create a list of data and functions that are required, and put them into an order that makes the program structure build and flow from one definition, condition, loop, GUI element, action, etc., to the next.
What follows are a number of case studies that describe how I've approached various programming tasks in a productive way. Each example traces my train of thought from the organizational process through the completed code.
20.1 Case: Scheduling Teachers
In my music lesson business, teachers were familiar with hand written paper schedules that looked like this:
Monday: 3 student1, 555-1234, parent's names, payment history, notes 3:30 student2, 555-1234, parent's names, payment history, notes 4 (gone 3-17) student3, 555-1234, payment history, notes 4:30 student4, 555-1234, parent's names, payment history, notes 5 student5, 555-1234, parent's names, payment history, notes Tuesday: 3 ---- 3:30 ---- 4 (john doe 3-18) ---- 4:30 ---- 5 student1, 555-1234, parent's names, payment history, notes 5:30 student2, 555-1234, parent's names, payment history, notes 6 student3, 555-1234, parent's names, payment history, notes 6:30 ---- 7 student4, 555-1234, parent's names, payment history, notes 7:30 ---- 8 student5, 555-1234, parent's names, payment history, notes . . .To run my business, I wanted to create the above schedule format on a web page, and frame it in an HTML document that had some permanent info which teachers wouldn't alter. I wanted each teacher to be able to make adjustments to their schedule without having to mess with ftp or anything having to do with the web site. I just wanted them to be able to click a desktop icon, type changes into their schedule, and have it appear on a web page. I imagined a simple application that would do those things, and came up with this basic outline of how it could work:
- Download a teacher's current schedule text file.
- Backup a copy of the existing schedule, just in case.
- Edit the schedule.
- Upload the altered schedule data back to the website.
- Include the new schedule text in an HTML template, retaining the proper line format.
- Confirm that the changes were made correctly and that they displayed correctly on the web page.
- Keep the teacher interface simple and intuitive, like writing on a piece of paper.
After looking at the above outline, I just did each step above in the most direct way possible in REBOL code:
; first set I some initial required variables: url: http://website.com/teacher ftp-url: ftp://user:pass@website.com/public_html/teacher ; ... and gave the teacher some instructions: alert {Edit your schedule, then click save and quit. The website will be automatically updated.} ; 1) download the file containing the schedule text: write %schedule.txt read rejoin [url "/schedule.txt"] ; 2) create a timestamped backup on the web server: write rejoin [ftp-url "/" now/date "_" now/time ".txt"] read %schedule.txt ; 3 and 7) edit the text: editor %schedule.txt ; 4) save the edited text back to the web site: write rejoin [ftp-url "/schedule.txt"] read %schedule.txt ; 6) confirm that the changes are displayed correctly: browse urlTo satisfy step 5 in the outline, I created a downloadable executable (".exe" file) of the above program (using XpackerX), and uploaded it to the web site. In the http://website.com/teacher folder on the web site, I created an index.cgi script containing the following code:
#!/home/path/public_html/rebol/rebol -cs REBOL [] print "content-type: text/html^/" print {<a href="./scheduler.exe" target=_blank>Download Scheduler</a><br>} print rejoin ["<pre>" read %schedule.txt "</pre>"]The first HTML line creates a download link, so that the teacher can download and run his scheduler program at any remote location. The second line includes the preformatted schedule text on the web page. I can put any other HTML I want on this page, which the teacher never touches (their contact information, lesson rates, information about vacation dates, types of students they want to teach, etc.).
What could have been a very long and involved database programming task was accomplished in minutes, and was used every day for many months in the business. The free form format enabled by using a simple text file provided the opportunity to incorporate various notes, changes, and info that would otherwise be awkward to include or difficult to emphasize in a database type scheduling app. In this case, writing the pseudo code outline provided an immediate solution, and it worked out to be the best way to satisfy our needs. You'll see later how I built this basic idea into a much more complex application which runs a busy business of 25+ instructors.
20.2 Case: A Simple Image Gallery CGI Program
When putting together the web site for my music lesson business, I wanted to regularly add photos of students performing at various events. At first, I just uploaded the photos individually, and added a link to the folder that contained them. As the collection grew, I wanted users to see the images more easily, without having to click on each individual file name. So, I put together a simple flash presentation that showed the images one by one. But updating that presentation required too much maintenance. What I wanted was to simply upload photos, and have them all display in a nice format on a single web page, without any required maintenance. This type of small CGI application was perfectly suited to REBOL. It only took a few minutes to write, and it now gets used every day.
For this program, here's the outline and pseudo code I worked through in my head:
- Start by creating a simple command line script on my home computer that reads a directory listing and uses a foreach loop to run through the files and perform necessary actions.
- Within the foreach loop, check for specified image types (extensions in each file name), and only work with those files. Add a counter to display the total number of images. To do that, use a counter variable and increment it each time through the loop.
- In the foreach loop, wrap each image in the list in the HTML tags required to disply them on a web page. Add necessary headers to create a CGI script that runs on the web site. The script should print the HTML to the visitor's browser so they see a web page containing all the images.
Here's the code for step 1:
REBOL [] folder: read %. foreach file folder [ print file ; this is just a dummy action to be sure the loop is working properly ] haltFor step 2, I added the counter variable, and checked for specified image types using an "if any" conditional expression:
REBOL [] folder: read %. count: 0 foreach file folder [ if any [ find file ".jpg" find file ".gif" find file ".png" find file ".bmp" ] [ print file count: count + 1 ] ] print rejoin [newline "Total Images: " count] haltI shortened that script a bit by using an alternate version which relies on nested foreach loops. The alternate code makes the list of potential image types easier to extend in the future:
REBOL [] folder: read %. count: 0 foreach file folder [ foreach ext [".jpg" ".gif" ".png" ".bmp"] [ if find file ext [ print file count: count + 1 ] ] ] print rejoin [newline "Total Images: " count] haltFor the last step, I borrowed a line from the earlier "guitar chord diagram maker" example. It builds the HTML required to display each image on a web page. I replaced the dummy print function above with this code:
print rejoin [{<img src="} file {">}]Finally, I added the typical CGI headers and page formatting code required to make REBOL CGI scripts perform correctly (see the previous CGI examples in this tutorial for similar patterns):
#! /home/path/public_html/rebol/rebol -cs REBOL [title: "Photo Viewer"] print "content-type: text/html^/" print [<HTML><HEAD><TITLE>"Jam Session Photos"</TITLE></HEAD><BODY>] print read %pageheader.html folder: read %. count: 0 foreach file folder [ foreach ext [".jpg" ".gif" ".png" ".bmp"] [ if find file ext [ print [<BR> <CENTER>] print rejoin [{<img src="} file {">}] print [</CENTER>] count: count + 1 ] ] ] print [<BR>] print rejoin ["Total Images: " count] print read %pagefooter.htmlI uploaded that script to the folder containing images on our web server, and updated the link to the photos on our web site. Now, we just upload new images directly to the server, and when web site visitors click the "Photos" link on our site, they instantly see a dynamically created web page full of all images currently contained in that folder.
20.3 Case: Days Between Two Dates Calculator
In my business, teachers often need to figure the number of days that are between any two given dates. I can do that easily with the REBOL interpreter - just subtract any one date from another. For the unfortunate souls who don't know REBOL, I wanted to create a little GUI app that would quickly figure the calculation with some simple pointing and clicking.
This application ended up being built in stages. I started with this very simple pseudo-code idea for a script:
- Use the "request-date" function to get a start date from the user. Assign the response to a variable.
- Run the request-date function again to get an end date from the user. Assign that response to another variable.
- Subtract the end-date variable from the start-date variable. Assign the result to a third variable.
- Alert the user with the result.
That's all very straight forward. Here's the working code:
sd: request-date ; get the START-DATE ed: request-date ; get the END-DATE db: ed - sd ; calculate the DAYS-BETWEEN alert rejoin ["Days between " sd " and " ed ": " db] ; display the resultThat was too easy. So I decided to create a bit more of a GUI interface. Here's the pseudo-code thought process I went through:
- Create a "view layout" window and have a separate button run each of the request-date functions (start-date and end-date).
- Run the days-between calculation after the end-date is selected, and display the result in a text field. In order for this to happen, the numeric days-between result needs to be converted to a text string (because fields can only display text string values). Don't forget to update the displayed results with the "show" function.
Here's the code:
REBOL [title: "Days Between"] view layout [ btn "Select Start Date" [sd: request-date] btn "Select End Date" [ ed: request-date db/text: to-string (ed - sd) show db ] h1 "Days Between:" db: field ]It works, but I'd like the user to be able to see the chosen dates in text fields. Here's my pseudo-code thought process for that feature addition:
- I'll add two more text fields to the GUI layout.
- Whenever the user selects a new start/end date, I'll update the appropriate text field to display the selected dated. In order for that to work properly, again, I'll need to use the "to-string" function to convert the chosen date to a text value.
Here's the code I came up with to make those changes:
REBOL [title: "Days Between"] view layout [ btn "Select Start Date" [ sd: request-date ; Update the start-date text field: sdt/text: to-string sd show sdt ] ; Here's the field to display the selected start-date: sdt: field btn "Select End Date" [ ed: request-date ; Update the end-date text field: edt/text: to-string ed show edt db/text: to-string (ed - sd) show db ] ; Here's the field to display the chosen end-date: edt: field h1 "Days Between:" db: field ]As it stands now, the program will crash if I select the end date before setting the start-date (because the days-between calculation tries to run without any value set for the start-date variable). In order to fix that, here's the pseudo-code thought process I went through:
- I'll start the program by setting the "st" and "ed" variables (start-date and end-date) to an initial value of today's date ("now/date").
- I'll display the initial start and end dates in the GUI text fields. In order for that to work properly, again I'll need to use the "to-string" function to convert the date into a text value.
Here's how the program looks when I make those changes:
REBOL [title: "Days Between"] ; set the initial values for start/end date: sd: ed: now/date view layout [ btn "Select Start Date" [ sd: request-date sdt/text: to-string sd show sdt ] ; show the initial start date in this field: sdt: field to-string sd btn "Select End Date" [ ed: request-date edt/text: to-string ed show edt db/text: to-string (ed - sd) show db ] ; show the initial end date in this field: edt: field to-string ed h1 "Days Between:" db: field ]Great, it works, but the days-between calculation still only runs when I change the end date. I'll add the days-between calculation code to the "Select Start Date" button:
REBOL [title: "Days Between"] sd: ed: now/date view layout [ btn "Select Start Date" [ sd: request-date sdt/text: to-string sd show sdt ; Run the days-between calculation, and update the display: db/text: to-string (ed - sd) show db ] sdt: field to-string sd btn "Select End Date" [ ed: request-date edt/text: to-string ed show edt db/text: to-string (ed - sd) show db ] edt: field to-string ed h1 "Days Between:" db: field ]As I played with the program a bit, I realized that it would be great if the user could manually enter/edit the chosen dates. Here's my thought process:
- I'll run the days-between calculation whenever the user makes a change to the text field.
- I'll need to stop using the "sd" and "ed" variables to perform the calculation, and instead use the text contained in the GUI fields, in order to be sure I'm working with any potentially edited text values.
- Again, I'll need to pay attention to converting dates back and forth between text and date data types. Data displayed in the GUI text fields needs to be converted to a text string, using the "to-text" function, and data used to perform the days-between calculation must be converted to a date value, using the "to-date" function. REBOL automatically knows how to subtract and add dates, but it doesn't know how to perform those types of calculations on text strings. Just use the "to-date" function to perform appropriate calculations, and it works like magic.
REBOL [title: "Days Between"] sd: ed: now/date view layout [ btn "Select Start Date" [ sd: request-date sdt/text: to-string sd show sdt ; Perform the days-between calculation using the value ; contained in the end-date text field (first convert ; that text value to a date value): db/text: to-string ((to-date edt/text) - sd) show db ] sdt: field to-string sd [ ; Perform the days-between calculation using the values ; contained in the start-date and end-date text fields ; (first convert those text values to date values): db/text: to-string ((to-date edt/text) - (to-date sdt/text)) show db ] btn "Select End Date" [ ed: request-date edt/text: to-string ed show edt ; Perform the days-between calculation using the value ; contained in the start-date text field (first convert ; that text value to a date value): db/text: to-string (ed - (to-date sdt/text)) show db ] edt: field to-string ed [ ; Perform the days-between calculation using the values ; contained in the start-date and end-date text fields ; (first convert those text values to date values): db/text: to-string ((to-date edt/text) - (to-date sdt/text)) show db ] h1 "Days Between:" db: field ]Next, I realized that I wanted an additional feature. The program should also be able to figure an end date based upon a given start date and a given number of days-between. Here's the pseudo-code thought process I went through to add that feature:
- Display an initial value of "0" days in the "db" text field (that's the number of days between the initial start and end dates (today - today)).
- If the user manually enters a number of days, add the given number of days to the start date, and update the end-date text field with the result (again, be sure to convert between text and date values, as in each previous example).
Simple. Here's the updated code:
REBOL [title: "Days Between"] sd: ed: now/date view layout [ btn "Select Start Date" [ sd: request-date sdt/text: to-string sd show sdt db/text: to-string ((to-date edt/text) - sd) show db ] sdt: field to-string sd [ db/text: to-string ((to-date edt/text) - (to-date sdt/text)) show db ] btn "Select End Date" [ ed: request-date edt/text: to-string ed show edt db/text: to-string (ed - (to-date sdt/text)) show db ] edt: field to-string ed [ db/text: to-string ((to-date edt/text) - (to-date sdt/text)) show db ] h1 "Days Between:" db: field "0" [ ; Add the manually entered number of days to the start date, ; and update the display: edt/text: to-string ((to-date sdt/text) + (to-integer db/text)) show edt ] ]As I tested the above code, one bug became apparent. If a date is manually entered incorrectly (for example, I tried "267-Aug-2009"), the program would come to a crashing halt with an error message. To fix that, I wrapped each date calculation that involved manual text entry in an "either error? try" routine, and alerted the user with a nice message if they entered anything other than a proper date:
sdt: field to-string sd [ either error? try [to-date sdt/text] [ alert "Improper date format." ] [ db/text: to-string ((to-date edt/text) - (to-date sdt/text)) show db ] ] edt: field to-string ed [ either error? try [to-date edt/text] [ alert "Improper date format." ] [ db/text: to-string ((to-date edt/text) - (to-date sdt/text)) show db ] ]I also added an error check routine to the "db" text field, in case the user entered something other than a valid number of days:
db: field "0" [ either error? try [to-integer db/text] [ alert "Please enter a number." ] [ edt/text: to-string ( (to-date sdt/text) + (to-integer db/text) ) ] show edt ]At this point, every feature I can think of has been added, and all obvious bugs squashed. The evolution of this application is typical of many software case studies. Many large applications start with a basic working idea, then gradually evolve as the code is tested, user interface adjusted, features added, bugs found and eliminated, etc. That process is creative, and it can be really fun and satisfying. When writing your own applications, you have complete control to make them perform however you like :)
Here's the final code:
REBOL [title: "Days Between"] sd: ed: now/date view layout [ btn "Select Start Date" [ sd: request-date sdt/text: to-string sd show sdt db/text: to-string ((to-date edt/text) - sd) show db ] sdt: field to-string sd [ either error? try [to-date sdt/text] [ alert "Improper date format." ] [ db/text: to-string ((to-date edt/text) - (to-date sdt/text)) show db ] ] btn "Select End Date" [ ed: request-date edt/text: to-string ed show edt db/text: to-string (ed - (to-date sdt/text)) show db ] edt: field to-string ed [ either error? try [to-date edt/text] [ alert "Improper date format." ] [ db/text: to-string ((to-date edt/text) - (to-date sdt/text)) show db ] ] h1 "Days Between:" db: field "0" [ either error? try [to-integer db/text] [ alert "Please enter a number." ] [ edt/text: to-string ( (to-date sdt/text) + (to-integer db/text) ) ] show edt ] ]I packaged that script as an executable program, using XpackerX, and distributed it to all the teachers. We use it every day. (... Of course, I still just use the REBOL command line to perform my date calculations :)
20.4 Case: Simple Search
It happens fairly often that I need to search for text within files on my various web site servers and on computers at my office and home. Every operating system has programs to accomplish such searches, but I'm often unhappy with the way those programs work, so I decided to create my own customized tool that operates the way I want, on every machine. This was a simple problem for which REBOL allowed me to devise a quick solution.
I started the process by thinking through the algorithm in terms of normal human activity. If I was to manually search through every file in a given folder and all it's subfolders, here's the pseudo-code that describes what I'd do:
- Obtain a directory listing of all items in a given start folder.
- For each item in the list, if the item is a file, read/scan it to see if it contains the given search text.
- For each item in the list, if the item is a folder, switch into that folder and repeat steps 1-3 (I must include step 3 in step 3 itself if I want to do the same thing to every subfolder - otherwise the process would stop with 1 subfolder - very important!). When done, switch back up to the parent folder.
Step 1 is easy in REBOL code:
; define a starting folder: current-folder: %.\ ; read the directory listing: read current-folderStep 2 isn't much more complicated:
; define the search text: phrase: "the" ; for every item in the directory listing: foreach item (read current-folder) [ ; if the item is a file: if not dir? item [ ; read/scan the file for the given phrase: if find (read to-file item) phrase [ ; display the path/filename in which ; the search text is found: print rejoin [{"} phrase {" found in: } what-dir item] ] ] ]Step 3 is recursive - the actions in step 3 include executing the actions in step 3. Such recursion operations typically require creating a function that contains the actions desired, which include calling the function itself, in which those actions are contained. Here's the new code needed for step 3 - notice that the function is named "recurse" and that that "recurse" function is called within the body of that recurse function:
; create the function name: recurse: func [current-folder] [ ; for every item in the directory listing: foreach item (read current-folder) [ ; if the item is a folder: if dir? item [ ; change into that folder: change-dir item ; and do all the steps in the function again: recurse %.\ ; go back up to the parent directory when ; there are no more sub-folders: change-dir %..\ ] ] ]I put all of the code for steps 1 and 2 into that recurse function, and now it's fully operational:
recurse: func [current-folder] [ foreach item (read current-folder) [ if not dir? item [ if find (read to-file item) phrase [ print rejoin [{"} phrase {" found in: } what-dir item] ] ] ] foreach item (read current-folder) [ if dir? item [ change-dir item recurse %.\ change-dir %..\ ] ] ]While testing the function, I found that some of the system files could not be read. That produced a read error. I squashed that bug by adding a bit of "if error? try []" code:
foreach item (read current-folder) [ if not dir? item [ if error? try [ if find (read to-file item) phrase [ print rejoin [{"} phrase {" found in: } what-dir item] ]] [print rejoin ["error reading " item]] ] ]To complete the program, I added a few variables to request the search text and the starting folder. I created a string variable to hold a complete text list of all files in which the search phrase was found, and I printed a little header to show that the search process had begun. When complete, the text list of files is displayed in the REBOL text editor. Here's the final version:
REBOL [title: "Simple Search"] phrase: request-text/title/default "Text to Find:" "the" start-folder: request-dir/title "Folder to Start In:" change-dir start-folder found-list: "" recurse: func [current-folder] [ foreach item (read current-folder) [ if not dir? item [ if error? try [ if find (read to-file item) phrase [ print rejoin [{"} phrase {" found in: } what-dir item] found-list: rejoin [found-list newline what-dir item] ]] [print rejoin ["error reading " item]] ] ] foreach item (read current-folder) [ if dir? item [ change-dir item recurse %.\ change-dir %..\ ] ] ] print rejoin [{SEARCHING for "} phrase {" in } start-folder "...^/"] recurse %.\ print "^/DONE^/" editor found-list haltNext I wanted a CGI version to run on my web sites. I'll need to input my search text and starting folder using an HTML form:
print [<CENTER><TABLE><TR><TD>] print [<FORM ACTION="./search.cgi">] print ["Text to search for:" <BR> <INPUT TYPE="TEXT" NAME="phrase"><BR><BR>] print ["Folder to search in:" <BR> <INPUT TYPE="TEXT" NAME="folder" VALUE="../yourfolder/" ><BR><BR>] print [<INPUT TYPE="SUBMIT" NAME="Submit" VALUE="Submit">] print [</FORM>] print [</TD></TR></TABLE></CENTER>]To make this work on the web site, I'll need to include all the standard CGI headers, and decode the submitted data (this standard code format is copied from the earlier CGI examples in this tutorial):
#! /home/yourpath/public_html/rebol/rebol -cs REBOL [] print "content-type: text/html^/" print [<HTML><HEAD><TITLE>"Search"</TITLE></HEAD><BODY>] ; print read %template_header.html submitted: decode-cgi system/options/cgi/query-stringHere's the final CGI version:
#! /home/yourpath/public_html/rebol/rebol -cs REBOL [] print "content-type: text/html^/" print [<HTML><HEAD><TITLE>"Search"</TITLE></HEAD><BODY>] ; print read %template_header.html submitted: decode-cgi system/options/cgi/query-string if not empty? submitted [ phrase: submitted/2 start-folder: to-file submitted/4 change-dir start-folder found-list: "" recurse: func [current-folder] [ foreach item (read current-folder) [ if not dir? item [ if error? try [ if find (read to-file item) phrase [ print rejoin [{"} phrase {" found in: } what-dir item {<BR>}] found-list: rejoin [found-list newline what-dir item] ]] [print rejoin ["error reading " item]] ] ] foreach item (read current-folder) [ if dir? item [ change-dir item recurse %.\ change-dir %..\ ] ] ] print rejoin [{SEARCHING for "} phrase {" in } start-folder {<BR><BR>}] recurse %.\ print "<BR>DONE <BR>" ; save %found.txt found-list ; print read %template_footer.html quit ] print [<CENTER><TABLE><TR><TD>] print [<FORM ACTION="./search.cgi">] print ["Text to search for:" <BR> <INPUT TYPE="TEXT" NAME="phrase"><BR><BR>] print ["Folder to search in:" <BR> <INPUT TYPE="TEXT" NAME="folder" VALUE="../yourfolder/" ><BR><BR>] print [<INPUT TYPE="SUBMIT" NAME="Submit" VALUE="Submit">] print [</FORM>] print [</TD></TR></TABLE></CENTER>] ; print read %template_footer.htmlI use this search program constantly. It took only a few minutes to write using the most basic principles and syntax patterns seen over and over again in this tutorial, and it runs on every computing device I own, including all my home and work computers, my web sites, my phone, etc.
20.5 Case: A Simple Calculator Application
Next is a quick case study about how to build a small calculator application in REBOL. This is not so much a real life business case study - it just seems that building a GUI calculator app is an obligatory cliche among computer programming tutorials. In fact, such a calculator can be easily enhanced with specialized capabilities that, for example make it perfectly useful for real estate agents to calculate mortgage rates, or for any personalized computations a business owner may need to perform regularly.
I started with a pseudo-code outline of how I wanted the program's user interface to look when complete:
- There needs to be a display area to show numerical digits as they are input, as well as the results of calculations. A simple GUI text field will work fine for that display.
- There need to be GUI buttons to enter numerical digits and a decimal point, as well as buttons for mathematical operators, and a button to execute calculations (an "=" sign). Each of those three categories of buttons will do generally the same types of actions, so I'll create them as separate GUI styles, each with shared action blocks.
That was enough of an outline to begin writing some actual REBOL GUI code. I toyed with various window, button, and font sizes/colors until the layout looked acceptable. Here's what I came up with using the pseudo-code above:
view center-face layout/tight [ size 300x350 space 0x0 across ; basic window sizing/spacing display: field 300x50 font-size 28 "0" return ; the display style butn button 100x50 [ ; add the action code here for number buttons ] style eval button 100x50 brown font-size 13 [ ; add the action code here for operator buttons ] butn "1" butn "2" butn "3" return ; arrange those buttons butn "4" butn "5" butn "6" return ; in the window butn "7" butn "8" butn "9" return butn "0" butn "." eval "+" return eval "-" eval "*" eval "/" return button 300x50 gray font-size 16 "=" [ ; add the action code here for "=" sign button ] ]To turn the above display into a functioning calculator, next I needed to think about what must happen when the number buttons are clicked. Here's some pseudo-code to outline that thought process:
- The user must be able to enter numbers that are longer than a single digit, so every time a number button is clicked, that numerical digit should be appended to the digits in the display. I'll use "rejoin" to build the display number, and then I'll set a variable to store that number, each time a new digit is clicked.
- In the GUI code above, I started with a "0" in the display field. That'll need to be erased before any other numbers are displayed.
That's all easy enough to do in REBOL code:
if display/text = "0" [display/text: ""] ; erase the displayed "0" display/text: rejoin [display/text value] ; build the displayed # show display cur-val: display/text ; use a variable to save the displayed #Now I need to think about what should happen when the operator buttons are clicked:
- I need to assign a variable to save the number currently entered in the GUI display (that number is already saved temporarily in the "cur-val" variable above).
- Erase the display to prepare for a new number to be entered.
- Assign a variable to save the operator selected.
That's all very simple - in fact, it's simpler in real REBOL code than it is in pseudo-code:
prev-val: cur-val ; save the displayed # in a variable display/text: "" show display ; erase the display cur-eval: value ; save the selected operator in a variableFinally, I need to think about what happens when the "=" button is clicked:
- A computation must be evaluated, using the first number entered (the "prev-val" variable above), the operator entered (the "cur-eval" variable), and the second number entered ("cur-val").
- The display area needs to be updated to show the value of that computation.
The easiest way I could think to build the computation was to use the "rejoin" function to build a string representing the first number entered, the operator entered, and the second number entered. I could then evaluate that computation by simply using the "do" function on the built string:
cur-val: do rejoin [prev-val " " cur-eval " " cur-val] display/text: cur-val show displayThat was all very easy. Here's the code we've got so far:
view center-face layout/tight [ size 300x350 space 0x0 across display: field 300x50 font-size 28 "0" return style butn button 100x50 [ if display/text = "0" [display/text: ""] ; erase the "0" display/text: rejoin [display/text value] ; build the # show display cur-val: display/text ; use a variable to save the displayed # ] style eval button 100x50 brown font-size 13 [ prev-val: cur-val display/text: "" show display cur-eval: value ] butn "1" butn "2" butn "3" return butn "4" butn "5" butn "6" return butn "7" butn "8" butn "9" return butn "0" butn "." eval "+" return eval "-" eval "*" eval "/" return button 300x50 gray font-size 16 "=" [ cur-val: do rejoin [prev-val " " cur-eval " " cur-val] display/text: cur-val show display ] ]After testing the code a bit, I found a bug. Whenever the first computation is completed, any additional digits entered are appended to the total displayed from the first calculation. That happens in this line of code in the number buttons definition (the "butn" style):
display/text: rejoin [display/text value]That problem is easily solved by setting a flag variable when the "=" button is clicked:
display-flag: true. . . and then checking for that flag every time a number button is clicked - if the flag is set (meaning that a total is being displayed), erase the display so that a new number can be entered, and reset the flag variable:
if display-flag = true [display/text: "" display-flag: false]That fixes the first bug. Testing the program a little more, I found another small bug. The calculator would crash with an error if the "=" sign or any of the operator buttons were clicked before numerical digits were properly entered. That was easy to fix by simply setting some default variables in the beginning of the program - that's a fundamentally good practice in any sort of programming:
prev-val: cur-val: 0 cur-eval: "+" display-flag: falseAfter using the program a bit more, I found another bug. If the equal sign was clicked repeatedly, it would perform calculations that weren't intended. The following line was the culprit:
cur-val: do rejoin [prev-val " " cur-eval " " cur-val]The "cur-val" variable was updated every time the "=" button was clicked, whether or not a new number or operator was entered. To squash that bug, I just used the "display-flag" variable that was created earlier to check if a total was being displayed. I wrapped all of the action code performed when the "=" sign was clicked, into an "if" conditional, and only performed those actions if the flag had been reset (only if a total was not being displayed):
if display-flag <> true [ ... ]Finally, there was a bug I'd had in mind from the beginning: if the user tried to divide by 0, the program would crash. To handle this situation, I added the following conditional check inside the code above:
if ((cur-eval = "/") and (cur-val = "0")) [ alert "Division by 0 is not allowed." break ]At this point, the program appeared to be reasonably bug free, so I decided to add an additional feature that seemed useful while testing the code. I wanted a running printout of all calculations performed, similar to paper tape on traditional printing calculators. Adding that feature was as simple as could be. At the beginning of the program I added a "print 0" line, and then added the following line changes to the "=" button:
prin rejoin [prev-val " " cur-eval " " cur-val " = "] print display/text: cur-val: do rejoin [ prev-val " " cur-eval " " cur-val ]Here's the final calculator program:
REBOL [title: "Calculator"] prev-val: cur-val: 0 cur-eval: "+" display-flag: false print "0" view center-face layout/tight [ size 300x350 space 0x0 across display: field 300x50 font-size 28 "0" return style butn button 100x50 [ if display-flag = true [display/text: "" display-flag: false] if display/text = "0" [display/text: ""] display/text: rejoin [display/text value] show display cur-val: display/text ] style eval button 100x50 brown font-size 13 [ prev-val: cur-val display/text: "" show display cur-eval: value ] butn "1" butn "2" butn "3" return butn "4" butn "5" butn "6" return butn "7" butn "8" butn "9" return butn "0" butn "." eval "+" return eval "-" eval "*" eval "/" return button 300x50 gray font-size 16 "=" [ if display-flag <> true [ if ((cur-eval = "/") and (cur-val = "0")) [ alert "Division by 0 is not allowed." break ] prin rejoin [prev-val " " cur-eval " " cur-val " = "] print display/text: cur-val: do rejoin [ prev-val " " cur-eval " " cur-val ] show display display-flag: true ] ] ]
20.6 Case: A Backup Music Generator (Chord Accompaniment Player)
In my music lesson business, one of the things we teach is improvisation ("jam session") skills. In order for beginning students to practice, I created a simple program they could use to hear and play along with any given chord progression, at any given tempo. Building such a program with REBOL was easy. Designing an application to play pre-recorded chords from a given text list took less than a half hour.
Here's the basic outline I came up with to get started (a very basic knowledge of chord notation is required for this case study):
- Record wave files of major, minor, dominant 7th, half diminished, diminished 7th, minor 7th, and major 7th chords on all 12 root notes (A, A#, B, C, C#, D, D#, E, F, F#, G, and G#), along with a few other commonly used chord voicings. The recordings all needed to be of short block chords, of the exact same duration and volume.
- Compress and embed the wave files using the binary resouce embedder from earlier in this text.
- Load each sound into memory and give each one a variable label.
- Create a GUI with text fields for the chords to play, and the tempo. Add "play" and "stop" buttons to control the action.
- When the "play" button is clicked, play the wave data for each chord in the given progression, using the given timing gap. There will need to be some multitasking code to enable the looping chord progressions to be stopped.
- Add some buttons to save and load the chord progressions, along with a button to provide some help/instructions.
The first step was mechanical - no programming required. I recorded the sounds of all twelve major, minor, and dominant 7th chords using my favorite recording software and my guitar. I saved each sound as a separate wave file in 1 directory on my hard drive (I later recorded a much larger collection of chords, but this was enough to get started).
For step 2 in the outline, I used a variation of the binary resouce embedder program from earlier in this text to loop through the files in the directory:
REBOL [] system/options/binary-base: 64 sounds: copy [] foreach file load %./ [ print file uncompressed: read/binary file compressed: compress to-string uncompressed if ((length? uncompressed) > 5000) [ append sounds compressed ] ] editor soundsIt provided one huge block of data containing every one of those sounds in embedded format. The output of that chord data can be seen at http://musiclessonz.com/rebol_tutorial/backup.r:
64#{ eJxEd2VUW833ddyIE8fdHYoVCi1S2mJ1F+ruTvvU3d3dC1RpC7S4ExwSJFgSSEhC EmIQIvfl9//yrr32mTMz58vcNXfP2XOTEhIQx0CgRbEL4zds32dPBIFA4EnEZYFA...For step 3, I placed the "load to-binary decompress" code (found earlier in this text) in front of each embedded sound file data chunk (to decompress the data and load the sound into memory for quick use). I gave each chord it's appropriate chord label (A major, Bb major, C minor, G7, etc.). In doing so, I decided to use all flat symbols for any root notes that had accidentals (i.e., F# = Gb, C# = Db, etc. (no sharps)). Here's how the code for the A major and Bb minor chords looked:
a: load to-binary decompress 64#{ eJxEd2VUW833ddyIE8fdHYoVCi1S2mJ1F+ruTvvU3d3dC1RpC7S4ExwSJFgSSEhC EmIQIvfl9//yrr32mTMz58vcNXfP2XOTEhIQx0C ... bbm: load to-binary decompress 64#{ eJwstwVcU9//P757d9eMbQwYMWB0d4cgraCogIgdKHY38lb0rZjYXW8VOxGbDukc 3TVqCWPdv32+///j9Tj3nnvuOa9+Pc85iQtjYkr ...Here's the full list of chord labels I created (the underscore symbol was a label that I gave to a silent sound that I recorded, to be used for a beat of rest). I manually labeled each of the chord data with the following labels (using my text editor's search, copy, and paste facilities, that took about ten minutes):
a bb b c db d eb e f gb g ab am bbm bm cm dbm dm ebm em fm gbm gm abm a7 bb7 b7 c7 db7 d7 eb7 e7 f7 gb7 g7 ab7 adim7 bbdim7 bdim7 cdim7 dbdim7 ddim7 ebdim7 edim7 fdim7 gbdim7 gdim7 abdim7 am7b5 bbm7b5 bm7b5 cm7b5 dbm7b5 dm7b5 ebm7b5 em7b5 fm7b5 gbm7b5 gm7b5 abm7b5 am7 bbm7 bm7 cm7 dbm7 dm7 ebm7 em7 fm7 gbm7 gm7 abm7 amaj7 bbmaj7 bmaj7 cmaj7 dbmaj7 dmaj7 ebmaj7 emaj7 fmaj7 gbmaj7 gmaj7 abmaj7 _Step 4 in the outline just required building the following simple GUI. It consists of a few labels, a text area to hold the user-entered chords, a text field for the tempo, and a couple buttons to stop and start the music action. I also decided to add the buttons from step 6 - I even put all that code in here - all that was required was to save and load the contents of the text area. Simple:
view center-face layout [ across h2 "Chords:" tab chords: area 392x300 trim {} return h2 "Delay:" tab tempo: field 50 "0.35" text "(seconds)" tabs 40 tab btn "PLAY" [] btn "STOP" [] btn "Save" [save to-file request-file/save chords/text] btn "Load" [chords/text: load read to-file request-file show chords] btn "HELP" [ alert {} ] ]Now all that's left is step 5. I started by loading the user entered list of chords into a block:
sounds: to-block chords/textI also gave a label to the tempo, and made sure it was treated as a decimal value:
the-tempo: to-decimal tempo/textI took the play-sound function that you've seen earlier, and used its code inside a foreach loop that played each of the sounds in the user provided list (now in the "sounds" block). Because those chord labels now refer to actual pieces of sound data that can be inserted and played directly by the sound port, this was simple:
wait 0 sound-port: open sound:// foreach sound sounds [ do rejoin ["insert sound-port " reduce [sound]] wait sound-port wait the-tempo ]I wrapped the above foreach loop in a forever loop, because I wanted the chord progression to repeat continuously. To stop the music, I first thought that I'd need some multitasking code, but it turns out that it was simpler than expected. All I did was create a flag variable (the word "play"), which was set to false when the GUI stop button was clicked. Inside the above foreach loop, I checked to see if the play variable had been set to false, and if so, broke out of the loop. The stop button then simply closed the sound port after setting the variable flag to false. Below is the full code for the PLAY and STOP buttons in the GUI. Simple :)
btn "PLAY" [ play: true the-tempo: to-decimal tempo/text sounds: to-block chords/text wait 0 sound-port: open sound:// forever [ foreach sound sounds [ if play = false [break] do rejoin ["insert sound-port " reduce [sound]] wait sound-port wait the-tempo ] if play = false [break] ] ] btn "STOP" [ play: false close sound-port ]To finish up the program, I added some instruction text to the alert which pops up when the help button is clicked, and I put in an example chord progression that appears in the text area by default (the chords to "Hotel California"). In testing the program, I realized that if the GUI was closed before the music was stopped, play would continue without any way to stop it. The operating system's task manager was the only way to end the music at that point. To fix that bug, I added some code to trap the close button and stop the music (set the play flag to false and close the sound port), along with a request to "really close the program?". You've seen that sort of code in several previous examples.
Here's the final program (a shortened version, WITHOUT the chord data required to play the example):
REBOL [title: "Chord Accompaniment Player"] play: false insert-event-func [ either event/type = 'close [ if play = true [play: false close sound-port] really: request "Really close the program?" if really = true [quit] ][ event ] ] { . . . all the chord data goes here bm: load to-binary decompress 64#{ eJw8dgdUU0/w7k0vJNTQe++9SpUqCogIiiKgIIq9YAdU7L397NgVRAQEpEnvvfca CCUhQEhCIJUk9/E/7/3f2bN7z92d... } . . . } view center-face layout [ across h2 "Chords:" tab chords: area 392x300 trim { bm bm bm bm gb7 gb7 gb7 gb7 a a a a e e e e g g g g d d d d em em em em gb7 gb7 gb7 gb7 g g g g d d d d gb7 gb7 gb7 gb7 bm bm bm bm g g g g d d d d em em em em gb7 gb7 gb7 gb7 } return h2 "Delay:" tab tempo: field 50 "0.35" text "(seconds)" tabs 40 tab btn "PLAY" [ play: true the-tempo: to-decimal tempo/text sounds: to-block chords/text wait 0 sound-port: open sound:// forever [ foreach sound sounds [ if play = false [break] do rejoin ["insert sound-port " reduce [sound]] wait sound-port wait the-tempo ] if play = false [break] ] ] btn "STOP" [ play: false close sound-port ] btn "Save" [save to-file request-file/save chords/text] btn "Load" [chords/text: load read to-file request-file show chords] btn "HELP" [ alert { This program plays chord progressions. Simply type in the names of the chords that you'd like played, with a space between each chord. For silence, use the underscore ("_") character. Set the tempo by entering a delay time (in fractions of second) to be paused between each chord. Click the start button to play from the beginning, and the stop button to end. Pressing start again always begins at the first chord in the progression. The save and load buttons allow you to store to the hard drive any songs you've created. Chord types allowed are major triad (no chord symbol - just a root note), minor triad ("m"), dominant 7th ("7"), major 7th ("maj7"), minor 7th ("m7"), diminished 7th ("dim7"), and half diminished 7th ("m7b5"). *** ALL ROOT NOTES ARE LABELED WITH FLATS (NO SHARPS) F# = Gb, C# = Db, etc... } ] ]A full, playable version, with the complete data set of embedded chords, can be found at http://musiclessonz.com/rebol_tutorial/backup.r.
Here are a few chord examples to load. All the chords:
a bb b c db d eb e f gb g ab am bbm bm cm dbm dm ebm em fm gbm gm abm a7 bb7 b7 c7 db7 d7 eb7 e7 f7 gb7 g7 ab7 adim7 bbdim7 bdim7 cdim7 dbdim7 ddim7 ebdim7 edim7 fdim7 gbdim7 gdim7 abdim7 am7b5 bbm7b5 bm7b5 cm7b5 dbm7b5 dm7b5 ebm7b5 em7b5 fm7b5 gbm7b5 gm7b5 abm7b5 am7 bbm7 bm7 cm7 dbm7 dm7 ebm7 em7 fm7 gbm7 gm7 abm7 amaj7 bbmaj7 bmaj7 cmaj7 dbmaj7 dmaj7 ebmaj7 emaj7 fmaj7 gbmaj7 gmaj7 abmaj7 _ _ _ _Brown Eyed Girl:
g g c c g g d d7 g g c c g g d d7 g g c c g g d d7 g g c c g g d d7 g g c c g g d d7 g g c c g g d d7 c c d d g g em em c c d d
20.7 Case: FTP Tool
I often use REBOL's built in text editor to edit files on my web server:
editor ftp://user:pass@site.com/path/public_html/file.extThis entire case study evolved from my use of that function. I decided to create a small script to speed up the above process. By hard coding all my FTP info directly into a GUI text field, all I have to do to edit a file on my server is run the script and change the specific file name:
view layout [ p: field "ftp://user:pass@site.com/path/public_html/file.ext" btn "Edit" [ editor to-url p/text ] ]While using that script, I'd often forget the exact names of files I needed, so I decided to add a folder browsing feature to the code. Here's the thought process I went through:
- Add a text list to the script. Instead of entering the URL of a file name in the text field, enter a folder. When I submit the URL now, the script will read the contents of that folder and display each item in the text list.
- When I click an item in the text list, the script will join the selected file name with the given folder, and open the editor at that URL.
Here's the code - as always with REBOL, it's extremely simple:
view layout [ p: field "ftp://user:pass@site.com/path/public_html/" [ f/data: read to-url value show f ] f: text-list [ editor to-url (join p/text value) ] ]This worked well, but after using it a few times, I decided that I still wanted the option to type in a specific file name, to have it open immediately. Here's my thought process:
- Add an "either" condition.
- If the entered URL is a folder, do as in the previous script (I can use the dir? function to perform this check).
- Otherwise edit the entered URL directly.
Here's the code:
view layout [ p: field "ftp://user:pass@site.com/path/public_html/file.ext" [ either dir? to-url value [ f/data: read to-url value show f ][ editor to-url value ] ] f: text-list [ editor to-url join p/text value ] ]I ran into some occasional problems with the dir? function, so I changed that line to read:
either (to-string last value) = "/" [As it stands, the above script is a useful FTP editor. To create a new file, all I have to do is type its path and file name into the text field. REBOL's built in text editor automatically creates the file if it doesn't already exist. As I used this script more, I wanted to be able to navigate folders automatically (without having to type in the names of paths/files at all). Here are my thoughts:
- If the user clicks on a folder, append the folder name to the current folder displayed in the text field, then re-read and display the contents of the new folder in the text list. This effectively changes directories.
- To go up a folder (back to the previous folder), add "../" to the directory contents read from the folder currently displayed in the text field, and show that data in the text list. Also, sort the data, so "../" appears at the top of the list.
- When the user clicks the "../", remove the last portion of the currently entered path (everything back to the prior slash symbol), update the text field, and read/display the files in that folder in the text list. For example, if the currently displayed path is "ftp://user:pass@site.com/path/public_html/folder/", remove the "folder/" portion, update the text field to "ftp://user:pass@site.com/path/public_html/", and read/display the contents of that folder.
Step 1 is easy. Just rejoin the currently displayed folder in the text field, with the value selected from the text list:
p/text: rejoin [p/text value] show pStep 2 is just as easy. Append "../" to the line of code that reads and displays the files in the current folder ("f/data: read to-url value"), and sort it:
f/data: sort append (read to-url p/text) "../" show fFor step 3, we need to search for the 2nd to last "/" symbol in the currently displayed path, and remove everything after it. To do that, we'll start searching backward from the 2nd to last character (to eliminate the final "/" character in the folder, because we want the 2nd to last "/" character). That's easy - start searching backwards from ((length? p/text) - 1). I decided to use a "for" loop starting at that index position, and decrementing by 1. Each time through the loop, pick the character at the current index position, and if it is "/", erase all characters after that index position (use the "clear" function to delete everything at (current index + 1)). Then, update the text field with the new path, read the directory contents, and display in the text list, as in steps 1 and 2 above:
for i ((length? p/text) - 1) 1 -1 [ if (to-string (pick p/text i)) = "/" [ clear at p/text (i + 1) show p f/data: sort append read to-url p/text "../" show f break ; quit the loop once the 2nd to last "/" is found ] ]As I looked at that code, I realized that a simpler way to do the same thing would be to use the following code. First clear the "/" at the end of the text, then clear everything after the next "/" character ("find/last" searches backward from the end):
clear at p/text (index? find/last p/text "/") clear at p/text ((index? find/last p/text "/") + 1) show p f/data: sort append read to-url p/text "../" show fI added those changes to the current script:
view layout [ p: field "ftp://user:pass@site.com/path/" [ either dir? to-url value [ f/data: sort append (read to-url p/text) "../" show f ][ editor to-url value ] ] f: text-list [ ; if the user selects "../", run the code from step 3: either (to-string value) = "../" [ for i ((length? p/text) - 1) 1 -1 [ if (to-string (pick p/text i)) = "/" [ clear at p/text (i + 1) show p f/data: sort append read to-url p/text "../" show f break ] ] ][ ; if the user selects a folder, run code from steps 1 and 2: either (to-string last value) = "/" [ p/text: rejoin [p/text value] show p f/data: sort append read to-url p/text "../" show f ][ editor to-url rejoin [p/text value] ] ] ] ]Now that's a useful FTP editor! We can browse through any folder and edit/save any file, just by clicking items with the mouse. I could certainly stop there, but as I used the program, more desired features kept popping up. Next, I decided to add an image viewing feature. The thought process is simple: if a selected file is an image (jpg, png, gif, or bmp), open a new GUI window, and load/display the image. Otherwise, open the file with the text editor, as before. That's easy:
either find [%.jpg %.png %.gif %.bmp] suffix? value [ view/new layout [image load to-url rejoin [p/text value]] ][ editor to-url rejoin [p/text value] ]I would occasionally click a file accidentally while browsing, so I added the following line to check whether the code above should actually be run:
if ((request "Edit/view this file?") = true) [(do the code above)]I actually have several sites that I update regularly. It would be easy to simply copy this script several times, and change the hard coded FTP information for each web site, but I wanted a more elegant solution. I decided to add a mechanism to save and load FTP info for any website, in a config file. First I created a button in the GUI to save FTP info for a site. Here's the thought process of what should happen when the button is clicked:
- Use a text requester to ask the user for the FTP info. I'll save it in URL format, as one line, exactly the way it's typed into the GUI text field. Use the current FTP URL typed into the text field as the default text in the requester.
- To avoid an error, stop there if the user cancels out of the requester (i.e., doesn't enter anything).
- Use a file requester to ask the user for a text file to save the info to (default to "%ftp.cfg").
- Add another error check to make sure the user has actually selected a file.
- If the file doesn't exist, create it by writing the FTP URL line to a new file.
- If the file does exist, append the FTP URL line to the existing file.
- Alert the user that the operation is complete.
As always with REBOL, each of those steps is extremely simple:
btn "Save URL" [ url: request-text/title/default "URL to save:" p/text if url = none [break] config-file: to-file request-file/file/save %/c/ftp.cfg if (url <> none) and (config-file <> %none) [ if not exists? config-file [ write/lines config-file ftp://user:pass@website.com/ ] write/append/lines config-file to-url url alert "Saved" ] ]Now I need a button to load saved URLs. Here's the thought process:
- Use a file requester to have the user select a config file (default to "%ftp.cfg")
- Use an "either" condition to check if the file exists.
- If the file doesn't exist, notify the user that they need to first save some URLs to a config file.
- If the file does exist, have the user select the desired FTP information from the file (one URL line from the file). An easy way to do this is with the "request-list" function. I'll load each line in the config file into a block (use a foreach loop to read and append each line in the file to a new block), and then display that list with the request-list function. When the user selects a line from the list, I'll copy the selected line of text to the GUI text list (the original text field in this program, containing the FTP information).
Again, that's all very easy to do:
btn "Load URL" [ config: to-file request-file/file %/c/ftp.cfg either exists? config [ if (config <> %none) [ my-urls: copy [] foreach item read/lines config [append my-urls item] if error? try [ p/text: copy request-list "Select a URL:" my-urls ] [break] ] ][ alert "First, save some URLs to that file..." ] show p focus p ]I added a "focus" function to the end of the above button code, so that the user can just hit their [ENTER] key to connect to the server after selecting a URL from the config file. It makes sense that some users would expect to have "Load URL", "Save URL", and "Connect" buttons, so I also decided to add a separate "Connect" button to the GUI. Since clicking on the text field and clicking on the button both do the same thing, I created a "connect" function, so that code wouldn't need to be duplicated in the action block of each of those GUI widgets. In that function I added an error check, so that the program doesn't crash if the user types in incorrect FTP information:
connect: does [ either (to-string last p/text) = "/" [ if error? try [ f/data: sort append read to-url p/text "../" show f ][ alert "Not a valid FTP address, or the connection failed." ] ][ editor to-url p/text ] ]As I tested the code, I realized that it would be much better to increase the size of the text list and the text field, so that I could view the entire FTP URL and the listed file/folder names. 600x350 pixels works well (fits on screens with low resolution, but is big enough to see full file paths). This is how the program looks now:
REBOL [title: "FTP Tool"] connect: does [ either (to-string last p/text) = "/" [ if error? try [ f/data: sort append read to-url p/text "../" show f ][ alert "Not a valid FTP address, or the connection failed." ] ][ editor to-url p/text ] ] view center-face layout [ p: field 600 "ftp://user:pass@website.com/" [connect] across btn "Connect" [connect] btn "Load URL" [ config: to-file request-file/file %/c/ftp.cfg either exists? config [ if (config <> %none) [ my-urls: copy [] foreach item read/lines config [append my-urls item] if error? try [ p/text: copy request-list "Select a URL:" my-urls ] [break] ] ][ alert "First, save some URLs to that file..." ] show p focus p ] btn "Save URL" [ url: request-text/title/default "URL to save:" p/text if url = none [break] config-file: to-file request-file/file/save %/c/ftp.cfg if (url <> none) and (config-file <> %none) [ if not exists? config-file [ write/lines config-file ftp://user:pass@website.com/ ] write/append/lines config-file to-url url alert "Saved" ] ] below f: text-list 600x350 [ either (to-string value) = "../" [ for i ((length? p/text) - 1) 1 -1 [ if (to-string (pick p/text i)) = "/" [ clear at p/text (i + 1) show p f/data: sort append read to-url p/text "../" show f break ] ] ][ either (to-string last value) = "/" [ p/text: rejoin [p/text value] show p f/data: sort append read to-url p/text "../" show f ][ if ((request "Edit/view this file?") = true) [ either find [%.jpg %.png %.gif %.bmp] suffix? value [ view/new layout [ image load to-url join p/text value ] ][ editor to-url rejoin [p/text value] ] ] ] ] ] ]As I used the program more, I recognized several additional essential features that were required. I needed to be able to: upload/download binary files, create new folders, delete, copy, rename, change permissions, and get info about existing files. I just added buttons to the existing GUI to implement each of those features. Here's my thought process and the code which does each of those things:
To get the file size and date of any selected file, I just used the "size?" and "modified?" functions built into REBOL:
btn "Get Info" [ p-file: to-url rejoin [p/text f/picked] alert rejoin ["Size: " size? p-file " Date: " modified? p-file] ]To delete an existing file, I simply use REBOL's built in "delete" function. I added a requester to confirm that the user actually wants to delete the selected file. When the operation is complete, the directory listing is updated and the user is notified with an "alert" message:
btn "Delete" [ p-file: to-url request-text/title/default "File to delete:" join p/text f/picked if ((confirm: request "Are you sure?") = true) [delete p-file] f/data: sort append read to-url p/text "../" show f if confirm = true [alert "File deleted"] ]Renaming a file is just as easy, using the "rename" function. Again, I just added a confirmation request and notification when complete:
btn "Rename" [ new-name: to-file request-text/title/default "New File Name:" to-string f/picked if ((confirm: request "Are you sure?") = true) [ rename (to-url join p/text f/picked) new-name ] f/data: sort append read to-url p/text "../" show f if confirm = true [alert "File renamed"] ]Copying files on an FTP server is just as easy as copying files on your local hard drive - just read and write:
btn "Copy" [ new-name: to-url request-text/title/default "New Path:" (join p/text f/picked) if ((confirm: request "Are you sure?") = true) [ write/binary new-name read/binary to-url join p/text f/picked ] f/data: sort append read to-url p/text "../" show f if confirm = true [alert "File copied"] ]Creating a new file is as simple as writing a file with an empty string (""):
btn "New File" [ p-file: to-url request-text/title/default "New File Name:" join p/text "ENTER-A-FILENAME.EXT" if ((confirm: request "Are you sure?") = true) [ write p-file "" ] f/data: sort append read to-url p/text "../" show f if confirm = true [alert "Empty file created - click to edit."] ]Creating a new folder on the FTP server is also done the same way as creating a folder on your hard drive. Just use the "make-dir" function:
btn "New Dir" [ make-dir x: to-url request-text/title/default "New folder:" p/text alert "Folder created" p/text: x show p f/data: sort append read to-url p/text "../" show f ]Downloading binary files is done using the "read/binary" and "write/binary" functions. I just added some code here to find the file name (separate it from the full path of the selected file), and used a requester to present that as the suggested save-to file name:
btn "Download" [ file: request-text/title/default "File:" (join p/text f/picked) l-file: next to-string (find/last (to-string file) "/") save-as: request-text/title/default "Save as..." to-string l-file write/binary (to-file save-as) (read/binary to-url file) alert "Download Complete" ]Uploading is also accomplished using the "read/binary" and "write/binary" functions:
btn "Upload" [ file: to-file request-file r-file: request-text/title/default "Save as..." join p/text (to-string to-relative-file file) write/binary (to-url r-file) (read/binary file) f/data: sort append read to-url p/text "../" show f alert "Upload Complete" ]Changing file permissions (i.e., read, write, and execute on Unix/Linux servers), is done using "write/binary/allow":
btn "Chmod" [ p-file: to-url request-text/default rejoin [p/text f/picked] chmod: to-block request-text/title/default "Permissions:" "read write execute" write/binary/allow p-file (read/binary p-file) chmod alert "Permissions changed" ]I also created a help button to display some text held in an "instructions" variable:
btn-help [inform layout [backcolor white text bold as-is instructions]]Here's the final code for my full featured FTP application. It's a far cry from "editor ftp://..." :) I use this program regularly (a downloadable Windows .exe is availabe at http://musiclessonz.com/rebol_tutorial/FTP_tool.exe):
REBOL [title: "FTP Tool"] Instructions: { Enter your username, password, and FTP URL in the text field, and hit [ENTER]. BE SURE TO END YOUR FTP URL PATH WITH "/". URLs can be saved and loaded in multiple config files for future use. CONFIG FILES ARE STORED AS PLAIN TEXT, SO KEEP THEM SECURE. Click folders to browse through any dir on your web server. Click text files to open, edit and save changes back to the server. Click images to view. Also upload/download any type of file, create new files and folders, change file names, copy and delete files, change permissions, etc. } connect: does [ either (to-string last p/text) = "/" [ if error? try [ f/data: sort append read to-url p/text "../" show f ][ alert "Not a valid FTP address, or the connection failed." ] ][ editor to-url p/text ] ] view center-face layout [ p: field 600 "ftp://user:pass@website.com/" [connect] across btn "Connect" [connect] btn "Load URL" [ config: to-file request-file/file %/c/ftp.cfg either exists? config [ if (config <> %none) [ my-urls: copy [] foreach item read/lines config [append my-urls item] if error? try [ p/text: copy request-list "Select a URL:" my-urls ] [break] ] ][ alert "First, save some URLs to that file..." ] show p focus p ] btn "Save URL" [ url: request-text/title/default "URL to save:" p/text if url = none [break] config-file: to-file request-file/file/save %/c/ftp.cfg if (url <> none) and (config-file <> %none) [ if not exists? config-file [ write/lines config-file ftp://user:pass@website.com/ ] write/append/lines config-file to-url url alert "Saved" ] ] below f: text-list 600x350 [ either (to-string value) = "../" [ for i ((length? p/text) - 1) 1 -1 [ if (to-string (pick p/text i)) = "/" [ clear at p/text (i + 1) show p f/data: sort append read to-url p/text "../" show f break ] ] ][ either (to-string last value) = "/" [ p/text: rejoin [p/text value] show p f/data: sort append read to-url p/text "../" show f ][ if ((request "Edit/view this file?") = true) [ either find [%.jpg %.png %.gif %.bmp] suffix? value [ view/new layout [ image load to-url join p/text value ] ][ editor to-url rejoin [p/text value] ] ] ] ] ] across btn "Get Info" [ p-file: to-url rejoin [p/text f/picked] alert rejoin ["Size: " size? p-file " Date: " modified? p-file] ] btn "Delete" [ p-file: to-url request-text/title/default "File to delete:" join p/text f/picked if ((confirm: request "Are you sure?") = true) [delete p-file] f/data: sort append read to-url p/text "../" show f if confirm = true [alert "File deleted"] ] btn "Rename" [ new-name: to-file request-text/title/default "New File Name:" to-string f/picked if ((confirm: request "Are you sure?") = true) [ rename (to-url join p/text f/picked) new-name ] f/data: sort append read to-url p/text "../" show f if confirm = true [alert "File renamed"] ] btn "Copy" [ new-name: to-url request-text/title/default "New Path:" (join p/text f/picked) if ((confirm: request "Are you sure?") = true) [ write/binary new-name read/binary to-url join p/text f/picked ] f/data: sort append read to-url p/text "../" show f if confirm = true [alert "File copied"] ] btn "New File" [ p-file: to-url request-text/title/default "New File Name:" join p/text "ENTER-A-FILENAME.EXT" if ((confirm: request "Are you sure?") = true) [ write p-file "" ; editor p-file ] f/data: sort append read to-url p/text "../" show f if confirm = true [alert "Empty file created - click to edit."] ] btn "New Dir" [ make-dir x: to-url request-text/title/default "New folder:" p/text alert "Folder created" p/text: x show p f/data: sort append read to-url p/text "../" show f ] btn "Download" [ file: request-text/title/default "File:" (join p/text f/picked) l-file: next to-string (find/last (to-string file) "/") save-as: request-text/title/default "Save as..." to-string l-file write/binary (to-file save-as) (read/binary to-url file) alert "Download Complete" ] btn "Upload" [ file: to-file request-file r-file: request-text/title/default "Save as..." join p/text (to-string to-relative-file file) write/binary (to-url r-file) (read/binary file) f/data: sort append read to-url p/text "../" show f alert "Upload Complete" ] btn "Chmod" [ p-file: to-url request-text/default rejoin [p/text f/picked] chmod: to-block request-text/title/default "Permissions:" "read write execute" write/binary/allow p-file (read/binary p-file) chmod alert "Permissions changed" ] btn-help [inform layout[backcolor white text bold as-is instructions]] do [focus p] ]
20.8 Case: The "Jeoparody" Training Program
My friend wanted to create a program to help train employees at work. She hoped to create a game similar to the Jeopardy TV show, which could be played with a group of employees, in order to quiz, instruct, and interact with them in an enjoyable way. Together, we devised these specifications about how the program should work:
- Employees are organized into 2-4 teams of players who compete against each other for prizes.
- The program displays 5 columns of boxes, each under a separate category header. The columns of boxes are divided into rows of 5, with each row displaying incremental values of $100, $200, $300, $400, and $500.
- The host of the game operates the program and manages game play. To start off, one team chooses a category and a dollar amount to wager, and the host clicks the chosen box. When the box is clicked, an answer is displayed. The first player to respond gets a chance to determine the correct question for the given answer (i.e., "What is ____?"). The program then displays the proper question, along with some educational information related to the topic (the point of the program is to both test and teach the employees). The program then asks the host which player got the question correct or incorrect. The wagered amount is either subtracted or added to the player's score, based on correct or incorrect response, and a running total score is displayed in an area on the bottom of the screen.
- After each question is completed, the chosen boxes are displayed as empty, and made unresponsive.
- Winning teams continue to choose answers, and game play continues until all boxes are completed.
- The program needs a way for the host to prepare and save the categories, answers, and questions required to play the game.
Most of the code required to create this program will revolve around the game screen design, so I started outlining the program with a GUI layout. I looked online for some images of the Jeopardy TV show, and with a little trial and error I came up with a design of buttons and boxes that satisfied the general required description:
REBOL [title: "Jeoparody"] view center-face layout [ backdrop effect [gradient 1x1 tan brown] style button button effect [ gradient blue blue/2] 100x65 font [size: 30] style box box brown 100x35 space 40x10 across box 660x10 effect [gradient 1x0 brown black] ; separator line return box "Category 1" box "Category 2" box "Category 3" box "Category 4" box "Category 5" return box 660x10 effect [gradient 1x0 brown black] return button "$100" [] button "$100" [] button "$100" [] button "$100" [] button "$100" [] return button "$200" [] button "$200" [] button "$200" [] button "$200" [] button "$200" [] return button "$300" [] button "$300" [] button "$300" [] button "$300" [] button "$300" [] return button "$400" [] button "$400" [] button "$400" [] button "$400" [] button "$400" [] return button "$500" [] button "$500" [] button "$500" [] button "$500" [] button "$500" [] return box 660x10 effect [gradient 1x0 brown black] return tab box "Player 1:" effect [gradient 1x1 tan brown] player1: box white "$0" font [color: black] box "Player 2:" effect [gradient 1x1 tan brown] player2: box white "$0" font [color: black] return tab box "Player 3:" effect [gradient 1x1 tan brown] player3: box white "$0" font [color: black] box "Player 4:" effect [gradient 1x1 tan brown] player4: box white "$0" font [color: black] ]That looks like a lot of code, but it's all just simple VID GUI layout widgets. Next I began devising the data and logic required to make the GUI operational. First, I thought about the data required to play the game, and decided to organize all the potential questions and answers into 2 separate blocks of strings:
answers: [ "$100 Answer, Category 1" "$100 Answer, Category 2" "$100 Answer, Category 3" "$100 Answer, Category 4" "$100 Answer, Category 5" "$200 Answer, Category 1" "$200 Answer, Category 2" "$200 Answer, Category 3" "$200 Answer, Category 4" "$200 Answer, Category 5" "$300 Answer, Category 1" "$300 Answer, Category 2" "$300 Answer, Category 3" "$300 Answer, Category 4" "$300 Answer, Category 5" "$400 Answer, Category 1" "$400 Answer, Category 2" "$400 Answer, Category 3" "$400 Answer, Category 4" "$400 Answer, Category 5" "$500 Answer, Category 1" "$500 Answer, Category 2" "$500 Answer, Category 3" "$500 Answer, Category 4" "$500 Answer, Category 5" ] questions: [ "$100 Question, Category 1" "$100 Question, Category 2" "$100 Question, Category 3" "$100 Question, Category 4" "$100 Question, Category 5" "$200 Question, Category 1" "$200 Question, Category 2" "$200 Question, Category 3" "$200 Question, Category 4" "$200 Question, Category 5" "$300 Question, Category 1" "$300 Question, Category 2" "$300 Question, Category 3" "$300 Question, Category 4" "$300 Question, Category 5" "$400 Question, Category 1" "$400 Question, Category 2" "$400 Question, Category 3" "$400 Question, Category 4" "$400 Question, Category 5" "$500 Question, Category 1" "$500 Question, Category 2" "$500 Question, Category 3" "$500 Question, Category 4" "$500 Question, Category 5" ]I also needed variable labels for the category headers (so that they could be edited later by the host, without having to edit any program code):
Category-1: "Category 1" Category-2: "Category 2" Category-3: "Category 3" Category-4: "Category 4" Category-5: "Category 5"To manage game play, I realized that every button would do basically the same thing when clicked, so I created a function which would run in the action block of each button. If each button sent a unique number ID to the function, it would be easy to map each question/answer in the blocks above to individual buttons:
do-button: func [num] [ ; "num" refers to the unique number parameter sent by each ; individual button, every time this function is executed: alert pick answers num alert pick questions num ]The questions/answers in the data blocks above are arranged so that every 5 items are incremented by $100. I added the following code to assign a dollar amount to the chosen question, based on which "num" value was passed by the button (questions 1-5 = $100, 6-10 = $200, etc.):
if find [1 2 3 4 5] num [val: $100] if find [6 7 8 9 10] num [val: $200] if find [11 12 13 14 15] num [val: $300] if find [16 17 18 19 20] num [val: $400] if find [21 22 23 24 25] num [val: $500]Now I just need to ask the host which player responded correctly or incorrectly to the alerted answer above, and assign a variable to the response ("correct"):
correct: request-list "Select:" [ "Player 1 answered correctly" "Player 1 answered incorrectly" "Player 2 answered correctly" "Player 2 answered incorrectly" "Player 3 answered correctly" "Player 3 answered incorrectly" "Player 4 answered correctly" "Player 4 answered incorrectly" ]. . . and then update the score display boxes based on the response above:
switch correct [ "Player 1 answered correctly" [ player1/text: to-string ((to-money player1/text) + val) show player1 ] "Player 1 answered incorrectly" [ player1/text: to-string ((to-money player1/text) - val) show player1 ] "Player 2 answered correctly" [ player2/text: to-string ((to-money player2/text) + val) show player2 ] "Player 2 answered incorrectly"[ player2/text: to-string ((to-money player2/text) - val) show player2 ] "Player 3 answered correctly" [ player3/text: to-string ((to-money player3/text) + val) show player3 ] "Player 3 answered incorrectly" [ player3/text: to-string ((to-money player3/text) - val) show player3 ] "Player 4 answered incorrectly"[ player4/text: to-string ((to-money player4/text) - val) show player4 ] "Player 4 answered correctly" [ player4/text: to-string ((to-money player4/text) + val) show player4 ] ]I added that function (with a unique incremented number argument) to the action block of every button. I also added the code to erase the face and disable each button after it's been used:
button "$100" [face/feel: none face/text: "" do-button 1] button "$100" [face/feel: none face/text: "" do-button 2] button "$100" [face/feel: none face/text: "" do-button 3] . . .I now have a working game according to the specified outline:
REBOL [title: "Jeoparody"] answers: [ "$100 Answer, Category 1" "$100 Answer, Category 2" "$100 Answer, Category 3" "$100 Answer, Category 4" "$100 Answer, Category 5" "$200 Answer, Category 1" "$200 Answer, Category 2" "$200 Answer, Category 3" "$200 Answer, Category 4" "$200 Answer, Category 5" "$300 Answer, Category 1" "$300 Answer, Category 2" "$300 Answer, Category 3" "$300 Answer, Category 4" "$300 Answer, Category 5" "$400 Answer, Category 1" "$400 Answer, Category 2" "$400 Answer, Category 3" "$400 Answer, Category 4" "$400 Answer, Category 5" "$500 Answer, Category 1" "$500 Answer, Category 2" "$500 Answer, Category 3" "$500 Answer, Category 4" "$500 Answer, Category 5" ] questions: [ "$100 Question, Category 1" "$100 Question, Category 2" "$100 Question, Category 3" "$100 Question, Category 4" "$100 Question, Category 5" "$200 Question, Category 1" "$200 Question, Category 2" "$200 Question, Category 3" "$200 Question, Category 4" "$200 Question, Category 5" "$300 Question, Category 1" "$300 Question, Category 2" "$300 Question, Category 3" "$300 Question, Category 4" "$300 Question, Category 5" "$400 Question, Category 1" "$400 Question, Category 2" "$400 Question, Category 3" "$400 Question, Category 4" "$400 Question, Category 5" "$500 Question, Category 1" "$500 Question, Category 2" "$500 Question, Category 3" "$500 Question, Category 4" "$500 Question, Category 5" ] do-button: func [num] [ alert pick answers num alert pick questions num if find [1 2 3 4 5] num [val: $100] if find [6 7 8 9 10] num [val: $200] if find [11 12 13 14 15] num [val: $300] if find [16 17 18 19 20] num [val: $400] if find [21 22 23 24 25] num [val: $500] correct: request-list "Select:" ["Player 1 answered correctly" "Player 1 answered incorrectly" "Player 2 answered correctly" "Player 2 answered incorrectly" "Player 3 answered correctly" "Player 3 answered incorrectly" "Player 4 answered correctly" "Player 4 answered incorrectly" ] switch correct [ "Player 1 answered correctly" [ player1/text: to-string ((to-money player1/text) + val) show player1 ] "Player 1 answered incorrectly" [ player1/text: to-string ((to-money player1/text) - val) show player1 ] "Player 2 answered correctly" [ player2/text: to-string ((to-money player2/text) + val) show player2 ] "Player 2 answered incorrectly"[ player2/text: to-string ((to-money player2/text) - val) show player2 ] "Player 3 answered correctly" [ player3/text: to-string ((to-money player3/text) + val) show player3 ] "Player 3 answered incorrectly" [ player3/text: to-string ((to-money player3/text) - val) show player3 ] "Player 4 answered incorrectly"[ player4/text: to-string ((to-money player4/text) - val) show player4 ] "Player 4 answered correctly" [ player4/text: to-string ((to-money player4/text) + val) show player4 ] ] ] view center-face layout [ backdrop effect [gradient 1x1 tan brown] style button button effect [ gradient blue blue/2] 100x65 font [size: 30] style box box brown 100x35 space 40x10 across box 660x10 effect [gradient 1x0 brown black] ; separator line return box "Category 1" box "Category 2" box "Category 3" box "Category 4" box "Category 5" return box 660x10 effect [gradient 1x0 brown black] return button "$100" [face/feel: none face/text: "" do-button 1] button "$100" [face/feel: none face/text: "" do-button 2] button "$100" [face/feel: none face/text: "" do-button 3] button "$100" [face/feel: none face/text: "" do-button 4] button "$100" [face/feel: none face/text: "" do-button 5] return button "$200" [face/feel: none face/text: "" do-button 6] button "$200" [face/feel: none face/text: "" do-button 7] button "$200" [face/feel: none face/text: "" do-button 8] button "$200" [face/feel: none face/text: "" do-button 9] button "$200" [face/feel: none face/text: "" do-button 10] return button "$300" [face/feel: none face/text: "" do-button 11] button "$300" [face/feel: none face/text: "" do-button 12] button "$300" [face/feel: none face/text: "" do-button 13] button "$300" [face/feel: none face/text: "" do-button 14] button "$300" [face/feel: none face/text: "" do-button 15] return button "$400" [face/feel: none face/text: "" do-button 16] button "$400" [face/feel: none face/text: "" do-button 17] button "$400" [face/feel: none face/text: "" do-button 18] button "$400" [face/feel: none face/text: "" do-button 19] button "$400" [face/feel: none face/text: "" do-button 20] return button "$500" [face/feel: none face/text: "" do-button 21] button "$500" [face/feel: none face/text: "" do-button 22] button "$500" [face/feel: none face/text: "" do-button 23] button "$500" [face/feel: none face/text: "" do-button 24] button "$500" [face/feel: none face/text: "" do-button 25] return box 660x10 effect [gradient 1x0 brown black] return tab box "Player 1:" effect [gradient 1x1 tan brown] player1: box white "$0" font [color: black] box "Player 2:" effect [gradient 1x1 tan brown] player2: box white "$0" font [color: black] return tab box "Player 3:" effect [gradient 1x1 tan brown] player3: box white "$0" font [color: black] box "Player 4:" effect [gradient 1x1 tan brown] player4: box white "$0" font [color: black] ]After playing the game a bit, there were no bugs, but I realized that it could use a few additional features. First, I used the binary resouce embedder from earlier in this tutorial to create an image header of a photo I found online from the Jeopardy TV show:
header: load to-binary decompress 64#{ eJyVj3s804v/xz/bzGyFucRGohgm1ziuuU7CNGxWuTaxbBpyLVJUpItLcyfXNIZI jkuJboqFJsNodG9uuXRyya18ncfj93t8//4+3/+9X6/H6/1+bY1ufQKQzg5ODgAI BAIo2wNsjQE4QFQEKgoVERWFisJgomIIJAIBhyNkJSR3IuVlUSh5WTk5BSWMsoKi 6m45ORVtFVV1DawWFq2so6+jqY/RxGr+GwKCwWAIMYQMAiGjqSCnoPk/s/UMkBID dAEmBLQPAEuBIFKgrZeAIgBAQP8C/D/bT4qIbS+3xUNIAASGgiFQsNhOKPRfEQSG ANtlpKT3wmQMxGT32br7X5JHHTAKiGCW75JTNbQjkk6GZzYOqGl63Hl++UrSA952 jAIIAEH/e2AbMACCbMdsa5pSABgMgkBEwJD/c4DAAERKRNpAZq8tdJ+7PzHc7lL5 gy0BsHPbAJaCSAHWwNFKVxP98V4tOkWdfD7FEjacdjSkarU//C/n4IDH8tIsGPlr F8jSOHVpqLEgNs++1taBHGuekzY4eM/ojEII4R/1Q+ZIEH2QWTpkVWn+ntRBthgZ kympJr8jt/eRTxvTS1RNGD3meRMcm4kAZ2CAnTULVlJflfeI8BVvJWeJaNZitC7j HSzwe21RvYdfbQEZcgNoufW05RxBPLziaGaLDnMiIu5cgjXhKavuH/3ewXQVtg6Q BLgRCGfHVnFmn6LPF/fJDI1/TejRG5nB2X8vi0llhhEm3Fb/XnK+KeG/sKxkl6Py E3ZteGrG4qqpYSazc72YsFrY6n0ht0oo2EEs4dhdJjJvOThxbRVx3ruRD921c4ct XXp89nPCL1Ikh1ZwlkpvLRz53sKF8WfDpRW0V7dePB2671umDPyzp0PJxckwXbHc pTnSOjTC54hLNXHdWIVdxdi9pDKhqNWOrCdNu3LPTh8e6tlxg9pQZw/KFHWY2OGM Z33g/Y140axOK5pkwP2FSiCj0RhPPofjhXBtt52xdJjhjMZC9IMH+GNXzhlmhij6 fGjVfqN1lIHPvdV686aDXaIb6tn6gH1kYn1bpyM5Fi6c6cIsFn39lXJXLybMmRTv soo4Nv7eqf/Byy2ANn2FByPXt1Xt8KZQEjhR08GMzINfIqIfBVT7HI4YKYlv/MRP bv94k1JMSbSZATZOlnwEa64bdZBL/dZ6iEmlv1FwwpnNoCoplqla0drmB70Sd/H1 sZ9ijEDcfSc3TrdMbtAs3ZOg0+s96CofOOEnUod2Xqo2TylA/5xW1LtJzLNtp8vS 1UwD/YqprdJffrIwcdFhwvmr+CKmQDfT+P2R2AvojAzZ4RItnkwq00z74hIujcx1 Mzh42OioCXKvxeU3Ze4LhSJNyZYt72K7XrxlYf0p1TZX2MXlrulNBYgLUc2umSfJ 9fPvBnVHGUEaCRImNyxX74XvEyg79i/XIB/bfxsP1DCbf7O03rV/mvFg3u344qJ6 8IDbp3PMP47rJyasP1ii1wgX3yT4Zzh8dPztIlE1r3yH+6TqFHKa0ULlS3gTzBPE oj4lDr4sEL9lrb7w2lG5jL3+g8+L+V5QmpvPdnGOED5HQNzNxvqubX52yVriGraq tO6Jrj6r7imhjdzFQqA3yqLzMDmjNeevW4r1uGeg03qjg5oeh8z8EE0fVZ7+TelY e3W27vblk7f1nIP9tWUx+PCfl50zdzXALUJVIesptLVwlles2qRi0C0KawvonDkS 0zL7bfgZvd+C5RxyaI+NmlSmpC36BtZYzzsVXrEgGDPrIzSG/uVbdKpq2DcrlPyi N42GS+7PFLRyYffvkrYAZeof6SN31Ir1RJfPpgUQok53lbrErr+803Wn8lLXOyzc bNkDgxT0n0PxnGhFDEeBBEs3nirrFOlQfMk1ZaKTK+lOZkzuhnKYwwE1xeMToRUa m1188t34vrAtIIR9quLENPsjKebLtLCelN50PXG+jtoA74lKjV7Wr3Oc3Az4bqHH fC+6atqPZVOY5d5DeF5My+8XnELv+nu97Rt08WoK2HySEbXy6rSNWuimAyaJS7A6 SX0ou0A3F0RV4b2KuCabPbAT8W5z54Vty8Izbu7qnrLNNLxwfLHB5liKIqWUNJ90 UfHge9e0PKqdZ/zrQxifKoPGRGGVylrq3QXxlbRaHMtvl1ezceO38aWZYhJPuMJH ejSw/FUCKXPtlhuR899Au2LnD/fl/tDL75bbTwxWxWELbRTCUw+KEEO4+x4f+yK7 3NIWrBDsOyJweXaOzW5N2+4XZNVQ8GIlt3u37tUzZQKfQtWQdgLrxKIsAlpsf6tD o/ZAtHwp++FX7iNdP1t88Jk0P6Rhaytfjl1r5fos47hqjFXgyu3S1PEfY9U/P058 QWn5uLJ7wslybYFUsvopb0qbc/Nnm7CRPWdKT7sQuDHZpfn5uRG+T86/YcEu3Hrt qNEbH/QR/R0a0GSdJJ3lFmDdk2+Vrw2R/IrOT3wZ3zliXC5Qzz5s5/XnCsqU3Ryv RyQmaybczOGgx6kGS0+DCivDV/LMjJpNtDiBbQ1wOFQtcMMkZZ21r+++T2P02ZpG riura80pOBzlxXNgZhgO0q4p3T6ePqo/9ojap3RR5kcx41Jp9ustIK5ctUlT/Zsb SqOttfW3g+LDtANDVTJz3ZW78YyWXH4z+5MatFYdaTpNZtaOeCzr0gsqN9pkqlnB aJE5SAUx9MS4hQRy8gt+7QTuz+hSoPD+StBsxmHcpWWzji2A+PlddStmXqvTld7D It5HXH6KH6UkVzP4LFPesu165Bzn7PU8M+Eeca0dcPOOR8hk2tBMbjM1GnG6Th4P bTaewuxw9UHqx6WXdQZ1QgV1Wfvt0esmCRs35On1p7W1RHe+rRTwm3eeS/YJwTX1 7seY44NCcNbGVr4UV7kQr2W7n+w+J+LEqePRR6qbW9KcsOJ3lRuuNGmaedb2fnia 6r+SRnLzuwMnTD0nWOqHS+iGR0zPl9NCc3fVwrTvo/6EMaQHown3/SQZuBn+85z0 A5Qn0pwjxFWWaw5bnzpBTHGiBzh3eZuO3bPe4ffgx8rpjoETl/GxCwpXrQ0rUNzI /GzFqw/+umAS0bYoPoTMSieKOYANUqVjVOt/dJl2R8VWFsLYeUcT6hG/LbnCQaWu nYh71cfoGmhOulEmjHajoedAYNc79Jq4fcZ13veLs3U0nW8efhb3IANWlUaGEXz6 SOqrnr5OXQ9lGobK/1kkW0UBoaYMwLUk0i5sSk1kr21+Yb53rXgFBIOdMpShR70h l/ejIBs3xoZzsiML7GcHNCtryNM5U3u1WxKJDfcCM+MSQKBzcHP5l27zTafCJWtB ODP3kcH3oNnHd6pC/nY/mV99Rv1tdJ6ClirctOvPIGhOXqMuuK+OWNgib6At5uzn hDUjZBUh45SPH50uEPDDVJsQc3AvvfEGL+magCbq2xiep1ZX3aYTbenXi9+g4dfh 73l5xFvLRDrUvMFD1vLgr+e/bK6GIV6m/XJ7pBB8iLQo/iu63OmYtppIog038vOe M0qCnEPH7Ds4AirpYAGrL/tc0y4lDdT3jHiSLyb1w0K38rcmQRJwaRHrX9ZPT6Y/ kzCWO9z6mFnaBuOHBH/rVhqrMcQXkE0JBz7nD3ziZVdpWE35yFO9Tq4Fz8T5lWjk U1qQiR0I1OBDbpzMpLjyzuVxCgmbtOHcvflM3HK5lPbPNYf1oj2/U72/zl+UOsEj SsbQVq/tcZMeKOMHTdJIxKZ3KaxBN7veuhaPRHBWpofxGGz2ksnNHPPlfguPGhfj r/NsDNaRd5VnDHf8s5byWOa6TG5atR7hkLEfVbytUc6X6PR6eHpj4CyLau5BBrL2 d1wP2QJsHD7ouDj3hiskzdk2zN5mlIep3NXEgk5zuwNas4+s5hwvI9ck90b4FtBD iSSWDqbMQ2IS6FIsEbJ9RxI+Y4V7c3HQSmqh4l4Vmbb0GTMNnrRjD8cyUiouJjHT kyuWUsMHnnAXTzE3nkbF6X/2ezD1aHCjwNdz691/ABEeZGXYCwAA }Adding it to the top of the GUI was this easy. I didn't edit the image to fit, but instead just used REBOL's built in ability to simply resize the image:
image header 660x40Next, I decided to add an option to resize the entire GUI, so that the program could run on computers with varied screen resolutions. I looked through all the GUI code and realized that all the widget sizes were divisible by a factor of 5, I stored that as a variable word "sizer":
sizer: 5Then, anywhere in the GUI where there was a sizing pair, I added a little math calculation to dynamically specify the size. The image size above (660x40), for example, was written as follows:
image header (to-pair rejoin [(132 * sizer) "x" (8 * sizer)])Tabs and pad sizes were set like this:
tabs (sizer * 20) pad (sizer * 2)With those sizing calculations added to every widget, all the host needed to do was change the one sizer variable, and the whole pixel size of the game would be adjusted.
Next, I realized that the host could potentially make mistakes in game play (I did while testing the program), so I wanted a way to manually adjust game scores. I added the following code to the action block of the score boxes, which allows the host to click on the box, and enter a new value to be shown on the box's face:
player1: box white "$0" font [color: black size: (sizer * 4)] [ face/text: request-text/title/default "Enter Score:" face/text ]According to the last item in our specification outline, all I need now is a way for the host to edit and save game data. I started by assigning a variable to all the code that contained variables which the host should be able to edit. I wanted this code to be writable to the hard drive, and "do"able, so I stored it as a text string and included a REBOL header:
config: { REBOL [] ;________________________________________________________________ sizer: 5 Category-1: "Category 1" Category-2: "Category 2" Category-3: "Category 3" Category-4: "Category 4" Category-5: "Category 5" answers: [ "$100 Answer, Category 1" "$100 Answer, Category 2" "$100 Answer, Category 3" "$100 Answer, Category 4" "$100 Answer, Category 5" "$200 Answer, Category 1" "$200 Answer, Category 2" "$200 Answer, Category 3" "$200 Answer, Category 4" "$200 Answer, Category 5" "$300 Answer, Category 1" "$300 Answer, Category 2" "$300 Answer, Category 3" "$300 Answer, Category 4" "$300 Answer, Category 5" "$400 Answer, Category 1" "$400 Answer, Category 2" "$400 Answer, Category 3" "$400 Answer, Category 4" "$400 Answer, Category 5" "$500 Answer, Category 1" "$500 Answer, Category 2" "$500 Answer, Category 3" "$500 Answer, Category 4" "$500 Answer, Category 5" ] questions: [ "$100 Question, Category 1" "$100 Question, Category 2" "$100 Question, Category 3" "$100 Question, Category 4" "$100 Question, Category 5" "$200 Question, Category 1" "$200 Question, Category 2" "$200 Question, Category 3" "$200 Question, Category 4" "$200 Question, Category 5" "$300 Question, Category 1" "$300 Question, Category 2" "$300 Question, Category 3" "$300 Question, Category 4" "$300 Question, Category 5" "$400 Question, Category 1" "$400 Question, Category 2" "$400 Question, Category 3" "$400 Question, Category 4" "$400 Question, Category 5" "$500 Question, Category 1" "$500 Question, Category 2" "$500 Question, Category 3" "$500 Question, Category 4" "$500 Question, Category 5" ] ;________________________________________________________________ }To use that code in normal game play, I just executed the code contained in the "config" variable:
do configNext, I outlined some pseudo code describing each step the host might go through to edit the config data:
- Warn the host that these steps will erase the current data and end the current game. A simple requester and if condition will serve this purpose. Break out of the current block of code if they choose to continue the game.
- Before going through the process of editing/saving, request if the user would simply like to load a previously edited configuration file. If so, just run ("do") the chosen config file, close the current GUI, and rerun the GUI using the new config data.
- If the user hasn't chosen either of the previous options, give them some directions about how to edit the file, save the default config code to a file, and open it in the built in editor. After the editor has been closed, request a config file to load, then close the current GUI and rerun it using the newly chosen config data.
Here's the code I created to satisfy each of the above steps:
; step 1 contin: request/confirm { This will end the current game. Continue?} if contin = false [break] ; step 2 loadoredit: request/confirm "Load previously edited config file?" if loadoredit = true [ do to-file request-file/title/file { Choose config file to use:} "File" %default_config.txt unview view center-face layout gui break ; needed so that step 3 doesn't run ] ; step 3 alert {Edit carefully, maintaining all quotation marks. You can open a previously saved file if needed. When done, click SAVE-AS and then QUIT. Be sure choose a filename/folder location that you'll be able to find later. } write %default_config.txt config unview editor %default_config.txt alert {Now choose a config file to use (most likely the file you just edited).} do to-file request-file/title/file { Choose config file to use:} "File" %default_config.txt view center-face layout guiI added that code to the action block of the header image. Now the host can click the header to edit and save all the data for category, answer, question, and GUI size required to store complete Jeopardy sessions. I packaged this final program using XpackerX and gave it to my friend. It suits her needs perfectly:
REBOL [title: "Jeoparody"] config: { REBOL [] ;________________________________________________________________ sizer: 4 Category-1: "Category 1" Category-2: "Category 2" Category-3: "Category 3" Category-4: "Category 4" Category-5: "Category 5" answers: [ "$100 Answer, Category 1" "$100 Answer, Category 2" "$100 Answer, Category 3" "$100 Answer, Category 4" "$100 Answer, Category 5" "$200 Answer, Category 1" "$200 Answer, Category 2" "$200 Answer, Category 3" "$200 Answer, Category 4" "$200 Answer, Category 5" "$300 Answer, Category 1" "$300 Answer, Category 2" "$300 Answer, Category 3" "$300 Answer, Category 4" "$300 Answer, Category 5" "$400 Answer, Category 1" "$400 Answer, Category 2" "$400 Answer, Category 3" "$400 Answer, Category 4" "$400 Answer, Category 5" "$500 Answer, Category 1" "$500 Answer, Category 2" "$500 Answer, Category 3" "$500 Answer, Category 4" "$500 Answer, Category 5" ] questions: [ "$100 Question, Category 1" "$100 Question, Category 2" "$100 Question, Category 3" "$100 Question, Category 4" "$100 Question, Category 5" "$200 Question, Category 1" "$200 Question, Category 2" "$200 Question, Category 3" "$200 Question, Category 4" "$200 Question, Category 5" "$300 Question, Category 1" "$300 Question, Category 2" "$300 Question, Category 3" "$300 Question, Category 4" "$300 Question, Category 5" "$400 Question, Category 1" "$400 Question, Category 2" "$400 Question, Category 3" "$400 Question, Category 4" "$400 Question, Category 5" "$500 Question, Category 1" "$500 Question, Category 2" "$500 Question, Category 3" "$500 Question, Category 4" "$500 Question, Category 5" ] ;________________________________________________________________ } do config header: load to-binary decompress 64#{ eJyVj3s804v/xz/bzGyFucRGohgm1ziuuU7CNGxWuTaxbBpyLVJUpItLcyfXNIZI jkuJboqFJsNodG9uuXRyya18ncfj93t8//4+3/+9X6/H6/1+bY1ufQKQzg5ODgAI BAIo2wNsjQE4QFQEKgoVERWFisJgomIIJAIBhyNkJSR3IuVlUSh5WTk5BSWMsoKi 6m45ORVtFVV1DawWFq2so6+jqY/RxGr+GwKCwWAIMYQMAiGjqSCnoPk/s/UMkBID dAEmBLQPAEuBIFKgrZeAIgBAQP8C/D/bT4qIbS+3xUNIAASGgiFQsNhOKPRfEQSG ANtlpKT3wmQMxGT32br7X5JHHTAKiGCW75JTNbQjkk6GZzYOqGl63Hl++UrSA952 jAIIAEH/e2AbMACCbMdsa5pSABgMgkBEwJD/c4DAAERKRNpAZq8tdJ+7PzHc7lL5 gy0BsHPbAJaCSAHWwNFKVxP98V4tOkWdfD7FEjacdjSkarU//C/n4IDH8tIsGPlr F8jSOHVpqLEgNs++1taBHGuekzY4eM/ojEII4R/1Q+ZIEH2QWTpkVWn+ntRBthgZ kympJr8jt/eRTxvTS1RNGD3meRMcm4kAZ2CAnTULVlJflfeI8BVvJWeJaNZitC7j HSzwe21RvYdfbQEZcgNoufW05RxBPLziaGaLDnMiIu5cgjXhKavuH/3ewXQVtg6Q BLgRCGfHVnFmn6LPF/fJDI1/TejRG5nB2X8vi0llhhEm3Fb/XnK+KeG/sKxkl6Py E3ZteGrG4qqpYSazc72YsFrY6n0ht0oo2EEs4dhdJjJvOThxbRVx3ruRD921c4ct XXp89nPCL1Ikh1ZwlkpvLRz53sKF8WfDpRW0V7dePB2671umDPyzp0PJxckwXbHc pTnSOjTC54hLNXHdWIVdxdi9pDKhqNWOrCdNu3LPTh8e6tlxg9pQZw/KFHWY2OGM Z33g/Y140axOK5pkwP2FSiCj0RhPPofjhXBtt52xdJjhjMZC9IMH+GNXzhlmhij6 fGjVfqN1lIHPvdV686aDXaIb6tn6gH1kYn1bpyM5Fi6c6cIsFn39lXJXLybMmRTv soo4Nv7eqf/Byy2ANn2FByPXt1Xt8KZQEjhR08GMzINfIqIfBVT7HI4YKYlv/MRP bv94k1JMSbSZATZOlnwEa64bdZBL/dZ6iEmlv1FwwpnNoCoplqla0drmB70Sd/H1 sZ9ijEDcfSc3TrdMbtAs3ZOg0+s96CofOOEnUod2Xqo2TylA/5xW1LtJzLNtp8vS 1UwD/YqprdJffrIwcdFhwvmr+CKmQDfT+P2R2AvojAzZ4RItnkwq00z74hIujcx1 Mzh42OioCXKvxeU3Ze4LhSJNyZYt72K7XrxlYf0p1TZX2MXlrulNBYgLUc2umSfJ 9fPvBnVHGUEaCRImNyxX74XvEyg79i/XIB/bfxsP1DCbf7O03rV/mvFg3u344qJ6 8IDbp3PMP47rJyasP1ii1wgX3yT4Zzh8dPztIlE1r3yH+6TqFHKa0ULlS3gTzBPE oj4lDr4sEL9lrb7w2lG5jL3+g8+L+V5QmpvPdnGOED5HQNzNxvqubX52yVriGraq tO6Jrj6r7imhjdzFQqA3yqLzMDmjNeevW4r1uGeg03qjg5oeh8z8EE0fVZ7+TelY e3W27vblk7f1nIP9tWUx+PCfl50zdzXALUJVIesptLVwlles2qRi0C0KawvonDkS 0zL7bfgZvd+C5RxyaI+NmlSmpC36BtZYzzsVXrEgGDPrIzSG/uVbdKpq2DcrlPyi N42GS+7PFLRyYffvkrYAZeof6SN31Ir1RJfPpgUQok53lbrErr+803Wn8lLXOyzc bNkDgxT0n0PxnGhFDEeBBEs3nirrFOlQfMk1ZaKTK+lOZkzuhnKYwwE1xeMToRUa m1188t34vrAtIIR9quLENPsjKebLtLCelN50PXG+jtoA74lKjV7Wr3Oc3Az4bqHH fC+6atqPZVOY5d5DeF5My+8XnELv+nu97Rt08WoK2HySEbXy6rSNWuimAyaJS7A6 SX0ou0A3F0RV4b2KuCabPbAT8W5z54Vty8Izbu7qnrLNNLxwfLHB5liKIqWUNJ90 UfHge9e0PKqdZ/zrQxifKoPGRGGVylrq3QXxlbRaHMtvl1ezceO38aWZYhJPuMJH ejSw/FUCKXPtlhuR899Au2LnD/fl/tDL75bbTwxWxWELbRTCUw+KEEO4+x4f+yK7 3NIWrBDsOyJweXaOzW5N2+4XZNVQ8GIlt3u37tUzZQKfQtWQdgLrxKIsAlpsf6tD o/ZAtHwp++FX7iNdP1t88Jk0P6Rhaytfjl1r5fos47hqjFXgyu3S1PEfY9U/P058 QWn5uLJ7wslybYFUsvopb0qbc/Nnm7CRPWdKT7sQuDHZpfn5uRG+T86/YcEu3Hrt qNEbH/QR/R0a0GSdJJ3lFmDdk2+Vrw2R/IrOT3wZ3zliXC5Qzz5s5/XnCsqU3Ryv RyQmaybczOGgx6kGS0+DCivDV/LMjJpNtDiBbQ1wOFQtcMMkZZ21r+++T2P02ZpG riura80pOBzlxXNgZhgO0q4p3T6ePqo/9ojap3RR5kcx41Jp9ustIK5ctUlT/Zsb SqOttfW3g+LDtANDVTJz3ZW78YyWXH4z+5MatFYdaTpNZtaOeCzr0gsqN9pkqlnB aJE5SAUx9MS4hQRy8gt+7QTuz+hSoPD+StBsxmHcpWWzji2A+PlddStmXqvTld7D It5HXH6KH6UkVzP4LFPesu165Bzn7PU8M+Eeca0dcPOOR8hk2tBMbjM1GnG6Th4P bTaewuxw9UHqx6WXdQZ1QgV1Wfvt0esmCRs35On1p7W1RHe+rRTwm3eeS/YJwTX1 7seY44NCcNbGVr4UV7kQr2W7n+w+J+LEqePRR6qbW9KcsOJ3lRuuNGmaedb2fnia 6r+SRnLzuwMnTD0nWOqHS+iGR0zPl9NCc3fVwrTvo/6EMaQHown3/SQZuBn+85z0 A5Qn0pwjxFWWaw5bnzpBTHGiBzh3eZuO3bPe4ffgx8rpjoETl/GxCwpXrQ0rUNzI /GzFqw/+umAS0bYoPoTMSieKOYANUqVjVOt/dJl2R8VWFsLYeUcT6hG/LbnCQaWu nYh71cfoGmhOulEmjHajoedAYNc79Jq4fcZ13veLs3U0nW8efhb3IANWlUaGEXz6 SOqrnr5OXQ9lGobK/1kkW0UBoaYMwLUk0i5sSk1kr21+Yb53rXgFBIOdMpShR70h l/ejIBs3xoZzsiML7GcHNCtryNM5U3u1WxKJDfcCM+MSQKBzcHP5l27zTafCJWtB ODP3kcH3oNnHd6pC/nY/mV99Rv1tdJ6ClirctOvPIGhOXqMuuK+OWNgib6At5uzn hDUjZBUh45SPH50uEPDDVJsQc3AvvfEGL+magCbq2xiep1ZX3aYTbenXi9+g4dfh 73l5xFvLRDrUvMFD1vLgr+e/bK6GIV6m/XJ7pBB8iLQo/iu63OmYtppIog038vOe M0qCnEPH7Ds4AirpYAGrL/tc0y4lDdT3jHiSLyb1w0K38rcmQRJwaRHrX9ZPT6Y/ kzCWO9z6mFnaBuOHBH/rVhqrMcQXkE0JBz7nD3ziZVdpWE35yFO9Tq4Fz8T5lWjk U1qQiR0I1OBDbpzMpLjyzuVxCgmbtOHcvflM3HK5lPbPNYf1oj2/U72/zl+UOsEj SsbQVq/tcZMeKOMHTdJIxKZ3KaxBN7veuhaPRHBWpofxGGz2ksnNHPPlfguPGhfj r/NsDNaRd5VnDHf8s5byWOa6TG5atR7hkLEfVbytUc6X6PR6eHpj4CyLau5BBrL2 d1wP2QJsHD7ouDj3hiskzdk2zN5mlIep3NXEgk5zuwNas4+s5hwvI9ck90b4FtBD iSSWDqbMQ2IS6FIsEbJ9RxI+Y4V7c3HQSmqh4l4Vmbb0GTMNnrRjD8cyUiouJjHT kyuWUsMHnnAXTzE3nkbF6X/2ezD1aHCjwNdz691/ABEeZGXYCwAA } do-button: func [num] [ alert pick answers num alert pick questions num if find [1 2 3 4 5] num [val: $100] if find [6 7 8 9 10] num [val: $200] if find [11 12 13 14 15] num [val: $300] if find [16 17 18 19 20] num [val: $400] if find [21 22 23 24 25] num [val: $500] correct: request-list "Select:" ["Player 1 answered correctly" "Player 1 answered incorrectly" "Player 2 answered correctly" "Player 2 answered incorrectly" "Player 3 answered correctly" "Player 3 answered incorrectly" "Player 4 answered correctly" "Player 4 answered incorrectly" ] switch correct [ "Player 1 answered correctly" [ player1/text: to-string ((to-money player1/text) + val) show player1 ] "Player 1 answered incorrectly" [ player1/text: to-string ((to-money player1/text) - val) show player1 ] "Player 2 answered correctly" [ player2/text: to-string ((to-money player2/text) + val) show player2 ] "Player 2 answered incorrectly"[ player2/text: to-string ((to-money player2/text) - val) show player2 ] "Player 3 answered correctly" [ player3/text: to-string ((to-money player3/text) + val) show player3 ] "Player 3 answered incorrectly" [ player3/text: to-string ((to-money player3/text) - val) show player3 ] "Player 4 answered incorrectly"[ player4/text: to-string ((to-money player4/text) - val) show player4 ] "Player 4 answered correctly" [ player4/text: to-string ((to-money player4/text) + val) show player4 ] ] ] view center-face layout gui: [ tabs (sizer * 20) backdrop effect [gradient 1x1 tan brown] style button button effect [gradient blue blue/2] ( to-pair rejoin [(20 * sizer) "x" (13 * sizer)] ) font [size: (sizer * 6)] style box box brown (to-pair rejoin [(20 * sizer) "x" (7 * sizer )]) font [size: (sizer * 3)] image header (to-pair rejoin [(132 * sizer) "x" (8 * sizer)]) [ contin: request/confirm { This will end the current game. Continue?} if contin = false [break] loadoredit: request/confirm "Load previously edited config file?" if loadoredit = true [ do to-file request-file/title/file { Choose config file to use:} "File" %default_config.txt unview view center-face layout gui break ] alert {Edit carefully, maintaining all quotation marks. You can open a previously saved file if needed. When done, click SAVE-AS and then QUIT. Be sure choose a filename/folder location that you'll be able to find later. } write %default_config.txt config unview editor %default_config.txt alert {Now choose a config file to use (most likely the file you just edited).} do to-file request-file/title/file { Choose config file to use:} "File" %default_config.txt view center-face layout gui ] space (to-pair rejoin [(8 * sizer) "x" (2 * sizer)]) pad (sizer * 2) across box (to-pair rejoin [(132 * sizer) "x" (2 * sizer)] ) effect [gradient 1x0 brown black] return box Category-1 box Category-2 box Category-3 box Category-4 box Category-5 return box (to-pair rejoin [(132 * sizer) "x" (2 * sizer)] ) effect [gradient 1x0 brown black] return button "$100" [face/feel: none face/text: "" do-button 1] button "$100" [face/feel: none face/text: "" do-button 2] button "$100" [face/feel: none face/text: "" do-button 3] button "$100" [face/feel: none face/text: "" do-button 4] button "$100" [face/feel: none face/text: "" do-button 5] return button "$200" [face/feel: none face/text: "" do-button 6] button "$200" [face/feel: none face/text: "" do-button 7] button "$200" [face/feel: none face/text: "" do-button 8] button "$200" [face/feel: none face/text: "" do-button 9] button "$200" [face/feel: none face/text: "" do-button 10] return button "$300" [face/feel: none face/text: "" do-button 11] button "$300" [face/feel: none face/text: "" do-button 12] button "$300" [face/feel: none face/text: "" do-button 13] button "$300" [face/feel: none face/text: "" do-button 14] button "$300" [face/feel: none face/text: "" do-button 15] return button "$400" [face/feel: none face/text: "" do-button 16] button "$400" [face/feel: none face/text: "" do-button 17] button "$400" [face/feel: none face/text: "" do-button 18] button "$400" [face/feel: none face/text: "" do-button 19] button "$400" [face/feel: none face/text: "" do-button 20] return button "$500" [face/feel: none face/text: "" do-button 21] button "$500" [face/feel: none face/text: "" do-button 22] button "$500" [face/feel: none face/text: "" do-button 23] button "$500" [face/feel: none face/text: "" do-button 24] button "$500" [face/feel: none face/text: "" do-button 25] return box (to-pair rejoin [(132 * sizer) "x" (2 * sizer)] ) effect [gradient 1x0 brown black] return tab box "Player 1:" effect [gradient 1x1 tan brown] player1: box white "$0" font [color: black size: (sizer * 4)] [ face/text: request-text/title/default "Enter Score:" face/text ] box "Player 2:" effect [gradient 1x1 tan brown] player2: box white "$0" font [color: black size: (sizer * 4)] [ face/text: request-text/title/default "Enter Score:" face/text ] return tab box "Player 3:" effect [gradient 1x1 tan brown] player3: box white "$0" font [color: black size: (sizer * 4)] [ face/text: request-text/title/default "Enter Score:" face/text ] box "Player 4:" effect [gradient 1x1 tan brown] player4: box white "$0" font [color: black size: (sizer * 4)] [ face/text: request-text/title/default "Enter Score:" face/text ] ]
20.9 Case: Scheduling Teachers, Part Two
After several months of using the teacher scheduling application described in the first case study, my business expanded, and the teaching staff grew. With the way things worked in my short initial program, I would have to create a new folder on the web site and compile a unique version of the program for each new teacher. This would require recompiling and uploading a new version, for each teacher, every time I alter the program. I wanted to make a multi-user version of the application to simplify setup and to save maintenance time. I also wanted to add some error checking and a simple password scheme to the existing program. To create a new version of the application, here's my concept in outline/pseudo code form:
- Maintain the existing folder and file structure on the web site (http://website.com/teacher/name, schedule.txt, and index.php).
- Add a file to the web site containing a list of current teachers and associated passwords. Put it outside the public_html folder, so that people can't download it without a password.
- In the application, start by downloading that file from the website (using ftp).
- Display a text list of teacher names from the downloaded file.
- When a teacher name is selected, request a password from the user and check that it matches the associated password for the given teacher.
- Append the teacher name to the http and ftp URLs, and run the program as before.
- Add some error checking and backup routines every time the data is read or written locally, or on the web server. That way, no data is ever lost.
- Compile the program and upload it to the web site. Point all links on the index.php pages to that single file. Now, any time I want to add a new teacher, all I need to do is add the new teacher name and password to the downloadable text file and copy a blank index.php and schedule.txt to a new folder on the web server. If I ever make additional changes to the program, I only need to recompile and upload that single program file.
To start things off, I created a text file called "teacherlist.txt" and stored it outside the public_html folder on the web server. It's formatted like this:
["mark" "markspassword"] ["ryan" "ryanspassword"] ["nick" "nickspassword"] ["peter" "peterspassword"] ["rudi" "rudispassword"] ["tom" "tomspassword"]The first thing I do in the program is read the data:
teacherlist: load ftp://user:pass@website.com/teacherlist.txtNext, display a list of the teachers. The first item in each block of teacherlist.txt is the teacher name. A foreach loop reads each of those names into a new block, and that block is displayed using a GUI text-list widget:
teachers: copy [] foreach teacher teacherlist [append teachers first teacher] view center-face layout [ text-list data teachers [folder: value unview] ]Next, get the password from the user and use a foreach loop to look through the list, checking for a match in teacher names and passwords entered by the user (the first and second elements, respectively, in each block):
pass: request-pass/only correct: false foreach teacher teacherlist [ if ((first teacher) = folder) and (pass = (second teacher)) [ correct: true ] ] if correct = false [alert "Incorrect password." quit]I add the following line to the script, which keeps REBOL from terminating the script when the [Esc] key is pressed. That behavior is the default in the REBOL interpreter, and makes it easy for someone to just stop the script and view the teacherlist. (I'm not so concerned about security here, but I don't want passwords to be blatantly available):
system/console/break: falseFinally, I come up with an error message to be executed any time an Internet connection isn't available. It allows the user to read any of the recently backed up schedule.txt files so that the program is useful even if an Internet connection isn't available:
error-message: does [ ans: request {Internet connection is not available. Would you like to see one of the recent local backups?} either ans = true [ editor to-file request-file quit ][ quit ] ]I wrap all attempts to connect to the Internet in "error? try" routines, and duplicate the original backup routine from the initial program so that no data is ever lost. Here's the final code:
REBOL [title: "Lesson Scheduler"] system/console/break: false error-message: does [ ans: request {Internet connection is not available. Would you like to see one of the recent local backups?} either ans = true [ editor to-file request-file quit ][ quit ] ] if error? try [ teacherlist: load ftp://user:pass@website.com/teacherlist.txt ][ error-message ] teachers: copy [] foreach teacher teacherlist [append teachers first teacher] view center-face layout [ text-list data teachers [folder: value unview] ] pass: request-pass/only correct: false foreach teacher teacherlist [ if ((first teacher) = folder) and (pass = (second teacher)) [ correct: true ] ] if correct = false [alert "Incorrect password." quit] url: rejoin [http://website.com/teacher/ folder] ftp-url: rejoin [ ftp://user:pass@website.com/public_html/teacher/ folder ] if error? try [ write %schedule.txt read rejoin [url "/schedule.txt"] ][ error-message ] ; backup (before changes are made): cur-time: to-string replace/all to-string now/time ":" "-" ; local: write to-file rejoin [ folder "-schedule_" now/date "_" cur-time ".txt" ] read %schedule.txt ; online: if error? try [ write rejoin [ ftp-url "/" now/date "_" cur-time ] read %schedule.txt ][ error-message ] editor %schedule.txt ; backup again (after changes are made): cur-time: to-string replace/all to-string now/time ":" "-" write to-file rejoin [ folder "-schedule_" now/date "_" cur-time ".txt" ] read %schedule.txt if error? try [ write rejoin [ ftp-url "/" now/date "_" cur-time ] read %schedule.txt ][ alert "Internet connection not available while backing up." ] ; save to web site: if error? try [ write rejoin [ftp-url "/schedule.txt"] read %schedule.txt ][ alert {Internet connection not available while updating web site. Your schedule has NOT been saved online.} quit ] browse urlWith the new application complete, I wanted to create an additional cgi application for the web site to collectively display all available times in each of the teachers' schedules. This would help with scheduling because both students and management could instantly see a bird's eye view of all open appointment times, on a single web page. In order for that display to be viewable by the general public, I want the cgi app to strip out all personal data contained in the schedules. To create the cgi, I need to search each line of schedule text for "----". If a line contains the characters "----", that time is available. Here's a pseudo code outline that I thought through as I organized the process:
- Make a list of all the teacher pages. Store the links in a block.
- Use a foreach loop to cycle through each page in the list. Read in the data on each page in line format, using another foreach loop.
- For each line, use a find function to check whether the line contains the name of a day of the week, or the characters "----". If so, print the line, adding some additional formatting to separate days as headers. Also print each page link as a header separating each teacher's schedule in the printout.
First, I created the block of links:
page-list: [ http://website.com/teacher/ryan http://website.com/teacher/mark http://website.com/teacher/nick http://website.com/teacher/peter http://website.com/teacher/tom http://website.com/teacher/rudi ]For step 2, I created the foreach loop to read each page:
foreach page page-list [ data: read/lines page ]Inside that loop, I added the code to print out the teacher name and day headers, and the available times:
foreach page page-list [ print newline print to-string page print "" data: read/lines page week: ["MONDAY" "TUESDAY" "WEDNESDAY" "THURSDAY" "FRIDAY" "SATURDAY" "SUNDAY"] foreach line data [ foreach day week [ if find line day [print "" print line print ""] ] if find line "----" [print line] ] ]Now I've got a little command line application that does what I need:
REBOL [] page-list: [ http://website.com/teacher/ryan http://website.com/teacher/mark http://website.com/teacher/nick http://website.com/teacher/peter http://website.com/teacher/tom http://website.com/teacher/rudi ] foreach page page-list [ print newline print to-string page print "" data: read/lines page week: ["MONDAY" "TUESDAY" "WEDNESDAY" "THURSDAY" "FRIDAY" "SATURDAY" "SUNDAY"] foreach line data [ foreach day week [ if find line day [print "" print line print ""] ] if find line "----" [print line] ] ]Next, to the basic CGI framework provided earlier in this tutorial, I simply added the code above. The only real changes I needed to make were some added "< B R >"s (HTML line ends) to make the text display properly in the browser:
#!/home/path/public_html/rebol/rebol -cs REBOL [] print "content-type: text/html^/" print [<HTML><HEAD><TITLE>"Available Appointment Times"</TITLE>] print [</HEAD><BODY>] page-list: [ http://website.com/teacher/ryan http://website.com/teacher/mark http://website.com/teacher/nick http://website.com/teacher/peter http://website.com/teacher/tom http://website.com/teacher/rudi ] foreach page page-list [ print [<BR><BR>] print to-string page print [<BR>] data: read/lines page week: ["MONDAY" "TUESDAY" "WEDNESDAY" "THURSDAY" "FRIDAY" "SATURDAY" "SUNDAY"] foreach line data [ foreach day week [ if find line day [print [<BR>] print line print [<BR><BR>]] ] if find line "----" [print line print [<BR>]] ] ] print [</BODY></HTML>]As more teachers were added to the scheduling system, it became apparent that a CGI version of the editor would be helpful (for use on mobile phones, at work, and in other environments where installing an executable was problematic). For that, I simply used the password protected online text editor, found earlier in this tutorial:
#!/home/path/public_html/rebol/rebol -cs REBOL [] print "content-type: text/html^/" print [<HTML><HEAD><TITLE>"Edit Schedule"</TITLE></HEAD><BODY>] ; submitted: decode-cgi system/options/cgi/query-string ; We can't use the above normal line to decode, because ; we're using the post method to submit data (because data ; from the textarea may get too big for the get method). ; Use the following function to process data from a post ; method instead: read-cgi: func [/local data buffer][ switch system/options/cgi/request-method [ "POST" [ data: make string! 1020 buffer: make string! 16380 while [positive? read-io system/ports/input buffer 16380][ append data buffer clear buffer ] ] "GET" [data: system/options/cgi/query-string] ] data ] submitted: decode-cgi read-cgi ; if schedule.txt has been edited and submitted: if ((submitted/2 = "save") or (submitted/2 = "save")) [ ; save newly edited schedule: write to-file rejoin ["./" submitted/6 "/schedule.txt"] submitted/4 print ["Schedule Saved."] print rejoin [ {<META HTTP-EQUIV="REFRESH" CONTENT="0; URL=http://website.com/folder/} submitted/6 {">} ] quit ] ; if user is just opening page (i.e., no data has been submitted ; yet), request user/pass: if ((submitted/2 = none) or (submitted/4 = none)) [ print [<strong>"W A R N I N G - "] print ["Private Server, Login Required:"</strong><BR><BR>] print [<FORM ACTION="./edit.cgi">] print [" Username: " <input type=text size="50" name="name"><BR><BR>] print [" Password: " <input type=text size="50" name="pass"><BR><BR>] print [<INPUT TYPE="SUBMIT" NAME="Submit" VALUE="Submit">] print [</FORM>] quit ] ; check user/pass against those in teacherlist.txt, ; end if incorrect: teacherlist: load %teacherlist.txt folder: submitted/2 password: submitted/4 response: false foreach teacher teacherlist [ if ((first teacher) = folder) and (password = (second teacher)) [ response: true ] ] if response = false [print "Incorrect Username/Password." quit] ; if user/pass is ok, go on: ; backup (before changes are made): cur-time: to-string replace/all to-string now/time ":" "-" schedule_text: read to-file rejoin ["./" folder "/schedule.txt"] write to-file rejoin [ "./" folder "/" now/date "_" cur-time ".txt"] schedule_text print [<strong>"Be sure to SUBMIT when done:"</strong><BR><BR>] print [<FORM method="post" ACTION="./edit.cgi">] print [<INPUT TYPE=hidden NAME=submit_confirm VALUE="save">] print [<textarea cols="100" rows="15" name="contents">] print [schedule_text] print [</textarea><BR><BR>] print rejoin [{<INPUT TYPE=hidden NAME=folder VALUE="} folder {">}] print [<INPUT TYPE="SUBMIT" NAME="Submit" VALUE="Submit">] print [</FORM>] print [</BODY></HTML>]Now there's a way for all the teachers to edit their schedules. I can add a new teacher to the system in about 5 seconds (just create a new directory on the server and copy blank schedule.txt and index.php files). Anyone involved in scheduling can make changes online, regardless of location or computer type, and everyone stays synchronized. In addition, anyone can get an instant bird's eye view of all available appointment times - this helps tremendously when scheduling new students and maintaining daily activities.
20.10 Case: An Online Member Page CGI Program
One of my friends wanted to create an online member database for a local club. He wanted members to be able to sign up and add their contact information, upload photos, and add info about themselves. He was tired of manually making changes to the members' pages, and wanted users to be able to add, edit, and delete their own information. He wanted basic password enabled access so that users could only edit their own information, and he wanted a back end utility that allowed him to make changes as administrator, and which automatically saved each successive change to the database, so that no data could ever be lost. He also wanted users automatically emailed their password, in case they forgot.
Here was my basic thought process and plan of attack:
- This will be an online system (a web site), so the user interface will be a set of HTML pages that display each user's information, as well as a set of HTML forms for users to enter information. We decided to have the page display the following fields: Name, Address, Phone, Email, Age, Language, Height, Date the user was added, and an uploaded photo.
- The data will be stored in some sort of online database. Since this is a small group with only a few users, I decided to create a simple flat file database - just a text file filled with blocks of REBOL data, one block per user, stored on the web server.
- The page that pulls the info from the database and displays it in the above HTML will basically be a REBOL CGI application that runs a "foreach" loop to print each of the entries in the above HTML format. The pages where the users enter their information will be forms that submit the information to a REBOL CGI that appends it to the database text file. The pages where the users edit their information will be forms that display the information currently in the selected entry, without the password. When the user submits the new password and updated info, the CGI checks that the submitted password matches the existing password for that entry, and then replaces the old block with the new one, in the database text file. The code for emailing the user a forgotten password and for automatically backing up data will also be put here.
- An image upload/update page also needs to created. This will be an HTML form that accepts a local image file on the user's computer, submits that file to the CGI, which in turn writes that binary data to a directory on the web server, creates an HTML image link to it, and adds that link to the appropriate user entry in the database text file.
- The back end will simply be the password protected text editor explored in case study #8, with links to all the backup text files, for easy recovery (copy/paste) of lost data.
Here was the basic HTML layout I came up with for step 1. Each entry in the database will be displayed using this template:
<HR><BR> Date/Time: 23-Mar-2008/13:11:42-7:00 <A HREF="./index.cgi?function=">edit | </A> <A HREF="./index.cgi?function=">delete</A> <TABLE background="" border=0 cellPadding=2 cellSpacing=2 width="100%"><TR> <TD width = "600"> <BR> <FONT FACE="Courier New, Courier, monospace">Name: </FONT> <STRONG>The User Name Goes Here</STRONG> <BR> <FONT FACE="Courier New, Courier, monospace">Address: </FONT> <STRONG>The Address Goes Here</STRONG> <BR> <FONT FACE="Courier New, Courier, monospace">Phone: </FONT> <STRONG>The Phone</STRONG> <BR> <FONT FACE="Courier New, Courier, monospace">Email: </FONT> <STRONG>The Email</STRONG> <BR> <FONT FACE="Courier New, Courier, monospace">Age: </FONT> <STRONG>The Age</STRONG> <BR> <FONT FACE="Courier New, Courier, monospace">Language: </FONT> <STRONG>The Language</STRONG> <BR> <FONT FACE="Courier New, Courier, monospace">Height: </FONT> <STRONG>The Height</STRONG> <BR><BR> </TD> <TD width="170" valign="center"> <A HREF="./default.jpg" target=_blank><IMG align=baseline alt="" border=0 hspace=0 src="./default.jpg" width="160" height="120"> </A> </TD> </TR></TABLE> Some Additional Notes Go Here... <BR><BR>The database design for step 2 was even simpler to create. Here's an example of what each block looks like. Notice that each entry in the database is just a text string separated by spaces, for each field of info we want displayed on the member page. In the block, I added a link to a default image, in case the user didn't upload their own photo. This file was saved as %bb.db:
["Username" "19-Feb-2008/4:55:59-8:00" "1 Address St." "123-456-7890" "name@website.com" "40" {REBOL, C, C++, Python, PHP, Basic, AutoIt, others...} "6'" {I'm a nobody - just a test account.} "password" [ {<a href = "./default.jpg" target=_blank> <IMG align=baseline alt="" border=0 hspace=0 src="./default.jpg" width="160" height="120"></a>} ] ] ["Tester McUser" "22-Feb-2008/13:14:44-8:00" "1 Way Lane" "234-567-8910" "tester@website.com" "35" "REBOL" {5' 11"} "I'm just another test account." "password" [ {<a href = "./files/photo.jpg" target=_blank> <IMG align=baseline alt="" border=0 hspace=0 src="./files/photo.jpg" width="160" height="120"></a>} ] ]At this point I could begin the work of step 3, creating a CGI program that prints the HTML page in step 1, with the above data. Here's a simple CGI script that simply prints the HTML design together with the entries from the database inserted:
#! /home/path/public_html/rebol/rebol -cs REBOL [] print "content-type: text/html^/" print read %header.html bbs: load %bb.db ; load the database info print [<center><table border=1 cellpadding=10 width=90%><tr><td>] print {<TABLE background="" border=0 cellPadding=0 cellSpacing=0 height="100%" width="100%"><tr><td width = "600">} print [<hr>] reverse bbs foreach bb bbs [ print [<BR>] print rejoin ["Date/Time: " bb/2] print " " print rejoin [{<a href="./index.cgi?function=">edit | </a>}] print rejoin [{<a href="./index.cgi?function=">delete</a>}] print " " print {<TABLE background="" border=0 cellPadding=2 cellSpacing=2 height="100%" width="100%"><tr> <td width = "600"><BR>} print rejoin [{<FONT FACE="Courier New, Courier, monospace">} "Name: </FONT><strong>" bb/1 "</strong>"] print [<BR>] print rejoin [{<FONT FACE="Courier New, Courier, monospace">} "Address: </FONT><strong>" bb/3 "</strong>"] print [<BR>] print rejoin [{<FONT FACE="Courier New, Courier, monospace">} "Phone: </FONT><strong>" bb/4 "</strong>"] print [<BR>] print rejoin [{<FONT FACE="Courier New, Courier, monospace">} "Email: </FONT><strong>" bb/5 "</strong>"] print [<BR>] print rejoin [{<FONT FACE="Courier New, Courier, monospace">} "Age: </FONT><strong>" bb/6 "</strong>"] print [<BR>] print rejoin [{<FONT FACE="Courier New, Courier, monospace">} "Language: </FONT><strong>" bb/7 "</strong>"] print [<BR>] print rejoin [{<FONT FACE="Courier New, Courier, monospace">} "Height: </FONT><strong>" bb/8 "</strong>"] print [<BR><BR>] print </td> print {<td width = "170" valign = "center">} print bb/11 ; image link print {</td></tr></table>} print bb/9 ; "other information " text print [<BR><BR><HR>] ] print [</td></tr></td></tr></td></tr></table>] print [</td></tr></table></center>] print read %footer.htmlTo that code, there were a number of features that I realized I should add. First, I wanted to munge email addresses so that they were less likely to get collected by spam bots. This line of code does the job well enough for my needs. It turns "name@address.com" into "name at address dot com":
(replace/all (replace bb/5 "@" " at ") "." " dot ")I also wanted any http:// links in the "other information" section to be automatically linked. To do that, I used parse to search for "http://" and the ending space character, then wrapped that link in the required < A H R E F = ...> tags. Here's the code:
bb_temp: copy bb/9 bb_temp2: copy bb_temp parse/all bb_temp [any [ thru "http://" copy link to " " (replace bb_temp2 (rejoin [{http://} link]) (rejoin [ { <a href="} {http://} link {" target=_blank>http://} link {</a> }])) ] to end ]Furthermore, I wanted to have line endings in the "other information" section automatically converted to HTML "< b r >"s, so that they display correctly on the web page. That's easy:
replace/all bb_temp newline " <br> "My friend wanted a count displayed of the total number of members. That's also easy, with "length? bbs":
print rejoin [{<font size=5> Members: (} length? bbs {)</font></td>}]I also added a "join now" link to the CGI page where users would be able to add themselves to the database (that page hasn't been created yet):
print {<td><a href="./add.cgi">Join Now</a></td></tr></table><BR>}In order for users to edit/delete their info later, I needed to tag each displayed entry with a unique number to automatically select the appropriate block from the database. To do this, I added a counter variable to the foreach loop, and incremented it each time through the loop (counter: counter + 1). Then I replaced the generic edit and delete links in the code above . . .
print rejoin [{<a href="./index.cgi?function=">edit | </a>}] print rejoin [{<a href="./index.cgi?function=">delete</a>}]. . . with links that contain the counter, and which can be deciphered by a CGI program as "get" data:
print rejoin [ {<a href="./index.cgi?function=edititemnumber&messagenumber=} counter {&Submit=Post+Message">edit | </a>} ] print rejoin [ {<a href="./index.cgi?function=deleteitemnumber&messagenumber=} counter {&Submit=Post+Message">delete</a>} ]Here's the script, as it stands so far:
#! /home/path/public_html/rebol/rebol -cs REBOL [] print "content-type: text/html^/" print read %header.html bbs: load %bb.db print [<center><table border=1 cellpadding=10 width=90%><tr><td>] print-all: does [ print {<TABLE background="" border=0 cellPadding=0 cellSpacing=0 height="100%" width="100%"><tr><td width = "600">} print rejoin [{<font size=5> Members: (} length? bbs {)</font></td>}] print {<td><a href="./add.cgi">Join Now</a></td></tr></table><BR>} print [<hr>] counter: 1 reverse bbs foreach bb bbs [ print [<BR>] if bb/1 <> "file uploaded" [ print rejoin ["Date/Time: " bb/2] print " " print rejoin trim [ {<a href= "./index.cgi?function=edititemnumber&messagenumber=} counter {&Submit=Post+Message">edit | </a>} ] print rejoin trim [ {<a href= "./index.cgi?function=deleteitemnumber&messagenumber=} counter {&Submit=Post+Message">delete</a>} ] print " " print { <TABLE background="" border=0 cellPadding=2 cellSpacing=2 height="100%" width="100%"><tr> <td width = "600"><BR> } print rejoin [{<FONT FACE="Courier New, Courier, monospace">} "Name: </FONT><strong>" bb/1 "</strong>"] print [<BR>] print rejoin [{<FONT FACE="Courier New, Courier, monospace">} "Address: </FONT><strong>" bb/3 "</strong>"] print [<BR>] print rejoin [{<FONT FACE="Courier New, Courier, monospace">} "Phone: </FONT><strong>" bb/4 "</strong>"] print [<BR>] print rejoin [{<FONT FACE="Courier New, Courier, monospace">} "Email: </FONT><strong>" (replace/all (replace bb/5 "@" " at ") "." " dot ") "</strong>" ] print [<BR>] print rejoin [{<FONT FACE="Courier New, Courier, monospace">} "Age: </FONT><strong>" bb/6 "</strong>"] print [<BR>] print rejoin [{<FONT FACE="Courier New, Courier, monospace">} "Language: </FONT><strong>" bb/7 "</strong>"] print [<BR>] print rejoin [{<FONT FACE="Courier New, Courier, monospace">} "Height: </FONT><strong>" bb/8 "</strong>"] print [<BR><BR>] ] ; automatically convert line endings to HTML " <br>" bb_temp: copy bb/9 replace/all bb_temp newline " <br> " bb_temp2: copy bb_temp ; automatically link any urls starting with http:// append bb_temp " " parse/all bb_temp [any [ thru "http://" copy link to " " (replace bb_temp2 (rejoin [{http://} link]) (rejoin [ { <a href="} {http://} link {" target=_blank>http://} link {</a> }])) ] to end ] print </td> print {<td width = "170" valign = "center">} print bb/11 ; image link print {</td></tr></table>} print bb_temp2 print [<BR><BR><HR>] counter: counter + 1 ] print [</td></tr></td></tr></td></tr></table>] ] print-all print [</td></tr></table></center>] print read %footer.htmlThe page above was saved as index.cgi, and serves as the main display page for the site. In order to ensure that a fresh copy of that page is always viewed by visitors, I also created the following index.html page that simply refreshes the index.cgi page. By using that index.html page as the primary link (and by making that HTML file the default page for the web site), visitors always automatically see a refreshed view of the member page, with any changes/updates that have been made:
<html> <head> <title></title> <META HTTP-EQUIV="REFRESH" CONTENT="0; URL=./index.cgi"> </head> <body bgcolor="#FFFFFF"> </body> </html>Next, I needed to create a form for users to enter their member information. This was saved as add.cgi. The form posts any submitted information back to index.cgi.
#! /home/path/public_html/rebol/rebol -cs REBOL [] print "content-type: text/html^/" print read %header.html print [<center><table border=1 cellpadding=10 width=90%><tr><td>] print [<font size=5>" Add New Member Information:"</font>] print " " print " " print " " print [<hr>] print [<FORM method="post" ACTION="./index.cgi">] print [<br>" Your Name: " <br><input type=text size="60" name="username"><BR>] print [<br>" Password (required to edit member info later): " <br> <input type=text size="60" name="password"><BR>] print [<br>" Address: " <br><input type=text size="60" name="address"> <BR>] print [<br>" Phone: " <br><input type=text size="60" name="phone"><BR>] print [<br>" Email: " <br><input type=text size="60" name="email"><BR>] print [<br>" Age: " <br><input type=text size="60" name="age"><BR>] print [<br>" Language: " <br><input type=text size="60" name="language"> <BR>] print [<br>" Height: " <br><input type=text size="60" name="height"><BR> <BR>] print [" Other Information/Notes: " <br>] print [<textarea name=otherinfo rows=5 cols=50></textarea><BR><BR>] print [<INPUT TYPE="SUBMIT" NAME="Submit" VALUE="Post New Member Info">] print [</FORM>] print [</td></tr></table></center>] print read %footer.htmlI integrated the following code into index.cgi, to read and add the info from the above form to the database:
; here's the default code used to read any data from an HTML form: read-cgi: func [/local data buffer][ switch system/options/cgi/request-method [ "POST" [ data: make string! 1020 buffer: make string! 16380 while [positive? read-io system/ports/input buffer 16380][ append data buffer clear buffer ] ] "GET" [data: system/options/cgi/query-string] ] data ] submitted: decode-cgi read-cgi ; make sure at least a user name and password was entered: if submitted/2 <> none [ if (submitted/2 = "") or (submitted/4 = "") [ print { <strong>You must include at least a name and password.</strong> <br><br>Press the [BACK] button in your browser to try again. } print [</td></tr></table></center>] print read %footer.html halt ] ; now create a new entry block to add to the database: entry: copy [] append entry submitted/2 ; name ; the time on the server is 3 hours different then our local time: append entry to-string (now + 3:00) append entry submitted/6 ; address append entry submitted/8 ; phone append entry submitted/10 ; email append entry submitted/12 ; age append entry submitted/14 ; language append entry submitted/16 ; height append entry submitted/18 ; other info append entry submitted/4 ; password append/only entry [ {<a href = "./default.jpg" target=_blank> <IMG align=baseline alt="" border=0 hspace=0 src="./default.jpg" width="160" height="120"></a>} ] ; append the new entry to the database, and notify the user: append/only tail bbs entry save %bb.db bbs print {<strong>New Member Added.</strong> Click "Edit" to upload a photo.} print [</td></tr></table></center>] print read %footer.html ; now display the member page with the new info refreshed: wait :00:04 refresh-me: { <head><title></title> <META HTTP-EQUIV="REFRESH" CONTENT="0; URL=./index.html"></head> } print refresh-me quitNow we can finish up the rest of the work in step 3 of our outline. The pseudo code in my outline reads "The pages where the users edit their information will be forms that display the information currently in the selected entry, without the password. When the user submits the new password and updated info, the CGI checks that the submitted password matches the existing password for that entry, and then replaces the old block with the new one, in the database text file". I've already created links in index.html to reference the "edititemnumber" (created earlier using a counter variable in the foreach loop of index.cgi). And we've already created the basic data entry form to add new users. So we can check for the edititemnumber, and fill the form with appropriate items from the database. In order to find and replace the original entry in the database, once the user has made changes, the original values also need to be submitted as additional hidden form fields, along with the user-editable values in the form's text fields. Here's what I came up with:
if submitted/2 = "edititemnumber" [ ; pick the correct entry from the database, using the submitted ; counter variable from the "edit" link in index.cgi: selected-block: pick bbs ( (length? bbs) - (to-integer submitted/4) + 1 ) print [<font size=5>" Edit Your Existing Member Information:"</font>] print " " ; here's a link we'll need for the section of the outline that ; enables image uploading: print rejoin [ {<a href="./upload.cgi?name=} first selected-block {">Upload Image (Add or Change)</a><hr>} ] print " " print "<br><br>" print {<strong><i>PASSWORD REQUIRED TO EDIT! </i></strong> (Enter it in the field below.)} print "<br><br>" print [<FORM method="post" ACTION="./edit.cgi">] print rejoin [ {<br> Your Name: <br> <input type=text size="60" name="username" value="} first selected-block {"><BR>} ] print [<br> <strong> " Member Password " </strong> "(same as when you created the original account): " <br> <input type=text size="60" name="password"><BR> ] print rejoin [ {<br> Address: <br><input type=text size="60" name="address" value="} pick selected-block 3 {"><BR>} ] print rejoin [ {<br> Phone: <br><input type=text size="60" name="phone" value="} pick selected-block 4 {"><BR>} ] print rejoin [ {<br> Email: <br><input type=text size="60" name="email" value="} pick selected-block 5 {"><BR>} ] print rejoin [ {<br> Age: <br><input type=text size="60" name="age" value="} pick selected-block 6 {"><BR>} ] print rejoin [ {<br> Language: <br><input type=text size="60" name="language" value="} pick selected-block 7 {"><BR>} ] print rejoin [ {<br> Height: <br><input type=text size="60" name="height" value="} pick selected-block 8 {"><BR><BR>} ] print [" Other Information/Notes: " <br>] print [<textarea name=otherinfo rows=5 cols=50>] print [pick selected-block 9] print [</textarea><BR><BR>] print rejoin [ {<input type="hidden" name="original_username" value="} pick selected-block 1 {">} ] print rejoin [ {<input type="hidden" name="original_date" value="} pick selected-block 2 {">} ] print rejoin [ {<input type="hidden" name="original_address" value="} pick selected-block 3 {">} ] print rejoin [ {<input type="hidden" name="original_phone" value="} pick selected-block 4 {">} ] print rejoin [ {<input type="hidden" name="original_email" value="} pick selected-block 5 {">} ] print rejoin [ {<input type="hidden" name="original_age" value="} pick selected-block 6 {">} ] print rejoin [ {<input type="hidden" name="original_language" value="} pick selected-block 7 {">} ] print rejoin [ {<input type="hidden" name="original_height" value="} pick selected-block 8 {">} ] print rejoin [ {<input type="hidden" name="original_otherinfo" value="} pick selected-block 9 {">} ] print [<INPUT TYPE="SUBMIT" NAME="Submit" VALUE="Update Member Information">] print [</FORM>] print [</td></tr></table></center>] print read %footer.html quit ]I added the above code to index.cgi. Notice that the above form points to edit.cgi, which actually does the work of checking the password and processing the changes in the database. It has all the standard header and read-cgi code, and then it uses a foreach loop to look for a database entry that has all the same data as that submitted by the hidden items in the form above, and checks the original password in that entry. In comparing the original password with that entered by the user, I also enabled an administrator password "blahblah". I also added the code to email users their password, in case they've forgotten it (just send the stored password to the email address contained in the database, for that entry):
#! /home/path/public_html/rebol/rebol -cs REBOL [] print "content-type: text/html^/" print read %header.html bbs: load %bb.db read-cgi: func [/local data buffer][ switch system/options/cgi/request-method [ "POST" [ data: make string! 1020 buffer: make string! 16380 while [positive? read-io system/ports/input buffer 16380][ append data buffer clear buffer ] ] "GET" [data: system/options/cgi/query-string] ] data ] submitted: construct decode-cgi read-cgi ; get password from the entry submitted: foreach message bbs [ if all [ find message submitted/original_username find message submitted/original_date find message submitted/original_address find message submitted/original_phone find message submitted/original_email find message submitted/original_age find message submitted/original_language find message submitted/original_height find message submitted/original_otherinfo ] [read-pass: message/10] ] ; save the old block: old-message: to-block reduce [ submitted/original_username submitted/original_date submitted/original_address submitted/original_phone submitted/original_email submitted/original_age submitted/original_language submitted/original_height submitted/original_otherinfo read-pass ] ; so that the original pass is not replaced by "blahblah": either submitted/password = "blahblah" [ entered-pass: read-pass ] [ entered-pass: submitted/password ] ; create the new entry for the database: new-message: to-block reduce [ submitted/username submitted/original_date submitted/address submitted/phone submitted/email submitted/age submitted/language submitted/height submitted/otherinfo entered-pass ] ; check the password, and replace: if submitted/password <> "" [ either ( read-pass = submitted/password ) or ( submitted/password = "blahblah" ) [ foreach message bbs [replace message old-message new-message] ] [ print { <strong>Forgot your member password?</strong> <br><br> It's being emailed to the address for this entry, right now... Wait for this page to refresh, then <strong>check your email! </strong> } print read %footer.html wait 3 set-net [user@website.com smtp.website.com] send (to-email submitted/original_email) (to-string rejoin [ "Forgot your member password?" newline newline trim {Someone was editing an entry with this email address, but the incorrect password was used. Here is the correct password, in case you've forgotten:} newline newline read-pass ]) ] ] save %bb.db bbs ; diplay the edited results on the main user page: refresh-me: { <head><title></title> <META HTTP-EQUIV="REFRESH" CONTENT="0; URL=./index.cgi"></head> } print refresh-me print read %footer.htmlHere, I decided to add the backup code. What I did was create a folder for all previous versions of the database text file to be saved as backups. Then I created a text file that contained the number of the current backup file (to start out, that text file just contained the number 1). Then, I incremented that number and saved it back to that number file. And finally, I saved a copy of the current database to a text file with the current backup number appended to the filename. This code went right before bb.db was saved in the CGI above:
backup-num: load %backup-num.txt backup-num: backup-num + 1 write %backup-num.txt backup-num filename: to-file rejoin ["./backup/bb-" (to-string backup-num) ".txt"] save filename bbsThe following code is basically a simpler version of the editing code above, which allows users to delete an entry. All that's needed in this case is the username and password. All the other info is passed along to delete.cgi as hidden fields. This code gets added to index.cgi:
if submitted/2 = "deleteitemnumber" [ selected-block: pick bbs ( (length? bbs) - (to-integer submitted/4) + 1 ) print [<font size=5>" Delete An Existing Member Account:"</font><hr>] print [<FORM method="post" ACTION="./delete.cgi">] print rejoin [ {<br> Your Name: <br> <input type=text size="60" name="username" value="} first selected-block {"><BR>} ] print [<br>" Member Password ( same as when you created the original account): " <br><input type=text size="60" name="password"><BR><BR> ] print rejoin [ {<input type="hidden" name="original_username" value="} pick selected-block 1 {">} ] print rejoin [ {<input type="hidden" name="original_date" value="} pick selected-block 2 {">} ] print rejoin [ {<input type="hidden" name="original_address" value="} pick selected-block 3 {">} ] print rejoin [ {<input type="hidden" name="original_phone" value="} pick selected-block 4 {">} ] print rejoin [ {<input type="hidden" name="original_email" value="} pick selected-block 5 {">} ] print rejoin [ {<input type="hidden" name="original_age" value="} pick selected-block 6 {">} ] print rejoin [ {<input type="hidden" name="original_language" value="} pick selected-block 7 {">} ] print rejoin [ {<input type="hidden" name="original_height" value="} pick selected-block 8 {">} ] print rejoin [ {<input type="hidden" name="original_otherinfo" value="} pick selected-block 9 {">} ] print [<INPUT TYPE="SUBMIT" NAME="Submit" VALUE="Delete Member Info">] print [</FORM>] print [</td></tr></table></center>] print read %footer.html quit ]Here's the code for delete.cgi, which the above form points to, and which does the actual work of deleting the selected block from the database (it's basically a variation of the edit.cgi script above):
#! /home/path/public_html/rebol/rebol -cs REBOL [] print "content-type: text/html^/" print read %header.html bbs: load %bb.db read-cgi: func [/local data buffer][ switch system/options/cgi/request-method [ "POST" [ data: make string! 1020 buffer: make string! 16380 while [positive? read-io system/ports/input buffer 16380][ append data buffer clear buffer ] ] "GET" [data: system/options/cgi/query-string] ] data ] submitted: construct decode-cgi read-cgi foreach message bbs [ if all [ find message submitted/original_username find message submitted/original_date find message submitted/original_address find message submitted/original_phone find message submitted/original_email find message submitted/original_age find message submitted/original_language find message submitted/original_height find message submitted/original_otherinfo ] [read-pass: message/10] ] old-message: to-block reduce [ submitted/original_username submitted/original_date submitted/original_address submitted/original_phone submitted/original_email submitted/original_age submitted/original_language submitted/original_height submitted/original_otherinfo read-pass ] if submitted/password <> "" [ if ( read-pass = submitted/password ) or ( submitted/password = "blahblah" ) [ backup-num: load %backup-num.txt backup-num: backup-num + 1 write %backup-num.txt backup-num filename: to-file rejoin [ "./backup/bb-" (to-string backup-num) ".txt" ] save filename bbs foreach message bbs [replace message old-message ""] ] ] remove-each message bbs [ any [ message = [""] (all [ message/1 = "" message/2 = "" message/3 = "" message/4 = "" message/5 = "" message/6 = "" message/7 = "" message/8 = "" message/9 = "" ] ) ] ] save %bb.db bbs refresh-me: { <head><title></title> <META HTTP-EQUIV="REFRESH" CONTENT="0; URL=./index.cgi"></head> } print refresh-me print read %footer.htmlCreating the image upload page for step #4 in our outline was a bit of a challenge. That's because REBOL has no built-in way to accept binary data from HTML forms (images, in this case), called "form-multipart" data. I searched the mailing list and quickly found a solution at http://www.rebol.org/cgi-bin/cgiwrap/rebol/ml-display-thread.r?m=rmlKVSQ. Andreas Bolka's "decode-multipart-form-data" did exactly what I needed. That function converts the data entered by a user, as well as the files they choose and upload from their hard drive, into a friendly and easy to use REBOL object.
#! /home/path/public_html/rebol/rebol -cs REBOL [Title: "HTTP File Upload"] print "content-type: text/html^/" print read %header.html read-cgi: func [/local data buffer][ switch system/options/cgi/request-method [ "POST" [ data: make string! 1020 buffer: make string! 16380 while [positive? read-io system/ports/input buffer 16380][ append data buffer clear buffer ] ] "GET" [data: system/options/cgi/query-string] ] data ] ; here's Andreas's magic function to read form/multipart data: decode-multipart-form-data: func [ p-content-type p-post-data /local list ct bd delim-beg delim-end non-cr non-lf non-crlf mime-part ] [ list: copy [] if not found? find p-content-type "multipart/form-data" [return list] ct: copy p-content-type bd: join "--" copy find/tail ct "boundary=" delim-beg: join bd crlf delim-end: join crlf bd non-cr: complement charset reduce [ cr ] non-lf: complement charset reduce [ newline ] non-crlf: [ non-cr | cr non-lf ] mime-part: [ ( ct-dispo: content: none ct-type: "text/plain" ) delim-beg ; mime-part start delimiter "content-disposition: " copy ct-dispo any non-crlf crlf opt [ "content-type: " copy ct-type any non-crlf crlf ] crlf ; content delimiter copy content to delim-end crlf ; mime-part end delimiter ( handle-mime-part ct-dispo ct-type content ) ] handle-mime-part: func [ p-ct-dispo p-ct-type p-content /local tmp name value val-p ] [ p-ct-dispo: parse p-ct-dispo {;="} name: to-set-word (select p-ct-dispo "name") either (none? tmp: select p-ct-dispo "filename") and (found? find p-ct-type "text/plain") [ value: content ] [ value: make object! [ filename: copy tmp type: copy p-ct-type content: either none? p-content [none] [copy p-content] ] ] either val-p: find list name [change/only next val-p compose [(first next val-p) (value)]] [ append list compose [ (to-set-word name) (value) ] ] ] use [ ct-dispo ct-type content ] [ parse/all p-post-data [ some mime-part "--" crlf ] ] list ] ; now we can put the uploaded binary, and all the text entered by the ; user via the HTML form, into a REBOL object. we can refer to the ; uploaded photo using the syntax: cgi-object/photo/content post-data: read-cgi cgi-object: construct decode-multipart-form-data ( system/options/cgi/content-type copy post-data ) ; I created a "./files" subdirectory to hold these images. Now ; write the file to the web server using the original filename, ; but without any Windows path characters, and notify the user: adjusted-filename: copy cgi-object/photo/filename adjusted-filename: replace/all adjusted-filename "/" "-" adjusted-filename: replace/all adjusted-filename "\" "-" adjusted-filename: replace/all adjusted-filename " " "_" adjusted-filename: replace/all adjusted-filename ":" "_" adjusted-filename: to-file rejoin ["./files/" adjusted-filename] write/binary adjusted-filename cgi-object/photo/content print [<strong>] print {Upload Complete. } print [</strong>] print [<br><br>] ; now add an HTML link to this file, to the database: bbs: load %bb.db entry: copy [] link-added: rejoin [ {<a href = "} to-string adjusted-filename {" target=_blank>} {<IMG align=baseline alt="" border=0 hspace=0 src="} to-string adjusted-filename {" width="160" height="120">} </a> ] ; display image inline append entry link-added foreach message bbs [ if (all [ cgi-object/username = message/1 cgi-object/password = message/10 ]) [ if ((length? message) < 11) [append message ""] message/11: entry ] ] save %bb.db bbs ; show additions by refreshing the index.cgi page: refresh-me: { <head><title></title> <META HTTP-EQUIV="REFRESH" CONTENT="0; URL=./index.cgi"></head> } print refresh-me print read %footer.htmlThe last step in the outline was easy. I just used the code from the previous case study (the password protected CGI text editor), and pointed it to the database text file. I also looped through the backup directory and printed links to each of the files in that directory, so that any of the previous backup files could be easily copied and pasted into the editor, to revert the database to a previous state.
#! /home/path/public_html/rebol/rebol -cs REBOL [] print "content-type: text/html^/" print [<HTML><HEAD><TITLE>"Edit Database!!!"</TITLE></HEAD><BODY>] read-cgi: func [/local data buffer][ switch system/options/cgi/request-method [ "POST" [ data: make string! 1020 buffer: make string! 16380 while [positive? read-io system/ports/input buffer 16380][ append data buffer clear buffer ] ] "GET" [data: system/options/cgi/query-string] ] data ] submitted: decode-cgi read-cgi ; if schedule.txt has been edited and submitted: if ((submitted/2 = "save") or (submitted/2 = "save")) [ ; save newly edited schedule: write %./bb.db submitted/4 print ["Database Saved."] ; print {<META HTTP-EQUIV="REFRESH" CONTENT="0; URL=./bb.db">} quit ] ; if user is just opening page (i.e., no data has been submitted ; yet), request user/pass: if ((submitted/2 = none) or (submitted/4 = none)) [ print [<strong>"W A R N I N G - Private Server, Login Required:" </strong><BR><BR>] print [<FORM ACTION="./editor.cgi">] print [" Username: " <input type=text size="50" name="name"><BR><BR>] print [" Password: " <input type=text size="50" name="pass"><BR><BR>] print [<INPUT TYPE="SUBMIT" NAME="Submit" VALUE="Submit">] print [</FORM>] quit ] ; check user/pass, end if incorrect: response: false if ((submitted/2 = "username") and (submitted/4 = "password")) [ response: true ] if response = false [print "Incorrect Username/Password." quit] ; if user/pass is ok, go on (backup before changes are made): cur-time: to-string replace/all to-string now/time ":" "-" schedule_text: read %./bb.db write to-file rejoin [ "./backup/" now/date "_" cur-time ".txt" ] schedule_text ; here's the form that lets the user edit the text: print [<center>] print [<strong>"Be sure to click [SUBMIT] when done:"</strong><BR><BR>] print [<strong>"(This will OVERWRIGHT the current database!)"</strong> <BR><BR>] print [<FORM method="post" ACTION="./editor.cgi">] print [<INPUT TYPE=hidden NAME=submit_confirm VALUE="save">] print [<textarea cols="100" rows="25" name="contents">] print [schedule_text] print [</textarea><BR><BR>] print [<INPUT TYPE="SUBMIT" NAME="Submit" VALUE="Submit">] print [</FORM>] print [</center>] print {<br><br><br><br><br><br><br><br><hr>} ; here's a linked listing of all the backup files available for ; copy/paste: foreach file (read %./backup/) [ print rejoin [ {<a href="./backup/} file {" target=_blank>} file {</a> }] ] print [</BODY></HTML>]That's it - the web site and all its features are complete! You can see a live demo at http://guitarz.org/tester and download the complete set of scripts in this case study at http://guitarz.org/tester/member_board.zip.
20.11 Case: A CGI Event Calendar
My friend liked the system above so much that we adapted it for use as an online classifieds page and also as an event calendar listing on the same web site. For the calendar, we just changed the database fields to: Event, Date/Time, Location, Contact Name, Contact Phone, Contact Email, Requirements. Links and display text such as "Join Now" were simply changed to "Enter A New Event", etc.
The calendar was in use for quite a while and functioning beautifully, when my friend asked if I could create an event page that actually looked like a normal calendar display, instead of just a list of events. Ok, so here's how I broke down the basic creative process:
- Design an HTML page that looks like a calendar. My guiding thought was that the CGI program which printed this page would include a loop that runs through the days of the current month, and prints HTML table rows and cells for each numbered day, one row per group of days Sunday-Saturday.
- For each day of the month printed in the table above, search through the database for dates that match the current table cell being printed, and then print the event description (first item in the block for that event), with a link to the event listing page.
As always, I began the process by looking for some existing code that may be useful in my design (it's always a good idea to avoid reinventing the wheel). My work was immediately made easy, when I searched for "calendar" at rebol.org. I quickly found the HTML calendar by Bohdan Lechnowsky, which prints out an HTML calendar display for the current month. It uses a table design created by loops, much like I had imagined. I read through Bohdan's code, made some comments as to what each section accomplished, and made some changes to the design of the tables so that the calendar stretched to fit the entire page of the browser. I also wrote a line of code to visually highlight the current day (so that today's date is always printed in a unique color). You can see the original code at the link above, and here are my tweaks and comments:
#! /home/path/public_html/rebol/rebol -cs REBOL [] print "content-type: text/html^/" print {<HTML><HEAD><TITLE>Event Calendar</TITLE></HEAD><BODY>} ; print month + year header: date: now/date html: copy rejoin [ {<CENTER><TABLE border=1 valign=middle width=99% height=99%> <TR><TD colspan=7 align=center height=8%><FONT size=5>} pick system/locale/months date/month { } date/year {</FONT></TD></TR><TR>} ] ; print days header: days: ["Sun" "Mon" "Tue" "Wed" "Thu" "Fri" "Sat"] foreach day days [ append html rejoin [ {<TD bgcolor="#206080" align=center width=10% height=5%> <FONT face="courier new,courier" color="FFFFFF" size="+1">} day {</FONT></TD>} ] ] append html {</TR><TR>} ; print non-month days at the begining of month in gray: sdate: date sdate/day: 0 loop sdate/weekday // 7 + 1 [append html {<TD bgcolor=gray></TD>}] ; print every other day, with the current day in a unique color: while [sdate/day: sdate/day + 1 sdate/month = date/month][ append html rejoin [ {<TD bgcolor="#} ; I ADDED THIS CODE TO VISUALLY HIGHLIGHT THE CURRENT DAY: either date/day = sdate/day ["AA9060"]["FFFFFF"] {" height=14% valign=top>} sdate/day {</TD>} ] if sdate/weekday = 6 [append HTML {</TR><TR>}] ] ; print non-month days at the end of month in gray: loop 7 - sdate/weekday [append html rejoin [{<TD bgcolor=gray></TD>}]] ; finish and print: append html {</TR></TABLE></CENTER></BODY></HTML>} print htmlWith step 1 in my outline done, I completed the second and last step by adding the code below. It was really simple. First, I created a variable called "event-labels" which would hold any events in the database that occurred on a given day. I put this inside Bohdan's while loop, which ran through each day of the month and printed the calendar table cells for each separate day). I used a foreach loop to compare each date found in the database to the current date being added to the calendar. If there's a match, "event-labels" is rejoined with the first item in the event entry (the description of the event), and linked to the event display. The string of text in event-labels is then later printed into the table, within the current day's cell.
while [sdate/day: sdate/day + 1 sdate/month = date/month][ event-labels: {} foreach entry bbs [ date-in-entry: 1-Jan-1001 attempt [date-in-entry: (to-date entry/3)] if (date-in-entry = sdate) [ event-labels: rejoin [ {<font size=1>} event-labels "<strong><br><br>" {<a href="http://website.com/path/calendar">} entry/1 {</a>} "</strong>" {</font>} ] ] ]That's it! Here's the whole script:
#! /home/path/public_html/rebol/rebol -cs REBOL [] print "content-type: text/html^/" print {<HTML><HEAD><TITLE>Event Calendar</TITLE></HEAD><BODY>} bbs: load %bb.db date: now/date html: copy rejoin [ {<CENTER><TABLE border=1 valign=middle width=99% height=99%> <TR><TD colspan=7 align=center height=8%><FONT size=5>} pick system/locale/months date/month { } date/year {</FONT></TD></TR><TR>} ] days: ["Sun" "Mon" "Tue" "Wed" "Thu" "Fri" "Sat"] foreach day days [ append html rejoin [ {<TD bgcolor="#206080" align=center width=10% height=5%> <FONT face="courier new,courier" color="FFFFFF" size="+1">} day {</FONT></TD>} ] ] append html {</TR><TR>} sdate: date sdate/day: 0 loop sdate/weekday // 7 + 1 [append html {<TD bgcolor=gray></TD>}] while [sdate/day: sdate/day + 1 sdate/month = date/month][ event-labels: {} foreach entry bbs [ date-in-entry: 1-Jan-1001 attempt [date-in-entry: (to-date entry/3)] if (date-in-entry = sdate) [ event-labels: rejoin [ {<font size=1>} event-labels "<strong><br><br>" {<a href="http://website.com/path/calendar">} entry/1 {</a>} "</strong>" {</font>} ] ] ] append html rejoin [ {<TD bgcolor="#} either date/day = sdate/day ["AA9060"]["FFFFFF"] ; HERE, THE EVENTS ARE PRINTED IN THE APPROPRIATE DAY: {" height=14% valign=top>} sdate/day event-labels {</TD>} ] if sdate/weekday = 6 [append html {</TR><TR>}] ] loop 7 - sdate/weekday [append html rejoin [{<TD bgcolor=gray></TD>}]] append html {</TR></TABLE></CENTER></BODY></HTML>} print html
20.12 Case: Media Player (Wave/Mp3 Jukebox)
This case study started when a reader of this tutorial sent me an email question. He was having trouble creating a simple script that would load the file names from a directory on his hard drive into a GUI text list. He wanted to be able to click on .wav files in the list in order to play the sounds. I generally don't have time to answer questions like that, but this one was a quicky. The following code switches to the Windows media folder, reads the directory listing, and displays the file names in a GUI text list:
change-dir %/c/Windows/media view layout [text-list data read %.]I just added the contents of the "play-sound" function found earlier in this tutorial, to the action block of the text list. This loads the contents of the value selected in the text list (the file name), and plays the sound:
change-dir %/c/Windows/media view layout [ vh2 "Click a File to Play:" text-list data read %. [ wait 0 sound-port: open sound:// insert sound-port (load value) wait sound-port close sound-port ] ]That was simple.
A few days later the reader emailed me for some additional help. As it stands, the script crashes if the user selects anything other than a .wav file, or if another file is selected while a .wav is currently playing. I wrote back with some code to get the text list to show only .wav files and to make the program wait to play another file. I also wrote some additional code to let users select a different starting directory. Here it is:
; Here's how to use the "request-dir" function to let the user ; select a folder to switch into: start-dir: request-dir/dir %/c/Windows/media change-dir start-dir ; To display only files with a ".wav" extension in your text list, ; create a new empty block. Use a "foreach" loop to go through the ; directory listing, and append to the new block only file names ; which have ".wav" as the suffix: waves: [] foreach file read %. [ if %.wav = (suffix? file) [append waves file] ] ; Now you can display the "waves" block of data in the GUI text list. ; To wait for sounds to finish playing before another file can ; be selected, add a "wait-flag" variable to the play-sound ; function. When a sound starts playing, set the wait-flag ; variable to true. When it's finished playing, set the wait-flag ; to false. Also be sure to set it initially to "false" at ; the beginning of your program: play-sound: func [sound-file] [ wait 0 wait-flag: true ring: load sound-file sound-port: open sound:// insert sound-port ring wait sound-port close sound-port wait-flag: false ] wait-flag: false ; When a file is selected from the text list, only run the ; "play-sound" function if the "wait-flag" variable is not ; set to true (i.e., if no sounds are playing): view layout [ vh2 "Click a File to Play:" text-list data waves [ if wait-flag <> true [ play-sound value ] ] ]As I tested the above code, I realized that a few various .wav files in the Windows media folder wouldn't play properly, and the script crashed. I added the following code to handle errors:
if error? try [play-sound value] [ alert "malformed wave" ; Alert the user with a message, close sound-port ; close the port opened by the broken wait-flag: false ; play-sound function, and set the flag ] ; back to false (so other waves can play).I also decided to add a button to the GUI to allow users to change the directory at will, instead of just at the beginning of the script:
btn "Change Folder" [ change-dir request-dir waves: copy [] foreach file read %. [ if %.wav = suffix? file [append waves file] ] file-list/data: waves show file-list ]At this point, we've got a nice little .wav playing application:
REBOL [] play-sound: func [sound-file] [ wait 0 wait-flag: true ring: load sound-file sound-port: open sound:// insert sound-port ring wait sound-port close sound-port wait-flag: false ] wait-flag: false change-dir %/c/Windows/media waves: [] foreach file read %. [ if %.wav = suffix? file [append waves file] ] view layout [ vh2 "Click a File to Play:" file-list: text-list data waves [ if wait-flag <> true [ if error? try [play-sound value] [ alert "malformed wave" close sound-port wait-flag: false ] ] ] btn "Change Folder" [ change-dir request-dir waves: copy [] foreach file read %. [ if %.wav = suffix? file [append waves file] ] file-list/data: waves show file-list ] ]This was posted online, and within a few days several readers asked the same question: "How do I get it to play .mp3 files?". REBOL cannot natively play mp3s, so we need to use an external tool to make that happen. Earlier in the tutorial, I included a .dll example that plays mp3 files, but I wanted a slightly more industrial strength solution. I decided to give the well known "LAME" mp3 encoder/decoder a try. I downloaded the compiled Windows version of LAME from http://www.rarewares.org/mp3-lame-bundle.php, and compressed the .exe version of it using the binary resouce embedder found earlier in this tutorial. For the sake of saving space in this tutorial, I uploaded the compressed, embedded code to http://musiclessonz.com/rebol_tutorial/lame.r. The following line writes the lame.exe program to the current directory of your hard drive:
do http://musiclessonz.com/rebol_tutorial/lame.r ; ~250k downloadTo use our media player program without having to download anything, simply put the above lame.r code directly in your script. Once you've got lame.exe on your hard drive, you can use it to convert .mp3 files to .wav files using the format:
call/wait {lame.exe --decode your-input.mp3 your-output.wav}I added the line above to my existing program, and changed the "waves" block-building foreach routine to include .mp3 files:
waves: [] foreach file read %. [ if ((%.wav = suffix? file) or (%.mp3 = suffix? file)) [append waves file] ]I also changed the wave playing routine (the action block of the GUI text list), so that if an mp3 file is selected, lame is run and the file is converted to a temporary wav file, and then that wav file is played:
file-list: text-list data waves [ either %.mp3 = suffix? value [ call/wait rejoin ["lame.exe --decode " (to-local-file value) " temp.wav"] if wait-flag <> true [ if error? try [play-sound %temp.wav] [ alert "malformed wave" close sound-port wait-flag: false ] ] ] [ if wait-flag <> true [ if error? try [play-sound value] [ alert "malformed wave" close sound-port wait-flag: false ] ] ] ]With those changes, the code now looks like this:
REBOL [] do http://musiclessonz.com/rebol_tutorial/lame.r play-sound: func [sound-file] [ wait 0 wait-flag: true ring: load sound-file sound-port: open sound:// insert sound-port ring wait sound-port close sound-port wait-flag: false ] wait-flag: false change-dir %/c/Windows/media waves: [] foreach file read %. [ if ((%.wav = suffix? file) or (%.mp3 = suffix? file)) [append waves file] ] view center-face layout [ vh2 "Click a File to Play:" file-list: text-list data waves [ either %.mp3 = suffix? value [ message/text: "Decoding mp3..." show message call/wait rejoin ["lame.exe --decode " (to-local-file value) " temp.wav"] message/text: "" show message if wait-flag <> true [ if error? try [play-sound %temp.wav] [ alert "malformed wave" close sound-port wait-flag: false ] ] ] [ if wait-flag <> true [ if error? try [play-sound value] [ alert "malformed wave" close sound-port wait-flag: false ] ] ] ] btn "Change Folder" [ change-dir request-dir waves: copy [] foreach file read %. [ if ((%.wav = suffix? file) or (%.mp3 = suffix? file)) [append waves file] ] file-list/data: waves show file-list ] message: h2 " " ]That's a cute solution, but the performance is not acceptable for any legitimate use. Large mp3 files take a long time to convert before being played.
Another potential mp3 playing option I considered was a small command line mp3 player called "madplay.exe", available from http://www.rarewares.org/mp3-others.php. Madplay doesn't have any GUI interface - you simply run it on the command line and control playback using keystrokes. Madplay can play many types of media, and keystrokes can be sent to it programatically using the Windows API or the Autoit DLL. I did create a working app using madplay.exe and autoit.dll, but I won't document that code here because it felt like another cobbled together solution.
To find a real solution, I googled "play mp3 dll". The first thing that came up was "libwmp3.dll" from http://www.inet.hr/~zcindori/libwmp3/index.html. Bingo - that did exactly what I wanted. The dll shipped with example usage code written in Visual Basic, C, C++, and Delphi. From these examples, I was able to decipher the required function names, input parameters, and return values, and came up with the following code to access the .dll in REBOL:
lib: load/library %libwmp3.dll Mp3_Initialize: make routine! [ return: [integer!] ] lib "Mp3_Initialize" Mp3_OpenFile: make routine! [ return: [integer!] class [integer!] filename [string!] nWaveBufferLengthMs [integer!] nSeekFromStart [integer!] nFileSize [integer!] ] lib "Mp3_OpenFile" Mp3_Play: make routine! [ return: [integer!] initialized [integer!] ] lib "Mp3_Play" ; The following function and structure aren't required ; to play mp3s, but we'll use them to determine if a ; file is currently being played: Mp3_GetStatus: make routine! [ return: [integer!] initialized [integer!] status [struct! []] ] lib "Mp3_GetStatus" status: make struct! [ fPlay [integer!] fPause [integer!] fStop [integer!] fEcho [integer!] nSfxMode [integer!] fExternalEQ [integer!] fInternalEQ [integer!] fVocalCut [integer!] fChannelMix [integer!] fFadeIn [integer!] fFadeOut [integer!] fInternalVolume [integer!] fLoop [integer!] fReverse [integer!] ] none ; The following functions stop play and release memory when done: Mp3_Stop: make routine! [ return: [integer!] initialized [integer!] ] lib "Mp3_Stop" Mp3_Destroy: make routine! [ return: [integer!] initialized [integer!] ] lib "Mp3_Destroy"Now those functions can be used in REBOL to play any .mp3. It's very easy, using 3 functions:
initialized: Mp3_Initialize Mp3_OpenFile initialized "test.mp3" 1000 0 0 Mp3_Play initialized ; Just change the "test.mp3" file to any .mp3 you want to play. ; Be sure that the file name is sent as a string, and that it's ; written in Windows file format (use the "to-local-file" and ; "what-dir" functions if necessary, to convert from REBOL file ; format).That's all the code required to play an mp3. To check if an mp3 file is currently playing:
Mp3_GetStatus initialized status if ( status/fPlay > 0 ) [print "playing"]To stop an mp3 from playing:
Mp3_Stop initializedTo clean up afterward:
Mp3_Destroy initialized free libI added some code to download the libwmp3.dll to the hard drive (of course, the .dll file could also be embedded directly in your code, using the binary resouce embedder from earlier in this tutorial):
if not exists? %libwmp3.dll [ write/binary %libwmp3.dll read/binary http://musiclessonz.com/rebol_tutorial/libwmp3.dll ]Now we can add real mp3 playing ability to our little app. Here's the final code:
REBOL [title: "Jukebox - Wav/Mp3 Player"] if not exists? %libwmp3.dll [ write/binary %libwmp3.dll read/binary http://musiclessonz.com/rebol_tutorial/libwmp3.dll ] lib: load/library %libwmp3.dll Mp3_Initialize: make routine! [ return: [integer!] ] lib "Mp3_Initialize" Mp3_OpenFile: make routine! [ return: [integer!] class [integer!] filename [string!] nWaveBufferLengthMs [integer!] nSeekFromStart [integer!] nFileSize [integer!] ] lib "Mp3_OpenFile" Mp3_Play: make routine! [ return: [integer!] initialized [integer!] ] lib "Mp3_Play" Mp3_Stop: make routine! [ return: [integer!] initialized [integer!] ] lib "Mp3_Stop" Mp3_Destroy: make routine! [ return: [integer!] initialized [integer!] ] lib "Mp3_Destroy" Mp3_GetStatus: make routine! [ return: [integer!] initialized [integer!] status [struct! []] ] lib "Mp3_GetStatus" status: make struct! [ fPlay [integer!] fPause [integer!] fStop [integer!] fEcho [integer!] nSfxMode [integer!] fExternalEQ [integer!] fInternalEQ [integer!] fVocalCut [integer!] fChannelMix [integer!] fFadeIn [integer!] fFadeOut [integer!] fInternalVolume [integer!] fLoop [integer!] fReverse [integer!] ] none play-sound: func [sound-file] [ wait 0 wait-flag: true ring: load sound-file sound-port: open sound:// insert sound-port ring wait sound-port close sound-port wait-flag: false ] wait-flag: false change-dir %/c/Windows/media waves: [] foreach file read %. [ if ((%.wav = suffix? file) or (%.mp3 = suffix? file)) [append waves file] ] initialized: Mp3_Initialize view center-face layout [ vh2 "Click a File to Play:" file-list: text-list data waves [ Mp3_GetStatus initialized status either %.mp3 = suffix? value [ if (wait-flag <> true) and (status/fPlay = 0) [ file: rejoin [to-local-file what-dir "\" value] Mp3_OpenFile initialized file 1000 0 0 Mp3_Play initialized ] ] [ if (wait-flag <> true) and (status/fPlay = 0) [ if error? try [play-sound value] [ alert "malformed wave" close sound-port wait-flag: false ] ] ] ] across btn "Change Folder" [ change-dir request-dir waves: copy [] foreach file read %. [ if ((%.wav = suffix? file) or (%.mp3 = suffix? file)) [append waves file] ] file-list/data: waves show file-list ] btn "Stop" [ close sound-port wait-flag: false if (status/fPlay > 0) [Mp3_Stop initialized] ] ] Mp3_Destroy initialized free libI wrote a longer example that shows how to use other features of the libwmp3.dll: pause/resume, volume control, fast forward/rewind, looping, reverse play and vocal removal. It's available at http://www.rebol.org/view-script.r?script=mp3-player-libwmp.r. The function prototypes in that example demonstrate how to use all the other functions in the library: equalizer settings, stream playing, retrieval of ID field and recorded data info, effect application (echo, reverb, etc.), and more. The example below demonstrates how to attach volume, loop play, and seek parameters to GUI slide controls (this example only works with MP3 files):
REBOL [Title: "Jukebox"] if not exists? %libwmp3.dll [ write/binary %libwmp3.dll read/binary http://musiclessonz.com/rebol_tutorial/libwmp3.dll ] lib: load/library %libwmp3.dll Mp3_Initialize: make routine! [ return: [integer!] ] lib "Mp3_Initialize" Mp3_OpenFile: make routine! [ return: [integer!] class [integer!] filename [string!] nWaveBufferLengthMs [integer!] nSeekFromStart [integer!] nFileSize [integer!] ] lib "Mp3_OpenFile" Mp3_Play: make routine! [ return: [integer!] initialized [integer!] ] lib "Mp3_Play" Mp3_Stop: make routine! [ return: [integer!] initialized [integer!] ] lib "Mp3_Stop" Mp3_Destroy: make routine! [ return: [integer!] initialized [integer!] ] lib "Mp3_Destroy" Mp3_GetStatus: make routine! [ return: [integer!] initialized [integer!] status [struct! []] ] lib "Mp3_GetStatus" status: make struct! [ fPlay [integer!] fPause [integer!] fStop [integer!] fEcho [integer!] nSfxMode [integer!] fExternalEQ [integer!] fInternalEQ [integer!] fVocalCut [integer!] fChannelMix [integer!] fFadeIn [integer!] fFadeOut [integer!] fInternalVolume [integer!] fLoop [integer!] fReverse [integer!] ] none Mp3_Time: make struct! [ ms [integer!] sec [integer!] bytes [integer!] frames [integer!] hms_hour [integer!] hms_minute [integer!] hms_second [integer!] hms_millisecond [integer!] ] none TIME_FORMAT_SEC: 2 SONG_BEGIN: 1 SONG_CURRENT_FORWARD: 4 Mp3_Seek: make routine! [ return: [integer!] initialized [integer!] fFormat [integer!] pTime [struct! []] nMoveMethod [integer!] ] lib "Mp3_Seek" Mp3_PlayLoop: make routine! [ return: [integer!] initialized [integer!] fFormatStartTime [integer!] pStartTime [struct! []] fFormatEndTime [integer!] pEndTime [struct! []] nNumOfRepeat [integer!] ] lib "Mp3_PlayLoop" Mp3_GetSongLength: make routine! [ return: [integer!] initialized [integer!] pLength [struct! []] ] lib "Mp3_GetSongLength" Mp3_GetPosition: make routine! [ return: [integer!] initialized [integer!] pTime [struct! []] ] lib "Mp3_GetPosition" Mp3_SetVolume: make routine! [ return: [integer!] initialized [integer!] nLeftVolume [integer!] nRightVolume [integer!] ] lib "Mp3_SetVolume" Mp3_GetVolume: [ initialized [integer!] pnLeftVolume [integer!] pnRightVolume [integer!] return: [integer!] ] lib "Mp3_GetVolume" Mp3_VocalCut: make routine! [ return: [integer!] initialized [integer!] fEnable [integer!] ] lib "Mp3_VocalCut" Mp3_ReverseMode: make routine! [ return: [integer!] initialized [integer!] fEnable [integer!] ] lib "Mp3_ReverseMode" Mp3_Close: make routine! [ return: [integer!] initialized [integer!] ] lib "Mp3_Close" waves: [] foreach file read %. [ if (%.mp3 = suffix? file) [append waves file] ] append waves "(CHANGE FOLDER...)" initialized: Mp3_Initialize view center-face layout [ vh2 "Click a File to Play:" file-list: text-list data waves [ if value = "(CHANGE FOLDER...)" [ new-dir: request-dir if new-dir = none [break] change-dir new-dir waves: copy [] foreach file read %. [ if (%.mp3 = suffix? file) [append waves file] ] append waves "(CHANGE FOLDER...)" file-list/data: waves show file-list break ] Mp3_GetStatus initialized status if (status/fPlay = 0) [ file: rejoin [to-local-file what-dir "\" value] Mp3_OpenFile initialized file 1000 0 0 Mp3_Play initialized ] ] across tabs 40 text "Seek: " tab slider 140x15 [ plength: make struct! Mp3_Time compose [0 0 0 0 0 0 0 0] Mp3_GetSongLength initialized plength location: to-integer (value * plength/sec) ptime: make struct! Mp3_Time compose [0 (location) 0 0 0 0 0 0] Mp3_Seek initialized TIME_FORMAT_SEC ptime SONG_BEGIN Mp3_Play initialized ] return text "Volume: " tab slider 140x15 [ volume: to-integer value * 100 Mp3_SetVolume initialized volume volume ] return btn "Reverse" [ Mp3_GetStatus initialized status either (status/fReverse > 0) [ Mp3_ReverseMode initialized 0 ] [ Mp3_ReverseMode initialized 1 ] ] btn "Vocal-Cut" [ Mp3_GetStatus initialized status either (status/fVocalCut > 0) [ Mp3_VocalCut initialized 0 ] [ Mp3_VocalCut initialized 1 ] ] return tabs 50 text "Loop Start:" tab start-slider: slider 120x15 [] return text "Loop End: " tab end-slider: slider 120x15 [] return btn "Play Loop" [ plength: make struct! Mp3_Time compose [0 0 0 0 0 0 0 0] Mp3_GetSongLength initialized plength s-loc: to-integer (start-slider/data * plength/sec) pStartTime: make struct! Mp3_Time compose [0 (s-loc) 0 0 0 0 0 0] end-loc: to-integer (end-slider/data * plength/sec) pEndTime: make struct! Mp3_Time compose [0 (end-loc) 0 0 0 0 0 0] ; TIME_FORMAT_SEC: 2 Mp3_PlayLoop initialized 2 pStartTime 2 pEndTime 1000 ; 1000x ] btn 58 "Stop" [ Mp3_GetStatus initialized status if (status/fPlay > 0) [Mp3_Stop initialized] ] ] Mp3_Destroy initialized free libLibwmp3.dll is a very powerful and easy solution for playing mp3 files in any Windows programming language. If you're interested in playing mp3s in REBOL, it's a must-have.
20.13 Case: Guitar Chord Chart Printer
My music lesson business has provided me an enormous variety of coding challenges. This program was written to help students in high school jazz band quickly play all of the common extended, altered, and complex chord types. It creates and prints instant guitar chord diagram charts for songs. Although it was written to help teach complex jazz chords, it can also be used to create chord charts for any other type of music (with simpler chords): folk, rock, blues, pop, etc.
When I set out to create this program, here's what I envisioned:
- Users should be able to select from a list of root notes (A, Bb, C#, etc.), and sonorities (major, minor, 7(#5b9), etc.) for each chord in a song.
- A list of selected chords should be shown in a text area.
- When the user has added all the chords in a song, they should be able to click a button to view the chords in their browser. By displaying in a browser, the user can adjust printer settings to print charts at different sizes.
- I wanted the user to be able to save and load chord lists to a text file, and to be able to create a zip file of all the rendered chords in a song (the HTML and all the images used to display the song on the browser).
To understand how this program works, it's essential to understand some basics about how chords are formed on the guitar fretboard. Every chord label in our musical system has two parts: a root note (letter name), and a sonority (type/characteristic sound). The traditional way to teach chord theory on guitar is to use two fretboard fingering patterns: 1 with the root note of the chord on the 6th string, and another with the root note on the 5th string. Each shape is a diagram of "intervals" (notes from a major scale, "do re mi fa so la ti do") that are combined to form chords. Every type of chord is made up of a specific formula of intervals, and that unique combination of intervals creates a predictable characteristic sound. The shapes can be slid up or down along the fretboard, so that the root note (interval number 1) in the diagram is placed on the specified root note of a given chord.
Here are the interval fretboard diagrams, showing where to put your fingers to create chords (These are basically pictures of the fretboard, as if the guitar is sitting upright in front of you. Search for "how to read guitar chord diagrams" in Google to understand more about how fretboard diagrams work.):
Root 6 interval shapes: Root 5 interval shapes: ___________ ___________ | | | | 4 | | | | | | | | 3 6 9 | 7 | | | | | | 1 | | | 5 1 | | | | 1 4 | | 7 3 | | | | 3 6 | | | 5 1 4 6 9 5 1 4 | 9 5 | | | | | | | | | 7 | | | | 9 | 7 | | | 5 1 3 6Here are the interval patterns used to create chords, along with the various symbols seen in music to represent each type of chord:
CHORD TYPE: INTERVALS: SYMBOLS: Power Chord 1 5 5 Major Triad 1 3 5 none (just a root noot) Minor Triad 1 b3 5 m, min, mi, - Dominant 7 1 3 (5) b7 7 Major 7 1 3 (5) 7 maj7, M7, (triangle) 7 Minor 7 1 b3 (5) b7 m7, min7, mi7, -7 Half Diminished 7 1 b3 b5 b7 m7b5, (circle with line) 7 Diminished 7 1 b3 b5 bb7 (6) dim7, (circle) 7 Augmented 7 1 3 #5 b7 7aug, 7(#5), 7(+5) Add these intervals to the above 7th chords to create extended chords: 9 (is same as 2) 11 (is same as 4) 13 (is same as 6) Examples: 9 = 1 3 (5) b7 9 min9 = 1 b3 (5) b7 9 13 = 1 3 5 b7 13 9(+5) = 1 3 #5 b7 9 maj9(#11) = 1 3 (5) 7 9 #11 Here are some more common chord types: "sus" = change 3 to 4 "sus2" = change 3 to 2 "add9" = 1 3 5 9 (same as "add2", there's no 7 in "add" chords) "6, maj6" = 1 3 5 6 "m6, min6" = 1 b3 5 6 "6/9" = 1 3 5 6 9 11 = 1 b7 9 11 "/" = Bassist plays the note after the slash NOTE: When playing complex chords (jazz chords) in a band setting, guitarists typically SHOULD NOT PLAY THE ROOT NOTE of the chord (the bassist or keyboardist will play it). In diagrams created by this program, unnecessary notes will be indicated by light circles, and required notes will be indicated by dark circles.Here are the locations of root notes on the 6th and 5th strings:
6th string notes: 5th string notes: 0 1 3 5 7 8 10 12 0 2 3 5 7 8 10 12 E F G A B C D E A B C D E F G A The sharp symbol ("#") moves notes UP one fret The flat symbol ("b") moves notes DOWN one fretHere's my plan of attack to create the program:
- Use a text list widget to display a clickable list of all possible root notes.
- Use a text list widget to display a clickable list of all possible chord types.
- Use an area widget to display the chords chosen by the user (root note + chord type). Every time the user clicks a new chord, rejoin the existing text with the newly chosen chord text. Put each new chord label on a new line.
- Add a button to let the user select when to render and display images of all the chords in the browser.
- To create the images, I'll use REBOL's built in draw dialect. I'll also create a simple HTML page to display the rendered images, and save all those files to a newly created subdirectory. Then launch the browser to view the created page.
- To draw the images, first I'll draw a grid of lines, each 20 pixels apart. Vertical lines represent strings, horizontal lines represent frets.
- I'll plot circles onto the above grid, where the required intervals are located in every selected chord type. To do that, I'll create a map of all the possible chord types, telling the program which interval numbers are required to create each selected chord type. I'll also create a map of all the possible interval numbers, telling the program where to plot each required interval (XxY coordinate) listed in the chord type map. Finally, I'll create a map of the frets at which all possible root notes are located. The program will simply read the chord labels entered by the user, plot the required circles at the appropriate coordinates, for all intervals required in each chord. I'll also print the appropriate fret number for the given root note, and chord label too, directly in each image.
- I'll need to create separate chord type, coordinate, and root note maps for both the 6th and 5th string shapes. I'll need to run through the rendering process twice for every chord (once for the 6th string shape and once for the 5th string shape).
I started by creating all the required maps. Having those ready would help me deal more concretely with the action code. The root note maps are just blocks containing all possible root notes, followed by the frets at which they're found. The interval maps are simply blocks containing every interval name, followed by the coordinates at which they should be plotted on the grid diagram. The shape maps are simply blocks containing:
- A chord label (symbol) used to indicate each specific chord type.
- A list of various other names and labels used to represent each chord type (all contained in a string).
- A block of the intervals used to create each chord type. Because several intervals can be found multiple places in each diagram, I included some numbers multiple times, using multiple labels (i.e., the root note is seen as 1, 11, and 111 in various chords).
Here are all the root 6 maps:
root6-shapes: [ "." "major triad, no symbol (just a root note)" [1 3 5 11 55 111] "m" "minor triad, min, mi, m, -" [1 b3 5 11 55 111] "aug" "augmented triad, aug, #5, +5" [1 3 b6 11 111] "dim" "diminished triad, dim, b5, -5" [1 b3 b5 11] "5" "power chord, 5" [1 55] "sus4" "sus4, sus" [1 4 5 11 55 111] "sus2" "sus2, 2" [1 99 5 11] "6" "major 6, maj6, ma6, 6" [1 3 5 6 11] "m6" "minor 6, min6, mi6, m6" [1 b3 5 6 11] "69" "major 6/9, 6/9, add6/9" [1 111 3 13 9] "maj7" "major 7, maj7, ma7, M7, (triangle) 7" [1 3 5 7 11 55] "7" "dominant 7, 7" [1 3 5 b7 11 55] "m7" "minor 7, min7, mi7, m7, -7" [1 b3 5 b7 11 55] "m7(b5)" "half diminished, min7(b5), (circle w/ line), m7(-5), -7(b5)" [1 b3 b5 b7 11] "dim7" "diminished 7, dim7, (circle) 7" [1 b3 b5 6 11] "7sus4" "dominant 7 sus4 (7sus4)" [1 4 5 b7 55 11] "7sus2" "dominant 7 sus2 (7sus2)" [1 b7 99 5 11] "7(b5)" "dominant 7 flat 5, 7(b5), 7(-5)" [1 3 b5 b7 11] "7(+5)" "augmented 7, 7(#5), 7(+5)" [1 3 b6 b7 11] "7(b9)" "dominant 7 flat 9, 7(b9), 7(-9)" [1 3 5 b7 b9] "7(+9)" "dominant 7 sharp 9, 7(#9), 7(+9)" [1 111 3 b77 b33] "7(b5b9)" "dominant 7 b5 b9, 7(b5b9), 7(-5-9)" [1 3 b5 b7 b9] "7(b5+9)" "dominant 7 b5 #9, 7(b5#9), 7(-5+9)" [1 3 b5 b7 b33] "7(+5b9)" "augmented 7 flat 9, aug7(b9), 7(#5b9)" [1 3 b6 b7 b9] "7(+5+9)" "augmented 7 sharp 9, aug7(#9), 7(#5#9)" [1 3 b6 b7 b33] "add9" "add9, add2" [1 3 5 999 55 11] "madd9" "minor add9, min add9, m add9, m add2" [1 b3 5 999 55 11] "maj9" "major 9, maj9, ma9, M9, (triangle) 9" [1 3 5 7 9] "maj9(+11)" "major 9 sharp 11, maj9(#11), M9(+11)" [1 3 7 9 b5] "9" "dominant 9, 9" [1 3 5 b7 9 55] "9sus" "dominant 9 sus4, 9sus4, 9sus" [1 4 5 b7 9 55] "9(+11)" "dominant 9 sharp 11, 9(#11), 9(+11)" [1 3 b7 9 b5] "m9" "minor 9, min9, mi9, m9, -9" [1 b3 5 b7 9 55] "11" "dominant 11, 11" [1 b7 99 44 11] "maj13" "major 13, maj13, ma13, M13, (triangle) 13" [1 3 55 7 11 13] "13" "dominant 13, 13" [1 3 55 b7 11 13] "m13" "minor 13, min13, mi13, m13, -13" [1 b3 55 b7 11 13] ] root6-map: [ 1 20x70 11 120x70 111 60x110 3 80x90 33 40x50 b3 80x70 5 100x70 55 40x110 b5 100x50 7 60x90 b7 60x70 9 120x110 99 80x50 6 60x50 13 100x110 4 80x110 44 100x30 999 60x150 b77 100x130 b33 120x130 b9 120x90 b6 100x90 b55 40x90 ] root6-notes: [ "e" {12} "f" {1} "f#" {2} "gb" {2} "g" {3} "g#" {4} "ab" {4} "a" {5} "a#" {6} "bb" {6} "b" {7} "c" {8} "c#" {9} "db" {9} "d" {10} "d#" {11} "eb" {11} ]The root 5 maps simply mirror the lists above, with values altered for the 5th string:
root5-shapes: [ "." "major triad, no symbol (just a root note)" [1 3 5 11 55] "m" "minor triad, min, mi, m, -" [1 b3 5 11 55] "aug" "augmented triad, aug, #5, +5" [1 3 b6 11 b66] "dim" "diminished triad, dim, b5, -5" [1 b3 b5 11] "5" "power chord, 5" [1 55] "sus4" "sus4, sus" [1 4 5 11 55] "sus2" "sus2, 2" [1 9 5 11 55] "6" "major 6, maj6, ma6, 6" [1 3 55 13 11] "m6" "minor 6, min6, mi6, m6" [1 b3 55 13 11] "69" "major 6/9, 6/9, add6/9" [1 33 6 9 5] "maj7" "major 7, maj7, ma7, M7, (triangle) 7" [1 3 5 7 55] "7" "dominant 7, 7" [1 3 5 b7 55] "m7" "minor 7, min7, mi7, m7, -7" [1 b3 5 b7 55] "m7(b5)" "half diminished, min7(b5), (circle w/ line), m7(-5), -7(b5)" [1 b3 b5 b7 b55] "dim7" "diminished 7, dim7, (circle) 7" [1 b33 b5 6 111] "7sus4" "dominant 7 sus4, 7sus4" [1 4 5 b7 55] "7sus2" "dominant 7 sus2, 7sus2" [1 9 5 b7 55] "7(b5)" "dominant 7 flat 5, 7(b5), 7(-5)" [1 33 b5 b7 111] "7(+5)" "augmented 7, 7(#5), 7(+5)" [1 33 b6 b7 111] "7(b9)" "dominant 7 flat 9, 7(b9), 7(-9)" [1 33 5 b7 b9] "7(+9)" "dominant 7 sharp 9, 7(#9), 7(+9)" [1 33 b7 b3] "7(b5b9)" "dominant 7 b5 b9, 7(b5b9), 7(-5-9)" [1 33 b5 b7 b9] "7(b5+9)" "dominant 7 b5 #9, 7(b5#9), 7(-5+9)" [1 33 b5 b7 b3] "7(+5b9)" "augmented 7 flat 9, aug7(b9), 7(#5b9)" [1 33 b6 b7 b9] "7(+5+9)" "augmented 7 sharp 9, aug7(#9), 7(#5#9)" [1 33 b7 b3 b6] "add9" "major add9, add9, add2" [1 3 5 99 55] "madd9" "minor add9, min add9, m add9, m add2" [1 b3 5 99 55] "maj9" "major 7, maj9, ma9, M9, (triangle) 9" [1 33 5 7 9] "maj9(+11)" "major 9 sharp 11, maj9(#11), M9(+11)" [1 33 b5 7 9] "9" "dominant 9, 9" [1 33 5 b7 9] "9sus" "dominant 9 sus4, 9sus4, 9sus" [1 44 5 b7 9] "9(+11)" "dominant 9 sharp 11, 9(#11), 9(+11)" [1 33 b5 b7 9] "m9" "minor 9, min9, mi9, m9, -9" [1 b33 5 b7 9] "11" "dominant 11, 11" [1 b7 9 44 444] "maj13" "major 13, maj13, ma13, M13, (triangle) 13" [1 3 55 7 13] "13" "dominant 13, 13" [1 3 55 b7 13] "m13" "minor 13, min13, mi13, m13, -13" [1 b3 55 b7 13] ] root5-map: [ 1 40x70 11 80x110 111 100x30 3 100x110 33 60x50 b33 60x30 5 120x70 55 60x110 b5 120x50 7 80x90 b7 80x70 9 100x70 6 80x50 13 120x110 4 100x130 44 60x70 444 120x30 99 80x150 b3 100x90 b9 100x50 b6 120x90 b66 60x130 b55 60x90 ] root5-notes: [ "a" {12} "a#" {1} "bb" {1} "b" {2} "c" {3} "c#" {4} "db" {4} "d" {5} "d#" {6} "eb" {6} "e" {7} "f" {8} "f#" {9} "gb" {9} "g" {10} "g#" {11} "ab" {11} ]Next, I wrote the code to draw the grid image, onto which all the circles will be plotted. This was simply a matter of creating 2 blocks of line start/end points (one block each for vertical and horizontal lines), drawing those lines onto a display, and then saving that display as an image:
f: copy [] for n 20 160 20 [append f reduce ['line (as-pair 20 n) (as-pair 120 n)]] for n 20 120 20 [append f reduce ['line (as-pair n 20) (as-pair n 160)]] fretboard: to-image layout/tight [box white 150x180 effect [draw f]]To begin with the action code, I created the GUI skeleton code for the program. Here's the layout, based on the specs I came up with earlier (I also added a button for help):
view center-face layout [ across t1: text-list 60x270 data [ "E" "F" "F#" "Gb" "G" "G#" "Ab" "A" "A#" "Bb" "B" "C" "C#" "Db" "D" "D#" "Eb" ] ; The chord label list is simply extracted from the block above: t2: text-list 330x270 data extract/index root6-shapes 3 2 [] return a: area return btn "Create Chart" [] btn "Save" [] btn "Load" [] btn "Create Zip" [] btn "Help" [editor help] ; help will just be a long string of text ]I wanted to have the chord labels added to the text area when the user selected a chord type. Here's the code I came up with:
t2: text-list 330x270 data extract/index root6-shapes 3 2 [ ; When a chord type is clicked, do this: either empty? a/text [ ; If the text area is empty, insert the root note and chord ; type into the text area: a/text: rejoin [ copy t1/picked " " pick root6-shapes ((index? find root6-shapes value) - 1) ] ] [ ; If the text area is not empty, rejoin the existing text, a ; newline, and the root note and chord type together. a/text: rejoin [ a/text newline copy t1/picked " " pick root6-shapes ((index? find root6-shapes value) - 1) ] ] ; Display the added chord: show a ]Now I need to write the code to actually create the diagrams for each chord in the list. I put that code directly in the action block of the "Create Chart" button:
btn "Create Chart" [if error? try [ ; Create a chords subdirectory if it doesn't exist: make-dir %chords ; Erase the temporary contents each time; delete/any %chords/*.* ; Start creating the HTML layout: html: copy "<html><body bgcolor=#ffffffff>" ; Loop through each chord in the text list: foreach [root spacer1 spacer2 type] (parse/all form a/text " ") [ ; Start creating a draw block, which contains the fretboard image ; we created earlier: diagram: copy [image fretboard] diagram2: copy [image fretboard] ; This is the loop that plots each of the intervals in the chord ; formula block: root1: copy root foreach itvl (third find root6-shapes type) [ either find [1 55] itvl [ ; Plot a white circle for intervals 1 and 55: append diagram reduce [ 'fill-pen white 'circle (select root6-map itvl) 5 ] ] [ ; Plot a black circle for all other intervals: append diagram reduce [ 'fill-pen black 'circle (select root6-map itvl) 5 ] ] ] ; Plot the root note and fret number text in the chord image: append diagram reduce ['text (trim/all join root1 type) 20x0] append diagram reduce [ 'text trim/all to-string ( select root6-notes trim/all to-string root1 ) 130x65 ] ; Render the collected draw block and save the created image to ; a file: save/png to-file trim/all rejoin [ %./chords/ (replace/all root1 {#} {sharp}) type ".png" ] to-image layout/tight [ box white 150x180 effect [draw diagram] ] ; Add code to our HTML string to display the created image: append html rejoin [ {<img src="./} trim/all rejoin [ replace/all copy root1 {#} {sharp} type ".png" ] {">} ] ; Do the entire process above again to create a root 5 image: foreach itvl (third find root5-shapes type) [ either find [1] itvl [ append diagram2 reduce [ 'fill-pen white 'circle (select root5-map itvl) 5 ] ] [ append diagram2 reduce [ 'fill-pen black 'circle (select root5-map itvl) 5 ] ] ] append diagram2 reduce ['text (trim/all join root type) 20x0] append diagram2 reduce [ 'text trim/all to-string ( select root5-notes trim/all to-string root ) 130x65 ] save/png to-file trim/all rejoin [ %./chords/ (replace/all root {#} {sharp}) type "5th.png" ] to-image layout/tight [ box white 150x180 effect [draw diagram2] ] append html rejoin [ {<img src="./} (trim/all rejoin [ replace/all root {#} {sharp} type "5th.png" ]) {">} ] ] ; Finish up the HTML code, save it to a file, and display it in ; the user's browser: append html [</body></html>] write %./chords/chords.html trim/auto html browse %./chords/chords.html ] [ ; If there was an error anywhere in the rendering process (because ; the user incorrectly edited chord labels), alert them to make ; changes: alert "Error - please remove improper chord labels." ]] btn "Save" [ ; Save the selected chords to a text file, with an error check to ; avoid accidently overwriting existing files: savefile: to-file request-file/file/save %/c/mysong.txt if exists? savefile [ alert "Please choose a file name that does not already exist." return ] if error? try [save savefile a/text] [alert "File not saved"] ] btn "Load" [ ; Load a saved chord list and display it in the text area. The ; error check is there in case the user clicks the "cancel" button: if error? try [ a/text: load to-file request-file/file %/c/mysong.txt show a ] [] ] btn "Create Zip" [ ; This routine creates a zip file of the created HTML file and every ; rendered image in the ./chords folder. It uses rebzip by Vincent ; Ecuyer: if not exists? %chords/ [alert "Create A Chart First" return] do to-string to-binary decompress 64#{ ; Insert here the compressed zebzip code by Vincent Ecuyer, ; found at http://www.rebol.org/view-script.r?script=rebzip.r } zipfile: to-file request-file/file/save %/c/mysong.zip if exists? zipfile [ alert "Please choose a file name that does not already exist." return ] zip/deep zipfile %chords/ ] btn "Help" [editor help]Here's the final program, with the help text and rebzip code included:
REBOL [title: "Guitar Chords"] help: { This program creates guitar chord diagram charts for songs. It was written to help students in high school jazz band quickly play all of the common extended, altered, and complex chord types. It can also be used to create chord charts for any other type of music (with simpler chords): folk, rock, blues, pop, etc. To select chords for your song, click the root note (letter name: A, Bb, C#, etc.), and then the sonority (major, minor, 7(#5b9), etc.) of each chord. The list of chords you've selected will be shown in the text area below. When you've added all the chords needed to play your song, click the "Create Chart" button. Your browser will open, with a complete graphic rendering of all chords in your song. You can use your browser's page settings to print charts at different sizes. Two versions of each chord are presented: 1 with the root note on the 6th string, and another with the root note on the 5th string. Chord lists can be saved and reloaded with the "Save" and "Load" buttons. The rendered images and the HTML that displays them are all saved to the "./chords" folder (a subfolder of wherever this script is run). You can create a zip file of all the contents of that folder to play your song later, upload it to a web server to share with the world, etc. -- THEORY -- Here are the formulas and fingering patterns used to create chords in this program: 6th string notes: 5th string notes: 0 1 3 5 7 8 10 12 0 2 3 5 7 8 10 12 E F G A B C D E A B C D E F G A The sharp symbol ("#") moves notes UP one fret The flat symbol ("b") moves notes DOWN one fret Root 6 interval shapes: Root 5 interval shapes: ___________ ___________ | | | | 4 | | | | | | | | 3 6 9 | 7 | | | | | | 1 | | | 5 1 | | | | 1 4 | | 7 3 | | | | 3 6 | | | 5 1 4 6 9 5 1 4 | 9 5 | | | | | | | | | 7 | | | | 9 | 7 | | | 5 1 3 6 To create any chord, slide either shape up the fretboard until the number "1" is on the correct root note (i.e., for a "G" chord, slide the root 6 shape up to the 3rd fret, or the root 5 shape up to the 10th fret). Then pick out the required intervals: CHORD TYPE: INTERVALS: SYMBOLS: Power Chord 1 5 5 Major Triad 1 3 5 none (just a root noot) Minor Triad 1 b3 5 m, min, mi, - Dominant 7 1 3 (5) b7 7 Major 7 1 3 (5) 7 maj7, M7, (triangle) 7 Minor 7 1 b3 (5) b7 m7, min7, mi7, -7 Half Diminished 7 1 b3 b5 b7 m7b5, (circle with line) 7 Diminished 7 1 b3 b5 bb7 (6) dim7, (circle) 7 Augmented 7 1 3 #5 b7 7aug, 7(#5), 7(+5) Add these intervals to the above 7th chords to create extended chords: 9 (is same as 2) 11 (is same as 4) 13 (is same as 6) Examples: 9 = 1 3 (5) b7 9 min9 = 1 b3 (5) b7 9 13 = 1 3 5 b7 13 9(+5) = 1 3 #5 b7 9 maj9(#11) = 1 3 (5) 7 9 #11 Here are some more common chord types: "sus" = change 3 to 4 "sus2" = change 3 to 2 "add9" = 1 3 5 9 (same as "add2", there's no 7 in "add" chords) "6, maj6" = 1 3 5 6 "m6, min6" = 1 b3 5 6 "6/9" = 1 3 5 6 9 11 = 1 b7 9 11 "/" = Bassist plays the note after the slash NOTE: When playing complex chords (jazz chords) in a band setting, guitarists typically SHOULD NOT PLAY THE ROOT NOTE of the chord (the bassist or keyboardist will play it). In diagrams created by this program, unnecessary notes are indicated by light circles, and required notes are indicated by dark circles. } root6-shapes: [ "." "major triad, no symbol (just a root note)" [1 3 5 11 55 111] "m" "minor triad, min, mi, m, -" [1 b3 5 11 55 111] "aug" "augmented triad, aug, #5, +5" [1 3 b6 11 111] "dim" "diminished triad, dim, b5, -5" [1 b3 b5 11] "5" "power chord, 5" [1 55] "sus4" "sus4, sus" [1 4 5 11 55 111] "sus2" "sus2, 2" [1 99 5 11] "6" "major 6, maj6, ma6, 6" [1 3 5 6 11] "m6" "minor 6, min6, mi6, m6" [1 b3 5 6 11] "69" "major 6/9, 6/9, add6/9" [1 111 3 13 9] "maj7" "major 7, maj7, ma7, M7, (triangle) 7" [1 3 5 7 11 55] "7" "dominant 7, 7" [1 3 5 b7 11 55] "m7" "minor 7, min7, mi7, m7, -7" [1 b3 5 b7 11 55] "m7(b5)" "half diminished, min7(b5), (circle w/ line), m7(-5), -7(b5)" [1 b3 b5 b7 11] "dim7" "diminished 7, dim7, (circle) 7" [1 b3 b5 6 11] "7sus4" "dominant 7 sus4 (7sus4)" [1 4 5 b7 55 11] "7sus2" "dominant 7 sus2 (7sus2)" [1 b7 99 5 11] "7(b5)" "dominant 7 flat 5, 7(b5), 7(-5)" [1 3 b5 b7 11] "7(+5)" "augmented 7, 7(#5), 7(+5)" [1 3 b6 b7 11] "7(b9)" "dominant 7 flat 9, 7(b9), 7(-9)" [1 3 5 b7 b9] "7(+9)" "dominant 7 sharp 9, 7(#9), 7(+9)" [1 111 3 b77 b33] "7(b5b9)" "dominant 7 b5 b9, 7(b5b9), 7(-5-9)" [1 3 b5 b7 b9] "7(b5+9)" "dominant 7 b5 #9, 7(b5#9), 7(-5+9)" [1 3 b5 b7 b33] "7(+5b9)" "augmented 7 flat 9, aug7(b9), 7(#5b9)" [1 3 b6 b7 b9] "7(+5+9)" "augmented 7 sharp 9, aug7(#9), 7(#5#9)" [1 3 b6 b7 b33] "add9" "add9, add2" [1 3 5 999 55 11] "madd9" "minor add9, min add9, m add9, m add2" [1 b3 5 999 55 11] "maj9" "major 9, maj9, ma9, M9, (triangle) 9" [1 3 5 7 9] "maj9(+11)" "major 9 sharp 11, maj9(#11), M9(+11)" [1 3 7 9 b5] "9" "dominant 9, 9" [1 3 5 b7 9 55] "9sus" "dominant 9 sus4, 9sus4, 9sus" [1 4 5 b7 9 55] "9(+11)" "dominant 9 sharp 11, 9(#11), 9(+11)" [1 3 b7 9 b5] "m9" "minor 9, min9, mi9, m9, -9" [1 b3 5 b7 9 55] "11" "dominant 11, 11" [1 b7 99 44 11] "maj13" "major 13, maj13, ma13, M13, (triangle) 13" [1 3 55 7 11 13] "13" "dominant 13, 13" [1 3 55 b7 11 13] "m13" "minor 13, min13, mi13, m13, -13" [1 b3 55 b7 11 13] ] root6-map: [ 1 20x70 11 120x70 111 60x110 3 80x90 33 40x50 b3 80x70 5 100x70 55 40x110 b5 100x50 7 60x90 b7 60x70 9 120x110 99 80x50 6 60x50 13 100x110 4 80x110 44 100x30 999 60x150 b77 100x130 b33 120x130 b9 120x90 b6 100x90 b55 40x90 ] root5-shapes: [ "." "major triad, no symbol (just a root note)" [1 3 5 11 55] "m" "minor triad, min, mi, m, -" [1 b3 5 11 55] "aug" "augmented triad, aug, #5, +5" [1 3 b6 11 b66] "dim" "diminished triad, dim, b5, -5" [1 b3 b5 11] "5" "power chord, 5" [1 55] "sus4" "sus4, sus" [1 4 5 11 55] "sus2" "sus2, 2" [1 9 5 11 55] "6" "major 6, maj6, ma6, 6" [1 3 55 13 11] "m6" "minor 6, min6, mi6, m6" [1 b3 55 13 11] "69" "major 6/9, 6/9, add6/9" [1 33 6 9 5] "maj7" "major 7, maj7, ma7, M7, (triangle) 7" [1 3 5 7 55] "7" "dominant 7, 7" [1 3 5 b7 55] "m7" "minor 7, min7, mi7, m7, -7" [1 b3 5 b7 55] "m7(b5)" "half diminished, min7(b5), (circle w/ line), m7(-5), -7(b5)" [1 b3 b5 b7 b55] "dim7" "diminished 7, dim7, (circle) 7" [1 b33 b5 6 111] "7sus4" "dominant 7 sus4, 7sus4" [1 4 5 b7 55] "7sus2" "dominant 7 sus2, 7sus2" [1 9 5 b7 55] "7(b5)" "dominant 7 flat 5, 7(b5), 7(-5)" [1 33 b5 b7 111] "7(+5)" "augmented 7, 7(#5), 7(+5)" [1 33 b6 b7 111] "7(b9)" "dominant 7 flat 9, 7(b9), 7(-9)" [1 33 5 b7 b9] "7(+9)" "dominant 7 sharp 9, 7(#9), 7(+9)" [1 33 b7 b3] "7(b5b9)" "dominant 7 b5 b9, 7(b5b9), 7(-5-9)" [1 33 b5 b7 b9] "7(b5+9)" "dominant 7 b5 #9, 7(b5#9), 7(-5+9)" [1 33 b5 b7 b3] "7(+5b9)" "augmented 7 flat 9, aug7(b9), 7(#5b9)" [1 33 b6 b7 b9] "7(+5+9)" "augmented 7 sharp 9, aug7(#9), 7(#5#9)" [1 33 b7 b3 b6] "add9" "major add9, add9, add2" [1 3 5 99 55] "madd9" "minor add9, min add9, m add9, m add2" [1 b3 5 99 55] "maj9" "major 7, maj9, ma9, M9, (triangle) 9" [1 33 5 7 9] "maj9(+11)" "major 9 sharp 11, maj9(#11), M9(+11)" [1 33 b5 7 9] "9" "dominant 9, 9" [1 33 5 b7 9] "9sus" "dominant 9 sus4, 9sus4, 9sus" [1 44 5 b7 9] "9(+11)" "dominant 9 sharp 11, 9(#11), 9(+11)" [1 33 b5 b7 9] "m9" "minor 9, min9, mi9, m9, -9" [1 b33 5 b7 9] "11" "dominant 11, 11" [1 b7 9 44 444] "maj13" "major 13, maj13, ma13, M13, (triangle) 13" [1 3 55 7 13] "13" "dominant 13, 13" [1 3 55 b7 13] "m13" "minor 13, min13, mi13, m13, -13" [1 b3 55 b7 13] ] root5-map: [ 1 40x70 11 80x110 111 100x30 3 100x110 33 60x50 b33 60x30 5 120x70 55 60x110 b5 120x50 7 80x90 b7 80x70 9 100x70 6 80x50 13 120x110 4 100x130 44 60x70 444 120x30 99 80x150 b3 100x90 b9 100x50 b6 120x90 b66 60x130 b55 60x90 ] root6-notes: [ "e" {12} "f" {1} "f#" {2} "gb" {2} "g" {3} "g#" {4} "ab" {4} "a" {5} "a#" {6} "bb" {6} "b" {7} "c" {8} "c#" {9} "db" {9} "d" {10} "d#" {11} "eb" {11} ] root5-notes: [ "a" {12} "a#" {1} "bb" {1} "b" {2} "c" {3} "c#" {4} "db" {4} "d" {5} "d#" {6} "eb" {6} "e" {7} "f" {8} "f#" {9} "gb" {9} "g" {10} "g#" {11} "ab" {11} ] f: copy [] for n 20 160 20 [append f reduce ['line (as-pair 20 n) (as-pair 120 n)]] for n 20 120 20 [append f reduce ['line (as-pair n 20) (as-pair n 160)]] fretboard: to-image layout/tight [box white 150x180 effect [draw f]] ; spacer: to-image layout/tight [box white 20x20] view center-face layout [ across t1: text-list 60x270 data [ "E" "F" "F#" "Gb" "G" "G#" "Ab" "A" "A#" "Bb" "B" "C" "C#" "Db" "D" "D#" "Eb" ] t2: text-list 330x270 data extract/index root6-shapes 3 2 [ either empty? a/text [ a/text: rejoin [ copy t1/picked " " pick root6-shapes ((index? find root6-shapes value) - 1) ] ] [ a/text: rejoin [ a/text newline copy t1/picked " " pick root6-shapes ((index? find root6-shapes value) - 1) ] ] show a ] return a: area return btn "Create Chart" [if error? try [ make-dir %chords delete/any %chords/*.* ; save/bmp %./chords/spacer.bmp spacer html: copy "<html><body bgcolor=#ffffffff>" foreach [root spacer1 spacer2 type] (parse/all form a/text " ") [ diagram: copy [image fretboard] diagram2: copy [image fretboard] root1: copy root foreach itvl (third find root6-shapes type) [ either find [1 55] itvl [ append diagram reduce [ 'fill-pen white 'circle (select root6-map itvl) 5 ] ] [ append diagram reduce [ 'fill-pen black 'circle (select root6-map itvl) 5 ] ] ] append diagram reduce ['text (trim/all join root1 type) 20x0] append diagram reduce [ 'text trim/all to-string ( select root6-notes trim/all to-string root1 ) 130x65 ] save/png to-file trim/all rejoin [ %./chords/ (replace/all root1 {#} {sharp}) type ".png" ] to-image layout/tight [ box white 150x180 effect [draw diagram] ] append html rejoin [ {<img src="./} trim/all rejoin [ replace/all copy root1 {#} {sharp} type ".png" ] {">} ] foreach itvl (third find root5-shapes type) [ either find [1] itvl [ append diagram2 reduce [ 'fill-pen white 'circle (select root5-map itvl) 5 ] ] [ append diagram2 reduce [ 'fill-pen black 'circle (select root5-map itvl) 5 ] ] ] append diagram2 reduce ['text (trim/all join root type) 20x0] append diagram2 reduce [ 'text trim/all to-string ( select root5-notes trim/all to-string root ) 130x65 ] save/png to-file trim/all rejoin [ %./chords/ (replace/all root {#} {sharp}) type "5th.png" ] to-image layout/tight [ box white 150x180 effect [draw diagram2] ] append html rejoin [ {<img src="./} (trim/all rejoin [ replace/all root {#} {sharp} type "5th.png" ]) {">} ; {<img src="./spacer.bmp">} ] ] append html [</body></html>] write %./chords/chords.html trim/auto html browse %./chords/chords.html ] [alert "Error - please remove improper chord labels."]] btn "Save" [ savefile: to-file request-file/file/save %/c/mysong.txt if exists? savefile [ alert "Please choose a file name that does not already exist." return ] if error? try [save savefile a/text] [alert "File not saved"] ] btn "Load" [ if error? try [ a/text: load to-file request-file/file %/c/mysong.txt show a ] [] ] btn "Create Zip" [ if not exists? %chords/ [alert "Create A Chart First" return] ; rebzip by Vincent Ecuyer: do to-string to-binary decompress 64#{ eJztW+uP20hy/+6/oldGsJ7bcEU2X00Zd4bX9iILXO4AY5N8EOYAjkTNMNaQOomy PTbmf8+vqptkU3xIM4cgARICHmvYVdX1fnRrPn745a9/FsvrFy9W1VfnW75biFVZ VNnXSixfCDyr/crZlsXtwvzeeVz885IkSsJEJYEQju96bhCHrhKOF8s4CGToSgKS QeQHnh/jo1KRG8aRFzb0HD9O/CCMPA+fvciPwziUEX4RMkhkpEAIH90gAGFf0j6h lCqUbhTRPkEcY3dftvx5kUwCMBYSCU+GIO1KIh64sR+5oAo8FUWhBDnwJIJEhX4U Bgq4IJbIOIqilj/phknoRrSMz1GcuJGrSC5wBCRFvHoKLISQzSchVOwr0PMJHjyr JArjlj8CVH6SsP4iBQFiLyR6TuCrIJRhABJJ7LsBRCQg3w8j3w8U6S+KPGI1avUn HNggCsKA9ZdIpUJgJ1hIkhgSu0lEJlBeEvpgFkDYzvO8JKJ9wtiVkCgMGnqe60ZK KS8I2XQkVBzR3k4cuxArimLCk6RJ6I32gd2TOJaQgei6RKCl50Bb0JRL8jqeD39x vTCCMgWwYdYgJP3BYSRkc0mIEDYIvdCnfQJP+lC+77XyRqEXwwqK9efHWPahENID VOdJ2A94xHMko4T2CaMwdGNJvEKqIJJebNFzlAv7h2HC+oOWwFWSkFxR7IGnhPzP C8mllMv+l4BXP/LZ/+BCkZcElrwiTkLlh6Ek1/IC2N93pQyJJwgC5cAXHUgVKC8G HxxDgUdUJHuH54VQTEPPIWbJA2lrOBR4ChLaG3huHICviA0FVv1YerRPhF29wA3I F32yrSv91v+kC6XFiBGXfwtJ867PsYQHvkN2dPA/wGQYUQz5McweRz4LRL8pz2/5 g/IilYRxzC4sOSEkCcUERE1CWJhihewRKNIZ4ilCRMBTSR4J51CBp1r/U1BO7MKY gmMM1pCkJ0d6HqJAQgO8qx968EyyaUwBqRLONT4JLmPX0h+CN4CTUIoiwYIkSOKI bBrBt0PF9AQ0CgvAiwnBlyQF0Yb34iUiuPUXz4e/+WHCoSkSFSSkb9JfGMR4i1RF sSIhYBKHimMoAo8wNwUXtAd2PK/lLyQ4KJi3iwOIgqDlmIDh4bBuRLEC0jHUyj6n wlj6yqd9EBmsY7flDyaCjwQR2QMxBu1CZxxLgfQofkOOMWDCIsQTlBr6fkIJDsGF gEx87Nky6LnIXyCpONmQTZFWKdgD5B0w5VKyAZ4HHn1yQGTDIPDBIUUXIgRJTXmi 5RCxhtiCY3K4wEt8BY/kaFIhJQ+OZuI2Voqjzw0SlA6XRIopuCjFWhyCHx+lIuTs 66K6yMAnYJQkpCvgUkpAMqCADtlukfTJb8g8cF3lIUdJYdUkbAG2Ql2TAs6Yih0S kQXnTEhvKDsKviBp10C5LmKdc4JykbvAsUVQIANQRfRdjkCsJ+QJhIjcmniUvYEo FZiXigMNsuMfBbFEdkXSQ9RaHEqsgRUv4qqEihdHiUfUkQ6hfeQ7iowIe8HzyFNg fqRBN+RIgpeBhcAyigigGiklhx1kRe2OFZcRBEQEhmOXPikZIf0Q50IidFA3JaWi GC4ETwttHcLACAJPG4WqgkpYocJHeUKyIYdHrZYI5Yh6A4QatQYB9w+hQlFBeCuL QxSwGLHic0/hB1iOeHeH0lmAHEE6pOB2kd042FDIoE1FwQS3jVD/wsTiMIopMwfs bjC2knBu9nKUeKgAlYKIJFAg0iRnxQAMIF592gh5TmFjyygCFHyJxKkzMrIkJSny IfBBbQqXJo96IRmw90ewODZyyQ996BaeEUUWh/BYdFcel1+PyiYeyeEWI4uiDHFN g02gXS/k2gRXcWPuIZDEAAAci8PYRz1CeQ04DkPqtJKQnNbF5hQSFL+UPShwyFho xqjIUGNDXurD16SVvOC9iuwScdQgUSJsdXFC4kQajbmoUeeFxEuGjdDt+DCdx1GG foBSXJsaoDwXJLmYQJ9YhqOSXWNoB4mUTOJQQGMXlxtDMIi2hPIRVSrIg+xnpQbl I/BhK86uCFgoyKVWE0EVkOZZSPg1jImmh2IJFoQpKO84ktw+QuWykleM9EgFjgVD oUYUwru5PCnkyDgMOakjn8Nu3BrCi9F3UkoXAedMFNOWQ9RjlCBASM0wQiDi2ujF HrWHIduKOl4F0Ti/oByhpYkSTn2o2S6ylcUhmm1k/5gbYAHTkBlc0mGETgcGcqkT g1DcuLtc0UARfazkIKPONbECz6HyFlAAkQQOJXzEBHsekij6IF2t0PpT4eUCAGFg 4iCmCg/fRGsCh7I6TPS/KI+xrqA+Eheyp8spCnUT/knujnQCD+Yy5lGCg4dziUQd hVfDjnaFgmIQooorFNIMFVD2Qm4GYBKSDGWBLBLSRtQ6QHpu19F9INTdxLdUGEgq skFAoSYirsKBz30bumvEleIeE70cQjIgFYZU0PyYUomA3WDAGA2bVaGgnASxy85B WQfr3PyFQEMB5pQBRqkwetysYSoj1H1+e1c5h7t8UzlqITbHYmUNY7OP7fJBVHeZ +Jxuj5m4eRBK3OR4lxZrsc+q4744iLz6edagasBljnnvNtv/cC1mvzfoVSmYpIa+ bvfLcuyxF0V2m1b55+xNTaUzHTqe+FruzRLt71AfORf0kxawTm8pFVDH2uBen5Ah eALUhBi/hX3R/uQfx906rTIHE+uAkoz8pB9ApTTXWprgV8u0eHAO1T4vbkkX7+kd 1LC6y1afDsf7Fhq4Ha39VuRVnm41lz2Fbcp9lq7uQCfdm426kzQz/KpjZXp3xZra 5atPzRDOO5M+UGp5lWn+JLyeUprZ3ZfjykjFu4/vUEtrCZ+lkL5rZPe76uGNIfHy u2uexxPjbst0Lf6zzAsxe/l9JpZV6dxlX2vXaY2pCeH17HF2PSzo60N+W6QQKju8 0KRX6dbZ5NvMwcoCTBsxxMvvCONfXEydj1pFWVHtp2ERqxo2K9ZOuXFqlGFoNK8a mrh21tlhtc93VbkfAcdQ8GhkWJXF52x/yMuCDaYlAUKuj19OjfiOwTm8hfFFMk4q tnlVQRhwm2OJkCdD/t/rcNf79wMeLNzkRbp/QBJhc3XNiGX2wjbW4ZyDECSLYfRV C42WU7lXJ7F9Ho2zZKQxUQn9S3HnddKJrgYzCWEc7sp99WyNM/b/PpWfS6EAfaKj 3eS3/7CXrcuBFKDRKdw1a7dZdYFRhszAjDZs9zm0EpzYAX6KVUuXd1lKJZXCNbOM tSp3D/Ndim01eWmxf063A2H7P8t80LjF/WFdHpwqv88mBGCPYEhBkH1u6e2lzq+N bUJ2flce9+IPdACsrjpeXtZRPb/Pi2OVAciXfZDTIJgfMuy9pli46gaAlpQKz2WS EmRfUnr7RElptvyDeHWffhWuYfIhQ/w6NJe4o1KXRXWnhRZ1tzVfpw+WUOR7F9lv sy/vz1jwKf7WxV1YIazf2Dqg3eCQ6+PqtI3E0ICGvtMAwgk6IJidui2ifQ8g6DTQ WoUTDea+VktnbN/R0rD1/7u0RLuNaCmkQ2lbB+ROP7HrdAAD5V6qqvEu+1u+c6gD emjU9P1deb9D63XIKI9RJ9UZOSxmuS/TEJSFMupdVzXymhdaYNNnafB1vs9WaKMe BO+toa4fG+gihQ8tCZT0/Rf6rdwwaqentaLzX8t1vslXGGLQcPHSEMJ4E2zY1tBz lqwzINxn1V25tsRzmBxU1r455N8ycfL7qWu8RgHYlEIziaKb0TzRIIF5e9dFN7vr AYARG6geA4umyRTbrLit7nTr/mKyre84jhZ1IX48wEKW63ShXotv2/xGQJVZet9Z OdHRonnR5dxoY2MLD+VkG5gxh1v8s+D92xkvLw4V1NEhYIR5ZYt6Jf7Uvjhh5mrg 3rNm0hTM3jo9h0/5rmd8OQ5apfm2B++oHkKj63W22cJrOwDXfV5HbNOofktl5mTf Lk0rFYw5Zbqpsv2wTz7R1wYT3Gs7cVjxbx5uIF9+fxywVHcQ7C3r4fQRG5jJawIC 2r499NaNO5lg/6NR89BdeYdYAz9slQE7Gnx1gj/kBUyh96bTyHHCm9OncTjOiQy3 HtqBchw9r02W6QMM5DX76SWiIVZMNaydhdP8a3YE/qjfT1gt+4oassmz7XoMlumw HDXVQd1rkKK0KA7mBaOStqhNBJSBNecJKHHP8PDTA4zzPi4O6KdXfSn7gOiq/z8g /s8FhGVhUAVL93Cx88Dr/PCpON7fwPiHaqgqtqA0je0LJPS0Ql91g8mt70fWuaHm +okYpr8sN5tD1uflSUE/EfEtkNHTaOnUP/k/aihp2zfjJ7O/f/y3D3Rw3HbTx705 Xz78PLNHjephh3bWNI14oZvg+lQeWObjtdkcLrRLqztmoLf/92bQAeIP1OZyR23a +fvyMzp8UiwdYM7ms7b9NgxpaMK9ZOjJdb89fIOAxZfYAhG9yfeH+lBiaQYl6r1E Qd9S08J1UPXgMTjHNLwukChW5TpzGr0265xs/2k2O2GoPosAL+Crs8Rq1+ukWzGb XY+tIzIw5HUgOr4BZxU/YsRqZqtfjvl2TXMVvUz3q7v8c1aPoewccBJMBWh0PtUD zOFnTbt2JhOVWKVakcOGENCQ+rm14Rfk7Y4NhT4Z+kG0089/MAxsekNsibxqFaGr ShefuCK0X4krQsuL1fa4ziwGWgLzdZbt6DKFQQ5aFII8HG/q8Q/MWwjwqpsSY87s z/mhqhG+3JFWml60uB2c0DgBcL3maiuKG6dWjiZTIOvDP9o0Y5VpM4kyoJ7hymMl mqJguTje10GmHbWuj00OqNXecZglJhdEjFk7cfGTWrhkoIWYRLFjrre1IVDusmKu pZtry8+/7HOUPF63mv9W7oWlt4Vwx3VlIhYtzIsTh9HDHllx+Uq/ubq2XJJsuSzK iuejNwbnRANky4VZmnvdJWPFhY5BTofa9Plef+pGKotmgHvJPt1uxbJBNNvid3IA frOn2ZuJLrtkT1u+/KARUkGi8WDdnnC8GZpX9d4UIA3GG83t9QCnr0W6gzXX+ru8 RVVncrFFoAwWsfqSkqEaOUbaNnqMu/HYakKfMOaL7iHOoAIGujnbj6xYtK8260cf 0RXllxcDcpNmqSyUhQlvU0OJtzdDpDDItyEpltrNmISRqg0X42FypBk1ZEzV2qYo FFqHteuP4LE2N2zX2l0n9N5qgA8tGZq3+fHeOtByBjvU+un3wvVDljfBL0a7oj76 iGS6ctdxbin1gu5cR5fdrQwzBM3VZWC5Q5mqBqKantekr9PDRvjX4MGi9ZijzubU s6kcWX+y0/vopKlrM3efVrXrzwR3aXGb6SMgpj+XIpDtKUmbawd2Ose7HaP98mW2 G6Db15LupnugVPY0mX6Y2lXCqpQ/NaPLEOJpomSfQcvUeT3lUC0B4m1kbu7poptx e9f8neXuxEPN1dRyfYiNrTpg7SRnZTvIe9P0aIT+NJQedOecbVrocw7XisXNqWmx piZDevrQwy0J3ZM07chqS8Fsmo4aqBW51y0fC7tffp+t7NsIu2vmi7vW/9vG2fTL fy22D+JLuf+EJhK5vHPMrM8XDvVxBg1E9Qms1ULTo6Xo9MFUQupe2Oqh1w2rnUaa Bes3091riLetTC2ZLo2p9rjFoVHuFSRJj9vq6oTA3485zSrvy+LHiluHCSKDXTYf EQ3chHAmGD/uoBTraLfS6badwOvXXNubg5sGs0OTYaxY4dmMnZEPr7P9vtwfTjt2 /dZuZgl4pImnpkwriaq30fdpf16gFxnv3qlmma9AzJ7VtpsG9CReCIG4O8Xi7vEr mdK8OeHnPv2UUYrQwxhDnGOn9tU6Lds9hOnXB8KYNNy83qX7QzYnhmtiJ8lp6iD/ UA42qtXd/nju/P/VeNt51QOWukqP3xVwn6ddXsMO5sRXptf7lu3LNxp8br4NKZbm 6GKTbuFHfRZ4BxNOU1vUlz7WfbJ+NUKSA8nI90p/UaD7xQGGGEHmXqhGHuTH6le7 B6mj0HPNxOB5bEuR6Tg0Csy/Ich6kH2Gg9qGo0e0u4deogomNN2732q+7HNKZkR7 /fvgqe0GLm/bDXuLI1va6XXKiyy4jitZ70d26OfrqX160J3deqsTUnVEm3DIZrgY nyvo4TIxuNrnoS/yoMDd++3a5IOgw6wf0Jqs7uamYtfJYHxedM/Mkr2KuZgEp6f9 ppj+JvWZSwv7YY3O/uYI50+i/ISaQd3U9d9OzlPtZ3xWVeen5Ha419m2H2zTJGpp +eBqCmhitK+fM9/pHHteflf014sfgviRmvD37lvvrfuWGvHmO88X0jGXI+8J97d/ ef9xqnE/fWaEMAMiXTcsxsbBoQfzcL5GNPyxo3xx1lPqx3wt9YLLsaGnkdrTd0L0 HXuw4qGbHagXIxQU4d7kcPdsd6G+aN9HnqS3GDNIadj1dp8+HNCPXM76ozWMt1PI k9CR4Sr7PrYYKpRTBIpS39dt04FzmzHE9h6uaP9e4EJ/eYJb1s5B33aLOt8lu9xF Zr+9f/t769qDhzpDz8vvsUrePdZfa3pSSLhsiNo2dM8Hvyie4pOuoD+OFL9++PVX AUVfhPYP5G175+fbtov9pPTz4S/vWxtlxeUx8Dxux6uOXp1crr8vR5PkG0Fnhktd i/gvXujjBeXCrpSbFG3Kms7/+cBhsl42TJg5Vv8/eJB++vRbgfPZ4gJJntFh0EOT aHMD+fTsv892WVqJ/Fk1nx778LQnwkUU6Kn/EIP/jIt/6G8mXmCOaR/ULHa7qUv9 Y5zy8MrUxQWxsDzxU1NsZnXVmRFH45s+wVWf4qLDG1r3r3wkN3wBaz9D96uT3xgZ QrBPjCZtc3p9NJ1p9D3g5e55rU+jlj2MJxv+tQ7Q9jg15b+oQClr7z/GLT52VTY9 PGz6x1fzxQWI9AwcbGnc50bK9JZ0Mr1sDhyvxWG3zSu+yzpv1WE5GfeZchLuM+U0 DPUPVs+zwo5QnwReqvH6eXrKPTT3oU/zDHp6d6eL8fMp+znXJzxtpf+2e87QXa/K TiNknc6anHxSBfS3cObvc+TYY2EuRdYLpGnr5LOP1V6o0ARS5+pZna07CC0Pet62 j9hfoGv6L0cgfyluTAAA } zipfile: to-file request-file/file/save %/c/mysong.zip if exists? zipfile [ alert "Please choose a file name that does not already exist." return ] zip/deep zipfile %chords/ ] btn "Help" [editor help] ]
20.14 Case: Web Site Content Management System (CMS), Sitebuilder.cgi
For many years I used a simple CGI web site manager called Chico WebTool. Together with a javascript WYSIWYG HTML editor, the WebTool script enabled an extremely simple way for users to add, edit, and manage page content on web sites, without installing any software on a client PC (i.e., no Dreamweaver, Frontpage, etc., needed). New pages could be added directly in a browser, from any computer, and they were automatically linked in a sub-page tree structure on the web site. Users selected from a list of HTML templates (which were very simple for designers to create), to give the entire site a consistent look and feel. By adding the third party javascript editor, page content could be edited easily by users, even without any knowledge of HTML. WebTool ran in web servers on any operating system, as long as they had CGI and PERL installed. WebTool created static HTML pages, and didn't require any SQL database. It was a versatile setup that worked absolutely intuitively for novice and experienced users alike, long before any of the modern CMS packages became popular.
One problem with WebTool was that it took a long time to install and configure on each web server. There were also a number of features that I wanted to add to it, and some significant changes that I wanted to make to the workflow. The web site where Web Tool was distributed is no longer hosted by its author. So I decided to create a similar system in REBOL, more exactly suited to my needs. Here were my thoughts to get it going:
- Start with a simple HTML textarea editor to create and edit pages. The password protected editor presented earlier in this tutorial is a good start.
- Create an interface to add new pages, and to select existing pages to edit and delete. All that's needed is a text field to enter new page names, and a list of links to existing pages. The contents of any existing page would be read and sent to the textarea editor, and the edited text would be saved back to the same file after being submitted by the user. If a new file name is entered, the new file should simply be created with an empty string, then sent to the editor.
- Integrate the code for a javascript WYSIWYG editor, to automatically enable visual creation/editing of pages in the above editor. I decided to use the openwysiwyg editor from http://openwebware.com because it is stable, small, runs in just about every browser, and enables many essential features. The openwysiwyg installation is composed of numerous files in several folders, so I decided to compress it with Carl Sassenrath's rip archiver. This would allow me to embed and extract the whole package on any operating system, directly from the web editor script.
- Create an interface to upload images and other files used on the web site. Andreas Bolka's decode-multipart-form-data function, explained earlier, will work great to handle file uploads.
- Add an interface to run OS and REBOL console commands, to manage files and folders, to create backups, to download files from other FTP servers, etc. An entire script that does all this was already presented earlier in this text.
- Create a template system to wrap all user created content pages in a consistent overall page design. User created content will simply be inserted into a table area in any template's HTML layout. This gives the entire site a uniform look and feel, without any work or general design by users. All users have to do is type some text, add some images and/or other basic content, submit it, and the page generated by this script will look complete. To link pages together and create a navigation structure on the site, the template system should create several menu areas on each page, with automatically generated links to other pages on the site. I wanted users to be able to add new pages as sub-pages of any other existing page on the site. The home page should be able to have links to as many sub-pages as desired, and each of those pages should be able to have as many sub-pages as desired, and so on, for as many levels deep as desired, to create a simple tree structure, with the home page as a starting point. The system should automatically choose between 2 basic template designs - 1 with a link menu area (for pages that have sub-pages), and another without any link menu area (for pages without sub-pages). I also wanted each page to contain a separate menu area with links back up through the currently traversed sub-page tree structure, on every page. This would make the entire site easily navigable both down through sub-pages, and all the way back up to the home page. This organizes every area of the site into clearly divided sub-sections, and enables visitors to instantly know where they are, and how to move up and down through the tree structure. The site map and menu links should be built automatically by the script, but should be manually editable, directly within the script, using a simple syntax. Template layout pages should be easily editable by a web designer, or even by users who know basic HTML, to change the entire look of the site, and to easily alter static elements found on every page (logo graphics, color layouts, copyright info, etc.).
Steps 1, 4, and 5 were already covered in scripts described earlier in this tutorial. I would just need to incorporate them into a new script with steps 2, 3 and 6 above. I started out with this large amount of code that I've already written for other situations, and covered earlier in this text:
#!./rebol276 -cs REBOL [] print "content-type: text/html^/" print [<HTML><HEAD><TITLE>"Sitebuilder"</TITLE></HEAD><BODY>] ; Read the submitted GET or POST data (standard code covered earlier): read-cgi: func [/local data buffer][ switch system/options/cgi/request-method [ "POST" [ data: make string! 1020 buffer: make string! 16380 while [positive? read-io system/ports/input buffer 16380][ append data buffer clear buffer ] ] "GET" [data: system/options/cgi/query-string] ] data ] submitted: decode-cgi submitted-bin: read-cgi ; If no data has been submitted, request user/pass (as demonstrated in ; several earlier scripts): if ((submitted/2 = none) or (submitted/4 = none)) [ print [<strong>"W A R N I N G - "] print ["Private Server, Login Required:"</strong><BR><BR>] print [<FORM METHOD="post" ACTION="./sitebuilder.cgi">] print [" Username: " <input type=text size="50" name="name"><BR><BR>] print [" Password: " <input type=text size="50" name="pass"><BR><BR>] print [<INPUT TYPE="SUBMIT" NAME="Submit" VALUE="submit">] print [</FORM>] print {</BODY></HTML>} quit ] ; Check user/pass, end program if incorrect: username: submitted/2 password: submitted/4 either ((username = "username") and (password = "password")) [ ; if user/pass is ok, go on ][ print "Incorrect Username/Password." print {</BODY></HTML>} quit ] ; Here is Andreas Bolka's decode-multipart-form-data function, ; wrapped in some standard CGI code (all covered earlier in this ; text). It's given here in compressed form, and written to the ; server to avoid some of the issues that can occur when ; deciphering different types of post data. Uploaded binary data ; is simply sent to a totally separate script (created below), and ; then returned afterwards to this script: if not exists? %upload.cgi [ write/binary/allow %upload.cgi to-binary decompress 64#{ eJyFV21v2zYQ/m7A/+GqoYUDTFHaAV2h2A7aNVsHpEixZhgGwxsoibbZSqJKUs2M LP99d3yRZNnFBFgv5N3xubvnjvR3T84TxTNZvvjxJcS5nk5+u35zewOr9XTSKFEb eMhlbXhtYrNveAqG/2OSnanKv5LHILKav7t7f7Ocv7t+/XY5v/v17uZ6GX0Uhmet KAuuonniBueJE3lz+/bPJa4wnSjOijjfihQ2bZ3DKillzkoomGGQtZsNV+vVdAJ4 6Xth8h3ovTa8SmRjhKx1gqqI/0vLtYkrbnayAC9PV/Th9uNdNByhi4ynULHPHLRB B7ZP4PnFi4tDIbf4WOzlD69Gcvc7UXJYNVILI77yK7AeCRmANlIZnYi6aY236ays R6DoYk3D62Lo/LFMXnKmTs6u+8/Ba/TLNUXA+XwieBg6tY+dg17NP0hlOrFZKngu Cx5XbWlEw5SJN1JVsbPp8uZUmnhIljCGsTGxs0YDPsWl0AZyDAo6zEtRxRnf+jcK Qi3rOFf2UW78F75UouIxQUBkYVWylEIum72lLQ0JUjGwkW1dXMFGoMFDbBB1ziSd MxgnTJ9pVe3QWd9t0IP9Uw5mRQqfpKghiuPIidGCiWGiJAejjFAwtV9EPrDBXa+H ESDfhpMYAT9pvc6KgMQFInVUkFVT8grRQL5jSnOD6Is2RzqiWkiji+D/a9T8vhQ1 H6rR2qS4Ctn4F/qUeLkuISg4oPQMPY8LoRtJkbMhS0mT07jrJJFtJU3JRB3BWa/a s+Gyt44lSHc7h41lQP0oZMSuRlUoazTuEhFAAKv3PYn6aNOF1YAeRodtrte3bDlS H5aY/b4Mbp7C6Gy5+X7UyAHfvZHeYdsJjk3NYMfqosRi7CQ7JwPagOSsq2f3MtY8 LF5fwN7YaKyn+0Gd90O+qk3VQM0qDl9Z2dp73HgUp9dJoSEiDkbg4XIRPQbMloto EHceGSNh43upCphpXnKsrYFWRFLRgEdcmB122xmx7oqAYf871tpg+x5r+gujBbNR CwndY8Dds/H+Yl1Pj/O9/oag3WJk9gmhPRmL0BUg+h6EnhzLONaGHjXOV7i6SvSx caHpsukKnRPQUbsb0t26crDXHMXcpj11QbOdlOAfWlhRB6q3PJF1ibWF4XRatkdJ TR1pthGKdLu5M5jZkJ0hwvXYnN883bbS2xiyhlCcsNF50FqVb5bTIYOJtQkry+EG h9paIvn72nR7wqBhdIsRUL+9dvophPPQdIK32JHCUgl36Dan5vKtnfjU5n6w47mM 9nvxdHIJjZIZznRLYQci30u212B9wyU0yA1gWkG3GTYjwwvolve0JVN/KGxUlqvU 2DRXX5EIrcZjhVWWSmxFjR0isPl7W1+4S4vN3kpg9FVKsPAjJqkUSobJRDjCYDTN jlqAXcD10w510uykkUmwPJ3cE5Ykw/WUte21xgpdhfqT7jzHL66WcwY7xTeL6DzR /Sn2HPWvyP6CkNLLs4ZpvaAb0euZi8/CPaLlG5Z/plAMDsLzhC3nmVo+9ksaliG0 e1GY3eLVxVPI0BJXi+cHMgjJFF7o+cXFU2skoO0FHbHmSBVZb5e/f7i5ff0Wfrp9 /+Hm+u56nvhxq4u/Q+mfMUIa8lYptIoViUcPsxMaj1AEPD2hjev6SSS9Mpa68PSc RvEVj+o26E6kOyC6/wuK27PN6mEQ6Ucn/xAB7vRbbhZ/ZyWrPy/9eBRiF63XtmxC cAhPYgq62TeKJz7tXwz8v0F/TBDpl1aY/wDPpuhm7AwAAA== } [read write execute read write execute read write execute] ; I added a little error check to be sure permissions are set ; correctly for the upload script: if error? try [call {chmod 755 ./upload.cgi}] [ print { <center><table border="1" width=80% cellpadding="10"><tr><td> <strong>./upload.cgi</strong> has been created, but there was apparently a problem setting permissions for it. Please be sure that upload.cgi is chmod to 755.<br><br><center> <a href="./sitebuilder.cgi?name=username&pass=password&submit =submit">Continue</a></center></td></tr></table></center> </BODY></HTML> } quit ] ] ; If a username and password have been submitted to the script, but no ; other data, print the main start page: if submitted/6 = "submit" [ ; Print the current working path (by default, where this script is ; installed) - just to let the user know what folder they are working ; in on the web server: print rejoin [ "<center>Path: " what-dir {<br><table border="1" width=80% cellpadding="10"><tr><td>} ] ; Here's the form to upload data to the upload.cgi script: print rejoin [ {<br> <FORM ACTION="./upload.cgi" METHOD="post" ENCTYPE="multipart/form-data"> Upload File: <INPUT TYPE="file" size="50" NAME="photo"> <INPUT TYPE="submit" NAME="Submit" VALUE="Upload"> ; I added some new code here so that users could click a ; link to see the existing files on the server. This link ; sends some GET data back to the script. IMPORTANT: ; *** The data after the question mark in the URL appears ; just as if it was submitted by an HTML form ***. When the ; script sees this submitted data, it runs the appropriate ; code in the "listfiles" section below (see the section with ; '"if submitted/6 = listfiles"'). This technique is used ; throughout this script to run "subroutines" in the CGI code, ; to perform various actions. This allows us to use 1 single ; CGI script, instead of many separate files (similar to the ; webserver management script described earlier in this text). <a href="./sitebuilder.cgi?name=username&pass=password& subroutine=listfiles">Files</a> </FORM> ; Here's the form that sends data alerting the script to create ; a new file name. When submitted, the script will run the ; "edit" subroutine using the file name entered below: <FORM method="post" ACTION="./sitebuilder.cgi"> <INPUT TYPE=hidden NAME=username VALUE="} submitted/2 {"> <INPUT TYPE=hidden NAME=password VALUE="} submitted/4 {"> <INPUT TYPE=hidden NAME=subroutine VALUE="edit"> Create New Page: <INPUT TYPE=text size="50" name="file" value=""> <INPUT TYPE="SUBMIT" NAME="Submit" VALUE="Submit"> </FORM>} ] ; This link runs the "console" subroutine: print {<a href="./sitebuilder.cgi?name=username&pass=password& subroutine=console">Console</a> } ] ; If a constructed edit link has been submitted, run this edit ; subroutine. This code was presented earlier in the tutorial: if submitted/6 = "edit" [ ; Create new file if it doesn't exist: write/append to-file rejoin [what-dir submitted/8] "" ; Backup (before changes are made): cur-time: to-string replace/all to-string now/time ":" "-" document_text: read to-file rejoin [what-dir submitted/8] make-dir %edit_history write to-file rejoin [ what-dir "edit_history/" to-string (second split-path to-file submitted/8) "--" now/date "_" cur-time ".txt" ] document_text ; Print the HTML textarea, in which the text can be edited by the ; user. This data is submitted back to this script, and when the ; script sees the "save" value (submitted/6), it runs the "save" ; subroutine using the submitted text data. Closing textarea ; tags are replaced in the editable text, so that they don't break ; the actual textarea in which they are being displayed: prin rejoin [ {<center><strong>Be sure to SUBMIT when done:</strong><BR><BR> <FORM method="post" ACTION="./sitebuilder.cgi"> <INPUT TYPE=hidden NAME=username VALUE="} submitted/2 {"> <INPUT TYPE=hidden NAME=password VALUE="} submitted/4 {"> <INPUT TYPE=hidden NAME=subroutine VALUE="save"> <INPUT TYPE=hidden NAME=path VALUE="} submitted/8 {"> <textarea id="textarea1" name="test1" cols="100" rows="15" name="contents">} replace/all document_text "</textarea>" "<\/textarea>" {</textarea> <a href="./sitebuilder.cgi?name=username&pass=password& subroutine=listfiles-popup" target=_blank> <FONT size=1>Files</FONT></a><BR><BR> <INPUT TYPE="SUBMIT" NAME="Submit" VALUE="Submit"> </FORM></center></BODY></HTML>} ] print {</BODY></HTML>} quit ] ; The following subroutine saves the edited file text that has been ; submitted by the edit routine above: if submitted/6 = "save" [ ; Save newly edited document (textarea tags replaced during the edit ; process are returned back to normal here and saved as they should ; be): write (to-file rejoin [what-dir submitted/8]) (replace/all submitted/10 "<\/textarea>" "</textarea>") print {</BODY></HTML>} quit ] ; Run REBOL console (for file and OS operations). This whole script was ; presented earlier in the tutorial: if submitted/6 = "console" [ if not exists? %rebol276 [ print "<center>REBOL version 276 required!</center><br>" ] print {<center><a href="./sitebuilder.cgi?name=username& pass=password&submit=submit">Back to Sitebuilder</a></center>} entry-form: [ print { <CENTER><FORM METHOD="post" ACTION="./sitebuilder.cgi"> <INPUT TYPE=hidden NAME=username VALUE="username"> <INPUT TYPE=hidden NAME=password VALUE="password"> <INPUT TYPE=hidden NAME=subroutine VALUE="console"> <INPUT TYPE=hidden NAME=submit_confirm VALUE="command-submitted"> <TEXTAREA COLS="100" ROWS="10" NAME="contents"></TEXTAREA> <BR><BR> <INPUT TYPE="SUBMIT" NAME="Submit" VALUE="Submit"> </FORM></CENTER></BODY></HTML> } ] if submitted/8 = "command-submitted" [ write %commands.txt join "REBOL[]^/" submitted/10 ; The "call" function requires REBOL version 2.76: call/output/error "./rebol276 -qs commands.txt" %conso.txt %conse.txt do entry-form print rejoin [ {<CENTER>Output: <BR><BR>} {<TABLE WIDTH=80% BORDER="1" CELLPADDING="10"><TR><TD><PRE>} read %conso.txt {</PRE></TD></TR></TABLE><BR><BR>} {Errors: <BR><BR>} read %conse.txt {</CENTER>} ] quit ] do entry-form ] ; List existing files: if submitted/6 = "listfiles" [ ; Print a link to get back to the sitebuilder home page: print {<center><a href="./sitebuilder.cgi?name=username& pass=password&submit=submit">Back to Sitebuilder</a><br>} print {<table width=60% border=1 cellpadding="10">} print {<tr><td width=100%><br>} ; Get a list of all files in the current folder, and print ; a link which runs the edit subroutine on any selected file ; name: folder: sort read %. foreach file folder [ print [rejoin [ { <a href="./sitebuilder.cgi?name=username& pass=password&subroutine=cleanedit&file=} file {">(edit)</a> } ]] print [rejoin [ {<a href="./} file {" target=_blank>} file {</a><br>} ]] ] print {<br></td></tr></table></center></BODY></HTML>} quit ]That's it for steps 1, 4, and 5 in the outline. Step 2 is very simple. The new file creator routine was already taken care of in the code above. To create a list of existing pages that can be edited, I simply constructed links to each of the files, with a call to the "edit" subroutine in the submitted data (submitted/6 = "edit"). I only want content page files to appear in this list, so I removed all other file types from the list:
pages: sort read %. dont-show-suffixs: [ %.html %.jpg %.gif %.png %.bmp %.rip %.exe %.pdf %.cgi %.php %.zip %.txt %.tpl %.r %.tgz ] ; Remove file types listed above from the display: remove-each page pages [find dont-show-suffixs (suffix? page)] ; Don't show directories either: remove-each page pages [find to-string page "/"] ; And a few other odd files: dont-show-files: [%rebol276 %sitemap %.ftpquota] remove-each page pages [find dont-show-files page] print "<hr><br>Edit Existing Pages:<br><br>" foreach page pages [ print rejoin [ {<a href="./sitebuilder.cgi?name=username&pass=password& subroutine=edit&file=} to-string page {">} to-string page {</a> } ; <br>} ] ] print {<br><br><hr>}Step 3 is also very easy. I used rip.r from rebol.org to package the openwsiwyg editor - it just took a few seconds. The results are at http://re-bol.com/openwysiwyg.rip. Just "do" that file, using REBOL on any platform, and all the contents are unpacked. Here's the code that unpacks and runs it, along with a nice notice to the user:
if not exists? %./openwysiwyg/scripts/wysiwyg.js [ write/binary %./openwysiwyg.rip to-binary decompress 64#{ (compressed/embedded rip file data) } print { <center><table border="1" width=80% cellpadding="10"><tr><td> <center><strong>INITIAL SETUP: PLEASE RELOAD THIS PAGE AFTER FILES HAVE BEEN UNPACKED...</strong> </center></td></tr></table></center></BODY></HTML> } do %openwysiwyg.rip print { <center><table border="1" width=80% cellpadding="10"><tr><td> <center><strong>FILES HAVE BEEN UNPACKED: PLEASE RELOAD THIS PAGE NOW</strong> </center></td></tr></table></center></BODY></HTML> } ]Here's the javascript code that integrates the WYSIWYG editor into our existing textarea editor. I just printed this on the same page as the textarea editor script:
{<script type="text/javascript" src="openwysiwyg/scripts/wysiwyg.js"></script> <script type="text/javascript"> var full = new WYSIWYG.Settings(); full.ImagesDir = "openwysiwyg/images/"; full.PopupsDir = "openwysiwyg/popups/"; full.CSSFile = "openwysiwyg/styles/wysiwyg.css"; full.Width = "85%"; full.Height = "250px"; WYSIWYG.attach('all', full); </script>}I decided that I wanted to include a separate editor that did not include any WYSIWYG code. This would be useful for editing templates, code files, and any other text that doesn't need visual HTML editing. I simply included our original text editor code in a separate "subroutine" that can be called by setting the third GET value (submitted/6) to "cleanedit":
; non-wysiwyg edit: if submitted/6 = "cleanedit" [ write/append to-file rejoin [what-dir submitted/8] "" ; backup (before changes are made): cur-time: to-string replace/all to-string now/time ":" "-" document_text: read to-file rejoin [what-dir submitted/8] make-dir %edit_history write to-file rejoin [ what-dir "edit_history/" to-string (second split-path to-file submitted/8) "--" now/date "_" cur-time ".txt" ] document_text prin rejoin [ {<center><strong>Be sure to SUBMIT when done:</strong><BR><BR> <FORM method="post" ACTION="./sitebuilder.cgi"> <INPUT TYPE=hidden NAME=username VALUE="} submitted/2 {"> <INPUT TYPE=hidden NAME=password VALUE="} submitted/4 {"> <INPUT TYPE=hidden NAME=subroutine VALUE="save"> <INPUT TYPE=hidden NAME=path VALUE="} submitted/8 {"> <textarea id="textarea12" name="test2" cols="100" rows="15" name="contents">} replace/all document_text "</textarea>" "<\/textarea>" {</textarea><br> <a href="./sitebuilder.cgi?name=username&pass=password& subroutine=listfiles-popup" target=_blank> <FONT size=1>Files</FONT></a><BR><BR> <INPUT TYPE="SUBMIT" NAME="Submit" VALUE="Submit"> </FORM></center></BODY></HTML>} ] print {</BODY></HTML>} quit ]Step 5 is the main work of this project. The first thing I did was make a link on the main page that would run a "buildsite" subroutine:
print {<a href="./sitebuilder.cgi?name=username&pass=password& subroutine=buildsite">Build Site</a> }To start building the template system, I created some basic HTML templates, compressed them, and had the script write them to files on the server:
; Build site: if submitted/6 = "buildsite" [ if not exists? %menu.tpl [ write %menu.tpl decompress #{ 789CB556DB4EDB40107DE72B0623A456AA63C7691E00AFA5247649A484A46129 E2A9F265B15D8C9DAE9D00ADFA41FDCBCEAEED90847015355292DD999D3D73E6 CC1873D71EF7E8C5C4813E1D0D6172D61D0E7AA0A89A76DEEA699A4DEDD2F0B9 A103E56E9AC7459CA56EA269CE8962ED98C268997DA7635B261DD0A163EDE063 EEAA2AA02BF3E6711230FEBD888B8481AA5A20CD5AE96A8E1CDA81A828662AFB 398F17A497A5054B0B95DECD18F8E5822805BB2DB4A8B84E8EC08F5C9EB382DC C46990DDE46AD3681B02860CD4A774A23A5FCF06DF88327143A63A18802BD01B 9F50E7841265CA16CC4D641A1FC09E7357E4428C4FF78991A6F151C43BA51743 07042FD5F57E9EE3BE7B18650BC6E137824B327E085E326747203CD480F95919 F110E629269DC429DA3CD7BF0A79863B87B0F7E5C0B11D1BFE2003F206BC4993 DCED98DDB17D015ED81371C99E2E1FDCA69D2E027193384C89CF443E2B1189A2 809771BC8BE8E0B32499B84110A72131E4EA74E6FAE52A62711821934D5DDF57 E0260E8A882807ED7D912A15378BEFA9F8B037C35788121120E4EC0E161D09A6 C8664B78EF85482EDE00A93A6EB4CAD3DB3055676E2214658DB0B986B0A9BF1C 220868880C6F9BAC15072D5F506DA53C48374110D807BF1869A1E5944EC727C7 F8C38588B34BA2A088D96D43285BB1FAD9353335D712CAA8DC34114A7C4F7017 2FC30F418826132CB79EA0C79397574934756B13A96CC41A49435BC5620E46C7 95B3E7E64C0819974885D0AA3385C1A873ECAC143ACA9134863F72EE8B581173 D1D0F8310B3116E654F6FC7A16756D9F97D35A3EFF5B5CD551437F58DAD5CA96 3A929535ACBAB02396CE97E5ABAAB72D6DC1C6EB1AED0194AE909F24ABCC0E7B D9326BE3E6F0C5FA5DE562F89A5AEDB2D45085AE1ECB5321B792A1DA074C8F57 4E0F51BFB87A7B97F279DFFA9945F02C8BF7055DF273CF4211BCB81ACB38CBF1 29E0949AA83AFCD102CCDC22DAE0FF125F6E2B00DE21918DBE5A0F87AA457A53 D25AE7F63513BCD97E6B976D657855DD9B7C556FFE923231E56A716E6AF3BEB3 1EB73CF71AD90B5AE2AF4EA7BD6DA6D76DF25498F295FD449847E647D3EA65B3 3B2E4EC15F3074FD006814E770CE3C3845AF06749204A43D07CE72C6172C686C 1D2F2FA747125A954893FFC3EDFC039C3D1A760A0A0000 } ] if not exists? %nomenu.tpl [ write %nomenu.tpl decompress #{ 789CAD556D6FDA3010FECEAFB8A6AAB4490B09B47C288D235192162468197557 F5D3E4246E92CD4B9863A0DDB41FB47FB973121874636DA7FA83E397E3B9E79E 3B1FCE9E77D9A7B7131F06743C82C9F5E968D807C3B4AC9BC3BE6579D4AB2E8E 9A3650C9B22255699E316159FE85E1361C7DE93A03BFE7B90E1DD291EF420387 B3679A80B63C98A722E2F2A34A95E0609AF5B555D9369CB14F7B90283533F9D7 79BA20FD3C533C53267D987108AB0D3114BF5756A2BE88130813260BAEC832CD A27C5998AD76A76DAC8006944E4CFFFDF5F00331262CE6A68F00D280FEE505F5 2F2831A67CC19928037903DE5C321D0D69BFFB1D1A691DBDD57857F476E48356 A6761F16059EB36E922FB884EF484EE4B20B8198F313D01666C4C3BC42ECC23C C3A8459AE15DC0C2CFB1CCF1A40BFB67C7BEE77BF00325283DA027AB54AFE19C 5E7AB710C47D8D4BF6ED72E031ED9D221126D2382321D7F16C2012C3802097E8 8BD8107221262C8AD22C26ED7277356361B54B781A27A864CBB60F0C58A6914A 8871DC39D0A152ED597FA77AF21EC3D78C840688257F8045AF24A3F2D99ADE6B 312A37DB9476330A041EAF705AB6EB4CB66472CB4A6390487E478CA68505C3EF 9BBA8A0CD7198ECF6BE380155C270AB7C846E7C29FC270DC3BF73702490AE4CD 7151C89018096778DCFC348B11C96295236B826BEAE969BA53CCA7A55BE5FFAE 1CAF2B253C2BBD355A1B05AD8574ACF5424565B42F016AD9EB7AD38CD6A08F5B C48CA94477880D6F28E74BBDEDA6FDCFC4E06B463D3372B82DE64B0ABCD5F9CF B4FC3DC28D52F943AABA31566AD52295E1E154E2E257D3DEA8C8DD374F3DFCBA 15ADC2E9A0EDA387E69C617FAD1A225926C813C97EE3A4E5F6F3D983D4BF829F D0B6ED63A0495AC00D0FE00AAD9A003D21A0342840F282CB058F9A8EA5E1DCED 07F5FCC050885A5AABFC736AFC02A1651F4AE3060000 } ] ]The documents above are just simple generic HTML pages, with 4 codes inserted:
sitebuilder_title ; Page title in head tag ; ** By default same as the source file name ** sitebuilder_links ; Link menu(s) generated by this script ; (as defined in the site map that we'll create) sitebuilder_path ; Links back up through the hierarchy of sub-pages, ; to the home page, which we'll also create sitebuilder_content ; All of the data contained in the source file ; of each content pageWherever those codes are found, the script will replace them with appropriate data, and then save the newly constructed files as web pages to be viewed on the site.
I'll keep the list of links that should appear on each page, along with the site's entire sub-page tree structure in a file named sitemap.r. When the script first starts up, it will create the sitemap.r file, and a blank home page content file:
if not exists? %sitemap.r [ write %sitemap.r {%Home []} write %Home {} ]Starting with the home page, every entry in the site map will simply consist of a block containing 2 items: a source file name, and a block of sub-page links. The site map must have one and only one "home" page. It can be any file name, but by default, we'll use "Home" (notice the %Home file name created above - that can be replaced by the user in the site map, but it's a recommended default). We'll also automatically create an index.html page that forwards to the home page, if no index.html exists. Here's an example of how the site map would look with only one page on the web site, labeled "Home.html":
%Home []The file name (%Home above) contains the name of a source file to be processed (a content file that the user can upload or create with the built-in editor). The block following it (empty above) contains the names of any sub-pages that will be processed and automatically linked to it (none in the case above).
Below is an example of how the site map would look for a site made up of a home page and two sub-pages. Home.html, Page_One.html and Page_Two.html would all be created from the source files listed, and a menu bar would be automatically generated and placed on Home.html, linking to the 2 other pages. Neither Page_One.html nor Page_Two.html would contain any menu bars with links, because they don't contain any sub-pages:
%Home [ ; your home page (index.html forwards to it) [%Page_One []] ; Page_One.html appears in the menu bar of Home.html [%Page_Two []] ; Page_Two.html appears in the menu bar of Home.html ]The next example site map below contains a home page with 5 sub pages, the 3rd of which contains 2 sub pages, and the 2nd of that contains 3 sub pages. In the generated .html pages, link menus are only placed on pages which have sub-pages (i.e., only Home.html, Page_Three.html and Page_Three_B.html below would contain link menus):
%Home [ ; your home page [%Page_1 []] ; Page_1.html appears in menu of Home.html [%Page_2 []] ; Page_2.html appears in menu of Home.html [%Page_3 [ ; Page_3.html appears in menu of Home.html [%Page_3_A []] ; Page_3_A.html is in menu of Page_3_A.html [%Page_3_B [ ; Page_3_B.html is in menu of Page_3_B.html [%Page_3_B_1 []] ; Page_3_B_1.html is in menu of Page_3_B.html [%Page_3_B_2 []] ; Page_3_B_2.html is in menu of Page_3_B.html [%Page_3_B_3 []] ; Page_3_B_3.html is in menu of Page_3_B.html ]] ]] [%Page_4 []] ; Page_4.html appears in menu of Home.html [%Page_5 []] ; Page_5.html appears in menu of Home.html ]The key to understanding the site map idea is that any source file names followed by a link block will contain an auto-generated menu of links to those sub-pages in the .html files generated by this script. Pages without link blocks will not contain any sub-page links. They are simply wrapped in a template. Of course, users can manually link to any page they've created, if they don't want any auto-generated link menus or template design to appear on the site. They can use this script to simply upload content, or to create/edit HTML/script files. If that's the case, they don't need to create a site map at all.
To process the pages and build the site, my thought process is to create a function that reads each item in the site map and does the following:
- If the item does not contain any sub-pages, use the nomenu.tpl template. If it does contain sub-pages, use the menu.tpl template.
- Read the contents of the file listed, and replace the sitebuilder_content code in the template with the contents of the file.
- Replace the sitebuilder_title code in the template with the name of the file given.
- If the current item is a sub-page of another page, replace the sitebuilder_path code in the template with links to the containing pages, to create a path up through the tree structure, all the way back to the home page.
- If the item contains sub-pages, replace the sitebuilder_links code in the template with links to each of the sub-pages listed.
- Save the file using the file name given, plus ".html".
- Call this function recursively for every sub-page that is contained in the current item. This will work through the entire site map.
Here's the code I came up with:
; First, load the sitemap and get the name of the homepage: homepage: to-string first load %sitemap.r current-path: rejoin [ {<a href="./} homepage {.html">} homepage {</a>} ] ; Set up a flag variable to help determine if I'm on the home page ; during the recursion process: begin-recurse: true ; Here's the main function. It takes the name of a page to read ; from the site map, and a current-path variable, to keep track ; of where we currently are in the site-map tree: recurse: func [page current-path][ ; Set the current path (where we are in the site map): either begin-recurse = true [ print-path: (to-string page/1) ] [ print-path: rejoin [current-path { : } (to-string page/1)] ] begin-recurse: false ; STEP 1 ; Choose whether to use the menu.tpl or nomenu.tpl template ; (page/2 refers to the block of links in the current page - if ; it's empty, use the template without menus): either (page/2 = []) [ ; STEP 2 (for pages with no menu): constructed: replace ( read %nomenu.tpl ) {<!-- sitebuilder_content -->} (read to-file page/1) ; STEP 3 (for pages with no menu): constructed: replace constructed {<!-- sitebuilder_title -->} (to-string page/1) ; STEP 4 (for pages with no menu): constructed: replace constructed {<!-- sitebuilder_path -->} print-path ] [ ; STEP 2 (for pages with a menu): constructed: replace (read %menu.tpl) {<!-- sitebuilder_content -->}(read to-file page/1) ; STEP 5 (for pages with a menu). This code creates an HTML link ; with a nice color changing rollover effect, for each sub-page ; listed on the current page (the page/2 block): link-list: copy {} foreach item page/2 [ link-list: rejoin [ link-list {<TR><TD style="border: solid" } {onmouseOver="this.bgColor='#FFFFFF'"; } {onmouseOut="this.bgColor='#D3D3D3'";> } {<CENTER><FONT face="Arial, Verdana, MS Sans Serif" size=1>} {<A HREF="./} (to-string item/1) {.html">} (to-string item/1) {</A>} {</FONT></CENTER></TD></TR>} newline ] ] ; Now add it to the menu area in the template: constructed: replace constructed {<!-- sitebuilder_links -->} link-list ; STEP 3 (for pages with a menu): constructed: replace constructed {<!-- sitebuilder_title -->} (to-string page/1) ; STEP 4 (for pages with a menu): constructed: replace constructed {<!-- sitebuilder_path -->} print-path ] ; Step 6: write (to-file join page/1 ".html") constructed print page/1 print { ... DONE<br>} ; Step 7: ; This code builds the sitebuilder path and calls the recurse ; function on every page in the link list: if not (page/2 = []) [ if (to-string page/1) <> homepage [ current-path: rejoin [ current-path { : <a href="./} (to-string page/1) {.html">} (to-string page/1) {</a>} ] ] foreach block page/2 [recurse block current-path] ] ] print {<center><table border="1" width=80% cellpadding="10"><tr><td>} ; Start the whole build process by calling the recurse function on ; the sitemap. This will start with the home page and work down through ; the tree structure: recurse mymap: load %sitemap.r current-path print {</td></tr></table><br><a href="./sitebuilder.cgi?name=username& pass=password&submit=submit">Back to Sitebuilder</a></center>} ; Write an index.html file that forwards to the home page: if not exists? %index.html [ write %index.html rejoin [{ <html> <head> <title></title> <META HTTP-EQUIV="REFRESH" CONTENT="0; URL=./} (to-string mymap/1) {.html"> </head> <body bgcolor="#FFFFFF"><div id="divId"> </div> </body> </html> }] ]I added the following link to the sitebuilder home page to allow me to manually edit the sitemap.r file using the editor subroutine (the one without WYSIWYG):
print {<a href="./sitebuilder.cgi?name=username&pass=password& subroutine=cleanedit&file=sitemap.r">Edit Site Map</a> }At this point, I can create and edit my own sitemap.r file and actually build the site. Now I need to write the code that builds the site map automatically. I added the following code to the "save" subroutine created earlier, to keep users from ever having to understand the site map format, or from ever having to manually create/edit the sitemap.r file:
either (submitted/8 <> "sitemap.r") and ( submitted/8 <> (to-string first load %sitemap.r) ) [ print {<center><strong>Document Saved</strong><br><br>} ; This code recurses through the existing site map, and lists all ; the existing pages: recurse-sitemap: func [page] [ append sitemap-pages page/1 if not (page/2 = []) [ foreach block page/2 [recurse-sitemap block] ] ] sitemap-pages: copy [] recurse-sitemap load %sitemap.r prin {<table border="1" width=80% cellpadding="10"><tr><td> <center>Now ADD this page as a SUB-PAGE of another in your site map:<br><br>} ; For each page currently in the site map, print a link back to the ; sitebuilder script, which will run the subroutine that actually ; adds the new page to the selected location in the site tree: foreach page sitemap-pages [ prin rejoin [ {<a href="./sitebuilder.cgi?name=username&pass=password& subroutine=addsitemap&newpage=} submitted/8 {&existingpage=} page {">} page {</a> } ] ] ; Give the user the option to not add the current page to the ; site map: print { <br><br>If you've ALREADY added this page to your site map, or if you do not want it in your site map <a href="./sitebuilder.cgi?name=username&pass=password& submit=submit"><strong>click here</strong></a> </center><br></td></tr></table></center> } ] [ print {<html><head><META HTTP-EQUIV="REFRESH" CONTENT="0; URL=./sitebuilder.cgi?name=username&pass=password& submit=submit"></head>} ]This is the subroutine called when the code above is run and submitted. It recurses through the existing site tree, finds the page that the user has selected and adds the new sub-page info, then saves the data to the sitemap.r file:
if submitted/6 = "addsitemap" [ recurse-add-sitemap: func [page] [ if page/1 = (to-file submitted/10) [ new-block: copy [] append new-block (to-file submitted/8) append/only new-block [] insert/only page/2 new-block ] if not (page/2 = []) [foreach block page/2 [ recurse-add-sitemap block ]] ] recurse-add-sitemap new-site-map: load %sitemap.r save %sitemap.r new-site-map print { <html><head><META HTTP-EQUIV="REFRESH" CONTENT="0; URL=./sitebuilder.cgi?name=username&pass=password& submit=submit"></head> } ]At this point, the script is fully functional. I added one more subroutine to display help text:
; Print instructions: if submitted/6 = "instructions" [ print {<pre>} print instructions: { ; ... HELP TEXT GOES HERE ... } print {<pre>} quit ]To finish up, I added the following links to the main page, to display help, and to view the generated web site pages:
print rejoin [ {<a href="./} (to-string first load %sitemap.r) {.html" target=_blank>View Home Page</a> } ] print {<a href="./sitebuilder.cgi?nameword& subroutine=instructions">Instructions</a>} print {<br></td></tr></table></center></BODY></HTML>} quit ]The following code is the complete web building CGI script. It's the longest program in this tutorial, so has been compressed to fit on this web page neatly. Unpack it and upload the sitebuilder.cgi script to your web server, along with a copy of REBOL version 2.76+, and you can use it to visually build WYSIWYG web sites, directly in your browser. Upload and edit files of any type, automatically create navigation link menus, wrap pages in design templates (2 included to get you started), run console scripts, and everything else required to create and manage complete sites. It takes just a few seconds to install and it's easy enough for absolute beginners to use immediately.
REBOL [title: "Sitebuilder CGI"] write %sitebuilder.cgi to-binary decompress 64#{ eJy0vOmypEiWJvjfn+K2t1RNldCZGDtURWQJYBgGBgbGDik5I+z7YuyQku8yjzpc 99iIzBqp6e65IdcuBqpHVY+e5fuO4vHf/9sfwT4O2gom8I8/hMMXjWMU6ePPf/nS 9XkzfnwN22aMm/EP49bF//YxxusIZmNd/Z/g159a/PmHuyFLf/rhztHXP/1gCIbE /emrno9xMOVVFPdffwC/3/wB/N6EUa7un/7ypY/96A9hmv/bRzI14cefwaoN/eoj 8kf/I5iSJO7/8ucvH8fPsORjmH0M2zDGNdh2Y942A3j0PCb+nuJh/EMdj1kbfXxv /vnzVVV04+tvbnz+fEr+t4/aL+OPYTymnv63D+gCX05tvg/8+1Y4Qp6bLVlexR9/ 7tohH/M5/o+Pb4vJ258n2bX9OIB5003jTyK/C/nLeUafP37XxU3022X/XZOwiv3+ Hz38y5e/v/rKc58r/77Yf6CzQ2P99ofvS/ve6/vnZ4cvf/nyZZiCOh/HOPq3jygO 2yj+3KOPX+7+Icibf/v4ee++fPn3jzz5aNrv88/84SOI4+bX5v/j46c9+piGuAc7 fxj+7cuXo8u//MsvbUD448dDRBP/60fbf/zmPvrz/X/9aSd/Nrhj9m2T/umr/UF/ aB/PD+H45T8+/nCs/i+/bfhV7fPZH+MPPe7nuP8fH1Kb5s2Hdkwp748VHqb5k6gf GO3b76n7DzdFkz9kzrgr1x+/Hps9fv2gWUNQnj9+/SM4/GrifzxU8fXc9+uHeSy4 8evDab5+/PDdFD596MdPF/oY8j3+8St2+frx2eTHr5+fX//xLL5+qIfWlraP/kuS PlX8n0j6QXiqpvFhuCr341fdZGThsJQnLX9++6b0rx8WLZnH1+978Lsl/QB+6uN0 768/gN+8+XDtzxjwt49DseOnFf37R5jFYfnrrn/ExwZsH2Nex8c+fVp817dp79ef 9pM3Ydv3cTgetjH9orbfGkj3iwp+ax5f4nzMDt/6l3/5uddhMV9/vv76rx/+Mc6/ /Nz389nP11//9bux/UuSH01+O9Jf2Z8C3jUfvvt3exh80vb1Hz5t/N//9q8fP/zp J3P9bpXfXODXhebDR1v+j4+0/WibL3/5reF+FX5e5y/GAf68t3/8+vFf0es3Zxs/ 4jUfxuE/Pv7p0whrv/tj/9Nclv648dvbf/2ne3uo5c9/+dvHbxt8u/nXv/0jkVNX tX70adK/lQkefu/3G+hXVbucGo3tH74/+xYv6q6PDyXg6H//65dY3G4WDM3w7r7A mqBBgH+3rnk1bneftuAMpgn/aQ33jstXL0v5ZR3aPAg8/S0+zAGWv0gqRUXIpnnP 5sbc0hl7IusUzE0xa4hBosZqPL15LlYx1LGmxIAJwfZ4UXrKMfTHjQu+xHJWBU42 uv1zjuk3D8KK3vjNY8akuyA9/JkYiYRQwuMvADouNoMzREwezjsXMzuyypcHPU1t 0+TMFIscUu0AGKiijy6NXih5USR59oIDD7k+8qray7atef41esPTAmYrokX0C+6M GZkh7Wz4pF5rRfZYofT9FsDLLI1u2QeNv9EspVqgkVHTM3oyW5ajW2NKd/UuacwX hvBUVG1uOTpehSBBbWWvrjjFh3NImI7oPi1BEghiexB0zGo1/awEr3Fz3HdhBPe3 I6Hj19YtkSsOSy0o3WSnedTGgE8ACTI+aEhP06EBZ8ljJsVHF4hSiHiql6xS+pv3 aNLpC7tiTmBX3ILp4hMSrSFQO3LyzLrJhKpg+cHg1+HiXtXBri60t13pFt+5UVu1 JgGK8PHllSO9cktg0ybIG4GZ7SSsL5MpXcveKk6YagKupNdFNAt+KW0ocuQb38q3 a8Aw0J7r0Rd5TRtDpDorRl52RI0XQaXMBau11zvpHmmWT6qQRzyb23wu0nFR3Ohl tChO7a+M4wP3L5x+TbJOdmmD6uYQf6Ty6yY0llneLINMe+0lYYXeKFdcGGBtf+d2 mRc5cAV9yiDn7AV9ueO9Br91lB0b9Aa+zVgqJ0FP0VZ9yapLSq02imUgZ/qlNi5E 0YvibRRNRNQYhLF90P8yAPw2omil30MiQ6HqpV5aT9YnrTJbfzcmLrvR9GNGVLfB /adyg1w61tpo7McYCa6V/uWO+S4YoHLQESzObxjgEOZG35PZu8duNIhFiTxdOXm3 g5YT7IsQF9VPFX14wwkijy75RbphyfIkXP+xNcCFj6iLArxLxHrJl/e1ojw46gjk npodFYmtzuXXMkhRR9DUVyBX7dh+4e5hzOvPDEWmju2y7jCkoXdvtnaTtJSLwpqB YHitV6J9025CEtDYpcCK9UA6FUzw1L6wSxO55DUawDvgVpBagAoFtn6K2GJJpXWm arV0YcwUyHCuyXZJefr8vXAUi8hxfdbXL6F/74apfDTHpMxgCC4jjIf91bnLTtgV EPQKlKhS6MSuMo3B34gq3qA8sG+oo/ljGYlfDA3qxox/RNKEyVjhleIlW2bHbZ4k iQSBDq/5llVsODxv2OX2tgIsMARXEcdX2W8Ax3/JqM4X5oaAG41Y3kwWCYNmSgAV zW2XqeorEh4ILN5ZM60Q/Oo32PwYm6QwsQZfUKKWv1DNvEZ3QSw8wdsbTXJfYY5c JhiCGWrZzMtGQ6ld8ghvuMWyzG01xxfReoIPfjWr92x+ga+a42Cc0IdekVm2rdfr rdAu+aBWhA0BqI7OT6TsUupmPQaVLsR3aeptIGrXgnWvxvNLUb1pJ7xClwWDLtNW lma9qCIScphbLqBtjjEMrWkXZcnbIIr9LuG4HS4usRqxhF937QuoN/BdtedNxdny KUkD6nWzTweXePJyEmRVX6p4zAO7ipavg7RnLNLUVgtQ5eBXOX/5EkO8i8SStVqq cGFEJwfCu5wW4u1GtEDo3Ex4KFvlcrsH91pnLC/AYjAhcixJLnbSd9QXELjXwITh zZytb3QCX0CdyKbgk5XbjUJr5WaoDqvsFxDNqVc4K+IZ13WdkjsfJ1U9/KLNnFUA LYxzeKlsLA4u0wMm1Cdecy/cDBtwpRli1oIg80Bvs3t1A6mY0fIbjjhjvbJfQjpT 3fSNw0b8EHdidJadnC830GCuXQUdnrpc1W7KjqS30DT9449f/vbx50/Q/FP+jdc4 nI6//6Vb3wHXkabjvm/7//gYj1T754MqVR9/DbP64D0Ehn38Efw1Jf/tL79hPj8B ihNv+CE8AE7c/+mH0Q8OHhMc+CPuf/wKff1Y8mjMfiQv//QRxlXV+VF00ITjyeWA lONnh+hPZ0k/4effDv8LqP6VD4THqr6xgeATux6QLf5YjmcH9/H7YyrV9uF/4sFj MvVJ/BCP4zGBjy7u63wYPknMJxT7yMc/fnyoBy0ajtkfRG06BI6Zf7CMX3HJgcO+ q2dsPzX0xx+CY/7H7z/WxEFe+jj5B7j+P77B6p8x5T9/Qrwff0aR//wdOP74M1z+ hI55M8U/gP7vhgF/Hgc8NHh8fLv6VP6ffvPot5Dvl+4/Yb/vRO0vPxGutjlU9ivk /EXP3yR96vn7rtf+wXaG0e/HA0Cn8cd36vUr2sU/IfFPk/8FzH6Hez/R0t8gya9f P59+J8af+s5/xoy/wa19XLTHkL8h4j8rWPXH7JO/LMcu/SHK+49fmvz128b8z1ji 335DX/+T8f962vHvhO5XCvertXz9Hc3jnux3mlRP1ZgfVjqCv1CAr78KNL8J+Ljl 1cFXTvQqOW59/Q05+06zuuxIpL/pf+ry80b8Q0b2faTPrv/3t/8+/ucttm+nw0rj H6tj8z6nedDFzwUMn1b78eu+/ET3fqe876WW/wIb/viHi8zyKDrs9NsSf+FsPy3x b2ce9p+o6bcSfmF2/0AC+l+S8Ks6fpYRR5+e/EtH9lvk+njGy0HD02OX/6HIf8jE v5vA7FfT8eU/2/T/Vxr+09c//X5PToZ/zGo4aHHbj99zxz/98Xs954hFfxiydvnD MCVJvh5t/vxPf/ws3R0tii49PtMjGPzTH7vm8zqou+Ozzz8/j7zzeT/6fPoZSY/r 7PP+/u3peCz1+Ow+5fSfV+n+fSZ9XLdz/IfYD7Pv4ebb1D7+/I1i/910Pgs9nxf/ 8a3Zv/4XRBxE83vZ6vujr+DXv3xGpEPy/3Eo/xD9ccSVg1y3fR4Pv9PBNzv/1MAv tc6fI9uxgmTs3lM7+t/EfZYM/I/k2O/2W22hjaKPb70//r8s8nuPz2e/DU9ff8i+ 5yDuMLIP7jN6fi5H/baFP+enr986HNHm78b4XU7/u2D3PeD9L8eFTw/4588F/Pi3 k+jf6f9wr7/93b1vMeSfm2Do/v2nPycRfzsU/LnGXwX/5e9i+F9/VsSnsv52evC/ vLTPSmrz6/p+SW5fv+/IZ9X6Q/a7b6v4Hmf/N0/gW5fPvl//xHxefhvyPxnu5/39 7bB/+/iXX1We5P0wfnzLQL/m6X/9+Os3L//6ceT9NB5//L+Cym/KP1n5YdLfyj6f 5vbbIf/yv1nHB0hrj8j3iYY+L/7/U2beHIqYwm+17a9/En7z7XPMv/2dTf1Xsddv y5hHiPxc0DfJcfTxaTsfVd6U/6DW/Q/R1bd0ciqk/YSsjm38tMFfdvkXYPSrAPIv P4Gu7/D5ozl28LNaOh6BJh4+o943APYzPThV8f4Itscwyzbky5aCQ3hE9nEAf/r+ x+K30eS39b3fdfyWEP7zAt9vXTsWdxmArbAKZ4RZduOuCbqZDWVnBBGX9rrACpnA b3gIqbroCfqlvTwu4yVFdDMtgld6Ena1JJ1CrUV9BpiKgUlIABi1zG5M+UNtWL3V 7M5+t7pW4OkCe6C1IAy6ohIUOalD2pgnYYhAJ9rdscChoBHx6i109WYp/lpXqZ+G miyxPLznjGbvUMEt4ZWTYL1ihestTu8kchFOwm4KU6GwYo+ImHppfAWswlPUElOS xlvCNQT56zKvl8pg0aYN+O3ZM5dIcvfQecFuz0FnepPgjlRTkOKx0pA5bdwINfc0 PHhifHgEvZ5fmXH2beiiC11CIPO8pIk/JzHRUc3lej4M8jPiCl5kXsGeDS3AUo0q Bor3DJ8KENibO746zBIyNkS2Cs6vHfOymF2GGL75rJrQ15MwFnIJ1aYvD3bmoCFV KDGsBY2NigAW6eTVuPGOvrT2wpToi4XHnV694k3bQuENksY/85Mw2uC2gZdviBfp 9HhzbagJbBDcUfiN3gkg3ScXBMYqqKGRoVQQiwyYk0pDNWTwgchv+yRsDQuOkw2e TXCjraEqNp0STfCbz2u9ZwNdD0ONm+JDRTomnBbcOsxYsJB9CCJzIO3hSdhMGJS8 9vNMzq+BEGFwJPh9SAgdkMHEqFAlwcYRjWLKdhpQakYNiuEET4znTiMp052FUQle ABrJRzkB31ft+oCma4MZzD7LDeaG26SS1hYdNqh2hLCHDbEBTxAxahQ8jIl5Sidh yespvSUfS+O7pYwFHdyBAvSKxiAeY+7d1wQUARHEIzgk6Nu7G6/3nOmDWuyiMmFn gDofVy7HSG+jxXfCFpvuFVNDvzsSMEoAWM6klwrzXlzqlLsh+wNxp6InjQRLReBG ErJ7Y0/Cdg65EA/MZGecAtx4A3HbhceRMV5bNCYmvWuFC46gmVAZBqhEG6oImHfg OJMFqM/r/SSsWIEA1JKp2RNCwncwmL1EVKlqQEgdee7ctc5hyIiXZ1BsL4OYZkoE 3sLeW8SDwnRQPglrVIoBwztgLmEv4HOvy9Ie4MNtlRuObvPYWl+HKklBXXZYxFpo VQg/Nhq6kQAY7NnhLAzdr/AY0Eto0KT7ZlIgQaiGcpU7uWn1GHDk0COOuJAJ4gNv maAIkqX1CbCzgbhS4XxepkGSmacWHeJKjyPEBDoz2Rw7YQu7gx6C93AxqIhJq0qG WywRI1gHyvcrqWBktCo3/yTMjvZw3g2AU4gmymkWL3kG9wFnX0oeRBHYXdEFAajS XRRB7a5Ef1GnBLuDV/0G7jyCnGe2N2QWzZOIzikglzlBb/SF1hmnTZpmkZbrIhE3 1+nFpb9wb9V19HhpSJ+Fu7fLm+zzJCzV1tpT1/ugbjdgkIlklUxnDt+XBG3QV2gQ F/LyknvQnUcGGO5ov5RXO/EIXcJ0mCOzkzBgSbJsS4Cl0cbeADqUkNYM9sCwI+Z7 LTaHs/ceyBD7jItHeIISP2JpY4fjCwG+kgw7CVOjSGB8sWd0baXlzaUvfeMlAORo k4C9PFro85xEmB3Mrz2stbSpCniEbM3QK3sIXs7ZCcTuaZ8H6WwZew/BQA6mKqBJ qyM+wdprdrm4RRyIi5IVc/rObEaQwjA7yyFr6tI6N+cQtBUDn7mbg5jL+FJZtDZd EEPIJNAkOUsQB8tA+Hp9pd5M7QvuEPE6oPLkRihy+NW9PQmDo5LxX0/yqifQEWgu O02X+0DcVnKQMvk+F+FVcQTRpLcwPXCCmKDxRaAvUi6WzEDg4kkYkcQJRG2vB1Ko 10WEXx5lUcsRODbJRMjcXkT0SngB3t/bl7I87YdscCBD5izf3xIZOs/Mr62c9R/5 zAJviWtv7fRogPwuR9uNSZt4nsfCs8E1heY0rjnOt9QEaLWUdde5NSFkP2+AjKeM 8eBrFaAvKQOkQMro4DANQc10kWtNM95tNFfPZDCquMsaCkQ8N3hM8OFFr8p5ZoN7 HzGNdUL1ouszSax3sq1EBwTwDXzP9tuMh3tPeTMKZNeWYVOHvr26xUqTgeGdVDyn OkFFvFdDtdjtwTtIBgTCI+It9gLyMYJvB60XIbAG1Y1cQRakbupO9vpFNmy6YO/b tsInYb2VvnO1rmIjS4qFyZn01u1joEGp9hboLb/MXcXxVwZZGhB+imoJwZMTT4nj s7gjLL/DGjIJ4geiLgdE30aBNl7zOG3I2u5lpbWO7Tr1ldTNkLQD3erX7uJuHSrY 0KvsUyGw4pOwSyEij0e0qZXBGbJmD3l0n0axywAcfFGBpUE+Ukz0S8THEVLyfS+d JLsjUe1hgzFJr7POTGLab3mMKi0MbiJLdjSGbFs63d+1D5r2Xcbu5kVUx9KdD64z 4pvppLr2pG5oH/jv8iQsD9Y+vMSUJW8x0EN56fl6ACvt5kUHFCWiMj4CXROFPZGJ oallAdeq7KIWFZ8hLHvpTsIq2b4jAtuOhjY40BpqXHTvcdwXWs5wxfuiuq1Ek/wN ZYF4ftBbIWI72fVPE8Vc0AbxczyDODuaHAx80IF11U3JnRC4G+sbngYSv0Qih2uv Oh6otHkUQ13vfTreG+f2DPNeva3nwvguE0rzvuloaCLyfQJKTaxRIGRtu8MiD4vQ Fmfk1+Oq0AlwQOT9va2F+kKCG53mWyFsJ2HyHMCOmrzQmFqfzpBmGtfNrfSkXO3W GaCTURu3Mx2QSqYmv17O3Nfe9Ii859bXgyYaJ2FuFJcvu8DzbmjzHkNMAZx9Z5xr EQYi+C5oEdi4bLUpR3ZPl3a0dbjxiLuYr4bVKd0ZuOBIM3OIQuKggDOE5HhDE8gH MwlE9aat0OMWvdp4QZ0nt1BZMmlXADWTgKml6yBUYaidhGnG40oagmm8EfxA3eab Ye2RTJ8z1rDBBLJMObkxRsRPRHOCodvMN2qTphtz3IKMD/v8BphmF2Ve0ktZBxcU frp99K7jsrJXMk8QmcZ8Hm+lRPcMbzfv7OjEy201L6ZXmFUcHe3OlZXM6Rl2oLob mFbee/boTt6RS2JIqvBYwK0ModzsWdUikJeXNLT7bu1dLktxHb0uHJ3za27rbgJo pbteKj5iMfM6sxJv0TsA3tiwFoSk+TDH7ZIhjVpTONLmStZz4Al6ny+Iu4HnHBDU azEQMDER4mo61Ew/jhCI6wwjeFya19yy1spz6bnrJlH1tS+6gIltEnQkhYeGxTt7 AOnrAIkUiZisU4IoWKw8uj2nn/ULCvC7tMzL+q4Nlns5jyqBaTgAaNemqwYZRcu2 zu6U3PBOoSFdokIZkQmpjjxdDLu2k44oEW47GOlPy2eWiNAAdWUHJiWNumRYMpnS ykKSszs5So0MaoHO2wBrFMGCOS5T4DtFN4p11sCnR4/fkFcyUTik6Pd53BJhWreB Ie6urp+FSUpKIutjuai4no6R3+2wWQhG4DwgYaTMgIvgRcTc52V6BXzW46Da7IvM 0AFMzQ4EnoXdNiqO7z3r8s+iowgOFV7q7eY53JawIuo/SsGvOAFZXXLWA4QUnNWc 4vmIy3ZWXtbxDN1vpfBsMw5+SDItoYizELDdZtdRi8g1DtoICMOe1bjgCaNkIsLh Qy1oZpTGon6KxIM4bwAnNLb5sEOL0LSqy1zHM8cUJDOYWiTnsWAPz7u7xH7D77gn dwKlB/XtSHdmLCScdL+j51THb6+8OGAPUQjD4zlxtvfcx+eS++82kPADN7e9Hbml GOK3QlsXyDDA+V0iDtm/EIQ6c3S4cbWlDEC4KharniNrO6CJLmDXHvH71HxLmTBl EC+idQdRcZOTIqu/zCOIG4Z/v25nnUGX1cUrxexEfYaz0p3U0svx7jrGczKDFMkz 0maWjxlTMFjAmobQ5cCBLZGfECOG2bOjyx7lvMhCWi/jcM+TLfQb5mG9fT3qU7GS DCSKm5h3OM2/XB8XqfL4h+C79WNfLjh8IMxzxeU5JFurHobf075OvdL3YiCUiGCA /bgpc/vKtyrDunICrS7y7jVM0WjNiBJkL9dgvJ8zOjrsuZUX12TNs2fFmi9NcIGy veS4m3cIZhS0eMXoANLM7urdOpaZq/gA6OXlyQ/e4JyJWMdCLi9WDNazdy9CJL+q 0ytrN80TfM4PO/eXQNkUZoSuy53IVBCKFTjdYgRyiz143852FtXk4smKJKNbeUVX EesyC/JMdESQeHPxgAdvSrGlCnb1YiCiOdRpQVQRLrfCXlVSPGNaw5nmi6LwB74L b9g08NyC9eARkeeFk0fjvmKNCJcgBVqyOsQc/iDmMJnlDnkHc9a8z0b79OQclQrM i1loA+51B/fE6JbbsKa25ODFXOq8tlYHnZuqznce7/ebywSN10rvEt1f6rmuIdtR 4x2bpxYmFDleMDAAtV5cjhCCTe0uJO91SC35l3KCFhd0utmukPVa1ghd7ZDPnUsR KPWgCuEWob4UZ/5gGFrm5rQoZvpSmhwY8XmY3HJGYYrs9lzHoFSruVIlii2X3NrP +CzPKW0DMolZ3hhcRX1wqV50ls+07N4xsagy72WIpSA70L3lNbdaYl4r+ulWJnce 1t3fCZOR2qceMwVil1VwDyuan2CLhloDb/tjZhrfU/1uTcScaIramQH4OXdPndjG fA4PtzhjWi4vs+e22b7aJ1qLOXy7P/csDC+sAvl3yj/Yw7jFPaBfamc6Uj2U5SSk jHSs9ptlnsFeREc1ZUjEOm0HdVsrbtFtQj6SO0k9aX2E5RcZ2wskJfkbJhzEhmpW yy4RPZLZ+Izdszsp8LXGarZoJUvOW6MG9CeOmEzccfK7R4O7xhqNtb+LnPTURwsF jTI97vKSA921DrL07OgphwNUX9MamTEMkEj3ArX5tFMN/zIs69wjDa1EYEnn7vaE rIECyNujAzwDm8ZHRMVn7oQtjocC8Q5hFK5h22N/RUUvzLd4i3cXZ8docYKm6YqB TQ7ireUN7Sfu+HpguYeMsLGcE4p9oZ5TYCBK/1rcl3aEdzNT146n3D6FwZ4WFffd iwFPljtPIs67lyhVzWyvL5uiVM5FEknLl2tUueGtO/Bl0EM4mMwNHFSdZ9vb0Ers Mgg0y+GvSb6NhX17eOEjXdbrHX1ZbUieGUqZqmh2QbI+i6LOJAvbN2BrqK/RcKwZ H1mk1HRJYpyIKPl7w1RK7j7VbhZbL/b897m0alOgerjks0r0TCfUhDdtcQCni1My Ml5k0AA/t1ct29SjWC6hc73RC3m77CAkr2V5s/VzqvNwMDN9s6wIBsula0sug9a4 qSIm3bYAwwKuHUmR+JLaOOt7uj4FT+rq8y/g6dlwffYA4dLjKhG9dYMjspWPZOuq wq4WqfcCQ6ubJo/I+A7GYpNLF2qSRmIpPC78fb4Sga/o5wImKYUe40Yu71Ov4i5t 3jvGN70dZ3YMGct79qyyHSQhToHHFXVViO5R9PIeZU3SlSoMpjPhtyZ41uq5efjp /cZVJmElRfK+VE0X1Ap6N1X17inKCsl2jUbOpes5wx5Ap7j6d71BzxxdcxBT1zmf l3ADTnj0+RnDQ2Ruxk2MIAjpUDtmApF/jTJaJlyMPq1dmyWiYto7HPTn8wDgshQa c1ksMXSpIamwGzi9vdoCZjVCKDeGqfviOsxLN6d+BO46acAT9Q7vKQRwjIWeuRPs z4ad4LkPFKIfJ6kOPkPIh8LKjj3S5tB96UemTZO1szSMtffA76Eo83Gxc/rZZs5V 9/5SBwbLyJacuRYSPhCAeX2eNxCRe5jWyHDPClAM5Hl13Q0mKLp7jVkl9PPF1Ysb vZ6xBnaE9msrWLfNek8phVQB+c71A5DtHH9Z6KHxrm+rQrSpbyibjfbLgI/TjKmZ 4JUNLp2rB0HUxxazTjlRggrDv0JWK8YAdR9X3r7rKu3jzliUEKVTVXqAEumGyMkC 5xovVYGsgvxJmNnocECwVx6AC+OuXavNyQxQV3A4ssMuaXGZUZarCj4Pg4Z77L7K E5k43sYqRh1Pvzv2AMe2JWWkoJ6zstbaLXV8CgCb7mKxNd3aCwA0B7mVRe6KMtLe uLWir/Ubg9R9iPfqVp2EMYFAlCojFerbIIg2SqjRi1VWd+QCghG/uO7Sa6Kw1d87 td2EhOeron0vRDabG/DGzxm9Wq5rNYBjzIK96Xuk8AafIwBjMYi5/IXeOVHr71e3 fk+b/SJLbntDNXJsQZG8avKWn0urN1Ogk17RHNXGPXCMTHd7T3Z368souQbvovZA WyksXKDakdpMcdL28t1F5cYmq4JQ0dmdZLtAojlBKDBIL4+s00zrZluVc11I9bmH iLiF9wOiaGh8P1Lckc4xgJG8u3U006zmXFq1zFU27q8LrV0x9pUKpMo5FRYfv66c ugAAZjON7vImjzjZ+v6BhOw6qKtj9Cs4T+DvstMlFdgnoBQtrhyDYpN8TVjQw6PJ VCkYi4BSTu+jxDC+LzostTeDydveQ+w7SUef9blOW9+8MbuHKlPGA8DM5NaWBV+q okJV3lW2b+Xbh2+WNEiQZ9ONe7UKu1wioYbe5kw8r9YZn70RRpxonTbQoJJrZagW BcYewTOn0Cv9Xif29sDCIBvAAM6orKXdHofe2asFr7Rs+uccAAflc5i1+B6JWNkG Qejb73RutcswXvRLOnhsoyAK7wqmKKmJfal84tFXZHuBgefl6jHnmfU59Rr8kQNe 2ZUYYaUr7zaduVtYF1fVGjqEeQTK4/HY2jUtdeKmYak6sLqEk0+ie5yLJJfL7nix dKfca2Pg23SXoyVVpfgZ2Qmy1jtT3bb5jek37S45aspW5H3NZVc97NF7OP25eqAO 9dp4Mv56O5gvQz4N0G8Js9qhkVJpgpcn+JBdStC6HomFUK6NfDwCfX4Vdxr09p04 Z6ddITrDixltw0q1RMzwPhT6bpUkiPod6rH71akMqiew8vHk1wt7hVLU4tebaldd J53DNolZlyiZyaVsNtXx6Rln+vqSaG4E1zBwX2GvJufntrrSFiLEoEp0FvdUlHkY 53PMdMYaUW5Grsmz1ZgudOeuhDbBNonH5TbBz1cskgVPKJXrDMulkhZLGOwW2CKK jlmUXrvsfO6U0XCIoh7MgI/CYLG1hlxyc4eaROJ4FFd4k8wX/djErI9ehVtzmaLd cGQ22j6LF7I4I0eQbt1u06FufwItNa71lRbzHK4IVH0+LEqAXvGGTUoOoE9S8mXA vGP9a5hfPrsSLa2ew7YsyG27gUPaN/3sTJ6IxQvs6MnMuDNruE9wEISGhGsv03Ou jYxtx2r+caR68O4G8XquBRXzAbUlWIOqYFWZA7gHDSrs1NYsoYdIkvcoNIR4R32f 7leLrzftsQAxr0Qykc/dsfEnYe+rHe26q98BmczQPGzUPUiXGjAzj3wySdLPe9UP y64coe15MN3oWiNdrO4zS7CQDJw3IDxCz82vPXt3ZxJQOHh1uSFPpFoZkTAParFP nxLrEULlKDHRJBiNqcYFgSbG7O/59D6fIk79AElaxeiKQRGlJm2kU+miV13gXo28 hxmCfR/f384zy2Dfqmb+Wdm7CY2F5TwSyD0Jc6QNGt1B2kBQKw+6PKrCkX6FWHsA JFF4crUf0NJAu5RtJpyGWPqpXsd3aELuG6vc97mu4V29ifRhPMjfZDDXD0V5k8r9 8p5z29tthRHNXTFaJFmnuwkFWwstg3QkPagFd/pJPc9V98ZFEhm8HQFFXQO2BrtV eHEKYy4cUHKXPl8EsFoE/kEBOd0RU4Hg0aIEStDY6AKb47l8I7CO6O34E+CZMO8j ZycZD7vfZIKMqEAq8OUt98Z9WuotZN8+MYt6Ka3zXUaHBMng+XESVnYZcBMv14hl wh3QC+/W5NJFg8J5Fw8S1MM0lpd5QTCM1Yu0s3LDg3dW3el4ckm48Ry2ixH1s2R8 m8FVcJ9p7gnO1YIQ8jUpWsoYSdcUMg9oFHijY38i/EQbO9m8bK4dvPCncY60ofx8 vIWlkF2UCpHpPdOqg5ELwNBwlio18HBCTEsq8hGIfpvqzkFV7hMeqt2t6ijkqpwx bRX014lgigctNEA7tCV5hywWfGOy7CI7RDLzUOQFQKKkVnlweiRsclxXrx+sKMae Z0cHW8W5mFvebdKdVRCpX0xTORieqT9l6xI7cCgo8grO/AAbIZaJq4Hkk3lLAJ4Q bP5xrrjU7x6wXG+BSnW/XZG7bwdjXR5OnToEbWFW/DLCWi6Uipph4NKuZv9kuWFr sw2o0N+fB3AXkDWeJiJRmUa3wGLuEHobzBdYFndXGirbRkZev1ahcGUsOLwpfZu4 wiRqAZZvHHoO20rlPZFG76unpsaIjq5tPHrya40MF35mFyAuWcjdCK2G5Yun1l0+ dDiJzbBi4++3Vp5LXj3FjBQbgdi8LMSI4Gn7GHVEY7W7FuGBSKVac6evZXE5LL65 cu/7k7A6lgCOVL01R8j6HaR6kLiNTfNoZVgmTasK4X5QcB0vGhyaOKRnWDRkrwU9 8u2kwkhAyWQPjJpoFxg4nj3g+o4mbb3g1+vD7p0tyZSkjTMpv5pvEaTCftNvMdCj ekUii5TFTOXnovpC7skxVvZUziEobjWEI6IUFy9t4wAJxggx3ZXJ9oz8l4zeSpbc nkWzREhZGqh6D9+9TjWqY2O1O1fp+Xxz1r3EYrlMMISDnx4okmVmOq/ngXjuHpw0 aKjc2/cjf/Eul1219yItOpk6ARbyJi3dz29FPIQ5z8q1ccsVxdc3aHF+Hz2I17K/ +qg1NTYgK4C3OEDM2HoT9BtXQrrRUB20PTWoOC+TLflrJOfqbNHRsV/oTPFFnxa9 lHequVagY18m70WYO68oshmZg3y7v6jxdtxaR8s+J+ExKp+P3lrFO+owsHu9wZjz YF8XqvYQKjAXBKjehCF7+/Oq4HZ5iwxnFZHyxjwMTjOEs9HKb7q83XClZTiCDynN yeVhLD2wYXf0EUKX8eAcnkMrjivdH+0McGV+nR0zWI4Ez9zSM0eHH8TOQII+35dX wmRkzbhu/SDvtxWEvX26HywO9seOUKtjtsTF11+wN+RAG3CEEqDr2c6kPWg56aqS zhLX8Ph62Epo12k4x25c1m4IvTmD032dfwdkovSxv9rabaVkxCJ0kWzOwTFDbTEm +lcMig8/ml5DPtD6+0W+yiuX4TztvkSYnbzNyAoOrWrcvMOGpxyWxyQddCfOOrNo 7nXpUeQJoJcyaS8UE3szx4mvl5EIoljpJkO7hJyNzqaArJ/LmgNqfTS1mFw+btjZ aPkA0opXPafgBDEylHMDFXSa09tFx7XrUF5uE+fxWnvlc3QSU1R7vBiFz1331ikC S56BC5eatajwBwe7sgeCNVacWZmewZHB5wQz4g5Mw6Tbk30J8t6SBC1ykrTlYq8N 9jCjl7PR0mgsvNDAozZuCd4sda3toXYgPOtcXXtfH7DOhyzozyEj00UrxBge0pAs 1zd84TglPr+Wwpchre/tPApWaFUwZBST1Hh3AGYM42a5+2YK07VkbljjbSFdMt3W jakgUXwq1iqJnXdzi+IhfaPymLraUKDd08N6chwjoqe4Cq3IqPUp0lphfUe4u+Bv erLDzhoSZFyU0B6eN+BZuMiTShyIoEg58A+Lf0FPw0QO3gonVfQyRTaoD2Z5Ny79 Yxuu9CIb3CpTiRmBB+M91xwDmLpnuB424mZa8lWqNuCatiL7IvhlCDhGvDA3LXTo hWMY2EA/2XGEJBdFBmN4xC9nWn33+IQxxXi5LRaPTQeMYCn1ybt0SVZXKLr5Tu25 cNlQ9+v8kmDShQa4jiAAciLRz9NzLQh74Y9EFejIUSKwbXWhE5Jr0jYp2WrvnXvl kvNSX68rH5R5HcM5AWxlW7+Ia7rXYNKfyesoK7By5zeJokbV8Lr8BRmZ4RUCMTXd DsNPTKdM4f1EAgkIr6ZXbHomizNyUW41xBfnukbjyuK7vAFgWYJv1u5SvO+WSVE7 f0Dwq4movReFjwvMSO6oNKk2Pn3YZRXqKpi8yO7nKpXiW9Y4rkb21IUZXoepCxuF yShue770yS/0PvSTBoYaT/LAJ6fV9rKsaS4bdqByl+l8IDMDxNY9D2IvzxrabC9m hW8xhki6LaNk5tsXKX6Mvu06HS4VVttMJI7cR3gYnWi83sPzKxY3MpWconfIN7AR DnAk/7vkAbf9wgyRryIX9PFw7mCHR8QArKyJB8Tux1fQD9ALQVzKMwrCVCWdLUgO qi0inJyMGSYrFh/ULIqzRlr3Lw+PjMLO2+fr/I5DKkWdGLldIwnp9WQ568xYvQcO 0hs1R6VFkGWC5fFdbL07Bru1SlxM26o9vtvCO1P6zXVJKaldUdBwV9Dyutf5gNl/ kd3bHkjrDpSUpUma6VC57z+6t1jXUuA/KHu5Pe2llnNzYwprUNnDDYoWFwrUXl/n M5TnJRMecjaVGX3gf0UvJ9koQ0rveVLrc7DYfTBLrOZqQxtaBy00X21kCtjL1B/+ 0nPng78CzZnceckRbKZXkFzLOz4B0O4wtZSzTC44RLWWsojQO3/hmRyxkTdDvoUm julniDvnKlXpX4hLXzEXZdYfGSHlXjBR2TsQeRQ/bC7rySN6eHSUU4cWZVrAlbSE Df8G10qUpcS5SjXn1f19b7msHEUoeGyRdDPq9H2L9sJ9QjBSXbRZVnxzzsKw0iPp 3V0rdYtSDXpq3Is8V6nmu4NPcbB3cPGkA3POKTu7gq19QHoyvpRF5cD504eKBz71 RG/TVatO2RJVt+wNC7J1Pvjreoo0y9rQLsKY3y5cpQ1T3N48DN4IH5lWxEyktn1f GU2PVUcJqKsHjtgdfBTbDBfbmVRQkDvtaDJPRcuAus/4t2s/3ydyXt0rJI6KAj6P b8PhB0mUKvicJisEgU4QPGQVVcfze0EEBSnSqDoS5XTbxAQR97A1nlfDjSVAS0PB ZhCkmF2ulY6AVVaCHBEMELFsdESjr9+V8JsuvB9QQIM17BEVFTiFTklF7AubItr2 3o1TP9B5f4ctJiEdlyNUPDdBKdkd4fA0UAHnl4wEjQq1ldd3aL0Ln0cCO9yV7A2I rwy9hs5tSTm3Ho9kUna+DY29rxTCJuW199Dp9nfulCAgmNG6fl0GVy0Yx6elCljh h2EpVwCZH9t7e4+whUU+4LHwsD2gVEKQtqWC6KIV2PkVWKEQS3mb3xDw9IBm2YXZ v7oPPUEOH1fjQJ4UGB7Xjb/z460m1NtwJMH4PojVtZ78d3cueYVv+cmtkBEEBr9D FNkGzdPknTrkI2gMWqKpa3k+Ig5fOa+5C/CiUNURkY9UojwAqDvnADGeHwHA3LIq bB8LqsC1ML45i4S91pVL0D0idu9v9o3FXg2K19TbfMBgIw5XGZyQeTu/BA7XBdLO IkcbDx6p9XcdTOw2iwjwSLYQkDEpJqwjlRoqgaZeZT8KxxOsxsqCmncPjn52dPvV 1QLPVrCDI4WACPJakjwlwoyLo8WK6OVbTJYRoNjlicxIo5VuRskgeGNXTdZy6Axc 6LRcWTUaMZtREvLV7PKIYvn8LlhHKLFAKoANY/dXDDhgjoxt/8Trg7eucbNuCW+m Z3ym2iUAR9AzFLXYSAZTVrEX55GGkxl8iYPGC9B5bOXaZ2ppDFDfGjN3pXDt1Mde FzZ15uhtLggv6IUQRSIAWEHPLRtgHvxUAAAid+29PmKh0SKVNig6gPO7EfH8PYfn 7l6MOmuewZ6wLWQ6jq788F6lOuP6wPtBFOo2TFtNENpVHSFvyXrNNdQDFzPBB9MR V6iQ7XdOO9X5SJIBKiNOXl42eFsthte2hCnl/hZvAz8GDmvxo52bOIwG6D7mCxlf x827EJyYcquRhME5odRUhOXKkswqLCo4TEkvhAFRt/dx2Wd77xIy7xlE9u51m947 Pip40tdRfXmiBXRJt+CchJlQtGiA39HMSErcAI7fxqBmHpN7WNiMV7YlUxiTmLG1 Slx0T3TQXybuoqx4Dc3r45wDnOAShM6K2heiR6+VtDsT8QQiUTzQcqUPmd2PY0DB 6E1OmqGoF61tPJm2djB+KSISn+tn64oq/IKBD1MEiNqUekyKkikSiQGKn3aoZGhv iyuVcDRWeFhijfqbe1Lc+AxstTKRs7DnDrnK7KjkjbhZtW3mZNNtTtDBDEW67Gs0 2Z3qWG0xc773ISbzhr2y2DrvzIx/578rxunN21U5Bp4UCoZcFMSJ7hJRdJG8hts8 DsgQYnyWyEuzK/d4iBvMvx/onGfRvEAD4H6eWSy6IxoGlpRXRqP6pQunpRYr2GxA qup7lPVSpQB3NuEWJk2YdqyvKIQaSOoE1qhnnEMQ2pUNSSEDVT5aRViKtQ+fadfl kmhcvBXbBmoOiidANAccU+KIxhj+SAX1tPW8AUPi+bWU7fk0DIeTYlheRjK51eV9 xfA2ZF8W0gt6Z7fWs7LwCzhLU708YGDAA/JlaV5LLgv+u/+JoPKCgiOOERCMR/zs gzWl44sT7zajNYhSRrcEQLNyfrZj4YRNeuA077WEHQeM2GZKzrmCjGKmJWxjYyKj GTzMzKgfCWQ//LuQ3EwQjyT5zXoXNSOgMbwUqIXYbbMRHGluIjCayTkEaYdWM3Bs HpYpOBan394EGC88G1U1Pd0Tp1gbOQybarGfd+pRp36w5hUVSfogUGRBnCOtViYA RxfyYeBcT3dgb7Sk2LSolPJU0RK5bydG4/t8VWlo8iJU7dh+UNh6nIzzoAbO7hTf rTIc36Wqrlvcqu6zQpn6DQjZPjzSqaQlJlvn2SmD7XnX1smvMZINNVJk4/INktX5 LXxSGBcHI3i95EuJePO9QJCAlEM5Rm5VHHWVA97eEb8VLvxu8r1+0BkEoF1hCSkX 7vEZbbOKipQJ2Fu9SuKVv+f+MwxJCIXnVzuqGPBC+nL1pYFSVNH3hvSaXrtgG4yy LEhwdc+mwSty87Ih4ABmQP1+YwagoqsfEskDLY6AyyMv0xTRCQGIiUZZv9CCfASe gJ6OFVgWxvl4zTnQIWR3JXb4s6ER3Ts1IvwC2cD99XpnXAI56aE2+DkoIAPiheFc HAvR7B4i484M4vMBc/HSLsCU6R3A80zL6FD4Fn2VVA86oOE5kE/NGr5mjTa0uwqp 5DAhdWeJtb6BfZd23O/+hYxDWpSXjE8cFBTi+Z5j6DW8ciCwqGxQN5NQjCdhYPTb 7JA8CUCQagBpVw80ucR0QJx3M7pNURj48s0xp51H6FBlkZwNwGFGQA/hkyS2Aimn nIg3FXitL8ID1SvmMNxuEl3cPpe8RFHpoYje5gj2b7wO6xdrOciS9gABNUqQxbOg BCTq6W71F6o2MssgUGIaFrdsYw1pzkYrAtRVUjboncePoiAgYKU1jHw8Ro+mQHle XOkCFyopX514Wp9AZRGKPUmR0Tww6t1p57qGfimUV7U5ffuo3yollknVrpZM3XSa vMuArlxB/I7aB/iXYt4DRAqx/RJs6Tcy2W6ZncGeVlSWGWvlKmZaU/VYXboMj8vq bVkeitlMUJwvoptvKxRCUXGRb+YuejEnocA9Ww7eeH5fw6KSAM5angkdhtJC1bhQ bNo+5F3eb8zLfLGXWmIXeWF9Gng/67XH37UO3lOOR2EFP0P37V1KrVD1zwZ8a3gX PpT5ZhgNBgQXyNxB0538QH2HusTwscbKYak/mGhhQ8qQZfDRnf/1mqmUpN0ZadZu TDbF6JWDpHzwUtZeuIujl4EjqbeseFgwHVZ88yB3nmT59dDFC3Iv0JmhxHFOrSSX tTZjigd/Fel1uIqZwN8FOTLS8n6gAZvVbvorKpWrfAPonGOUQbjdbwOtU2dIZYGm YF+125XVXFha0a2LRiJ8a5NKwwcVhmqhd1E3hyYxXV67e4WV/IE0DCPsDMPz3rmw FMIOIrHN3R22xSIWXgFdVXk66yqAJQfTk9TvlgVUnGYrqCNd6atZBLeHjsxeNiFp cTbalcP5ynqw79BSDXg8IB4Sxos4ZaBphmS3L5VmZECpyaFeibb/ZlSr0mSOsIwW vGHN+djjVQaXleMY3C3g2qN8rJ9j6WD2L+71sIppZZDmxlI3zTVbWzYRXGDvFtKY 20uwRsl9/+69IO91CzHa0boDFm4d/obLKDcrIMJF4thQ+KWO7JT4KFrUxVuwXoYh zoIrNYXYzs7hyOeKS7S17zwKZxFULG5fozsZVEOem+RzeujLTnTDdffT2iV6R/BL z33BVVelleA7Yhbk5/eC7A1viCk1yTcmv0A5Kt3dTwLLOthvkkmjxlri7WKAi5/N 1gCyiU5T1UGnqwf9/3B1FVuuAkH0g1hgwZbB3X2HBrfgX//ylsx+pg80XVeqqisu b7Z/7gdU9LFp6aYaAaGXNQbDQhx8KDgYy5Cqa7XWT0iSiFEqL65eD3yZxdwWbmgb jGXWge/zya4jKu2RkY05HStngNjaYYqC4fFRrDDzLXugDyS4ieJxP6y126ZKzTNW 5P4Q5rh/NPSMAJdGhcpiHTB7SdohnZb+Q4NPQ0CRZWgYitwHL/5Y/pUzbF0Q9OcA AC99aZ0jB/U6PpHWLvsPHeutTpZYJ6aTmh0rwhfnq3ADln+dPEZwr3v8cn4bM1yN Z74kCHx1zMrdDvn1vA7tcFYVFM54vT/dNjAll0CTysYj0dPcSRO8+mUawZxpXBEz 0e5k4U0QRcU79s9FCYnKP2t1oZEIRvjTOBULK596+4TxAc1S3pP4KWBVtTNkke5c HTF6KEaH8klYHa59IEyycEyfrYnHrjNQ/MY9idG9aIzMPfoo8LlXEFGjNYuCFuKw 16WFH/I+pv/CfSiWQiGF2Yegynw+WWxsxejJvitXLN6z+8gyry0dEX6eFhRH1gQL z3syfnuwNxZEvrjNY8BgwegduRaEetpq4gx5zhU+25otaU5OWkj8z85z4FYv4YKk HM+7POsCU4cdc86gWFVKbKFXX9Ec3E55FrGmrTMGyJdOPPqM8lrWEWTn1k/VqUaW vuogN+5yrqQd0M68llcuZfRJzmRB/gzz2U1PGSqm7wpLEMyDlFjZPhZijgwRGTrY oF2ealXgEdS+hO9VSPYeb8ea9gxGS/pPrEpCfD4hSHO3WRh5gyfCClcq6zJwnf+J jk+0/QSyQISoULhg1rtvZ6cyfORfzhwwy0tvtbl9BU+/OSFlv6blZO1T1qUlBsly 0vSu+EKk3o+/TjhIwea/8bP98Y0VJodUAyF5psEmSJIEPosLZy5PWLwqk3PYOakv s1Wi6a4pgQ6P1JUTX8KOeqMkXqqmUuJRQIX+HXK9kCcKsZr4mQsKeuBHAv1NHF5G wJ3fHgfGap6wWzqbfLUg5KCWsewe0LCqm4Ku5c2Z3SB2uWhJPpbnOWt/Av3nB03f 5ksFEoFRnQEMtbXeLKim6kuMWhw4msAo5JqOhj5RmYNgatlc5lJYFT21xuf4gHyX JUNfTa/XupPknbzjz07ylPQSu9avZDuIh3oaX5w3eJBhzFA8fe4V+Ch6zfzp1+iU yvjGPjXzrbIr67wEaYLk6i5I0y4OTCzqaH3X5B3OYaOygcMe92JR2765dDkCz2yo xoBf6eNzlXjDYB2LYfce9Rx+/TDegV8N8BamZJgXLtJr6dLt7KdkTKZjtc2sPckk ni2wnhd8rAnYvt1XSIagyV4Y/+69FiRyEs4yzcdbifxwzPssEfqn8gklCF53d77W omiz7AmOMRsUqaKirkzWrBciCMBPDsYbhlPt6TBifr16Gb6OplovhyfdXyG4+Rzj 7Oni7rp6yoME3KKa+YTUh+sEnGRvkxJtiekqGQWo5Ii4/wNKBJso0HVJgP1/kev+ Ev97LLXSHO4nnhEAuONGNSZCPS7K8VWZk6QALE/6aU6F8xvwTUThZWbKSDYo17pE iP4O6t9i//+ifi6mMO2kOFJ9fPefQEzYTyCAGFRHM3GK1K7HWaoasN+d+UJgygwy TEo5NK9p+2oRBi69nxyQo3SOzWimjoQU0LHUWK2rQt+iGWK+A3OtCQJBdTrTfY+g 7Q9VLr+k8TMkqFiSN7Y+PwAX4oOQmer7+IqShBEWDBXwSaZ0rXmak87i4hl0swlN QXI2YzNRLaWw2ETbW0C/zlMgM7DPRJevnzeHntD6tttkObR5ONsNsKNZvHTec0PA XVWk+RA9UZ0/gjKFVbSJjkLNZ6BvOw1o92mDYtqSYZVw5+zagLyogK/RLc93X6Pf qpHhqsTMqnPbPR9/g2nAZYJQEvNTIM+CbpvSIYCg80ZmfPjm7V3ttgXZi8hD+dgm 45DAiGKKrTkAJaPjPnYkEBDnStfD4rMiRuR53yiYp1PUYNCEadbXEtVr46E7U+Xe dK7ke09nmq6i5hP0iAzdq7utRhfzbuN6zxsyZ8FmmwcJ/IDR22GY/4fuGsANv+0I O8NNDZvvQIntGFcqsMHZD2Am1CFN3b3lX4iGz3MmROruUN/LhGVmfB24J88vGLTH TBEXamaLn0Zg5fK15PSimzUkuP6iG8T5qnMlMPU/pkKKZ/Y6KB4IMKIhKEa0xK5o BwxREGZyQthHERFJpdewOCA0Cd1Nmf7EcdaLg0tYaJ9ZqrvMAPsEdvHk6W/bhHxO 3KQe64a/KJe95YSEbIiPJohxE4AoZt8ytNSZ7RwYXwa0fsI29Crfig7bVZanEcb3 P2ARMkzITYu7KrCzx3MSNh/L1z1FqGHonI0aXuNmgfrXYbDk2U/bQGGYG5nf4Kg5 UbE5QlVbGPNpQTXRvY7CGMWMu6tYgwydkGIEvYaL+fYIGVvuuvTP1yTHAmb8nDPe oxm0AW1DH2JJXxBg4zxZqjskGU0/2DP0ky+xkohVWHPtaC4oihiFwKbP+qbZALzm Hxgn9K5J0decphpohr5NzDSzlq5IEvR8a+mSFOnRfjiUPnb3AyY/ADlx4+kDdvde mEtu/azzhfMTKZIEmVfZa7obwlfZfVHE7Zo0xCWDROXCI4Gfuv3MSrCgBOJsT4di vxKKDP7XkPr1J6ITP413D9ZpnXXKHrwtxWmnDHav5ksZIguR6qZgtzau5g0R5g0/ O5ZC/uBK6eJOTJHq/xcM7rglJchT6nE2Ppz7UtLyK3MHvwkb3sAAZ1tcy9LpaB+Q 33vP7AFRpoffTfUrMYcf1d0bj0dG0QNz752wEdvF5Mdn8PJHGEZywdaRdwPBi+xu Yv7uJPjZewDBCJk3LzZVrTn7mD+/HG/1ccgy737fAHbxU0BwjRvteeT8nhYVAnYd LECG4CuGv+ATz+gRjNRI06puJ+e+rufVpoqSg5voQE3ER7whhiYk85n4gnNOKbWx +KnQT+EDyIw1wBO2g3Qisf5zQSxpASviFp8c50uai/KlP2tYE5iLdE1u3BPjzILX 1ouKMhbVzfo1furUk4TFF1smhF7MghMh2vlpsWIT97KCWmOadpcZ1WO/QfzrqIbo i7TZh/uQt5ta1h+9R+dnBrmCQfCcfrrAHPq7w0xZKVr3Nd0W4Ad174TLkW0955eS HGTNflvW2+7YRTNxEBcTpXzumQ91NautsmtdJbWouC74Nol8lV0WOU4IztKB+UtX XLKeWgNObRvvpyYW1ihHdOfVPVVQl45A4H8w49Iu5mjlvsJtrCzsQtXlRJyaSmVV nhxd9LeipNDt5gw/RtxllVXeBDg+WyzoTV+qPqaJfnsBVrnKF5YGBWxhK6qXjrsH 16H7X3UrNkprlaqQLCWKCZW131Dw0yPP8hp8xwYNz7qBzaXCd0AAHpHazon+k/9e c3yriyLDmFqGsHjH5lUdusZEuw+Q3YXHZPbs2yacw0ViwQFeZy4c0p7dYcu795XV MdZklktQisZO5vuVdOSiTaddotBssHL2wkc/OZ/spLJToEaRAsFiHiPTNWb8DiY/ 12QXQiEzof5FgsD1dkPCOZc9IMOqLTGIuM+tMdMLfYJjRtRltaQDrdQr+0JgNSs5 qTAzgu3EUjZDsk1791W8donkVdox3YqQ3lvcVEH/Y0P9qYLmAiw3IuM5CiAL2zj8 ilDngHovmMmq7hIHxobJC6XS4IyUP+HZy3UUC3bbMDMW3tETNVZu1n+eOdYL2yWW eW1OH7ZXFZaPDVNVhx/p36FhuZMqXTQ5NGPVWSDbVrcpzM3bqCcJf8JI2UFofnEl d2rO2wLp5L7j10f035WcdZNK/L725+S00/7IOR+K2iSycQw3feEqzLNnL/HxWiIt zOXiGMW70gTJdfI7j1CgOa10A3Ey4x6yoOSGkFQPFu3HIlYWXG4wWbvwZziVCuPL BuZC9NjJBTmpuzoPG9kMOCs2eJOePGUzdYzXztgHiXcDn68IOcrwMYZgZrhnQSZN 0FnOrPIkS7FI1nq1jrkI1e9iOkKuRAi0DcRWbbjg73hwngi6DHiGjlp1uRwF2U8n /FoJZqmdemTfh6xXsNmNa020Oi8vAVLw9DulSpvBYDy7hJQEEKDXlK/ExLmK/T7T /YzNCCat/qMvaStCJfBzX+GxfSTGzPqxRQJBk9p2dyxg3DJ0MJxR3goGFRCO7e6M v5T7mcDMzToD5OtKRv92U1y61Ez7HR9wpsN5FecqogDfdbA0sRba/uaXmK9Gb3/N YuukcPg+Z5IAMyrXL4tpYvCzD6+pSaXvcgdZFpGg/OmCuTihOVj3YAsnxzTY9xdV iNyaOwwNJOF6JjCvwAsod/r+IqmMKgUKDuvIOm0rYBRrbY/XAMJ39y3tJRsdk7Mh DpAWMWmPRM5y0vezIOM5dgUYCV9n74hVhlLaUWa358aW+TTiV/vlkUnrRXc3y+L1 oRgAlFY/C9MbFs1V+ZPZ+x7nRFaqKPupmOyz0ZCFX1ZaifVZ/3OpC7Et1c+9emuk j3l9ATgMWiEGXalGfaBjf1arHQbRbRn+f3Mx/LLCaUVht3E7SimiTSp6ESpJdcsy o7+JaaEHl1FqYOlQSKEu/sqAZ0Fm3RLaeAULZtRoEX5eCt9U9pUxbYZKsHgsV3yO vW35cPGJs6tGezR/5z/vJxfC6w7/FGQq9fbM2CSBUQbWa3YJ2cf8bIkNdVARjZHb NW1WF2nijMbTr/iLoqjFQXDTYEiH1z+j8X7MltwYVBCWJFsbYwInXCQn+gaFb7bi iUr9zrPVVq+3nuPrAuKC9rGTNsCbHJd+B/fp0T9frCx98ZznbQHKAXv9cMgRiHwb /qe0cnR9/eCMHZN+RnLRygjjem1q5flwOfB2Sj5L36ASFCK4KWeHzkL41rGvIXQV sHkWgijO2ivD1U1mzeS40uBDYKbmtCjZQoz9qPOA/kwsWYGD3UZiZzQhVt4uw/Vy nnJ6m/nv9bl7afzxprTbc2X3bkr7JyAdT5f7iTijGP8ptGduG97HPnvf+Hc+9Y9g J5Pp0EMuXr99avbPfmMfryAhnA9E0NeGGiaHvqcHB18Qlkizp0AG63s3ITG8ryhQ 1EZGi8VckZVplfImpheAo8guDHa0wBhZ8CmZOCsO+q3+f0AXMrrP9M1WRCi1o+JI BGdVmmj/Mc41HVcy7gElkkJbXwsxi6j+i3kZ93N+FYn9NA6hWgcpX8vzug2xklb9 QVQllcS5g35uhlLLqgJfTfB9h4BY+XkMyTOQdam91TwMt+vO5FH5vp3qg8LPYmkV 2VMtb2b/ab9GErMhywnQ7jmpR79LqcOLwvp+hgZOhGODymARg7p1DtsILxf1fh/j 2X0j6QCzYClKXM20tHImy8RItpbrfa556ayy8HvsTFu9TrLPd6+rsQDUhSNy4bVN LvMcolCupylqGdSk44RzmzNJOCYIIRiwNKK5+JnzwNZhnXwpjOYwpy2W5Cr5oCG6 UXBC4jOFLx+7V4aBlVbhSkNVrzGf1zfczHKgpEEZ048hvZ2a5KJ3O4szcn0byWNW jxv7Sn3Tr2cDIPt5XXzffnsYSxW5fX947EjX66B3VsCPbB/wenpndM7drPF1JEpm rJavosCBVlXSpOeFM9ti3mSCrkRGburoVpkDmkjzTSwdmUjTKHBwxINFmKCbs0vl xA8qkJFg5H+sQ+Jm8lzM9SYThfrQwz5KMG7StJFozpvscarSivmYhBr4NkL26+4n CWTwdjEuPpkoWBGSYftzuZ04w0z0vqo3IQbkq/VS2lOHOeM9z871gbWLawM1QfWb /7kdcsaBy22s1L/yBM+K8c/R4JaNK1wH4kgjB4TYiHolvYrsQ2blbGu49OpJzYD5 et9jsODVildzEaF2BdV2SbeXJ9UlE0C/cknYgT5pYB30qfgoJNRvGdmeUaZ3yqv4 +VchJqRJ+XHW4R9nHxieko819baeflOax/oO5UnNtijlz5e13r7XgmNwxpffdnI0 82O8N+9gfQ+2FEM72nBzO4DdB7xW9vMUyLXp3znXIanjlwa44FW684x+izE6bDQF dt263d1FEwlntbobtK2d5UcCnIc34JAYP6mO3HyG/NIF7NyAmVBvkzpQoizcn8+i 9Fa2fzi5e/12NN9TNZdMmsL7EEJLg8pP8IrA583SlzkYGpRxZ84mvFiMR6zRABz0 4n6lsOaI810UnirLOpmc0iDdnfJ1rXAvXm1h9Vz5hO2bk3QJbTKgh4uYESBEoMfB Bn2LwJyYFIwgJfvZe9l9ItyLRhZFMPlrCtinoPtRCD7Vth8wX7XtkmZoywQhubG1 GafjVH5U8NQZTek7dj6LNXUiNoww5sj3/DnasQpz2HEU7Fmt5vKz1n7PAGn4lnrt wRqglBCAYyrv0PcAROzNANRHSXXYuBs5UBPLmpA+58tE8TFln+D45Uvb5YLza7py gJGU/NJaLdN6AotpPCGFljFVT/D0uRN6iC2ZPlOu3OmQWyjLvFb/FOUp2u/WNOlO LamwuZBR1EICzv8/sQA2D2qUZ+TD8Hp3UVkUy4cGI/2qMelHaFn4szwFcgruxVW9 RZosO6q8e18O9uUCQiRqsNv83m9xba+6zMckD2d0Q3aCRK7fIsbJ+J/8/Ux5ecCu vS11YoVQyuwGli0V0EoW/wQzEE8hH5udtnsFbX8C9WvS/PcmkQ//fRdv7d0mzNOI vU0vqV7o/cV0vDl2dHlteXeXFBlfeRMh1hr/IGAfuARvADCC1LcyqaUINtZHZEXp z+hikp083MDO/F2GnSmsgtJu5vf7aS0y7I0yXwFjQsDjixFOwx4tTFRLX2QORnEK 9gHyp6Z982fmw9HGb9YgVmQDYzTXos0+IsqYSHntDV8nxJXQmva6E2Ro0qCZMrDm YpEMrvXnYrcGch6Ha/7nHqJIVrYcFQ2DMWkFjAokqSULylcGXtMMnhrmG6TUnNvy ymFrIt6l/EwsaV78YcakznAajCaW2azoJ9fsLUjZer3f0oe9SY7uz5AJfxwze/Xc TQiqr+X4aVUjfl6e0gdNrW0jupirtaPvpCnkVzZaP8Urf1NeupyXBVpR5pEtKCPv OVqBy3y36f+hnyU+PQVyvvceuL/jbECVnO9ZQXPFhexAC4ldcwe/fYEGweddMlbK QEgFHr4vNJnEazawT336hKC4cNIv0zZ7PL91oYyj7MMJSn3M0k3XRg7ZxpfRu2/z ximTV+LcULYPD/IYolgS+g6fga4vhhof9JvcayQjBMvzA0t1U31Q6fW7Jlwjjd4X FmVk2emvA2ObC/5MAG6NREhTifY8ZwRFwl0HgVfHOBzWBZxtuBCPZJDwOd6+d9a9 E4dVi3stqb0SKulWgzUr1Cx6Ckhw+FlgNhfqG9N0foiEPA0NK0Xn7V3FtFBGxscu 3k0xPHPgqwUUaVPd72Y2LPjbwHLEQ8zjnrkgK2CU0X7rR3Fi3e5aHdn7SX/2HOw3 XSxznymCBw/BgdTAjciCRlUIBDR0WNhA3l//mSh/BV4ElnC9QzUktdOijUPuhUX7 aq3PNQa5qVAWX5Juf5bzGuV4gX7BEnxlXAy9FX54TpgJFzBIUNwo0g+cgSgzokdN HPibjcTM0qaFTZROt6yDftFqxaKG+zJkI1FiWPzFof55ooaKsD+VTZFuIa7BOc34 lPRyPb5fuWkLHhIE8IkzdJXh4cKxH7DcWcVTHGtkDMvpMeMZTmzGuD9A9N8JUO8i Suh12IlvFjpWZlcrBTx4tiDZc02caq/Y+yQ/lL9/6g/nrQ57K08jJtamcIbvtH6h zrQMYCGanpWXpOnCuSssyo/lBTIRK1RbbE4U+O9RoBs4rElctH7+5ypct/yMy60M kC3VRmKdQaDKCWBY3KH9hOzV1Z95rTincAKcnNw2G8RsrfaOdInlk7bH06EIvbld nO1PGkrgfe2EvtbGgyDsfYkAgCotUKxNefVdNK4nlLicDwXgpxWS8j125OH5ZE0U C+WYHjEhfudPQPk8kxh6rys5A5R8fpkgjdmAu3NMQhRuXHxVtCj6j+LdHtHe11Me UKYLkYhFVwUr6wBbbsil0sY9GeveoUvIConHnS/pxDDVi73fpyhiCFsFFhNKC0io pzygl3JpyUDntuzGUjevv/eAUUuNDGuekQ5+IUY+9phfQvhkEHmutipCnAaDG7X2 C6qncrQoBM++a823m6vUzRxv2FaG988/+2uW2u8aOabuG8Yh9BJU5drdT0Tmb81j vYhzfjv4tIg0n3BpHSJVa0MAmfHVBzdFnlK4L4ZhScH0Rm/RGQZiFsu4Wvvb+WmJ rVf3EzeeAz+z7lEBN0iav26/hkdAVUhvCoWtJAZ4gcCUOMlhLATtu5YSO78Ktlar ZXy1b6nbzLk48Wdf0BYXOsX4FSEqvvsN5mz6HKP+0fuzvckkD2ay4X7mizOlw2vi y3Zeh11CliuAnRQtxTOBqUtcXkCckuEsdRXDJJkr5CzogpR3t3mceoRmMBCBHoUs JrJvDRUaYDoswIDMtXeLp3cK0IJHJUwHMJ2Kt3FXVtjIpPebDS8OjXDTfZGO+8Hc l5T+v0th4z/O/MF2wR5vOPwJy6c+Q2d7NfZwBz9wmDNV6QoqdBsQgqDiyysOvizO A0RzXHZI64a9W0D8ydyt94R9bbd7pgnNYfouI17z1M+gT4dXfE96rqe0JVUuUJIU VEQhs1Q2zAvJktitc6YflG2TMnbUlkLPiQy6IViYYdicL3kwKmO7ceKZc+1Qbsj+ yfUlfQk0ui3N5rWebGdqoicUkI6tUVxf9s/RiFUp66KD9Kexy2BSuEcwQ1pjHSo3 aZyEKGPMOaMpdJJ2M3rQTvVXq9mzgtXIGaXl81rXNev5GYDBqil2ppfUlXdIfnrO GG4ly5u0q3T8dA1AzlbhF6ANG2bzjGFxLSm1M8Kfezb+vrYvb9EcaItoANQd4V/w mJNEOmbzs4NoWkcnqgcLhI3jGdVa7nshfi78gEFFgT1Tq9uUjPxp6nzGikleYHNi qVt6UutVGUWJomBMy4YpR/jY3dlry5bmO+nFtN+8a+XL9/lk4d1EhUjjxTBjMvpd EmJX/el7i32jyH70szftSL7NMAUcellBCSGAN4Xu4PwtYkPInxc07FBhAeunN0dX tT2ZPbaZ5ZITMRWRwN653M4NiQFTN1iHVkq3Nw3BzBHs1eBfzZf65/3NMDFkHefK GH3PuVMalB7c6YYjrp5PlEY4hj0GSNRiNZRZJipNBVK3Yzl/jqUrdG14Up3Hi/nd KMP35XWKRm948vsv+IAqDK+sUSC8CBlB4OLK/Js0YP/KrHyyYOPHMTuptvGzY8m/ QHlm+73AERGAznf8Vmmgc+LOysUS7u5zYew4fh0w0lRXVtmKh5SbkwjydM5vv31W KmDqxDv/VMqEIPAoidyT1Wa9DOtVWDcN/fkf+cd1vg1CITtkmiirgz2QcTDdmFbU n2fpO+4EktgjpbA7/Kt4bv+29em89gKqJ3258axm74rxHZHDYUeCysO9A+9b8t43 RitkeYKjyOM9Oxt5Hwt8nNm0f5RRLzVeP/OoiUCab4D4lOJqjSNx8WHSgUZXscI2 ZvWIlDufRSyY8Fjh9qDTEIcXoLEMCFJwBSMkrYQRQ/MCLEoG4Js9gB4dQL0Kbh1H xOuXFa4k6vPM7OE7BzSBW24NG5jjAXziCHIT2VBk+GYB9DaKcJcg/Gch3Klpzju9 4E5d3iXv1kaWx8+i/A3CHrAmrtZD/c/PtGk2wQdHwuMlc+pEUTHtnr67yYeRDX5B CYyB1GwzmhTg+5Q5PWPzFzBqttdwGsfkRBn2PC2kNTuits86sGhahGxaHu8lpNBi D1E3CwFC5VmCXaT5jOnPGzIJ4bhQvuhDDO9LU1D+dJbfVa37nw5wnDFLHLQrNQpa V9dg5bVCehMZTKydiheSEONTHtxeXZMAjwULZV+louU3G8gXLElIILto9RqWyTmE YF3GhhSlfS9huZTNYqsgCTSr6Eko/KReFCUlVqjq7VlyVuIisASjyzbFVrEngf7l 8RpCq9ZNQfkI1nxiNXMKq4RIaip/wvZwW0iFLvbyEyJx9OpjrwhjfBUYBboXu2Zg vTDSD+7DL2xMQ9QOB7lRByuqx5ggtu25mPCZ2FTNFnf/QOk0/wBjUt14tdr8nME4 jDHQGpAGMmWg6u1P6Fkvm5Q6JOjZ9PZh+BlOkyPvqvtqIh31ro1BDZ4YXucuIG+0 jle/rX4o5KhHXk3V4vZ90uLwjMaCHOXcBnbLn0HUsU9cEcJXLEDDjULrCLxdicr9 n01lEn0W0j+3+cbGOGCrmtxeO0W4Rn2HtBo4sOU9F7NfmadAhekB9YA1QY9HwFYV o0PJFn7jw1Gq1UcaM/b1sgGoVgaw8yFDPxywc65F1J4CeXGo5miduIZUBQCHDsu2 461Z8lth09RDw7NovfAb8Rx7s7l/vQEn23pxScuBggf39VSOWWlxqW9ecKCcyLfA yfxLaKgpZpnPbm6Gkr2cECqrvLZX7x8z0pd5xTf8LbMJOr/BZ8sYQjbD6ZHefgau Rt+TNFt23pfET1uBS2DTExi239/ZcEu/MYeBiFXAIpMa9ayULDT+6YS/ORIb1IUA P/pikWEXFFpuBUTll0VT1w1J/RxGivlK83389mi69shyESm1DXu/T93zNeMvHvfh ChLlZYeko3Thvtd6jWkN7tNbeLIMxjbqq2ynkMjtaVMaKbFvlDJziEL2P81sx+BR 6bGuk4HPKxh7Vb3pYukVBtBXWVhs2asSDHUp/ePlpelpBHYEt/NsQF8wNUjyqRyV BTvD3sHdZSeR1T6MZa2hjsbQ+/qidBzWfQz7+Rbv9r7EZoqCMvGtx7IpOhdkQuSZ 2Zv5H1zk4AwYxe5mQ5zkS56vYIXMgIyC6AmYnk3B5YyWkNqW5LCVr55zQBkGnJ2P wadARs+g7GJ+0w8U6FfwHryaPDdnko+PSbc9S1Jrf5eHrfYZLM4535KhZJd64c/U pXDI06OLyKaOMNfAeUSfAM/gSfdb+fcFpgXQQMqmtjnPeuULiIQs9Jufu33NUCvR hBtRT8afXqqE9SkII0pHJ4rQ0MHwutn3+DPATTfSPqHzARHHFjtbd7fas3pIZPlj bBFWFrZJpmc4VX4ykC6W9IwdjHwCUNjnC/MbjBNRfdrcuzlxW+PZ78wsAZ9TqRkH nnnwsdz0bEDpz5ownGRIsCbkOi43dZZNPSf1u/m+kCUa4Onkmc/VbI2di/PHzOfV +hzvRvPFSPp53HICn2r7HTplrIRwDlsJromLbFEoAh4KygE5sRHbDrONQI6m3h+c pslSTK2HjZWT/hXiNimfEPRCy2n5sEVvoju6eolgQhC4+7dobaoOn+MqAh7Xt530 gTjni8JdSrApY0EgP3ZD6z4LMs3AUmC2FmJY5yAmm+ZOIGT4VkaCv6ryt1PvlFku qOM6BWQBtxTz75vZj3Wz11panedrMpKdUEcu2qAH5QXM5zcmM6+KMF6UbwrXvU/l oAQfO0I/G73HIpAP2WrJbVGhLCLCzwQmekMlBcameIN0INgo9nUhP1AoIuum1YTd Zi/YH0VJCFvoWWCE20p5kPNWmikkq0N6qu0XQUqv9x2D7ls2OfxngRtdW16WIEpD O1bR2r/2Bq9bjp5f1d2W8LCBWTAI3Q4mvqg8uyLGYp1BeU02CQcTg5+FmONmHa/3 1dhG1VRhGxAF/1vKrJVRLfRx3/4RphM5KCnYBtGzB/kKGBEcMuzFU36WMB8rBUe6 SkGRsomZ1256k5OwxZsJRiqDYt4GM1RVUEz5TRXDMT0rYhYn6u/UwaFQBLaC8agf 5WOg5rogZtYfWaCkQh8+jKTnie1ixLotgwvQ9RHDiupmy5+asNifd++5FM1RF+Pv EiAWWNG2Lvj6hWzVjNpOtejvSTNGS42g+UH8d1CW6U3Z2P32nsJlPs6uC4bFIu49 BH1whpAVEhuAOGj2wFJ/a0/9UKQIeeGxIwuDHuHhz8mT4Xd9USD4BzW8URupAWiR ZFH9KALbMpayuJRTVLbAnkPvxA+p1DhHY7gNv4FvafHLTd3wDfO38vmazYssibQU IBHk6117sSOrmGD0udBGBq+9I0vETdjAN/UY+SEPAGuGXOP2Bbs1svTms2cPS1qH J/IrpUKi/5Rejmi190PKlQ07J1i/pLTFbx/OUBMsjpJyJRuPvb1D52A4aHR8jhOc vaMfEuId3nj8VQuUPy2Pp6NAbzwYK8phJZSLqzibs98WR6sziMNv3RwWz69aVgWe hGL8lIHimpw7pdSFx1opRFxjOSVmvdv/f0/O37FtpLZ4ezVBfeoWp6GZYJBXGX46 9P1sZFAqgaZFU14ZckwVyzvjt3z9KIRf0fcBd7FB719U64UTSrljWt7kYU5W/WYR hX3L+OuZ225t2nHHXgpqv+HmIww28CyxHIF/hnFMXMD5yZ0kjHVNGNzPZtI4eCRE 5SAJiXYY+ackGVKh04cbe/2+1cf89kQ+E7BXdR5Rm5f/TmkmMSdzarbyf9Oz1bGw iUGoy/ZebYrn8WeiKYQDjfAN0DT+pMc7ktho46TU5FJQtQVaUvaMJy/9CGxjHOdY /2arGcRbMcgkALLoM4N8uMA7ykUw6K6fi+crzkdzEgYUHG2iEhWWpERL3m53M4bO CXHWHdfU95a9KzVhr6/wbGbrPYnhFpkZ87CJqyQpC/G9vxjy+lxjiHl8X05idvwC 0Q+oUKK+c/BTW2LDjjONWxn8jACHdIJRmsfzJ0W4ypvxDw0YyQToXk9Y60yCIrd5 u/gu0+JGF6lLUDZFMbwht2qRS+jpNycYogGTYGywDYe7iOjl7uMXE+iGCUhX6mON ZHSguXzslqQ4KxAR8+0GQV+u0Ned5aekSuqW8haAhNOUWtwKDTLRA4aCP2wfNAt0 hiS5+Mw4huE9VX9pj/CY/3P7DwY0gHyinkhLlwMxF5k4hS65UO6FSv0K/P/J08aA ppBi5yPVNj7Fui7/fAMj7l01cNtBgZ26agP7WZJcUB5TLvBSDuqaFINwdiCN6B2g 1zg7kc96pF8gnCfqs3LAGbbgL9hiSnYqaNs9D9mfVEfB83Da4O+ogzpR53EwA+dh 7ocw5CDF9fSpKYFgnfG9S0O5kxcUzZo/oWn1Uj36Ap7ZA4tHQglIwpDiSV71/L5f 3+n3+6aroBfwcolI5DTyBHVwHBGa3adCgZmuqNzO3waT5DODnM+nbHkiS4Lp9dW1 MI88QMkpx4CVLOqyPogrZya1RP8M0FIsZM2/13v8yJJCGaz/+vNjURSdxIJwIO1R WYoESdEx+E55z5FH7C8vutkr3M8ND11i0hY0Sik//m1tbwjxgiH1s6NcFl6xVmwi 0OPf10foA7Vuw6g73fPejFopN84wIYnOg3uR0l4Py6WfjXk1Pnn/iVf7ibQvKXZP TI0UsQdAha/7m8X3PtI6VNygaJVcs8Xin1Nx0haxVgDGhyJuxsWine7T2Omz7kR/ oBCv712REnHxljbILF0rVoLDxXc7LJ39039FkECc60c/wd1Hx1XagiWPru2w+f7U Gh9vCjfMUhhrVG3faF5ET37e/3/ARtjFr8CP8aJkFfdibv5gd7HW3ZHd2NW1sbRu heRpxJRI08dpHFnaVek3Q1GCYitzl/zOCW7fSPT6Cd01j1+DemjukAlM5nOUBbKJ Y38kY/gzGAy8Ee3jN5r8QWeFw0L8wsO1vZbC5U4Z8Vx+tEKJfEt9VCQecMP9rAHH m8G+9Hc5iWd1Jwz9m1PMo+wm9oTbNQeYK2iaV/xy3lJTsG3oyDQB7rTVCjaFQdxs NSPk0ylQQPA2PPscaVL5YNX6kt6qCaqfa6mJVjLDhqzLQr9zl8Ekh32/vVhPLMIY rPBKu5eq0Awa80M5P1NePTc1NF85Mf5TiUrD/IxIBdevLPKHtvCn8AW/xuQFXwft hHM71iwDvYUyvUyTXBnjzyBqnO66TxXqkaPBH6jA8bKzZcBUcYSzVugEeeAnEQOT ArlwndLSVNL/LQG+4Rss5nPunykWaH1PuO9fHuTdHpfgYFWUjtsEXhpwEvRRT2TX 4G+Qi/IiRJta5bBn8ZuBcg0jy/0THI1PXI+Jtuy4KfAbzTkfRazYE4WLPGnR0lYm fGL9WKzpRD3WRWqXqzuI9oWgH9jW7z9XLglkDM0mXdjp6qTG+dRS/62sjvdT2JT7 EZ/6bQ4qvVy0FoALfxiiHwx1yhc90ffCPpUjy+/RRel3b0Z1+xq8N1LOzaQOtR2W yEEwK2uCiHTmV2mV3xPIOvamRZhCVf7Gs3J5BvpWrQS6udk73LGvp3bty4O0ovnZ fDber5XzGml153ZmzH3P6p0xuoUJeCE7BoCwtP25mDD4lJ1tkwjnNIXKM1v7MsLS muKOgx9rZshUH/H/LGTppYdTBmDWDAi56KvZuCFl+zRiJ0RTzXcaq4Eq6y6gw5mX lRJc0fEqvpR+QelUwebMFT7NDujArdJXy7nDbhNau7P+eanlHno+UK51ILy1OAz0 WsZwX82WKGb+k5u7Ul7DxNxpBMsJ2tmJfXXIzZiTbcOv/wN3n1n3vXPtVeXOeDIy ohWi29T9MjOUbmhyf6FIEhJ5egs5SStRA9S+sTBGKSZUgOOe6fC87XHncUb49Bag aziTm0z0gO+faFZfBj00ZZbwXGBDp6R+ideX2/HFT8CLt8k6xDD29J9pwiYoJ6/x NK/vECxPozDDQrdD+4/3jpKIth2qlH9CHCSKiCMd9NO6+HJr9tsAPOKg8mc9AAjO DuMO9FJQR7AreFcjN8QdG8h3tJds6scA0QdL7chw5s9h78cHh/cMvYl3r/IW9FzM MhpmAPp1CJ0u3zwICm/CzKEpMVCLiwxbvdI7hN/iphL3hBk9QomlCb77FDREpm3/ 3Ef/sbm87Gu9slbjveOxpv0hCYWWQ4353kYml8xD30Xc6C+OKU2rSiycmJym5Rwb fj95s5LRMWUsJuECf/EgM5LZpV3Gbp2XiSJmHK37Uu2pEdvCYYmneIeDkF6FpWI8 2pnipwy1lVKUGvSYBgw+0M3RMWDo4JbMnEU9mCQ0nDcirIFwq+h8ONqBSmdH8mIV cTOp5H9m4TMHTlbsMbhu1gLVvZbsqxVntJIq53XKqb4aWedanGo4/BsmVJgxIaY/ 4OwMxv0U0iehrOvlvOiqVzKFu10FQ66a5j6fz+2I2vf9ddKx+k6+JEXbRgE2nMZj /x2AA+NeiwiIn6fffBv6uCffVkGNN01Yo9Lk6euHLQs5DApUsv18mNc2S4xWqOm8 Rz6gBE5iZiksMr2cPCtiil0Jp2cZ1/sthUjE+aFfM5L8yf7/bpEs8sRpyY7ZwICw VyfcNSixlIN/Yccaa5XgPmEbwoMX71ImCuPCUKclb80xRG6sspHEaRdhSTIpXmY/ /brUTKrTQP4R9LAqWSkAJP4PB4SaIUQoRi/48IVEFYYsKWUF+NKJV7YvYVB64Zr5 rhFoSHVTVN5zUmMkFIXNba9D4jMZZ0kJ9V40AtB4/20oAvXj8rTWfGCnqQrNaDnZ aso1yn3wbzSMy1Kr5BDNQtX1qcwl/wzrgFFx3P2BNTPosxbf0WxXtO/rheR+qohN BLLYcENVXpvxf+RciqHZDLwLDc/Yyx1O+A/SFt8qDV53gvI1onXRePGyS2yyb9MU mKOc4f7g8HXMLLgvDfeNw0QcAKQLbmCH+vDJTts+wOVXQjjuB4Ddj3/x053P3OyQ cbRDRW1Q89MIHrMyNpBW0zCtlmYEHb0SsPk64GcZd6ouwDgXzCwjneaBksdgoIBH YoGVswgBUg13b/1ZxVwEyDBM2jVRcgL3KRm5ioIxnq6O+xETJoaJoK/KjzAycr+1 iPN0m9prhDvBe+de+U+vj1pBNnWO3IuaoKZMjuHBCpDzzB7QlmgQylADHS8h4Wk6 A7Awniw3MyWO0PGjOuPUdhR21Ss2Md2dJewswC8XfhryC7NPTVvQ9ilvUDdwx3Lc uYpoX1aUXgq+IKX+elMim2G09knfmkdjKHyRW+b2VylQdN9g2P18zYnGlPrnxRdO H2HpQxZKUs9bV4i7ccgE4ZAp1jL8oJhz07HT783TEakdYnXBebpi6hmb90qcaK3y HK8xVmi056siQpljQkJp3lpY4JHLNALK6AIfURmWsMxHC5IiYk5qJzX12dKfu8Gm L8jOf2c69IWPRlxIJ6ah6YZojKY6vwDY2s6AOc3R5dvY56dk9J0JYdLvaOLPrAgt WqaPqEclWymAB7X6TR7Fmn3VkIH3j6ze7sgEw+sEDO7si7Opv84o+OpofiX3UPzn no3QcnCzL6zKBfMyjtKI/64ynRaV6H1i8TdlRBtfmtx0DxUjJSsqrYlaBGYjwkJt q2c7pwZAYzv6EsjowAC6knYQG2FhFK3S+Ye0w3bxCWZArTfzU2/fgVpzvJFRvJxp kiqD45l1vy49xY7vTovIVQbSyI/83sUUmE3QO94Jn6QWSfF41cmO2lmOXOKpD+aj ne77fFjxf+4Jr3zRKVkyFVPtu+1XV870tkgplz8/PyGFMiXW40s3AijOxZTbp2gd hS5rUMbWDcd+ZqnOVho6HW6uQh5QKTMxklTpMAyOe2QORkWg0WxccISqk6uAqYXN t7peb7eC/cVH39afX+2VhRmwqobgbUqbze4qOr8nxe1LB2FDVLta61KajQKd08tB 6NunCBsvuKbz/anb0n3eXFDF+YeHfIluNcAqyMjKHwiwbMhJAxaodK5RjnkfRuW7 0MClg4oEuDwkuSmWmG/EuZ+v6bzek2H41OHUwW4pr/tj8Yj9qi1i7jxuzbuIGMbX lL8JZwv8EwDQ2K5n5JWNk9NS7DMCVkwqJ+iVwZ/UY33LPvRC7RliCbyt5tvgMuaT QZm43kjm/xy1IAyEcdM5D+CMiV/NZ6fvz9e7mjWklTExohhRtCZJPYso1UUAAvTJ qiNiA75zQxpx7GUyEDYStaFKTL+/tEF4Vvh/7OMWM2Ku5cDVWG73N73oClJ12cy+ min4OeUv09i9068/zfeDEY6Y+MSuvVMt3un36YSjYhq/82TjYhke/pDFsVIX4dGl cD+MLvsag7GqUoEL7ioLqqWoIDG7vpO+OLA+vvfna3pu0c00WwY/S0rfuC807i1f KwSzBPkq0k7ODps3F740eJobHHfpBarc9lHbBN34Gs+Mi+8U1OBpl07HAwTQE6xh Pjm7oWZKUyfu0Rp+VTb/aFbz/nQKH2S6nS/D+rGr3wa9r6cKatNzBpY1wBbuC86x B71hID7Y+J0xePP5Lsw7VOMWhzs2ZTkmkzzK5RnFEd9+SPH858mbnS7q7coqcNsP XFQhfV3YI3WLRRp1FxQgxvjlQOUOEcuZ6PeRzXVKjgesSnWN6PL9dMJGQ3/d3rz0 cjvY0QhiGVUEVFWDWOvb1Beqxr1qTTMjzrwkab65NJKMiRshJVu6gX4asWxyG/XW fixp/LjruOjWenlzQ3VkEy5YStGlyME4cKojv8mLRwyXGxvBrfvfSvm0yzPpew4l TS88f/CmtM2RWuFQg5KZMVUpB0x1uSa/WBUAOON0YSP5vGoEhgm9zJj3XE6952sy ewJU56k2lcug7Zik1JV50VKYb8bWJDzA9HvjhrWeXXz1uN76xgnZ+dfAUAUcc+Yz 56iwjIrVvkq76l5HAIicN+9cgo9xHsN7NvnJTz1vqShYbZ8Zca1eL65qr8S2iKmR wGfWfbZkBvfNLzKnw+5lHs1eOBKtFd7/4+q8tVtndij8QCyYU8mcg0Qxdsw5Zz79 r3NvJReuvCxTwwGwPwCD8du60lfvXHZr9H3KPVW3cDW/+jDjEq5lT/U8cf+aE0dD 5qutPLWEcfxaYjq7bTl2Ci9Py/AmPZSN7/FM2lNDWQcCsLWecI8HvnG9XP3G+20Z Q4twauxXnG8fiZs6K7X5h6TzfsfdfQzyl7nbl/eu+Tkc1ZFlbxFMat+B1NoLbI79 cwyiuOkOPzbBxE4CTEaMz8ciXP4lgr4mcwqXd8NQZKnyme8+s7bS7N0rGNgde+ZW Xc6/hw2ApllwURZCv9W3FL9kzRTgWmPkbkjlOg5CRcPPSYoZD3ZcgNE6gQ9ZN6Tp USc98M81VrDGY2WxatAzfFlE7/chOm2l1pL32zHAy27oEECptvGmuXjFwugfQskB TbHhSJVJyu/5AOiDNiPMAkynCLyJGqqUAdvYwzoTAib4eqXWlnJmRlYIElRuaqK6 c9zUQfa4UBSZ+ZuKkFt2TQTmHqKIQLRVztsv2AdVF3UKmT4+kUugTamXHGC6WaDV xxn3d/hFBGsWRtUDfru8XHVKpaVdraeRJaIfR8kRKBbXZRCKY2wVxwUetXyQh8OJ kzvwUkDoJKGxD7IePBP7rdXNcffqCLuovrEX6zp89M2OES8eRlPwSyQOBA9q/tWC uU0+OfbaxjOGmcJkRrp81hn77fKCeRu+B5S7DQXLwhbMkOAEbtZDU7cRfYj8eMd8 G+rJBrbKHDXlE/gQ8IdYbj2r9PYviI2zVMOSM/W+JVcvoh8+svlRvgBsolxMcyv2 6mw6xO4NV12rBh4XfLgSeLXPWnch5P7WA3C+yJ0Xzm2kUSJSKswJVFCoe5IF61Je imoQl7hYVkRaiCydYw6YKFOPnmz7oUCH/LtpdxX6hw6TTmlW3LCf2BWpGzvfFrIp z9vZ8TrPR66MjifT7Htoufd7OdRGvM0ZxYPktwEwHEWFWSegoiA+vd/eNrM1OI8X aUi7Or11tTyYu3TG8nyofGnG+8TBRWzNC7LmR7R/LaBPS87OP92bfmIfQCAfMG3b ps8VrM/wQ/HBwOcIsvIYhqWLt2zQ9uhWF5x30Rnc7f6q7WqLTEo+WGPmkQg/wPSV nLyRaiGKIe27WnZBDliv9uGSwRzEuOvnYZgOOjYpqpQp++2KuPQ4ArZBlbxtMTzn dvX2Pr7BbB02GopV7milBEjlF2nJO/t5izOO5hR6aXF3Cv/atX6hAi1KpqbWF354 0tBEGl1Sn8d9A2rAfTnH8MsDAhO0Ob4eJ6CVk7i1DNECzQiVne7E32MQqUJ6fRcR Mw19aFFBexx6aw+mdLm6yG1FECI0qctBWVvyXGUSKKXU8OVCqG7z8g7l9yBQNu1v MdxtvGNkuXlVBPLJjVOeSZd9XmP3/RXffYrEP5IO+tJhJmeyAR0vXYwXGQDWXxf0 OTJXfpsqJzCeczYfLJ8PRQp7mPz0GEWsWVXbDIhq+w2YnXRkHqQY91KbImZLdd/+ Zg/mKQeFkjI4xt52koSBAVuaAQaklxSl1YDc43R9eX3uSgvp8zmbPYHeVNKSRLCn P/af+zePUWlArKlnNtnNQUk2Jn+iF25ICVInVQT1pKYeaYSqvqB0tgY7X3JAPwc5 RN8VbX9dkHgR4zzKusqx72itY/etf/Fh/3TDUoWyldV9vWAZdky2wDn3c60a/FbQ oh7Ex8z78rdW58T3Lq6EjEMbG+QlvRtSpQb30jf9+2Uh13L33107dsx+4HT0jUqc Ncc5wepT4OBc/xuEwXz17Iu8TarSez+3KcNYC0tuLlSAiJqVQKrLQhWETxyHdEBG lh4IBMo0t0ezZWD4pTp9Iuee4TpCDyJBtRSrcFNcUwLjVrlqhl0nQ0Tx/QQWVgrE bKnG+hGlwnXjF3LeXPi7ZiE5x0hSbaofKvrMq8c5ueVXeIth9RqHYqg9wr1pDPNV 3t1PB/v62snHwkZ1XD16M78cAAfl5gEAtghEUMg5kpDj6VoeRfkyT/w7xSNFeOdQ GDC982By/x2JWirVN8fv0/+bPPKbinBUGEZWOdND+CusEYYRekzCnP1IvyJy9r+x /UlY/KgTg7Vu2Ny+K0k56SJJKNmYf+Yg92TN0bUmdP0J/KsAJ9r0MEhUR+n1uqjC ctbMWPeqDCtKdoNM6IC8UjUnCK5SFZP5N+vOrpi5AVWzS9MAZoO+777DQiBtesex 6djSiRlTNrj8bNVKbeSQB+QQvnvsdhf6JVy/BzQWMREQSTx4MSX3e0Y2Kff9T6Kz Tn0ZZLeeSjA6z40ViBk3+WQHxaeWAqahX1Yhs/nvoWM5CnSKcVjcI+RLET9ibvNp 2n4gstW8DQXi9INMjPuogQVJyNzdo1t+xezcNLoSzddvBvnyYa4OghcEO6M9+oBS 9e7S9Sw/c4Rci9nkt2fPLU3goEBb+GLRwnNKkeTMKtuUQb8RPcqNO68peItthyps Of3GTwkkBhmvhfUJ/ESzdW7o4RM8JpEHENIPOUoz/dHO8V02fmXoCBEV8NQxNfSa H31DuKFUAPX1DQnCPBFe6p9ilt2hbVsPuAWmi67PYRFk9qoei0OOXxAbBg9U1iY4 53z0mXR2kbc8CtDZ7BU9aI+wOskSmUQPpGF/30j8ZkGdFUjZJAJuJsZfrdHFBlpY SaFeG0eoyHagGEXyoYsoPlWuGCv5xiygt/a+hs/ECeN3qTg/b5TqY6/fh/zNBXWH tWjFS/vGDTzigrooebvBoSmxW7jb0YN+ce8WFzMxhljuM86aqZVQ7NgJuPL7Yv7u s5xodRDRaouogcB5j4RQ+X1b6P4Vj4TJuPjz0aD3jHnh2i/EYTbdV0479NZN7SbG 4p+SpMqUgwNN5HZjnZMBfnd/UnGoBvX1KmSlcs5bFOfWBuIK3t5gzEROilzB/FJs JmfO3zKubfGOBXB1doVlh6v++ynruH+HugUi+KsRWjl5kGr0pM4+mMmoTypyAhWU Up5HOED7lVRBMl5iCpUOTWWtca2uSBaSX2sh5ZSPgiGdIeVB/DZfSmzmAVAxBjq3 pwmvGzcVbvT7NW3ZNvP8cfK2vkOwWMES31TRczNBjNcyUaSuR3A2cFSygr0mxHFx VLw9BrylnkW1+IVXiOWjOk4Juk2i1+Ew9UK4U46F7yY26DVNKHufalzuBGhPFiLC HgMM+ZGcwQmJT5H87aU6LOvLSHZJtF5E6w93cS0ZErUyxRxQru7KqMGkvBOF9Gdn OnlwORtOybrMZxcFSsU/V0s46xBeQ2ZzOT5zSNYxzIVnjG8dGTAW73mQRODRwB1k fbBrcCORgOZoZxcIzU1Gql8XFAgeP5zV6sSWC4wUHO6nfWkjf5OrWRt+sGvVyj2l WHgPQhr+0HCUTKpQQ8CXT7LIb18QXIxGq3iv5i692XJ1ZbyKIKQgT2o6rcUic1XD nEv2BUblVgQ2uj1jHQfXO/ukrUX9uiDbkEYp4K/7k6eRuIl7oWR5BLd0Jp+3jlAt 0lvVPp+r7D6KhTQivHxFXgryVJo4z58BwRt7BAeCZrTq9dtsFwWravbwmDjOCs9M skCf3F6Lspe+ToFQszSzXpO6ed99nUzKnxbYHZgC+Lsi+MixHEuCdsnKcxrTljOF rLiG94cn4G3hPiZEsNnOObHbRBuYiO9dc19/BtBJMOww/Her2/dLW/KcNz9yoyzx ttcfc07QxBVfcymkJWiPnJVWgYKlj/r4d+1yX178tU2Bu5dL/DfAjU8vyqASjH+r HCe7ygmKLwF20NXwjtKuiXYIyj22Ph+H3GHKpb76LcB/PS0EujEb9Q/YVB9+P3NO bLnYC62XqmkfNPWc/kv2K4eUYkQBs4LhTtPNSvHcbAaCBPKrabUMhwaT/CBPRZsr 1UcYTVgyfsfmYlAAvw19VjxaGn88kKzfsLixJ90uxKIRw0RnAfxnn6my4yM+hTlE GMMFde+Lu9O7pd6Xxs17h4CBOXUQB62Ii85Xb1jl81Xx2Y1gvDb/pqML4YteEtd8 49J7iFOOM7G4sFfrtB+fL/g3mPfm2CMfWueiqITU9yu+oPiJEt2TwdefAxrzJGUc 9qWhm85Y25jOuMte1rvIQ7X3I4DMCAOCSm5+SWiQtFzuHM8pCKfFkAJuJ+OvbWbT +/nQZQeILtt6ZfnvahvHP2IJJw4Yut6Lc2cSH2o4iBBS14Xl/RJHx1iboeteR/a7 z3xlbQnygv41XVrVS8gy+izRhyJez1dJ+daHjTkFBe35AVvMVZUXoTaPxea7WL2e Pvito8NbeKWhy+tfMWRSXyh04j6T4skdUJKoKpFjS6KyUJEydcTJgaS58Jd25ErD jAlWW7+NDFtU9peRdnTuZllZ+Kx8fS57DzMOIj9vvWmbzI9aiPTa8+h5XfjqVDjC cHB3UciC379agxL4jq6yPV5HWN6erxjWFevrVXmvkUqrzUVrt0+3CtubOlNvQpKD 4b4h6gMPSYu/nV9N+9V1HxGeA2woICQlwxV4dBfZtIis6qzxHbRTiZ4MViaeOgbT c+TdDCs98D3z0Qzj/DPewWHFW/FDiLQQjxEgu3P2J/7qVwp4aDOg7Tnp3h/8yV1e xgrVeXhHY8aXKDiJybTJbxGL8UAEOwlVETWW91bfagLThFULKYU7NFCZ9SlQWNKY v/NzNJz35pybc0x4hqYO4mi/WXf68kdVfHPI6xnfcp+UnvBVGjI5T6SWRQiu0EE3 NVQDmZgSn1WtL+kyyLkLHg7i9X9C3WIDOX4lHVYz8YXjrlPyWaLqyidDUW087OjM Xg55JgV6OLQ0S4JCmp2y2Yn7tP828i8HSNVxfLb3NJvd8T4nQHZOG3KfZ6puhJvf 9QkhfTuMDEIWH4bcTx7mkWjS4kk7exz5pbrXYzf19P7QUbHUoLmka2iNglDy4sxi qohTVL2ajs6AR8gXBUIxRxQ8H1mb2aEOq+V3zagCevEhnwptTzV8u9IG9KU/ov/q xoupM4KEqTHxr81HkiGwPd3sOyIOlUfZAZB4hb+GzvrscdYfjacXszsreGJMleK9 joB54cO4iKtnCOxj9KBOb1VPa1qRtZi0tW11Onh/flMRyHvSlVmFCcEDGNEMas55 NI31sW8wFvAbMd8CHwUM0pHfF9g3oX8ptV9FulBNlqLEv/ssHnW58fwkUDc28TYx h14pW0FMTCIfYUjRWLg9xp8B2kBYgFNG5niTL2d8VGKAgfr8Td/MEAJUJtImL9qL XnWT3uXZ+jDtEZg9TSqurucdMww9y+DVm5Lr2OYgFz0iSbS8++ufZrYoP+I9fFpC A5sLmp8ijhpEaQVIMmVVekKhi7CWH7Fa89mCqQnnXInkZXwW2XHd7LdU9GqzigA6 hmhmKCKClgrNsA2Y0I9IPKVxQwwn0vAYGt60XGZF0bc9kVh1J7Ku+mLA330mkn4L YzP2jmsi+zp+OuuwPaBg2ZbWnO/zEb+Q5eocYVxaYC5xdwjScGTmnEeE6XX95jUm iZGd4d+gXYY3d2nWG/UGzUIb4nN1n7qzk7Jzkd4n30HAEpxEb2lJFzraLYp4COVv pUJx6HYwiKALqRtGRk2v27jgPFz5xJXOXKpwZdPcX5oZqrcbXNB7hQTakyA206E2 EH5TEbIAt3VThx+i4mzs4PF+dSyf9bzn2tn7MiLE5Q8qu+0LlBfiAyQEVTFspDl0 3wmC+qsce3lXDJNruDEN+GIYAmwlnQ2HnjIzTu/05dGFknIPTSUvE6CIdOpi82bv wnvtX1jzmw29V/e1GdPjG/33X4ekAaY4Asa5RCC9ISjhY/SfwrO/7l9tOCO9NhL8 RLAgHb0nofn0m8J/5QjnAs3Xma3ACQDzAh3WeIxh8DnVlqA9JFh4JKimkLvORCOa 5UWaWgAO3b+jA3bxu2bvYdyx9ewMNLXHu+TJ8P0OXRGkLdXiX5zvKU3sukS20Sb4 luDG5Udlri8NEF+kVKK/7EQdL4KNaVgjSng6LzuvuNuy4rjc4df0JQl3V3jwZgZ5 3yiXmWNiWoJDoo6+ZTneL38jen4H3hNg/qsozjCpi6rq5MWEBxthSehWZsWiW6Qb MwVhQPp9+r0V3U3F7bpLY4IQ/srQhjyfoeKA8YVpnGAkuf06K6TpVPZ9DmVJQYN2 6Y0wHuz+bihWGjRbm0bYi1Ec4+k/MrQt6yF4Y43T0ZPQtJmbjKHDVh9ieAa7rmjc lpa6HrzGebJkHXHjvZj0BxZPWRgmufhVQa8mWXFp4AcUBrttDrEbaJbilHDK/Ko2 JqMLZQ4oUCe63Ln8JodAIptvhigSahWsP4klfoSvpCKU1d0/fgPJEZTivDNGoHmm ZCUN4IOuDIIvmfbCpKNAC65N50sC3mVa7Ezw2zTJixkEMtD/xkW1Xz1xNJPJoI0o tHQqGMVLdlaq9MoOPjpI7PIEVZqUj1H5pBvWsd6/BeaoPNHCzM8ZzC76SpDMJ615 RA6uKUZKHRmrHxRDgyKRnr57V+fn2vsaC09ODO/1gfmb11gXhFAM56PZcjQxbjQ7 10rS3W5Fhk8hULmOpRLNmo0nDcZ1lZQmXw/oO4QTrzcI3n/mhnIUeqU05K61nL1D uhm/NHbn3D11MEwYJLAzUd94EEKv7SN8deDbLGiwcmf3yQgR+g1148yPc4Yu91Bf Sx7Iz/oKWS7j1Rejt5+6WZBUyq1IhlDpqpbA8eGvHExCwD2rl1X8qSJS12WQY8ky 8BnVrcNUeoKee9m/t84KuUF6i0H5MlWm6htJFz/wWLEJFYzDiDtzTr9/A4ooWWg6 SyCcy5MIC5pz4N0svHGZEtS4g3ZZZALAldAe+EYxVcIjLq93+mDM6ko/0+3+kVRt jbXcevmqSgBzY63NfX3D+nu1TTPuWz5y5BtEU6mmhUm2h8urTbNSnk8nOWz4Zw7y SjBIoJuAgr9VrYmHkKaM/OvKdMCscqEC9Ao6dI+CDsMEmIWfN0ZawGIQVI9lT3T+ M2t17fQZYPgPCxRfLSVS2AZXdA2to0v5zK2NkwasqpfN4yEAH86OnSZWn3DQJjbP Ava3zQ7qUWnJi+ppG+yliovtfhy59Rd/fTwyP7iiWKCNajsCMyGku6oiSq8lqqpU MOv6Nf9OT7/zNDnLM1x1LB8bnB26Q2ttbDaOqTQjq4jMzUAu45HI/LSOWXAFZ77l l4iJx/vgxD8NM13Smo4TUaOx0yN81P28T4nZMHMt2Z/KlTx9jlEXjibioEozbqxX eDZQJS93uKrmr9eYrDeGM2JxutjwDjyeY9+zSefw3FWXhVnhCp58qhO9iYpGvWPW MjDpNyIqcki/9ST/jZvYnmKJJE/XtrDPCE8viglSmhew1CwsCj+ueEPvVhavEj98 FiFbmhgFKKb889OHWv3raS+ckvJwLN99w7u1P0IadjsmAgrcHeHeruBcF+qqEenE HKi8tnxNPFReX1NlyHd357/VauJ5sm8QkuzRjOzRGh/uiUM9Vzg35aFB7eOOIKVE Mdw+uLO9yLSk1Texb8ns7uGI+EVEx8cQSM8Fssp5tLRj8Fo4MdRa3/2gd72hq1Fk KZ1T44d6VpxdQfb1uvpGhbIdw+3h19NqXl6J3lewGhlJR+T6bt6NV/OGazJiXG84 sZyZ8RKpz/sgOtuwFO/NhBElgFZGwa/rt8Dce3DXcGzujx+bDNR3xM8mIk2fV8t+ ffygvlvtqzJkiY1MiktHzFR3CI+ajNxns6GK37cZZPpWGhMLCxZuBs0HuZ5gO5zr JDIlB7IcPektcem8o8BlCJOgQrOBwCB212DkA8W/ayZlCEJfl9XeycbvFCeFgNgC 0ZctHdUKY9Wasmj+Ku8QK6xtmZHdIe+xaUhxbzOfKn4JRdUA99JLeqm/mjPnxhtC 7OnOsTd9yX3l1IfYhxIqbfvjqlcSEKrxfDXAzTXKR6Pr69cFhWTr8tgIo6P0BTzC ELuMaAYertfEXLRErym7aYqCTOJxjWdLWxQj8gB6WASya+a/19mK04CD3vF1ie8X GM499Pbf6imvgJ/RZT9yK6aqX6267mki+QGn6xKS5IoJmhdLUtzv+U0UL4MkGFw1 tzU9IT7kBGgCySJbUD5JT3j+W1AdGC5h+Niaig+lzcIKH53ibbCL5/g9OoIGJ0Kc 28HXHZE56fo1Q4TuvpuLafYv1465drCcoa2y+qH1Bc2f0Xi6xqC8rworwz8T54d3 tZJ9j4SEMJmpJwb1SHj/pk0MbGE+0ZMdMkLLEwAUWkNsWlvinwZY7uuRqvvc+d9W 69AS6SXrpCZoSw1BM9cC211SyauXMxVY+p0lmmguDcB+iMt5z80o+SoKiIu/bVwX /1b4G66hI1XBNDT8+iyi/ehH+DV1JoRozFxChZSCnCDkMuFvNTynlRRP6KmtZ8/h rgCB3zMVeUGnQIKCL5ivsbuibem23/nMsY+Rw0iN+pGmkuLasPgQNxMxVO/nGs3P VmeD+GTLL+4w8CbPkBP6Mc4DN3SI3uGezzK5wgGPUCAfe/+NIHveaUonAVA3F+XE UAR5gflXc7W/atuT7Xgndagi87dwJumSxBeE594+Wyx05YLYmeYTax55nRA8WXh7 p4W7iLEPyuiphL8uKIWMgRxEcoqmLU6jL7I/1Zfq53cQyhMsDLRmeLyKTm82NTbF rtMtNoT6fT3wC2Od49c2i5yeA77SGxiuCDSJ2/cZbVymTh/tWkra3/bLibKviSQm cxHr0bbEl/fc2Ufl+DOTv/vM4ktYX28K+oppNHYGTq70cqdoY5reBkyun0rP0CCs p4/RR5BZBEjx/a7jLrdm4V/db+m7DUmdqxLpRuXlk+PF3TNGQbHVcNTUMO0mG1A9 2RKZT0TWqD51WgOhiMK+/+8iqCX7BbHIGdHDF1TUz/0E6Qqe6zq1/ARRfQfQaxNV 9/2Vs0A76G+rJ+0P+t6THEtSgySNR/yD1alza+/WJSTRktPnw+4fa1HofkC1OMP5 rd6kpzJlfIeEC74WEbD5RPTGLeZR9wU/w69AfvJDeA8TPvkpSdQciAvIXKLrIwxU 73+Xf9iyWR1X6oUpg61P7/GdaNlLUUmGMsGI+j1AW1Dc9TJtTKvAKMK3yoIRo3BH ynlPF8iGksTvWCnKCAVLveseH4fIwCKSWx25hlqXfrPuDI6XBz6V0kIhO9rNwE3t uTXYWJEcA0DLC3+j4udORmVJX+ykR5R30R6MVuRQmdDg/fEa6V5oNPbeL2hFPJ9G cZ4dULUDVHamI8HCpgYIDdSHIpoEYgyk1XxhkJUKa8Xlut/Mnk2Pqr6zb1sUT9qh zS983Lv/ilYrOxiJJq+dMKk+8Brw4kCdShq6RGkjfespuG3o/msBsUi8rkGLkFwQ TjbRj/euMC4g2O5MZVMXL0bpryYejMtXdl/kx+Kb14F8sedATD7+M4a3/QC+sFVP tzsn2FFRWTsa5tzPgUm7uGJExxR4QlYgTy2cNe5LOyQ1Tw369nnqipt/04Q5Bl0h JRby6jcz+gAFPp8Ic4E9Ddj0C7gxHlSq74scjy80ZqktQrwUzzoYTjVN2PuvQDZ4 7Tr0lSKNAKyNEaYjb/StAOXEZZzadkvQBBYIGUj2GlulEYLkosai+RuvDfVA5N8C MzV1YOhrgPK2YMO+5hsiCNIDQp3Tj5dLkV6OuqAn9WGOzy+KDlt3GUP34FQmqEFq +d0aBZpO9Ex87QRYNWQmhYaqu4zePuoCcN/H3Z7C0zpr6T+6EsJLV9qd39uuLDeP qCT2bxAmz/Jm6RL0RE40X0VZHRTzngUtOhJcdHdUkm9Jsnfz4XFkfn15PmTRQsht yuqsqvpzdOTMvFzQkV4bvdvbwBg96td18DZ4Rbipgs8RxCDTqiUI5huAoTA8pJpb Vxrs1Y9IEr/FhePC07otdbroTQX0QDAS/125SCc2onQDKarOXvgWgpq4w1+eYHxJ npNBRL1sMKu34zduUglcHAX5BcPCQMqF7sEs/n7D9JTrYuvRp5aBL3jBEGyxymIK H+DhMbD9GAfJg6+385unBV85k7P09SR6X5SB9sTNxybyenLjhLfowJxHaSiwzykD MIiGBrkDEigf6Hs+AVSifzdtUefzcWBkeRAXBoJq3qYs+HUUoGDngQgAh9IAdFF9 9bB1BHZ2VP2iA8iQUMTuYSnwi9XT+ALHIB3sI9bnbl7fLw618eEpSKVwvgsjuPmq 324Logf3XQsi8sMCg4eraPW06MHfuCnr+10oBLljtLICZvkBFg7MWItwdV19DdhR zJurS1Bw+SyIM9C+iltnMK91ZOsImH6dI3K5QcfeAaw+BNS/vdwSHMzkaJfbM0ZY 0XQJvO8DCbXAksEbvOBpq+isugGZLVDb/W3ntB5Pzke3NFWctPYATANKoR8z7fZ6 +CjcVyny6EK+FFvtajinQjIIk8qppCKPoX2SftvTRaqitFZ7NspxuC4Tgvt0LKxb EF4YTtBz/zUmvwQhEiS1GP2eWvkA1z4Tk3BKyCr87zQ7bBseCsBuGUThFhm6PHmD JydfMhziuWJIH0D/OowWO3HYn7N1Tc9rj+KugDzIJlbjFxG/2/1piykNVnigYlYX /CUpchfVOqQZY+o6yBFsRpvy+SvLHMk2jehrtk2EOhSXGfyf0XgoXYvIV+xrrGC3 0HQ+cpF2KxRS0dk/mdo0nShE0HhJPQ6YI05DGhSNUa7kyqGs029xwdO9Nv0oH4wk 5Ff6MSll0p/KubJm+sjsCN+8P2MbwSbixzekI4PsmV5QrxKr8SnH5HdrJBnJJfxz sKQ9bTaWVcaMWk/xamefmrYXvoLdY4BRfNkWBTxxnD2vzfzuOeSTKpRT/t5C3sRL 1EpNt91+lF3ijqWLaK0RaRodbptzB0dhH7J4KbMUhILvWds2yttLl1PBZE2k32p1 F2vwBabbTGd6PpRz2H7IB6rqVVL1gn0D1uvq9nUIFqgtPfMj1sH7EJkKftGbsGLc b60O8ydUzdMK6lkGebQgbj/hoc8RuyZY7vQ+wPJFou03BKKLlaJFUo1u/HpZQDkg mvfnZgOpa7sqa51rCxp3JhvMu2UaRG8naRjvBcWaKqm8h5RVvG3IJkuAlj7LXs94 4oBz1f4ennLnAXyzNfPWhEdk9ocxQHed4QM8qjZ3OeyyesHMG3OHIgXvBcj4vtfv 8/XISwwiXtD+fJjx6P2VabQ7hN6F8EfhOJEy2xX1SaLPQaaUBpWet1eR8hhhKne1 nDZQhdIu+QK13xS+Ep7atKhVK4qcwrXOc4FUVgOvslbHwW8fo1l3GbeO1qx0Fk/f YrMC3tdSuEgHb9b9cz+6iV/EnpyMkcADR849dX09diWvRQY9wSAdtPpuK4+jn3B1 +2Mq9aW/5RVHQ7H8qu1fQ38fZBQDKa/JCIKWZYAppq1OSmAjmmWc97sZxU2XkWTe joktNUl7icgWT7yCi5Rmdn9uBpXPFv43+2GsqT5mHtOTkMgivl5pXXqcW9MMHapa B7Igk0nYtwufy++a/fKbE6j2HxfEJ/BXOXOJgrQv7loZ0jNQiwTfvjbnvn5cPd17 oGsg7Ea+oYPAWBu1TbBPVyWXHpf6pTqi62kyKPy81GdBkdU0/i49Jz1bkmpdo+Xo mEuDYW2c8CGYJP0X5ryUUlYOcCWKFn7NKZ7bLPkUVJIm94jHKUKnL8Lf772xj2kd I5XxvqFBDi6jYmsK61DcfgViw/bfMHERy283oSbQ7tetQJgp5S80QQNWTg9xYP25 s/DEHnC0+b5DvpHN81KISMNPaT2kbjT3Y+mW7bf3AGvJ6nCrqkTjhwXIvcr6i0gi XONAYLj9QZoFxPo+2h2O1NB6trQoCRSXj5zB2zttf5Mk8IlfuVXEZE7ouuOOOf/G Yz8+pJ3RHoDP1MNXSuvLXu0KC/MXqg6p8URviP3ki67K79dEy21Sn0tWnYtN2qWX Wje2G7VVlcn+7J5G5VHkCx02w5vls0cxJb4ITPW67tEWX+gv7vizEPXt/IWwwYCf c58hEc9PU3UcMzDxD0nO56aMndetd/gEypxEEOudvlUpr0b5e5+woZoKs8Zn9N2k 2T9XLwOCLKUkbHGdFD2fDBH0AoQQ3w34EclqfwGbOKrRRtekKbV+/Zn41RRsim5t 9amBXb/Xtr1GVa7DmauMQIAHALF24yYvFPNrE9zd1oxEUSixlHs/gfmbJkTe1CK/ 4NVlLQR7WLGOGym/MCoG5gRojGOVHKLF++yFRC/2gKMj7VI5anah2CfPRv68gFZf z+37lxGNnc/AyhnGjI1HZzfv1IVC1pRTvzrTTQjGit2XxNaB3E/8h5Qm863uv4x+ fFC46r9qM0kPXIsVSuYGb3aHNXcHymJplBN8UAWMpecBn0iAYSVRKEwzG+G11dF/ oYKQLEZuy6GdzUJRXKKukzGSgsrXv5Q0FiKgq56onqy34DDTZQn2wXCDMjYSVDhV NH5BzAtf8v4pkL2JERDDNbV2ZLf92tB03AKolBveYNJtGDZm2bqnyyOF2KrgclRB ULvk/Bb+nM1OZcEF8EFLbHaeqQ3vm5L9Bh6NEgOJlHkfnMFVVyFOtcKrFT/uCIHV CKdNxht/ZsYJWy8aXCB3kAArS/nhEJar1sgYRiYyviQ1Z/vbzHPMB1kp41oR0s6+ ld9eADtBUMO/ifKXr/TPVcjUlfYggVkzMcKcsDnPKjQ9a+I7MkDozPBhQ3uYjY5+ VZP4Evr2A6jdxfyqbWxfj0NczGkb2emuHwrs9ARfh3iJoblrMCFAnTBen0lCy1Ni wnkYQkZC2MNwmpn4M1I2NucqDFbBcqrasZWJbRXVTKwLhq7RUPx0DbSvcBTJE9IV UrapAcMz0Diyl8gTmRP/Sd+gPZd69T6FN3qItTkRF3G89RVCGTv1a+zJAXPlaPge GEAsGg/+6Cd+Q+eXwfQzSH+pDoGKZp1ZDovet5W3WvlBHTjbp7qiP49lfxUu86lJ LFbLbJF3N7W3x0thyqAaL8e269cCYmjaJfU0pYgyp/rzZiWtYvq+PVzgM10xvFra IoSLHcpnR9+V9+EI/YXyU9SM/0zwd2sofrK+HEifvMIyifoNdTHHHdU694YlkaLd 9K9jOjWH44qc2CFaLjEx2y/Py9Qr+zqp39z2Yio9BO6p3ea0K/QgeNHOGNQ0/RX0 Z4d+VzDip5UAIGWC05AdvKqcF22lHtPJKu63wt8N0wb7rPEw5JW2rfRd6Qxq5R7c dgu43qRGpdWdh5eopqNSHQrWAqhPvrYYv3S7gv+02eVgeV4MDweT8wLUW/h6kHfB HPLplvuZAImAafdeA7cUCML6gV+mwEL6XT1VbTK38Qv8FAPcnMLL/uJJa9GNtkpU u3x94y0Di9ZNChW7zcW4vzB6Dui4HW/Yg3aJ8dGB9C7uN0kSfN/8oJA5s5kcRqR6 gXJdfGQuVw4P8d38IPyCEwDMr+irSI2vUJDG9aXrZPhhe5+qftesWbuNhZfExpuH GwfqzTXWNlrZJw6KVGByZ5vtA/34qr7pRVaE0b5l4pCupQ43Uv9nxA/MfBE+aLUv 8/PLAWqxjs+RoRKrCGZCEi9lBDfs0tYmyllkzDHP40SPq7jew4fD9me+RsVr2znv vCRA78QE4PFLAtMoHep+dxIIN++9JFu/Z1+p9Ubadg4k0wwD82DwfAte9i/VqfaC qSJ5X67q85DDvlMEOR8vKD5gNOif+GttOhjS/LHpbI+UNb9QUZfB5uBXzMy1v93R 92ss3I9ddE26GPcqikd6te88e0Jdf0gPzh5nSz3nNNqX9135dGMc+EbqVLv+Xbz6 Z2uEcDQOb8DX5YOYwBE5JqDeiS+9vlyjRoYoJrZggyuNcfFizhpcfjE6d3kc9WVN c2R+XRDWACNiXPZDlgZGgOwW159uSiR6PIK6xwK7KirriE9ZpMHzaEllLM9jXD/4 W9kS4895dNn42Dq1b3jaBOYTXO1CfqAJmYIPGgOHaiCt9hFO5W0htYWUjOFm57J9 LV6LmkeMtF9ExE/NS4KV929ZUFCbtt4BjZpmykYmTa8L1h5QpH+3/ZJJYAUApVhV BZ/WJY0mNudUf7bGGwITH4uuVjrIDJnm3DWAw6KVFZ5P5DYdU5/KADbWZnuPLQe8 VZE7BB6gRptICui39L0s3uxNz4I9gwo+qA7A7T4SC4eRUeNFl/tOUeuTDOHsbIfr +p3zgCSR9y9dfDrcq36jU1J/+Jdnj4H7hZRqiHieXCBxh6zimZycGQCz9eCwceAW WJVdjmYlONWFLbltSu/S+c0gX3z5b0jlchuvdKdS2TDuj/wav2pymsSI4Plil65t sW5+t/UQRQctDODxG772XVW/+un3a95zPGc3bsXyQ9L6g/LOofLnbUKfEG5CnJy5 gafaMP+k1hzy41IcQW69AMaumH+3Nfw2Mih4CNAZdQ5Ckxl5rZhdM3oP6tiXWHx6 fn3U0vQl/jSueiGweS93VlbflXKr3rPEv5rWfJUEFoafzLo/e8bakO9dnioxFaAB kN8OItt3QftohK6qszQhgfkCaJfvVYwp8xf52zBDRDOCDOfAd2fVCMvEEG6VBZq3 YuVhklvzcfKdCIt3A05pG7j95Y23+xkoFbjQwi9/b7ns7a0v9o9NCLcKZ02cNqYY ThYApcz79S4r9wsG0FBT3Jgjr0jXJvzTL++HmqGJys3tFxHBKqLK8iQGZRi+gmCO +kZpXMqB9dPPfF6/OKmAOOy1M3z7MSjhaK61/XgNEt1bK/9pZlvh3k7FL9ntpNhk Y7F7RBJ8bWcBj2STWsbfW5Fhquj1ACNk90OpXcYmCvVZtxuwGr9FeZ/vB0a/8veD 7yi4Q1DARfyIgduaEqAiH+QVntI9Q4t+hDCZpcED5wr95PIdWV7K/3atai54KiW9 QT1sSKTZuqEMnf4NCke+wQjRyA1ct77MP/OKY993bO/kHr5lmTdIZuf/JEne36XU xO28thxInNp6GYzlLaGlQE4g+M4qy/iB6ciYdtWIzcFCCubzcuCEqHfpBrnfmrAA xdx5d6g/Vs04eqCEVC5IENsYSxXukTTVbwr8DkSbGAqyJvNm6aSLSFFcX5EBSH/l Qa4OWT2nFyAm+JeKpGHiaxXopCxrbw4cmZoaSuEhXh+eU23KvmndoEMUmXjFffOV 95skmeA2jXr+ZQ4ZLm0rAlh0OSxT/2mPHH+fJ7/CYeG3jO1D/BtLhtbJaNnmNHeO P5t1/rGAc0E+FRQapfJ18HoNEdl7B6Py/NgK95gqMCUNQwz5lzmPjHoYOYUoj4h2 HmpuTB1+4+ay+tEqSpwuijKj1IxQJd7VZlerF4jAPEWcCB47x0DJqeSme/fGNlC7 I7UK9p1FhL/n0TslltPxc3DjFdUSPQk5eu/AEDv6i3FPt7uBUpgLSajHLyi8uvir W57FOb7KdamBqfv9sAjpYiD18lw2jdsY++NNfj4Jb0Rf//AeBwuoNJ6Uek+qbZKm Vc/ABnisdb+2VY3d+T/jnslPy5INqo41/9QdfrOt2bvrUZRFuXRxElk3VjfMeV9C oVTecKfQJFBtj9XWiPjhL/DfamLVRnKmwxLHr5Zno7h7FqIa3siBRkndTo3zeTCO 4czzQornzIv1dRvV1DaP875/SXiyhxALdvk9HUFDzu3gmgYWXzgSBzNmGwLwkpBW zp6EZcm0slSbWFvrKzexT+NGoPLbNEksvH2VJ+98A0nZKtGmXpDOm3xFEV1+Ronb D7qmRcUU3ZGgcoli0ItUeLMub8o3hP7us7NhpTEtj3BN2bo9P72JmNdtAL0FOx53 ZaXlGQtdzMqFfwmbnMqnLp4gVgUrEcrY/AUxaiVNLmKc/f6Q7zU38Yc1IZSOWlRB q3xfHJ9jIIDbdRrIPnnk6GGWDTOWVEpHJK/ml4TvCJn05nSdcZUZDLjPzonqs7df 7VcqOqk/5Xuga/AjzHFtnFgYp/tuVCOOQexkXNuv2GNoHKvk1+s9tafKNxk22jfj OuA+TYaylhPz2gHRTZE38Qr3MurngHKH4+Hru4WMFv/9MHsZxBPeekGS0grCv+7s 0BE7tgbVE/pRGr6L/04uHr/ACoG0mYxBo4m1duiRHeDHPx+GAWkGyjdm2Wnb1IPc 4USpyq+b7VL+WZr3Cm27odOG1ROmcGsGcyPjEmC1aqlxMdO/bSkK51fjFFJqwPWC 2kezcMZ74bypD059cet2ky0gtg8dti8CP9jTvZKXeLwU+StQES77zbrPZnfzbP0W 3kXtZpody+dxb59bCN+U/la6yasb2q7IZTMv+QpFijBExNXw3j1B/fpzAy2nVHDW eYe6VjuPczjEGPWQtELC2Xeq9eGrlVrykUfLlsQSUxoJ1In7rZl20mbRiv22Job3 HtzdsVP2gKqT3H/K4SiOMM58M3Gftbdr9c78FWRA5zHBSnmFI2rhVHfvfHN81+I3 45KfS6wl6KD3X8Qdc4jLliJEgEFJ2zIKLIURcM96ZQoLMKflouQaMgGt8GK0mnsV /77N9gz3F3wIaJe5n3Mkxsi+DcyrkDJSRMGKQDYOEmgsyhp14kvGwVNwX9YOBqCo j5z9a+ivCnmXVOhnJn98omh7aU3ZnyXhYO0VyPws63zmmTlTyHNKQ0JgYUjKtCe+ eNpuk/7v19xt5gzu6B1Uzde+K8fivv8xwcmXgzvUGWDd+u9GxC+Yp9AyZWK5fRyW q7ta0CP75Tu/AcXXY1e3xciYcFYzlBzS1fzE7vpG3gJGSD62mJgly4QfHexq8OHH ASXvAKLOYMbqpf6yU5q/vTL7N16rRtDDdFhg0l/K8RisG7+LjtVmFZNCCKJiNgyn sutL6t3v6LU4tj3Z6J+z1exkYcBmxrTmvIPDLbgXzqN7SLvlC1oUVrAJxmyo4S5O pSZix+TzOOLwRW/8mL3+1DdBjrfaykqyqs6m2FaKg5qeMnkjwhCWKa68VAncZDSM bSyc6G7CWiZTeyZVxotggOa38mr2JmgqwoS6LvoVnbdb6HVpz+srsKUtW1Wu6t7I ZYV3gr412ZW7ckLuUPYmwt3L159zwkIuwCkLVbD7+AV4mMp8FSsE59tFFYgC/v9n /P6EYFGRzfPhYl6QQOgtylUTwX/qAfPFLoXY9nYIdknb6DxzW9hcnlSaKHKcxMy4 8wiH3NL3BVX1gKHNp/Nbx4JzDnet31xQS1PHZXQDX++FlVwU3vBPn9pmdGLkgMJB GKtZeD7hwndmytOaj/c3T1k+4PI2kGC/kmrkjSGOcIwuvzrTfxPI24R8NBxeyDLG 05W5JNHQ6ayynYqmLsgSfMso9r0SIDRnqvyb1/jahYSt8ONu6/0MeUn73AxvLhzv wnwvMrtLq7ZYDva6djQLdh9eRg1scoFLgaOI1z+TP05dDw0bb8/blzEii5Iyjgef WV/Cnkw+fss2hjeBhWOW282WEbzb818JpRfAZDf23w9LNHhXSzDLZsrAQHFKkzjS OSh6TxE+LCfqv1DBrZpkZV690PczcDZeEVwhwHv0lxZ+u1b3+UNdYDqqdN0RMw16 LjZv+iF0362nfvnCHpLAmkaL8IuHpifk2DKy8JokWpyBJfbf6QKOEr32jPoS3yJO CyU8e39g/eiMsL+FsZxAKte5WWjU/U43RnwOatthwvqN+zdEvedf22yHZ0e9Qt9A rSErqrqXDYUdQg8qyp+0DMMa7t+FFRT3hbwwmFnd8OixpRtAvq7r+NNNyC05zwJt OOZkzn7e8gZl3vcBk51HYVm7psDEsPjWUul6Jx3ZzQrtn90E9mmYaZD5Z0LzitXD Pu1loBtYdXWyGQFMYcRYK4MWPWyP+Oy+qATg541KSFg7jxwv+qp6DKtTymD9tqX4 gwUu+lbIS1UcgwQW1gacaY840RrvFZ7DmzUQeRmKV53C+eCvd/llEHzSr8L1cO33 yZy1HSCGCUVpAjtaxZ1rPGueqbsScaAOsx836MCCcRhsltoS+IT7f1xdt5bbQAz8 IBbMqSTFJOacOuYk5syvt1zqnhv73ZkSd4HBDBbAtl9C6iTwJrCm3P6pQa4hw8rQ GjNcGMMijiZImJXlJPRD4JVk/zVVjbsWPge2/Yw55MrDkdncxCbzRsLwL0EecGWu I3Nq7bi9ldUn6hu0lpVHN8Y/Nl+eSpWl+VSNXnWYhCalHBBMV3FQFEwf2M+vo/// xRNgAwIovLn13R75TCOryc7D5PPmRUqDwhlhASvOwLSNjhMrDxXwsQaI2OE5/31N p4Mhfx3TvZtdXOTfU2/48tYfsIZeChqgmvKNR6Qgh3P4/YaxqknfT1HoQL3zaEbu 3x6xlGvgbJK5wuVyeF0md0E+g/iiDwZ5sDQJuunp603fjtjdXwkQ8sQd0COG+Jox CZP2604WYda+ODipiN4+MC2GGk4HEQFXuLCoqzXg8S5wYc8rf4ydOIdi9+3hj50E psNZxZ8WckQDrx6eZ5hOqXsGQ/h4vkie467ZLHQxJycYKvV3e46CTpanmRaGfBEJ SyTWvinrn0btxxkmgBRK+fEQX8mUCd8UhVa6g71BfzuXjMigWfKHYIacznJd8UYZ Xn4cwUg8ZTV/K8oNiXrZSZFDjJW471J5cx1VBYoRfr2Ybgf/CHb6mi1myiTIHtez VpZWUiliv4T1w12/6ZsQ5A15CjxTSRanS9rYZ71NfWSq2KGAQvqnKSxBGV0I0mGx dnyjg43Lu94ODr3xjvklLsRqV8bUyUlauVpWHF/Yy8B8KS5DSqq914X+/YaxCMdd YcxRhq6//M+xcdQ2RE8b/uRpo2OUzg9f1Fw0+K8v6xsOv6u6ZF4SL0r+ByA4mtXV /6CywtDqbovUO0ezkXC7rrD+DNTMhVDR2KA8vdHj0suc9klpPwC8wsA2g6Qsmx8/ Iuc55uykMd7cTir+R7ldj0BhTSV+iYsx0suVOE4pvbaPdU9CWt5KZYq4WcNQk5Aq pZrvV9ed63cDqvWqeS/KqGl+qWW4p+MvcVFu4U3pOyNb4NjLNdK6yNLib/AtJzcc 5A/Thg63KC3wcqZUh+8prUNJqbxvJF2u+Pw12q91LfCQdOj+3nLAXZ0qsA1EpQZd 6d5zdosn3CxL86zvQIgD5IW3vvbGH9G3X5nbLL9H31etFdXX/YZWwHiiaMXxjUIp 0q1O+nkOwdjz+p37cBe+DB+0ybdwJnnMVSrtFK8SYX6714ZJmvGy9blezfbjpfU+ rMzjdGoqakfVZZS5/XIbaMtLbs087UJOsnqhhj7ZJ+1Y8W9eo3yWm0uiQNjegSZK Ys2pC8GyboTiXIggJiWV7cAMH8uvqp0KP6bhZLjyxSdUby4V+LUzkozEoVCyftF7 2PN1ySOSOXPjtjhgnyGE6CEw6bYGGeEerBENuq35AbMwYqImWMB+hVgijfvFE/ig vB39Jbod5uajEuFp+X7CI7ahrHUwjDpLhuUkHMHdDd3U/DTebXYM3f1rZ/pAsE9z DydoYeK8PAq/YQVSUZZ8Rbczh++B8lAJfIG+QeN3L2lLTxi8HtaQRR188guOfDfj emS9If/i4Kt9dkvGLlByQFaQrSPTkfHtfc60uJCAPosscVYONMf+ThQbMHP2z8y4 s+kfoVRVywlGUC7Rm7sTMBAJkrEIY8PFuvDIoyaYLo1J1uM7lXtlz94WwmUkYflr Guzsfy17EwrcR3IFVDk7wnP6nti1x9EmMjfb9W6zhYIR9YehLoOMn/RSjzV72eU9 //UAXRI3uqNuVDcWfaouJmldQpVKXDq2qW3ssuIIs3X9rh4PpGHuOyAOJ7BcdRtH 5kP8mZYSnNjTN5GwovziSuuZjcIxNz6q4EJPft4vIINaZzCv/IDoZVliSh7EUZb3 kSDg4U8uCGhTG4h6tt5OP6uoTIDPE9HsLZCKip1xQqQOe67PIAkh6gBRuTKecD3i fQSXLGq831QEEvbDosDR5xueloKYCv0FW8qCUImhyu2Z75whRv7Gq1/Z+oUogv3k krvdLg81PQavv5RqUT4u4FhKxPlC+emAqpaRMm/YOag+YllIECRSGcoxNrZSrxRW 2R2AEbQffc6KSBn9RY3RZdFSyOAa6fn6TpJ48BX/CpRAHb0Xa/HKRUP+2CMJQby5 tclO0k+/yBDvLZRto/7LadHuYUJxsMbJk3BSVGK5Jl8YJ6KCUyVjPAHj0FOxhklT yjNFi8Qt03JeBUp774Rv5Tfrnuy7fk2aRe/urHGLQOE04l1mjsspiVMA/0a502W5 kfZGplAi9X7zYCn2A+qdYtWRvwWAXn0ysAiASkkGLDMI7xjRruBA6C/NDNp+IUs2 p9ecD08x5ntWDtfXbK+U3A/ZMtbpL9tu8DjKVxZ/n1BskPSsnuBFNdaTEN78joEt F3EOOusNBMTZ/iysRsxD4rhDDvPQlv652eDaFQU/zI47DuRe/NL5jLJ/D+6afiwY p/vtHV3EzM/NBGxjcKsgsTfpnDRnpc5ONP6WpSjdSyGTiD8K8WLHEBVngMiVAN6Y WHgC13fWlyaVVApHIBfQGUJzXzt6cQgqifxr8349oMcPMcvKD+BXJApyNJcjHBYL pZI0y2wDzzrT6wKUDab5Ov7pltr94jxJrNL2MXgL+dMpj6VHEl/5TUH0PugWc/Mo cLS9lbZKIjdZu3kIOEfynOJF+N3O9mg9HiS4rz/APXP8gmNAubHxmqoq2hyfz3tz Fcg3BTqq2YVoE0i4e/Yw/yo10DZ3zSw5ykzYbK8z5CvJ/D85R6RjfXKnkVY7P/TM Mb4fxwe1auQ5hTt1E8vBcAf0TnTCW2wp9RF1RYp+CkJ/aask/SUuz9B8LpvZs8Uq UMlVegiyvcWAEkKxMS9520Hyle0zxTaWhfbBZakXXpVrvnyK3LioX6T9kkul9nNb axff4AkG0TPbGt+KFKMvlm8sqV021ulR0FGod2nLGKCmQfTaXb+BY+DPpRdHBXT6 l1MqdfvJryEpjNOWMuaDRIs9zDXfuIZXR3gGH4YNH0sX7Z+J0O+cPxn1MY7fIEzn zAxoX0qJKe3wvIl0ER4tIVkVcO4YNVw7yhwg0KUNeyTMR4p4wH0KGWtKSd+RmP+u WehsgU9XMDaX8yNCWhu81O3NCPvcfQpS6CvQco3MbzDuMr4wyqhCOoZsRuTnKIjQ +YsaKYUxkYGhpisKbyd8iQLdoO8kSqH6hV/N1JEreosA4DeykFNkAzYFhagz+NXf oF2Ov311vcE3sIddJq9Ia9Ig6Xl06kkiNGl1EMHGo6+fIZNXFZw7I+dyKc1eobCd Ya8ItPv+LX+yzGPtX4XRBl9Zn3uyU4Eqsg+T+t5MR9GNlRALRbxjrbVGn7bDGrwG tW10EcwJun//uanlYPcD3jX1OEz1ucQGryhphJBA4ayYooZCexb3Vb7vBD9nbdUJ d9kIW8ZBVHxY7P3rTtTlLpmUj3zR7wWJkFtEtamWWl9KNIsEUVVe3hs6xj6bXPMw qhd5c64RECdIeiFO+7ubzRF9I9CKk3lg5G08yPxtk5ivH0v8Nin81njmtKpFzzO8 jyI9DeVOe6PUvLHkEny836z71LlBlId4x3JlwuGdV6lPFFrqevOVTXl6N26zCJKa R09ZpcUthIe7iLutiJyouq6/xbkz8ZEQURGuzxmCn36tZHIiCnB4bhupJFBWdfmc 6m9IfQtR/zJFUw6YguM0MSaWU+Z+hRjHY2Dwik7QqUgQq5mOah007HWDKb6syXKU kf96D+rJGkyPQjbIFOuvQCyqrwMjLva3c8H41C8OZ/VqWm8AKeXszbhhiRmdCoUZ lXjq1xhGzeS4eGUIasNMvWWjymokjQ+C1+sXz3SKwWOkK4dPP1FIqS+Suw90JsEz N5pH/RiXruFLVbI8bm16M+4oYrC5ivikDvMu9luvMTf3R8fhOxHek7YJ7wsYqvtQ k+/ni5VOLWuDJmQL8QRCZuVRmjZAkfQFwOAzAl8t+tvcPpSbBJSIZD+oVmwW6aZf vZ68d4sjA8xjPPoqXvHqqCdEz7e8rv4x9rUOMcD7noovbfpNR2sm+ZUlQ4MIDCtc gFZML9Z3zvAKGROWnJ5xNIhOOezLU1wEcb5waUn4G1b0jdxF4JdSbVbnnq9R4AWw warVWdUD7KCdrZicbdGRISW+5sxyn6UcosqWhtbk1UgBCKpLcQTx78PcqfYvSqp7 ODtK+H4Tb5/lTio8l8xCdD380gUfGy+BMnuGxQrQ1MHU6GcAAHKbAtHfhrMRSFdm fGFgQY7YATs1nDHBwwSwSDNfmSpeJWTQgMsVyIFKNWPk26o2iy9eQmH0GPPr6C+j giqsfZ3fJYCsGarHJq6webRvs8vOxbUO+nlNOJivvWRDhdleGHjUp75mzSvZzd/y JyjyYu29jhQibxEQAhjkV9AJm9zdIWExWigMF8smdTe17Wlh7T72/fTxSiLN/kZN +1cizsCo3UnADRWiDmeJz2C3GlbZUmgSbFXKKvTU5hhxGJ6AACutFeyep8AdcHTI XcXym9s+JizZXptxCjunPulCv2DYJehochqB5fVUUs4qAM/7dgeenbC811TgKO3x ZcTlDna/CmUrQuzm75cijiE/5TlArmlzXHv2/T8roZofzTGUGWQ5ESLewghKHtK8 20HsBZZo/T8lFsArIJCIEFt9zekzeVL6Ft6EEqdevGOO/KGNuJ5fHrYfrJjUo34c 3ElY9Nn12kv7vu2vRFyQKPKi4LFQQmEzzuql8+UAO6wcj6GtUNfNnu3QSHd5Y1qU VeGM6oeyK7yArh1OfkNd9HrktWbfnijuffwyRkcJJD/I1kHL7X5uQsb7QkTQvZ+C ExnTjzbmvInuM33j47F7v0r4nJgs0T79K48dflasqX7R5EiIoNOLYwVZnjGOoVWO aMzLTdoj+zGH00wAld8hipL+5s+YL3laItYvJhd+6Jk+QIuYpSaAgXPcljbnp7WH CQ7tvyz+MXB1/f7g+TIRrNg8FgJ/S/r5QfCmLn1FEpM0WYCc+lS3FA6Y7GVEXKdq wqHDTkxfBIyBMWRyRtMiPE699PcrH8Zf39wVO+kpudJhM6nTj64VRuKrGlDtKRwf pn3eClee2ifu9sd5lboNle2nan2+wcRean/xjMxfPqcmUIHYKiy5Kqz5H4LD1c0S kQBngBptBhtrb/ukyVapeS+hIouNHXTWxaiMfguzXAC6+d42zXacXMYdbuSd5hl9 OTWfywWZ9iqCN9jhQVBPhSRPA2xb0/6S3GLnLAv06+jFHJ2em/L12r4T+jxUCr11 Dmnip5HZnAxhpISwIZ9QbRYKdkK7PdBKa0ajM+25Mvr1zZqLcq/+iok3KbqtzS7x oARX/1nfMuEIg4PLBnxvk4TkIkbBa1puvDJiA4YWsMOTyu9R0XmbZKsr746Uzhrv 1pAXF27Xgm1EhabpvJjsNjlFMrDl9OjcVtYyc6OKd01HFVDhf93p2uIj6EcXontc VSWTS7cUBxYdtIVzIAKgi3k/fy9ABfclcnyO7egnABCeNGfA8YB/8Qw5bPA6W1jQ R11NsyDoic2NsxZ8wjzpbhQ8jaCH7maz0oBE0PxJ2tLtZtehxzoxlj8NZ/fisTsS XhAgJb4Doclp6BKWl48Pv8041V7xloPUqGz6U7g0tDAvZkyyFBFmCPn8GSmrK6K8 iV6MhxgTILDsyOWkqXuk8h81eT9N6QxSO5ukE2GXTh+Qz2/juPivQv6sF9z8su0Y AA1N4Gnm6HvIgt+DSBUw6TBPILPq1QZaRA572qpqbAoHw4srtreRk+D+ZTuDT//2 iGHyzsj1edWBJN4iOwpEsuvR9MmckB0Lbbw4iSr8qjiwos4kZY63N7YJUqcpcRYm 0W9TCygBnb8imRTVkHAv86AdKvgim8ULSFhT0+4qxS8IOgxs9f19Yswo0OAlkQjO 5xP9p4GW9lFTVAGuHcvPS11k3P+AM/aJnP0+OThajVQM4ENSksvM9zRJ3FKykX4E TsXTVVH+fVicEXV6x1f7yRR3rOcLsm/7ZX89+mPZvMpyL3+ejjBW//dKLBJdKNOk PfeX+A4fH/9TmCUSGSSmz/AkPtNwYK/ecMKw+Eqggt+1l9YjGL7AtFImysk/rvOx 9mcUz2Rr30Zk7L+9O0HIV8frPcd6Zy0j9J4EJdEXe+ogcfi0M2rcA4ocw2q3XDeO kFPnYzcNQUGlE3FO4q8HuPal79Gw1vL9CCefTrMeP9E3Xo+T0ZTckXJA6slBp/Nn rZNEVyE4KJBMPErF4vbdL0FuOjPeI3aJPMZIP4XNSpkV2M+iodyoSfXsBZYZim5S 6fmaaTmr58lYx+fWs+6xJ5/fokkHCl/lNUyz7KLbe1Glaant177Pex+hvmD5CAZD qOg+qbPhw+ROS7Ph21IussLi/PybJCkaOQMyr4yfgFGuNSV4a9z0rkMZKTBCwTMW kFBlUDbj6RPDL4Wrkg5BhZKdQdO4p9+AIjRUHu9vz/vy2ipTl09vT9OH/IL/7e00 vgt3Phe3l7e0PEmzbp3Hw0W+KTDIscxG+HvtC7Yv44s5vePAXj4LwE5vpUSUzu3A HO5tlMKgnw+VLpixmh1I/K/sAxRWL68DyrdP+Wu0ofhop4B+onz4wBreN7KeaEKx xZo89Kb5JhAbeK7IERURib+i4/CxaNACAmXccsynPyMxNhoYQDxvpEb+HJIwpNg5 IdjMdVlvfsRceJ072y6Yk8IvqObCL4Q/K08UX64BBOfw+zAfOajns7QaEa0U8Ek+ 9WHIoMkKeC6Rqm+Z/m6Ji1VqN9gqqH128cIJKsICZS85MvFrGuge49wL8fHmtnAc ffWS5x3WNKCj1qDYCtjkUftf7GR9ASD5j7bIM7xztoB8P1+F6N/TajtDHWWAt09y Hjl9MKe6qAeqSNuTwHpY5QjLnlMiOjrUGmlG5FTTeyv6/VpQW6tj/qudYl16ZCju 3TZ/Q+uWbh26pu/ATXTjQhiFJFi3cXRKn76r2J1PudfPguY2mbpamV3nb2IptT6h 1qf7S16vosjM4jP3ElpQFO0bzzcw2/TnsAEjgUgZRFExnstJoF8fZLs+NiU2vxAk 18NjJQuyaGW+lBCtpB7Y9y7GvHUS6MQ5DSnz4h1FYwvf8B43C1pkYhb9WCYKd8/f ZgMfjPXTVTiDyXLwreToIBCRlRM4rjDFZY8SaOAZvUkl4Q1Ab0vC4/q8GviElOdv APrdgAp7ZbEkAPR6sl8GfYYkbX0NEubkCoy52wGn5HClatC/f/X7ZZ0Jf9C8EHxg CzBt7DfjwkZ+Jp7dvlMUtOvPq0xSdgqnsTrHanp3ViV3hMMwsue2SgWDmGTbREvd 3b4hFYcXvxr9cwHNbMAZ5j+1cgFSNqnltO1J3RyhUBCWxx9mv27JW5K7V/OB4Azc 9M+BA2x+wVz0R9Vx3/AzDT2GGGbcqC9SpOonL9h2O0HP+oh995I/YybTlkcU1uuk tXfdksEszDOgEu2fm/SSRyzf8yEfClLRRVBu9OLAsnj0+pi1C6dI81fjL2QXfMMd crN9aLsydA5x+pYq7E+SRDSvj9eH4VDj7jVSo1GIkkZsvEHQYz9t3FchuBummlHw otsoVd/a2j5m3nITLgF18/vN5sF9EB0xJPSzFiKQ7hKx4fXXwTvJP2G0aVtYVgFQ 22WawOj1afiyeIgdNxwdFTDjd/CEsOGyn0HUEXT+hhysw0nmC3q186GxGg+6KI5J 8/zxYSwe9u0tm6xuo3xBtUoMr/LnV1S4CGtrhk+mdmJq3ta7I6Hb0csHKHnE+D7X KhzEhwvOZrU8wnTjF4Jx3Jwjs54ihfE3T8vnwUVQSPtOp+FRhv1Fq84Ln98agp5B C3NBZL00EmFTKCl8+paRaSDrIBxMETT3+c99dWJzgMWs6eXxpXhv8aI3kM33nSOD uH385qNf9IyhIOgoW7Rgq76Z53qU7VpFiSBc0y9zlFjAZ68pjymERWyLCludv+Dp SvdyILkYRE7NYiu0iB9Uw5YxJqmNY1xXYeClBF/A7252mWRpKyaARQOR/h3ZpPbJ KvX1MYjm1c+4zQCRQ+FY1tPRG/9q/Yj7IlJg056ynp/iNwbomblFZkZeKQmSecKU plVkobZY5mTlb1usNRrGLMc89VL7hudGzTU/LrPaDLW23+VfcMT4AR7AgNGMnOjH CXXKr2LqPkc/njMDVsHGpqcsfBJqCrxLOPxA3DNL6nysVeSk1n9Z0FD3CBCth7EA 3a1rPlRCCeVAQfM+IY9wJ6E91fOKX8vxCj/kYpayJN2SlnypiJUx/C/SvocaaPJt d50rvcPhTo4ijKte0pm1LGABOnKSV7aAdlxo2Z+v+TEb3ErSGYHwOX2Fxs/D1DRA 6RSyva8Kv1CsshRow9Jv9FAswgdp+Rngk2a2idUlw9J6vfNQVaYdbxsz54SKXx3Q tKNrdh83dzWBTfK7Z4SQiU/SHhudXoUrH89FMvmw28yL0haseyv8WIRsZOmQy86/ D6NXjsr0Wm9Etuc/nZUtl4ESEaaE2Ye4HyWHTteM85xJGaeJZMcpneReh0SG8wVP ht+s+5fmD1/54FW+vzmaPx7XmxxUlKHeB4+axLrnwlhHLxGKiHoFYDMG1qCyNJv3 Kr23/ty9Joqng+WPcoV2e/PTjgdJio4g5L2q0H56VOj8IqTxDkneX5wiTh7tQPUG ZGsIXrEF/erNlYK258o+QbyD51HoK8VQC7jlPfwintt7vTzTF++HWpnc/8RKOiXE 64C+i/z91Vahfu3slm+jyBc/8zuNJY6VEbGniNza/UaewRW2NDLRox7YDLMjkeff pl+cVvFY9p1LUHT9pvDV6NQ2PaREGZZARa3rjbSiSnjBU2gEe2cIIbljfIfGo/OV hgZJCMICwfC8K6s3UNXvURE35HQF6MbAJ35IvuXbg8M56K5XMCJxBPePZRDgxWP/ +5WBV99/PPJo1L11Sm6vhD/3iJHSx8udDyh+OU0lfLpSil0Q42XPUx5diXanMLVh 3Jd8ue79/7ls7t+uecTWo2kun//amf9mQMjFgDqSNgLULrRpTsGswtycWysuVXHv v99liCVmsJSQ3kuBwyWWFyEii2I4/X3NvG/CELLDPXOku/aKN9eYX7H27j/dkpk4 wjSP/8GunKkV4wNtUq9Xwp7lujkPXWgzvxtAeXtp12MEw/edtsgJKr7U4PPNQwB4 qKy992Rij9X4FcerxlwaTUWrssZv8YTHmXJ/mWNqHQQRJ+/NyAZ9te4iN3xMczZu Hy+wCL0gn2CNj7dv7Ioeu8431a4pbKccDNIQ8/iF7bcrgHVCNbdGyMy6SqTuYynX NDQyMzWA72246gq39jZYPAAro7HWcNJKN3ZtIOWt/eaCqAtu21eP9FpJvL5cCjns uOR7k+XllsFEEhY1kM60ihyoEfpSNiKVEkrVVuVT9vL+R9UZH7FKUmECtg+5UnOH 6oXzql2qmekubRrCTOUjmoojM3m/6PokvTkIfmtGLx9TzCW/kyYBYa1o1cMbKX71 OR+r0up6PFu/83IYVfHLYN4w0zMVqUxfO/En6WHxFwYq3ut+4D76zVK1JIlSKzon DRei0haH8PrdVxoHH7Qqg2iiYFRkyMxlDrZXJzR0FnCd2mzGa056YvhXo3Odhvl3 8CVoU/59Mej11gfesSorWuZ0FH0HXFNRrQmmWt3wf8Vk1JV2VNYlRCwII/6ZLmA3 Dek0n7JylP0YXuZLEr8hb4ZXOupLmDW2Icvf00VyNlF9iJB+JzuBJP1Ecr31WL+m UbBy5nXoZgF8UxNJxEK0PJSbn43J3qnRYYmHRl91DISga6irUwz4ixmrrx0/k6b/ ue2+IYqvxHqLlpVyZCq2cD6Xgd0Dn+/zJhvApzOBm/Fdczj7BRGg4AFb8gdpNYnE DDDsz5ArQdNXCfCLiHrsU1d42tCgbywPZsenFA8neMFx/H0J01SkeA10sAK6ra1E vrxC4ONf6h6aaHAcO/JCZseThkQ4XJh9Hcu4jnosGncKBViYgCT6nACBOrQTGuSx 2elGsxwIIL9BGOjxS5p02FhjOQ3IN2jdYeGEPgdbFHicfUUGCfjeM08Kn8T++NBe Rl4vygPyXdyQ/m0dMQ/BWJ3xaSadtiehi92onURYTWRaFaTOJFAdKMjiJehaeLL9 9CEVFEck4WLZIFjRX988jZGi9qPaeOr15X0dkx7SUeEaA0DIVbTsRmFjcKC0jYuA Cdzm2Om4dkw9aohfWJF/X5NW4AffNv/EBxjFs4fehb5+eHC3KMrA5VG9H73rHLp9 nfVHLVIHqM7cju5SSGOrdH4lotQ7QODnwgX00G5CALCmCG8tN0nXEqhORxqzZYhS 1KcsXso58xrVyvOMNYXFx6Q6/VL3TeRAnUKNrzJ6weDI4vFxhSRQS0bD1u5WPUXP 6EEWKFup+pY/TBw3wnifJ1wpYLf1J30DoBCfoqAprhUmmW9ujLii/cTcK4PP0/Qq hdvq7XjhBcSKUF9MU9tDcH6EfQOy4J9pKS6T+YtWRR0AulaV0KRsrraoE1UU0v4H MukEI9pjtYupMbw7fdfGIVV32yK8Gg0m9Fu3jVFuAskEOl6hKPUv6qiQ7+47aqN+ HaKj+QRltkpL8eNlHcsdYzFJJx2ANVnsBq+e/HMj0HiiQhVI4SdPLlS92XpQn5ok iRchzzculiVf6DGjOogHIu2OldGBkW1LbpgozU7/C9vx4wbqdeR7KQUKQDTEHC6c UJiMi4Uhh7pIhxqoZWzVB6yWTLVNA37BRz3uDuNERP97vLYuGXO/F6cSX3Tdg0aD cDYGxlQZ4riDwks+cJlcrszKRHQ2oEchKiyAOibatamlIL+OTnMluFk3fOFZaoLP edIUkvmZRgKLFdYTsDIg7WhbsCnjw4H4mTCZvUiTossH95ztnzG8Q/a0xbSqH6bM 4QTWj5yA7acTQpw0qO5LttlsY40Ge86c+WpXNGCFClLrgkfZgzN/6QG3XA9thTn2 Nezzy/BqIyvm+iWh7trZs4mpp6SoDna7e0O0Zbq7WoqsG5EDtR7qzPXnlkv7JWJX LakKBUQDNNImh0F+R0lKZBZUYZq7ft4qYVRwgC2AzsDlg7mZAYQw95Bv/9c35UFH jeja6Q+95TRBncLMuTBssYkTUsqXdtfbOmV5uMrt7prPOhR0vXgYWONAdgrq7yki Pjr5xzjjUZiBj03D4FmTtov6+aVWMWQIRCIZ/rJeA8g06zvJ3ggwm4VM+u+nVq3g TzYUp3Sckr/4zi8dNmejoaZI0Xtl7FPe5t9H8TKmtiPUZkjZOzIl22AC7oQMuuw5 uPw1WhB7tgvwku20lI9vj+JhfwJfcymnXPeBhQrwK4vhQv4A+HPUeHgStL5npTSA w+pr4W+WCs7Hl4ajt8TaXeZ4Mc3iJGEFGffVIHv8f4z1s2Wy2+PzKzy+4jdtZhID hnnLtNJsX79ZKrBEkAZMZh9cK7ybvJLFB/+u2tzs9JtqyGzV6o9z5yy2t58h7dlR WcoF895U+VFJ4DegaOeLeW9k3TUBdDPXJpyFTawp/DV7at7jTaogjEC8Yo4t4/ky wg+SFJjdXUB2Mc2n+O1DiecPXXuTt3iihGyPFX9ICsknouJzwW+4XJIxhVRH1RPu aIR8R+Xsk8qNKJZ6a66tX9PgISRmmhLSg8cfVCwVfD4NdBYmsEgIaOu6HibiLTQa 5H2BxKgT0Em1U4DyjYfN1j+CH/LCQm0/GJDbGXqpVmwR3z+7xx+haTY5krVf1ssK EjlbSBtDUBvRk1mWOuBe4tDLv6jB9u909mjKoOcTxhQ2NzUDfyYpYgsG5blqtf37 wb/qCVPFhqyvzJYkfmKlHRKpWCl/d/Noisadyi81+DTO+sHhRr6q+JUM1A0nTd6J lqgw9zF1WXcq4UmRrDYjEuv3Vx4XpPcb6spEDxt2Ng+bKi1V13sXC9jzi3EL0g1G cfRpL0FTg8jeGOo1BEyXa0Ov4bG+tjGa66/R0jYID9nu51x1QgU1M1BOxRWkh5mJ uMtQgqy6T6KuPPenFQvHgKDZlYw8+nIdZYbC37xGURwEy29jsRXLopftB/afXJix 7PPps3SnI2OdDjhFEOe+3L7R38vh1FKnfBkA52d/LgzshkiuOLbp+YGIEXRxV5+0 ffKDD1aOk9eoSVzhWQ9J0nIQ7IRgyRwefHbBWBS+3MnfIQrXQFDA+I20oCADX0x+ IrK7BLJqd3u3wy+FFRVel86OnDPsRoXpVDSXJJBjQctQQp3foTDbgl8DBoBVDnMf sKc5r+YpY8HRlVDREs05AixJlaJY4Sk/pYmAi4hSwAJjUfmVsdSvb4YkjdOFCmP5 zh1uOU7CWyI8cQuSpsQQTR66kwW5oZJGL1zdzyIPs86Tl3gRHx6S0d+yYRbcSREF SYQsS7NE650MPyz9JVYNcCwFsqs9CFI64uJ56A+5fww7DhzgstHtIgYA/1vI8P+E HYf61Pk0llDRA6/DAYwrLUxhfWR5uYjSAHSkODyhX7owOhTO1Nr8/vxvTNQh/he2 pWwmj0fb84/4brDZO6/FrsU9W/+XCavvxY4NFmk99u2sxQdQ/DRhNsVUmZb1Dldx /9S4EANNYDddYprV8+QKx5PVNiky+WvX23nEZ5TCCWMebKJXckHBQ62tOLstMFAM rOqvO72mGq0Dow/WfCVwa0MfagGaQwiCyYcKRgNOmWOWu3kLC4p0xRZLLnFaq9tP L6lm/uSCct2dDVXcdWZbh9ch1qj4mHWR23VSIe8Vj0cGz/XvYixnFXjc1NaA/aKA zTUeJ9v/2BljKMQo3Ehw4XUtT/MbeqxjqLC+Ky5D3ZZGjPB0j1AUwnYd9Be/rshb ZTac/6SCe/6uGT1DF9RsZzqx6aUNRgRvfs3Fmrqgb4lFH9nCdLvqkEEDjtooEmbE SfwCsU5B8GnkfgsZcv8BGl+DgYqbe+nFktPp1xTd7kNs5q0BZ9eFUBPfwrsQZbeR 57R72xCj46qFrR/kFzW6e8q//jpfOrVQwKtvgTcmzq9XMnPtssuA/gE47I2nVKeK n2zH3zlV0EtV2sY7ZVbw9xjXOlhzchlBZx6h7ddTU9ChcJc664Q2xbIGntkvpCZ0 yQe1i0YlDql3B4cYzvugwaK/zQZ5G8vskldAziOh6kMlM3DFm14krq27U08hE4sH l3Lf9bRY1KLG8o351pi5rk9saP4b6ixQiykiDfha2V9sKU5TPRTbOCGGm666PqLP MhMAEThkheP0OgAfrtSdg1jWHvUQ95e4eGAFKduXpJrIpHZ3skLXWBsGgb26LZ3X e4GWoCtn7cJf4M2rL3Mohj7lNh6Jk9rPfiXi9F13KABfvc2QW3St0mQuK6ufzyIY BHRcDWogHvO5owMFenB8t5H3FJy9YaMdoqT2W6/BPEdC9ukg8VRs3dYMRo2xJ+Ws AvSeIv4wxM+8gAJ9ugkcqTW7cgZu1+933qclHIq/Xd8utGZ7lPBYspJPq7ZmLMHO iqpI+Q6yVmFZqzhm1DNnpENwA0LbSOF8hzuRpzRDqPzNuIilB38V7p4FvgFrLIsy RctNNGiJeR5W4FCKq5tSb34lIeVIIhlvM9A8ulhjmyNW89/XPDBEOt5G2KupArJ+ NWtuR5CI1pBn6bqNNrIQyc8m4G/z93Pfwziu8EJPm97N9agMv5m9Zddbh4Gyki2D Y5waikYGsoa8s0Vsh9X77uJswQ0ujOaQc2T6j7geqx6I2OuS0MP6RdqUTCjeKIlP OzgB1aciurmmvFcjm+c75noPsTayFaZrg8nQLGfDvX8ExXDRlmXOWPnVm7sZbjN3 JXowfcmgH1HvF+3HY2ROIJyc3Ji4tlLPDpyfTEgsfUh5oWtyoyD5nqvxyO+oT1rW A7Az5jhx0El2cwe1sdAMP/3Ui+baf6DEURVBf/rbszdf9fUgGtVEdlhvi6ZA/a2M S5PNm0Om/gTLvNBZ1gTEtVw5Ra64P1OyO1MN9l6YFuuf0EcOA4lpu1xxPZPM1xwL v76Jfj1HsNPC+ppA5oWKRUh5n+kqRg51MtnpKy4UEw7yME+VY8X2BLRSAriroofW UTh+A8oZy4PLiDpb2mCbTGI2H8q+QvW11zOwUxaIxj3Pb6VSAnvYNsVcdTiKM0/R Y9AHxn/PA6giydrWcttyGzSutnpwqH3J4WNSjMURpmn5eHvwDK4Q1i2cAgn+qxn7 3m4bmfCq+5drXB7pCcmD0v5YUnUdI5okJRhmkNI9EJvY6nTor9tiA8DW7nkpe3bF PKc9JNFYWVr5ixobcIIYLievzqmkpGxvoi4LBXt0JWwgrMlsWqBnpWgwG0ZlSLzv Z5VNweqekwoX58/1Qu9+A3Nmycp4w6nA1sg2hfPmE77ep8hcFnfwRDU9t82NdxK9 VJP1VEn7pN3VS4p+v34fVuzXaaHNJ+/p7By+tPps33qW33DEQBRyIOTHD5MJ/oow ue5e32UNLD172+Lz3CIlor9Iu5fXCQATAgjitGujsdFvfArhfWQZlscuJi6FqTQ+ 1P1d+uQodmXdGHBcHyyOzfoyf7OhWpO61WYT+UheSoZXkGnXD8txLSpx3ZfrZTlC Va6yrSM9AKsJcZ4CE0+jciEMV8efqYlQoYnK7cyJ/rqKiP3fxsJ/Euzk7Y0iDt7y agwmqQboH5OgsjPHIk4UxfrQ0W0zPn/qtvNt/j/n0ItwzqKXDZTasEQBEHInoydA y2IJc+OhJNqAb2QLD4uUWjbF2OLQbrYAzl+JmLziO0g0LK3gj9VCLx+Pd2e7iMa1 vyR7l2KocZ84bXhcr3Y+wBKCvKPYKecwcVn4j9E+H3QSEst4IwrbP8KdHBsae67B faPJFObSURbgMmRlyJhoAYAHTS596oejrZAMbci/R0VGYGI5cRwKiA365VRzZdNb VW1qp2klAo/HxFtAQYWo52hpE0vWBsBZWCEJmOLAGv8mSZgvnkNv8uiRPkdgj/zM l9PqM+HZ7+jdMhi0ilAIuqNcuTnab0jZgJudiBQ474Dw8X/BcUxI3GT8Xi78RUm5 0g69TeUoVEg4kDc8X2iGOIpVXxTI5kNLAP6Iq1jPqjIhzihev9EpdMITv0GbOWjW 6Tk7/ejb3osMgpRj/9Ae4PvFpehG+CU9urnmE/p0zNyEUU3D97z+CrFEiR7iK9OW Y0cO3eHr5Fze0HubU2/HUJV+gExFcvsNb6XHfzkx0NIzOrRBm9aJI0m/I/8jXWbh kBykJHWEMrSkSUufKaDRg4cs7Y0RU7OTH5EnQYGcyBnUcPyqgPlLUsk7gKE/Q0h1 RpQfu3gPtBJxfE237eslZVOKGebF9pQ8VPUwfryx37CquKYY/pCJvCzG9Z5Lnfil ByfFyGtYJGOZcSiJ4+6HVwAb6b0q/FDng16pl5JrHOa7sPnRsZ5wvshzDgDE7e3J n2kpVLwMitK3bI+bj0Qu7haYyIckFW5NchRfzpsGCIKcaHb4KtD9lplBRt7VUm0P x23v3zUrNuINtiOHDKsot042nH6xzW26vhBasbXsPsCgKk5HlBgry8yXfNJq1Egf 5kNEbQP8+uaXXgDU6FFVcradjFhyTIs78tooerRroiNDAOoXMM8cr6ryMRTZIGho 85EliOpDRv2t18A49SJxRgJxcQoq2G4KDXSgAstKFCwYtfb8ysV0ysQ2ZC6iDuU1 KyUZLz2lIxhN4LeB9kRhhAaW6xgY8wPTKrCb8MqXNVkWZ79J3CfHfBVHhpeXQvpM qR8Zc04gLxKzj1oZ/s0FgYmsLbFmfJlNBLBn3Swv5h2N14heGLUQ2Kc+UgOVTVSU pc/2YbyTAAFx2d556Xzc43fNLp4/2C8qlj41QUvhOvGz2eYUh8Mhg3sGAacD9ZSN GfK7o9HHQXuKhzcgxxxzOg7+95sd+lGs4utZliLNL1VzgzrzCj1P3kiurRtqOGH3 8YnrsZbcL9TPLt0HhG7jE3gKSoC/D2sf3GoMV4LGuWv4coMzQiwNb87V0y42/Ltr H0wUaWZq0HANr7vTUd/KEp55UtW4hN/+gJ0moTNgFazEVNXRAFF7XifCQ4w1vDqA qr4/ESk9XqAvvdbJbX7s97zoZpWbYoKU9W+REVzgAiRvqeyzBIAPu5ziBmXFy352 JQfrwIHfUhWObzPjsVvoG+vTk3tgvtePAPUO/uvoMNDvqlqvHMCQXsJfE3kwsJJl Y7rW3Jg5TZ73JtCAwOEdpn3nYDQ4asHfky7Qw98BwQ9Y82DwYctGvWMhfsM5HGWg RAYjGXQHicO+1mEtSEgEq85N/b7wtKz8Q8bulntj/K8H0M/8QV0QpdN4Lhi7jPNe wuZpfjGUpyzz4L+LoTHPZNP0l8d9//maF40t6zxBedW5fw8X3okADXv4xP57p7/0 BaXhUMVcJrm0PPM/JBx9KU/D+cAlaB53nXUa3QgwWRaQFJ3j/l6C3aIiziXnK5AT rzBf/sND/yVTf+XQE4nwvGymMXruiTnHBK5bgY+oYDSHN1O9Cu3Or0IZl0Ta1nJ/ 4W7mAs2WfyYJ2qF0aki7ijH0mjtj2HX0/01AhwsO88ikHpZLPI/RmqD/2pmVTw2s V6iU8hWiUKNAakV4AvIrpfgBOEKymIvOLzcLI8QGl4TlYMI39OVYtswRFfbbww/r pGphs0xJ3O1IoX+mJj1heYXEh4cBt61kCnyNmq4+m5WY8lj3rlH2FbALC6ED9O9u PsQL24fx/hzra3m4BRFwgqVz+vUVDOmVDns5eiEhHLLmm436Xq0kUQb+HSjfbzec yi9BflCBsczRmNV9W1JPascMrDYUxkzlwRUXQ8FWcbkcGDm+MGfxjKh0CkC6ulkt ldXXb09FtYkrI31h8RFWAuRkWq/BIO2CYTqoDjh9ESgbrZZWPacMvv0aakWwWedE bPTSVQ//RQ3fe3UrtBybvIl7m4mScqPQCXzNOOZCN6/66Uv/32iVIBCOWCVQteQs 8dax1t8/e1//YUFtfH+Fiwi/kGoQQi6R0nopWn/ogvfbtqCRU3XelaM55IclGB73 oW3T3RKkTWMd/M3TDuwG9gSNJBeDfGHssM+s0PbkLSwTwAPV64XgsSTvSkgGou9d 05dFwGymFkhhvSY7+BVi3yVtLa9B9/C9MdiKpdazLoJVbDD5FcNLmUctZjM5Gvvm oPgq+i6QRLOF/rwRo1n43+61WRs5+t7kY8vOEGwlv3MgXScre5c2jvXjeUUTn2B0 CaG2A/bxwPekJNmyRjI+Qfj5jegu4TmpD+5EAB5Hw1dSBWZ84Yvda5Maw3z3GbHX g7BRgaq/smSvKgpAVW++cPkRQO53N2dwqYuEWadL3M5e8ODQey/1RSy7SEH7cr6Y yyg+1yUI6JWd5YdSoAy9ZJLZYVPNtF/igqcjpkWS0mFneKiIcQb5tLptL8px1fIW N7AdluC38UEQxHZjA06yi50VzFF1k3fR34mmqT2GvMxxpFOaNMS+ymPdZI4kVZRY H/TAgR2u04Jk0cOgh3JaS65+AAot8kV31fv4Pa3+f/V2QyhUvA9WGGFJEUkFVK9E Oz4E399osTsy22zsu/qC3PuEN9kNrwwPMiXrKCr5fU2ts2LImF5InSJfjgBSZpwE tFlAYjP5Kos5CM24NURP/+cYLRWCa6MUXqsQpO/q9MFf4mIeyOTsF2yXh+Xur9zE xRepI/+HqpMlrKJClNiQXy4A0JiTWEyhgXQdsWth/RnpZ/udMFOGIWxgidGigOjY kSlWFZe6CpdOS680i/fmSPOruysBlK7a2kSXHhDOm6yk60C/AX/tTKrvZl6Vc3pb wpKykzTTlehMaIoC51g47wzwW7T91957bjluZemC/+sp0HGXqjIvMxLepZTqgaX3 oNXkaIEESIKEIWHoNHqXedTZB4YkGJEqVXX17XvX6tBSBgM4dptvm2NITs3LMeSI bVfk6XGNPoQrshea52M5Qlm1jmd+tToIzonrjegRnYw1etm9xLikKnvBGRl7o1Hf VsProOHZ9Gxe2fVVYrOxZuZCwhvlCKV12Lvjrm65k7rAM5HWqHOTDr0iBs6+Fw/i Sk2rbK86s0N33RJsR+GXHcELSBlCZnWzk8sb58moX0PfLK4uF7PpXFnuCQBGbjg9 HGnFmUjHvXoWk0MtcZ1u20vEYAcc7vG+WRMl/ry5ltPRPVognUU3OKqiNTzp6rUi 1SVreN6odXUL0+9Fl+FoxnjTjb5VWl3G0quz3ipMxnU2rOvE01flqCdjfW4NtnZT npyY/WYibM9cU53qVXm0Pg1DeWX3GPxS4XH5SCfiiKbdYNF0j0wyXYzsskWfzh2G 7ez5pC2JwqwqjER65lcktrvucazS9e1o6BPOsbdRjgBrW7etVQ/tAzVSYnJrLSrl G02Xa5cZhYGk6rRmTfiTvxudIM52z+N997r1RuGwIbbne21gNlfjOW50/GarFsdK FK8OTG1WTpIY4Ovw+7Xp6/NmXaTXEhswx7qfjH3VN8Sg2XaaLZXfHP1K8zRcGu5x Our7o8Gc2LeM1u7pyzyvHYoj7Kmr2nWhO6C2KsX7Y2pi+/0Gf62aQefQmdq1ynJ8 pZtiQ73u6uSlK3Cdi92iLkH16cr/hkwryoZwDKHf6zZmzLB5jCr95aRvKEt21uW0 OdXd9+ukpyq1HT6YtCeqeSQPo7WKD/1xeT3ADqzxvC7Y3TCa7sdHohdWibged43j et3oyuJpPQrGWqOiR6vxda4qQ0CNiXuSgrqvM03+acNMi5Lrg1WbGiy3NN6ylMqF 2w4P+nBmiIvL1rTjSBg4/VrcM+ZWBd8ut9Nk1Vzs5a1eJTpGefNHhz219PN8WGMI JbBj2SZ321YYW0GXvQrqZhp11pvAor06NdPaI1u88GSXNc9TGu/TI/tQzlJtWj4V gfFV9A0/XEq9cBZ349mFbUb1FekkrjW88rOWT7YOK94iTqY6qar76WQ/qG+PHcF4 +ub2Rqe6tIkT+HOja8U4UMeoW69R9tTfdocSbV8nqh9Ol/VtrAnXPe1LJmcNZptL a9rGm7WwHKNHhzO3GlOU3VueLqvOvqX1GFL2FSu8nM/V5LiqXdjDTLkE3sGJDMaT xxthQWnL86njU9K8nEGe67NgyfflgRnTqhupS7MXS62VWpka3WVt7swXTZ2pcLWk wzRoaRKv9tz2YonctBLEtu2Us+6r7bGlDlbqYXBcD5ZN7lrfjrdmMPeq/kx1zt5w tLeufHI+saYeVw/S9jKOh1YTXyxGITcKy7ujLXO9P1WNc3c2aNfq8wNx7iQ2eD3D 3fhUWx6nVt1pV0kz6mr0RT/g4jVqE0Ftowsr1xpoZtkLWnaoTkDy44rWHGnkgTmC A6ElNWovJkply7sxOb6GZCXEB96pUuXiGketZLLuLDbszK2cy1Hd1T45zCAhj+v+ UW2ptd4CQtS2sj3sN8J0uAialEq2HKEljDTBp9hxQyeniRlelv7MvDiNsmgcKA/i qcnSESTmVD06uCJJltAnqsyC6xvt6eJsOu5sjl9GwiyWhrMT1R/52z0zBave2ktl z7HW4My1Egth0POGzmikNQCsqzUS4rd2Eo6bFo/324Ry2SkyJyVrsMTzale1OtdR 0GlPni4fEmcsp2sHYTgW+d6U3HTG6pqrrzdb+lCRjFVIe8eAOkTEdYFTyeEQe+rE 33DjRbRU2yNzXN5JoqkQsy0U9bQb1Tt4g52djr2G38cnK3LFu7u41px0xUU0GnV8 l7Qtyh8Z9G5McTFVsUl8Ws6GurQdCHrsKP2JxZDTnW03x7WuUWPbG5MKDOm42nH7 8ZzajcXJRgxr01Dud0Y6XZntlWmTK/sagw5Ex37/NKE3Nh2fB4w3b3u7vrExqyZR pzaHKTnz221H7fcgUmGpjnadW+eeYVarzRp5Kk9zJArHUb0lkX5U5bbbhFXVTega vRM174e9RffArNZ8Fd80a2y3rqtTVqACGzfm3HggDlWpvNN3ptJVq8+Ynj7dchX9 OF53Vm3vMJR7R+NwahKDuNfgLhdr0FwJh5hd4VxwcGzqUPW04foYldM3XW7HRLvp 4ToTe0cpOVtVm7G0HQUq1m1tVlS/wY0jedvVOa8yrEQn31F0jzwfHCLibYouCy03 rR3jTnxYjuMwqPOmIsgEG3WDyUa20d02LXvJuE5lwfZqxmwQjGl5s+x1YsafHFfW JCj7tEHjUr0cmHh8nDHj2lxcuTvOYJuuoPWWdVedj72EjOdGgxguPJ8O2T07wLmk v7Jxv+bWhLK3XbEOK+1iMiN8Q9dkfjBeh2JVTFqOrSQTana+rCJJnJ4CYi2sh3U+ SEbRwNmcFlOaAxGQnyIUVbIbDYl15s02rR3bLrM6rFe+w4tcO9yzS32h22cuwQ/x tLUnBHq6WgYCtfA2xqHS9OrlxQVnqfRqHrU/0t4JXwtVd2n5srbX29dJpb+jINAe N8XxNj64STy67NQDPqO57Xov7JjGZbAvj0wcaBH4UPvFNei2dlUFTLnurQOe148m 4cHc5ga49bO+Em6nJlmN6JOjN5nRZEKPdrI+L6+h1DR7HXbCA7NezSzatfomNReP 2k7aaKtxa+Kuzd0YbBKzTuSGPFuaTU7sxMpJpQm+Hjd3ZaR1TakmQXnHG9NG2+LW oX4laxydHC+qHeKj1orUj/NgNiSdJleprsXrCV9EtXpltekvj5OyaLDEkl945/7g fFzKTSG+MmutLmzt1fTSq9KDTgdvNrRzoqwF3G6pM002o5G672/3x9P8MGyU1emk sfuW4yVHdhnu6lLYrB0Zf3NKph16FuPX065lORDlGPxuXltUpuNYtHbchum4rTM3 7z7dZOQ1I+qUzITtuA9eXWSO1fmR7Y7mwyFR23bGiyCZkPRst5wYXKOyr9StyWG4 N5TmgJWvptkoe0H11kSKJpP1xNvibu9i+ls+HrXaEr/xuY2wbCN/b7J2Wy3cGLmr ru30OWsS6Y1FoA9XdLt8csEnK8pggVfwzX5gKy6z93hrxF4tK7GSYZVq673lHoTz XGNkziA5vSYMtJqn79bV66ixaZRzjv2q1zu0O5VB395y6rm52RiXKj4c+ZJoMJVp v1J1BE9sjgFb6lew1Hyg+cy5K+wJ1Zv7w7JBITZddl2nKOcs8L2t01GooNmbXSeL PTE+94eTmbyc6pfjZdeDAe5paqLIfED1++ysw7i9eXl39K41iiTTkzm/3RxY9oEC ki/4mq05iepdukdixig9m7EbboeZDmJiaYRa9WROLVWUarJY3jJ2qAXRilL7tbYV HWx37FvgEq0nlEX7nT2rk5a9mV2JxaYyDlYtUjY3RGebRI42b5L2ZLgrh4hef3zq TTaLNb/w1/6MMKvLhFOjTsVjEq4Gv3343ahXp/OgZe8qKr2PWraLfgutiuuU91L1 9kyrshM6lajCBtqqVt3MKtfAqswO1dW1vrQn3a28sHt2bCm8wOm9Vs9orLrOeTPg exvh6ctVLHW2SkK1f55eg+UpFqEEF4squ+quVYUmTjU8VPou3t7g/Lx/xJdxh1fI rSFP8GZH0J8Og1JMW+Y3K6MTjMzGVq1t2xNGaAzW9vE8OM5b4a7Cznv7ldG9Ngaj 0WDdXHn8tFdlK26FMIxa+UJNvOayAS7uzA09ubBmq7PXo+Z4aHLdwZxKNJmBIE22 egrZ8cO11R83gu3aHrijoXc1KJYsQ1ByVDx/H0Vhx6Cm6taYR868cRkLw+NwdR6P KuqmVV1t576M1xy/Nj4cJfcqCivirLSSdu1UDneazObYjpWq1ZiIsUaLvSszqhHJ +jAbLOLmQlTMnuifOrVQVpdbu6cMlaBnTrwpc5mpF0ktK7pSWyUgz/7putEp/tBY VXqtwFsu2gtx7R8nm1pDd+MgOjV8NdG8qbXD6/743JwHFqm1m3454LfI4UZYa7g+ 2tfCs0H7w4p3blwm14q3otUwunadlXQWD9YRj2ryGdC/22xzttrWjMO2y5e3wPJ6 YM8u81O3ntSMFekpokaEjDp1cULwT3ZPGNmL6STcSfN1d45X8UO/Mtg1duKhXtkF rU4ZacWqPwqvYVdQ/Cs/GQlmVYk34XET8OPLWWp2iC6/VfF4Xd9b1lDbB+QuDliZ OfqxJw+DuJxzXGtzebOZrjd+mNTFUd0Xlr68EI0dwXodsVoPutSIPLWOU/O0Csda 36PHtbpco1031C90+2lv6EQ4avHR3dTnzPp6xCuyvRqBiauSA8exWpOxC8atXt8J bL0prPbspuJqW7CjLrvSWcIsr1QEzGB1mM069QPZcqv8mq8k8z07FDr6gBUc3Bgz /FW90hdjozJ9lx73B11fdd3lKNn2fbxWzm3P6Gi973uGy0rhTifZS+fYs3fzPUnX ufOYM7S1qMULktnPuVanJawG64tpjOaxMoq7SnNYPqIUNvaHsUNx43HvsPVt/dTa HhmGWB2q4mG9s4ND0ub7C1IKFFJ0z8yUHSQHaml0+XEC0eigrJvr6/xy2AdCc3Ra jfcTWmDU1fToVnyuS+3whrGa7k+CNOHk8QJvdTa03a7UrEV4SKjTrNG1ynkNFg86 3lVb9BV9OsaPLt89WjC+NXn2JvJkBoBKV4VwCkaKXjWqfWZo9R1waneNUF0tek83 gat4tQr2olWTK+uzhJ/aJ2tC6u7VGrDDcaBcmeZ8e/SWhmDsDtWAuHTY8Va1rfM4 lPj59en7UA56ZG6mA3nrzITkzCiC4VZ3okdfPLdFdaKAVGf4YQ3DN3f17imJWxQ5 HV5bq5oUtXv1J/+Maptbe3FeXnSjHUqzVRSKA3k1XC/96Mw3cKdJX8zKcSUb9AXf DmfalGl5TfzYXTfxQ/2oPX05cacBXv80qvqry3nHX2ojv2UfBgRfbYjSos8NCe4y GjmrxLCEBWdcBtUWWWeG9jluq1OlUw74dW5+OfYqw9hqVLVw6m64UXKhpjOc0MSB fxIu1Zoo+9RIaszxdY1eN1qrAVtpE3hgmfF2Vd5Pe6rK7Q3RJkbUxQipxaQ/M9sH uz49zBrGfjZfHbbIsektD2drOG5YzLo+OLLmXic7k/Fmz5QVfdXgd86oD54ZqdPM /BpPrqSyMqsBS3O65LFkx7Uag+ORrXvW4XrRJ6ZbN6vUTqyEAykYltcDLCkwJpQz 6y9nmuAGo+bAWZCV/ZqTBGvAEZdEJmtoyX+6WQgXVxYH0/FoPhht42Q6rhvx05Z+ tclagXSYXbezGqXNfdfkR/1kecEX3W4jZmmRkwUOX3bJaeAoNY/dzrneYMddOmbP 8MmyF7TvrycHfd0fKMlwyo/pw7S18pKgNztTdfoS8Lvhqm36ydVbUIY48qj1XoqW ogmxVLR1kqiMGjoYdKsX0cJ1Hke2Leya3IQ6cVPNr7ddWo/1gHZD80REZ1KrTi9b f8b67IhvNeeu542D8oXnTdxlFvWGOK7j54vmtsa7XX0ukMLkXJtV/Esn5lSerFes BR5419l8NKuZbrURSd7OYsXFU/pGv3DaZjhdNPfMRNuL1iA5q7K4t9cKrhC6ODaa OKl6J2Jr1VVn5Sa72N0uB8S41lvV6O20HG+um2Nr21sda+H1yBx6m5gZxPiKJve7 6OiuWGcdu1794jHqDHqqToYWVwudS8W3R3KwCDplBqw5t92c88Eq3J2Ytk8sZmuZ 4fx+V6EqfnuwXw6jERily3p6MvHDaLeLe9JioOy1ye4yGNTKLpWsm2EinejhnrKX rm+ODlTtKDWdvd2YLJu12bht7TuBc22NN93m3LE25/bpNNJVzxaZFXkorwf08JbQ 6Cn1gYArU4Ua0W1LOiTdxDxoTBzuq22PajrG2WgZ9diSXOI4V4/iSh1Nxk2lt43L /lknMS8tf9ZnhPG50yBDoksZ9YNU0UyDqE4b9r7e27Ha4VzZNaYTtz9bLrhLFDSl Q3MRTnb9cgp/M9mbbZXz+fG+McYH1Z5Zq1qaWRNO0h6v2EQw2GuXiyVz8iw2dbfl DS5HvF/dcA19NKxWyjYg1ELanm6Mjuegb3hqNvnLCCa0vzbZhBqSB3zPuNJV3S48 VfQ8qi01NVkj1kZ1Gg9Eb1ne58gZTY+zZP3YHO2W573Z7XOx16xcjiR1mV7iQbg4 C+fLtDUklvu61JMXXrunuXWh5joDvSmVV6vVxKN5Ldg2BlybdDcHnDEarW51SJDN 0TlQVf3cGrLTQyT4PYo9rbdKUx83JkrDtSVTbhvl2Kl5bp8tq10Fbd/Ml2RNvXR0 nhNI3qxNN67ph8GxNzIjV2Gnk5F5bNGsssIbRIfTSMllnkzdkMKlel+eRMOmIY0g cj62BieS0XBmL+/ac6KnHXy7f91qM1Un94v4yFFbN9rx0r5vWnpQ9mnrsid1dlXK O/YW+0lgdrxk1WhfVeHan890OSJ6x+A42igRYxwCjh/0rM6CncRBp3Ltm2uhfC1S YJ6pk4338N2yNxvUl+Y5IJuDCVXvyI7f9IN5vd8+OOSo1vLsxJLYVnMr010vPkSb E9WrlVGDPDFCxWZpZ27XlXXk47g+WfJ0Y8OxC5AutiZRBoHr1Z5g1jvKmpufdxY9 OZEkG0b64lj2z/Ber6vim9VI1NizvrhuKBxn/Ml4wvYAa5ZD2al6rsSEauR5B4Ny u41BhyZxca1uJrTVK7vuHJckTLzu9B0vXFbaYuW8qymVkSirwYis1fAF3ab701kj afvUqd891qYtyZ433TotTgNqVj6gsWgIyWkik5vRkF1oh3bcnFuydVxrkyMXjLRF 14lmXON06Zt+4C/m/ZFyjYmL2+n2tIQk9bKp69rLvj6UCY6e6KK7XySEy7IR0fKv KzE6b1fJ9Tg4VKt2V9RlfhqIiYv2EU6HfjQ5VwWu7LrrnUN1SEmzwZAftA0CeDBx pqsgabRVaTzYGIPtpb2h5qzB+OPj2OJxqVsnVHHd0fQ6KwZlCKq7XlTX6pREHk/s 8LgM5sGkWVFHTC2a1JuL5owazqfdfuSb6zF7HA1EMpTOjF33u4xykZiyS8WM1Noi 8EexlyjzwXDOcm5f7V3ppemGK2nrz0Mjaa5ibu5f5no3iK5ey+D40MCXBH0cP93r PgpN/Hya4Tx/oJoQFG4Ie+NtR21x2R52vT5BnI6H3ZAcJIk09PxO3K1ZS7IiH2bW cdCeDcsHGwFD60s3as530oSlls7J3/gQXviX2lXe1CbEWj1fhdAYNo+k0ak3yI7q DeVatznDw4Y7a5QDse1gEOjsuNpeKbHQqnS3eK/RiI8Ou+eFU2vQNGe9pd8/UpcG ZzQoWb2aZ5Lc8KtWrxl123pZA5LaKNyARRSYxDAYEle5WNqt/KHJ6KNuojonRqtS 3Stp793WUTvaXbql4oZZczStI4+e3NAADw8yzVvkLDqD4+KfB4ZwrRznUldfxZNE FecrrhMPRX1pr9cNRevj3gyc6muDWHZZ7+lQi9DdkubQm7nCwoAgxazVrbGZcOKg G+/6FUJcEbX5UDjwSiigY4VrQV6eZqoznTGLjk9WyytirdaV4vuzunCosLK13yj0 IOROhzFBTcxjRzUnjXh52FVHvlDjOAFfiK3OXBOqJ2qnX8/Rphwiiq4y181Zyzou e70w6nXlhd7VR9Xk3DlF9jHQW7vEnZ1E3q5X/IRsqFU+8GZ9T97F/UgclX2NM90Z XPdguThW3XOHVf1yIucTZjfVpzKxjsiENPid2Rlzg2ldGEwiSzvS6nCqHES+Vt1s yhuzDFmoz9vuTD2uTGdyGl+m55VG9AcnY95yBFvUVp7GBmEnSGj5fNpMI28wtxYH dyyFW+pSKyu6L4V8YpvjFqu0WzVTZZPZCO9xTcmbXne20UraW14bXnbHJGnIo3V9 PazW5ld11atXLhHdLy/Kr92pSF/xCx8dm0yjTVDkZbHXIVq0mvyE4nZG/6pz3jBZ N117r2+Cxmh99pYnet1eBrq9KO8ox6VGh76wEJe3B9R8XBk3+Cs13B5ntFLR/WO/ F7i9Ha2HJ+Egbm16Y1P6/KpTmsYlPX+Hlw1KrK23ajOenoxda7QEb5tpGopFLFTy MuLDUDJXyDqdFO2k79Rag1g3dYVbHSy5dqkog+XT17406zO6t0pMV51otoDWH/t4 T4Vo2286hFObdGWXWEodX+pcT+Nr7aioQ+Dyia5ZIkn45dhJNiTj3BHBN+koTVcz 9p2w7Vin7rXhVk+cNbe0QB25nXWHnSqSuBzPx2yz2p9FF6kx0iRt8gTb8ry2thk1 0JLKjHWaW0qqN8dJfzvRLcsaORVOFLgVrkIcI7NiZ37SJLtxicdu3KOuT1+Xttqt nN75vDfk0Fgmx9kw7k77Y9sbjrrreNBzzGlj28DHdR4sgaketRWLx40qESiTxtjA 92X/jBZYuhULbHy0KirdYKRuRWYZw6I1rkKL54rEuZPmXL/2N4bWUUYn5ug2ieow YXSSUFW6nFrFyXPS4NuLRn29EJaXQ7VW9UbN4XpXlyAaqUNsuImVa2PRaVkdlhwo sb5oJM36YL2MVztuV3ZDB06y3s/NmcJRjaRrtntTAJ2ZfZpoHjdRxkmjO6nZp+3S 31Z9Hvdk8hxLbWlL8lRfulzd8vYnbR1u5322xiYn+6xGQle9nuLeZLm/tncn7cIc NkDxniQtqZagmDW6Oxa6s5npJIRxWnvVcgp/7qw39UHfWdk252/IxoLvVSZii/DX W9pgmaVaqQ2C1nm4XA6M1q7BLGnd6YW0Jg8Xijetlq2TLc+qlUF9Z1y8aofrypWF AW5xtPW9SX1mrI+iznhD2vKsrVodd/3ZWhjbo+bVq8YBTVTjcjqab240RdBXzMWR vfaZDPc7sx/Mtb67q68tb1FnTvth5ert18cNce32JsR8yS0c4Ro41ejUfrru+dQT FqttrbsfB/toJzZGicuMq+OR0Zka5GRgVzdqdzEeervzdm00+Etyji+zylhdyVrd fNrnyLYu3mg0PgzEPXviuNqkYw81rtveH6L+dT3QuYEa+c0B3pkvq7XRaTY5u4d6 axiS7mG8oJ6+qWUYHt2Z3DivB4bbqg6Xuz4nLdtsfDrO5IAnnPph5LoBbW6smUSQ 4+5JlunAncpjQb9W2kF5TTisn7bkrhMNvJhtD4h4siKD+ah7Ydr9yzlcj/f0aSA5 wWiBq42dflyM6dbkutgkk4Z5rS03ZYtux4f+gJyZhy1uNuWx4u27s3NzUx8PRp7b aWjaNXKj6aE6PWwsvMlNrZ1ypNa7q0nLjUmv+nRXBFllGW/AnZc14hhRRNhfUB2F HXOXPd/vKMcmvx73lRj3prEcdWu25x/GZizi3cp5xOv18orYpr7y955wCJP2eh+3 CL13xuN43AlbU47b9tnG2hqH26DTb0U6u5hK9Ixd9PazDrMcd8fjXnmLBYtvom6w 2FMrr9cen1fTVYXbHMdxZ6jtiVFFWRJRL1FrrOCd/Eg3tgsZJ+cOPuUO5v5yZMrZ A7ySUELTvfjt1bnm7WO5MvDGyvw67w2Y8XRQPQetuBoPDGPHbbs4wUXqchnr4gGf 6vhKPpRPSR6vNY6N48NqnEQmp8yGoTU3V4YY1HRR5qkOURnjAbE3t9yp5hp2PI9N aiFT7Myf9niaKTMgrm0mbUpfeIIbb/iFuZZXzliu8TVuPoym1Y1ykqTjZJrMO9uD JElfb5V/v33ah44fY7+Vmv1pafuxHf78U2wuXBtbBKFlh19fyBfs5Fjx5qtA/IAt bdfdm5bl+Gt4Q7xAYVTB+vn9lqI4DPz1z/VO3ahLLWyoGaPeF6zX0qShhg20VldS MaNWH2I9qaphkm5oA0yvt7QhVpPGGiaDQ4mNOj1JaWrq58+ff8LzBsu94UV3OAwE /kk/oTn8/PBK7qoz+FUz2q2f3yGIFWA/BHvbP10i53RZfw6d/X8Rsb43/+/TrdOd /CdR5lv674/Ywlzukj32YWGvgtDGlhvTX9sRZsJnz7Tsj1/ScsskfI0dz/6CxcEr jAfmjYUQJJhLGzdd9+GpH5xwVBJ7+fKCvby+/CVjwTLxYFC/xvY5/gI1TQtVWTlA 39DeBo6P/XLamPGr5YRYlCw8J45tCxeyQXrmzk7f/GBbTvzrxoniIMwWf0+hE9tv mrpN9dbmy2NN/AW7lbgP/ENkLwPfwqK968SvezPe3Np9GNHHe9WX19eXdLqWCWN4 +fXlRiXs5XN8jrOpfytP/i852f0AjXtjY73u0MA8O94EFgZjR48QuzDghvclK42E 9O3cfvspWoIox1h82dtfX1Dj+NY8mtnTF3Rb2NeXB7nHsxcRXujBNgKxzZ/epeOP Wy0L4dEMsVUC7P+K+fYJm8yG9cms+nloxzFQNPrw8ceyGwlFP9c9E+RLBZ58xUrD c9IX+Ms7dXrBPtm/V2efvni3jjIc6oh3TzWi+OLadxoso+i9yhOk6KiqwP7w8iP2 tkDNBo8sRiUoltifn9ooCGHGsbncfPgbaMjfPqUVHyhyI/3vDyx9AgwZyV6IBBwb juR23QCJtn2QKN/+csOFn+RB+v+9Zb07aOcy9fVlH0QgDZJi1Ludry+f8Qg0ZpE4 LoDa5+Xaefn5Pr2f6p3eyMCMWU/7unEsC7rqSG3taxLZoW+CXI+l1kj7+vL7g0ZQ 2G8PUvG9FvZmFJ0ASN9rgflTLUD5MEhArm6jiMyj/ae6Bla+061Q7hZJOoCeiTlW JvboD8B8NG/0IIrhj2XgRgjviRcsDE7oI1uUAOyIgXmgU3d+PiJkCQWwFwDrvI+f ASZ/+r8f/nwQh/vT+0BNbBPaq3c4+e/pQApe/RWR/Eb3v97J99UFFESwFr2m6vOC QQ9rO/7668I1/d3PID0dA4ucq/2V/BmpUPQTjh4BVpjvyNoD1V8yGX3J6P4yTEn9 UtA+//OhKo7k9Hvm6tFK5Vb6qQB2SJz4L9/+8heEpv5rrtIYQnoATmf1wGsOaerS tU0fvX3JUTQ1Hri5B3j4k+YIe3lB4L0EjgB8I8xL60BfTgwctiP/bzFmn4HA/21d 0c//ydb1v6H4fy8oph6xmPqvxOKfFuF/4/Ef4jEAIoIE28rwMSXzxoywhQ2icOP7 uyidihL2C5ZrMvoTAa17KVosmPflAaI+/Cm4+4h9eJSC+yuSeGJ7WSY+pj3ZDqBH CED2ILY//QwDhgF45v5z+PIRMwHhngt8uIPgygmjGHMDwOcfbtU+fnyAnYKyT+Cj 5nPGhkAO6w43IIjo/0cpB5SM7Ne89S/gdPpL7Jc9uNbfHrpBP7ndy0u+oiIRhv7F y5tAgEUAp9iH9BUFLPoFCPkLMmfg22ILN1jusPzdL0/dZ2+/fbu19+0OcKV+v4A2 7y/Q8vcm8ky0EsGAXv9MqF4QuROcMElVwTg4GQEwkFQTofxrGoMHK+BrkDIf+roE SZgOHkP0fcuBgjBpQ2Xilun/vt25481/GFdgznn/fwUFQkP4+vubfkog/NfUdQFC ZYWzOQA0F58Q4mD/X/pfuaUHDv9xaiUnV32F6Pg3UG2pNdAkdYbBYEG37ywAM1ui 9CcsCJEowkOU0EESeTKhffC7nplS7vGfJiOQ5WuUY2Shh0vXAWkHSbDvOoib38vM LP4wO3PPx2C5K/MWBjax5/780wYcup9/amuGBM6L0XvV+qP6+OvLQNMH2rD2gilg DbSO8fWF+BEbDVpf/2NTxdPu/iG4B3amTLtBfM7N4MYT7OiYmOv4O8D8d0D/LqqF b17oP7z5e2DmrHLYgpY+vHUqSeLjk36BNrymyPQWdtBPDoy3Uu81Knx8pwoe+GCm 7vWe2nV8YECcFcoB81b2Hf35Z3D3gVol7M1x971iaAjo82tK4fdgNjXB92elGiX5 +K+U1kIOUz4l+3Qe3/M4PnxYOcjyPTrOSuYyvqpOBF66EzuB/yWNEl4h/jB//P0j MuUQZtqFMFkQz1hAg8SNnb0Zxq+3woWc3rX5NXdIX1FS7eExigfSKrdnODDNdDHk EmLLGFuAu2O7jve6sNf5p1Q0Idxdhukvd5X/BR88CI5e0Vje4Alq762w5xK2ChLf +ncspUl5qNjLbXr4bXovSNziJPTTVu+tLYsevjPdhfUFS41dGtmlJVGXAIuOi+b6 skDjMMPL17vXfZt8XhXogWb69B5Ikr9PybC471TMSPMlG1/g7V079aIgDAc1iEEf rGRpg7MJxPxWquSu/n4l5JWiGOjbU3dZ3V8KLv2/2J1V96I3XkHZMjp9AGKA6wpi iOiZEvJLKnnoOaLoFyxLy4In6/gvWBmJ7uLy470PLIrRv+k70LXyomsRLWV9FqKf c6gYCnhAl7uglXiAfoJ9DBN+eeT7YxOpLL1pASvDY/rox2LK3xls1mJWpPQCbM1d P/Km7vNHD99v8AOghG+5oMi3wrc5FyMvhvTxHZR+rv1G+dEPaETe5tvHJR3Jn74z vxwYYm+fxrjY0XST9N/Xu7/z7OHfu/0ClgKE9+EJ9tuPEIOXzaJZZKDs+DXNEHyI bNcG1Xyo9oJKvZRlroiMkJD+OxriF+ydigiZ36mc/6SR0xMSFSD0IO3Pphz9pKT4 8q5UPFPkoThKe2HBYgvD/Ld3SqGfYsQ5rsHE3i2WSXsBfe9wtPi5aXNOsIxeN35j v6AH334pg+i3N02Vn3x7jxWpXHzJCJnaEjSNNw39kqUjC7cFYvS0Xgp6AUjLLx+y gPX+CiLolHwfv70d1i+535TZrlsTj/KERvFeE/dPCarzPQV8I99IptNQ/sGUYr9E AejHXZ0zcwOI8F5/bpGqzR6B9/GayUQqT+DiJ8v4D0w9Fl0icItwwD9AzQiH+njJ gKa8vDkarwvHz/Ma+zBY2A/9wSM0Z9e8QOyJZgT9RCj0RCnLWwPYbQy56OatTdIs SJZrAafbDo8gBEmEcg6ofhA6a8cH+Cgk+lOqb2D8ndUlLYG8rSyhAn+lzi74giYw 8p18bYbBt5Hj+00QB3jR9ENmHWYL5vzW4ts6jyr7nPn4l8RtsglOMsrY3ptIs2a3 iL3oNcsf3JMGeSaBfC6WZg7yciRB/JAFefmYS2XvabU8UBz10rV9pdvutTRDe5PE eVMhzfWhrHcIzYOGpvlriI9XAZrHl/cbyMaQF8GiIIyz9YAfPucvsvAh5UdW6k3Y +UuRlHjMQfyeVfntOTuZP38pyPpSRBwlun0nEn6bX7zHlC0EI0U+Iu0kejdfeMue FpHj/z6CxD0I0ts01J+RrH8pN1He5j+eVbqtov0V9fr1Jhc/f0APPxYpot+/PeT6 /nm5+u1G5X9Erv4ggV0I2B8IUpGGf1+c/oVI8Z+opf+IXv6jG4meNXWQ+NhAk7ut 1GQG0Cs4cmHWPzIz3SHEB3Zopiby4/tLs1nFguZ5YJpqf/Tv2A+hvQhciuewX7KB vxR0zLoFYxdB2xgqEdowMAjR/q2Uhnv59r8eGvASr+FzeEkdhy9v83zl/KGidQxt 8HO2dNjWjFpX/YeWDtNG/uTyYfH308aeP7t2WPz9J6u/XTgsGP+n6wPJf4VK4Jh6 9zY8D+Ts9SZTz60Z2tSQBpoEtrc1zJcMB91J+rFYHLsvGf6EF+Xfrq49D+4fXGFL qxerbAWb//4mvZK+CJm+PE/5cVk+dQZ/yMtEaLE8T7yk6vLLt/8HfynlR281f8QM 8AVfINB0X9I4FqlsoVIR9qRtn3nuyz37A3Vw4O0+iXE7DEH/y0mGz/hNiV8PEfY4 uJdSyR9SkUgHnX600cd7wid40KQnNXp3LeW3Qp266di+YAVPf38qZkhyS8MmddWo pbgudweqNkjXkhSt1epJqlrvVPMVJAPaMNSff+oNtKeGMhi/zeGpExxVAAFT0T+I 92mvP39nTBqiY/S9Id97st/rKZ/2vc496Emh+/6oTNMU0mWELGny/l24ToEHvf0e YHu2n3yO9+5bqby9QUGVtwexirD/UQZAXhAVmWU5VWY0+J8gCV7VeEomOIqWGJaT JI5WeE4kNYKQdImlGJ5jRIkRGInhSKq8CV2jJFGnOFYmWVVQRFXSRBWqqbrEkLqq yIomaZoqEgLDEyRLsywlUqoqiqJKqzz99N1vikIKPDwnNZ3XBIVVGIGkNVIlVI7k KfhHJTRekghJECWeUzVN4kQYmKqpKqUTcnlkEknQGstpoqTwDCsqEnyWKE5UNEHk KBiToFCcIIq8Cm3RrExB8yohkRytqRrBle/7hq4kCnqmZB0GzZMkRRO6JquCIMgC jFKSWIkiFJWF+XOSoJGKKsFTgRI4jpL08olDWhR0kpcYkZdYgmVkGDmraopKCrqg sQJFCQQryxTwRkKta4KmEILOKqIm0wKllq+AVBigAaGqGsNJKs0JpExApzAURuJ5 RgKWsrqiE5yqCwJN8SRDA3slUhBgLipBPn0vo84ChQWGBI4qQApFYVSOISVSVwhR 42mW1xiGEhRG10GKRFLidJIlFYaWJZbkn+5IJ3iCoXSV1aGWqGm0rPEyKXAsISuc RtK8QDEyjEgjBFajKY5neIqgYdwCoYusSD59OTJJEhoHwsOJqsJQIGhQlJd1QuJF gaNlgZcJEBpWIWSSVElZ1yiCoHWK4GSFEcXyyFQFsV9VZZIHErCaCmLGk4ooapSG pBbESqU0Aqgl0rTAKKAwOsPQGgVtg+iVvy9PIESeJ2VFkIFRBMwIugOuwXglniJp UmM0iWc0Tpc0lpI4aJQUKGiYUVlVBdqU5YygOEITJAEkh+A1lVdFkpJAcXhoXgdV E2SC5hVghCCQFIghAc0rhEYi3RClJ3UC4WNkXtB0gWUECok1IYnAf01mFBAWVaYJ wAGe0yiKZDhWUJEoCpwMpWSdLMsZRRECB+JOKJwuypJCsgSoJDAXREtiaVBVmkeT VmHcUFngRInUWJGB4fEUr5SnqQsKLbCgOzQjg14RgqCKnMrQlACCT+qSKtIsTdMs QAGlSJKgKjS0DRINkgc4Um6M0hVQRgZEGlSYphSZFzWJUHiRFnmWZ4DSPMvJJC2J SJ5J0DsG1F1hOUQ87mlkIivTGq9xDKgcCeDACAILqCCBHLAKKDRglgKTBy1SJJGk GZA9nac0TZBZgST5JzkDpugCTYJUkCSncSyjc7rCg2LBiFRRB+yhWYnWdJ2VWQAP FtrldeCDpIL6iWVuwvgpEX1llyJLoOM0zEYTQeIlWZJkhI6qQoJiyaSkgVCLDCAR AdDMSLICAvJ0+xQQmOJkDbBMJxQWQF4FqKR0EG5AMBWwh2FBLSWN1MBU0BQJNAUx VCWCB214FlpGI3QWVA6UUOJlkdcpXlR1kFaRYXWCAs0AprGsCs9pUCQQW1mRAR0V gDMFZKXMTVEjRDA3kkBLOmAi1FdUhaLAshC6TlKsDuIqE4SqgRKRILJAASAymAWG BTx9YgAFc+B1gHeSlhUVyMXB+DiVA/2BAamizCugAbquiRRNga6C9eMRpyQd4Ep+ +s4HTUbj50kQT0KGhgHYkW7LQHqJU6FZnWIZwHZgk64y8IlBggQ8BjvFPjVGyxTS XJLVaaCpDjYToJvReJ5QNBqUg2ElAG2QXooAs0urBK+AjVaQHVQ4gSvrJgnmj9IB ZUBdWEkEZRdpHbRCUwG3aVGhVRJsHAGGk4Cf7/nAJQ/DD77vYzy8+2MvA8QY5JzT AazBy9A1cAZASCTwMGQgDyEToszwCgXaTwGHRIrkKAbIAGr7JGE6C0Rk4CXwCSwE AilaAqMng5MBTejAVBrgUOAZjgZm8DpIjwbqD0YHzJaoPZEezBlYJB7AFbjHA0an pKYVgVLAAoIFFxCKKTQYYEWU4TeoLog0qBIFGF/GC4kGiwalKIqCyYIJoQGLWVHX wKqRNEcq4FwB5hI0mCRQDoBqcFbAtwI9IGihPE2Z5nhREggZHDBRAPNBacBYiWaA p+CSAMAjoADBFWnwY2QSwBBapAQElrqolhvjAaUpQldpBd7C/2BhwejxJCEAfKgA SIwMigwCT4HhAgMIeAdlCFnSFHAUlPIxVAkgnBVhTCDmyPWSFAEkFqE7o+i6DnZM B3MLPOAoBbSHE+BPFUyYrmng4ujsE2DDkMF34MHfE0UoRfMiQQMCKYA0yNkD66PL YMXBDpOqrKpIW3kd3FANrMzTl/RAMxypkxzBIvcICQgFMgZekw4Oq6YxMkUA1oBW 0iRoEclxnMIAR8GH0BSFop+cKVoCzRMB91hVIRRKgWEoig42gwB4gwHzsgZyI6PJ UizMAhCR4iWZZSRdI8VyYyz4qiBdhAIQIIDQAnCpYCoIgBkV/AtkvTkQfIFCs+Zh CgpFgLmjwTMDl0Irn4QXwNcERx1qIRIDHygK3FfUIA9uGUg9CYMAW08CpyQBzJcs cwTCdgERkSnfvCaAGIBJFZG7y4JfwAJmg7co6RTgPfjfgiIwgEcCBVQXCARFYEbA mQK/XVIBQsvqBA4KzauyCPyhaYAYhgQ1B8CX5NTRkMEJAdACXeJokWAEcCGhAxAR EAyAqPLFEqIsSwIYbzD8Iri9OrJRArhorELxBFATBsZpABmijh7AHMC00DwBPhch gSg+nZ1GvqkgEiS4aBzPgxcBmMgI4MQpEAGILEVzsoDMIHLaQVvAi1EksCEs2BQw X2VFJxWggkxBGUqWwWyzEnjarKSCZAJK6CygEwsoDx4vCBlYCDAW4GIJispJyHkv 0wy8JbDvDAODEkDeQR80noFmNTAkOhommFROBjBTaRoiM3D6wZCAWwY2jNXBGS2j BgPTAhMpqCylg28D6CrRJMvBKFgKpglGnGQZcG2BneD0aRKwV1XBW9NpsA/PX2oB U1IoCJoIGAvgkwZAA0YHXDKQLIoF/1sBnFBAPjUIFoFOHLQigiKAfAvAlrL5BSTT VATVjAh+C0ACAAL4oEAesES0SpGAixBPMARQAESEYAUd8E+TYMzIR38KJwBkwJUB xwQ8ExZmCa4UDZZaIcA14VhSB5eHBpT8nonbgNlCG7oeT4G8u2M4W6rM1oXSpbkv 751feMwKF01jv31Gm7RQevj+CGUrH8exsNeO/5rvFYPBhEm2qHd7ct+GVxrFt3vv +TJ0qSXsa9rUO7tgi0k87JTONvQ9bLj4g2rF3B/Hgv2GfcF+f6fF9xaBnya8Mt3I fp7K0za80mBuK8W29aU4Z4C2miOm3X2Rj0Dpf3t9xR4yt78WK/+vr8CRD6WDO88U +G5HDw/f6SF2Ymgsa//75P0nG08pnbZ958d3WfZHVLrR6I9J9PcphLaYvj7sdvut nDMrFlaQJt02T5ZKPDXy3f3ZpXLvvv0tzxJi6ZHTry/ZQhFa7XEd6+VpA/WtUuB7 QRLZ3SPax46Wez8v1krgBuHXv/0PPf3528uPf69yEr+pC8AK/0Hdn79X+WHdoWOA EixhzFLomO4nbGyHlumbn7D2EBuafoQN7dBZvRSHUr7XoITVBpqeIdCD8CHiA98e sOi9lz/h0ncbLs6/3FLoRUL1/Qr5Rr037/5oI80/oQ1IHKJMHd6XjP+z1Pcpqrpt gk4VIt9w/ZKx8ONjR09Z+bxkvtKFff78GVO7Ha18aOL9vc6l+aF9u28ogDbl3gzZ WyX9Ozbye0XflzowKCWb+s5o3pXo28u7nf2+2H17F67e3eydPy1Z4Cfuvb/q+c+c lfn90QPAvMt7m8Xf0vB2cODNyvLif+3q63P2wPEt+5wy62324OHdbYm9xJVsn/vT I7QLvfwoVV004/R3+d0/sju+JEwp5R9Frdwu/s44FoF1wRbrZWoIXnIjApy1nGN6 wBJ+198smeLw9PkRauhNfyVS/P4odvcNAlgvlQMnhwi0DeDdZaXHAs/bL/ahXdph UWosX0HP1icnmowN64aGyaN6S9UG+TFfA22dyu+2sH0khVF6mAhkxzYjx73kp7o/ pecMsw1yZhiiDZLZkeHsDFeQHzY62dlXwSLR/Yyl66aZrx7F9h6DrqDd/Ji4iU6G hMWhhMxtzpyavCKS2/gVBC1tcTKcocsjsk7RWKCu6brB6TZe14QPcT6goxMl8Pry CdQ43qDnG/OYbvwLMolOG0Wbr9EmRuixHmOgSGCptgkKLZwdjBBLF/X3YbC0oygI gQbnpb1PT1eFCdh7ywHVz/egoelncQI6dmtD4TC9C+OBMgVVZjDepYmOA6V9rWDW 0ScslcQop7DrYtAl0AIcjbRVtAhppveH4Pk8882VpfbAC0xZ+AnLrg35lJrcvNHs rJ6d7duPPmUEgI4KAiGyIAo9EKW7gk8I2z4Vh8xA4FbQSkHFbG7Byc/4gqql7QJz kKOJAz6hHZhh4OXdR1B+iQZ2yQcdQffI9QTBNdP9fAs7PqHTKRkH05Hfmj069ukT okV+AiHOZCYMsnJ5I2iQqOSzHD0egslEJ200F5/iBcw+OwvvpITMr4e5UxQ6z3dw piWyc5CXdLdSRtN0thkRvX0CaJuPA+wBuB8w5Gx3LGYmcQA8ddAegQuWLR5jyOXP mIbGlNIsU++s82zzqgmShKafThoABbD+dqIsl454Y8bpzKK9vXRWl0wE0J7Wte2j XUe5R5JpC7p4IRWFEO1Wzu4EyEcb3ZtC7MqphDiQqjGOVPGuCIF/cyk/UFlXzvKh LdSR4y/dJD8It7bzUaKTGLb1EUgl20sT7XdON3WeNmjjVEawzNYivSuONt5U7fKg AQWlsoHmXESTT0ea0ulxg+1d8G58Q2cKkG7dyA3PusM7kqRVXLd4FQWr+AQT+/yX DFKVgSYZ9U4Vkzoqpqn19DM6MjssMPeOgellGSn2IaEuAcWnjMmXdCM9mrKZHXFA BREfsyO5SDvQ6cu0YfT4Rcma7kDDPSjykkpTLoK5TuXweXKA5egWoIw+BRHTuD8t AzPMkio3XC6g5uGqj0yCUuKBrphImcvafzu6ckfLOLiNNx9Srq9oxOk0wSgBrV0L 62hjbZDaf6newYY9SdGG2AckIAl4JGG0DNAeHMQSsPEfc1RDx9iy6si/2aCTeohT KQDYZxhNlENnPf4b9JSsYQpxetAWRD0LLpYm8iXTLeAWovlNW/LhfbAhFoW5eHtQ fAQ6qa1YmnsHZAMCQJDlG7dzWSwQ5AYpyITBsDJkLMhUqBs6BpyR2boZkey0S86T DFxuYpIdws1EYBMEEXB+kcQxVM01P7vn42WUDqZ4+RnLRlkwNlUSNKj0coKUkZaN +jfTyX9C13tkZ77RSePoNsKHXfUpBOQy9qmwBhkJbOsTtriURlxUS3mTCjjakqWh YWjFNmckFdHL55SWSMXN7LhASk+EIsXY3lAiK+EsCyLkmlTuLwfwtGwulncOFOOG zqU0APhUaEamNLmpQaPM2Yq8HCBMgdDRbZo3kUfmBTcQfTMeZC3dKXgzWHnjN1Zh Suq9Z8CDbJiz9p909FN2mU6aJIUnaS4CiVx6v1duTDM/I+UcKrdIXGRJsyMqDw5I Nt7LHhmoh62q9x1wd08JRn1BG6ZgzJgXRPGT44Q0rYEKZ+efMuYBokd3/EIilnIM hcwpTzPnKBP71KYV6orGluoeOKiX3O7H4FU7RzsTN9BMP4VJcxEFLihJBmlgi6IC o42alnnDbamXo/IEaQjCQGSj0P01BaPxTAYQqQodzW0MKp2C6AIxeocMZ+YlpWfw 00lYBdc9JArF5QlDJHSZ2pf959xDlO72HElTyVG42e871u2TBfBuY+fGLx2miSzG +xVTJwPZVgewOnP605Mu0d3rT5v2wWNep2YqRCfQSiNE1uQ2xsxqFDeR3EOHIlBI YTNzagK/8LnC3MotzChDuPRIT6Y1EAG9ZpUKzkv+pRQj3M/Sxw8jySQLiUgUPM1+ FYKup56N70A8D+JqR6A+qI3CO/mUeiQgRtnwkPcd5m2bhY5FoCOoezcIdintV7bt 5khfLzM/hdLsnBHaqR6scu48X8yQ2QHLwkPbC472o0G9BRUZqR4gPgVIFN1jbXQ7 QG7jh8iNQoKKXJW0IEoD5eiYGax0T2MpYHkUtRxBTUxudZVmIUioRSrT2C8AC2mt YXc0ULT07tJ0m2+uRbeYEnHhAWQfWiqx8R1r9ymXzIKWt3aRQoF7aqYXjoDIZdmI tLniRBjqKgP1skLl59jvAyr8i4fVjhT/QB7ss5m6KWaU4drJDrM6Vna31Q04b2Yt B27v061ONs57Ii+T7lQiUC8IyvyS5H5KYS2Ljh5H2R4NDUzWsN5AUzRVUzF5ht2X /nraACV7seGsjWL8Dy8/vBRux+2ella90xx+we7s0W73sJRk4S4HHgLeRXrEAoIk mPbikppYJxXi6JAghFyE5nJnx9HnB7bb0f35HYTyjBxULcc1d+grCPHpicW3plHF LDTKS+c5tbSJHI1ukp45qEXvEFKlTnqOKOC4pe2Umo4+onKFvOUWsFTpj5rMp/XY wq311BOF+fpZ1FpUdUEX3QggyN4/1oOZ3LyxZ36kTiyySmko76exFuAAmvVLQYZ6 XEDxzdtNlSHTrwzCcn/ttbDs0NBLLW3kg4n9gD7ll/c9252i5inzJO9pIycLo7M8 D8RnHz+X00rvNYMsP/aQUswut0FYAGSCYMpCYnK3FA8oluYsH6tm2cvCOQjRzibg sFV484i2O0TnckP5kN1CszMa5LpTA43/WzpEwILUIIHwboLTk56c0ggjtQS53U/5 gjiZWjT7dmfPAxw854M+gY1bgFuUDyHLX+ZgmrHjl29Fqu7Ra/2QvTQXYDI+FrKZ os/dqy3hCQwDBCP3yaA7YPej45gXeoDj1PsMkgimVHjB97jfupuYm7uaufwfP99G myl+BiPZKhaETd4+vnx32Ld0yt1TSoeEvKy/5DB9n0KqpyXpQqqYuQWor/R6iBx7 03gu6zbnsmzDsFI5f8PnR2R+h805h82ijIXihHTkacN3JEqDjlNwBxIQ0xuXP6Vx za9dP/szLZw+MU5B9iTr2UwdzJL2ps5BOsg7g6PcfuXwlcHlApA0awWBwvvu4N2N RItjqSv2MEZE0TxvijqkHrEbZtPJNwKUp+Ln8fJ707nBKHC5GGOUSVOerFzcMkBp VIEuD32olPksBUHLmoJ97+fHJ/XHPjwgyAPkgNjc1w9/+aGYFejgt+cGn5iXanhU SNuN+CAUN2I+NwyE+W7DN6L96YYfUCK9maAQ6ZscL1J5v6mc+UCNlPosomoR2qC+ aIjhguxGk8wju9WlHosWiUUKGaZVpq+3kvS95M3pSVu8RyN3C5Dnq/P4BHkZ2a1Q N7nMjHE2mNQgPph157P9OU83oErPamZsQvuNoqFnv8rZ04w8ZRm9j+bjnxG0Zyn7 +5L0nyNG/7QMPbaKaFOa6I9vCfmPtPvc9q9SPurHdn+V/m7Lbwp/vwc5H/+P77D7 z/Ugv+3hoRf6V/lXMp1F3kP64F/bPvXcPvWvbZ9+bp/+D7b/eIHJt2ep0pF+lIQ1 7xm9+OeFVUdB+7vNwot/Hkd3YH/QylCaaI4BNooM3WPInOJdtg7wHLyVA6i02RRR Mr8ozRzdDVtqnl/LSZpS0BRv0NUxd8Rz7mBa+AW5PYMR5Ln06LZoce84Km6KfLTE 5WDm5sJdUhTOswIPq0PmLWtSXiUs1hAgykluDlnqAef5mzcJ1lvQf7vFEtn7NIeC 6jwR5cE8oGWQfAxpo1k+5yGCfEoBFBnu29pS8Y0OQTG/PE1fZFKL1PVtyTpb60qz t3nd1O/6nGZ+0Jz+Ft1czU8Pk/HtzCXNWsncrZsI5c5o118WcRq6nyjL5t0yDY8+ em5xs0WNLMFmZQlGtK7y0PKnPLvzvDqQnWIdpudU87xRQZt0lSBNOZdWCm/BCghy Jm+PmfuXMaqQ2sWHBac80do1augbbjTJGA1uC2B5oqygy94O0fL2PWgFopduRyhl vpTiUoTy2IvVwaIaSshn66zFoeqHDPs9JMnW1W83IGMvlhO+ZP5QtuxXLLagJj4+ JLmQE439BqV/Ly+gpKnH3Hu93fwAk0RDQy1muzGKHHpUfP1IdjlEsZCM9H6BltLu YeojNdK1mQhkfLnJs5ZWcPJv6514ttIWhE6RR8x8dt3opVyEKna8/HwL1FAIZAF9 bHDb0U5JbA+gFd5yqykVH2YephcaYT8ErpUiTXom3bdPxR+3gpadrtD/kPhZwPTr mxKlGz2ybayreP8Fx5Mv+/8r1VugPP4R++V0v8kpLfUh3YG0idPCt4JpgYe9zB8K ptwkzE1XJ4o79xy0mmIu0crBnb4w+yhyUE48NxWlSzw+ZnRQk3QVJonSBDb6MoN8 Ef3dlEke06bDz5xXIHmeLb8JZRbelmNp7AO6ZfR2R/8Pn/HHrxRAoJ1dg/LxE8oy 3VbB3RO6LytPwq+cc9q0B5XMnZ0CZ4hywSn0FUF+cX9BFoDnSdV7ruNx7QWEL7Q9 lEIf1tGlTbf4sT+qK800iLrdDpktbNlpoHjKFxnQEF0QXv9BvDKbgna4ZJlyz/ET ENRsI0FWDGzVGcaFSmSrO/nyzDsGOY8bAOXT12Z8v6whXdoEg7jexHlgY8ZRgMhR BDIpjOd3v6E8A9rp8bSsk16S92v+rRW/lhYhsgWLjwX81TtDQ2q1JHQ/yX31P99A 8ClbQctu0XtMmKXpR2TGwmAfOmgFJpPBVF6BY3Gmnfc8UnqzWYb3Hx4voqggehR3 v+T7ZjJEerh6BmTHjpGKgIRkIlBEdGCEFjBH7LanIw3vbgP9lNmL7BbNbHskXjAl c1Eer6u+Lb1pIDSSoeVfe5bhnnU0/WWqDTD6AmZRYFNsIckyaaV9JKmuZEavNKgF eDtSZ5bt4rltuikSo2jZ6CaxSfSwuF6sbBU1sqTKg/9z3xaUO33LOLsT/SVdXHpJ CQxAWEqr3XfPZFsm8rTZbbyfcz/rzRpaaFoFjKSClnIEZaE+ZZ4kWnjKZDb3fIA5 8Amon8HY3ReMHiz5oiRqxRaFEl3v+p2vxt1cl6ex5vCGF99AUN4ElCHbbdH7Cdk+ PW4KuG3PQR6eGT9c0vdIJgCb7sCQOsYXtJ5j5QzK00GAqWjt5TaRfPvHnaJ3459e mZnZ0AJlU6b4QbEZJf+iqmI3ydF03Gxz8NOehRc9u2ENeSKfsqxLjgVPuyyKZQvP zDeJF5qUjf6RF52uoX152rh2n1Z2WTbK3YAVRLsw0g0OZrbOGAdpEjJb58uyXD9k 5T5v9xknFmjdc2Umbvzx85sFy8Jredvvw3a9kqtcjONpO0bmf393VE5Z4dKdAbl2 3LYTpo19yi7Zzq9lAf6+3KfzUihwecjFti9z6bhOfHnY2OfEZcws1rER3mftg217 dEshSnrYrYpMEgwK6WPiO4fELtQOKb3lrFZ2uiCV+ld30loZNmWChBbboMV0NSJd m71NJqfdzYtDuzawCPX24JznNyyjmmmdA4gqmiLQIVuuT7xFZj2zLR43OmeNF8h8 266WL+JvzH2+WlCSqbsCoR0eedAC1gCABHsFnQgc0NXsG+0QadFGvjgI0KZ5Owua YOapjQuyvUIo2EX+B8qUo5ceUlmQfNvOXXcbbUwDWxKXF2+xDyxBnEmCwPbOGS2a pQvL6yCAseU3gu4yehUb4wq7cBffj29wrgh9GTTPMI2Os7WHdLtTitmOj/AXITb6 YoPnbHuKH3ha+mEheWE/JCvTKTwi8kO+9N7mfWnzTvE3CU8nPzlQitLzaP4ptL3d DfmwO/suxnckua3k3HaTIWc9u6g/F+0oc7NSxX1UmdwBSmNOtGf6jU277cTK4Opm AxC5oiLRmlLgDj+bhz0BjyH83XS9IWXuJrw9GIR+sgRQvpkPxQrpGTlzjWH/839i 8g0Gsy0D2bL9mwwOFH3TQ5aOyXpoFbz7EH38ro3FPphopReC+syRL60hfnzTfnr6 6KF9NLIQ+asZZDjQB4R9l3QlvkgFZTHIDd7K+ef3Tg2ixiW0+TPbNpHe2ZurxD3a eKQGAnAzXwEo1t1veTIU9yBpPgWZgUPb7LJLegtp+4Ll2atUUm6rPoXLXbzJtvrc TV9mVu6K/HhP1u1W4KdEWW5pXXuFwNi6bQ3J7GE6iSy6TzU4gx6UDUBXA9uA4sv4 Yz6Ge2fFgnixF/Qx3ZdrGEKMNCXT7WhYd4C1uwMtZVDaAyqEZCSn7F17n7eoP17S cZv1Y893QMDAjzZmT0nFRzS47T96Y8+LPNINA1KlL/nLeeKg8E9QLiLbYOCiu+JT M5hFk2kIY4I3esKy77J7D25yNzRtsgRQN+qggWtn00OO4/sgnl3hbKfrs05xWOMV Pv4tyrYDRnFooiMX+XJelt0YZkBUbIMIH9q7ETq79Ln4M49qcq8hBbncqcuvHA0e 905ld0o/LY+V/da0YPka1PuxneI4EPr9/wMLkn5DLOsBAA== } editor %sitebuilder.cgiHere's a little script that I use to create quick header images to get generic sites started. To use in the standard templates in sitebuilder.cgi, convert the image to .jpg, or rename the header.jpg image reference in the templates to header.png:
REBOL [] save/png %rebol.png to-image layout/tight [ origin 0x0 space 0x0 image logo.gif image logo.gif image logo.gif ] save/png %header.png to-image layout/tight [ origin 0x0 space 0x0 across ; Load your own image here: image load %rebol.png ; Use your own text here: box black 400x72 font-color white "Sitebuilder Demo" effect [ gradient 1x0 tan brown ] box black 50x72 effect [ gradient 1x0 brown black ] ] view layout [image %header.png]20.14.1 Sitebuilder.cgi with Makedoc
Here's a version of the sitebuilder script that replaces the WYSIWYG javascript component with Makedoc formatting. This script is useful for building documentation websites, in which all of the individual pages are input using simple Makedoc markup syntax. The page contents are all processed into neatly formatted HTML by the integrated Makedoc script, every time the site is built. This is effectively a powerful wiki system which allows for consistent layout, quick and simple page content input (without any HTML coding), and only the absolute minimum browser requirements. Javascript is not even needed in the webmaster's browser, so complex sites can be created and edited using virtually any web connected device.
REBOL [title: "Sitebuilder Makedoc"] editor decompress #{ 789CED9DFF72DC4696A5FFD753606AC26D71961481C46F5952470248B4B5634B 1E89EE0E8757EB28B240B15A6415BBAA689AE3D0BBECA3EE7733011400526D77 B727663676D46D89AC02129937EF3DF79C9B5959FFFC4F4F9E1C6F9AD3F5A54A 13EFE86CFBE88D295E7FE57DFFEED1F566B9DA79B3B3F56AD7AC7647BBBBEBE6 A9B76B7EDA1D5FECAE2EFFF7F1ACBDE2FB675F9E7CFDD58B675F1A5DBD7876F2 F2E42BF362F676B96B4E6F96978B66337B76EC5E7C76EC2E295E57DFBD78F768 D3CC174767EF974FBDF39BD599F7FDF1E5FA6C7EE92DE6BBB9777A737EDE6CDE 7DFFC8E3CFF676B93BBBF0B677DB5D7375BCBEDE2DD7ABED3177D2F1BFDC34DB DDD155B3BB582F3C77B9FC997DF3FAEDC96CF082FC91969F7A57F30F8DB7DDD1 F5F7FFE405BEF247D7B8074FAF4AC26C7CD9EDC5F2B2F1BEBF5E6F97BBE58FCD EF3D3B98E5BAEBE4F57AB3DB1E2F57D737BBB649D7C8BB718FE4CFFCFABA592D 86C3BE77C9D96533DF3CF4E6BB47F77F9AFDC1C8C8DD601FB01916DBDC1DB9A1 B9BBDCDF72C3A3778F1E6D6F4EAF96BB5DB378EA2D9AB3F5A29139F2FA578F4E 97ABA75E37778F1E7DE12DCFBDD5DAF5FF62BEF54E9B66B5BFFCD06BE7C8BBD9 369BE3EBF976FBF4D1236E79FCB8BFE65879CF6962D51C78EB8D37783DEA5E3F 6867B273387ABF5EBD7F31FB93A7BD37DE2BEF25FFFDC1F38E18FDBBE185B36F 36CB1FE7BBC67BDB6C7E6C3687DE57EBF7CB95F7862E2D378C10D76C9B7A56BC B1FF8D6E7F56BF7EF3B5F7B539F9F275F57CC664EF669E2E4F5EBE7EF57CF6E4 78BB77F127986236BE77E67DCB8057F32B8266E63D73AE2031F45C42C8DB2EFF BD793E8BFD9927973C9FC9DFB3877B31F3BEC16AB7EBCDE257B52426FE444BCF 5EBEFAE6DB13EFE4BB6FCCF3D9DB6F8BAF5FE229AFF4D7F29B35FACCFBA3FEEA 5B7E75733019D2B363B1C7E8B59F9F1DDB6826B405033E7A1876275EF4857776 D19C7DD8CFBAD7300177DE6E79D5304FE2F1D79BF5FBCDFC4AFC67B93A5B6F36 CDD90EDF7874B3B7DBD915EE2B56F7AEF726E85EB4DD787475B7BF7EE851DED5 DDFE9E814B3D6A96BB0BC2F1F1E3EE3E9C6CDFC88137A76B8FBB5BED7BDD2F07 CE3F1F9F2FB964F8AC9FCB1623ABE5D641C29A18395F6FAE8E242CBEF878E03D 7BD17A780B00366CF6C6596EBDF58743EFFDDA5BAF1E7520D102F0CBCE38BD47 1D770EF16436BCF21393E1D9785BAD775EF3D372BBDBFEDEFB4C5CF76A7EFD64 D376E776C30BC3977FFEECCB3596F9FEDD476F78817DF1E78F32C134B9374182 9D3A9F699BFCC2DD73DCC2DBA0EDD94CDE75007BB369BC65D7B1815F6D9A3FAF 09D43D5AFEFCEC74F3E2D919466EF877373F057E4FB140B3793E0B66DEED72B1 BB789EF99F7967CDE5E5F57CB100DD78C727127672C3E28534D037E722DBA58D 5F11D9DEFEC641085D2C170BB0CE0650EF4C6D007D1C3BC8ECC52FB6D0BBDC03 2D44BFAA05AEDFAC6F76CB55DF8B662141DCDF5802DB4CE3ABE61648794FC03C D8E483A8724EBE9B793FCE2F6FF8E5137DF9EB90D2FE3AB8D5C1C9C7410EBAA6 575BC295EC69538CF7D913979B88AFA3EDC5FAF6684B125CFEC435DF7FF64468 0857FCF9FA3D7FBFC7213F7B72BD929F4FAFAEF97BB394BF9B9F1A797D21EF4A 22E3E70B79FDDFEDBB3B86CADFD7D2CE467E7AFFEFF2B7BDFF6AE13AB569AED6 3F3647CD1C0E221D74BDF4BEB73070AF6792BFE487DFDBCB0E7E4513BB759B8D DD5BB3E3D93B09105AFE9C79A0696FB194F05F6F96CD76620E99166B8C9EC275 81C600CE77D77FB959EFE6B63981B5B977CED4AF2DFEAD170BCFDEEDFD2D8374 77C87BC32C307B76B1B1F165F037CF4830CB70BEB1B3690397FF1C54018AF79E D17BC42762DFC53FEC62D39C3F109EBFB71EFAD1EB43F0E7DF492CF14A1F523F FF6E1F1BCF25287E270379FE71F488C93C10711FEFBDF6EC78FEC2FBDDEA747B FD45FBCFA8898F185AC6BA6F78C8B03A946E0D2246FBF800E6FD864315E2B8DA 8FB7C7E0999B2921E9DED7F3EBC1A8FECFBD7F3FBEFB8FEDA3BD55DA98BD28E4 47DBAB7FAC471FBDC7FB893B5F6E609F97EBF930091D783F5BF89879BBF9E67D B37BFEC3E9E57CF5E1C51F970488CD72E2BCFFA97659AE18C0CD9925EEB3172F 07BF49B73EDE77A9634972C73BFB93E447FEEDF2E527491AA089BE734D370B4F 5CC5BB5CAE3E3CC0E49F3E94F36D821992882EDF637F71B9DE30B717F3DD1138 3668207BD7528133979656985EB8E00EBC69B6027E9616B46CE2747EF6E1E6DA 7B7CDA0884C02EE72B018F393F5FCD17CDC1537BDDD9CDE64828E6D341E46E9A EBCBF9193DBBBC1CBCBA5ADF1E5B323A7B3AF36647B31658CF6EAEB0D90F9203 9DCAF97523B1770BA5B1EF7C2666F9E182CEAF377703FE346DAA4789BECDD9F0 CEE3D93E41EF3BFE788B2A13027A7DB9DC1D5DCF77177DBB831E1DEC6F9D1D1D CDEC701762E5D90FB3DE4ADE4C12A01BFABBF1E01FB5668736D2EF0BE20141DD 1226E8BA7D49BCC9B2DCA78F7A677C88B9755ED84AADA2E57DBBB5E70803C3C7 D14832CDD37B7AECFF37C6B69DFFD8FCAA4733ED0F3C361B3F56669208997B4B 6CD6FD12749C4E5414BF9CAD2FB74295E17A9BF5ADFC187757B4B51FF0679FD1 86E134721968C071F78C17C4D4B3FF35F875E00EFB57EF4FF23FCC263F85790F A4E14F822242EDE8F66EBBBCBD7B6F11F17EC1C2625F9F5C67AD681C4E83E8A1 3EDBF6F58BDF0222ED3DFF8D93FF8D93FF8D93FFC138A98640A9FE53817254BB F8CD28E625F16315DDD1F5FAFAE67A4A8671A55727AE1210BCA8E53A01D95727 2F8480FE17C56E8051A0A171E2D62E57FC5A2E6B5DCAFBDE6B235A7E15C0BDBC EB5AEC26F1E900AA1EFF2AD83BF01E0FBD61FF56E04FA67FEC1B07F6495DC572 E8BECF5E8C12CCFD04C405BF28820EEE69EF7B2054B563F6DE628EC51E765A0D 3BF476D072DB1CB5AD778B3AB65430D1F26DFE6BAF3C725500F9FB38185DD756 2D1FDBB7648DE07B0CF97D574138BD5C9F7DF0DAF7BE9F3CDEBDFB6EB03EB207 BAD1739F12D5D777B2DCF589814C8D363218F6FABB4A91AD915FAD6F3D5D5524 89A5338087A7CE05ED8FBED17F30DEFA9C7975E51A9E75B7BED9D8CE7B62DFFB 33302AAD8C8D3BB6FFC3F9678F3BBF19BE30F6B61FBF2390A42B93928B9D8E21 28FFAE698B47EEE24125E65EFDE50145FE8B6B6313B13EBABE33E8CB73B1F4E7 04BFFEEA8DD1D5771EC320FAF79344421ECDC5A12C0B2CED6D6084F5D9DB39CF 81A14DA76DFCC47FD8D018EE79B754D345ECD9E592B8C0679A7DB462B5F1937B A4FDEB8583FEA6B6DCF0EE93C5BA9F9F4939E5C5B30BA8E08B675F9B130DED39 F9E6C8FCDBB72FFFF87CF6C6D46FCCDB2F675E49FE30AF4E9ECFFC2FBC6FDF7C F5FCB719FAB17DECC7878A6D9FCC14CCB39DCD3E3BB4D3BCEE27CBFB7139B7D5 9007D3C5DEB9BB0248871CBCF34B30B83C6F018F961EDFA7A5817F30894CE2E7 C862DA7DC0923F2DA4F6573DD46876F0C02DC7EB15096E7FDFA4DDE58A69D8B9 8B5AA8EDAF7D20BEFE1EC41E586B84DAEFBC4F19D576417E3EB2167E08A06DF2 1EAC390DEF78B06CF75FC27BAD5FBA22A8B4FBA0DBEDCBA5AD874CD7F6445DC1 54861DDB0C25945BC97BF02A59EFBFBADE34DBADF7CF63704CB3BCCCE3B0488A 34346191E54155D7B92A0ABF8EA2CA24516E8A2428EB248AD22AD1619D844951 C4719AE67155EA78D45892846999FB6960749A69A55490E5611A44659EFB5554 66B149D2DAA445ADFD20F37D3FCAD33C494C5CA828F655558D1A8BFC34D56115 A8BAF4833A35B52E6BFE5445E86761E507791DD745182679EA1726A86B15D746 45751D472A499432A3C67C5507A688824CFBB51FD5615404459026795CEAD457 858E4C94C679111945F75468CA24A91446C9EBCAA7E97163A650892AB2228BF3 8C3ED44595727B5485759E547114E695E12E556565A9B158A9741E46611C1886 1A9A3C1C3596557946038C8CB7B2A8D66952A779C69023632A1D68197D54A645 569A3256751A546189713353157E58A7A3C66A93972A4899AFCC447E5CC65A25 B45BE43AD6751D44455AF9213F2561ED573415055198E6CC795AEA24CCC7B3C9 5BB841120651CD0099FD2CAB3148AA354EA1B4CAFD3AD61821CA18A6CAE33A55 748909C8ABA42A0A359E80C0F8A92AD23A8C5591875808F3AB34553A5041A093 34088A2855AA2CD32452659065858FF142E3E726648E468D152A2D8CAF8DCA98 FA1C670C824A1765AAA308974C7552C6B9D67594976511574161CA5AA5595907 0C318EAB62D4982A23FC22CD4DACF90F37D32AF6F340A57E8A83AB38C5A94D1C 073ED358A60AE317356E5DE28978AD1E371627659686B9F183300BF1CA24F22B A2AB52BE4F0499CC4FA300D3A701B352D32BE652F9695D1A9DC88EA5683CCCC4 8F5498263133542B7C4865756CA4ADBAA637651527DAC4254F0AEAB2F4555807 8A20AB711E1FDB8C6733C4A593AAF2CBCC8F921C57087D7AA99324C0E940003F AB79852EC70677CCCAD4AF99F9524555968A29C6A85195959F156954ABA02A13 4D48D5461B5D6A66B552B98A52823B0443B2285655ACFC98C057455CFB404158 8F1AD34121C30A8352F3AFC9555E2438659E8ABB67551163CFB2C0948974B820 78932CCA02AC1304B956E3C694D18ABEA54916A43E9842D864819F62A740453A 8D7C53FB090E136ADFE89C48571126604679DB8F82896BC47E56452A1780CCA3 B036992EE244F959ACA350279A4E9A803857BA88309A4F206401014F30330B65 3E8E001D63AD0CFFCF545CF979A14A457CEA92008A194DA5F0BDBA602263E6BD 4CD3C44F8B92F1A7750EE295E3D98CB31A8C2B4D01EE319FA136197E4228FAE2 6544AE4E8D5F67491594855F96511DA56518E0BA05D8925713D750694C70F859 9E6529D0A88AC044A14F00C6384B00CAD6BE06DA1550981114607799A8806888 0C2E3A760DB0176C0C8933AC22FE5906B1EF875919FB65A0FC10B02042492B06 CFCDF2A82E7C13548121CC19C93802B04286B3975598A755159B3C4DD218CC00 5EFD84D8F171B82A232DA5CA1401B811614D00CE8FC33AAA82710428B108B782 4405A30257990A7ECF13C2B9AE749696824F3A4C82342CE23C01F74D982725F0 A8827C9C03F2B2E0E939781BD455402E0C535215AE5599308A990152514676AA 4C5CE746C7CA48C40509A6512A0CC77896076916047825B09556755428838533 9586F202468C485F55CD4BCC05310ABE06F43F232FE0B3E97802B28C449714CC 5212031E599D310558BAC87400848745146620711C1795292546A28C9EEBB852 442A683E6E4CD51A4BE0978AFF639222D4DA8013C08B0E089D0408CB12322BBE 2DF9BECAC2C417FCADF3BCAA27E0181574D75459A4AB089C080D2E1B034325F0 552564AAAC76C058D6601DCE1AC4451C9145D30A041C3BAD627492F4416F2309 29801128310F664905EAC1D9A2020CA234655A63131204A9C9C0AB90E4391926 CFE389898962C240F24F58457086D02F243B717D926B6C07122AA231F70D38EE 678AA674A1AA72425C1252274C0382845B93FCFD1C502D4B93629E3C24692A26 A18C63C5DF15A84B52E6F9519E63117F8C670061059F08540835A8E80C8118F8 A05B1EE478430AD49631C859F13C92A002235360B9CA201FBC36EE19EE9F0A2F 81EE04922A419C288225F83AE1152C18D16CC15486421488BB8C5733489C6F32 063B765ADA374C5D20548C70326596E152210F4F4C12E409DE4E27881F6801E9 8D440883C11EC472A0B22819A7BA94A90304E3AC1256A923ED33D890E41B1971 323FD6898D333F2617405FF2382713063C57A0454DF26698C66427986316E54A F955813D147912E81522AB014AC2218B40616005FAE8930EF0243847914DC011 FE9B0525A626BFC646A93803E37555C0BF8A92FC820170AD384F31619A1363CC A1C62C1AE7098A89CD0499486E51A6F34CFE357912910E027A95553842A6207B B52441E1BAB130D38810C59E44663E6E2C08E1CF381299032F2F70777C22F14B F025F241C23C0C60A798BDA22318348B41DD50E186290925CAC61004E6909CB3 248852A63A2DE99A8D719CB706D5E21082AC7C533003351201A641B4073509BF 82458E7B9624D823AA034179688BD855824B91C893183FD5E0535EA551296FE5 51C1F590FB5C928ED2261F170B7930FA20D2B01C7E22188B22AAE32C65F6813A B8518D76810FE5404A4A8379A2D0195946800246753219664102F18B2CC92039 9132E223752EC0436242B790B922D825F19B4355CB2A4F723F82A1102ECCDC38 A190FE8860B25B96FA49129B94BFF0F5D04409E4282F4AD824C4027647EA015E 511C8544066E02DDC8F4A8B18A4949C32C2F62EC5F3089840B5C343735AC0918 2EC90E10C4843E31823CAB21F2B89B21BACA222AC7A222AC5011CA2F527C1122 95AB84A4E49784565197415EA44989C9924CA48A1F630E98765585CACF091A42 6B2C7712110D103B8220533E841D1CF3F15E1C34419EC1D4610E70352DF9D887 0842C7117F29E985C81843105116A30EE3921C9B97094C8F5154489E429792B3 4877F84590DA49A7E782CA3AC9A0068150BA71128E0218A0C411710D470F8971 B80D4E9B544C018F267F94051049B3D02FD208B311973E9042DE3613D7D0A2C4 B4F285F58669482E841CE69911C18318CC4B249C246A3279A9E0EE498933477E 98247E85281E47401EE369390E0EDB825998CCE06D01F10A8FC506E01A0E81B1 6179CA84426E80A30A56423E35C558D589AF1A12120415FE2AF11E92DC49BA29 302662045D47E0026415C988B155E457A617314AE04D9C3614161AA431830A12 F403610EB9CA72B27F44E24B1816D988275609B99AB916818E6B0A9C407EC7B3 1980C6293E9387E83F482D9430CCE22C29A3AA12E200A921E718900AF69F302E 1C511738AD5FE89C091DF74CA525E141F246EF94F44361C0402399E1A501AE49 9CE1CE581222A42149118E4B94071074C2601C01C84BE85389A80B092BB29170 5BA22997F4EF8B10C6B1321FD6E7E35ACCB129AB28C425EBA08CB2E930494E91 944442459E238260DE6515F836D3090BB73FD3B9324EE298C823F5126D113661 FE27AA4ED2770882C6883126BE068A2B68478193886645BBA7759042ED249786 800EDDD68110DA30CCA209DB16DA846D35040696480EA8C8A0712ECC446BD828 9204690D530B21C831FAA4CC6BB814142D8F101FE370020EC84344710C420B89 8981085824BFA70C90D950053901288138FB892AF3A8A255A4AED417CA316C47 1282F859CC3B26A42B4599E460385984194911AA3061E684A0E0FD58BCBA008A A032F00D94D93836E34CA86C09358C8903E42D609341BA49BE704A121F4E4BE2 243C54CA6809A400FBC752240808FEF13083A0261041C3B880A130D0A2CA35BC 2A826FC77929521C4AC4E402F9C4565594211283B00AA55435E667151949A047 6A0BA83126B40812A00CCA5CA1336D88E6A8391C312228405D8D978750DD0ABB 6593C2520611106B947959A2754804115165D0761076F41BBC08C0817714E01E C89D29B2A8D6A5847CE28F21880C039C407F806C9C1054AB33281D2189AFA11B 733446441842D6C99D105A4424616C7C8528CD8A680241C81BE13F6887083902 CE1ADA40E148F5A80040C80159081CD15D8838818772D605A90F015E8C299578 13530C438D82CA1037958ED22A24C39A38CE6C3E2D42520DE43D2C48A1C025EC B6E2DF08A5E7FB9384E2E382058A8D9186127F28604847AC6BD2103EE6E38818 2B8871695498C8FDA030E014BF2067C70439CDF17DF84E16F164F806E0850646 B58686948C201024C6CDF2145190124AA5E4629809316126750D296C4243C8C4 64F5A04661C624E420F56996CB43BF346871262F242A2BB22B6441DAF285CA17 93621C49DB804B10A72A216B8B2A8619AB2A27A1202B91429978824991D71078 A9DDA28343E43F7A05A137B699CFCD68359D55107B082919857B4AF0D2401D73 2950A4252A4CF9A930455340FE134D2E51269816E398C098342EC5C84225B580 1F976710173F8229275028894BF1330DB94963A97130D9602FACBEAA27195D4B 2D061542C2204C6362D297526B9601E3C02263E5FF6865F2206CB28AD33285BC 3096148C1FCFA6C850C934262FC2B0409ED6842F7E0AF216688412F64677203C F87D09D94ED117C02E38C27F553AC63380A448491335ECA9AC083D1118E8E03A 627211E799513E218986817CD4A812C87CCDD4223AFCA29C50F72465BE10CEE0 2DB41E158C628176C641E62B7030AB91F09A044A3E26E1C102E9AD2FB386300D 4D38E6673876104ACD8D304F997B2810A197936618180826623C2C74E04B4EC0 2DF05AA9AAC7647BF06A52D76014A412D2AFD81C67F37D61D799405B2505CC98 4C03812F0D3F1B34852F25307E159C0DFC740C41F81D941F6EC7E3A088CC6D02 E040FB91AB703932484C0A4E35385ED404661A55C0233E9E61BC6AE267618131 192619A22CA59815329E9CC8AED0BF702D5FE7356901E206ED0031A2943C8F60 872A0470B6710E206DA67E2AC5C414859E00B0558D326078B8B316C92205509F 945AD595A00AE32D9130C41D2C71821A46B02A89602C358F2D24FFD77E2A9953 500DEA2C3AD32F8B9A6C5F48C4A2BFA5FA0A094069EBB10E084C0111210874A0 7127A98C1564EE3405BA91A7BEEF4330D0DD0028041B1A11930D19BB02DD30E4 1869019238A843E83BDD2089D29EC9213CCC2A44B2465426C8469CB5222AE23A 945A5C12DB5487EB4C343A8442458C151501162742BC24CB711F2A0834933442 6247BF20178985023208CA214F50EED1E4E3B862AD0C860D9746C964752AE8A2 4D65C81EA54FB62318C9F08544945F964099F88EAFF18D0CFF9DC81DAB0D8A32 4276090DAA740E57E7FF4404D1C95C430FFC18E924BD01BB0B83DA257956B914 AFC6482BC57AC418720B61820A2497ABAA0EC01BF4363F64FC6B3509485B9146 2AC837AA4AC419196BE2B43028344D5469CD5D215EA01358A782AB63C23C0419 A3000B0875635C44782A7402C7C013B3B81E27614C91C9D24BA4650DA52C1935 DAB4347441DC94EC49722F918F10A4DC474A43F3606C264E229C319F64744453 5417A14F7E4C311C38894BF8B2085007C2D6A586428CF82964193642EED2B1C1 69425C88989B94098102C2868089E95194612AC42192097F2840B2AAA077157C 51F01B660F41C5C3B568D0180899F0B35AA45A20048A8623A6A9C813A68C44CA CB01362B712BA2C2673EC9E5051859021F21E39C222DD847C044B2F203394733 49951CA25DC4B0EA84D1326FF0875401AC451C1546C414A3C62B8A645AC04CB9 B708A03439A91655216143EFF0765CA5424E1B4D5283B8413B0949419D804802 AD8CA9A16AE3098044A1A2B17CE64B8D29E717B801088DAD41FE5AD8202CD595 6F64258BCC2A1A52D62E6068E3C622C0546A57558D20885421C5071F21471266 2C3AB6D51785CA86155625FE418A455715C4298C6A2211B5A49C3CAAEB028E06 22FA2A960A9E89512668421F760B0E68A45989F8912537B282810CF94444594F F859C55BF0BDA202D2143A0BCA01F180B5D2C38840523AD5708C18DE6C64ED0D BFC381A15C7E00A71983A38F3E14859F87B92FC902EA9FC1008066C867902336 7180D0802D049686E365759C3119889038992CFC41F60B457E4CA1E9552A0B02 C280E995AE0105D48E0CA6081561282ABD80B1A009844D7221EA7ADC1811C754 332AD11F46D63D82BA4818536C0A21C3F81D198C2E63AABC824FF1C88C6041F7 25713459C422826AA430919862B604650C072D93A486F7F8A52F8C8C8043182B D2540E621160E85D846582D41B8323045057320749CC68007E920BE09D0B8B24 8356F83D911B88E880A7088F894B8D7121CF64E809DBC63AA8223F0EA5D29862 259527167660E6B2181F4050C8B732569D5409710BBD876BF95267CA27A801C7 2563E8CC8451621D35173A9AD14D9D050AA60FC113590C37936845DAF9C8A104 8C548AEC370EA734115C6470606852E722744C50113D253AAE963527A49ECA51 D105FE0E61D1B25461D0C70A0799AC56478C3F0C70995A8A52912C2754B22580 5947E2244959291504924E25EA21F3402963866F135F6138CEE8515A903E040E B5142E8C0C97A1891E8670AADC871CF30FAA8921CB33901EB1521513020C5663 3F53B05E59EBD304B192522FFD0364839A09418FC0210121428E7E27358E1884 242CF01A92C6B4E931D98B4557421E138014EB20484D5CA704818861E317A435 B02694F791AF31BABA9222425556798DEC50131654C98AAF1F8A92D12438E47D 0D8F039E4571A52800A93E67FC5B905B71E6284078403401AA6092D199B980A4 036B256390080CA108B7C864A3485613B5A2A6B16426B431C07D2B21B74033C9 3AACFD7142A965353F4E544A1CC11DD18A393E9212F24A6656475064D9E180D2 C9751986CA8408C714089465E9496C1AD8B1CFEB3081081C0EE31A3F87F58BFE F063B4BEAC7C983A51D09702BF8D85622406462DF0A4C6FC8CE880D3108221C6 333CD048250261A97596A4E29E2828922D0245971A94CDA536A7233AAF63D2FB 7898515A06BCCBE80468EB1C6707DA605A6454051F422D26E4405226E29F2982 E8A06C615796498CE58ED479C891C871217A982711C196D3705449795D893256 41416AA9C830846E58C26864E45A85E118B6F10504A140561027F8184E5BA595 2CF2A56920F501E81ABE8B8448984DE419BA388921A6225193496955CA65A432 6EC2E7258100E22AC81829591845C504D708625315A1488A40C5222CC8EDB16C F899B806ACA4B61AD3C07603301EAA06FB4735079057F259887231455C612360 C54046000CAE482A45D04FB59314975329DEFBF0FF0ABF83F721F9A318115705 00AE2C05A2217D65722BAA64C78962E0B1AA827104E85A6016456221CA270533 4659A993C7CABF588FE85068BE5AC46892A7518DCF3143B930F0C95A5D20E394 353E7C5DB63084314957AA719606400F8924594B15B68D472445013D444EC26D 9374CC35B0179107798124D780569C2A85D74A83A0A1C905D5755E44D83CCD61 2D6400DCA854241F38D1A48019222C61860C3414E515CBC26B9449393C953A54 5493C349AA6827208429402FC052D144AA4A70E0093DC88B022828D0961A41E8 97B24986648B1B57D824B13F45188EA67272930AAB5A16AD039C045A39E16751 C954C14C509AC89818E3C1961260C26832640E6D32CC63091D56891039D02E4E 646D16A9A5268BF281AC6216B40341417B96E29012501961186020304C3369B9 210FE611920D4FD54247450A1613ED94C30D21E25246CEA486A5C116787F095E E3A011F30A0413ED6918A21A610805B2AD0A508AA4B46C9237F1CA322A60EEB0 6B80078D04470C0168E22F0A11E7AA527020A937C5852C7A13B1064107250D4C 3A59DDC94D98A6119E8824672E2A526D18930BF0735F760C41CF6B29C18525F6 8A4039020E118229F34216D12610944B2CE6D006D9F5141137A98123CA868D08 EC353064A286C113EDA4E54CC9DE151ACF02E4503D212EA444183D4333B28701 14045D8164A60E519502E23E4C95D42702CB573503914A98902E38D864C34C4E 5B4A169E6BE87382FF54D203D9A723DBCB545290A565479DA8BC3AABA5140771 2799270A2408C6A80191806BE048F05920AFAAA4701D8857205C33E02C8B756D EA1055178BE690E25A207B4A125FD4EC181C6B1F5004873338AC6F77C7653510 9EE942C3D570285D26650EB621B5CBB8D6A126BB56626818456226E51B245520 650059DF20E36B910FC6C8BE47A947098C24C4554DDF193168267BA8E42DE04C D6BAC63DB3C5CB0864E1F1C407A92493253ED003B307D828561982A0A822D948 901761922A9386509A4A6C3D267B05F0C0E3C06512A2C6AF2117A8701043E1C8 787A9E87017EE1CBE606888431C27753DC37035726D50353323335FC9EF88611 0512E055161538708882AD99CF0055823370A9EC425339098D870781460B4D2A 2ECC1DB728A488445F463A282364357034E0D2C38F3EDDDBE7DBAC6EECC925F7 F7F676EFFCF5FDBCD00EB40E8C9FB0A6E395C1563E6007854BA4105192070348 97AD30CA52640ECA011B24C0C9CA2F34BB56490C5F432BE49536393EAAAB1A8A 5FE37B52F683B1F804101C013DA572A9A910B1004738595F2507654C671A4818 6725C946B80DFC0EFA840F24FC244BAD0824686F5249592EA7631511A1646FC3 D8CC012A0F510B5F036C906AFCAC893AC425B04E9FB212DA93E7A9AD0BA3F368 1EED6579810138C7C3440C28A96E15B52421B2013CD6C89E91AC909D86085D8D FC2227C15D912B410970071A7199205E27358290880B4885792A843B2AE8795C 012D0181880E84EFC212C95E45A4A5759319D9C805D7271166D3AD44789B6C9D AE0C3407C002D86423852C2D6A701630D3715DCA5638B01B721BC8AE448229CB 180BC479DCB31C4621243760464B4C815FCA1A2F0880F225D2D09690C5AC44F7 E34570170404384E06222DA7D1D8663EF8ADEA2A16454A742159D22290B54274 07A2438A504867D42A04268402483536A4DF992FFB0B8209418797A035016349 46441732BC4235F96471D42FA941541D92DA9752BB5D1B20B1D4C00FF9239F6C A8AE4A99FE4A5800262073E066290001AE1BF15ADC4A0045AAFDB2A00A318588 4621D2219095C7C9663A1F9D19C05E614908224038CF65D139A06B0A6D6590FA 6904E420F8954662D006D01742925108F118027968E29B4C6799B036244D8530 91A55D48167C3C979D14615A3211D07ED282F2A5EAEC9B406223D79370C2F964 DDDFD4B2035B895B43AF987F03C84A21B8908A27D4027E49528401892B6649C1 5510E4B19F41586180B80DA2119E2E3B3609492617D7922A0F2428954157F4BB 901228E86DA079742F5528B309D297B2094076D2902F20FD19BA03CE8EA4280A 9186B07D140F9A02FD85D041BAD1361E2D1BF4FC60DC984282FA28456C064752 52E837C8E83477759B5CB625A1274359C72C71E6288F08F75272134133E9591E 4336E110112147864825D354769B791697043498553278A2087E17489937AC65 91072107474CA73B0C2ABF96E5BA42328D91224E524BF527A1470864B007EE03 DDA863B81E1C46F6DA43D52BF810CD4FCA4750C61C0485E96A625C769D9A5C16 8D0B2D89BB929A1D815504E46DD96F0712919195ACB0E220D365979C882B0C58 56FB92E4C11FEC51DB557A235B444444F36340DE8E436577119281B50F9DCBA6 4E1B19BF4624D40421F91FC64FEA86D5487D3046C7C86EF814478348A7A1283A 587259808E2570264A6C3C9BF0401432931EEA5A7650A8B2AC64AF13AC4EF694 21A68943788D50B30097C502185976E0202FE2C90428C640AA95523F821273C1 2DC81C89AC4088882C52D13A752D5B5CA0B41841A73253B29800DA4E975DA4FF 69807BFA085F525F2DB15D607A881CCDCA466BB05D3EE88044C9C9793812734C 9E8A278DC1D12472D15CA12F9B317DD9B0199934F5112F04872C4EA318A25CF9 C2D62B3F2DC9D1A5E4C132B9B7F984F487DA0641B18FCE09F63CAC890A5381DB 615E8615CC32F1B55D1BFA750C63B5FE34C718BCF7D759066E8C9F27B56C740C C89790019C44C330907ED8104A1FA5A522FA9188B237375191EC5B4DE38987D5 C83FD12D6473A9700B48859AA4279B8A69A26652E1C7520B4E422623ADF11E43 F89374485B93F5CBB090FD76BC0EB8327BA9DD078CA9C33253888F980C9E098A 952109582A9EB842222B3D84923293FD18428B6354806C2D60B0A49050D69ED1 3064B540AA9D90AB5C4A64857CAC29978DEC95825B1107A883F13085D0E61A4E 0E01839F239A0D138BE0604E8D5450B400058E9B23FE4A844C2D2DAA4CC0B2CE 278B07086B28490D3FE55DFE23C392F484DF021FC889202A08641C5E15B68604 DE852275B429210AE5649510088F732951A452C6AA7499F9B2412832917C9481 3C564B391EDEA04A232B5FFC2A850754A8EC069DECB2AFE9B27CA007BE97E74A 3E8B90FB61259F535196EC917DEA822C4E1E46AAA3F489D6544AEC862C134FD8 34F92BA883C48F851E8983A85AF65418F960893111CA18AC212AD129B2B484B2 8E98513884294B35F9CC4489C4862B827B221B640B5F1194652D7B9D80373A9C 1606BF2964B00A311282882AD5451CA1BF827CDC580C57C5BBFC1208C8705A59 194845A704462A0E92BD659F5EA664D4294328954FBA0B6166500A33AEA86470 4D883A7789899907A5A0AFD2600A2D93A2BE2C4DA5A02AFD4147A1FA125FB03D 132346E372330A47AAA1B9D05D546A1583D9B0455DCBDEB5503EDA9345B2AF4B 61F5CC1728228D40A6E0EDBA3293621B93AE654F936CAE0D4320260A0873005F 179668C8D65D408B584A644526930FC26550AC0CC700A2C6A5D3BC287446F226 F1E7D0DE5A725406458B4B95FA58938E2506C840C0F2026320B584A90FE7F235 AE38F9089270D32C970F12E6499AC222C0C4282BAC1604A455981499A44121ED 440B2CA6D4E490989C42FA1A07BA7CF448C96250A944F4C5B18669C7BA92AAA2 2E65AB04D2292E60BC381919826401C5CACA2AD142DEC7362BE50371440F9DCA F077E2C1A48849848CEC61A79BA45459880CAB30449941FA4924B2F31C9250E7 93E5B3226258A4C8AC928D2A3013184118C409BD4064831C81EC6C82DA2AD96C 5019CDF45676177E487E28267B0B1852A9104D3E7D019F0C4043D2911A9406E1 7259930F4027A9EFE9083B25B4921308B23CCDB48CD32F48662A816A44BC2E81 0400413E3324256C225E218EE5236B885F59EEC59E590DFEA1AD414938FA444E 0032F2D127D8620C4D917DCA6948A62E7DA84922D5392DBB083F99E22E485BD7 F6E8D35F381BC35E7D76B3D9C8B1BE728ACCD3874EEC191E39D835DD9D2CF862 F8923DB26FD08FD3E6FD7275D47EB699CE6C6E1AFB7AFFCAFE63E3A35E0CCE0F 6F4F0519B5E43DB74D3D70DE433788C7E3132D8F83FD87C2A7C7740C6FEBC63E EC8BF7B3F7D4FBF8408B0F9DBC3019F0F9FC72DBF46F2ED6C7F3CDFBED273E95 DC7F947DDAE1EE5C94F1A7CD4763181C6EF8B43B9047CE6291B9DE53980326E8 9F8E8EBCC1737F684FF4F18E8E9848778735C1B833DEECC9D56276F0CBCF1C9E B278FF61BBE58E26DDA33E3D417F67E376AE6CDBFB19FDE4A4FF3583F5E6FAEB D6FA9B8C25C72B1CC93944EDB9063F8F0FF1E88E0E90B0EC4F0E185D3169E493 C79A8CAE7BF0DD9F9F9DBC79F1ECA4F2B6BBBBCBE6F9CC9DE922A7115F2E1733 EFFEC925F6A6F5EA6A7DB36D5EFF28C7BFC819214F4EDF97EBCBF5E6F9E7FF5C DB3F9FCFBEF8A59B6F76F7EE05A5F91FF7BEF8D4CDCF4AF3EAC4BC698F693A67 A29ECFF46639BF3CF4FED86C16F3D5FCD0FBFAADF776BEDACAF9F7CBF3597796 D3A71AD4DE976F4C7DEF0455313E7E3800B687DE7C76AC3FD970776C54D7E3E3 934AFE7AF3891BE4D4A5E5AAB9F7DEF86C8A77FF6860883B6C5D643CEC19FF6F 45F244A2F5B06903A28F403B8507C307F5F7B93331DA2BDBF353BC274F9E78D5 EB57667CD6D0C3077D8CC6274726DEB3801C4BD567C5FB41FA0B09F753973EEC 7564A74F9D09DCF5E6418FEEDFDC27ED4FBBDDBB07E1EAC1934EDA5747E97C32 7BE3A36BFE91D3EE3F0EE9847775F7D04929F76D383D15E5FEC940725ED06F7A 6C5131C72672C4E1BE297BBC5C7704D1C7876B13CBD5A2F9C99D007FAF363178 EF13473DD9D35E262FC9192CE3976C2CCBD0EDBFE3F7FE96336246DE65A762E8 7BE3768F1FE8C7E97A71E79DBE3FB39961D66615A67AB1FCD11E58C8BF2F17F7 1AE2D5E94BD2D0BDE78D4C313A42697F5692F78D758CE191D40F1E4E333AB37A F49D2D3F3FBBDE34A3E3CE478D796E82DC770FFDC914DEDB9727C62BBE7DF955 65DEB4C7669EC8015CDBB3CDF21A3F58893B6EED915B384F33DF2E2FEFDA5352 0FED797D87EEC4FBCD46CE3F754770BAB3D0D6ED915CB7CDA96D567CF889B4DE B44A60BB6BAEE50B3968B73D76752EE7246DBC9B6B1B408E943BC2D3DE288EBB 3BC2D16C8B7F7AFBDDCB3F7DF707F750E90BF7CE2F2FD7B77D7F2FE7FCB06B3B F4E3727BC3DB7787C4F5EE425EBF98FF28AEC285D6A36DA3F315E35B2FA4AB2F 771EB144EAFAF38D0897E5077AE8D9E8BADEACCF9AED76BDC1063F9D35D7F60C B2CD0D04C07D8500366A4F24732A448EB194AFC5D92CDF5FEC8696E9ACF21DFD 3D9BCBD958F659E78C7A7BE8594FDCB616BEBCF47824B68079D856E5A4D3F94E 0E713B6EC7D97EFDD0A8BD856711855696576286439B83DB46DD9977CD652347 0F6E0F9D0178506720318B58686094D77292B980DD6177141B0E27DFBBD459D1 8D6D7DBB72F322B7D976991C619EF23D2C5C74BE595FB58FDF72FD9974ECAEED 74FB3D54E2B8F395D8F2B4D9DDCAC9616E066DCFFB667F5C36B787620B4FAAA3 97CDCEF9CC66EDAE6B1B914ECA95533FB289BBF537E73AB6D1D67DBA3718BD3B 5B76690DE9626360511E7EBA5CCD3777ED373DD8F304EFECD76B389BDAD13A23 5E5DDF00B76D3F4810F011BAECBE3FCA9BDFECD6CCE9F24CFCD4734750792207 DCA4499FACCD5C78BB87DF6CED0CE149327C3B680005B0EF8F576BBD637731DF D9916DAF9BB3E5F99D73013938F77DB36A36F38EA2B86891838CAD2B6CE40033 77C66EDBDBEDBE2999AED64A3203368C8FEDE9F67D20AC573DC77CACDCA39667 83B6E441CBD5D9E54D7B2ADCFBA6EDE56EBEA14B0798AA68CEE6E43A7734E0ED C5FAB233984BBE1277DD01807DA8DD0D22A0B394EB683B8B3278DB536BA71667 5C0EEC1DAF9F37F9CA3489ADDEDCBCF6FAED1E49EC2D9797DD5BDBF5F9EE9681 3D79E420B57C63F4C9CB577FF0F4ABCA33D54BFBB31C3DF9B6C3DC3D06DAC3A7 2DF689538F80E2D04DF29DFD562A19F2DC1E8B6B2F947974475B4A74C8D984B6 61797936F93E9A99F5A6D605DB986AE1F376C994AFAF9B95B34F67445B55B0D7 304257B2E971B9839AC1D1D9CE83ACF18895B904F338FA3B193B40CBDDBAEF6F DBA5365EA5C776985BF992969BCB85F7CAFCD1BCB1F95FBF7CE5BDFD4697E6AD 275F33E5DDC04836DB33D8E1D64E0939FEA045353908D5DD2EFCE642CEAD9399 B200D0FC446FB62D74BEDC7DCE936EDE33849D3D8E1257776AE36C2EE4B211DA B5109BF7D1D276EFB1FBEA2DA688C017D0B1B9E26C7EBDC4375084F8723FDBAD 2F7608D2438AA430BAE590B13353176E7258A633F3A24F22EECBFCDA3971E0D2 BB893BA2D2B9C0C57ABD65E64F6F763B6E6D23DF9D9B3DFBD676A67BF389E77A D94DAC0D12E9943DE4D74EE4A291E7CFEDE00FE5B86C7776AA9CC7B9ED7BE822 451EE020A0F5B1C32E1B3813C857D79DDE8D7ADCDD66E7C63A38CE377BE03B6F 664FAC2D25C4E72B17BA57EDC1A15DDFEE59C25DB13CEB8CD046D2F8792D80DB 6B5BB7DCCF40D76F1EAEAD2238EC22C3054D9B6AA497EDB40ACBC1301D426FFB 61F62E2FE9E5F844ECEBE6C0B5B4B7609FB0DAC6FBA9F24A4BDF1DF0480E5BBE 5F4D62F4D01D4E6F4BB0BC628B13E272527DD9B6C9D4F10C3B7372DDE9CDA564 D28527527D40405C7FEFAE2541094C6C2C286E6D15557E1A30257A7D27A7B4D2 67EF6ABDDD4D889344DAFF948BB7B08FB3167741F4ED1EBFC4C5EC8C8986B673 EAC891737B9BD3BA7095BED9D883A0DEB5797F7763BF32D2B91B91B9B230393F DDAE2F09120769E4A26D87D1275F1AC786BFD6DFB4A8FC278910C140C951721E 7C37D1C7CE07C4545D8CB63946AEB6207A2A13FD4112A76349F6A45A3B884537 EB57E20ADD21C46FC5E95CD88FF973CB10F53E9F8B378D88429FBFF758777D73 CADC5D346DF2B3DD9C4BC678F8464B3224B72EC16A47FAADBADCEE59BF6D7A05 637E6FD3D4667DE312C466C8ECFB3EBAACD19DE8BD970E9D50B0B0E948CD7AD5 71AE4D9BE54EE75B87703BDBA48D1A14D091BBA99B79BDBA1B6984FDC1B2BB41 4F9C67898B6CD793D19F6F8875CB6C564B043EEEDA6C091F69A36327879691E0 46AE7BC2BE376DDBF32EC6B6C4883CFE72BDFE606D7FDE34972DD2BF1C4FBE85 528B885263901977B3333DBED8E581C5E2D87D5DD830A1F6A2C2996A00F1A3AF 9AEA73FC5BA151E2A84255EC8552176AD1D1252C3ABF190B96A1ABB5083AF78A AF5E97FFDA3992B4A85CC4CAD7DBD9BBDEBEFEF64D69BCFAE557C61E48DF4651 AF29651606203B6869348D0F64BBC3D6333B5BF6ED4A40414FE7F6E06E5CCE55 236C7318D7FA813CCA81FA38A0DAEF92DC77A8E31783B5148B7FF27D4D3FCD2D 4D996F1DAEDD361B77CFC27D57440F9C7D5A6B81FBEAB0BFC7F5735FD973DEDD 7E13D4D642D96AE4B98716D69C3A1AF6F2EB6FDF9E7885F1BE7923479D98CA2B BEF3F60B8BDF983752FDF5DE7EF7B568FCC7B3CF661DEDE8CF3BFFEAE5AB7F7D FBD4DB4F8FE9CF331FF9C2DE0FAE04784F85698A4862D8A77736C52EAD136FFF 72230879BA999F7D6876DB2783696FB6FBD7F720D496E8B875AC6BF6D0D719E2 7032C57DD3F6DBB3AC346AAF6E8B6CB689168D7A4F7704B57B3A92CA92F41651 206EB69D51D3DB03B9AEF3B736038E6EFA6B4DB6C31AB6D0B76E99A87CFFA853 ADDDAD97C4E2E516086AAE87F731929E8D4DE7C39258C94A56CAAFACD6020764 D4B3CE0C2F771D14F76CD706838B2F07612D5F3BEA323B0DCDBEB48D3C9EB7DF 45EABE0C679A77BA3B6F1D93DC978D964E46BB3A0FFAECE0C9B8ACF4503392F9 BD4149D11D012F58809910530B71937DA618A098FB62E4C1ADAE7AD991838DEC 9B6286171D9B17DB7E103B8F1B6ABB7CD945B6B3411B3B5F12F19FDB2E820536 21E1BCF29D91E338B9B50AC3668236EFDB799199B419ADE94FB61FC0C1B41E74 488E3B8516B55D70F5CB164CBBEF8BED4A7543D6FAD8BD393F25651C74BE69D1 67CF6A47784237708C9693F138A67B481CDB8B06706CD9E7FA66CB903A16BCD7 FD8B7D8AE9E9AAA3FC074FFADEBAC07730E296B5904D57D7BBBB4F76BB2FA7EC 9992ED92B0AC472D4CEF8760E374E45D128A8E16C8B3E4CB813BECB57ACE3DB6 9DE5A2A15BD6CFEFCDF310991F98E67686E7DD350BD109B6E7B6E13D1259D171 BBDE03096EDACFF2A1D5353FBC5EB95FEDC5F69593DBB57BC53D796E09E6287A 2D39B09DDC4FF0B6CD5F2D7C39B83C05495D2B020A0FD3C13D8D94D5324BC506 7D148BB6755379A01A6237A379D5EE17180F65D5EAE58786D3C328B3DCF571EB BCA92D569EF61520AB2AE4CBB8063739CED219741C29DEA7FE7C31097FEFF100 41069083DBEC1714BFFFAC1B1531F86EDAE064F26C846F3B6FEB8D8F53F4C69C 368C613ED9706FB45FDDF0002556A22D3B97EEFDF8D4FA7B1F72F38135ACF563 B16A276DE459211A6E7D6E5B758CACBF570D2FED0A8B4A12D3B98BD7FECA707F 654F7A6C8B7B35B2CF006DBDBAD527C232DC7724F47EE992B1EB8C4D8883B4BE 7CD23C69CB0D72D334CC4E2E36CDBD4093D77E28DCABCE3C631FDDF7E6E0D738 DAD4CB7ED993FE63DCE8EFF6A161AB629BD140BFB86FC8BFA5DD69DB3FE8B6D7 C3767FD0BFD8F2BD8B3FFD84A2EDFF170F4CF7AF7B4271FF0983A7843F143F04 7614ED13EC0BBF6DFB6ADABEFA6DDB0FA7ED87FF60FBC3EF877A37F5AA5AE263 E4ACED93E58DBFDF596B11ED0F36CB1B7F3F8E7E20FFC8CA902D34EF808DAE42 3794CC16EFDC3AC054BC8D05946DD6228AE345B672B44F6C363D1F8D8B3423D1 B4BB586F8788B7DC8369C70BDA7C460FDA5AFAB65FB4D83F78DB7D9FD230138F C54C4FE1EE2C0AB75581C1EAD0BCAF9A8C5709BB350454CE4D4FC82C036EEB37 F70AACBDE8EFBFEB49F2BDADA1C83D13A30CD2832C83B47DB08DBA7ACE40414E 4A005D85BB5F5B6AE589FD6E223BBEB64CDF5552BBD275BF64EDD6BA6CF5B6BD D7F2AE27B6F22363FA7CDB53CDC3C160568DA3A4AE1547B77A176AC9E8EBD559 A7D36875E5AA797DA561C8D1DB8CEB16355C816DE10A8CB2AE3268F9B0ADEE4C 5707F65F08DED78D3ADBD855025B721EAD14F662054776FE36ACDCCFC6DFEFDD 36DA165A5F9F7C69DE78B5D127DFBEE917C0DA42596797EB6623CBDB7BD18AD1 5FBF1D949C4795AF9217D697F7FADEAD0E76B74941DEADB38A20C462DB41857D 2F49DCBA7AFF4D82DE6CB1DCCC1C1F72CB7EDD628B34713028720989F67EE6EA 8FE305145B7A6CD9AB2D18AE9DF692AE498B6E37465743DF1E77AB068FCFDBD5 20594896B83F95A5B4BD4C1D5AC3AECD6CF1F1B38BB66AB958DFAEFAF5CE63B7 D2B6DE2CBB3AA2E3ECF5C9377616B9A5D99D3DE9859A48A005F669A0EDB275D2 BB06B4367D6DD55A7130F24D6305E667EBCB85459A1D9DF96CD5DC76BFF4172E 1ABB42FFD9CDCA09A61FEE5DD16DEDB223745B5CCF77D74F8F8F6F9E7E767DE4 BE5CEA08E31F1F78DFBBFD06EDD74272E163BB09E96267AFB7312E17DA0B069B A51F77F3D23BD9A55DA0104BCB57122F6541657E268B077B136380ED762965F1 365BB8496B67F3C099A2BAB10B31375B5BC396EF076ED7D11FAC9AB4B2D676DF F157ACDE16CC7BBF740A772CA7BDC7F2B55BFDD7DE7EF6E478F82DBD82DB3833 F9E9E0500A4DFD42F8E5EDFC6EDBD5E1CF973FD9A6AFB869FEA1B1D8B99172B0 45BF4EE7CBA28A5D1775B5035757DD973B86CB2FF8DFA6B9922AFADB975F7FF3 95E925E4BF7DFBB2FC57ABA3447BD8EFB8746B5B8DD58AB7ED3A8374F112FF5D 0D3CCCA515D9E4E28AE557CBD50DBEEAF612B8CB48573FD12FB9C22DF0B42B34 0FE4E4563A00F4F6EDB96CC0FBCBCD72632B4FF2FAFAE6FDC5AED536F3DD762D E6E8B48C45F2F63BDCA4D4209B3D262B3BB2A9DEFBA1FD22E81F46EB106ECDE2 A043C097AFDE9EE8AFBED2F26DC1FB0D00ED1E8243B7886677690F9392AB404A 26DBACAF374B5984713E68FD9519DBB900DD97929A8D0CC059AB9D484F3D4993 FF21F668C7BE68B7CE3850DA238AF84EB39310C1439C0B74A28E3C74CA18BD7E 5B8755787D470F5DCAB0DB373CB765F2B89B14C75286DFEBD8AFBE199C469FB8 D583B72DF42D7E9CAFCE6C34D0FB0E6945DB74BB485C316DB495C4C68ACB7BA3 4E9D4278F4ABEFDC469E7EDF4D571B9595A3DE636FB683F5F56E71ABBBC3D555 061468BF33A8E57D673BF7F5A233BBBE34B306060B4795B5FD061AB76BA2AD9C F5FD7DD252AD7BCB689BF9A28311EB687646A41075E8C8A4AC3D399F6DC90F93 C34F58DFC1D89E0E6E07C9FC74E46ADD2E85915DF7F1DD2EC8F5EC65D2D716DE 8EBB2FF31DEF0372C8D6AF7B4F90ED70B82FA0DFA123246F2EDEDDA1E2D04C80 CDEB3727FAD5C95359D259B413D45684C054597EE907D2EE00D95B749FFFB9C2 6E719232498BB2765256EB6E3FCA9FBE7B2BDB0DBB0D253FCE97976EC3F064DB C2CC7E85B3232387AEF0D262C164A345B77271356F378E7791E47A3F9C8B57AF 4FCCD3C9DEB5FDB0DCB7474AF9862C281B31EC1E87B95B6ADCAD6D1DD22DF5B9 42D767EEBA277FBE7633712A4B9FE7F39BCBDDC1937B6B961D71B9FFDCC18EBD 115BEEFA31D991E128F8277BB51C079CDD1CD04647BFA3D03676E8BE7572E9A0 9AF99DED8733EB0278DCE56EE7D7FC6C79B9DCDD0DF6F62D7763CCEC96B205EF 5DFBE4B6213345280D36AC4A4AA253128F37ABE55F6E9A2EEC24E817CBF3F3C6 AE49598AB537EDC261937324596FA345BB20619767FBC1B4B6EB899C6CDCF0B6 F2B4013F07C26FCEDC70ED3D7FC1556588D8C1ADD8DF5C9DBAECE97679F47676 8D77C8DCEF586BD7F12FE6D7ED82C1C8A7F601249B3C5ADD42360048BC236262 BD24561BBB29554C2B7BF976EBB56CA46F9C6E62E436C7ADDD7621D1BBC23FA4 582E6F5E49C8E2F94DD3B2F746F6A6914B76E3F55BEF71ECFB3F05BEEF5D2F7F 927533BBB6FC7EBDA66F3263D7F3CD0767AF6E6F5C9717F6EE7B700FE73AF51B C938375620BBE507BBE3C962F67225F82B882DDFFC3B2DB85BFC38B6570FD692 4F9B41BDD20E6188C88392E9BECDFDEAE6DEE2F76A9ECBF6D30423A1DE0AFA89 BAEDBEEE79B8417BEFC67B24E91773FA0D65C2D7DD37D7B6AEBD7534CB06EE30 645A026465A76C9BBE97D3FACD580EAEFA1C20E6DA76B5566B813DFC5C0CB605 0C55FC3E75DD33654B13EE7F5848FEB81A50BB9F4FB482C886DDFCBDE7FDCBBF 78450F836ED7805BB9BF57C4E1D27B4F701519F784AFBAB97BBC3DF8648EF51E CF65B1175DEF88FC6819F1E05EFBF6134983F6A5671BE1AB0E32963C03E57767 17E3BB6A90D3203DBC8D4BD00F7DA8501AD7B2FFD3ED9C58CC77F32E24F66A63 680D01F079BB08D02DBDF7A532D13DE2CDB76B97E064A79D0DA6DEDB9E7A6D01 CB7A4ABFF0D351EEEE1DB7DB679FFA5C5AD907F2F020AEE59697EEB6DD5A575F 2B6B33ED65732E60BCE87787B87C6807E104BE8D60073D5210F851B6C783E267 BB83B60FFB87756BE2DD76D061C5AF8D30410C5B9579FDCA78AFDF785FBF7E63 EC04D927C845E223AD65F7D13BDDA53E3C05A41FF5F0C97B40F0E0D127DF4DEA 8A4334E8B720DDCBE75D29A9C7001BF423BEDCD60E3A7E22E508B7C78094830B 4A1A746AD24A98396CF41619817B2C1E829B9686DA264700D55B473A6E7E9A5F 09717C18C46DADAE69EC12EDB2FBBCC6113F7EBE753B02B7BBCD5C3E75D1AEE8 B902C75B0744DD4E88CDA0BDDED0E2847BBBB7AAA6650D16E45A52E7B47607ED CE3456794D57C8C6BCD55E38FC9CCEF0933BDD2782E4DFFF0B8956716B3A9C00 00 }
20.15 Case: Downloading Directories - A Server Spidering App
At one point, my notebook computer was disabled by a severe adware breakout. In an attempt to erase the troublesome files, the machine was rendered unable to boot to the operating system. I needed to copy a large number of recent data files that had not yet been backed up. Several options which didn't involve writing code were available to get this kind of job done. I could've removed the hard drive and put it in another machine, and then copied the files directly from one hard drive to another. I didn't have a hardware connector to install the laptop drive, and I didn't feel like taking the machine apart. I could've tried to reinstall the OS, and send the files across the network to be backed up on another computer. Without a system disk immediately available to restore the operating system, that wasn't convenient. I could've also potentially used a stand-alone local file transfer application (the "laplink" type), but without any serial/parallel ports, and without any OS access to provide USB support, I didn't have an application which made that option possible. Instead, I happened to have a Knoppix CD with which I was able to boot the laptop (http://www.knoppix.org/ provides the complete Linux operating system on a single free CD - it doesn't require any hard drive or any installation to run). I booted the computer to Knoppix, it found my network, and I started the Aprelium web server (http://aprelium.com/) on the laptop. Tada! Using another computer on the network, I was able to access all my files through the web server. I had access to the files at that point, but since I had literally thousands of files in hundreds of directories on the laptop, I couldn't download each one manually. Instead, I wrote a little spidering application in REBOL that did the job instantly.
To create the program in natural language, I thought about the process I would go through, and how I would click through the directory structure if I were to manually download each file:
- Create a new destination folder on the client computer to hold the transferred files.
- Start in the current subdirectory on the laptop (starting with the folder that held my data), and download all the files in it to the new destination directory on the client computer.
- Create subdirectories in the destination directory on the client to mirror each folder in the current directory on the laptop.
- Switch into each of the subdirectories on the laptop and on the client, and repeat steps 2-4 for each subdirectory.
I came up with the outline above by actually sitting down at the computer, and running though the process that I wanted to automate. I just took note of how the thought process was organized. Next, I converted the above ideas to pseudo-code descriptions of how I would accomplish the above things using code constructs:
- Get an initial remote URL from the user. Use the built-in "request-text" function to do that. Then, create a local folder to mirror it, with a nicely formed name (only allowable Windows file name characters). Use the "replace" function to swap out unusable characters, and the "make-dir" function to create a destination folder with the cleaned up characters.
- Since the file and directory listings are made available via a web server, I'm going to have to parse a web page for file names to download. That's easy - the web server puts "/" characters at the end of all folder listings, so anything without a "/" at the end is a file. Create a block of file names, and use a "foreach" loop to go through the list of files, using read/binary and write/binary functions to download the actual files to the destination folder.
- I'll also need to parse the web page for folder names to create. Use another "foreach" loop to work through the block of folder names, and the "make-dir" function to create local directories with those names.
- Create a function that changes directories on both the local and remote machines. In order to work with the correct folders, I'll need to create some variables to keep track of the directory I started in, the current local folder I'm writing to, and the current remote folder I'm reading. As I switch in and out of each directory, I'll use rejoin and replace functions to concatenate and remove the current folder names to and from the local directory and remote URL variables. Because I need to create a function that repeats both previous steps and THIS CURRENT step in every subdirectory, I'll need to enclose all three of those steps into a function, and call that function from within itself. (You've seen this recursive process of creating a function that calls itself, in the "simple search" case study. It's needed here to do the same thing in every folder, drilling down until there are no more subfolders.
The first step was straightforward. Here's the code I came up with:
; Get initial remote URL and create a local folder to mirror ; it, with a nicely formed name (only allowable Windows file ; name characters). initial-pageurl: to-url request-text/default trim { http://192.168.1.4:8001/4/} initial-local-dir: copy initial-pageurl replace initial-local-dir "http://" "" replace/all initial-local-dir "/" "_" replace/all initial-local-dir "\" "__" replace/all initial-local-dir ":" "--" lrf: to-file rejoin [initial-local-dir "/"] if not exists? lrf [make-dir lrf] change-dir lrf clf: lrfSince steps 2-4 above would all be enclosed in a single function, I decided I should assign some variable words that would refer to the folders I'd be accessing: "lrf" = local-root-folder, "clf" = current-local-folder and "crfu" = current-remote-folder-url.
To begin step 2, I wrote a bit of code to do the parsing of the file and folder names on the current web page directory listing. I combined the parsing requirements from step 2 and 3 above, and decided to use the variable words "files" and "folders" to label the blocks that would contain the parsed results. Here's the code that I came up with to read and parse the contents of the current page into the usable blocks. It looks for any link (anything beginning with href=" and ending with "), and appends it to the folders block if it contains a "/" character. Anything that doesn't contain the "/" character gets appended to the file block:
page-data: read crfu files: copy [] folders: copy [] parse page-data [ any [ thru {href="} copy temp to {"} ( last-char: to-string last to-string temp either last-char = "/" [ ; don't go upwards through the folder structure: if not temp = "../" [ append folders temp ] ][ append files temp ] ) ] to end ]To complete step 2, here's the foreach loop that I came up with to download all the files contained in the file block. It contains a replace/rejoin trick to make sure the filename gets concatenated to the current URL correctly (with no extra "/"s):
foreach file files [ print rejoin ["Getting: " file] new-page: rejoin [crfu "//" file] replace new-page "///" "/" write/binary to-file file read/binary to-url new-page ]I ran into some problems with certain links on the web page that weren't actually file or folder listings, or which didn't download properly. I used some conditional "if"s and "error? try" combinations to eliminate those problems. I wrote the errors to a text file, so that I could check them afterwards and download manually if necessary. Here's the revised version of the code above, with the error handling routines:
foreach file files [ if not file = "http://www.aprelium.com" [ ; The free aprelium server puts that link on all pages ; it serves. I didn't want to spider all the contents of ; their web page. print rejoin ["Getting: " file] new-page: rejoin [crfu "//" file] replace new-page "///" "/" if not exists? to-file file [ either error? try [read/binary to-url new-page] [ write/append %/c/errors.txt rejoin [ "There was an error reading: " new-page newline] ] [ if error? try [ write/binary to-file file read/binary to-url new-page ][ write/append %/c/errors.txt rejoin [ "error writing: " crfu newline]] ] ] ] ]I wanted to complete step 3, but realized that that's where the recursion pattern needed to occur - for each folder I copied, I wanted to look inside that folder and create any folders it contained, and then inside those folders, etc. So next, I defined a recursion pattern to change into the current local and remote folders, and to run the function in which all of steps 2-4 were contained. I decided to label the entire enclosing function "copy-current-dir" - it would be passed the parameters "lrf", "clf", and "crfu". That function contains the recurse function, which calls the encompassing copy-current-dir function, which itself contains the recurse function, etc. The effect of this recursion is that every subfolder of every folder is entered. Here's the recurse function:
recurse: func [folder-name] [ change-dir to-file folder-name crfu: rejoin [crfu folder-name] clf: rejoin [clf folder-name] ; NOW HERE'S THE RECURSION - call the function in which ; this function is contained: copy-current-dir crfu clf lrf ; When done, go back up a folder on both the local and ; remote machines. The replace actions remove the current ; folder text from the end of the current folder strings. change-dir %.. replace clf folder-name "" replace crfu folder-name "" ]Finally, I completed steps 3 and 4 by creating local folders to mirror each directory in the current remote folder, and then called the recurse function to spider down through them. I used a foreach loop to work through each directory in the current subdirectory list. Because this loop contains the recurse function, which in turn runs the copy-current-dir, which in turn contains this loop, every subdirectory of every subdirectory is worked through, until the job is complete:
foreach folder-name folders [ make-dir to-file folder-name recurse folder-name ]I wrapped the parsing, looping/reading, and recursing sections into the copy-current-dir function so that they could be called recursively. Then I added some error handling routines as I played with the working code. I included a block of URLs to be avoided, and some code in the final foreach loop to check that those URLs weren't already downloaded (in case I had previously run the program on the same directory). Here's the final script:
REBOL [title: "Directory Downloader"] avoid-urls: [ "/4/DownLoad/en_wikibooks_org/skins-1_5/common/&" "DownLoad/groups_yahoo_com/group/Join%20This%20Group!/" "DownLoad/pythonide_stani_be/ads/" "Nick%20Antonaccio/Desktop/programming/api/ewe/" ] copy-current-dir: func [ { Download the files from the current remote directory to the current local directory and create local subfolders for each remote subfolder. Then recursively do the same thing inside each sub-folder. } crfu ; current-remote-folder-url clf ; current-local-folder lrf ; local-root-folder ] [ ; Check that the URL about to be parsed is not in the avoid ; list above. This provides a way to skip specified folders ; if needed: foreach avoid-url avoid-urls [ if find crfu avoid-url [return "avoid"] ] ; First, parse the remote folder for file and folder names. ; Given the URL of a remote page, create 2 list variables. ; files: remote files to download (in current directory) ; folders: remote sub-directories to recurse through. ; There's an error check in case the page can't be read: if error? try [page-data: read crfu] [ write/append %/c/errors.txt rejoin [ "error reading (target read error): " crfu newline] return "index.html" ] ; if the web server finds an index.html file in the folder ; it will serve its contents, rather than displaying the ; directory structure. Then it'll try to spider the HTML ; page. The following will keep that error from occuring. ; NOTE: this error was more effectively stopped by ; editing the index page names in the Abyss web server: if not find page-data {Powered by <b><i>Abyss Web Server} [ ; </i></b> write/append %/c/errors.txt rejoin [ "error reading (.html read error): " crfu newline] return "index.html" ] files: copy [] folders: copy [] parse page-data [ any [ thru {href="} copy temp to {"} ( last-char: to-string last to-string temp either last-char = "/" [ ; don't go upwards through the folder structure: if not temp = "../" [ append folders temp ] ][ append files temp ] ) ] to end ] ; Next, download the files in the current remote folder ; to the current local folder: foreach file files [ if not file = "http://www.aprelium.com" [ print rejoin ["Getting: " file] new-page: rejoin [crfu "//" file] replace new-page "///" "/" if not exists? to-file file [ either error? try [read/binary to-url new-page][ write/append %/c/errors.txt rejoin [ "There was an error reading: " new-page newline] ] [ if error? try [ write/binary to-file file read/binary to-url new-page ][ write/append %/c/errors.txt rejoin [ "error writing: " crfu newline]] ] ] ] ] ; Check to see if there are no more subfolders. If so, ; exit the copy-current-dir function if folders = [] [return none] ; Define the recursion pattern. This changes into the ; current local folder, and runs the copy-current-dir ; function (the current function we are in), which itself ; contains the recurse function, which itself will call ; the copy-current-dir, etc. The effect of this recursion ; is that every subfolder of every folder is entered. ; This is what enables the spidering: recurse: func [folder-name] [ change-dir to-file folder-name crfu: rejoin [crfu folder-name] clf: rejoin [clf folder-name] copy-current-dir crfu clf lrf ; When done, go back up a folder on both the local ; and remote machines. The replace actions remove ; the current folder text from the end of the current ; folder strings. change-dir %.. replace clf folder-name "" replace crfu folder-name "" ] ; Third, create local folders to mirror each directory in ; the current remote folder, and then spider down through ; them using the recurse function to download all the files ; and subdirectories included in each folder: foreach folder-name folders [ ; foreach avoid-url avoid-urls [ ; if not find folder-name avoid-url [ make-dir to-file folder-name recurse folder-name ; ] ; ] ] ] ; Now, get initial remote URL and create a local folder to ; mirror it, with a nicely formed name (only allowable Windows ; file name characters). initial-pageurl: to-url request-text/default trim { http://192.168.1.4:8001/4/} initial-local-dir: copy initial-pageurl replace initial-local-dir "http://" "" replace/all initial-local-dir "/" "_" replace/all initial-local-dir "\" "__" replace/all initial-local-dir ":" "--" lrf: to-file rejoin [initial-local-dir "/"] if not exists? lrf [make-dir lrf] change-dir lrf clf: lrf ; Start the process by running the copy-current-dir function: copy-current-dir initial-pageurl clf lrf print "DONE" halt
20.16 Case: Vegetable Gardening
My mother is a retired Microsoft Access developer who loves to garden in her spare time. Farming has become a part time occupation and business for her, and learning to improve her yields is always a focus of her attention. She's collected a wide scope of knowledge about how certain plants survive better when planted next to each other, and she wanted to create a program to help organize that info. She wanted to create a standalone version that she could use on her home computer and give to friends. She also wanted to publish it to the web as a dynamic database. Additionally, she anticipated creating a version that could be carried into the garden on a pocket pc. I suggested using REBOL, because it could provide a solution for all her needs. She'd been working for several days with her development tools, and I told her I could get the whole thing done that same evening using REBOL. Here's the outline I created:
- Create a database structure to hold the vegetable compatibility info and other related information.
- Write a command line version of the script that allows users to display all the info for any selected vegetable (this could be run on any operating system that supports the command line version of REBOL, including pocket pc).
- Create a CGI version of the above script that works on the web site.
- Create a pretty GUI version to be used on the home PC.
- Write a separate GUI to manage the administrative adding of data to the database.
- Provide a way to update the data files on the web site.
To get things started, I used the listview data grid example from this tutorial to provide a front end for the vegetable data files. This provided a data structure that was suitable for the project, and it formed an instant solution to creating a GUI front end. Steps 1 and 5 were instantly completed (that database example is so useful - many thanks to Henrik Mikael Kristensen for creating the listview module!).
I created a few initial lines of data to work with. Here's the working database.db file that I created:
["basil" "" "tomato" "basil protects tomatoes." "" ""] ["beans" "onion" "cabbage carrot radish" "" "" ""] ["cabbage" "celery" "tomato" "" "" ""] ["carrot" "" "tomato" "Carrots strengthen the roots of tomatoes." "Carrots love tomatoes." ""] ["radish" "cabbage" "beans carrot tomato" "" "" ""] ["tomato" "cabbage" "basil carrot" "" "" ""]Each block holds 6 pieces of information about each possible vegetable:
- the name of the veggie
- a list of other veggies that are compatible with the given veggie (those that do well when planted next to the given veggie).
- a list of other veggies that are incompatible
- 3 fields for general notes about the given veggie
I decided to add an "upload" button to the listview GUI to satisfy step #6 in my program outline. It made sense to add this functionality here, because the user workflow would generally involve adding/changing data in the database (using the listview), and then updating the online database to match. Here's the upload code I came up with. It includes some error checking, so that the application doesn't crash if there's a problem with the Internet connection. I added a button to the listview GUI and put the above code in its action block. Here's the complete code I added to the listview:
btn "upload to web" [ uurl: ftp://user:pass@website.com/public_html/path/ if error? try [ ; first, backup former data file: write rejoin [uurl "database_backup.db"] read rejoin [ uurl "database.db"] write rejoin [uurl "database.db"] read %database.db alert "Update complete." ] [alert "Error - check your Internet connection."] ]Next, I realized that adding and removing new vegetables to and from the database would require some special consideration. It ended up being the biggest part of this coding project. I could use the built-in abilities of the listview module to simply add a new vegetable to the database, but there was a problem with that. Every time a new vegetable is added to the database, it creates a list of compatibilities. Aside from simply adding a new block to the database with fields listing the compatibilities and incompatibilities, that new veggie needs to be added to the compatibility list of every other vegetable with which it's compatible. It also needs to be added to the incompatibility list of every vegetable with which it's not compatible. Editing those blocks manually would take a lot of work and introduce a greater likelihood for user errors, especially as the database grows larger. Instead, I decided to create a little script to do it automatically. Here's the pseudo code thought process for that script:
- Create a list of existing vegetables. This can be done by reading the existing database, looping through each block, and picking out the first item in each block (the vegetable name).
- Create a small new GUI to enter the new veggie info. It should include an input field for the new veggie name, 2 text-lists showing the possible compatible and incompatible veggies (read from the existing list of veggies in the database), and 3 note fields.
- Use a foreach loop to run through the lists of compatible and incompatible veggies. Have the loop automatically add the new vegetable to the other veggies' respective compatibility lists.
I created the GUI code and put the foreach loop inside the action block of a button used to add the new veggie. Here's the code, which I saved as "add_veggie.r":
REBOL [title: "Add Veggie"] ; read the current database: veggies: copy load %database.db ; get the list of veggies (the 1st item in each block): veggie-list: copy [] foreach veggie veggies [append veggie-list veggie/1] ; create a GUI with the appropriate fields and text-lists: view/new center-face add-gui: layout [ across text "new vegetable:" 88x24 right new-veg: field return text "compatible:" 88x24 right new-compat: text-list data veggie-list return text "incompatible:" 88x24 right new-incompat: text-list data veggie-list return text "note 1:" 88x24 right new-note1: field return text "note 2:" 88x24 right new-note2: field return text "note 3:" 88x24 right new-note3: field return ; now add a button to run the foreach loops: tabs 273 tab btn "Done" [ ; First, append the new veggie data block to ; the existing database block. Create the new ; block from the text typed into each field, ; and from the items picked in each of the ; lists above ("reduce" evaluates the listed ; items, rather than including the actual text. ; i.e., you want to add the text typed into the ; new-veg field, not the actual text ; "new-veg/text"). "append/only" appends the ; new block to the database as a block, rather ; than as a collection of single items: append/only veggies new-block: reduce [ new-veg/text ; "reform" creates a quoted string from the ; block of picked items in the text-lists: reform new-compat/picked reform new-incompat/picked new-note1/text new-note2/text new-note3/text ] ; Now loop through the compatibility list of the ; new veggie, and add the new veggie to the ; compatibility lists of all those other ; compatible veggies. I put a space in if there ; were already other veggies in the list: foreach onecompat new-compat/picked [ foreach veggie veggies [ if find veggie/1 onecompat [ either veggie/2 = "" [spacer: ""] [ spacer: " "] append veggie/2 rejoin [spacer new-veg/text] ] ] ] ; Now do the same thing for the incompatibility ; list: foreach oneincompat new-incompat/picked [ foreach veggie veggies [ if find veggie/1 oneincompat [ either veggie/3 = "" [spacer: ""] [ spacer: " "] append veggie/3 rejoin [spacer new-veg/text] ] ] ] save %database.db veggies ; start the veggie data editor again when done: launch %veggie_data_editor.r unview add-gui ] ] focus new-veg do-eventsBecause the add_veggie.r script will always be run from the veggie_data_editor.r program, I added the following code to the action block for the "add veggie" button in the data editor. It launches the above add_veggie program, and closes the listview:
btn "add veggie" [launch %add_veggie.r quit]When the user closes the add_veggie program, the "launch %veggie_data_editor.r" code at the end of the program relaunches the data editor. This handles flipping back and forth between the two screens. When the data editor is relaunched, all the new data is automatically updated and displayed, so I don't need to manually update any displayed info. After playing with the system, I realized before closing the data editor I'd better save the changes made to the database. So I adjusted the above code as follows:
btn "add veggie" [ launch %add_veggie.r backup-file: to-file rejoin ["backup_" now/date] write backup-file read %database.db save %database.db theview/data quit ]Next, I used the above code to create a similar "remove_veggie.r" program. Instead of building a GUI for it, I just added some code to the "remove veggie" button in the veggie data editor to save the name of the currently selected vegetable to a file (veggie2remove.r). I also copied the backup routine from the code above to make sure any changes in the listview are saved before going on:
btn "remove veggie" [ if (to-string request-list "Are you sure?" [yes no]) = "yes" [ ; get the veggie name from the currently selected ; row in the listview: first-veg: copy first theview/get-row theview/remove-row write %veggie2remove.r first-veg launch %remove_veggie.r backup-file: to-file rejoin ["backup_" now/date] write backup-file read %database.db save %database.db theview/data quit ] ]The remove_veggie.r script just reads the vegetable name from the veggie2remove.r file created above, and runs through some foreach loops to delete that vegetable from the compatibility lists of the other veggies:
REBOL [title: "Remove Veggie"] veggies: copy load %database.db remove-veggie: read %veggie2remove.r ; remove the selected veggie from compatible lists (the second ; field in each block). This is done by replacing any ; occurrence of the remove-veggie with an empty string (""). ; That effectively erases every occurrence of the veggie: foreach veggie veggies [ replace veggie/2 remove-veggie "" ] ; do the same thing to the incompatible lists of all other ; veggies (field 3 in each block): foreach veggie veggies [ replace veggie/3 remove-veggie "" ] save %database.db veggies ; start the veggie data editor again when done: launch %veggie_data_editor.rNow the listview data editor and all its helper scripts are complete. Because the listview is generally run from the GUI version of the main program ("veggie_gui.r" - not yet written), I added the following code to the existing listview close routine:
launch "veggie_gui.r"When I design the main veggie_gui program, I'll add a button to launch the listview. When I close the listview, the above code will relaunch the GUI program to handle flipping back and forth between those two screens. Here's the final listview data grid code with all the described changes and additions:
REBOL [title: "Veggie Data Editor"] evt-close: func [face event] [ either event/type = 'close [ inform layout [ across btn "Save Changes" [ ; when the save btn is clicked, a backup data ; file is automatically created: backup-file: to-file rejoin ["backup_" now/date] write backup-file read %database.db save %database.db theview/data launch "veggie_gui.r" quit ] btn "Lose Changes" [ launch "veggie_gui.r" quit ] btn "CANCEL" [hide-popup] ] none ] [ event ] ] insert-event-func :evt-close if not exists? %list-view.r [write %list-view.r read http://www.hmkdesign.dk/rebol/list-view/list-view.r ] do %list-view.r if not exists? %database.db [write %database.db {[][]}] database: load %database.db view center-face gui: layout [ h3 {To enter data, double-click any row, and type directly into the listview. Click column headers to sort:} theview: list-view 775x200 with [ data-columns: [Vegetable Yes No Note1 Note2 Note3] data: copy database tri-state-sort: false editable?: true ] across btn "add veggie" [ launch %add_veggie.r backup-file: to-file rejoin ["backup_" now/date] write backup-file read %database.db save %database.db theview/data quit ] btn "remove veggie" [ if (to-string request-list "Are you sure?" [yes no]) = "yes" [ first-veg: copy first theview/get-row theview/remove-row write %veggie2remove.r first-veg launch %remove_veggie.r backup-file: to-file rejoin ["backup_" now/date] write backup-file read %database.db save %database.db theview/data quit ] ] btn "filter veggies" [ filter-text: request-text/title trim { Filter Text (leave blank to refresh all data):} theview/filter-string: filter-text theview/update ] btn "upload to web" [ uurl: ftp://user:pass@website.com/public_html/path/ if error? try [ ; first, backup former data file: write rejoin [ uurl "database_backup.db"] read rejoin [ uurl "database.db"] write rejoin [uurl "database.db"] read %database.db alert "Update complete." ] [alert "Error - check your Internet connection."] ] ]Next, I created a command line version of the program. The "Looping Through Data" example provided earlier in this tutorial served as a perfect model. I just changed some of the variable labels and loaded the data from the existing database.db file. Here's the code:
REBOL [title: "Veggies"] veggies: load %database.db a-line: copy [] loop 65 [append a-line "-"] a-line: trim to-string a-line print-all: does [ foreach veggie veggies [ print a-line print rejoin ["Veggie: " veggie/1] print a-line print rejoin ["Matches: " veggie/3] print rejoin ["No-nos: " veggie/2] print rejoin ["Note 1: " veggie/4] print rejoin ["Note 2: " veggie/5] print rejoin ["Note 3: " veggie/6] print newline ] ] forever [ prin "^(1B)[J" print "Here are the current foods in the database:^/" print a-line foreach veggie veggies [prin rejoin [veggie/1 " "]] print "" print a-line print "Type a vegetable name below.^/" print "Type 'all' for a complete database listing." print "Press [Enter] to quit.^/" answer: ask {What food would you like info about? } print newline switch/default answer [ "all" [print-all] "" [ask "^/Goodbye! Press [Enter] to end." quit] ][ found: false foreach veggie veggies [ if find veggie/1 answer [ print a-line print rejoin ["Veggie: " veggie/1] print a-line print rejoin ["Matches: " veggie/3] print rejoin ["No-nos: " veggie/2] print rejoin ["Note 1: " veggie/4] print rejoin ["Note 2: " veggie/5] print rejoin ["Note 3: " veggie/6] print newline found: true ] ] if found <> true [ print "That vegetable is not in the database!^/" ] ] ask "Press [ENTER] to continue" ] haltThat was easy! Just compare it to the original example - it's virtually identical. Again, that generalized example was presented in this tutorial to provide a model for use in many varied situations. Using it, I didn't even need to write any pseudo code.
Now I extended the above command line example to create a CGI application. To get started, I used the final CGI example provided earlier in this tutorial as a model. To it, I added the code that I'd created for the command line example above. The only real changes I needed to make were some additional HTML formatting tags, required make the page display properly in a browser (mostly newline "< B R >"s). Again, just an amalgam of several existing examples. No pseudo code required - I just had to think about how to arrange the existing command line code to fit into the general CGI outline. Here's the code:
#! /home/path/public_html/rebol/rebol -cs REBOL [title: "Veggies"] print "content-type: text/html^/" print [<HTML><HEAD><TITLE>"Veggies"</TITLE></HEAD><BODY>] veggies: load %database.db a-line: copy [] loop 65 [append a-line "-"] a-line: trim to-string a-line print-all: does [ foreach veggie veggies [ print a-line print [<BR>] print rejoin ["Veggie: " veggie/1] print [<BR>] print a-line print [<BR>] print rejoin ["Matches: " veggie/3] print [<BR>] print rejoin ["No-nos: " veggie/2] print [<BR>] print rejoin ["Note 1: " veggie/4] print [<BR>] print rejoin ["Note 2: " veggie/5] print [<BR>] print rejoin ["Note 3: " veggie/6] print [<BR>] ] ] print "Here are the current foods in the database:^/" print [<BR>] print a-line print [<BR><strong>] foreach veggie veggies [prin rejoin [veggie/1 " "]] print "" print [</strong><BR>] print a-line print [<BR>] submitted: decode-cgi system/options/cgi/query-string if submitted/2 <> none [ switch/default submitted/2 [ "all" [print-all] ][ found: false foreach veggie veggies [ if find veggie/1 submitted/2 [ print a-line print [<BR>] print rejoin ["Veggie: " veggie/1] print [<BR>] print a-line print [<BR>] print rejoin ["Matches: " veggie/3] print [<BR>] print rejoin ["No-nos: " veggie/2] print [<BR>] print rejoin ["Note 1: " veggie/4] print [<BR>] print rejoin ["Note 2: " veggie/5] print [<BR>] print rejoin ["Note 3: " veggie/6] found: true ] ] if found <> true [ print [<BR>] print "That vegetable is not in the database!"] print [<BR>] ] ] print [<FORM ACTION="http://website.com/rebol/veggie.cgi">] print [<BR><HR><BR>"Enter a veggie you'd like info about:"<BR>] print ["Veggie: "<INPUT TYPE="TEXT" NAME="username" SIZE="25">] print [<INPUT TYPE="SUBMIT" NAME="Submit" VALUE="Submit">] print [</FORM>] print [</BODY></HTML>]I didn't like the way the CGI required the user to type in the name of a listed vegetable. Instead, I got rid of the list printout, and added the list to a selectable dropdown box. Here's the final cgi example with the HTML dropdown box:
#! /home/path/public_html/rebol/rebol -cs REBOL [title: "Veggies"] print "content-type: text/html^/" print [<HTML><HEAD><TITLE>"Veggies"</TITLE></HEAD><BODY>] veggies: load %database.db a-line: copy [] loop 65 [append a-line "-"] a-line: trim to-string a-line print-all: does [ foreach veggie veggies [ print a-line print [<BR>] print rejoin ["Veggie: " veggie/1] print [<BR>] print a-line print [<BR>] print rejoin ["Matches: " veggie/3] print [<BR>] print rejoin ["No-nos: " veggie/2] print [<BR>] print rejoin ["Note 1: " veggie/4] print [<BR>] print rejoin ["Note 2: " veggie/5] print [<BR>] print rejoin ["Note 3: " veggie/6] print [<BR>] ] ] submitted: decode-cgi system/options/cgi/query-string if submitted/2 <> none [ switch/default submitted/2 [ "all" [print-all] ][ found: false foreach veggie veggies [ if find veggie/1 submitted/2 [ print a-line print [<BR>] print rejoin ["Veggie: " veggie/1] print [<BR>] print a-line print [<BR>] print rejoin ["Matches: " veggie/3] print [<BR>] print rejoin ["No-nos: " veggie/2] print [<BR>] print rejoin ["Note 1: " veggie/4] print [<BR>] print rejoin ["Note 2: " veggie/5] print [<BR>] print rejoin ["Note 3: " veggie/6] found: true ] ] if found <> true [ print [<BR>] print "That vegetable is not in the database!"] print [<BR>] ] ] print [<FORM ACTION="http://website.com/rebol/veggie.cgi">] print [<BR>"Please select a veggie you'd like info about:"<BR>] print ["Veggie: "<select NAME="username"><option>"all"] foreach veggie veggies [prin rejoin ["<option>" veggie/1]] print [</option>] print [<INPUT TYPE="SUBMIT" NAME="Submit" VALUE="Submit">] print [</FORM>] print [</BODY></HTML>]The final part of the outline that I needed to address was the GUI display version of the program. I needed to create this from scratch, so I came up with an outline and some pseudo code to organize my thoughts:
- Display the complete list of vegetables in the database (build the list using a foreach loop similar to the ones used in the command line program, and display that block in a text list widget).
- Display the info for any vegetable selected from the text list widget (when an item is selected, collect all the info for the selected vegetable and display it, nicely formatted, in a separate text area widget).
- Add a button to run the listview editor created earlier.
First I borrowed some code from the add_veggies.r example to create a list of all the veggies in the database. It uses a foreach loop to cycle through each block in the database, and creates a list of the first item in each block (the name of each vegetable). Then it sorts the list alphabetically. This should be run before the GUI is displayed:
load-data: does [ veggies: copy load %database.db veggie-list: copy [] foreach veggie veggies [append veggie-list veggie/1] veggie-list: sort veggie-list ]I decided to use a text-list widget to display the block of vegetable names. To display the info for each vegetable, I used a simple text area display. Here's the REBOL layout code to do that:
list-veggies: text-list 200x400 data veggie-list display: area "" 300x400To that text-list widget's action block I added some code to display the info about the selected vegetable (it gets evaluated whenever the user selects an item from the list):
; First, build a block of text with all the info about the ; selected vegetable, nicely formatted with newlines and ; capitalized section headings: current-info: [] foreach veggie veggies [ if find veggie/1 value [ current-info: rejoin [ "COMPATIBLE: " veggie/3 newline newline "INCOMPATIBLE: " veggie/2 newline newline "NOTE 1: " veggie/4 newline newline "NOTE 2: " veggie/5 newline newline "NOTE 3: " veggie/6 ] ] ] ; Now display and update that text in the text area widget: display/text: current-info show display show list-veggiesFinally, add a button to run the listview data editor:
btn "Edit Tables" [do %veggie_data_editor.r]That's basically it. Here's the final version:
REBOL [title: "Veggie Matches"] load-data: does [ veggies: copy load %database.db veggie-list: copy [] foreach veggie veggies [append veggie-list veggie/1] veggie-list: sort veggie-list ] load-data view display-gui: layout [ h2 "Click a veggie name to display matches and other info:" across list-veggies: text-list 200x400 data veggie-list [ current-info: [] foreach veggie veggies [ if find veggie/1 value [ current-info: rejoin [ "COMPATIBLE: " veggie/3 newline newline "INCOMPATIBLE: " veggie/2 newline newline "NOTE 1: " veggie/4 newline newline "NOTE 2: " veggie/5 newline newline "NOTE 3: " veggie/6 ] ] ] display/text: current-info show display show list-veggies ] display: area "" 300x400 wrap return btn "Edit Tables" [ do %veggie_data_editor.r ; launch "veggie_data_editor.r" ; load-data ; show list-veggies ; show display ] ]There are 5 complete local script files that make up the completed veggie program: veggie_data_editor.r, add_veggie.r, remove_veggie.r, veggie_command_line.r, veggie_gui.r. In general, the main desktop applications are started by running the veggie_gui.r script. The veggie_data_editor.r can also be run by itself (remember that it runs the veggie_gui.r program when it closes). In order for the veggie_data_editor to work, the listview.r file needs to be included in the same directory. The created database.db should also be kept in the same directory. I packed all those files into an executable using XpackerX, and sent it to my Mom. The 6th script file, veggie.cgi, got uploaded to the web site. The database.db file was also uploaded manually, but my Mom prefers using the upload button in the veggie_data_editor to update the database on the web site. The veggie2remove.r and database backup files are created automatically when the program is used - they're found in the same folder as the script files.
20.17 Case: An Additional Teacher Automation Project
Now that the group scheduling system is complete, I want to automate our daily checkout routine. Every day, our teachers are paid directly by their students. In turn, they pay us a rental/referral fee for room and resource use. That's our primary source of income. At the end of the day, teachers add up all the students they've seen, and pay a given fee for each completed half hour session. Some students prepay their teachers, and the teachers in turn prepay us so that they don't have to manage rental fees for prepaid appointments in the future.
It takes a lot of time to manually figure daily fees, and the process is error prone when calculated by hand. I want to automate the payment calculations based on the existing online schedule information, and I want to create an integrated record keeping system to more easily track prepayments. Teachers need to keep track of missed/rescheduled appointment payments, so that students are given proper credit for rolled over appointment times. Also, in addition to daily local lessons, some of our instructors teach online lessons, for which _we're_ paid directly by students. For those lessons, we deduct room rent from the total paid to us by the teachers. We need a solution to easily manage and track all those daily calculations for all the teachers. The objective is to keep a running total of how much money is due by each teacher every night, and how much money is owed to the teachers by students. To create a software outline, I thought about what I do manually every day to calculate the checkout fees for a single person. This thought process will serve as an outline to design the automated record keeping system:
- Each day at checkout time, the total number of lessons for a teacher is added up.
- The teacher owes us a given amount for lessons that occurred in the local studio that day.
- We owe the teacher a given deduction for each lesson they performed online that day.
- Any lessons which had previously been prepaid by the teacher are deducted from the total owed us.
- The teacher prepays us for any future lessons which were prepaid by students that day, and records are updated to track the current prepaid amounts.
- Occasionally, other deductions are made from the amount owed us (sometimes the teacher provides a complimentary lesson for various reasons, or we provide complimentary time to the teacher/student, etc.). Those amounts are deducted from the total owed us.
Based on the guidelines above, here's how I organized my thoughts about what the automated multiuser system should do:
- The multiuser requirements of the application are similar to those of the scheduling app from the previous section. I can use the code from the scheduling app to provide a current teacher list, simple password protection, loading/saving/backup of required data files for the selected teacher, etc.
- In order to perform daily calculations for a single instructor, I want to provide a dynamically created list of daily students and I want to retrieve current prepay records for the given teacher. That data will be stored on the web site, any changes will be backed up locally and on the web site. I'll need to come up with a data structure to store the prepay records. All other information (random deductions, complimentary lessons, etc.) will be provided by the user on a daily basis. The regular daily student list and prepay records can be downloaded and displayed in text lists. The other random deductions and additions can be entered manually in text input fields, and displayed in text lists.
- By default, each teacher owes a given amount for each of the students selected from the daily list (number_of_students X half_hour_rate). Add to that any fees for additional students not in the daily list (rescheduled lessons, occasional additional appointments, etc.)
- For each online lesson, subtract 1 student from the total number of students taught that day, and deduct the appropriate amount from the grand total due.
- Subtract any previous prepayments from the grand total due. Whenever that happens, make an adjustment to the teacher's record of prepayments.
To satisfy step 1, I'll use the scheduling app from the previous section of this case study. As it stands, that code is capable of selecting a specified teacher directory on the website and downloading any required data files (current daily students, prepay records, individual teacher fee rates, etc.).
The main work of creating the application is in step 2. The required calculations are in steps 3-5. Here's a more structured outline, with pseudo code, to guide the writing of the program code:
- Read a current list of daily students from the selected teacher's schedule.txt file on the web server. Store that info in a block and display it in a GUI text-list widget. Store a list of local students selected from the above widget in a separate block.
- Display today's students again in a second text-list widget, so that the user can select those who took lessons online. Store that selected data in another block.
- Provide a text input field to allow the addition of any students not in the daily list. Display a text-list widget to contain students entered into the text field. Update the text-list display any time a student is added. In order to remove incorrect entries from this list, the action block of the text-list should contain code to delete any students selected by the user.
- Provide another text field and text-list for the entry of deductions, with the same layout and remove code.
- Provide a button to manage prepayment entries and calculations. To handle that whole process, create a separate script - to be outlined below.
- Provide a "Calculate Total Fees" button. The action block of this button should add and subtract the total number of items in all of the text-lists, according to the rules defined in steps 3-5 of the overall program outlined above. Provide an HTML summary, which the teacher can print out and submit every day.
Here's the code I came up with to do all that:
; The "url" variable below comes from the multiuser framework ; borrowed from the scheduler app: students: read/lines rejoin [url "/schedule.txt"] ; Initialize some other variables: other-additions: [] other-deductions: [] prepays: [] pay-for: copy [] online: copy [] view center-face layout [ h2 "Local Students:" ; "face/picked" refers to the currently selected items in ; the text-list (use [Ctrl] + mouse click to select multiple ; items, and assign that to the variable "pay-for": text-list data copy students [pay-for: copy face/picked] h2 "Other Additions:" field [ ; add the entered info to the text-list, and update ; the display: append other-additions copy face/text show other-additions-list ] other-additions-list: text-list 200x100 data other-additions [ ; remove any entry when selected by the user, and update ; the display remove-each item other-additions [item = value] show other-additions-list ] at 250x20 h2 "Online Students:" text-list data copy students [online: face/picked] h2 "Other Deductions:" field [ append other-deductions copy face/text show other-deductions-list ] other-deductions-list: text-list 200x100 data other-deductions [ remove-each item other-deductions [item = value] show other-deductions-list ] at 480x20 h2 "Prepaid Lessons:" prepay-list: text-list data prepays [ remove-each item prepays [item = value] show prepay-list ] ; I still need to create the prepay.r program: btn 200x30 "Calculate Prepaid Lessons" [ save %prepay.txt load rejoin [url "/prepay.txt"] do %prepay.r ] at 480x320 btn 200x100 font-size 17 "Calculate Total Fees" [ total-students: ( (length? pay-for) - (length? online) + (length? other-additions) - (length? other-deductions) - (length? prepays) ) ; I want to create an HTML output for this section: alert rejoin ["Total: " to-string total-students] ] ]Now all that's left to create is a separate program to manage prepayment info. Here's an outline describing my intentions:
- Create and upload a "prepay.txt" data file to store prepayment information for each teacher. It should contain a separate block for each student who prepays, with fields for the student name, a nested block for the amounts and dates of each prepayment, and a nested block for dates of each lesson attended and the amount deducted from the prepayment for each lesson.
- Create a GUI with a text-list displaying each student who has prepayed. Loop through the prepay.txt data to get the student names (the first item in each block). Whenever a name is selected by the user, display the student name, prepay dates and amounts, and lesson dates in separate text lists. Display the total prepay balance for the selected student in a text field.
- There should be an "Add" button and some text fields for entering new prepayments. There should be fields for student name, amount, and date of prepay. If an existing student is selected from the list, those fields should be populated automatically with today's date, and with the name of the existing student. The action block of the add button should append the information to appropriate blocks in the prepay.txt file.
- There should be an "Apply Today" button to select prepayment(s) to be applied to today's balance. Store the names of the selected students in a block, save that block to be read and used in the main application, and add the date information to the appropriate blocks in the prepay.txt file.
- There should be an "Done" button on the list-view GUI to allow the information to be changed and saved. Whenever a student is selected from the list, their prepayment records should be displayed in an editable list-view (import the listview module and use the database example from earlier in this tutorial as a model). There should be fields for prepay amounts and dates, and lesson dates and amounts.
- When the main prepay application is closed, the prepay.txt file should be backed up and saved to the web site.
For step 1, here's an example of the block structure I came up with to store data in the prepay.txt file:
[ ; name: "John Smith" ; prepayment amounts and dates: [ [$100 4-April-2006] [$100 5-May-06] ] ; dates of lessons: [ [$20 4-April-06] [$20 11-April-06] [$20 18-April-06] [$20 25-April-06] [$20 5-May-06] ] ] [ "Paul Brown" [ [$100 4-April-2006] ] [ [$20 4-April-06] [$20 25-April-06] ] ] [ "Bill Thompson" [ [$200 22-March-2006] ] [ [$20 22-March-06] [$20 29-March-06] [$20 5-April-06] [$20 12-April-06] [$20 19-April-06] [$20 26-April-06] [$20 3-May-06] ] ] [ ; name: "John Smith" ; prepayment amounts and dates: [ "$100 4-April-2006" "$100 5-May-06" ] ; dates of lessons: [ "$20 4-April-06" "$20 11-April-06" "$20 18-April-06" "$20 25-April-06" "$20 5-May-06" ] ] [ "Paul Brown" [ "$100 4-April-2006" ] [ "$20 4-April-06" "$20 25-April-06" ] ] [ "Bill Thompson" [ "$200 22-March-2006" ] [ "$20 22-March-06" "$20 29-March-06" "$20 5-April-06" "$20 12-April-06" "$20 19-April-06" "$20 26-April-06" "$20 3-May-06" ] ]Here's the code I created to fulfill my outline requirements:
REBOL [title: "Prepayment Calculator"] prepays: load rejoin [url "/prepay.txt"] names: copy [] prepay-history: [] lesson-history: [] display-todays-bal: does [ ; calculate and display the current balance for the ; selected student: todays-balance: $0 foreach payment prepay-history [ todays-balance: todays-balance + ( first (to-block payment) ) ] foreach lesson-event lesson-history [ todays-balance: todays-balance - ( first (to-block lesson-event) ) ] ; update the display of today's balance for the ; selected student : today-bal/text: to-string todays-balance show today-bal ] foreach block prepays [append names first block] view center-face gui: layout [ across text bold "New Prepayment:" text right "Name:" new-name: field text right "Date:" new-date: field 125 to-string now/date text right "Amount:" new-amount: field 75 "$" btn "Add" [ create-new-block: true foreach block prepays [ if (first block) = new-name/text [ create-new-block: false append (second block) to-string rejoin [ new-amount/text " " new-date/text ] ] ] if create-new-block = true [ new-prepay: copy [] append new-prepay to-string new-name/text append new-prepay to-string rejoin [ new-amount/text " " new-date/text ] append prepays new-prepay names: copy [] foreach block prepays [append names first block] ] display-todays-bal show existing show pre-his show les-his show today-bal ] return text bold underline "Edit Data Manually" [ view/new center-face layout [ new-prepays: area 500x300 mold prepays btn "Save Changes" [ prepays: copy new-prepays/text unview ] ] names: copy [] foreach block prepays [append names first block] show gui show existing show pre-his show les-his show today-bal ] return text "Existing Prepayments:" pad 75 text "Prepayment History:" pad 85 text "Lesson History:" pad 100 text "Balance:" return existing: text-list data names [ ; When a name is selected from this text list, update ; the other fields on the screen: new-name/text: value show new-name foreach block prepays [ if (first block) = value [ ; update the other text lists to show the ; selected student's prepay and lesson history: prepay-history: pre-his/data: second block show pre-his lesson-history: les-his/data: third block show les-his ] ] display-todays-bal ; get the list of selected students prepaid-today: copy face/picked ] pre-his: text-list data prepay-history les-his: text-list data lesson-history today-bal: field 85 return btn "Apply Selected Prepayments Today" [ save %prepaid.txt prepaid-today unview ] ]In the original scheduling outline, I replace all references in the code to "schedule.txt" with "prepay.txt":
REBOL [title: "Payment Calculator"] error-message: does [ ans: request {Internet connection is not available. Would you like to see one of the recent local backups?} either ans = true [ editor to-file request-file quit ][ quit ] ] if error? try [ teacherlist: load ftp://user:pass@website.com/teacherlist.txt ][ error-message ] teachers: copy [] foreach teacher teacherlist [append teachers first teacher] view center-face layout [ text-list data teachers [folder: value unview] ] pass: request-pass/only correct: false foreach teacher teacherlist [ if ((first teacher) = folder) and (pass = (second teacher)) [ correct: true ] ] if correct = false [alert "Incorrect password." quit] url: rejoin [http://website.com/teacher/ folder] ftp-url: rejoin [ ftp://user:pass@website.com/public_html/teacher/ folder ] if error? try [ write %prepay.txt read rejoin [url "/prepay.txt"] ][ error-message ] ; backup (before changes are made): cur-time: to-string replace/all to-string now/time ":" "-" ; local: write to-file rejoin [ folder "-prepay_" now/date "_" cur-time ".txt" ] read %prepay.txt ; online: if error? try [ write rejoin [ ftp-url "/" now/date "_" cur-time ] read %prepay.txt ][ error-message ] editor %prepay.txt ; backup again (after changes are made): cur-time: to-string replace/all to-string now/time ":" "-" write to-file rejoin [ folder "-prepay_" now/date "_" cur-time ".txt" ] read %prepay.txt if error? try [ write rejoin [ ftp-url "/" now/date "_" cur-time ] read %prepay.txt ][ alert "Internet connection not available while backing up." ] ; save to web site: if error? try [ write rejoin [ftp-url "/prepay.txt"] read %prepay.txt ][ alert {Internet connection not available while updating web site. Your schedule has NOT been saved online.} quit ] browse urlI also need to replace the line "editor %prepay.txt" with new code that does the work of calculating daily fees and tracking prepayments.
Now that the program is complete, please notice how the outline developed. It took several steps. First, I thought through my daily manual calculations. Then I thought about how that could be encapsulated into a program, and I created a basic outline about what I wanted the program to do. When it came to writing pseudo code outlines to create the actual program, the whole process was made easier by having organized outlines of everything I needed to accomplish. To write the program, I first defined some required data (provided by the multiuser scheduler app), then conceived a user interface, and then performed calculations based on existing data and user input. Following that type of outline structure (define required data, define a UI, perform calculations) tends to be an organized and successful approach in many cases.
It should be noted that I'm not concerned about data security in this app. It is important that the teachers are able to access this info conveniently from any location. It's also important that local backups are made. The automatic backing up of files provides a historical audit trail of transactions and changes to the records, which is an important concern since this program manages income. It's not a problem for these records to become publicly accessible, so I'm using ftp and a public web site to store and retrieve the data. Writing secure applications, however, is an important requirement in most situations involving financial transactions. You should be aware that data security is a primary concern if you intend to do any programming related to typical business transactions, but that topic is beyond the scope of this tutorial. This case study was provided as an additional example of how coding thought can be organized to take you from conceptual phases to a final product. This particular code should not be emulated, however, for projects requiring secure data transactions.
21. Game Programming to Improve Algorithmic Thought and Graphic Skills
Studying a bit about game programming can be helpful in developing the ability to conceive algorithmic solutions to abstract computing problems. Graphic abilities gleaned from game code can also be useful in creating animated and increasingly interactive audio/visual business presentations. You've already seen how the "Jeoparody" game worked as a truly functional solution to a real business training problem, increasing the effectiveness of the training approach. Creative approaches to other game models are limited only by creativity. Otherwise, the game case studies in this section are not essential for understanding core business programming principles, but they can be helpful in increasing general programming skill, motivation, and enjoyment of the art.
21.1 Case: More About Creative Algorithmic Thought: a Tetris Clone
One of my favorite games to play is Tetris. I particularly like the "Rebtris" clone, written in REBOL by Frank Sievertsen. While playing Rebtris recently, it struck me that writing a Tetris clone of my own would be a helpful exercise for this tutorial. In conceiving how to make it a bit different from all the other endless variations of Tetris, I thought "why not try a text version?". Creating it may be easier than a GUI version, and it would run on machines where GUI versions of REBOL aren't available. Writing a text version of Tetris would also force me to organize a set of display techniques that could be useful in laying out other text-based applications. Sounds like a fun project with some useful side effects.
NOTE: I've never considered how to build a Tetris clone, and I'm writing this section as I design, experiment, and write code for the program. So as you read this, you'll follow my exact train of thought in putting the program together, and I'll make no attempt to artificially clean up the process. The point of this tutorial is to demonstrate exactly how to go about creating all types of programs on your own. I hope that following my footsteps exactly - imperfections and all - should be a helpful experience. Let's see what happens...
Instead of starting this entire thing from scratch, I remembered briefly skimming a tutorial about how to create a text positioning dialect called "TUI". I found it again at http://www.rebolforces.com/articles/tui-dialect/ and looked for some reusable code...
Here's the TUI dialect, created by Ingo Hohmann (I renamed his "cursor2" function to "tui"):
tui: func [ {Cursor positioning dialect (iho)} [catch] commands [block!] /local screen-size string arg cnt cmd c err ][ screen-size: ( c: open/binary/no-wait [scheme: 'console] prin "^(1B)[7n" arg: next next to-string copy c close c arg: parse/all arg ";R" forall arg [change arg to-integer first arg] arg: to-pair head arg ) string: copy "" cmd: func [s][join "^(1B)[" s] if error? set/any 'err try [ commands: compose bind commands 'screen-size ][ throw err ] arg: parse commands [ any [ 'direct set arg string! (append string arg) | 'home (append string cmd "H") | 'kill (append string cmd "K") | 'clear (append string cmd "J") | 'up set arg integer! (append string cmd [ arg "A"]) | 'down set arg integer! (append string cmd [ arg "B"]) | 'right set arg integer! (append string cmd [ arg "C"]) | 'left set arg integer! (append string cmd [ arg "D"]) | 'at set arg pair! (append string cmd [ arg/x ";" arg/y "H" ]) | 'del set arg integer! (append string cmd [ arg "P"]) | 'space set arg integer! (append string cmd [ arg "@"]) | 'move set arg pair! (append string cmd [ arg/x ";" arg/y "H" ]) | set cnt integer! set arg string! ( append string head insert/dup copy "" arg cnt ) | set arg string! (append string arg) ] end ] if not arg [throw make error! "Unable to parse block"] string ]I read the tutorial and played with the code a bit. In addition to being a great tutorial, the end product is a useful tool for formatting output in console applications. The function "tui" gets passed a block of parameters including text to be printed, directional keywords to move the cursor around the screen ("home", "up", "down", "left", "right", and "at" a specific location) and several other commands to get the screen size, clear the screen, delete text, repeat text, and insert spaces.
I tried a few commands to get familiar with the syntax:
prin tui [ clear ] print tui [ 50 "-" ] print tui [ right 10 down 7 50 "x" ] prin tui [ clear right 10 down 10 50 "x" ] print tui [ clear home "message1"] print tui [ home space 20 "message2"] print tui [ at 20x20 "message3" kill "message4"] print tui [ at 20x20 del 10] print tui [ move 10x10] prin tui [ clear (screen-size/y * screen-size/x - 4) "x" ]I had more fun playing with the TUI dialect than I did playing Tetris :) Basically, TUI wraps up some of the native print control codes built into REBOL, in a nice clean format that eliminates all the odd characters used in native codes. It contains everything required to move game pieces around the screen, so I'll start to come up with some requirements to build the game. Here's an outline that covers the main design goals I'm conceiving at this point:
- Draw a static playing field (the unchanging graphic backdrop design that's on screen the whole time the game is being played). This will represent the left, right, and lower vertical bounds which the game coordinates may not exceed.
- There are 7 block shapes used in the game. Create text versions of each graphic shape, in each of the 4 possible rotated positions. Come up with code to print and delete each of the graphic shapes. The TUI dialect will let me print and delete characters anywhere on the screen. I'll use directional statements to print the required characters, starting from any given coordinate. Put all these shape routines into a block for easy naming and reuse.
- Write a continuous loop to put one shape on the screen, make it fall at a given speed, and allow the user to spin it around and move it left-right.
- If a shape touches the bottom of the playing field, make it lock into the grid of other shapes that have already fallen. If the bottom row is complete, remove it, and make all the rows above it fall down a row to take its place. If the shape touches the ceiling, end the game.
The first part of the outline is easy. I'll use the "print a-line" code created in the "loops and conditions - a simple data storage app" example earlier in this tutorial. Here's a simple little backdrop that's printed to the screen:
a-line: copy [] loop 28 [append a-line " "] a-line: rejoin [" |" to-string a-line "|"] loop 30 [print a-line] prin " " loop 30 [prin "+"] print ""For the second part, I need to create some code to print the 7 block shapes. They look like this:
; 1 #### 2 ### 3 ### 4 ### ; # # # ; ; 5 ## 6 ## 7 ## ; ## ## ##Here are all the possible variations when the above shapes are rotated clockwise:
; # ; 1 #### 2 # ; # ; # ; ; 3 ### 4 # 5 # 6 # ; # ## ### ## ; # # ; ; 7 ### 8 ## 9 # 10 # ; # # ### # ; # ## ; ; 11 ### 12 # 13 # 14 ## ; # # ### # ; ## # ; ; 15 ## 16 # ; ## ## ; # ; ; 17 ## 18 # ; ## ## ; # ; ; 19 ## ; ##To print any piece, I can start at the top left coordinate in the shape and move the appropriate number of spaces right, left, and/or down to print the other characters in each piece. Starting at the first character in shape 2, for example, I would move as follows: "#", down 1 left 1, "#", down 1 left 1, "#", down 1 left 1, "#". Shape 3 would move as follows: "###", down 1 left 2, "#". Here's a block called "shape", made up of individual blocks that can be passed to tui to print all the above shapes:
shape: [ ["####"] ["#" down 1 left 1 "#" down 1 left 1 "#" down 1 left 1 "#"] ["###" down 1 left 2 "#"] [right 1 "#" down 1 left 2 "##" down 1 left 1 "#"] [right 1 "#" down 1 left 2 "###"] ["#" down 1 left 1 "##" down 1 left 2 "#"] ["###" down 1 left 3 "#"] ["##" down 1 left 1 "#" down 1 left 1 "#"] [right 2 "#" down 1 left 3 "###"] ["#" down 1 left 1 "#" down 1 left 1 "##"] ["###" down 1 left 1 "#"] [right 1 "#" down 1 left 1 "#" down 1 left 2 "##"] ["#" down 1 left 1 "###"] ["##" down 1 left 2 "#" down 1 left 1 "#"] ["##" down 1 left 1 "##"] [right 1 "#" down 1 left 2 "##" down 1 left 2 "#"] [right 1 "##" down 1 left 3 "##"] ["#" down 1 left 1 "##" down 1 left 1 "#"] ["##" down 1 left 2 "##"] ]Now I can use the format "prin tui shape/number" to print any shape. For example:
prin tui shape/3is the same as writing:
prin tui [right 1 "#" down 1 left 2 "##" down 1 left 1 "#"]I came up with the following code to print out each shape, to check for errors, and to get used to using the above format. Notice the use of the "compose" function:
for i 1 19 1 [ print tui [clear] print rejoin ["shape " i ":"] do compose [print tui shape/(i)] ask "" ]To erase the shapes, I decided to extend the block using duplicates of each shape to print spaces instead of "#"s. Now all I have to do is add 19 to any shape's index number, and I can print out a shape made of spaces that erases the original shape made of "#"s. Here's the final shape block:
shape: [ ["####"] ["#" down 1 left 1 "#" down 1 left 1 "#" down 1 left 1 "#"] ["###" down 1 left 2 "#"] [right 1 "#" down 1 left 2 "##" down 1 left 1 "#"] [right 1 "#" down 1 left 2 "###"] ["#" down 1 left 1 "##" down 1 left 2 "#"] ["###" down 1 left 3 "#"] ["##" down 1 left 1 "#" down 1 left 1 "#"] [right 2 "#" down 1 left 3 "###"] ["#" down 1 left 1 "#" down 1 left 1 "##"] ["###" down 1 left 1 "#"] [right 1 "#" down 1 left 1 "#" down 1 left 2 "##"] ["#" down 1 left 1 "###"] ["##" down 1 left 2 "#" down 1 left 1 "#"] ["##" down 1 left 1 "##"] [right 1 "#" down 1 left 2 "##" down 1 left 2 "#"] [right 1 "##" down 1 left 3 "##"] ["#" down 1 left 1 "##" down 1 left 1 "#"] ["##" down 1 left 2 "##"] ; Here are the same shapes, with spaces instead of "#"s: [" "] [" " down 1 left 1 " " down 1 left 1 " " down 1 left 1 " "] [" " down 1 left 2 " "] [right 1 " " down 1 left 2 " " down 1 left 1 " "] [right 1 " " down 1 left 2 " "] [" " down 1 left 1 " " down 1 left 2 " "] [" " down 1 left 3 " "] [" " down 1 left 1 " " down 1 left 1 " "] [right 2 " " down 1 left 3 " "] [" " down 1 left 1 " " down 1 left 1 " "] [" " down 1 left 1 " "] [right 1 " " down 1 left 1 " " down 1 left 2 " "] [" " down 1 left 1 " "] [" " down 1 left 2 " " down 1 left 1 " "] [" " down 1 left 1 " "] [right 1 " " down 1 left 2 " " down 1 left 2 " "] [right 1 " " down 1 left 3 " "] [" " down 1 left 1 " " down 1 left 1 " "] [" " down 1 left 2 " "] ]I wrote another quick script to test it. Notice the "i + 19" used to erase the exiting shape:
for i 1 19 1 [ print tui [clear] print rejoin ["shape " i ":"] do compose [prin tui [move 10x10] print tui shape/(i)] ask "" do compose [prin tui [move 10x10] print tui shape/(i + 19)] print rejoin ["shape " i " has been erased."] ask "" ]Beautiful. Steps 1 and 2 are complete. Now I can work on the last part of the outline (the things related to how the game actually plays, moving pieces and responding to user input). First, I'll get the shapes to fall down the screen. That'll be done by printing, erasing and then redrawing the piece one row lower, in a continuous loop. Here's an outline to organize that thought process:
- Start by clearing the screen.
- Pieces appear in a random order, so come up with a random number to represent some random shape's index number.
- Use a for loop to increment the vertical position of the piece: for each row, print the random piece number at the current horizontal position (initially set to 15), and at the vertical position represented by the current "for" variable.
- Wait a moment, then erase the piece (using the shape number + 19). Then increment the row number and start again.
- When the piece reaches the last row, print it there without erasing.
- Wrap that whole thing in a forever loop to keep it going indefinitely.
Let's get that much going:
prin tui [clear] forever [ random/seed now r: random 19 ; the number of a random shape xpos: 18 ; the initial horizontal position for i 1 25 1 [ pos: to-pair rejoin [i "x" xpos] ; print the shape represented by "r" at the "pos" ; coordinate: do compose/deep [prin tui [at (pos)] print tui shape/(r)] ; The wait time could be a user controlled variable, or ; it could be sped up as the difficulty level increases: wait :00:00.30 ; erase the shape, then continue the loop: do compose/deep [ prin tui [at (pos)] print tui shape/(r + 19)] ] ; reprint the shape at its final resting place: do compose/deep [prin tui [move (pos)] print tui shape/(r)] ]NOTE: It struck me in writing the above code that the TUI function actually takes all its coordinates in an unusual order. Typically, in coordinates with the form XxY, "X" is the horizontal position and "Y" is the vertical position. TUI uses the format YxX, where Y is the vertical position measured in rows from the top of the screen. X is the horizontal position, measured in columns from the left side of the screen. Keep in mind that the order of X and Y coordinates is opposite the normal expectation.
Now I need to come up with a way for the user to control the horizontal position of the shape. Here's some pseudo code to help me think about how to do that:
- Be on the lookout for keystroke input from the user.
- If the user presses the "l" key, add 1 to the current horizontal position of the shape (held in the variable "xpos"). If the user presses the "k" key, subtract 1 from xpos.
First, I need a way to get keystroke input without blocking the program flow (i.e., I need to wait for keystroke input to be acknowledged when it occurs, but I can't just stop the normal program flow to wait for key presses. For game play to continue, the "for" and "forever" loops can't be interrupted. So I searched Google for "REBOL key stroke" and got pointed to the following code at http://www.rebol.org/cgi-bin/cgiwrap/rebol/ml-display-thread.r?m=rmlSCRQ (in the REBOL mailing list archive):
c: open/binary/no-wait [scheme: 'console] ; set following to whatever you wish ; intentionally slow at 2 secs so you can "see" the effect wait-duration: :0:2 d: 0 forever [ if not none? wait/all [c wait-duration] [ print to-char to-integer copy c ] d: d + 1 ;let's do other stuff print d ]That little bit of code does exactly what I need. The parts required for my needs are:
c: open/binary/no-wait [scheme: 'console] forever [ if not none? wait/all [c wait-duration] [ print to-char to-integer copy c ] ]I adjusted the variable names, checked for "k" or "l" key presses, and used the code below to test that it worked the way I wanted:
keys: open/binary/no-wait [scheme: 'console] forever [ if not none? wait/all [keys :00:00.01] [ switch to-string to-char to-integer copy keys [ "k" [print "you pressed k"] "l" [print "you pressed l"] ] ] ; print "nothing pressed" ; make sure it's working ]Next, I integrated the above code into the loop created earlier to drop the shape down the screen. Notice that I added a conditional "if", to be executed when either "k" or "l" keystrokes are encountered. It checks that the horizontal bounds don't go outside the 5-30 positions. That keeps the shapes within the horizontal boundaries of the playing field. Also, notice that the variable "old-xpos" is used to hold the position of the shape that needs to be erased:
keys: open/binary/no-wait [scheme: 'console] forever [ random/seed now r: random 19 xpos: 18 for i 1 25 1 [ pos: to-pair rejoin [i "x" xpos] do compose/deep [prin tui [at (pos)] print tui shape/(r)] old-xpos: xpos if not none? wait/all [keys :00:00.30] [ switch to-string to-char to-integer copy keys [ "k" [if (xpos > 5) [xpos: xpos - 1]] "l" [if (xpos < 30) [xpos: xpos + 1]] ] ] pos: to-pair rejoin [i "x" old-xpos] do compose/deep [ prin tui [at (pos)] print tui shape/(r + 19)] ] do compose/deep [prin tui [move (pos)] print tui shape/(r)] ]It's coming along well :) Now I need to be able to spin the shapes around. Here's some pseudo code to organize my thoughts:
- Watch for the "O" key to be pressed. That will be the keycode to run the shape spinning code.
- Create a set of conditionals to cycle through the list of rotated shapes related to the current shape. For example, if the current shape (variable "r") is number 12, then the rotated versions of that shape are numbers 11-14. With each press of the "O" key, replace the variable r with the next shape in that list. That logic must "wrap around" (i.e., the next shape after 14 should be 11). Instead of using a block list of shapes to do this, I decide to use a switch structure to individually map each shape to the one it should rotate to (something like "if shape r is now #14, turn shape r into #11" - do that explicitly for each shape).
I already have some code to watch for keystrokes, so I'll try the last part of the above outline first:
switch to-string r [ "1" [r: 2] "2" [r: 1] "3" [r: 4] "4" [r: 5] "5" [r: 6] "6" [r: 3] "7" [r: 8] "8" [r: 9] "9" [r: 10] "10" [r: 7] "11" [r: 12] "12" [r: 13] "13" [r: 14] "14" [r: 11] "15" [r: 16] "16" [r: 15] "17" [r: 18] "18" [r: 17] "19" [r: 19] ]Wait a sec - that makes the shapes rotate clockwise (from #11 go to #12, #14 to #11, etc.) I prefer for them to rotate counterclockwise (#11 to #14, #14 to #13, etc). Here's the revised code:
switch to-string r [ "1" [r: 2] "2" [r: 1] "3" [r: 6] "4" [r: 3] "5" [r: 4] "6" [r: 5] "7" [r: 10] "8" [r: 7] "9" [r: 8] "10" [r: 9] "11" [r: 14] "12" [r: 11] "13" [r: 12] "14" [r: 13] "15" [r: 16] "16" [r: 15] "17" [r: 18] "18" [r: 17] "19" [r: 19] ]Now add the letter "O" to the list of keys to be watched, and run the above code when it's pressed. Also create an "old-r" variable to retain the number of the shape that needs to be erased. (Since the user changes shapes after the current one has been printed, we need to keep track of which one to erase):
keys: open/binary/no-wait [scheme: 'console] forever [ random/seed now r: random 19 xpos: 18 for i 1 25 1 [ pos: to-pair rejoin [i "x" xpos] do compose/deep [prin tui [at (pos)] print tui shape/(r)] old-xpos: xpos old-r: r if not none? wait/all [keys :00:00.30] [ keystroke: to-string to-char to-integer copy keys switch keystroke [ "k" [if (xpos > 5) [xpos: xpos - 1]] "l" [if (xpos < 30) [xpos: xpos + 1]] "o" [switch to-string r [ "1" [r: 2] "2" [r: 1] "3" [r: 6] "4" [r: 3] "5" [r: 4] "6" [r: 5] "7" [r: 10] "8" [r: 7] "9" [r: 8] "10" [r: 9] "11" [r: 14] "12" [r: 11] "13" [r: 12] "14" [r: 13] "15" [r: 16] "16" [r: 15] "17" [r: 18] "18" [r: 17] "19" [r: 19] ]] ] ] do compose/deep [ prin tui [at (pos)] print tui shape/(old-r + 19) ] ] do compose/deep [prin tui [at (pos)] print tui shape/(r)] ]The shapes are moving correctly now, but there's still a lot of work to be done. The first line of the last section of the overall game outline reads: "If the shape touches the bottom of the playing field, make it lock into the grid of other shapes that have already fallen". Right now the pieces all just fall to different stopping points in the playing field (depending on their height), and they don't stack on top of each other. Here's some pseudo code to fix that:
- I need to be aware of the highest coordinate in each column on the playing field. When the game starts, the highest coordinate in every column of the playing field is row 30 (the flat bottom line that makes up the playing field). I'll store each of these coordinates in a block called "floor".
- I also need to be aware of the lowest coordinate in each column of the currently falling shape. I'll make a block called "edge" to hold those coordinates (referring to the lower edges of the shape). Those coordinates will define the position of each of the lowest points in the currently falling shape, in relation to its top left point (the "pos" coordinate).
- Every time the shape falls one position down the screen, add each of the edge coordinates to the pos coordinate. If any of those coordinates is one position higher than the floor coordinate in the same column, then stop moving that shape (break out of the "for" loop that makes the shape fall). Use a foreach loop to cycle through the current coordinates in the relevant columns of each block, performing a comparison check on the floor and edge coordinates in each column.
- When a shape finishes its drop down the screen, calculate the new highest position in the columns it occupies (the coordinates of the top character in each column), and make those changes to the block that holds the high point information. To do that, I'll need to make a "top" block to hold the relative positions of the highest coordinates in the shape, and add them to the height of the current coordinates in the appropriate columns.
I'll start out simply, just getting each shape to lay flat on the floor of the playing field (row 30). For the moment, all I need to do is create a block of floor coordinates that represents that bottom line:
floor: [30x1 30x2 30x3 30x4 30x5 30x6 30x7 30x8 30x9 30x10 30x11 30x12 30x13 30x14 30x15 30x16 30x17 30x18 30x19 30x20 30x21 30x22 30x23 30x24 30x25 30x26 30x27 30x28 30x29 30x30 30x31 30x32 30x33 30x34 30x35]Next, I'll define a set of lower coordinates for each shape, and store them in a nested block structure similar to the earlier "shape" block. "0x0" refers to the same coordinate as "pos" (0 positions to the right, and 0 positions down from "pos"). "0x10" is one position to the right, and "1x0" is one position down. I look at the visual representations of the shapes again to come up with the list:
; # ; 1 #### 2 # ; # ; # ; ; 3 ### 4 # 5 # 6 # ; # ## ### ## ; # # ; ; 7 ### 8 ## 9 # 10 # ; # # ### # ; # ## ; ; 11 ### 12 # 13 # 14 ## ; # # ### # ; ## # ; ; 15 ## 16 # ; ## ## ; # ; ; 17 ## 18 # ; ## ## ; # ; ; 19 ## ; ##Here's the complete set of low point definitions for each shape:
edge: [ [0x0 0x1 0x2 0x3] [3x0] [0x0 1x1 0x2] [1x0 2x1] [1x0 1x1 1x2] [2x0 1x1] [1x0 0x1 0x2] [0x0 2x1] [1x0 1x1 1x2] [2x0 2x1] [0x0 0x1 1x2] [2x0 2x1] [1x0 1x1 1x2] [2x0 0x1] [0x0 1x1 1x2] [2x0 1x1] [1x0 1x1 0x2] [1x0 2x1] [1x0 1x1] ]So, the relative coordinates of the low points in shape 3, for example, are referred to as edge/3. Here's some sample code to demonstrate how I can now refer to the bottom points in any shape using a foreach loop. The code "pos + position" refers to the low edge in each column:
pos: 5x5 r: 6 foreach position compose edge/(r) [print pos + position]To check if any of those edges are touching the floor, use a foreach loop to cycle through the current coordinates in the relevant columns of each block, performing a comparison check on the floor and edge coordinates in each column. Here's some sample code to flesh out and test that idea:
pos: 30x10 for r 1 19 1 [ print tui [clear] prin "Piece: " print r foreach po compose edge/(r) [ print pos + po foreach coord floor [ floor-y: to-integer first coord floor-x: to-integer second coord edge-y: to-integer first pos + to-integer first po edge-x: to-integer second pos + to-integer second po print rejoin [ "edge: " edge-y "x" edge-x " " "floor: "floor-y "x" floor-x ] if (edge-y >= floor-y) and (floor-x = edge-x) [ print rejoin [ "You're touching or beyond the floor at: " pos + po ] ] ] ] ask "" ]Now let's integrate this technique into the existing code. We'll use a new variable "stop" to break out of the loop that drops the shape, when the current shape touches the floor:
keys: open/binary/no-wait [scheme: 'console] forever [ random/seed now r: random 19 xpos: 18 for i 1 32 1 [ pos: to-pair rejoin [i "x" xpos] do compose/deep [prin tui [at (pos)] print tui shape/(r)] old-r: r old-xpos: xpos if not none? wait/all [keys :00:00.30] [ keystroke: to-string to-char to-integer copy keys switch keystroke [ "k" [if (xpos > 5) [xpos: xpos - 1]] "l" [if (xpos < 30) [xpos: xpos + 1]] "o" [switch to-string r [ "1" [r: 2] "2" [r: 1] "3" [r: 6] "4" [r: 3] "5" [r: 4] "6" [r: 5] "7" [r: 10] "8" [r: 7] "9" [r: 8] "10" [r: 9] "11" [r: 14] "12" [r: 11] "13" [r: 12] "14" [r: 13] "15" [r: 16] "16" [r: 15] "17" [r: 18] "18" [r: 17] "19" [r: 19] ]] ] ] do compose/deep [ prin tui [at (pos)] print tui shape/(old-r + 19) ] stop: false foreach po compose edge/(r) [ foreach coord floor [ floor-y: to-integer first coord floor-x: to-integer second coord edge-y: i + to-integer first po edge-x: xpos + to-integer second po if (edge-y >= floor-y) and (floor-x = edge-x) [ stop: true break ] ] ] if stop = true [break] ] do compose/deep [prin tui [at (pos)] print tui shape/(old-r)] ]This works, but there's a bug. If the piece has been spun around (using the "O" key), the new foreach loop fails to stop the piece from falling. That's because the foreach loop only cycles through the coordinates of the "edge/r" block. If the user flips the shape around, the "r" value gets changed before this code is run. The easiest way to fix this problem is to simply repeat the foreach loop using the "edge/old-r" block. This is an inefficient quick hack, but I'm writing this late at night - and there's some value to pointing out bad coding practice - so I choose to use that solution. I make a promise to myself to come up with a more elegant solution later... (Note to self: once a coding solution has been implemented, changes are harder to make, and bad code typically remains permanent ... I need to be careful about using quick hacks). Here's the current code:
keys: open/binary/no-wait [scheme: 'console] forever [ random/seed now r: random 19 xpos: 18 for i 1 32 1 [ pos: to-pair rejoin [i "x" xpos] do compose/deep [prin tui [at (pos)] print tui shape/(r)] old-r: r old-xpos: xpos if not none? wait/all [keys :00:00.30] [ keystroke: to-string to-char to-integer copy keys switch keystroke [ "k" [if (xpos > 5) [xpos: xpos - 1]] "l" [if (xpos < 30) [xpos: xpos + 1]] "o" [switch to-string r [ "1" [r: 2] "2" [r: 1] "3" [r: 6] "4" [r: 3] "5" [r: 4] "6" [r: 5] "7" [r: 10] "8" [r: 7] "9" [r: 8] "10" [r: 9] "11" [r: 14] "12" [r: 11] "13" [r: 12] "14" [r: 13] "15" [r: 16] "16" [r: 15] "17" [r: 18] "18" [r: 17] "19" [r: 19] ]] ] ] do compose/deep [ prin tui [at (pos)] print tui shape/(old-r + 19) ] stop: false foreach po compose edge/(r) [ foreach coord floor [ floor-y: to-integer first coord floor-x: to-integer second coord edge-y: i + to-integer first po edge-x: xpos + to-integer second po if (edge-y = floor-y) and (floor-x = edge-x) [ stop: true break ] ] ] foreach po compose edge/(old-r) [ foreach coord floor [ floor-y: to-integer first coord floor-x: to-integer second coord edge-y: i + to-integer first po edge-x: old-xpos + to-integer second po if (edge-y = floor-y) and (floor-x = edge-x) [ stop: true break ] ] ] if stop = true [break] ] do compose/deep [prin tui [at (pos)] print tui shape/(old-r)] ]Next, I decide to test the existing program for other bugs. I've been keeping separate text files containing all the code changes I make as I go along. Every time I make, test, and change a chunk of code, I save the new trial version with a new filename and version number. I save each version, just so that I don't permanently erase old code with each change - it may be potentially useful. My current working version is now #19.
I noticed during this debugging session that shape 1 still breaks through the right side of the wall. I could change that by adjusting the "(xpos < 30)" conditional expression that occurs when the "L" key gets pressed. But that solution will keep the other shapes from laying snugly against the wall. In fact, that additional problem is occurring now with shapes that are only 2 characters wide - I didn't notice until now. To deal with these problems, I create a block of values called "width", listing the widths of all 19 shapes, which can be used in the existing conditional expression:
width: [4 1 3 2 3 2 3 2 3 2 3 2 3 2 3 2 3 2 2]Now I can check if the shape is at the right boundary, using the revised code below:
[if (xpos < (33 - compose width/(r))) [ xpos: xpos + 1] ]That check also needs to be performed every time the "O" key is pressed (we don't want the shape breaking out of the wall when it spins). I make the above changes to my current version of the program, and the problems are fixed.
The game is really starting to take shape! Now we need to make the shapes stack on top of each other. Earlier, I wrote these outline thoughts: "when a shape finishes its drop down the screen, calculate the new highest position in the columns it occupies (the coordinates of the top character in each column), and make those changes to the block that holds the high point information. To do that, I'll need to make a "top" block to hold the relative positions of the highest coordinates in the shape, and add them to the height of the current coordinates in the appropriate columns". Sounds like I'll need to loop through some columns to make the changes to the floor.
To create the "top" block I look at the visual representations of each shape once again, and come up with a coordinate list representing the high points in the shape, relative to the top left coordinate. It's similar to the "edge" block:
top: [ [0x0 0x1 0x2 0x3] [0x0] [0x0 0x1 0x2] [1x0 0x1] [1x0 0x1 1x2] [0x0 1x1] [0x0 0x1 0x2] [0x0 0x1] [1x0 1x1 0x2] [0x0 2x1] [0x0 0x1 0x2] [2x0 0x1] [0x0 1x1 1x2] [0x0 0x1] [0x0 0x1 1x2] [1x0 0x1] [1x0 0x1 0x2] [0x0 1x1] [0x0 0x1] ]The shape finishes its drop down the screen during the previous foreach loops we created, so to calculate the new highest positions in the columns occupied by the shape, I first need to determine which shape was the last one on the screen ("r" or "old-r"). The quick hack I made earlier is now coming back to bite me a bit - I now need to make duplicates of any changes that occur in both foreach loops:
stop-shape-num: r ; (or stop-shape-num: old-r, depending on the foreach loop) stop: true breakNow to make the changes to the "floor" block, I loop through the columns occupied by the piece, setting each of the top characters in the shape to be the high coordinates in the respective columns of the floor. The "poke" function lets me replace the original coordinates in the floor block with the new coordinates. Those changes are made just before breaking out of the loop that drops the shape:
if stop = true [ ; get the left-most column the last shape occupies: left-col: second pos ; get the number of columns the shape occupies: width-of-shape: length? compose top/(stop-shape-num) ; get the right most column the shape occupies: right-col: left-col + width-of-shape - 1 ; Loop through each column occupied by the shape, ; replacing each coordinate in the current column ; of the floor with the new high coordinate: counter: 1 for current-column left-col right-col 1 [ add-coord: compose top/(stop-shape-num)/(counter) new-floor-coord: (pos + add-coord + -1x0) poke floor current-column new-floor-coord counter: counter + 1 ] break ]The new stacking code works, but there's a design flaw. If I maneuver a shape into an unoccupied space directly underneath any high point in the floor, without first touching the high point in that column, the piece doesn't stop. Furthermore, if that happens, it changes the new high point to the bottom of the column which the current shape occupies. I realize here that what I need to mark are not only the high points in the floor, but also every additional coordinate on the screen that contains a character. This is just as easy to accomplish. Instead of changing the current coordinates in the floor block (using the "poke" function):
poke floor current-column new-floor-coordjust add the new coordinates to the list (using "append"). That will keep track of all points at which a character is printed on the screen:
append floor new-floor-coordThat fixes the problem above, but I've also realized that if I move a shape sideways into an open position in the floor, the characters sometimes still overlap inappropriately. That's because the "top" and "edge" blocks only mark the highest and lowest points in each shape. It strikes me now that I could just combine those two blocks into one, marking all the coordinates occupied by a shape. Here's the new block - I call it "oc", short for "occupied":
oc: [ [0x0 0x1 0x2 0x3] [0x0 1x0 2x0 3x0] [0x0 0x1 0x2 1x1] [0x1 1x0 1x1 2x1] [0x1 1x0 1x1 1x2] [0x0 1x0 1x1 2x0] [0x0 0x1 0x2 1x0] [0x0 0x1 1x1 2x1] [0x2 1x0 1x1 1x2] [0x0 1x0 2x0 2x1] [0x0 0x1 0x2 1x2] [0x1 1x1 2x0 2x1] [0x0 1x0 1x1 1x2] [0x0 0x1 1x0 2x0] [0x0 0x1 1x1 1x2] [0x1 1x0 1x1 2x0] [0x1 0x2 1x0 1x1] [0x0 1x0 1x1 2x1] [0x0 0x1 1x0 1x1] ]I remove the "top" and "edge" blocks, and replace all code references to them with "oc".
Now there's another bug I need to fix. Sometimes when I press a key, the following error occurs:
** Script Error: Invalid argument: [45 ** Where: to-integer | ** Near: forall arg [change arg to-integer first arg] arg: to-pairThe code referenced is not part of any code I've written. It seems to be related to keystroke input because it only happens when I press one of the game control keys. Since I'm not sure what's creating the error (maybe it's related to the timing of keystrokes, or perhaps it has to do with a key release), I make an educated guess and figure that the following line, which waits for keystrokes, is where it's occurring:
if not none? wait/all [keys :00:00.30] [...]I wrap that whole thing in an error check:
if not error? try [if not none? wait/all [keys :00:00.30] [...]]And, hmmm ... that doesn't work. So instead of guessing, I work methodically to check each of the other main sections of the program. Every section gets wrapped in an "error? try" routine, and I also put in an "if" conditional stucture to print out a numbered error message whenever an error occurs. I find that the error is first occurring here:
do compose/deep [prin tui [at (pos)] print tui shape/(r)]Wrapped in the error test, that section looks like this:
if error? try [ do compose/deep [ prin tui [at (pos)] print tui shape/(r) ] ] [print "er1"]I'm curious about what's causing the error, so I dig a little deeper. This time I have the error check print out the variables contained in the code:
if error? try [ do compose/deep [ prin tui [at (pos)] print tui shape/(r) ] ] [print rejoin [pos " " r]]Nothing seems to be amiss. Every time the error occurs, the variables show a correct coordinate and shape number. So, for now I'll simply leave the error check in place, removing the printout. This will keep the game moving along whenever the ghostly error occurs. I'll need to post a message to the REBOL mailing list to see if anyone knows why the error is occurring. For the time being, the following error handler fixes the issue:
if error? try [ do compose/deep [ prin tui [at (pos)] print tui shape/(r) ] ] []It turns out that I need to do the same thing for all the other similar occurences of code that print a shape to the screen:
if error? try [ do compose/deep [ prin tui [at (pos)] print tui shape/(old-r + 19) ] ] [] if error? try [ do compose/deep [ prin tui [at (pos)] print tui shape/(old-r) ] ] []With all the known bugs controlled, I can move on to implementing the last parts of the game design. We need to check if the top row of the playing area is reached. If any shape stops moving at this ceiling row, end the game. This needs to be done any time a piece reaches it's final resting place, so I put it immediately after the main "for" loop in the program outline (so that it's evaluated immediately after the stopping code is executed):
if (first pos) < 2 [ prin tui [at 35x0] print "Game Over" halt ]Finally, to erase the bottom line of shapes every time a row is filled in horizontally, we're going to have to redraw the playing field entirely. The "floor" block contains all the information needed to rebuild the current state of the playing field (all the positions at which a character is currently printed). Here's an outline and some pseudo code to think through what needs to be done:
- Every time a shape stops moving, check to see if any row of the floor is full (i.e., there's one character printed in every column). I can use a for loop and a find function to perform that check on the floor block. (I'll start things off by just checking the bottom row).
- If any row is full (for now, just the bottom row), remove that row of characters from the floor block. Use a remove-each loop to remove any coordinates that have y positions in the relevant row from the floor block.
- Move all of the other characters above the relevant row down one row. Add one y position to all the other coordinates in the floor block which are above the relevant row. Use a foreach loop to go through each coordinate in the block and add 1x0. To replace the old floor block with the new one, first create a temporary block made up of the new floor block coordinates, then copy it back to the floor block once it's complete.
- Erase the current screen, print the static background, and then reprint a new playing field using the refreshed block of floor coordinates. We can accomplish this easily using a foreach loop and TUI to print the characters at each coordinate in the list.
; #1: line-is-full: true for colmn 5 32 1 [ each-coord: to-pair rejoin [29 "x" colmn] if not find floor each-coord [ line-is-full: false break ] ] ; #2: if line-is-full = true [ remove-each cor floor [(first cor) = 29] ; #3: new-floor: copy [] foreach cords floor [ append new-floor (cords + 1x0) ] floor: copy new-floor ; #4: prin tui [clear] a-line: copy [] loop 28 [append a-line " "] a-line: rejoin [" |" to-string a-line "|"] loop 30 [print a-line] prin " " loop 30 [prin "+"] print "" foreach was-here floor [ if not ((first was-here) = 30) [ prin tui compose [at (was-here)] prin "#" ] ] ]At this point, I realize that I've made some logic errors in how the floor block and the stopping routine are structured. As it stands, when the screen is refreshed, the bottom row of the block (row 30) needs to be erased so that all the characters in row 29 can fall down one position. But if row 30 is erased, then the bottom of the floor disappears. As it turns out, row 31 should actually be treated as the bottom row, and all the characters should stop at 1x0 position higher then any character in the floor.
I make the required changes to the coordinates in the floor block (change all the y positions from 30 to 31). I also change the "new-floor-coord" variable in the stopping routine, and adjust the code above so that characters below line 30 are not printed. Additionally, the entire section above gets wrapped in a "for" loop to check if each row 1-30 is full. In the code above, I only checked if the bottom line was full - the number 29 referred to the row. I replace that number with the "row" variable created in the for loop. And with that, the last requirements of my original game outline are satisfied and an initial version of "Textris" is in working order. Here's the code:
REBOL [Title: "Textris"] tui: func [ {Cursor positioning dialect (iho)} [catch] commands [block!] /local screen-size string arg cnt cmd c err ][ screen-size: ( c: open/binary/no-wait [scheme: 'console] prin "^(1B)[7n" arg: next next to-string copy c close c arg: parse/all arg ";R" forall arg [change arg to-integer first arg] arg: to-pair head arg ) string: copy "" cmd: func [s][join "^(1B)[" s] if error? set/any 'err try [ commands: compose bind commands 'screen-size ][ throw err ] arg: parse commands [ any [ 'direct set arg string! (append string arg) | 'home (append string cmd "H") | 'kill (append string cmd "K") | 'clear (append string cmd "J") | 'up set arg integer! (append string cmd [ arg "A"]) | 'down set arg integer! (append string cmd [ arg "B"]) | 'right set arg integer! (append string cmd [ arg "C"]) | 'left set arg integer! (append string cmd [ arg "D"]) | 'at set arg pair! (append string cmd [ arg/x ";" arg/y "H" ]) | 'del set arg integer! (append string cmd [ arg "P"]) | 'space set arg integer! (append string cmd [ arg "@"]) | 'move set arg pair! (append string cmd [ arg/x ";" arg/y "H" ]) | set cnt integer! set arg string! ( append string head insert/dup copy "" arg cnt ) | set arg string! (append string arg) ] end ] if not arg [throw make error! "Unable to parse block"] string ] shape: [ ["####"] ["#" down 1 left 1 "#" down 1 left 1 "#" down 1 left 1 "#"] ["###" down 1 left 2 "#"] [right 1 "#" down 1 left 2 "##" down 1 left 1 "#"] [right 1 "#" down 1 left 2 "###"] ["#" down 1 left 1 "##" down 1 left 2 "#"] ["###" down 1 left 3 "#"] ["##" down 1 left 1 "#" down 1 left 1 "#"] [right 2 "#" down 1 left 3 "###"] ["#" down 1 left 1 "#" down 1 left 1 "##"] ["###" down 1 left 1 "#"] [right 1 "#" down 1 left 1 "#" down 1 left 2 "##"] ["#" down 1 left 1 "###"] ["##" down 1 left 2 "#" down 1 left 1 "#"] ["##" down 1 left 1 "##"] [right 1 "#" down 1 left 2 "##" down 1 left 2 "#"] [right 1 "##" down 1 left 3 "##"] ["#" down 1 left 1 "##" down 1 left 1 "#"] ["##" down 1 left 2 "##"] ; [" "] [" " down 1 left 1 " " down 1 left 1 " " down 1 left 1 " "] [" " down 1 left 2 " "] [right 1 " " down 1 left 2 " " down 1 left 1 " "] [right 1 " " down 1 left 2 " "] [" " down 1 left 1 " " down 1 left 2 " "] [" " down 1 left 3 " "] [" " down 1 left 1 " " down 1 left 1 " "] [right 2 " " down 1 left 3 " "] [" " down 1 left 1 " " down 1 left 1 " "] [" " down 1 left 1 " "] [right 1 " " down 1 left 1 " " down 1 left 2 " "] [" " down 1 left 1 " "] [" " down 1 left 2 " " down 1 left 1 " "] [" " down 1 left 1 " "] [right 1 " " down 1 left 2 " " down 1 left 2 " "] [right 1 " " down 1 left 3 " "] [" " down 1 left 1 " " down 1 left 1 " "] [" " down 1 left 2 " "] ] floor: [ 31x5 31x6 31x7 31x8 31x9 31x10 31x11 31x12 31x13 31x14 31x15 31x16 31x17 31x18 31x19 31x20 31x21 31x22 31x23 31x24 31x25 31x26 31x27 31x28 31x29 31x30 31x31 31x32 ] oc: [ [0x0 0x1 0x2 0x3] [0x0 1x0 2x0 3x0] [0x0 0x1 0x2 1x1] [0x1 1x0 1x1 2x1] [0x1 1x0 1x1 1x2] [0x0 1x0 1x1 2x0] [0x0 0x1 0x2 1x0] [0x0 0x1 1x1 2x1] [0x2 1x0 1x1 1x2] [0x0 1x0 2x0 2x1] [0x0 0x1 0x2 1x2] [0x1 1x1 2x0 2x1] [0x0 1x0 1x1 1x2] [0x0 0x1 1x0 2x0] [0x0 0x1 1x1 1x2] [0x1 1x0 1x1 2x0] [0x1 0x2 1x0 1x1] [0x0 1x0 1x1 2x1] [0x0 0x1 1x0 1x1] ] width: [4 1 3 2 3 2 3 2 3 2 3 2 3 2 3 2 3 2 2] a-line: copy [] loop 28 [append a-line " "] a-line: rejoin [" |" to-string a-line "|"] loop 30 [print a-line] prin " " loop 30 [prin "+"] print "" keys: open/binary/no-wait [scheme: 'console] forever [ random/seed now r: random 19 xpos: 18 for i 1 30 1 [ pos: to-pair rejoin [i "x" xpos] if error? try [ do compose/deep [ prin tui [at (pos)] print tui shape/(r) ] ] [] old-r: r old-xpos: xpos if not none? wait/all [keys :00:00.30] [ keystroke: to-string to-char to-integer copy keys switch/default keystroke [ "k" [if (xpos > 5) [ xpos: xpos - 1 ]] "l" [if (xpos < (33 - compose width/(r))) [ xpos: xpos + 1 ]] "o" [if (xpos < (33 - compose width/(r))) [ switch to-string r [ "1" [r: 2] "2" [r: 1] "3" [r: 6] "4" [r: 3] "5" [r: 4] "6" [r: 5] "7" [r: 10] "8" [r: 7] "9" [r: 8] "10" [r: 9] "11" [r: 14] "12" [r: 11] "13" [r: 12] "14" [r: 13] "15" [r: 16] "16" [r: 15] "17" [r: 18] "18" [r: 17] "19" [r: 19] ] ] ] ] [] ] if error? try [ do compose/deep [ prin tui [at (pos)] print tui shape/(old-r + 19) ] ] [] stop: false foreach po compose oc/(r) [ foreach coord floor [ floor-y: to-integer first coord floor-x: to-integer second coord oc-y: i + to-integer first po oc-x: xpos + to-integer second po if (oc-y = (floor-y - 1)) and (floor-x = oc-x) [ stop-shape-num: r stop: true break ] ] ] foreach po compose oc/(old-r) [ foreach coord floor [ floor-y: to-integer first coord floor-x: to-integer second coord oc-y: i + to-integer first po oc-x: old-xpos + to-integer second po if (oc-y = (floor-y - 1)) and (floor-x = oc-x) [ stop-shape-num: old-r stop: true break ] ] ] if stop = true [ left-col: second pos width-of-shape: length? compose oc/(stop-shape-num) right-col: left-col + width-of-shape - 1 counter: 1 for current-column left-col right-col 1 [ add-coord: compose oc/(stop-shape-num)/(counter) new-floor-coord: (pos + add-coord) append floor new-floor-coord counter: counter + 1 ] break ] ] if (first pos) < 2 [ prin tui [at 33x0] print "GAME OVER!!!" halt ] if error? try [ do compose/deep [ prin tui [at (pos)] print tui shape/(old-r) ] ] [] for row 1 30 1 [ line-is-full: true for colmn 5 32 1 [ each-coord: to-pair rejoin [row "x" colmn] if not find floor each-coord [ line-is-full: false break ] ] if line-is-full = true [ remove-each cor floor [(first cor) = row] new-floor: copy [ 31x5 31x6 31x7 31x8 31x9 31x10 31x11 31x12 31x13 31x14 31x15 31x16 31x17 31x18 31x19 31x20 31x21 31x22 31x23 31x24 31x25 31x26 31x27 31x28 31x29 31x30 31x31 31x32 ] foreach cords floor [ either ((first cords) < row) [ append new-floor (cords + 1x0) ][ append new-floor cords ] ] floor: copy unique new-floor prin tui [clear] a-line: copy [] loop 28 [append a-line " "] a-line: rejoin [" |" to-string a-line "|"] loop 30 [print a-line] prin " " loop 30 [prin "+"] print "" foreach was-here floor [ if not ((first was-here) = 31) [ prin tui compose [at (was-here)] prin "#" ] ] ] ] ]Now that the program is working to my original specs, I want to make it look a bit spiffier. First of all, the playing area looks too wide and tall. I check Rebtris, and it's only 10 columns wide by 20 rows tall. I like that look and feel, so I adjust the floor block, the code that draws the static backdrop, and all computations related to the right boundaries of the playing field and the number of rows, to reflect that change.
I also want to print out a "Textris" title header, some keyboard instructions, and a score header. Tui allows me to print this text to the right of the playing field where I want it:
print tui [ at 4x21 "TEXTRIS" at 5x21 "-------" at 7x20 "'K' = left" at 8x20 "'L' = right" at 9x20 "'O' = spin" at 11x21 "Score:" ]Keeping track of the score is simple. When the program starts, a "score" variable is created and set to 0 ("score: 0"). Every time a piece stops falling, 10 points are added to the score. That number is printed beneath the score header (notice that the score number must first be converted to a string, in order to be printed by tui):
score: score + 10 print tui compose [at 13x21 (to-string score)]Every time a row is filled in, 1000 points are added to the score. When the screen if redrawn to reflect the newly erased row, the tui code that prints the backdrop also prints out the updated score:
print tui compose [ at 4x21 "TEXTRIS" at 5x21 "-------" at 7x20 "'K' = left" at 8x20 "'L' = right" at 9x20 "'O' = spin" at 11x21 "Score:" at 13x21 (to-string score) ]Next, I want to add a pause key. This will fit in the switch structure that watches for keystrokes. Whenever the "P" key is pressed, print a message indicating that the game has been paused. Use an "ask" action to wait for input, and then print two blank lines to erase the pause message and any errant characters that the user may type in before hitting the [Enter] key:
"p" [ print tui [ at 23x0 "Press [Enter] to continue" ] ask "" print tui [ at 24x0 " " at 23x0 " " ] ]After posting some of this code to the REBOL mail list, another bug has become obvious. If the insert key or the arrow keys are pressed during game play, the game crashes. The following code produces a "** Math Error: Math or number overflow" when those keys are evaluated:
keystroke: to-string to-char to-integer copy keysTo fix that, I create my own error check. The keys codes for the arrow keys are #{1B5B41}, #{1B5B42}, #{1B5B43}, #{1B5B44}, and #{1B5B327E}. I check to see if they've been pressed first. If not, run the code above:
now-key: copy keys if not ( find [ #{1B5B41} #{1B5B42} #{1B5B43} #{1B5B44} #{1B5B327E} ] (now-key) ) [keystroke: to-string to-char to-integer now-key]That works, but a message to the list by Gabrielle Santilli creates a simpler solution. It turns out that I should have looked at the console port format a bit more carefully. All that's needed to get the keystroke is:
keystroke: to-string copy keysAnd that does not produce errors for any entered keys.
I added all the above code to the program, and then tested everything. In doing so, I made an interesting discovery - it turns out that the code which produced the ghostly key input error in the shape printing routines is in a section of the TUI dialect that enables one to check for screen size. I think the error has something to do with the fact that I'm "compose"ing the results - not sure, but it doesn't matter. Since I'm not using that function, I simply remove it from the code. While I'm at it, I remove all the other parts of the TUI dialect that I'm not using. It turns out that all I need is:
tui: func [commands [block!]] [ string: copy "" cmd: func [s][join "^(1B)[" s] arg: parse commands [ any [ 'clear (append string cmd "J") | 'up set arg integer! (append string cmd [ arg "A"]) | 'down set arg integer! (append string cmd [ arg "B"]) | 'right set arg integer! (append string cmd [ arg "C"]) | 'left set arg integer! (append string cmd [ arg "D"]) | 'at set arg pair! (append string cmd [ arg/x ";" arg/y "H" ]) | set arg string! (append string arg) ] end ] string ]With that error gone, I can remove all the error checking routines in the program (they were causing some additional problems). Now Textris feels like a reasonably complete program. Here's the final code:
REBOL [Title: "Textris"] tui: func [commands [block!]] [ string: copy "" cmd: func [s][join "^(1B)[" s] arg: parse commands [ any [ 'clear (append string cmd "J") | 'up set arg integer! (append string cmd [ arg "A"]) | 'down set arg integer! (append string cmd [ arg "B"]) | 'right set arg integer! (append string cmd [ arg "C"]) | 'left set arg integer! (append string cmd [ arg "D"]) | 'at set arg pair! (append string cmd [ arg/x ";" arg/y "H" ]) | set arg string! (append string arg) ] end ] string ] shape: [ ["####"] ["#" down 1 left 1 "#" down 1 left 1 "#" down 1 left 1 "#"] ["###" down 1 left 2 "#"] [right 1 "#" down 1 left 2 "##" down 1 left 1 "#"] [right 1 "#" down 1 left 2 "###"] ["#" down 1 left 1 "##" down 1 left 2 "#"] ["###" down 1 left 3 "#"] ["##" down 1 left 1 "#" down 1 left 1 "#"] [right 2 "#" down 1 left 3 "###"] ["#" down 1 left 1 "#" down 1 left 1 "##"] ["###" down 1 left 1 "#"] [right 1 "#" down 1 left 1 "#" down 1 left 2 "##"] ["#" down 1 left 1 "###"] ["##" down 1 left 2 "#" down 1 left 1 "#"] ["##" down 1 left 1 "##"] [right 1 "#" down 1 left 2 "##" down 1 left 2 "#"] [right 1 "##" down 1 left 3 "##"] ["#" down 1 left 1 "##" down 1 left 1 "#"] ["##" down 1 left 2 "##"] ; [" "] [" " down 1 left 1 " " down 1 left 1 " " down 1 left 1 " "] [" " down 1 left 2 " "] [right 1 " " down 1 left 2 " " down 1 left 1 " "] [right 1 " " down 1 left 2 " "] [" " down 1 left 1 " " down 1 left 2 " "] [" " down 1 left 3 " "] [" " down 1 left 1 " " down 1 left 1 " "] [right 2 " " down 1 left 3 " "] [" " down 1 left 1 " " down 1 left 1 " "] [" " down 1 left 1 " "] [right 1 " " down 1 left 1 " " down 1 left 2 " "] [" " down 1 left 1 " "] [" " down 1 left 2 " " down 1 left 1 " "] [" " down 1 left 1 " "] [right 1 " " down 1 left 2 " " down 1 left 2 " "] [right 1 " " down 1 left 3 " "] [" " down 1 left 1 " " down 1 left 1 " "] [" " down 1 left 2 " "] ] floor: [ 21x5 21x6 21x7 21x8 21x9 21x10 21x11 21x12 21x13 21x14 21x15 ] oc: [ [0x0 0x1 0x2 0x3] [0x0 1x0 2x0 3x0] [0x0 0x1 0x2 1x1] [0x1 1x0 1x1 2x1] [0x1 1x0 1x1 1x2] [0x0 1x0 1x1 2x0] [0x0 0x1 0x2 1x0] [0x0 0x1 1x1 2x1] [0x2 1x0 1x1 1x2] [0x0 1x0 2x0 2x1] [0x0 0x1 0x2 1x2] [0x1 1x1 2x0 2x1] [0x0 1x0 1x1 1x2] [0x0 0x1 1x0 2x0] [0x0 0x1 1x1 1x2] [0x1 1x0 1x1 2x0] [0x1 0x2 1x0 1x1] [0x0 1x0 1x1 2x1] [0x0 0x1 1x0 1x1] ] width: [4 1 3 2 3 2 3 2 3 2 3 2 3 2 3 2 3 2 2] score: 0 prin tui [clear] a-line: copy [] loop 11 [append a-line " "] a-line: rejoin [" |" to-string a-line "|"] loop 20 [print a-line] prin " " loop 13 [prin "+"] print "" print tui compose [ at 4x21 "TEXTRIS" at 5x21 "-------" at 7x20 "Use arrow keys" at 8x20 "to move/spin." at 10x20 "'P' = pause" at 13x20 "SCORE: " (to-string score) ] keys: open/binary/no-wait [scheme: 'console] forever [ random/seed now r: random 19 xpos: 9 for i 1 20 1 [ pos: to-pair rejoin [i "x" xpos] do compose/deep [prin tui [at (pos)] print tui shape/(r)] old-r: r old-xpos: xpos if not none? wait/all [keys :00:00.30] [ switch/default to-string copy keys [ "p" [ print tui [ at 23x0 "Press [Enter] to continue" ] ask "" print tui [ at 24x0 " " at 23x0 " " ] ] "^[[D" [if (xpos > 5) [ xpos: xpos - 1 ]] "^[[C" [if (xpos < (16 - compose width/(r))) [ xpos: xpos + 1 ]] "^[[A" [if (xpos < (16 - compose width/(r))) [ switch to-string r [ "1" [r: 2] "2" [r: 1] "3" [r: 6] "4" [r: 3] "5" [r: 4] "6" [r: 5] "7" [r: 10] "8" [r: 7] "9" [r: 8] "10" [r: 9] "11" [r: 14] "12" [r: 11] "13" [r: 12] "14" [r: 13] "15" [r: 16] "16" [r: 15] "17" [r: 18] "18" [r: 17] "19" [r: 19] ] ] ] ] [] ] do compose/deep [ prin tui [at (pos)] print tui shape/(old-r + 19) ] stop: false foreach po compose oc/(r) [ foreach coord floor [ floor-y: to-integer first coord floor-x: to-integer second coord oc-y: i + to-integer first po oc-x: xpos + to-integer second po if (oc-y = (floor-y - 1)) and (floor-x = oc-x) [ stop-shape-num: r stop: true break ] ] ] foreach po compose oc/(old-r) [ foreach coord floor [ floor-y: to-integer first coord floor-x: to-integer second coord oc-y: i + to-integer first po oc-x: old-xpos + to-integer second po if (oc-y = (floor-y - 1)) and (floor-x = oc-x) [ stop-shape-num: old-r stop: true break ] ] ] if stop = true [ left-col: second pos width-of-shape: length? compose oc/(stop-shape-num) right-col: left-col + width-of-shape - 1 counter: 1 for current-column left-col right-col 1 [ add-coord: compose oc/(stop-shape-num)/(counter) new-floor-coord: (pos + add-coord) append floor new-floor-coord counter: counter + 1 ] break ] ] do compose/deep [prin tui [at (pos)] print tui shape/(old-r)] if (first pos) < 2 [ prin tui [at 23x0] print " GAME OVER!!!^/^/" halt ] score: score + 10 print tui compose [at 13x28 (to-string score)] for row 1 20 1 [ line-is-full: true for colmn 5 15 1 [ each-coord: to-pair rejoin [row "x" colmn] if not find floor each-coord [ line-is-full: false break ] ] if line-is-full = true [ remove-each cor floor [(first cor) = row] new-floor: copy [ 21x5 21x6 21x7 21x8 21x9 21x10 21x11 21x12 21x13 21x14 21x15 ] foreach cords floor [ either ((first cords) < row) [ append new-floor (cords + 1x0) ][ append new-floor cords ] ] floor: copy unique new-floor score: score + 1000 prin tui [clear] loop 20 [print a-line] prin " " loop 13 [prin "+"] print "" print tui compose [ at 4x21 "TEXTRIS" at 5x21 "-------" at 7x20 "Use arrow keys" at 8x20 "to move/spin." at 10x20 "'P' = pause" at 13x20 "SCORE: " (to-string score) ] foreach was-here floor [ if not ((first was-here) = 21) [ prin tui compose [at (was-here)] prin "#" ] ] ] ] ]Here's a quick synopsis of the program:
- The TUI dialect is defined.
- The "shape" block, containing the TUI instructions for drawing each shape is defined.
- The "floor", "oc", and "width" coordinate blocks are defined. The "score" variable is also defined.
- The backdrop characters (left, right, and bottom barriers), instructions, headers, and score are printed.
- A forever loop runs the main actions of the program. The subsections of that loop are:
- A shape is printed on the screen.
- User keystrokes are watched for.
- A switch structure decides what to do with entered keystrokes (right arrow = move right, left arrow = move left, up arrow = rotate shape, p = pause).
- Another switch structure determines which shape to print when the current shape is rotated.
- The currently printed shape is erased.
- Two foreach loops check whether the current shape has reached a position at which it should stop falling.
- If the piece has reached a stopping point, the coordinates occupied by the piece are added to the "floor" block.
- The shape is printed at its final resting place.
- If the current shape touches the ceiling, the game ends.
- The score is updated.
- If any rows have been completely filled in, their coordinates are removed from the floor block, the coordinates of all other characters are moved down a row, and the screen is reprinted with the new floor coordinates and the new score.
- The forever loop continues.
If I'd been so thoughtful and organized as to write a structured outline like that in the beginning of the case study, things would've moved along more quickly. But any project is easier in retrospect ... I just try to remember that building as detailed an outline as possible before writing any code always saves a great deal of work and confusion.
Now that the game satisfies my original intentions, I'll bring the case study to a close, but not without first putting together a to-do list of things to improve in the program. If you'd like to try implementing some of these changes, first figure out where in the outline they should go, write some pseudo code to get the job done, and then come up with REBOL code to satisfy those pseudo code expressions:
- Save high scores to disk.
- Add a way to incrementally increase the speed at which shapes drop. Do this every time a certain number of rows is cleared.
- Add a "next piece" preview.
- Look for a way to remove the cursor from the printout, so that it's not visible along the left side of the wall as the shapes fall.
- Add sound. Play tones for each event that occurs, and play a background tune while the game is running.
- Rewrite the entire program using GUI techniques, instead of console text characters and TUI.
Looking at my coding process in retrospect, I should note some criticisms. One element that annoyed me was a set of badly chosen variable names. I initially used "r", for example, to represent the current shape number because it was first used to represent a random number. "R" is not so descriptive, and it was hard to remember what "r" represented while I was coding. The same was true of "i", which became more important as the loop that dropped the shapes grew in complexity. I left those variables as they were in this case study so that the lines of code fit neatly onto this web page, but in my own coding I choose to use more descriptive variables. Doing that in general makes code more readable and easier to think through.
The Moral of the Story:
Whether or not you're interested in game programming, and despite the fact that the final product of this case study is a bland implementation of Tetris, some general understanding about coding can be gained from the thought process covered in this section. It's typical of any general coding project you'll encounter: start with a design concept, outline the main structure of the program you imagine, use pseudo code to guide you from the "what am I trying to do?" through the "how do I code it" stages, and refine the detail of your outline by testing and experimenting with small code chunks along the way.
In general, if you can't think through the process of "what am I trying to accomplish" in a structured way, then you won't be able to write the code to accomplish it. Once you've got a basic grasp of language concepts and syntax, you'll see that writing code just takes lots of creative organization and experimentation. Keep a language reference close at hand, and you can work out the syntax of virtually any code you need to write. That's only a matter of knowing which functions and constructs are available to solve your problems, and looking up the format for those you're not familiar with. The difficult part in any coding situation is mapping each small thought process to a data construct, conditional expression, looping routine, function definition, existing code module, word label, etc. For large projects, you'll typically need an outline because it's so easy to get lost in the minute coding details along the way. Start with a top down approach, conceive and design a flow chart/outline, and then flesh out the details of each section until you've got code written to solve each design concept. Once you become familiar with that process, experience will show that you can code solutions for virtually any problem you encounter.
You'll find that in many cases REBOL allows you to think directly in code more easily than you can with pseudo code. That's because REBOL's high level design is meant to be human readable and human "thinkable". Although many coding concepts in all computer languages are generally the same, most other languages are more overtly designed and constrained by legacy concepts derived from requirements about how computers operate. Some languages tend to require much more low level coding or coersing of disparate modules to fit together in order to make the conceptual design take shape in final code form. Other languages get you bogged down in thinking about higher level OOP constructs. A lack of universal data structures such as REBOL's block/series structure, a lack of built in native data types such as time, tuples, pairs, money, etc., and a less natural way of structuring functions, variables and module definitions (not using words and dialects in a natural language way), require unique and contrived constructs to be designed to manipulate data in each individual program. In the most popular languages, program authors typically have to be more concerned about managing the rudimentary memory and cpu actions of the computer for everything that occurs in a program. That enables a greater measure of control over how a computer uses it's hardware resources, but it's very far from the way humans naturally think about solving real life situations. REBOL allows things to be done in a way of thinking that's closer to the outline stage. When you get used to writing REBOL code, you'll find that it saves a tremendous amount of time compared to other languages. Remember along the way that no matter what computer language(s) you learn, understanding how to think through the "what I am I trying to accomplish" outline is essential to writing code that accomplishes your task.
21.2 Case: More Full Program Loops: Ski, Snake, and Invaders
The Textris project was entertaining and educational, so I'm motivated to create another simple game. For this case study, I wanted to create a game that demonstrated more graphic techniques, instead of using text. I found a nice game tutorial at http://gm2d.com/2009/02/simple-flash-game-in-haxe. That game was written in another programming language, but does provide a nice example to emulate in REBOL.
In the Ski Game, the player is represented by a graphic that can be moved side to side across the top of the screen. Randomly placed tree images scroll up the screen, into the path of the skier. The goal is to avoid hitting trees for as long as possible. The longer the skier stays alive, the higher the score.
I began thinking through a plan of attack with this outline:
- First, I'll need some images to use in the game. The tutorial link above contains open source graphics. I'll use the binary resouce embedder provided earlier in this tutorial to import and use those graphics in the code of this game.
- I'll need to build a screen full of scrolling trees. To do that, here's some pseudo code, and a description of my imagined code outline: I'll create a graphical playing area using a 'draw' block on a 'view layout' window. To create a set of trees at various locations, I'll use a 'for' loop and the 'random' function to build up a block of the necessary enumerated coordinate positions, image data, etc. To move the trees, I'll use 'feel engage' on the draw block. Whenever a given amount of time has passed (some milliseconds, tested with a 'time' action in the engage loop), I'll increment the coordinate position of every tree, and increment the score. The majority of the program will run in this timer loop, so that the trees continuously move up the screen. If any of the trees reach the top of the screen, I'll remove them from the draw block, and replace them with new ones at random horizontal positions at the bottom of the screen. That will give the appearance of an endless hill of scrolling trees, and a continually counted score.
- I'll need a player graphic. Side to side movement of that graphic needs to be controlled by the player, either via key strokes or mouse movements. I can either check for 'key actions in the engage loop above, or continuously check mouse position using the 'all-over' view feel option. If a movement left is detected, display a left facing skier graphic and update his position 1 pixel to the left (current-position - 1x0). If a movement right is detected, display a right facing graphic and update his right position 1 pixel to the right.
- I'll need to check for collisions and end the game if the skier hits a tree. That'll involve comparing the positions of the skier graphic with those of all the tree graphics, in every iteration of the timer loop above.
For step one, I used Windows Paint to modify the right and left facing skier images that I found at the web site above. I created my own tree graphic by editing a simple line drawing found with Google. Using the binary resouce embedder from earlier in this tutorial, I converted those images to the following REBOL code:
tree: load to-binary decompress 64#{ eJzt18sNwjAQBFDTBSVw5EQBnLjQE1XRngmBQEj8Wa/3M4oYOZKBKHkaWwTO1/sh jDkNx3N6HI7LcOzCfnz/9v5cMnEai7lj4mokT9C7XczUsrhvGSku6RkgDIbHAEP0 2EiIMBdMDuaOWZCSL91bQvCsSY4MHE9umXz7ydVi3xgltYvEKboexzVSlpTa614d NonpUauIv176dX0ZTRgJlVgzNl25A3gkGwld1bkrNFqqedQfEI02AU9PjDeMpac/ ShKeTXylROqCImlXRFd9zkQoh4tp+GpqlSTnLnum4HTEzK/gjpmTpDxSASlHFqYU EE/8nddG9n+9LIm8t9OeIEra2JZWDRSG4VEioa0UFCZFqv/aMQh2Rf790EnGgcJU SVAer0Bhcp7/epVJvkHzBHjPfz+XSe6BwryC5gmQno3mAY3tpba2KAAA } skier-left: load to-binary decompress 64#{ eJyN0U8og2EcB/DvNrz+E5fJZSmRf9Ej76h3Ne1AIspyMQflpJDFU/KO1cQmSnGa A3PYkvInB3kvuyzlgJolh+fCRUq5iBvP8+5lTvKrX33ep+/zp9/b2Tthhl6zvGt5 W3nX8TYhS1//MOGnSjNEa/AUxd0UVQ3raL9IYbBvA2OBI9Q0DqB6fAujl08Yi97D Hr3F5EQYSss2OrrWEFo5xB+VO5Vx/skvnxmQbDCFvxcjMJ/b0s6LAZXGA3O0ZtTt pW3WbJmDeMC8a1gE9o3bTBFI9YvGhrOKSueyEQpu9ri60vQFXFqPMx1K+sNWrdOh 73Y/uMr85fKdcIrJ0z6vxSfsYV5KCU2JEPNIlD9dFZ65AfXwD+HsKdAZiiLdqtvt Hh65E5ZklTGmDvWLgxxKkjAivwt7XxhJEvIsrCY8ikLs0Tj3yGeCKaQtdsX9fv3G N1jCJdyv84lHJkNriiM7Li29OIDV0jcU8kuIHaiPLEDEsG9DQYxiQTi0A8sBpEvh OT65GmBYH9Jx5nf8TFFUFf5ZX2hFdG1uAgAA } skier-right: load to-binary decompress 64#{ eJxz8s1jYgCDMiDWAGIJINYCYkYGFrD4D0YGOBBAMBn4++Yz6HjVMSgY1oP5gWdu M/gHTmCwNutlKJ26l6F03VUGp3XnGGo+/mGILVnMoFkwhaHm7GcGz4m7GbABFwST eQWSNXMQbM+3DAwlULbmEgaWXih75QUGzvkQJstMBwbPRRA2L1D5yS8QNudioNQF qNYPDExAZRCtDg78c6Fa7wZK3Ycq940O3L1fAcLWigpctUsZzHTSj5Jd+l7NAKS6 3HnXk6jHSiBF7sUmxi7Gl9VAZrqVOxsZuTirg8TTS0qAQs5FIPF0BhYXFkgog/zg 7gJlq5SXpaWVF4O9lZKuXl6eVl4AZLIfKS82LzYuB2nlOFxWXl5ubA6ytm1KWU65 cXExkMl09lNNR3q5eTFQPYfHE7YT6cXlJgcYGI7cPMAOMtKhgcH9wE8FBuPycgOG BoYKtl8ODL4gjccY2HSAfr4BVMvgAwyazwwsXSA7ORgY2BQYeH+Cw+sAKPo5wEHj kQAO/GZwIIHDgc0AaxQSBAAFOXD7bgIAAA== }For all the rest of the steps in my initial outline, I organized my pseudo code thoughts into a general code outline. Since this program is all about a visual interface and event handling, I could use a very basic graphic and event handling code structure to begin filling out. Here's a simple skeleton:
; (Include the above graphic code here) ; Define some variables to start with (i.e., initial score = 0, etc). ; Create a "board" block to hold image information for all graphics ; to be display on screen. Skier image should be first, then the trees. ; Use a "for" loop to create the data: for i 1 20 1 [ ; Add tree image data to the block described above. Use the "random" ; function to come up with 20 random coordinate locations. ] ; Here's a basic screen layout structure with draw block, timer and ; key action detection, and the outline ideas above written into the ; appropriate areas of code: view layout [ scrn: box effect [draw board] rate 0 feel [ engage: func [f a e] [ if a = 'key [ ; Move skier graphic left-right ] if a = 'time [ ; Scroll the tree graphics upward. ; Remove any trees that go past the top of the screen. ; Replace removed trees with new trees at the bottom ; of the screen. ; Check for collisions and end the game if skier hits ; a tree. ; Update the score. ] ] ] ; Display a score in the GUI using some sort of text widget ]Next, I fleshed out the code structure above with more detailed thoughts about how to accomplish everything in the initial descriptive outline. No actual code yet - just thoughts about how to accomplish each of the outline ideas, in the appropriate areas of the code structure. Here are my thoughts:
; (Include the above graphic code here) ; Define some variables to start with: ; I need to generate some random position coordinates. Prepare (seed) ; the 'random function. ; All the items on the screen will be kept in a block (I'll call it ; "board"). Start with the code needed to display the skier image ; in a draw block. The block should contain the following info for ; each image: [ the draw function 'image', the coordinate position of the graphic, the actual binary image data, the transparency color (black), so the edges of the images don't appear square (i.e., so the black outer frame corners of the image file disappear by blending into the background). ] ; Now add twenty trees to the above block, to appear at random places ; on the screen: for i 1 20 1 [ ; Assign a random coordinate to the variable 'pos', within the ; bounds of the playing screen. ; Shift every image position down 300 pixels, so the user ; has a moment to see them coming, and to get situated at the ; beginning of the game. ; Put each image into the "board" block described above. ] ; We now have a block of images that can be displayed on screen ; using 'draw' (see the '2D Drawing, Graphics, and Animation' ; section earlier in this tutorial). ; Center the GUI window, and get rid of the standard 20 pixel ; gray padding around the edges ('layout/tight'): view center-face layout/tight [ ; Set the color of the screen white like snow, and set the ; size of the playing area: scrn: box white 600x440 effect [draw board] rate 0 feel [ engage: func [f a e] [ if a = 'key [ if e/key = 'right [ ; The second item in the block created above will ; be the position coordinate of the skier graphic. ; If the right arrow key has been pressed, add 5 ; to the horizontal portion of that position ; coordinate. ; The third item in the graphic block is the ; actual graphic data used to display the skier. ; If the right arrow key has been pressed, that ; data should be replaced with the right facing ; skier graphic. ] if e/key = 'left [ ; Same as the section above, but for the left key. ] ; Now that the data block has been updated with position ; and graphics alterations, show them on screen: show scrn ] if a = 'time [ ; Everything in this block happens each time a timer ; action is detected in the feel block of the draw ; function above (currently, the rate is set to 0 ; seconds, so all this code just keeps looping). ; First, move the trees up 5 pixels each. ; I'm going to need to deal with every item in the ; graphic block, sometimes removing and adding items. ; To make the whole process easier, I'm going to ; build a new copy of the changed block from scratch. ; I'll loop through each item in the existing block ; and check for the pair items (remember, there are 4 ; items for each image ('image, coordinate pos, graphic ; data, and transparency color)). Remember also that ; the first graphic in the block is the skier character. ; When working with tree graphics, we want to be sure to ; skip over the first four items in the block: foreach item board [ ; Looping through the existing graphic block, ; subtract 0x5 from each tree's position (move each ; one up 5 pixels). Append those new coordinate ; positions, along with every other item, in order, ; into the new block: either all [ ; If the item is a coordinate, ; and we're not dealing with the first 4 items: ] [ ; Add the new coordinate position ; (old position + 5) to the new block. ] [ ; Otherwise, add all other items to the new block, ; as is (i.e., we're not changing the image or ; transparency data). ] ; If the newly added coordinate is higher than the ; top of the screen, remove all 4 of its items from ; the new block (i.e., remove the tree graphic from ; the game). ] ; Now copy the new block back to the "board" variable. ; If any tree graphics have been removed from the top ; of the screen, replace them with new graphic ; data in the block. We can check for removals by ; looking at the length of the data block. It should ; be 84 items long (1 skier + 20 trees = 21*4, or 84 ; items long). Coordinates of the new trees should be ; at random horizontal locations along the bottom of ; the screen (i.e., somewhere along (random)x440 pixels). ; Append the new graphic data to the "board" block. ; Collision Detection: ; ; Check to see if skier position is within range of ANY ; tree position. Use a foreach loop to make ; comparisons. To ensure we're not detecting the ; skier colliding with himself, use a copy of the board ; without the first 4 items. To check if images are ; touching, we need to consider the sizes and shapes of ; both the tree and skier graphics. I came up with the ; following measurements: If the top left corner of the ; skier image is within -40 and +15 horizontal pixels and ; 5 to 30 vertical pixel, they will be touching. ; This is an imperfect estimate that I came up with after ; some trial and error eyeballing the images, which ; considers the fact that we're starting calculations ; from the top left corner of each differently sized ; square image file. ; The calculation should check to see if horizontal ; skier_position - horizontal tree_position is within ; that range of pixels. ; I'll build a new block of data to perform the ; comparison, which has the skier items removed: collision-board: remove/part (copy board) 4 foreach item collision-board [ if (type? item) = pair! [ if all [ ; "item/1" and "item/2" refer respectively to ; horizontal and vertical components of the ; tree coordinate being checked (the x and y ; values in the coordinate). "board/2/1" and ; "board/2/2" refer to the position of the ; skier graphic (remember, the skier's ; current position is always the second item ; in the block). The calculations in this ; section will check the ranges described ; above. ] [ ; If the above calculations evaluate to true, ; alert the user and end the game. ] ] ] ; Every time through the loop, increase and update the ; score display. ] ] ] ; Put the text label "Score:" at the top left corner of the screen. ; The game score updated in the code above can just be contained in ; another text widget. Assign that widget the word label "score". ; To make 'key actions work in the engage code above, the following ; stock line needs to be added to the layout: do [focus scrn] ]Finally, I filled in the pseudo code outline above with actual working code that completed each pseudo code thought:
; (Include the above graphic code here) ; Define some variables to start with: the-score: 0 ; I need to generate some random position coordinates. The following ; line is stock REBOL code to ensure that numbers are actually random: random/seed now ; All the items on the screen will be kept in a block. ; Start with the code needed to display the skier image ; in a draw block (black is the transparent color): board: reduce ['image 300x20 skier-right black] ; Now add twenty trees to the above block, to appear at random places ; on the screen: for i 1 20 1 [ ; Assign a random coordinate to the variable 'pos', within the ; bounds of the playing screen: pos: random 600x540 ; Shift every image position down 300 pixels, so the user ; has a second to see them coming, and to get situated at the ; beginning of the game: pos: pos + 0x300 ; Put each image into the block above: append board reduce ['image pos tree black] ] ; We now have a block of images that can be displayed on screen ; using 'draw' (see the '2D Drawing, Graphics, and Animation' ; section earlier in this tutorial). ; Center the GUI window, and get rid of the standard 20 pixel ; gray padding around the edges ('layout/tight'): view center-face layout/tight [ ; Set the color of the screen white like snow, and set the ; size of the playing area: scrn: box white 600x440 effect [draw board] rate 0 feel [ engage: func [f a e] [ if a = 'key [ if e/key = 'right [ ; The second item in the block created above is ; the position coordinate of the skier graphic. ; If the right arrow key has been pressed, add 5 ; to the horizontal portion of that position ; coordinate: board/2: board/2 + 5x0 ; The second item in the graphic block is the ; actual graphic data used to display the skier. ; If the right arrow key has been pressed, that ; data should be replaced with th right facing ; skier graphic: board/3: skier-right ] if e/key = 'left [ ; Same as the section above, but for the left key: board/2: board/2 - 5x0 board/3: skier-left ] ; Now that the data block has been updated with position ; and graphics alterations, show them on screen: show scrn ] if a = 'time [ ; Everything in this block happens each time a timer ; action is detected in the feel block of the draw ; function (currently, the rate is set to 0 seconds, ; so this code all just keeps looping). ; First, move the trees up 5 pixels each. ; I'm going to need to deal with every item in the ; graphic block, sometimes removing and adding items. ; To make the whole process easier, I'm going to ; build a new copy of the changed block from scratch: new-board: copy [] ; Now I'll loop through each item in the existing block ; and check for the pair items (remember, there are 4 ; items for each image ('image, coordinate pos, graphic ; data, and transparency color)). Remember also that ; the first graphic in the block is the skier character. ; When working with tree graphics, we want to be sure to ; skip over the first four items in the block: foreach item board [ ; Looping through the existing graphic block, ; subtract 0x5 from each tree's position (move each ; one up 5 pixels). Append those new coordinate ; positions, along with every item, in order, into ; the new block: either all [ ; If the item is a coordinate: ((type? item) = pair!) ; and we're not dealing with the first 4 items: ; (after we're done with this loop, 4 items will ; have been added to the new block): ((length? new-board) > 4) ] [ ; Add the moved up position to the new block: append new-board (item - 0x5) ] [ ; Add all other items to the new block: append new-board item ] ; If the newly added coordinate is higher than the ; top of the screen, remove all 4 of its items from ; the new block (i.e., remove the tree graphic from ; the game): coord: first back back (tail new-board) if ((type? coord) = pair!) [ if ((second coord) < -60) [ remove back tail new-board remove back tail new-board remove back tail new-board remove back tail new-board ] ] ] ; Now copy the new block back to the "board" variable: board: copy new-board ; If any tree graphics have been removed from the top ; of the screen, replace them in the with new graphic ; data in the block. We can check for removals by ; looking at the length of the data block. It should ; be 84 items long (1 skier + 20 trees = 21*4, or 84 ; items long). Coordinates of the new trees should be ; at random horizontal locations along the bottom of ; the screen (i.e., somewhere along (random)x440 pixels): ; Append the new graphic to the screen: if (length? new-board) < 84 [ column: random 600 pos: to-pair rejoin [column "x" 440] append board reduce ['image pos tree black] ] ; Collision Detection: ; ; Check to see if skier position is within range of ANY ; tree position. Use a foreach loop to make ; comparisons. To make ensure you're not detecting the ; skier colliding with himself, use a copy of the board ; without the first 4 items. To check if images are ; touching, we need to consider the sizes and shapes of ; both the tree and skier graphics. I came up with the ; following measurements: If the top left corner of the ; skier image is within -40 and +15 horizontal pixels and ; 5 to 30 vertical pixel, they will be touching. ; This is an imperfect estimate that I came up with some ; trial and error eyeballing of the images, and which ; considers the fact that we're starting the calculations ; from the top left corner of each differently sized ; image. ; The calculation should check to see if horizontal ; skier_position - horizontal tree_position is within ; that range of pixels. collision-board: remove/part (copy board) 4 foreach item collision-board [ if (type? item) = pair! [ if all [ ; "item/1" and "item/2" refer respectively to ; horizontal and vertical components of the ; tree coordinate being checked (the x and y ; values in the coordinate). "board/2/1" and ; "board/2/2" refer to the position of the ; skier graphic (remember, the skier's ; current position is always the second item ; in the block). The calculations below ; check the ranges described above: ((item/1 - board/2/1) < 15) ((item/1 - board/2/1) > -40) ((board/2/2 - item/2) < 30) ((board/2/2 - item/2) > 5) ] [ ; Alert the user and end the game: alert "Ouch - you hit a tree!" alert rejoin ["Final Score: " the-score] quit ] ] ] ; Every time through the loop, increase and update the ; score display: the-score: the-score + 1 score/text: to-string the-score show scrn ] ] ] ; Put the word "Score:" at the top left corner of the screen: origin across h2 "Score:" ; Here's the game score text which is updated in the code above, ; It's just a text header widget, assign the word label "score": score: h2 bold "000000" ; To make 'key actions work in the engage code above, the following ; stock line needs to be added to the layout: do [focus scrn] ]Here's the final game, with comments removed:
REBOL [title: "Ski Game"] tree: load to-binary decompress 64#{ eJzt18sNwjAQBFDTBSVw5EQBnLjQE1XRngmBQEj8Wa/3M4oYOZKBKHkaWwTO1/sh jDkNx3N6HI7LcOzCfnz/9v5cMnEai7lj4mokT9C7XczUsrhvGSku6RkgDIbHAEP0 2EiIMBdMDuaOWZCSL91bQvCsSY4MHE9umXz7ydVi3xgltYvEKboexzVSlpTa614d NonpUauIv176dX0ZTRgJlVgzNl25A3gkGwld1bkrNFqqedQfEI02AU9PjDeMpac/ ShKeTXylROqCImlXRFd9zkQoh4tp+GpqlSTnLnum4HTEzK/gjpmTpDxSASlHFqYU EE/8nddG9n+9LIm8t9OeIEra2JZWDRSG4VEioa0UFCZFqv/aMQh2Rf790EnGgcJU SVAer0Bhcp7/epVJvkHzBHjPfz+XSe6BwryC5gmQno3mAY3tpba2KAAA } skier-left: load to-binary decompress 64#{ eJyN0U8og2EcB/DvNrz+E5fJZSmRf9Ej76h3Ne1AIspyMQflpJDFU/KO1cQmSnGa A3PYkvInB3kvuyzlgJolh+fCRUq5iBvP8+5lTvKrX33ep+/zp9/b2Tthhl6zvGt5 W3nX8TYhS1//MOGnSjNEa/AUxd0UVQ3raL9IYbBvA2OBI9Q0DqB6fAujl08Yi97D Hr3F5EQYSss2OrrWEFo5xB+VO5Vx/skvnxmQbDCFvxcjMJ/b0s6LAZXGA3O0ZtTt pW3WbJmDeMC8a1gE9o3bTBFI9YvGhrOKSueyEQpu9ri60vQFXFqPMx1K+sNWrdOh 73Y/uMr85fKdcIrJ0z6vxSfsYV5KCU2JEPNIlD9dFZ65AfXwD+HsKdAZiiLdqtvt Hh65E5ZklTGmDvWLgxxKkjAivwt7XxhJEvIsrCY8ikLs0Tj3yGeCKaQtdsX9fv3G N1jCJdyv84lHJkNriiM7Li29OIDV0jcU8kuIHaiPLEDEsG9DQYxiQTi0A8sBpEvh OT65GmBYH9Jx5nf8TFFUFf5ZX2hFdG1uAgAA } skier-right: load to-binary decompress 64#{ eJxz8s1jYgCDMiDWAGIJINYCYkYGFrD4D0YGOBBAMBn4++Yz6HjVMSgY1oP5gWdu M/gHTmCwNutlKJ26l6F03VUGp3XnGGo+/mGILVnMoFkwhaHm7GcGz4m7GbABFwST eQWSNXMQbM+3DAwlULbmEgaWXih75QUGzvkQJstMBwbPRRA2L1D5yS8QNudioNQF qNYPDExAZRCtDg78c6Fa7wZK3Ycq940O3L1fAcLWigpctUsZzHTSj5Jd+l7NAKS6 3HnXk6jHSiBF7sUmxi7Gl9VAZrqVOxsZuTirg8TTS0qAQs5FIPF0BhYXFkgog/zg 7gJlq5SXpaWVF4O9lZKuXl6eVl4AZLIfKS82LzYuB2nlOFxWXl5ubA6ytm1KWU65 cXExkMl09lNNR3q5eTFQPYfHE7YT6cXlJgcYGI7cPMAOMtKhgcH9wE8FBuPycgOG BoYKtl8ODL4gjccY2HSAfr4BVMvgAwyazwwsXSA7ORgY2BQYeH+Cw+sAKPo5wEHj kQAO/GZwIIHDgc0AaxQSBAAFOXD7bgIAAA== } random/seed now the-score: 0 board: reduce ['image 300x20 skier-right black] for i 1 20 1 [ pos: random 600x540 pos: pos + 0x300 append board reduce ['image pos tree black] ] view center-face layout/tight [ scrn: box white 600x440 effect [draw board] rate 0 feel [ engage: func [f a e] [ if a = 'key [ if e/key = 'right [ board/2: board/2 + 5x0 board/3: skier-right ] if e/key = 'left [ board/2: board/2 - 5x0 board/3: skier-left ] show scrn ] if a = 'time [ new-board: copy [] foreach item board [ either all [ ((type? item) = pair!) ((length? new-board) > 4) ] [ append new-board (item - 0x5) ] [ append new-board item ] coord: first back back (tail new-board) if ((type? coord) = pair!) [ if ((second coord) < -60) [ remove back tail new-board remove back tail new-board remove back tail new-board remove back tail new-board ] ] ] board: copy new-board if (length? new-board) < 84 [ column: random 600 pos: to-pair rejoin [column "x" 440] append board reduce ['image pos tree black] ] collision-board: remove/part (copy board) 4 foreach item collision-board [ if (type? item) = pair! [ if all [ ((item/1 - board/2/1) < 15) ((item/1 - board/2/1) > -40) ((board/2/2 - item/2) < 30) ((board/2/2 - item/2) > 5) ] [ alert "Ouch - you hit a tree!" alert rejoin ["Final Score: " the-score] quit ] ] ] the-score: the-score + 1 score/text: to-string the-score show scrn ] ] ] origin across h2 "Score:" score: h2 bold "000000" do [focus scrn] ]21.2.1 Addendum
It should be noted that I did lots of trial and error coding along the way, while writing and testing this program. One thing that I tried initially was to have the skier move left-right by following left-right mouse gestures. I scrapped that idea because my code performed too slowly for this application, but the resulting code may still be useful in other projects. It's included here for completeness.
I defined this starting variable at the beginning of the program:
mouse-pos: 0x0and added this code to the "feel" block, directly beneath the "engage" function:
over: func [f a p] [ if not mouse-pos = p [ ; i.e., if mouse has moved either p/1 > mouse-pos/1 [ ; true = mouse has moved right ; update the skier image data in the "board" block: board/3: skier-right ] [ board/3: skier-left ] ; set skier's position based on the column position of the ; mouse: board/2: to-pair rejoin compose [(p/1 - 35) "x" 20] mouse-pos: p show scrn ] ]In order for the REBOL to continuously check for mouse events, the following "all-over" option must be added to the 'view layout' code:
view/options layout [...] [all-over]Remove the key action code in the engage function, and replace it with the above changes. The skier will move left-right based upon left-right movements of the mouse.
Another way to accomplish the same goal, without using the "all-over" option, is to use the feel "detect" function:
detect: func [f e] [ if e/type = 'move [ p: e/offset if not mouse-pos = p [ either p/1 > mouse-pos/1 [ board/3: skier-right ] [ board/3: skier-left ] board/2: to-pair rejoin compose [(p/1 - 35) "x" 20] mouse-pos: p show scrn ] ] e ]That type of mouse control wasn't the best solution here, but could certainly be useful in other programs.
21.2.2 Snake Game
Below is the code for the classic "Snake" game. The point of the snake game is to move a snake image around the screen, devouring a food pellet that appears at random locations. Every time you eat a pellet, your snake body grows by one unit. Avoid hitting the edge of the playing field, and avoid hitting your own body for as long as possible.
Notice that the code outline for this program is nearly identical to that of the ski game:
- Embed the images needed to display snake sections and food pellets (for this example, I used simple green and red button images created using the "to-image" and "layout" functions, but that can be easily changed).
- Set some initial variables (starting score, random starting coordinates, initial values for flags used throughout the program, etc.).
- Create a board block to hold the image data and coordinates of the snake sections and food images.
- Display the playing board in a "view layout" draw block, and move game play along by continuously checking for "feel engage" time and key events.
- Change the direction the snake moves every time a key is pressed. Adjust snake coordinates (move the snake section images), and adjust the score, every time a timer event occurs (15 times per second). As in the ski game, create a temporary block to copy and adjust all the new snake coordinates (move the head of the snake to a new adjacent location, then move each consecutive section of the snake to the previous location of its adjoining section).
- Check for collisions by comparing coordinate positions of the snake sections with other items on the board. End the game if the snake collides with a wall, or itself. Whenever the snake collides with a food image, move the food image to a new random coordinate, and add a new snake section image to the board (append an image to the board block, to increase the length of the snake).
REBOL [Title: "Snake Game"] snake: to-image layout/tight [button red 10x10] food: to-image layout/tight [button green 10x10] the-score: 0 direction: 0x10 newsection: false random/seed now rand-pair: func [s] [ to-pair rejoin [(round/to random s 10) "x" (round/to random s 10)] ] b: reduce [ 'image food ((rand-pair 190) + 50x50) 'image snake ((rand-pair 190) + 50x50) ] view center-face layout/tight gui: [ scrn: box white 300x300 effect [draw b] rate 15 feel [ engage: func [f a e] [ if a = 'key [ if e/key = 'up [direction: 0x-10] if e/key = 'down [direction: 0x10] if e/key = 'left [direction: -10x0] if e/key = 'right [direction: 10x0] ] if a = 'time [ if any [b/6/1 < 0 b/6/2 < 0 b/6/1 > 290 b/6/2 > 290] [ alert "You hit the wall!" quit ] if find (at b 7) b/6 [alert "You hit yourself!" quit] if within? b/6 b/3 10x10 [ append b reduce ['image snake (last b)] newsection: true b/3: (rand-pair 290) ] newb: copy/part head b 5 append newb (b/6 + direction) for item 7 (length? head b) 1 [ either (type? (pick b item) = pair!) [ append newb pick b (item - 3) ] [ append newb pick b item ] ] if newsection = true [ clear (back tail newb) append newb (last b) newsection: false ] b: copy newb show scrn the-score: the-score + 1 score/text: to-string the-score ] ] ] origin across h2 "Score:" score: h2 bold "000000" do [focus scrn] ]21.2.3 Obfuscation
Just for fun, I created an obfuscated (unreadable) version of the snake program. REBOL is such a malleable language that it's possible to create unbelievably compact code. I was able to squash the above 2030 bytes of nicely formatted code into the following 771 bytes of pure REBOL fury:
do[p: :append u: :reduce k: :pick r: :random y: :layout q: 'image z: :if g: :to-image v: :length? x: does[alert join{SCORE: }[v b]quit]s: g y/tight [btn red 10x10]o: g y/tight[btn tan 10x10]d: 0x10 w: 0 r/seed now b: u[q o(((r 19x19)* 10)+ 50x50)q s(((r 19x19)* 10)+ 50x50)]view center-face y/tight[c: area 305x305 effect[draw b]rate 15 feel[engage: func[f a e][z a = 'key[d: select u['up 0x-10 'down 0x10 'left -10x0 'right 10x0]e/key]z a = 'time[z any[b/6/1 < 0 b/6/2 < 0 b/6/1 > 290 b/6/2 > 290][x]z find(at b 7)b/6[x]z within? b/6 b/3 10x10[p b u[q s(last b)]w: 1 b/3:((r 29x29)* 10)]n: copy/part b 5 p n(b/6 + d)for i 7(v b)1 [either(type?(k b i)= pair!)[p n k b(i - 3)][p n k b i]]z w = 1[clear(back tail n)p n(last b)w: 0]b: copy n show c]]]do[focus c]]]The above code is a fully functional snake program (go ahead, paste it into the interpreter...). I created it by renaming functions using single-letter labels (r: :random, p: :append, etc.). Any function that was used several times in the program got renamed. I also removed any spaces which surrounded parentheses or brackets. Line breaks are included only so that the code fits inside this web page - otherwise, they're not necessary. There's not much practical purpose to obfuscating code in this way, but it can be used to impress all your friends who don't know REBOL :)
21.2.4 Space Invaders Shootup
Below is an extremely simple variation of the classic Space Invaders game idea. Compare the code outline of this program with that of the previous games, and notice again the similar structure: embedded image definitions, game board block creation, view layout draw display, "feel engage" key and time event loops, coodinate calculations to move game images and to detect collisions, etc. Notice also the "system/view/caret: none" and "system/view/caret: head f/text" code before and after each "show scrn". This erases the text caret (small vertical line) that appears in a face whenever the "focus" function is called:
REBOL [title: "Space Invaders Shootup"] alien1: load to-binary decompress 64#{ eJx9UzFLQzEQjijUOognHTIVhCd0cXJ1kLe3g7SbFKcsWQoWZ7MFhNKxg0PpH3Cx WbKUqpPoUNcOPim1Q+kPkCJekvf0NTx7cLl7d8l33+XywvL+FrFyhVpCPUY9QN0g LnG7ScjjrtM98iedToeM3kbW7/f71k4/p6R+USe9Xo/UqjUbi94jMhgMrL/8XpLm ZZP4spPyzxVTT35MM2Zir4vFYu4dM7GP2M483Fa8f8w0O/Vy24yzo8RXipfJmdb8 kJxwrdJ7K4gxiSs7/09czYpdW6vcsI+AtrEKQ7ScDPlLHO/aNQ8huzaVeSDaHrNi 3IlBjDI6mqVsWvIA0E5ZJ2OtlUIuAKHmqoS5kHOt9UPMP0sm3TU5PHdHQVIZMs3v qZTPmrMAQAj6ZXOSUtkwPKRwloKQNlexCDOvR4fpclGq76KNzC2mQPiG681i5gAw ZusVJEAh5JojBzrEGQYC2dncuh7+y83d7ASVAu8MpAQqkT9+3Gg3Q+wHI2AZSAFm 1+99FzMQkzllVUxeTFUrc4vC4Q4VV4wlLyaerjD1XPe+tLxK8SNbqTrJOIf/Bd4X V+VU7AfjSm0ZEgQAAA== } ship1: load to-binary decompress 64#{ eJx1Us9L3EAU/rTbMdHE9VlYukSQFhUpvXjQXrfizR8XkYAnt0oQVsTLGlgEFdSL l3jqpXgre6sEJAgDsidPIul/sHjopeIfILj0JdnV3ez0y7zJzLx533vvY2YXhzOI scs2yfaF7QNbDxLHjzfAu4HEhpKryAgDfccC4rfAws0IjF/96HsWyH7XMNXIon9Z QJvWsNQw8XZP4NPlKD73Whi/HcZO4z207fv7jyo8/jk4r1TdFQXcSrV+flEtq3x2 5amuB44lyU+BpHRKHq4dKXnZCbLkxl9kOF5BarPVDFWyBAWcEAVFsjrhENGmhyPK UXe+XNHf9HqZW9GgyzUUoloqXcXE1wv6iSTHohSkQ8yJQ5l2RCiSvPIGbaVkTFuu Ge5/erfdurb+wM3ETZHPyjaX5NzNHPATOHMsn894sMZJWX4uH78OYSvTrUU+paI2 q8nQl5JHMFaSOZLBbHPnoR2ndHUa5NtPwubfFKziT1YqRDdY2VV3JckT3X2ZIlwW KQjmUxGhGQ0Ecm5OlhBvUsSi/NpXmjLRoFx4YWuL0789fN24m+jsK2x+wGE+JjLR DePiqdbKZqZojf1qLZ2ptdO3ZrxXwjCODzuThK3Af4EF8jYSBAAA } alien-fire: load to-binary decompress 64#{ eJxz8o1jZACDMiDWAGI+IJYFYkYGFrD4CyAW5oZgAYhSBhZmFoaWphaG48eOMwQF BDFoaGgwPH36lGHZsmUM4uLiDFk5WQyzZs1iuHHzBsOfv38Ydu7cyWBhZsFQXlrO EBEVATTBaWlolAoDA/vp3bt37wHyZwPpTUCaedqpUBWGS6HLMj8AedpA0Z1QGqTK KXrNtCdgF/BLtrCD6GywOAPDabA6BobCTAMwXTfzFMh8uM7ZUBpi/p3QZdMMwLp2 796GbH7omrR2sH6Omc+h5m4C09pQuiKzHWp+O1R+D1QeQjstPQINIwag+wBUhlwj XgEAAA== } ship-fire: load to-binary decompress 64#{ eJxz8t3FAAFlQKwBxOxALAjEjAwsYHEXIBbmhmABqFo2FhYG9l4eBvajbAwKSTIM /H8FGFjUOBg4tnEyGP1VYWAXZWOwadNg4KhiYdA5JMLAacbJIHNLhUFnkgiDIpMg 2IyDd2UYVMqdGNLLyxoOz7RpCJ5p2pDi4sYAwlFpSz+AcEoJkF8O5KstZWhUkvig 4uLEoAIUO7f7zQcA8m8lvboAAAA= } bottom: 270 end: sidewall: false random/seed now b: ['image 300x400 ship1 'line -10x270 610x270] for row 60 220 40 [ for column 20 380 60 [ pos: to-pair rejoin [column "x" row] append b reduce ['image pos alien1] ] ] view center-face layout/tight [ scrn: box black 600x440 effect [draw b] rate 1000 feel [ engage: func [f a e] [ if a = 'key [ if e/key = 'right [b/2: b/2 + 5x0] if e/key = 'left [b/2: b/2 - 5x0] if e/key = 'up [ if not find b ship-fire [ fire-pos: b/2 + 25x-20 append b reduce ['image fire-pos ship-fire] ] ] system/view/caret: none show scrn system/view/caret: head f/text ] if a = 'time [ if (random 1000) > 900 [ f-pos: to-pair rejoin [random 600 "x" bottom] append b reduce ['image f-pos alien-fire] ] for i 1 (length? b) 1 [ removed: false if ((pick b i) = ship-fire) [ for c 8 (length? head b) 3 [ if (within? (pick b c) ( (pick b (i - 1)) + -40x0) 50x35) and ((pick b (c + 1)) <> ship-fire) [ removed: true d: c e: i - 1 ] ] either ((second (pick b (i - 1))) < -10) [ remove/part at b (i - 2) 3 ] [ do compose [b/(i - 1): b/(i - 1) - 0x9] ] ] if ((pick b i) = alien1) [ either ((second (pick b (i - 1))) > 385) [ end: true ] [ if ((first (pick b (i - 1))) > 550) [ sidewall: true for item 4 (length? b) 1 [ if (pick b item) = alien1 [ do compose [ b/(item - 1): b/(item - 1) + 0x2 ] ] ] bottom: bottom + 2 b/5: to-pair rejoin [-10 "x" bottom] b/6: to-pair rejoin [610 "x" bottom] ] if ((first (pick b (i - 1))) < 0) [ sidewall: false for item 4 (length? b) 1 [ if (pick b item) = alien1 [ do compose [ b/(item - 1): b/(item - 1) + 0x2 ] ] ] bottom: bottom + 2 b/5: to-pair rejoin [-10 "x" bottom] b/6: to-pair rejoin [610 "x" bottom] ] if sidewall = true [ do compose [b/(i - 1): b/(i - 1) - 2x0] ] if sidewall = false [ do compose [b/(i - 1): b/(i - 1) + 2x0] ] ] ] if ((pick b i) = alien-fire) [ if within? ((pick b (i - 1)) + 0x14) ( (pick b 2) + -10x0) 65x35 [ alert "You've been killed by alien fire!" quit ] either ((second (pick b (i - 1))) > 400) [ remove/part at b (i - 2) 3 ] [ do compose [b/(i - 1): b/(i - 1) + 0x3] ] ] if removed = true [ remove/part (at b (d - 1)) 3 remove/part (at b (e - 1)) 3 ] ] system/view/caret: none show scrn system/view/caret: head f/text if not (find b alien1) [ alert "You killed all the aliens. You win!" quit ] if end = true [alert "The aliens landed! Game over." quit] ] ] ] do [focus scrn] ]I created a version of this game for my friend using an image of my face for ship1, and an image of her face as alien1. An XpackerX executable version of it is available at http://musiclessonz.com/rebol_tutorial/corina_invaders.exe.
Now take a break from coding, and play a few games :)
21.3 Case: A GUI Playing Card Framework (Creating a Freecell Clone)
As far as I know, there's no existing Freecell game implemented in REBOL, and it's my other favorite computer game (Textris is getting lots of use :). This project will provide some more food for thought about useful GUI techniques. Here's my initial outline:
- Get the card images compressed and embedded into REBOL code.
- Write the code to display and move cards around the screen. It will be similar to that found in the Guitar Chord Diagram Maker example presented earlier. I'll need to click and drag images around the screen. I'll also want to make the images "snap" into position onto other cards, rather than floating freely.
- Create a nice looking GUI layout backdrop for the playing field.
- Layout the cards in random order, in 8 piles, on the playing field.
- Allow the selection and movement of cards, based on the rules of Freecell (i.e., cards need to be placed in descending order, red-black-red-black, goal piles must start with aces, and ascend through a single suit, etc.). These rules can be handled by a series of conditional evaluations that are run every time a card is moved. This step will require the most coding thought and will likely need a sub-outline.
To get started with the first step, I remembered seeing a REBOL card game at http://www.rebolfrance.org/articles/bridge/bridge.html . The zip package at that location contains all the .bmp card images in a single directory. I downloaded the package and wrote a little variation of the binary resouce embedder provided earlier in this tutorial. It loops through all the cards in the directory, reads and compresses the files, and then appends each unit of data to a single block labeled "cards", which is created to hold all the images:
REBOL [Title: "Card Image Embedder"] system/options/binary-base: 64 cards: copy [] foreach file load %./ [ uncompressed: read/binary file compressed: compress to-string uncompressed ; There are some other files in the directory that I don't ; want to embed. Limiting the file size to 10k weeds them out: if ((length? uncompressed) < 10000) [ append cards compressed ] ] editor cardsBecause the cards are read in alphabetical order from the directory, I need to change the order of the card data so that they ascend in the following order: Ace, 2, 3, 4, 5, 6, 7, 8, 9, 10, Jack, Queen, King, in each suit. I also added some information after each card's graphical data to identify important characteristics: card name, number value (i.e., ace = 1, jack = 11, etc.), color, and coordinate position at which each card should be placed on screen to begin the game. This provides a nice chunk of data that I can use to build other card games of any type. I saved the code below to a text file named cards.r, so that I can import it later with the "do" function. That'll keep my game code short and readable:
REBOL [] cards: [ 64#{ eJzt1z0WwiAMAODoc1Wu0OfkOVycvIOncOZoHTwQk2sMBAehL8mzqTqYFlH6Pegj 2J/j+b6FElcqByonKhcqK9iU9kjHbzsurxHLDjFylTf6Mo4j1bkFyw6IXOUtN9HH vu2qi/UwoBZpCKpBcDDBxyTwMZCChyEBquH8iSanK2iGh5NMyp3AfPMccb4x5QIM ufAxkECfQwB9Dn0MHQ1q3t3WfB3xb75joGvqTUmjaEiEVrUG8rJqGpufqd4jPmGQ iXg+1FHeUDSmOUzt2SxonHI6FX/zW6bP4luGL/iiSf0fajFTb4iymVjlyxnLPGth M/VBaLapD2aK6S6AvZm44vSmDCcbVFJqNk5rnh/sPYwSJmN5J7K8Wz0AAI/VC/YN AAA= } "ace of clubs" 1 "black" 20x20 64#{ eJztl7FRxTAMhgVHC14hR8UcNFTswBTUGS0FA6miNbKd49nSn0g5KC1Hzy/yF1vy +SLl9f37kap8ir6Ivol+iN7RQ7WvMv711HSUtV60rq0rTf5s2yZ9seR6Uc6tK62Y 5OdZT2XkflmyJ7wkl8n0d4ZrDOeMuJxcJnOA8f2pw67PkBkt5c4wNdpxIsPUaDuf UeyaQbErBu7h6A9kKJWmbXoWojEyw+xHL92e8RkCexhhxB/uI0OM3HNnIyZ4fjpL i/J8D48YxbuMjCb/zB+cw8vMvuJkJjOZyUzmCsP0L0x74Z8yDLKsw7Dl7Tww67WE eHsG5M89sf6uxGY1xejcfYnhPp8fMJ1EapKj2macG+4hqq4sk9lnks+wKhqRP6D6 tEzkrIYKZHYZijA2WsOAaIE/joSYyDdR5NvqB5uyj432DQAA } "2 of clubs" 2 "black" 100x20 64#{ eJztlzF2wyAMhpW+ri1X8OuUc3TJ1Dv0FJ19NA89kKasREDei4V+R4obv3QImNiR P7AEQsDn1/GNavqRspdykPItZUevVT7K+9/3VnQa60Xj2G4ly8M0TXIvklwvyrnd Si4i+fnomzLpZRiyl3hILpPp74yok+7BcGKXyeTrIw25DNd+N4ySEGRqTaWOZaq1 NzLI9o6Bfaj1gXZRKrmX9a0QqZYsc3a9dKnjM/VxBSP68NwyxMh/nsmICfrPTNKs vN6HS0zHu4y8TQGfD/hzhDl/8ck8hOF+5rixBUq0P0OmnxeI6efXlkwkbkTiT6wP jTYbMncaU5SezP9i2Iz0KqYF/KsMg9niMNAP+3agH7YF8VIHxha1ni/EFrVWL8SE CMPz9Xzb2AJ2RYYBuyvLZHaZfDOD9WFdE44pqGm/5SBtLLx9dmoHEo+x1q5i3BRi ImeiyNnqBBVpT9z2DQAA } "3 of clubs" 3 "black" 180x20 64#{ eJztlz1WwzAMgAWPFXyFPCbOwcLEHTgFc46WgQNpYhWSVce/WCp0tB3Xrvw1kiyn cl7fvx8hlk9uL9zeuH1wu4OHKN95/utJW132eMG+ayeVB8dxcC8SihcQaSdVRPzx 3N6qK/fbRlbBLZgMwf8ZDA4GPExwMOCwhwGTYYtKphxHY0UVVEzUffJxomMA8hcE /UG7Pn9loFnDgT0tA0FqwqV2/qJuqFNtoTkPCvmFhzamYwaqmHoYliNme0LQ6Xpv QEDKfpEEk8S9MI+p6pyvYc/0xcOQmG7vQ9dzYTMXjYtZzGIWs5hrGISbMPqHP2Ww yLUmM8rv3X36c0u2JybEYa7MfqWcN8i5NTPO3VcxmsjmDBXyZM/wTGKcbfDU8Nsa nszorJV1Ad2AweSOFdPGxzamCOTZhzaD812YYmoznmfHYbNZXIznncjzbvUDyCYa mfYNAAA= } "4 of clubs" 4 "black" 260x20 64#{ eJztlzF2wyAMhtW+rg1X8OvUc3Tp1Dv0FJ19NA85kKauVEIGDFKAuM5rhwgTiPwF fsBG5O3j+xmCfVF+pfxO+ZPyAzwF/0z3zyfJpc3hgnmWghNVlmWhkj0+XOC9FJzY RR8vdVPKHqfJ9wwn12U8/J4hOe4IhhQfwuAePds6grgqPwJsG3AWA5C/IMgPoNK8 m6k0W3qCLzPgOEWckxovygOVut30nCsb/8rDOk0dJjiuYsiPmPU4J7cLhmro87i8 Yyk8vM6aSp/tOdSMthHGs/SBZ7XSuZNZe7wzf8OAcmkGofbUTHySW0x6Iy4z+c26 PVPtGDZT7jw2MzSHWKu5IXPQmlp2Z/4Xo1dxFyMbfpNB/UJdZqz4rtoxzi1JTwiI ZqzM44oxz4i5JWPH7qsYCWRtxm/8UY95JmmfbeJoGnOYzljWWSsxfC47gPEr09IT meaa6l2pNGGaiGju2CgzpqfLdG2I6Sqm6VR/05Sd4Acse9Xu9g0AAA== } "5 of clubs" 5 "black" 340x20 64#{ eJztlj1WwzAMgAWPFXyFPCbOwcLEHTgFc46WgQNpYjWS5dS/SHo07WOoHDep/MWS bVnO6/v3IyT5pPpC9Y3qB9U7eEj6ldq/nqS2sqYL1lVuXOhh2za6syamC2KUGxdW 0c9z39Ug98sSLcElmEyE8xnkdpMBhy0CTAZNhmyZDPRM/Ywgqs5WGkPpIMwYgPIH QV44jOl8nvnTzTMELjvOZRgvSkCdzFaWy0OlzzzkaTIYaGLDw5AesfgTgjS3MQYB YxlXDOwKD89YU7Gpz+HIjOJhIrvuiNXOzz8y2eKNuTIz24NDP5Pc0uln8dwx833R MvP9dRnGkzc8+cc3h7N8eCnmoDX9XW7M/2Lq9TuDkYSvMlhvJYtR4rD0o8ShHIhG btnPPC235BNYzQkeRg6yq+SWfTTaXt571XJC+i47kFH9yYy6pvU7MxFGRcSWIfan SzPPGhM9jMMfmzFHdYo4XX4AibGWIfYNAAA= } "6 of clubs" 6 "black" 420x20 64#{ eJztlzF2wyAMQNW+ri1X8OvUc2Tp1Dv0FJ19NA85kKauVAJiQMigpHamCBOI+AaB QDyfvn5fIcgP5Q/Kn5S/KT/BS9DP1H5+i7mWOTwwz7HgRJVlWahkjQ8PeB8LTqyi n3fZVSPP0+RHgpMbMh7+z5A5bhfG45BBN7bHwngQTFlHUBkEKPjUIBiA/AchvcAG HcCo9tQMOE4XnFMzX4wbah22GDlXCn3iIS3TgAmKqxjSI2Z7nIvNIOaFPs/LOzaF p+f6Po1j9tewZVqxMJ5NH+9nuQ9vZNKID+bOjHoGZT9abKn12n4WjH4uakY/X8cw lrhhiT+2NVTj4UHMFT6NrbpPc3dSI5na4zpTe1xlhKcOZYTHdab2uM7UK7zBoLRm X6a2UbenZlSfxoDfETrl7cJuM519mPvpxJZ4IQ5iy+XO68WWdAN3Y4KFiRfZfWIL rD1treHKdGPCXgy6sT2J6d4XWLRpEt7t7jAzA6PBmGlPy03MUEyM5ZvI8m31B3Qa a6P2DQAA } "7 of clubs" 7 "black" 500x20 64#{ eJzVlz12wyAMx9W+rC1X8MuUc3Tp1Dv0FJ19NA85kKasRBIkNRhLcmK7r8KECP8e SPD318fX5Q3EfqieqH5S/ab6Agfp7+n8+T3V0no5oO9Tw4X+DMNALfdEOSDG1HDh Lvo51kNN7LXromXYBZOJ8DyDkoPOUMjBZCLuxtQxIxQnmzHDeMzsVHOh7GflrMY4 4inzQuDScn6ZpKfQcO4MZtFVjgxmMDLYEoa9MIonOyVDM4dRXsnh9IK+p2lOfQ2n zNQ8TOTQHTqMjuvLZvKMi5iW5mumpbGKaWp1I8YRz7aa34SZ0XydV0Pzk/VZaU/n 7Y8YT8x27p41dOzFztowterS/H+8ln16njUvU0zyOJNu+CqD4y22GGV97oy2PumB aGj+9nTVNM+epVUPg7Cb5hFu73DzGsujqlqV97L1GE886p6irp5irl2YIqE244nZ NBfj+SbyfFtdAaNeJZ72DQAA } "8 of clubs" 8 "black" 580x20 64#{ eJzVljtyxCAMhpVM2oQreFLtOdKkyh1yitQ+moscSFVaViDMUyB2vE4msNgr/I0R 4kf47ePnGXz5onah9k7tk9oDPPn+lZ5/v3Ary+p/sK58c5X+bNtGd9dj/Q+s5Zur rosur/WrmvK4LFYruBiVsXCcQT+HMUMuG5Wx+GcMQvYwGLXPkL8zGFDOHb1dGXxR GKMzdZwlf2zBILgqGYlhPRnBiAwG0VWGf5nC+JfdwjjLZP4Eo2RoZJPNiw03PWVN ecxxDFumLTOMda6rOixieIAJI97ESJqvGVFjJSNq9SRmwp9zNX8KE2WOYTuY1p+k eRZptgGaNQWDO9WLIY2EGDdfy6TA1J3nMFgERvaZbFe7PmPKkp25x1TBIRBjuIef s7+4FnEZHaOtO3Iba4NXpKMNVatTmv+Pe3kuR3XLLINwF4YT/pBBQeVdZhCfyIzi wweieFamee2nq3DmFoyWx2YYhOl8eFTzGD+H+hqLmWKoVX9RGFQZjN+LfX/2WQ7X lMfql99m6rwuMDhW/B33sjKOTYoblytIR+ey9g0AAA== } "9 of clubs" 9 "black" 20x40 64#{ eJzFl01WhDAMgKPPrfYKPFeew40r7+ApXHM0FnOgrNzWtKG/CTSjDFOmdFK+F0IS 0vL++fMMsX1Tf6P+Qf2L+gM8xfmZrl9euLdtjj+YZx7CQX+WZaExzPj4A+95CEeY otNrr0q0x2nyo4aTGzIe/s+w7bsMArgh4/B+DEJjrcpArZOFnsEYz1Y4jOl9qNjT xQIhHJpQGM4npwiZwTXpOiEqGzBR2TVMkFyeKULD0J0dRgugCOHxnIzp+jwI+Z7S h5AGpzHZNU14NAarqPlguhMMxdD1NnYMVl7aYqCNVNJ9FROdlhgEleFLgJgDJRhO T3DomYVNZp3ZZzCdNUbN+Za5bc7fhClpLgSZ81IY1DHBjH240+7EWGweP7vFh4ZY nJwbw1w15bzJh5Z30P4u79cES20x1ajimD/Ww0pvX3s1pq/hieGCX2nyvmew1S6s aRi5NklGrnGVPXFBVNfK8lxpdVXW3IYZ5aqFWc04IedpP5X2Q5s5TzsumeZdrsZd 2YHMwB5mdupYZjbb6YxMc8HgoNgftl5Yvoks31a/90iSufYNAAA= } "10 of clubs" 10 "black" 100x40 64#{ eJzNVzuO2zAQnQRpZoksr7BIlXOkSZU75BSpfQS2hAtvvRVbg0W2yIGmCrAJEObN jLQrUVTWQBZIaMuS6afHNx/N0B8+fX9LNr7geI/jI47POF7RG5s/4Pdv136sx8He dDj4SV+4uL+/x1lnmr2pNT/pS6fw8a6n2ozXNzftuSE38VlMo7/HiP7+AphGF+j5 R5idMMQlZmZjzswp5ZTJpy22Txi9lOQYTjojPUYsD5iYKFG2eY6eJY8YW75R9nF1 i7tyNEf3GJnlAsN5MqjHlFJs/k7hPcb1PGFiC1XXWmAo6sswQkIB16Go5ic9kw7D KDpgXnmWmNmxvhY4FFOigHMfQ8Zjc7uYYHpWGOgRtYwUA2MM0/FgUV1YKrntZhe+ x7iNaSikPPIzFLOrxd6HOAJsN2wxrpUP/QTHUEka/jrxLPLQP08koXImygwtHSaY oHwKsAOYnCkl+GGNgTH0cFZMQ4odz8ykS68wFX441lMoAleJ8fS5YZh6/Kpug0Od h9qQh5SouR6zvcdk6KkFtk16wkBPzieiyrMey7EhTy1w5PFMzHHEo3oQ0oQHMetD NuIxu2plDlwTnNn7uTI8pzxKVDjDO5tY1HBOrqdW3FBTi31MNZI5WboGpBB4YosD TM16qw3wiGzXIiVqcg4UWPXEuOWJlCECQUcNquV4HvHECCLkJp4CkOJywAO18C4e TJgdwDPyDx4vKC2kmCYmerAWFkuqS6Ok6w7WEnmoUKuaIet4TgO7EG6E0m1HKcT1 iAc3Tz6kxsdzHvBYilINVga0vm4xluqIrfIg3VKug7UsRZEYxdINdXzkQzgxIMGU B+m28SFVTU44CIkKIk/bDoP8xtMC78IDrmeLoRolJUvRB+SYP0ZbHmHWVJeY9njC xAMvoSaO9cjEo1dhxy6U3kmPEo15EGrXk5QIelA+pOMpyGTl0WIIcdn6aej93FAG 1I0almgQ7bnrmEot6LFwM0pTnGvxjLEyDdtLtYZfKnk1X2J+XU88AV0FTY7q4+Zg xnjbgDzrfdoIUYi9wzxirP2oK9COZGqWc6daYcgxzZvuvEWJGx7Zx3hbVZfuY6w9 W2iC9Xhvlt7JVxjlQevSxLemO+0IVj5UnqvbyXZtqJ0Pp9xoP5YY36GsMLqNkdt5 X7PF6ByjzMkd+/5Ig77GWCtj65XIDWQHcez1IJN9i4eaYNs1fGxjKm6kMPZ8isk8 pc9Cs8T9PeQC88fxP2KIXgbz3LgIc8l/okv+W/0GSJQzj/YNAAA= } "jack of clubs" 11 "black" 180x40 64#{ eJzNVzuS5DYMhV1OUCwvrzDlaM/hZCPfwadwPEdgylKgKyBVMZnAB0K0VZ2Yfg9S 94hU7fYEGyx71B/2mwfgAQTUf/719XeJ9Q+uz7i+4Pob1y/yW+y/4vt/P+3XuF7j T15f9xc+8Obt7Q2v3OnxJ73vL3xwC09/zFSX9evLS3+2/CU/xXT5ARgB4AnGI8In mNx/Wsw30pDPmBObe865aOO6YI63LkDtGJsxHnVAF6QDYwk0+axhDpfybqvT1pKa YfuUixMGz56r1EaMy7sTZww/3ojJnf70qz9eJAswcAiYTqIHht/wAzBd/EaH8uSP 76L1rtIdjwJjs893YXdMD6fpM9S6YGiKGBgrKcd2njFaSkRPY8lGDPxxXlVLRNer aJl48M80rEVjT2FMQp8859SrFIK9ZBjj9n+fZg1JI4bdJDB20XDXWMuyJcC2TWDs 2D7xUJuatVWzbSmUKE8YR0CqRWRptS4bAyoyYeBKVoVsurS2CbzD88xTa/FiKE8V ZWypQcMBA2mYvdSoY2FNm7GCThhphiy5iZn7UiB5alrrxNNYP6YgIo+nZHXG0Eew aMEzdETB6wUDTUFhatIaEYCklCZbbLhJqoEPC0k3rInHnQoCY5Rvg5hy5RFZb1oX kDVAEslmHiRiLUYMclqpE0S8xFWrNF2QdEmlETrrDJpeWtLg0WQICq8zT72B3hbQ 2AYFI8oRo1oLDoItiUXRaLnobcwXgsIhZ+CksKZrL+uIYVB+A09DmqCfqGcwjzzI jZAHFmmyqftaR58R1Nr55WFLlFtjHeqNTuL7QlQBD/h0rHk0AMQDfQzSUULRy9lR CdEaj6AllIUheXnEyCH+QumAQfkg8yMm7Unk+SJPsQhq9EcsigHlk/AW7nYWUJ54 WEA16iuxwqqKX3iwqpDMWIWJbe/Ck7QiTVHvstF0nv3hQeGJkAgeaJ6kWR+o3BJO MM4fwkMlS0YZzpg46nGOkTXj/GljrfLUGRs2+wHQaA+aJ5+RqsbGyr7CIAtbTZ9y ofTROSFrzknRr1jNU61SV2Wba3iHRKANTzxZdM2+RLvc2MnzPusGDM6O64aIkraC Tt737TvGgxREnviJ/afmfSo+MGz3RK4d/+50jXMlDNwxMTY48GrXGJmk2SfMAxPj J0ulMe5wPB2TasQIS5AYTsL6mHgjDxoAjHEAOryaMTFWs7etQCJi6NWEifEcGBrb MfdJPmJQiTCGuxoP/Y47gklDVDoOOd3bh65MuSBpokPHrOv3O5R3DIjgTzj9mJ4T 5vC5waGVvbxfMXE7hWGBzg0M77Su/uy3ZRwSwDAF/d3RAZMODBK32xrrZ+f5xj3k GfPd9RNiRJ5i+j3E72Gerg9hPvKb6CO/rf4HC5MFI/YNAAA= } "queen of clubs" 12 "black" 260x40 64#{ eJytlz2S2zAMhZFMGg4niyvspMo50qTKHXKK1D4CW46LvQJbjZotciBUmUkT5j1Q ki1RXjmbpS3/iJ+fQAAE5C/ffn0UHz9wfMbxFcd3HO/kg58/Yf7nQzvW4+RPOZ3a Gx/48Pz8jHeeqf6UWtsbHzyFl09bqW68f3ysR8Me9ZCp8v+MiIm+AeMeOGJMjxl3 7BFj/6RzIwx6bQ9f4ziOpT1mEb1eF18NsxL54DefUNM1U6OEzJHcVGaFXvtQXSin yQo3UDeM/8oWSxemTba3QCEw5udeZMzmC0/20IVrBsMNwGLUzcAH0Y7hnOhk2Q2G +qqz8QphO2L89VUMFqK0h+bXjuHSjQFSmw7G6xJ3MjrrtA2sLYx67R/8RA98KEF4 MXWT5+TcxCLkRGvasFvMIHWC7CYzZgmYTm647jEy5IzrhZDDFKyegdA5ea6mKBZL 3ssfG84DEzpJERmDp/X2WhWnkfVACmR+Y0jHQCgnSMTYZHIW3TJiMGjEPDZYeeLA MrdMDTCoRJhzFt9nPZM0wiBs5xKK/HZ7eh2sHj/lXg6SJOzr2DBAhxdjwXhKsXQ6 MHpM1IH/sA9DGsc1Q+9z8TAnOq6g1zpwF7IHvg1YWchk5p1/YZhusIc6Zeo68PlG BzuU9lyK3I6OUifjPGMZku9k6+3BvLZCFXKxttdXOq0DTuM8JBbUjU5mtXCtgrqa B+pYr6MhWUAKlYCQJuvtGREcMEI3Qwf24FfreEWc57VCgpuD20Phrc5T8kuWiLiG oVQEeRN3zwVJgXXev2ing9PMKhNkItoG9pHu63BrJc/WMMK6XkeZ5cj5GAuS4szF bxhtOpxn+nDxtWOM9tgohtTIyOhMV2wYxNJlkMy+a0YIdUxFSkEmTlvrDKGemVqT FxeWmVx2GM9YY5GiK85D3mVAVNY69AgLN5naaiareb7B4CuLLxuBhWv/sExfqrbO l5Trtf95aDriIOLUmoteMd42Vp3EewvFF2ZqeHM3WnR6ZulqbLSvYrytHjC+ZZdu 7a1R9pml6/MmoGf2fGiyZub88TJhjZGXmKV0eEJd1u53IWvG76Wqbpmmb7nlqt+T 1Uu8qiwxrbHdtU33dhfGdMkfm+7+xla/L8xVkduMhTm+HVV31yFzh44eCU3rOmDc h2/AHBhzL3PPf6J7/lv9Bas8HtD2DQAA } "king of clubs" 13 "black" 340x40 64#{ eJztl7EOAiEMhtG4qq9wcfI5XJx8B5/Cmddg4lVu8IGcTDphCy7ShP7x0MR45Xpc uC9taQmBw+m+dlkurHvWI+uZdeFWedzz/+um6Kv4/DjvSyeNP8Zx5F5GUn5cSqWT JkP82tWmlCyHIVlyG7Ymk1wHJvZhKPRhAsUeDBPBZEIwGUZCtJjsrskQG2Fnk5mn 9GAIYDgiu6ZmDhOQw24MEg8yLyg/aWb+hYk2k7c3g5EVbDBlW2ozZVuazIir2lnN ZKQy9I6dXjFD+UHyDNULqbuWmfk9hgBGLSrNkFqcmtGL/HMMEg8yLyg/lmAMR0zt iDBGTontyTOjNy7FYLWQM6DBULRrgTBQvXrV9Gt1R+5EyN3qAeRtVIj2DQAA } "ace of diamonds" 1 "red" 420x40 64#{ eJztlzFuwzAMRZUia9orGJlyjiyZeoecorOvoUlX8ZADZQrASaHoFpHIH1BAWqCD aNMylGfqm1JA+fh52wWxL/YD+4n9zL4JW+mf+ffL++qtzXKGeV6bcvDNsizclp4s Z8h5bcpRuviy16GMvU1T9uw6fbhMDq8zFKPLxBiTy2TqYHw9PFKHZsiQCWQZCd8E Moxk5PFARu8uGakY8O4cpg4Ec9jDFKRVbTRLmEa1ZWycZBmlB+ZHM3BttEOVR7w8 Y6adryeMmnd/reJ515Z+5f81mMEMZjCD+edM8hmKPqNqNQGGVK3W1R0wpKs7YOw2 wejRtfubIV2IAdPk58/2JD+aq84nerqYsi+rB0uASTUD86znHc2X2VlqRBhvAUl+ bHjLkMvEHsZmxDAgI0CPY11MzzdRz7fVHVe+QnD2DQAA } "2 of diamonds" 2 "red" 500x40 64#{ eJztlzFuwzAMRdWia9srGJ1yjiyZeoeeorOvoUlX8dADZQrASaHkRSS/QaKJgaII bUWJ8kxRFEnbx8/La+ryze3A7cTti9tTeunjM///87Y2KXM/0zyvXTv4y7Is3LeR 2s9U69q1ow3xx4dWZeR5mqon5+ndZWq6nck5l3swVMhlavbtYUUuQzkjhsRUmOGF SHMs07U7TPfIwIC1s5pREfShYuC6GiKstvZ0NcJqYLPRUyyj7OHfPgNjQ07VLvH8 jBm5XxuM2Hdsj5k6kDvlLvn1YP48QwFGZ6BbNzBjU9nNr98yu9WNHW2O+Cfk58h+ hfbdyoP5n0zxGTKBZxkVwCjGSCUCilXFwJhXDM4dcyMGOUj6RozydNS9c20h9VCE 7BEXbjH9YXKYrFimCmartowMri0ktcPaArTbuQIxJs3BTPYUaR/ewLgSYiLvRJF3 qyuqXC8m9g0AAA== } "3 of diamonds" 3 "red" 580x40 64#{ eJztlzFOxTAMQPMR64crVEycg+VP3IFTMPcannyVDhyICamTv5OGNnb9ayPEgBS3 /qnT913XjuT05fXrnIq8sz6zXljfWE/pvsyPfP/jYVEpYznTOC5DPvhimiYe8wyV MxEtQz7yFP88aVc7uRsG8uRzeHQZSr9nZgwwEGEwwEAgHnbkMhxRy2B7F+ujQDDl HaSxYwAaR9VQ+cn/IW0oJrtFbQD8lCnhgWVsTJn9diQM3w+68ZQ8eQyIetn5ieTZ r9eOMequ47Fl9tehys9t6UxnOtOZzvxvBn1G9KQbzNrbhD9smbVHWj1OM1avVIzZ c1U8du+W73XINNuqP9yTVGau26GjeCIM+fmpjJfn6mhDjHqt26pNUDLkLKBcL/SZ GXyGIoy3oJv8HDOOhJjIN1Hk2+oKvccYTPYNAAA= } "4 of diamonds" 4 "red" 20x60 64#{ eJztlztSxDAMQA1DC1whQ8U5tqHiDpyCOtdQ5auk2ANtxYwr4Q/xWrJiadhQLLNK HK+cN7IseW3n8P716LJ8xvIay1ssH7HcuYfcPsf3x6dSqMz5dvNcqnTFH8uyxDq1 YL4dYqnSlZri44Wb6uR+mlCT0/SsMuguZwDA78Eghl2Y8Bt/fPu2KJAeDROAdCIy ySxXgPoc3TsbWhXGADSGVoX5LDIhmatMsl47I8qZya2rIaLodjxq/uQ4aQwdlxif XCtx5oyUL85IeUfLXKXj2hC/y//rxvwLJhiYdlZvMAFAZQA6Q5wJ7WJwAUMWDJkp CwYMGYud3Xy2xMcUZ0u+THnv5cZcH+N1JnSTqmfq5CT2fMvUPVLa4zgj7ZWMEfdc 5o+8d9NxDZkyhL8+k5h9rkevEeNRjc/KjOKMPyfFUb4qY8n7pmTGq4xCmBmbPyqj 9WRkLN9Elm+rb8X3AoD2DQAA } "5 of diamonds" 5 "red" 100x60 64#{ eJztl7FSwzAMQF2uK/ALOSYmPoKFiX/gK5jzG578Kxn6QUzceRKyVV8rxZbEteW4 XpW4jpwXy5YlN3l9/74PVT6xPGN5w/KBZRO2tX3G+7sHKlzmeoZ5pqoceLEsC9al BeoZAKgqR2nCnyfZ1Urupgks+ZoeTQbC6UyOycFEhy3syGSyyaAtk4mCybwHYoSt Mk0QmmDqNEFogqmmQWicwQePOmoaH3Of4X4ujQdjTGtMZq2kRcEM+0lgjQcvbIav Rdc/hbX8LJjuekmmt+7giB8+r5Gks+TXjfm/TDd+BNOLQ8F041kw3bzgzCC/fs1c et+4xJg9/nH52bNernUfyo25TibZTI420yJXibHcMkCJ1cZoMd8YNXcO/8DjHMxx 1brO07Tv/A/2ltzehpTx0BMGU97LLP8Qo+4te0bdWxqj7S18IB0hRkXIliGF0S0d +VlnwMM4xmMznm+iF8e31Q9Nm/Jv9g0AAA== } "6 of diamonds" 6 "red" 180x60 64#{ eJztlzF2wyAMQGlf16ZX8MuUc3TplDvkFJ19DSau4qEHytT3mKiAEBAIpLhOXofK JgT5W8hCyM/vx+9XFeQT2gHaB7QTtCf1EvQzXP/axYZlDqea59j5A/4sywK917hw Kudi5w+vgp99baqR52lynJynN5Zx6veM1VpvwhjHMkDwPksYmKxkLL5IMtqgSQzB wGOWZtJIlwxEojB0HZWMj1Y2lEe3Ml6ZJ0OjxFikjSNdMV07hvfHCnz21pj4VPlD xrnOMWq9aoZcd+wPLei5emI22V//zN9lyPypGLJuYKZTN5ygbjhBTbiVuXfduIfP kviI4ixZL9G6kyjN4ClJBrtOMzgEJINDuZ7BS0syOCnW29nMZ0l8RHHurBdWkutu G+Mtk5wc5Ji9vu3RnChXEzPK+cQM905+A/f3oNWNtt2n5mL8EbVF4o+YYWqLTrdm pKktNt4xrC0XZlhbLDLQSogPk2RCRnOThdxot8IahhURI/kmknxb/QDHNOZR9g0A AA== } "7 of diamonds" 7 "red" 260x60 64#{ eJztlz12wyAMgGlf17RX8OvUc2Tp1Dv0FJ19DSZfxUMP1CnvMakCosYSMlJ+nKly CAZ/FkII2d5/HHahyBeWNyzvWD6xPISn0j/i9e/nWriM5RfGsVb5wJN5nrHOPVB+ AaBW+chd+PcqVTXyOAxgyc/wYjIQrmdSjCYTY5xMBtLdGGlz4lerHmEztpajTMpY RS2IlmCKWhAtzuCNC0XU4vboDJ9X7jwNxlrElBv/FPGWqWcCyx48sRnuZ9U/mbX8 LBh1vSSjrTs4YpXPa0Ud88+KWVkahk9PZ7ibVIa7+3KGL7/K8MC5XM/NbPb4x+Xn /nolrRKMFoeCUeNZMOq+4MzK/jqbcecN6tXzhgiK83LLFvPy+NC1Fp41dcWGqk5l /nPC1czWOYF3JolkJjXKW4aMVJ9NlUk02U4cEtOLZ2K6++L0BF7fXyk2ve0enI7K N30nIXuiaU+9w2Dye5nln8p088aR6eYNUttZdy06uSzGugvT7qiG8dhsiovxfBN5 vq1+ATh8w+n2DQAA } "8 of diamonds" 8 "red" 340x60 64#{ eJzdlztSxDAMQANDC1whQ8U5aKi4A6egzjVc+SopOBAVM6qEP3ESfWx5w+4ygxLH K+dFliXFO3l5+74fknyE9hzaa2jvod0Md2l8Cvc/H3KjMqVzmKbcxSP8mOc59HEE 0zkg5i4ecShcnrgpIbfjiJZ8jY8mg8PvGXDOZJxz3mQQ/owBcjdr3Oeg7S34hdmv PYUCmZYuG5PMItPSZWXCgztDRaNx1hkkTBzcJiNaYdKDqyGqmXa87Q90+eyt+ETW ijNj1HxxRss7dtQqXVdN/FneryOMui7GaPFhjBpnxqj5okwl7yczl67nS/i8RgSI RpkS2bVIUTLsppovNomed8X14wwNpcrQJBy3Y/kDhGnVfJmqVfO0Yww10K556pbO SO1/1LzUTttbevaorr2uKudkvM0Ar1+FKdFqrAuc3AWQxacwrTgXppmv7R+4nndw YlTWhl+MX6GeoctnZ/ucY2rUMyyTbQivZ5A7DvJ6dnLXRl7PLs9Vl2szYtOWDA2M zpjSxfR8E/V8W/0A+lG2V/YNAAA= } "9 of diamonds" 9 "red" 420x60 64#{ eJzVlztSxDAMQANDyecKma04Bw0Vd+AU1LmGKl8lBQfaihlVRnbirPWJrR1YdnDW m8h+UWRJdpyXt6+HIZcPqs9UX6m+U70Z7nL7RP2fj0vlZcq/YZqWUzroYp5nOqeW mH9DjMspHamJ/g5SlSq34xh75Tg+dZk4/JwBiNBhECB0mYDXY5B3mwyEmsmSZGic tZosSQagVrRIgqEbK0WrJHxoMiIWqfH0MCYVJt+4KeJSV0+IPXvoos8kbdo/WEuJ Nfy8kuVRYMRLoUbc+SOFPZbpYlw7DPPPaXTAE0kxPAg209ODzB40mc2xsEmSwRKg whoM76yt0nHnj7QZbjpjLp3Ppj1aOosx57tkUOSW5Wdr/VGMsY4pZrf8c8YzdocP PbFwxPS38ucqOd+Yg5657FkTXGuLZ41yrXWGC0yGO+9MPXUTajWJQegzRbf5bloY LDda7zjBoIlyBqx3LrennasIqlXnRliVXz6faT+Vt1Ute2jHtW6rmkyE2J7vhUEQ sY2aaa0/G9NYxzZmt/w5ozJYMygni2Ka3X7G803U/7a6H78BawWaX/YNAAA= } "10 of diamonds" 10 "red" 500x60 64#{ eJzNlzGu1EAMhg2iiUYwV3ii4hw0VNyBU1DvEaYdrVCu4Daa5hVc4lVcwRVShFD4 bU+yySS7byWeBJPNy77Jny8e27GzHz//fEs2vmL/gP0T9i/YX9Ebmz/h/Pd3vm/H yT50OvlBN3x5fHzEUWcm+9A0+UE3ncKf9y1qN14/PEzPDXmIz2om+nvNmPsX0Uz5 Dnv+keZKGOJaU2nSjX3WTx6jT2dsK02vl/Su6dN0pBmzgZSep3GeznmtyerSqcs2 HCPRHL1ofuf8bWW8rySuD3F6wtU/9Epczq4RvqXhi6a/aEYzYwpEQtDwrNGVzBo3 tQ8UsZkmmuYJ8JYT7ZxqSDW2ksaelSbgnnbpDY0UxGvLcf+EKDRrqAxbe9zPFOra 2dzZrMviJSWIc4o9w8PWPxZ3qefAKXHnZ4+PFO5h8hiI9aYybDRd9GzsctK9hCOO GRkieWZYmu446tiIaJFLhFI84FAhuNazR6hD5HYcSiVa1E1CCTlELSdjNlAiwSDF YLScFBgRSslvppi04wSEkCX5UEyHWzacgmWxDDYcwzI1HKRfIVlhwp6DVOCqqRgk fsspHKtGMYFCl3b2cITmYk0JncSWQzPHMMk81vpHrZbZmjPM6XfxQn65RhcUzsZp /Zz18SO1ZqBrnDFoiBST4YNwzFEzNODDubOAHXAmzCZ1b+akobrGOeOcYjT66p8j zllBwAzqB/j5kANQUEwSJAFf5cAo0+i3odG4PeQY1XCbz5HgHzZMh7AywolEaDgE P4cFoxykU8MRYl6sgcYyruXoghZMksBxZ4/IxRq1B0kQdvbIGpNQ6vEwtf4ht8af wPpA7p53w5A/yynQPlfJSkBaakKI6q1d/THMXFvgLI4HdUyLxlyjUNHiUR2z/ua1 DpXoSj0MJXDOqiOf7vYcLbmdwKGpWP/yjtdwULsVj0Cwt/KLpldOPcfoJfIrsLfy RWNtg91Ib5JqsbXyRaPtpyvaZsU52sW8Vc0ab2Pw2cyJqvGWN2u8HbKEeF3jHNaF XjS1BW/sodqssXZ9/OZW3qzLfAaNWNRbjrVD15CvHUvc2nPx86TV4oYmVk19DWv8 A48u/dRNzXpq4+dR/6vRn8Yen1Gv2MQLc1Uj9X2tT97KjzTdmOurn996nRvQXH2H XGlujv9Ro45+Cc1z4y7NPb+J7vlt9QeRdPNP9g0AAA== } "jack of diamonds" 11 "red" 580x60 64#{ eJzNlztuXDkQRWuMSQjCri0IE806nDjyHmYVjrUEpoQw4BYqNZgo8CYceQuMBujA oO8tvu5pVttuBQ5MqX/vHV3Wn6237/97Lb4+4PE3Hu/w+AePP+RPv/6I+5/erMe+ Hv1XHh/XC3/w5vn5Ga+8Mv1X5lwv/OElPP0VpW7Wq4eHeW+NB73LTPkFTK3tHnOq td5l2vxtmR+kQa+Z/9WGqeqouWPpDdP8XbaBVbP0bjMyp7oYUZlLh8xVDHVFnVvJ mLp0FJevcqHza63/ugyuDE3SnXHxC/MZql/IFKqlYtmZdstgqwKDdJS89qInZ4bG wbxhqciQ5RgZbnZmHKktSypzcLPD5s8QDzpZqjNKg+C7exLsORhEEQbdxOeKwTUZ VQy52HX8E0yuxbM2U+Femz0rzmQyXJ8JoZbo18oXXc8KewqwMkN8Vt7BKLaYgqdR 9SiZvX4QZjAiyIMwUpHhOzCIcu98VqkamJFNWYR03IfKQGJ3Bltkgkwo9FjLQouu GGSadccKG7IAWJZ2xlikk7Eh4CQd2Bg4MmkT7/mCTN4ZFaNrRF2EZWZ+7YrB36OM xWz6XgBRtTnoIKg0IftQlYxIWwp7UdzN7Jy2A0iCUNAZbJthBRBWNy1iKegoAy1W 2HxMxgnmxL1gTRfa6TrWCvaKfg2moyt1aPIJBS3Br7msaOw9aVlbKRwyuw53y4lG ZDDUMYlx9qBYlYtO1qAjlLFiT7Us+nTKEnT8Rho59Y/sV+pY1HGZ1nIi0T9CJ8t3 dHI6Db8h9amYy9zEEO7AVvedA8Floo4V6Kj7zhhTZsa8W7notNLNrdkY/2u3B/2B +HBmcMDuNY8YN4YWQWSc0a03MaQRQ3xy4y2qBLUWmCQmTdwKKBS0R/ZS2HQK9ur+ rQC1Jmwhz8/GQIglRm9gORjcD/FhAcrqcnaW8VwRiX6hm89NzBHEjrToV9ZLF8tg Aw3NFnKxOn2NBEUh07GdSS7j1UgSU4ajZs97KgvwK/CPXvToe/WNJh+AOFpp0553 zD4OShwSDIEdd0LvVPrMHuUIsrlW6EGeW527dRymZNrGNJ+9GKLCcwlHDxk/bS8M P+E+hBINRm+Q8aP8wvD4wejFWB+8MiqZdZSfGf+kHG2IEQd15RxcR96Z8eOQI1zK GDwnv8MsHexlPEMO5jiCd3smopeYbTBI53GUB7/QMzAIx7+7HnVWfNh7xcus0PXd HjxVZzih6LuP98icFgOD1E83Mnt8PKJuc+YJ6hU2Q5wv8emdedVj4m758q9lfgy6 YwOJ9zvthsmHjuqleCLzo++Q18xP12/IMIZ3mOOL6s+Zu+tFzEv+J3rJ/1bfAGnk dy/2DQAA } "queen of diamonds" 12 "red" 20x80 64#{ eJytl0tuFDEQhgvExjJQV4hYcQ42rLgDp2A9R/DWGqG+greRF2TBJbLKFWqFNFKQ +atsd7e7h3QQ8aRnJu4v9a5y59OXX+/I1jdcH3F9xvUV1yt6Y/sn3P/5vl7jOtkP nU71Q1/4cnd3h0/dKfZDpdQPfekW3j5sRe3W65ubcrTkhg+ZQv/PxHiJ0wswJeJ1 xFymYwbajpnLP8n5Sxp4bY++S7aV8MpNOq/9Iv3ijSBPPmFrUuYyLYxjSRCkRMRi sxXMOoZgMotXotoBW6drTHGV0ML6HeP3amZZ/GIYobcFG1LKPTQ+jAxPkxjDzIXW zLRm4BvbEiFYrAuMmt4ZVscqU8pjMSRODHkPoz2dQVyaHDN98GtmpNuj7MCILfz2 SJ3ZyEGcK8Pr+KzscUyzKmIpPc5rv5xGrqvSMLZ8reMzM7ahYM37Os4rOaKVoguh vM5YIkS1UYvDwJRmsu6K/cWOkbmGLYjK08DoPY20T5XyZLrH2kC2cF8yVXHJ5tmo i3AzM4pdEOWIskdB8sYvTjI3lQshUfQUeFurRL71l3MhMaUYA++YXj/Q44KHOkAD UyC9tz55SMqZrM9WjGC7NoY2LIwmhTa6og+ezaRExgByI+PCrU9JNIQ+KQM/cxoZ iMmw2rsYVEgi5MbnvV8EZWjngG+QANEj43y4hRbumUj4Fp3fMapCICcGGMQQc05b Xc5HNUiNNpOjy2MMXXRUGSsMr1k7346+646ZUhlLbQ6bGOKPAmGQWYDQkO7sek0u 9RMi7PSabtiMWHqXzqMuj4JAXpPJqabvmQQxlYEgxNLKddTlM2n0NZ2kjCQPMZv6 QbbVZI/CVmWSsjPRQ5wVgg4mK1gog5gNE3ytG251JgliZBNnhRK6oRcs6pVHRgtc yxwp4DaBd36xQtYxrhqUM+2YQgHSKYW4nHDyY2QweLSrSJ3RtscAED/Wjw4eqbHV OKGzs86RTX/p+NLCUMiGTNnlvfrSa7IdYm7jl41LO7zaoC47pg62NjD7oN4w0uYt TF+G+YYpdWiLbV1hJmNs+NvkvSJHb/bD2s6C+WxZmHs7XOthJMT9GMNhNTN2k+uh Jm8XVX7FXOoBXJkWB1Xld3Lmw7ozOq5ptKcd1o8LY2N28KvJEZLOcJmmTXzqQSyW rVr0A1NWjNVJO4V2tdrjY2NFp/faL3sM6nGuxBmddpWxfOk4BIHntiHO9ljW8i71 ic26WfO/MKBad/r65GcnQi+ZysQnniF7vqby9FLmAHmunOlIUPPrgLEYvgBzYMxz mef8T/Sc/63+AJ3HlmT2DQAA } "king of diamonds" 13 "red" 100x80 64#{ eJzt1zEOwiAUBmA0ruoVGifP4eLkHTyFM9dg4iodPJCTCRM+3utiX8NPkNaY+FrE 4BdoQSg9XZ5bw3GjdKR0pnSltDIbLrf0+30n6T0sn8ZaydJBX/q+pzyVRD5NjJKl IxXRx2FclYp110UUj24PTTQNjG9jgmtjXPAtDAkHjXPQEHEeGW4uawJVQo19bIZY yDgP750uGl5z6uelTCwYr1QR7h+qBpoQFxuLv5nPeGx46QIm/fOAkSUnb2TJyRqe CS5vmIwqqjDS1KixLxvVixP3FdC9D8tt1kzF3/yeCQVGTV5tgpq82ujJq0zQk3dG 46GR5zwwMNqZqZlZY4aNGTBowGTcYR/KhjNvZOPawOinUZ3RT75KA6LIlLwTlbxb vQADV0S89g0AAA== } "ace of hearts" 1 "red" 180x80 64#{ eJztlztSxDAMQA2zLewVMlScg4aKO3AK6lxDla+SYg9ExYwqIdsDG30YaXaXzkoU Z5wX2bKVkfLy9vVQunywPrO+sr6z3pVD71/5+elxqJS1n2VdR9MOvtm2jdvWQ/0s RKNpR+viy5M2ZeR+WSiSz+UYMlSuZxAgZACghgxhgonnwyMl5uwwyG8CSEOaYUcQ +ghnQ4rBwfwaArK+t+cgGOu7YZw1vITp4vgFe78uZVAOBdXbd2GGV51fMMx+BYdV Z0/lTvgMAoUM1d19JlYzMe/GjzFEN/kGJzOZyUxmMv/EYIJRqdFjUKVhj9E51lgt R1T5HI1Vy+jM7TAIZnqNqaIoMiVAn3PVmRgMI+RG9cZftY0sMK5gWl0WMVUyZhX7 vku/0PNr36Vr0R/G7rRlokDsDIYMZBgbVYbJxHwoKSbzT5T5t/oGyDsmgPYNAAA= } "2 of hearts" 2 "red" 260x80 64#{ eJztl0FOxDAMRQNiC3OFihXnYMOKO3AK1r2GV7lKFxyIFZJXxkmESOxfHDEjRkjj NpPKfeM6qe2kj88ft6nKq7YHbU/aXrRdpZuqX/X+211ro6z1TOvaunLoxbZt2heN 1DOJtK4cRaU/99aUk+tlkUjel0PISDqeIaJ8CoYzh4xQ7I8aChkm8gyrj0X/9SjE qJLLWDp3LMONoYihgfFjdwyYQ8ugcVlGgD/SkHw0w+OjKKP3PpjRWdc/OKafwWYV vNPemz2GSUJGcnc9FasoNpx3eSJW5SQ5eGHOy+SYYYoZm12AYZvJgPFpGuUpZE5U E2bqz18zbhaDOg8Zs15ABsmF+X8MTzAueT3DLnk9Y/PJWU0HNjGOaotlUG0xDKwt bX3uzKDaUtf53syZawvbzQNgxk3IDlM3kz8zYhhcW76ZvdrC424G1paZ+JEAafGc Q4YiQyBWf8uEMsXMfBPNfFt9Aow0CNT2DQAA } "3 of hearts" 3 "red" 340x80 64#{ eJztlzGSwyAMRUlm22yu4Em150iTKnfYU6T2NVRxFRd7oK0yo0orYACB8aCdOB2y CfnKQ8aYjOTr/Xky3h7cvrjduH1zO5gP75/595/P0Eqb/WnmOXTu4C/LsnDvPORP QxQ6dzgXf1zqUCs7ThP17Hc6dxkyrzNoFQxoGKtgQDEfDtRleEaJcVd2gQvBlwLB sGCPLUXJYHBDJYr18SMkA2oGYB/Gm7wvkPeVxf8YlNGTgPJZyJFR8HrLdSbMYZKo noUbm8JEsWIwh4lixZAIE4Wf1g77kBT7mZB2+Q8OZjCDGcxg3sSggpE5aYNBgC6T cmQRzkoGY65t5LgV08iVNdPKuZmxIZU3cneesw2pvFUDRCaP3KHe6NU2GKuzFxkC RR0Fm7Vfuc7QqiErplmLZoYU+8f2Gc0+JA2DCkYx566pGM07kebd6g9PV+vB9g0A AA== } "4 of hearts" 4 "red" 420x80 64#{ eJztlztuwzAMQN2iYz9XMDr1HF069Q49RWZfg5OukqEH6lSAE0tJsUWKsqm0BoIC oS0rpJ8ZWpZM+vX9+2FIcuD2wu2N2we3m+Eu2Sc+//mYm5Yp7cM05S5u/ON4PHIf LZT2gSh3cYsmPjzXrozcjiN58jU+uQwNf2cAIOzBEOEuDJ4dD7ICUCvJsDB8RXKs FcVgNkOlgIw5mkAy0M/ImFcYjAeHofq+QN5XUc5jUHpfFAjqWcgrZ4XHm9HCYHGz KMmffKbCzawYBoubWTEMCTez0jNX1TivSQzLY5B2WYNX5qIMdjByxq4wCOAyAMZR zSCAcVQzahG3GVQvjN8zAI0/uywTPAYzQ1tMzBLojGFTrsz/Y+wKt4xd4YZprHDD LHNTuQuSWVZ4I8cZppEra6aVcwsTcipv5O4Sc8ipvFUDzEy5cod64/TiWatt8FQM bTHJq8fEuqyXQcmgYlLdulJDaqZdi6qYtyQzm0iO2ZFepi8el3Gli+n5JvK/re7H H4xdySf2DQAA } "5 of hearts" 5 "red" 500x80 64#{ eJztlz1OxTAMgAtiBa5QMXEOFibuwCmYew1PuUoHDsSE5Ck4DmntJI2NeOJHem7z 8px+dZrEdtqHp/frieWFyj2VRyrPVC6mK25f6PrrTS5aFj6nZclVOujPuq5Up5bI 5xRjrtKRmujnrjbVyOU8R0ve5luTidP3GYTgYMDRFxkyGTQZ6stkQDFpBOkBtQKq L7qDDWtFMZiboVIaBiQDfkY+8wGj5vmAYZHjAjmuXfkag9L6pkBQayHvLArNN6E7 g7uZTWF7ck2FmaI0DO5mitIwUZgpCjj8x+XPjriIGE8Sg2fml5ggL4Qu0/HDhun4 c8304qJmevFVMf041cyJcoIn//w0g5LBljnI8/Uc9vYLzQzkzPw/Bh2MjOEDBgFM ZoskZS5IBot3D3LLxgxyS2FGuSXvz0Zu4X3+D+UW/HwZGjFs1WLSe5mXGeQWZozc kplxbgEwnCwzQyT3ZQivqc14/Dl6GMfz2Iznm8jzbfUBqcKs2fYNAAA= } "6 of hearts" 6 "red" 580x80 64#{ eJztlztSxDAMhgNDC1whQ8U5aKi4A6egzjX+yldJwYGomFFlZHviyLYSmd2dLAVK vI7sb+WXLCcvb9/3Q5QPTs+cXjm9c7oZ7mL5xPWfDymVMsV7mKaUhYsf5nnmPJT4 eA/epyxcoYh/nmpTjdyOo7fka3w0GT+czwBwF2E8mQwTZn96GG5MMMSdAxqlYHgE FAZRKZKhVIxaCR2SDCSD4xlfjQtyXKvyO4ak9azAFesu/7koPN+MrgytZrIS7ck1 FWYWpWFoNbMoDeOFmUXp8VUK3TJ9zNkM+YvswX/mSoyTFU5lFD9sGMWfa0bbFzWj 7a+K0fdpyVwoJvTEn6MZkgy1zFacr+ZQPS8KZkdahjoY6SEbDAEmAzSGaoakU2ww xYLrDBWLcDoDKI0dzVDBOJURRZQYXzPFCvEzKXOYbRdVTjJ5hXZiS2Z2YsvCELZj SzqfjdgSz/m/FFtwBYawHVviSyn2Y0tkjNhCedZ1ifPTRIGTGFiNSV89kzGli+n5 Jur5tvoBfRyUSfYNAAA= } "7 of hearts" 7 "red" 20x100 64#{ eJzNlztSxDAMhgNDC1whs9Weg4aKO3AK6lxDla+SggNtxYwqI9s4keKHtEMIq8Tx SvlW8eOPk7y8fT0O0T6onKm8Unmncjc8xPhE5z+fUpE2xX2YplSFjX7M80x1iPi4 D96nKmwhRIfTNlVh9+PoNbuMzyrjh98zCKAyAOBUxuNhjGwzUuNCQDqyzeRhCEhH XAtTGDZOwQBnwM7w9jQY0a8GE433C3i/Vuc6Bnn2xQEn5p3/Mzs03oSuDK5pFifm 43PK0mSnYHBNk52C8SxNdixatWjeh2ZpDPpd7sHrmbrmJVPXvGAami8YTYdHMn+s eclUNb9laprfMjXNF0xF8wVT03zBtOy/GMdPuCpj6bthDC1zYZhTizZ20uGt3V8h jNBfEyxri2mN6tieDBoYrq0GgwAqs8ywSOc4g3nUO5pfmI7mM9PTfHo+K5qPz/kb 0jz+vAz1mJhVY8J7mZXpaD4yiuYhvw51NG/ST7zWQQwooje2WTUTY/kmsnxbfQMa WW519g0AAA== } "8 of hearts" 8 "red" 100x100 64#{ eJzNlztSwzAQQA1DC1zBQ8U5aKi4A6eg9hFot9JVXHAgKma2EivJknb1W2XIJCiW nVVeNvo82/HL28/94ssH1Weqr1Tfqd4sd759o8+/HkKVZfPbsm3h4F70Zt93OroW 67fF2nBwL9dEu6cyVVVu19Vq5Xt9VBm7/J1BAJUBAKMyFq/EIHXODUIGss8UoWuQ AfCxY2iGIvAxZ4AzIfCJFQbL32owdobh/bGh1TSC0xjk2VMARqw7/2YMaL4JzQzm NCnw+fiasjQxqBjMaWJQMZalicGMqzPO+0XVGLRnOQdPZ9rOS6btvGA6zleM5uEl mawwWt354zQfOY/HDhpzGDVP+2xu6TymbNnc0vnUK3YCFM4jpG7ZFuM0Tww/AQp/ QI76uowJMxiYdp+PsZvR2I+588J35lBMf2ctRF/bayp06LghBq152GdmnL80g5zB mpm5tkxdowblnAxOMIW+LQaZTj0mrbBIZziDcdYb97iKadwrS2bkfLg/K877+/w/ ch5zdwYMTPhMiVQGjeY8xov3wHmIf4cGzvv/raNyaaa8ZjcY/NSdV8sUM/NMNPNs 9QvETVBI9g0AAA== } "9 of hearts" 9 "red" 180x100 64#{ eJzFlztSxDAMQANDC1xhh4pz0FBxB05BnWuo0lW24EBUzKgS/uSj3yYClsVZryPl xbEs2UqeXj5vh1beSn0s9bnU11KvhpumH8v197tedRnbbxjH3tSjnByPx9JWDbff wNybelRV+XuwXblyfTjwXvk43O8yPPyeAWDYYQgAdxmk/2IIsFqhBcMAQLVCC5qh rgYteAYkA2lGzWHMaF+cYFqRdoG0axW+x5DsfRHKkFH4ot/ZjMFJqKcg/UWLsb2F uT/p095NY5D7aBxDMA+2ego4YhgFwzgPEm38rMwySLcuLMP11DCknFAVvM+wZ9g8 KmTId+NjfpodsQB8zNMEkvc7wRzznVsXAAdxSCfjMBOr52L+OOY1w/JOLZiYDwUT 86FgYj4UTMyHwhlywZ8xKC9gyGRsT8xhxhcJn2Zi40xxeMm1s6q313KfuNN7QmZv Se1Rcoa16id7JimDBEMJRm79EDysMCTuO8UsOvS5aWIWa4Mc55ggV1qmOYh0zl0Z 7KkcfO5ex4w9lYuJUcKFY768T02ht8XMxm4ynGdIMuSZ+B3SMOG7qGE2ysUZt+o8 Q3bROWbzcp7JfBNlvq2+AMWyKIX2DQAA } "10 of hearts" 10 "red" 260x100 64#{ eJzNlz2OHDcQhcuCE6Ih8woLRz6HEkW6g0/heI/AlBAWvAJTg8kGvsRGe4WKBBDW ovwe2d3TTc5qB7AAiTM9P93fvC4W64fz4dOX99LGXzj+wPERx584fpFf2/l7XP/n t36cx317yv19f+MDHx4fH/HOM9aeYtbf+OApvPw+Sk3j3d2dvTX0zr/JmPx/psb0 XRiLN9jzg5hXlsEfmU3N1VhrSjFF309HPHYmPthLTJo6UwN/rmemxvj8FKM6q2bJ IKPZHJh4YfA58ZDYh7elMXT0gYmN2a3tjB1s3hhFvGQM0+JFXmHUr0y2lHx9eLnY 89SZZwW0YHBOYGKEQRvz0pAHw72sM9m8993GgfE70+w5Mfa0mbwyfV48+7wzlYyp wI4DU48+NHo0YeI405nNz+nA4Cdmu804L775+bDu+Ekig+T9F0jJjALPtdsZCb7a qtOcWLyNa+FawIhvNYDIMjMaKFCwCCZRcpErOhqEU1mKIDrCsuz2nHUUOiU7IrnV oZHhu9cl8/JSSnFVJsbDWnHKyxxSqTTqIMLFRRUSmQjWYNRRcwEQfy+uIRYnHbHa II6OjLGqKqlBlNmQPDBeXYPgg9CRpa3H8V6quUHOu44U+ODE0MmlQRKCazf6nGVg oEMnmwUHw6CSXRlsbjqAIoSQ8oFuhNCkw0WCRsCTnyg06XCllRFee5xAaNZRvDrM PQo/FXHzvDJOI3UQiwrfQFY+X9EpWHuNQRkk+KruBuaKzeO9bGT8Mtg86xjz+zT3 SYexMfpw1tGwnNdi1rHlb2kL39a0IqxnHaQmgvAQG7MOEnMZYgw6/szkHmHHWIWR Z6aIG2I+iNpgz4q01ImE4MfzvdyG9BQkhKwcGHoX+b6lcmx7mIFBtp9LAjLOj4yp q0Rwr4IyRnMnHZZUXGaPC6xiqFjBZqaUpbXBUIROlisMixhLHRO9xck1ZmFdRiXX nqAox1d0MFiWW/OphrJ+YdJmT+7NhCWVncFf7sW24VhYpTecptM7zM6w/Tj2xt64 4D3bOtXGtDbm2BvX5iZfZe14O9Pa4ZHhzXqT3pl1e4D82plTB94ZLJ/uzFebGbR5 n9A2V5tVbdsR7DZzuwBG87rTkNUcyp9jlfZ0xl5h+rz2jc3ExLgxrl8K+47p4MPN zwh8hD5ydd15XfycKufEKhXbdq2msO7gzkz74rDnIxNrv3ZYU6POa3vIA/PN8TMy LXS/A/PWuIm55T/RLf+t/gNy5vcz9g0AAA== } "jack of hearts" 11 "red" 340x100 64#{ eJzNlzGO5DYQRcuGE6Js8wqDjTbwKZxstHfwKRzPEZgSwkBXYCowmAl8iY3mChUt 0DAG9P9FqbtF9Wxv4GDVrelu6emzWFWs4vz5+etv4sffOD/i/ITzL5w/yS9+/RH3 //m9n/vj0d/y+Ng/+MKXl5cXfPJK87e01j/44iX8+TBKHY6fHx7avcMe4l2myf/A 5DzfY04557vM3H5Y5p0wxGtmU7NaF4lmtl7eM/mpvcFfWsDgkBsMnPX6Bf5S6jSx fj1e+zDi+8zTqGMtalzlL7Egk52pWWCMqaw6rd1gkl8KZbPnyOiSYIxJKPE83Y35 0plXzfAKXmFy5vT0drH5zZGnZpDh82GSLn/K88jA485oLpsJZ6b5YHMzzvw9ht7K lImYuWwMn3y9xGuVkT4ZXWj03s+eui5jpXHyndn5GSd/QcZqbABDZ+joK+ZEBPFU WKJSOtPmts8flylSRYo8axz93DyS+BVVpFbRWA6MVQ7BkU6FWfo8MfKDTqBD/K5i rBpLpe2DDmyEh010QVJHyBQZmKgF0TaDXVrTqUIG5J7BU7VkSFm3GZNTkT0DC7WG 5FnKm1Cj0J5hBAQQFAsDq3TSYDNuGEZLDUyEo+SoA1uT5SkkGkTLoVLK0c8yZZjN ZSNAjzpYdkh0Mlh+lgt0VEd7MH0LCwbDpTCVW/YgPXEvOyOhwiZObM8EBAfPg0H+ hEJm1JGc+soLcLdMZcLE6qATcsbig4gnWEYSStCDTuaMcqrQKVNRDJwGPyugKIrC onlStzlk3esgnqg7qouCgVmVk0y6H0vce1JTqUVLnjAWTBx0apCoaYERyDaBqJu4 08HDGCuhitUSUIToiaNOpWsXzj3rhIGxDOKgI+o2MwWzcpIMz0GHcfR7YBakCuO8 01GuFVtSc+8tmcXebuiYJc8wMBPCZ8MaZKJDJ3qmcrCE1I037ZGe8QgbElFKG/2M UgGIDDyzFquDTuVehCuQaYB4mg7+4U1IVfcT8gmjIcWGdUqD6mKIuHkfZH0ZGF8r M3ROlXseSOlUxhqF288+WixeOm3JY41CvdDZq9zyL6ti8+I3MA1FrtsMK3zHNfoQ f1FJxRPMq8yuJPcyTSZhNWAIlnF2/x3Dck8mu/N1lUFnuGLYNpxBUFnn2Vh6hzkz 3n6c6cspsj/1TnVmvI3hh6EbGWv7KpPzhfF2uDL0S1tl8OS7DBvL1oEvzKkzmlcm HRhv8/yxrjy2/21HMPq5YQH6NgLz23YWV0zXscVJVLF2ZE4r41lq4Raz+plRxbKz UJyZr5nNz77VQDwDyuC28zoz82pPM9+shVLPO7gj07wPQsf3UNe50bd37+whr5lv Hj8g4xn3bcZjcY+5e3wX8z3/E/1x93+rXx/+A4IDtCr2DQAA } "queen of hearts" 12 "red" 420x100 64#{ eJytlz9u3DoQxicPaQjihVcwUuUcaV717pBTpPYR2BILQ1dgK7BxkUuk8hWmCqDC YL5vKGlF2hs5SKTVaq397cxw/tKf///xr9jxFdcnXP/h+oLrnby35/f4/tuHdvXH vb3k/r7deOLD4+Mj7nxS7SW1thtPPsLbx1HUi+Ofu7t6duhdOGWq/DmT0pKmv8DU hPOMWaZzBtrOmeW35NwIQzjaw3ctpfh2bsLDcV327iWvZ00P9TlNNSxTx2hQn4sd YUnp6TssCUcf4t3n6ktJOCIMTROvgREwLiUzlUwypi1oZaApt5VA6w3Gg6kBR88s D89Xm71IESCQhNf3xjz19mhdGeX5bMgD15WOjJZguvDpFsPl7Ewz6Kma0qedSQmy dmYhg8e87zZz3YrDVgqSOixeuG1xjzggRdsvAgWZa5E+OwMXp+YerI4FTDEM0XTw M8IUmjJbQF32dNgYNznYUw3CS6LUF4wkmipVaTg0r5HrGZHYbCGiSarjNwOTY4Qh BcEI6sA7pMLAZIkzZJQc8BFigsPyQscg7M5H3Ev2XuByjaqXPOjyzuWqyFbJVKUR 67j0jJ8l4hEYqIpUBSelnil4AhNYYzBHNQWs3/X2zFEcHQ1BDj93UVOU3h7PisBy NEJZDMBclLm3xzsIIiSFy4c2kUtJgy4rrbQ1Ayy0xDIPNpsgaSVjvoDDysDMaRci DoJ9mUfGN0GVeW3KX5FDQTNzei2VV+Q4CmLSILu4JjGbh3hFLBouCRaxahQ+9HIi BME1Ck95YdtDF8lu0JX5Q0beeeYR4zbG1BdrPy07sITEB3HwT74YRIMjqxYrH+Ne XGktV0JCCoqbEwSNjPjWlh1SjMrgnheMyVnW/i4s7sE/JsfqzqJq4Z19zzizOegW 1NgE9cylMAhIV0syJQRBQ66iHJiiYslaCbmxdlgxymRPdKKyScioi4WCYsDvWWKo L0YwjzFFq0B9JSYAfu9jdKN/2MWi9aHcsmN2zRfHeEW2AchDklKOXqC+Xxf7CFU5 Fqcwj1we6xTzC+ZUq0INGGXQHIeYss85ilE2u8CnzOyRYU9EE2RrhcloYWwSI4NM Z+dYGzDlphfMwnKwCW39l7P3ykyNYZ1rMFswFDgcrvZwbITapkjrpBxSbcpsDBtF S66JDJ6oGS7X3mtjLKxTzaytNqTcwR4bh6HaKJ52Zh2eK9MG+Tplrwx8rbcYjm7O cCTPkcGY36d+2wMYg7DvNnO7ELbdgw1UswfbmH6m9IzVT65SbzBWXhz2zNTenm1X pCQvyEQthznYmG135W2zlYvtwnfGtmVh3aXptm1rqXxllmn9w1puO1FjHZN+sYfc YjrVXx9kTpC3ypnOBK3rOmHMh3+BOTHmrcxb/id6y/9WPwHf55TR9g0AAA== } "king of hearts" 13 "red" 500x100 64#{ eJy9lztSxDAMhgVDC7pChopz0FBxB05BnaOl4ECqaI0eTtavWGYwcWLHE3/zS7Zs bfb1/fsRtHxyfeH6xvWD6x086PuVx7+erOZl1RvW1R5ycWfbNn7Km6A3hGAPueQV N8+lVFXulyV4hRZ0mQATGJzDEMxhgHAGwwS4jMWvy0i40GPMXI8hEYG/M7vFixga YMCPF/nrHAbWWeLlrc8shveYF9MwbX0O7j8YnS04OrbN+wxVMr9mzEpskoG0G0+c 1hS69WxGIOlk71bMbogg3GyWDJImceLLuhXDA6JvZqTFw1jC6DAeDdAZo6aow+jE udj024wqHM0ZY57I45xJ7xN/RIjdwbhQjTU0GyS39lvrLO9pv9tMdEh1bAIVQzEC 5k/iTsYgJPPC1t5QY+JH9L21x0xoX+5EptjPMkY6K4Lmfo5CiIVMfnaiUCGTM4dH mUxxBlWglCmYKJTLlGfZtjsV6jkTI56f+CqPZNFsM+Zz6DKh8qaRW0/yT7lGlTRa vk+FQsVQmUirbNxgqjLG5PnxhCFHZui3R8apj1z8+6Wpvf/FNcToV6Jja1osIJAf L/TjNcJM+eYYjftle2PkP9HIf6sfYx2h1vYNAAA= } "ace of spades" 1 "black" 580x100 64#{ eJztlzF2wyAMQNW+rg1X8MuUc3Tp1DvkFJ19NA85kKauqhBNAkggUmcEG5MnPgoS epb88fXzDtK+uZ+4f3I/c3+BN5GvPH85pF62VW5Y1zTEi39s28ZjlJDcQJSGeEUR P461KtVel4W8hktwGYL9DIoNfYa3HFyGcIDx9yPT7p5NBpUizZQStGwXj9wXkGW7 eCRjDNsRIFdk+lCiIXQZTCHTs2KI+Qu98BCDA4zhZ55HzBgrxhACUrbnRozlkuTR /nk1mHqByxBb4MZzI8YeZ67cZCYzmclMZpx50jta3vd9BnWS9RjUC7QeM+tBkT/L XHllsMyfRc69aS7rC7sGyCqnf9UJBrOnbqmLovqvFGOdTGQoP1OtJpV2OWOeV6o3 m1aQFWNYI8nP/fAZKn5l2o3VyvYGoz2iGMMjxn6cNsSMfBONfFv9Aj95nK32DQAA } "2 of spades" 2 "black" 20x120 64#{ eJztl01SwzAMhQXTLfgKGVY9BxtW3IFTsM7RsuBAWnVrFBkYWX6OXJqZdlEnrjvK F/lPfnZe309PpOlT8lHym+QPyQ90UPssz7+eS67TrDfNcynWS/4syyLlasl6U86l WK/VJD8v3lWTHqcpR4mnFDKZLmekOWkPhhOHTKa4PeIoZFjHvWG4qgozlYUay5/3 gNERMQzoOxNZR3AMNRqSfaWpi0vIbPRijPkJvXQWwwMMtfMlz5kNg/uVOJs2d2LM WsqIbs9Xh/EvhEyWHgzEcxyrQ8wvd2euwLBfOaFuIIuPZ8T4ddFhzl+n/2T20hav Y5Dh1k2kq5jZZ76y2y86TJvuzG0xO2m06v02gyI4YGCsej8wVqnaP7G2cL1/Ym2x W3VPE8xKuAVtYXdwQtriD05IW/RcZh1BbbFMT1uq2IDz5cYeagvw3tYVIGW+BuI5 cuTH8AImTEPMyDfRyLfVN3+MWqT2DQAA } "3 of spades" 3 "black" 100x120 64#{ eJztlztyxDAIQEkmbcIVPKn2HGlS5Q45RWofzcUeiGpbBSHZQp9Z2PGWwma9yG8k LBiDv35u7yDyx3ph/Wb9ZX2BNxlf+f71I2ktq5ywrukSD/6zbRtf40iQE0JIl3jE If75bKfq5HVZgiW0oMkEOM8QOhjwMOhgwOEPAybDHmmmwjEvBRUjz1AbHQN6zmw0 +0MS88ZomDhtZ0C1h7I0tEbNpFzBgfEQQznpesNmyMHouPMwomKyUcedDaTiczbE 8/Px6piBeJgARGYeVs9+htm5yUxmMpOZjJ950jta3vf3GVKV02RGvUTLDGpc8QdS VRzVyp2hXFxHNXdnRK0egNrhB/sEzTyjb6Hi9LE7evMPZtxrlbWOvkFtszIKczZe JTf6XrQw4X76SNzRZshIw5BTx2TIwTh8NsXFeL6JPN9W/6HQFrv2DQAA } "4 of spades" 4 "black" 180x120 64#{ eJztlzF2wyAMQNW+ri1X8OvUc3Tp1Dv0FJ19NA89kKauqhAQg4QtkjhD34tsTIQ/ IFsKyO+fv88g8s3ljcsHly8uD/Ak7TPf/3lJpZVZTpjnVMWDfyzLwnVsITmBKFXx iE18edVDGXmcJvIEp+AyBNczbE44gmGLD2HwEnsaPCkgl/UGQjNJl4F6zKxAazOK z5WiGACwSmszShxoBSWeQtXzNFCjnMVgDjqr+AwOMPF+xYRQMVnRz0UBV5uzon3a 8ZdM6vjLMB0ZYQhwIJ7rZ7+GKdyd+ccMAriM38J/BiQ9kmI4fBFBNxqmWYduyWCz qFzOUGcqw6Adxr5VO8yt/EVplfQYK3fmGOagNVrW+32mF3mbTC+X0EwvJznZA2lX 7O2VhcG8ufb23MJI8XIA1M1n5gk1c0DeUm3lJkeq3mHpu5F4hbiBl77Va66Uldnz F+VMcddfhenlosrmbRHGjVUnUMeZMXtcxptpkBn5Jhr5tvoDMlDOXvYNAAA= } "5 of spades" 5 "black" 260x120 64#{ eJztl0FywjAMRVWm2+IrZLriHN10xR04BescLYseSKtuXVk2YMtCMiUzDDMocYyc R+xE8o/ztf/9ALYjlR2VbyoHKm/wzu0znf/Z5tLazDvMc67SRj+WZaE6tUTeIcZc pS010eFTXqqzzTRFz3AKLhPBZjCddxlwGQZcBl2G+nIZGGFkXw0eVAahGYjKQH3N 4ggGOebCEWMGgN5pnzNyHmjOhcm5EhTnJgZL0vWOz+AAU+dYCnComOK0905OwMuY iyPjrsSLO3Xi1TGKjTAR0M/n5t7vYU7ci3lKRtMNyWj60zL6vGiYK/NLMv+e77cy a2nUkB7quioYVZ8Fs1K8ovre6Zhr9mLWYVbSaNZ7m8E6LT3GyLEzY+VYTm9bE7C8 XE1NSMWbyyibH6sJmBcfpiaUf5iawGs3RxMKY2rCiTHjVRhLEwCcRMyMieS+HPOX 0NVztpk4wgyMx2dGvolGvq3+ALZph/D2DQAA } "6 of spades" 6 "black" 340x120 64#{ eJztlztSxDAMhgVDC7pChopz0FBxB05BnaOl2AOpojXyI4llyY/dBGhQ4s1K/mLH tvxn8vr+9QjBPrm8cHnj8sHlDh5CfOb6y1Ms0uZwwjzHiz/4z7IsfPURF05wLl78 4UP881w2pex+mlzPaMIu4+AwQ3EMxxl0XcYTpzCEBSNwNBmCvAEwGcjbXB0QTJyL 0pGMX2LtCIZCHihHMDFX0HCuYiglnXb6DA0wvj5jEDMmOSTyhx2k/ZmTE568vV6h 0856KcawEcYBEXb3Vz72I8zK/TO/ypj7vWAs3ZCMnc+CqeyLkrl5n17LnKUtNR0T TEUPJWPrqmROWi+XXhGUOkGbGYzwYpMDaDI8HCIog4oRU/OTDImkuJ1xRleKId2M nlXdjGZINWNoq71eMkol4uuD3reM19kYSZVp5OrGtHI1zkhbWyi9XJva4ktPE6gM /7G27K/7urbAdm9dW/YHzaa50BZY721oS0qNpras6SOyCG2mZqHbdoqNMtDrbMux 40zXhpiRb6KRb6tvHjBX8/YNAAA= } "7 of spades" 7 "black" 420x120 64#{ eJzNlz1WwzAMxwWPFXyFPKaeg4WJO3AK5hwtAwfS1FXYslNsWbFUmpeiRHXl/F4s W/98vX2cn4HtK/op+nv0z+gP8MT9czz+/ZK9tZl3mOfcpC3+WZYltqmHeAei3KQt dcWfV3mqzh6niSzDKZgMwe0M8hzGTEw5mAzhYUyXc4PnQOaM0JxAHQvqc5ZAMMg1 F4FgAKAP2nyQdSCDdl5ZK0EJrmKwiK4PbAYdTDpeMSFUTAnkvCjgb84lcNSLBzXq 1TGKeRgCtHXYzP0WZuWuYRTNS0bTvGQ0zQtG1bxgVM23jK75lvkHmv8Do2le5qxp XqzhXvXatjsxnpztuTvW0FOLI7Wxl55d147nGnRdyzvVi1z3qE3zMjvdo/l+P2aw XnaLGazhhRmtYS7fWPNYHq5DzSe3tIqy+76ax/VtaKB5uLxWbWue38sMzRdmqPmV setFQ82jIZ96rEOYZtI648nZNBfj+SbyfFv9AGTB+m/2DQAA } "8 of spades" 8 "black" 500x120 64#{ eJzNlz9WwzAMxgWPFXyFPCbOwcLEHTgFc46WoQf6Jlbjv7EtK5ZpC8Wp60r5JbWl z8rL6/vXI4X26fqL62+uf7h+Rw/Bv7rzp6fY27aGD61rHPzhfmzb5kbvseFD1sbB H97lvp75rbp2vyxWa1iMyli6nEFYw5hxUzYqY3E7psGjwecMqpBkEFs71fdMRiCL H+EaZoTThSGi3mjjjKCDzmiYqBUjGD9ikETXGzqDCcafrxhjKiYZYOuyBmXOyZjI V/hTJV8dI7QZxhJ0HTZrn2UEre7cPsFmtiIjaZUxolYZI2q1ZQ602jD/QKtnMJJW +ZwlrbIYFnkWo2NyOTGVwZl4uYElanyccRMFiDs7pknnbzJoAnweQ6kIpFGMTwgt cm2S4pxTFKuJmK891YhdynuRjPOoGsNFOrzW3pnapzP7fapuzNSfqTo2Uw8P2zn1 94AJ9X7MoA6pxgziszOj+OSNMKo/SA/XYR3zXdMhuPu2ekZ5lB/qGTnMQz3vN6rC zPWMriRzPedaq+fLDvVMVtXY3zK8rgsMFMlf4x0kMjPvRDPvVt855Lq+9g0AAA== } "9 of spades" 9 "black" 580x120 64#{ eJzNlztWxDAMRQ2HFrSFHCrWQUPFHlgFdZaWYhb0KlrjXxJLVmzNwJkZJ05G9p34 o2c5ef/8eXYpfYf8FvJHyF8hP7inVD6H+tNLzjzN6XTznG/xCD+WZQn3WOLT6bzP t3jEonB5lY9q0uM0+VHCREPGu78zue9dBs7RkCHckGE4qQxc/QSnMq5+ZjYkg+Rz bkgmulgaYg6RdCAN7ousFVKMsxgU0bXGmIHKgDGxvmKI8qqgykApWbvpCbl+N3zq eeOvMp7ir9Si9Be2ySON2WeG+bBhwCYm/AWgEcPGXjdVC8nCrNw5TJ4zIDGkMkhz T/DZCSpTmihX0e992L54kS+AvuYFo2ueM3eg+QuYInNpKJpvjUGMahglRjXMYboR Y+nzeOyGObT44pra+C89m9aOZQ2a1rIlJphiiyVG7YO+MB6yfo+ZJoYXJsX7PgNW qDRVM8re1DDKHrf3x+VdUdsrVwZlc9X2XDb2o717ZeDvSfPIo+xqHrTO7LHm01uZ 19/ZJNOLURvTiVEbo7yLtsxRujojRa4wkCJvmG61nbF8E1m+rX4BEApi6fYNAAA= } "10 of spades" 10 "black" 20x140 64#{ eJzNlz+OEzEUxh+IxvKyvsKKinPQUHEHTkGdI7i1UuwV3EbTbEG/V3kVEtIK833P 9mTsTNiVFgmcTDKZ+fnz+2d78unLj/di7RuOjzg+4/iK4428s+sH3P9+W4+xHewt h0P94gsnDw8P+OaVYm8ppX7xxUv4+DBLXbS3d3fluaZ34VmmyOsZ5f2/wBR5gT3/ iLmShrBlupoml5yLMcVYNJRgmd0wyhMXK+NC8fmSsVNN4kSiQObkQ6hVsjJqtaKp ttAYBvrMmIkkm7WVKVub7SbOPFqwTmbPwLTelVEqmF/lnNPQxiia0YB0HZUrDC48 rn6dbe6mdkarjm59nxkOE+rlsMs8Kaw2nZlRXRkpLT4Dg3gqDFTfxmoMPLzIl1+A LOZKi3MoU750QQTJlL34tPLJhOS+1PVgzldlFsnZu3T/BNPg+i7joZNdSlJXlx2m F0b1WPZ01ELUGYTlkgEiFkJrytjNjDrInHV4HgcGUZYUoZN6PYOKbmSyw1xA32M6 8R1hCybIyCyEqHP0x6OnZPDzWIKwUCfl03LKJ5qT8zSWXxapOqCOMbME/DiWpxA7 B7oMt3JAVvLELBQiZS2zk020rV+4RCGpQsitk0lHsq9CraGL00nHQdtqq9cIhJJM 9phBuUcZfmUKjToZ3vJozVehUQfxpUHwvah68WbRFOcTDeI9xfxE/NDBc6XaMi5m PzjGsSdGflL+bDQ98GmKswnl7jwmFw0amYVCMji2yBxnxt7nllLkZGGXKYZMouSe UxPKc04zq0FaSknByYmBDjpnqzArfgv1mAsIobOrlWpFS6FRJ3qaeq54TCXMgynO nLnSZw50osy14YSzxfUos/ijlHmseSI7bh7jfLfIbRYErnEzw0VCNjpSdhiVDSMV mRi1rYGrHFa7pSGzToEJNyUlz1Uz7zK2O+I8co/LFwztC7ou3LaMtx14ZX7d4od3 2X5wv1iWvgGsixy3jcpwVSQjbYdZmbrQVkZv6h7Xd6qRoT1I0NPK1MsDw03EFuld xrZV09GrjG3P1Z7HzvSdfC8+Qa4w9YnBQib9caMONee0x7ky7QllZGqcz4VhMmVj c2daPcdSpnzp6hfmQsQEcXEd4Jwv7q60pz6s4anNglkuGPilfOIDk6rQWGMarj9D bpg/tv+R6bPytcxz7UXMS/4TveS/1W9aPkPU9g0AAA== } "jack of spades" 11 "black" 100x140 64#{ eJzNlz1y3DgQhXtdTlAou6+gcrTn2GQj32FP4VhHQNqlgFdAOoVgFeyBELmKibHv NTg0CXA1CjYwR9RQmG9e/7JB/fH1+yfx4xvO33H+ifMvnL/JR19/xuf/fO7n+Xj2 H3l+7m984eL19RXvXGn+I631N764hF9fRqnp+PD01B4d9UkfMk3+B0YAPGCqR/iA 0fbLMv9RBj0ym1qNJcdQa1XpyyNTqVdyCVWVqcPCxPhyKWCaQKkzhxyqpxQXEbYU H246x1qou61kSlBtNfBaodPaT4aqQlvZuB6kM3pktliLgJEqmpzpFjam9oTUGIPB mZ2hsYFB8GFRfBlMLfns857YbKltTM7n2HcmWHXGlDq+dsG4E7Iq/RmZWsnY4itX DKKtvCuDJXjC4NW/AmyqF9xBivmV5HH9+NzGeoktkpliJkiG/Gz9E0xKjCI5bjrt WIt14V8QQ+VBFcQwMmsKC2QYR8k4i+fuxIjFbC2bQSlGFB+choEJ0KlRLQGCRzG7 TycmyApE8koIOjAVbyOTVWORqKshrx5atCgnJnZfU250KdLtK4YYmhDWtIc2Md7Q lrItsIZUi9yWmfGOziiGJYYVb+mCqWYMGdbk9gJ3dGAQF1sDq1UgBKZYHRn2Ukgs uYQVDEyNOuJxUUZXUdgslkadiCplyrD3ZIXHppNOKbHsa8EMMrNOYd6OI+xCB8t2 PGYd7yo9vTyEE8N76fxiYQcGt+DZFjt70tGTzwwiXuvsfyMVZdYJViTULY05IV2z jr1gXi4SOJG3nht1xEo09KGw3bLRuzDqrC+ZzJK6DHvlNuoE9lUOtiLqEjjx2uQP PJai3qvezzozahm3aMbkaGz9JDIz4SXznoEQrOWt5ybGcysQWmpOjl8wlbNA0WFs y4KBeI5LY+AY4DCosFZzlGYtDIxk7UMFhbCFiFg9M4Etk6ETfY6nv9fkO8eRYR19 XHhbc/eCThv6Odd9WmpzI9ZmBk5gFMCj1frOfWA4pmlrEZ8wGUNRtx14Z3zcUwfL yslo+0Z7Z/q2wc+5j7aaVtt3mDvTb0qYCT0dMNXuO9UVQ9ewZbT9fj4y8Kf1zbau F0zfVnNutTPononp23O5MxxQ7b6Tn/PD1Cy8z4PFqBPDq41B8BiKcTOmx1pIZ9Q3 1FTKZuxYr9qZxgcsDZiX+5POyWf1By20Zwuo/H0HbqfYO4MnrLpyF5zr1e4MhGSF LTK1TQyv8cRXoYM7SIf+6Y9318eJefP4BRmvzNtMu4f4FvPweBfznv+J3vO/1b/O 39P79g0AAA== } "queen of spades" 12 "black" 180x140 64#{ eJytVzuS1DAQbSgSlYrtK2wRcQ4SIu7AKYjnCE5dE3AFpVNKNuBAHREi3mtZXkv2 4F1AXtuz9pvXrz9qaT59+flefHzD+RHnZ5xfcb6Rd/78gvc/HurZj4v/yeVSbzzw 4enpCXc+Kf4npdQbDz7C5cNItRtvHx/L2bBHPcUU+XeMiIn+B4xH4Axjeo7xwJ5h 7FU8d9KgWz28Wl5HI9etX36VxAFI4jf8semAsYkDMP7nL3QbQ/FrmDEA+053ZIfR VTlQ9aMu9KtfLsGVeynyKkcYhavFMBZGLZWqw9C6EGM1PACYDLYob8CQbbCl1VYL s7q6E4xfX4+BwoYxu4OBPqualUDmSzs9YuAhxGTNV/n1sPXdqKdUW9ryNcTH3JY6 ka310+XCohDEGMKqHGJUEtWpW+LnA8wEoinBjDJptygHGCFR8oBIihIXzR1mBlGI BKSEe4pxXz9CY3iXRMKUJtxm2fHMMMZXOc+44Yg3HXmCC5qzRGBACKK046ExYMAD YRhyvfUYjCZaJPoBwh4Tc6qiWfbgy3Tv2mEiZFBQRE1YoRo4GHKPSZYXDAb8I08c 9CjjQedpK1WeUQ+nMJ8nzkIE+UAPJxK+7GHxjLqe0XefdzGw/WTyMGXzwMMo54WH eQdVkJEHmXJb0HWLEV6J9TmFywwcbBFDHhSUDTxBSL/aiqw37XnCVRahVbN3jYEn 3NzbZ81rj9rkYhZ23bjEkHgGdbTlUZaaCxRimIaGWkImT0o+e5h3DUxzb6vqea4N YFBTB3oYuFpjCOCU817PUqGeNmJqG9/qmVjmIYZrzjfOC4Nfw7y4TR6WNF8l3ji/ FJHvMUrHfH5dc/J61DDyqIXJX80+46vokQfOsKoCW8IiesfDlaDlXVub2WHAhOpB c1WfPTS2x4ApedNE3ap599tjADKSsHUqgm1HmLI0XmWHZf5XjMmiWUptz/6lHsN2 31brdTGA1Q3Glw1tq4hD3FbZYNaFylejZdkpdzD+oerRv8D4snqC8eVZ22rtkkle yi4+W4xvRHqeumNo+6Y1hj2m1o+smxF/Xg4wy26GpS5tRmwa6mLdCbBD4kapdjkb MfVbrFXfcm3KQeq2zOuw1L2d79yqlGeMtUbDNaGN1GPkD3vIlotGcm8QcwJ5KY+e ES1+nWA8hv8BcyLmpZiX/CZ6yW+r3/c0VV/2DQAA } "king of spades" 13 "black" 260x140 64#{ eJztlzEOAiEQRdHYkKzDFYiV57Cx8g6ewpoj0O5tKCw5BAfYbLayxZmhUpMB+xl4 y4b9gc3r5nJ7HQ3XAzkjV+SO7MyB9wN+f0LjswJPE0JbaOBLSglX2qk8Ta1toUFb +Dh9H/VTe+9rrzbvuplqXO1chQG3WcggYCgzxyVJcAYmK8DnxLXMApEyE9hZgDMZ b5WgDGQLAvw/ZUmrQFE/6kf9qB/1o37Uj/pRP+pH/fzlZ6QHGehlRnqikd7qDVAb l+X2DQAA } "card back side" 0 "none" -200x-200 ]Next, I wrote a little GUI app to test that all the cards display appropriately. It builds a GUI block by reading, decompressing, and appending the data in the card block above, using image widgets to display each decompressed card. That GUI block is then viewed with the typical "view layout" code. Note that the card data block above is imported in the beginning of the script, with the "do" function:
REBOL [] do %cards.r ; Start creating a GUI layout block by setting the size, background ; color (dark green), etc.: gui: [size 670x510 backdrop 0.150.0 across ] ; The following foreach loop cycles through the imported cards block, ; and adds only the image data and coordinate info to the GUI block to ; be displayed. Notice that the foreach loop cycles through the card ; block in groups of 5 ITEMS AT A TIME. It reads each card's graphic ; data, text label, number value, color, and coordinate position, each ; time through the loop. The variable words card, label, num, color, ; and pos are assigned to each item: foreach [card label num color pos] cards [ ; Notice that only the cards' graphic data and position information are ; used in the GUI layout. The label, num, and color variables are not ; used, but they are included in the foreach loop above as placeholders ; for each group of 5 data values in the card data block. Notice the ; use of the "compose" function to insert the graphic and coordinate ; data, by reference, directly into the gui block (if you print out the ; created gui block, you'll see a huge mass of data): append gui compose [ at (pos) image load to-binary decompress (card) ] ] view layout guiThe code above provides a fundamental way to reuse card images to create all types of games. Adding the "feel movestyle" code presented earlier in this tutorial allows us to click and drag the cards around the GUI. Here I'll make some changes to the code because I want the cards to move using "snap-to" positioning, as if they're placed on a grid and can only jump from one grid position to the next (as opposed to floating freely across the screen with each click-drag):
REBOL [] do %cards.r ; The following function enables the pieces to slide around the ; screen. The coordinates are rounded to multiples of 80 and 20 ; pixels to enable snap-to positioning (the horizontal width and ; vertical height distance between each card's origin). The ; additional 20 pixels accounts for the default border around the ; overall GUI: movestyle: [ engage: func [face action event] [ if action = 'down [ face/data: event/offset remove find face/parent-face/pane face append face/parent-face/pane face ] if find [over away] action [ unrounded-pos: (face/offset + event/offset - face/data) snap-to-x: (round/to first unrounded-pos 80) + 20 snap-to-y: (round/to second unrounded-pos 20) + 20 face/offset: to-pair rejoin [snap-to-x "x" snap-to-y] ] show face ] ] ; Here's a revised version of the previous GUI block. The only ; difference is that it uses the snap-to positioning definition ; above ("movestyle"): gui: [size 670x510 backdrop 0.150.0 across ] foreach [card label num color pos] cards [ append gui compose [ at (pos) image load to-binary decompress (card) feel movestyle ] ] view layout guiThat code is really starting to look and act like a card game. You can pick up any card, move it around the screen, and it automatically lines up and snaps over any other card on the screen. To create a different layout for other card games, all that would need to change is the initial positions of the cards, and the number of pixels rounded in the snap-to code. So, steps 1 and 2 in the program outline are done. To complete step 3, I simply added the following code to append some graphic lines to the GUI block. It draws the lines on screen using box widgets that are 2 pixels wide, to represent spaces where free cards and ascending stacks of cards should be placed during game play:
box-pos: 18x398 loop 4 [ append gui compose [ at (box-pos) box green 72x2 at (box-pos) box green 2x97 at (box-pos + 320x0) box white 72x2 at (box-pos + 320x0) box white 2x97 ] box-pos: box-pos + 80x0 ]Next, I need to lay out the cards in random order. My thought process to accomplish this is to load the card data block and then select random cards from the pile and swap their coordinate positions. I'll use a foreach loop to run through the deck several times (52 cards, times 3 = 156):
random/seed now loop 156 [ pos1: pick cards rnd1: (random 52) * 5 pos2: pick cards rnd2: (random 52) * 5 poke cards rnd1 pos2 poke cards rnd2 pos1 ]That works to lay out the cards randomly, but there's a bug. The loop in the existing GUI code which places cards on screen runs through the cards in the order in which they appear in our initial card.r data block. Now that their positions are out of order, they are no longer layered correctly on screen into ordered visual columns (their "z-order" overlapping pattern is a mess). To fix that, I created several functions. The first function simply collects and returns a list of the positions of each card on screen:
positions: does [ temp: copy [] foreach item cards [if ((type? item) = pair!) [append temp item]] return sort temp ]The following function uses a foreach loop to run through the block of coordinates returned by the function above. It then uses a nested foreach loop to run through each item on the screen (for each coordinate in the above list). Removing and appending each card image on the main window (append system/view/screen-face/pane/1/pane) changes the order they appear in the GUI, and overlaps them properly in the layout (this same remove-append technique was used earlier in the movestyle code). Notice that I include an if condition to make sure this function only runs on items above points 398 pixels from the top of the screen. That's because I don't want the piles of cards on the bottom of the screen to be disturbed:
arrange-cards: does [ foreach position positions [ foreach card system/view/screen-face/pane/1/pane [ if (card/offset = position) and (position/2 < 398) [ remove find system/view/screen-face/pane/1/pane card append system/view/screen-face/pane/1/pane card ] ] ] show system/view/screen-face/pane/1/pane ]Because I want all this visual re-arranging to happen before the viewer sees the screen, I'll use "view/new" to create the GUI without immediately displaying it. Then I'll run the arrange-cards function, and finally display the layout with the "do-events" function:
view/new center-face layout gui arrange-cards do-eventsAs I play with the layout, there's another z-order overlapping issue that comes to my attention. Not so much a bug, but a display option that I want to enforce for the way this game should operate. In the existing movestyle code, when I click on a card, it is removed and appended back to the top of the screen pane, just as in the arrange-cards function. So, whenever I click on a card, it covers up any other card(s) with which it shares pixels (the other cards get hidden behind it). I don't want this to happen - the cards should stay aligned in nice neat columns. To fix this issue, I added the following code to the movestyle event loop, which arranges (overlaps) the cards again properly, every time the mouse button is released:
if action = 'up [ arrange-cards ]Now I can click on any card, pop it out of any column, view it, move it around, and then pop it right back into place, and the other cards will automatically overlap and align properly over/beneath it. Very nice!
As I play more with the code, I realize that there is currently no way to keep track of where cards are located, once they've been moved. That's a simple fix. I just added the following line to the 'down action block in the movestyle code. It stores the starting location of any card, when it is first clicked (before it's moved):
start-coord: face/offsetThen I added one line to the 'up action block above. This replaces the original coordinate in the card data block, with the new coordinate of the moved card, once the mouse button is released (after the card has been moved):
if action = 'up [ ; Save the new position in the card block: replace cards start-coord face/offset arrange-cards ]Now I can add code such as the following line, to obtain any desired information about any clicked card, just by searching for coordinates in the card data block. This example prints a card's name every time it's clicked, because every card's label is found 3 items before it's coordinate info, in the card data block:
print card-name: pick cards ((index? find cards start-coord) - 3)Here's some code you could use to print out all the current information about every card in the deck:
btn "card positions" [ foreach [card label num color pos] cards [ print [label pos color num] ] ]As I tested the existing code, I realized yet another necessity that will likely occur in any card game. I want to keep users from being able to move cards anywhere they want (outside the playing area, on top of other specified cards, etc.). To implement this feature, I'll just add some conditional evaluations to the above action block to check for certain situations, every time the mouse button is released. The code below checks to see if the offset of the face moved (face = card) is directly on top of (sharing the same coordinate) as any other card, or if it's outside the playing area. If so, the card is moved back to it's original position by setting it's offset to the start-coord variable defined above. It uses another conditional operation to make sure this is only done for cards on the playing field, and not on the stacks on the bottom of the screen (only on pixels 398 and higher):
if action = 'up [ if any [ (find cards face/offset) ; on top of any other cards (face/offset/2 < 20) ; outside the playing area ] [ if (face/offset/2 < 398) [face/offset: start-coord] ] replace cards start-coord face/offset arrange-cards ]At this point we have a generally usable framework for creating just about any card game. In fact, I can actually play a full game of Freecell at this point, if I don't mind the computer allowing me to execute illegal moves. I still need to implement various routines to disallow moves that are considered cheating in the rules of Freecell, but all the display and interaction code needed to move cards around the screen are in place. Here's the full code so far - go ahead and play a few games:
Rebol [title: "Playing Card Framework"] do %cards.r random/seed now loop 156 [ pos1: pick cards rnd1: (random 52) * 5 pos2: pick cards rnd2: (random 52) * 5 poke cards rnd1 pos2 poke cards rnd2 pos1 ] movestyle: [ engage: func [face action event] [ if action = 'down [ start-coord: face/offset face/data: event/offset remove find face/parent-face/pane face append face/parent-face/pane face ] if find [over away] action [ unrounded-pos: (face/offset + event/offset - face/data) snap-to-x: (round/to first unrounded-pos 80) + 20 snap-to-y: (round/to second unrounded-pos 20) + 20 face/offset: (as-pair snap-to-x snap-to-y) ] if action = 'up [ if any [ (find cards face/offset) (face/offset/2 < 20) ] [ if (face/offset/2 < 398) [face/offset: start-coord] ] replace cards start-coord face/offset arrange-cards ] show face ] ] positions: does [ temp: copy [] foreach item cards [if ((type? item) = pair!) [append temp item]] return sort temp ] arrange-cards: does [ foreach position positions [ foreach card system/view/screen-face/pane/1/pane [ if (card/offset = position) and (position/2 < 398) [ remove find system/view/screen-face/pane/1/pane card append system/view/screen-face/pane/1/pane card ] ] ] show system/view/screen-face/pane/1/pane ] gui: [size 670x510 backdrop 0.150.0 across ] foreach [card label num color pos] cards [ append gui compose [ at (pos) image load to-binary decompress (card) feel movestyle ] ] box-pos: 18x398 loop 4 [ append gui compose [ at (box-pos) box green 72x2 at (box-pos) box green 2x97 at (box-pos + 320x0) box white 72x2 at (box-pos + 320x0) box white 2x97 ] box-pos: box-pos + 80x0 ] view/new center-face layout gui arrange-cards do-eventsThe program as it currently exists is a useful generic foundation for any card game. Now we need to begin working on the game logic for Freecell. Here are the main objectives, along with some pseudo-code ideas to help organize the thought process:
- If a black card is placed below any red card at the bottom of any of the 8 "physical" piles of cards, or vice-versa (red-black), check to see if the moved card is 1 card lower in value than the card it touches. If not, don't allow the move. For example, a red 8 can be moved below a black 9, but moving a red 8 below a red 9 (not alternate red-black), or a black king beneath a red 3 (not consecutive), isn't allowed. You can make a disallowed card movement happen programmatically by resetting the face/offset of any disallowed card back to the value it held before being moved.
- Only cards exposed at the bottom of pile, or one of the cards in a descendingly stacked group of alternate red-black cards at the bottom of a pile can be moved. For example, in a group of cards r7, b6, r5, b4, r3 at the bottom of a pile, you can move the red 7 and all the cards underneath it to another pile with an exposed black 8 at the bottom of the pile. You could also grab the black 4 and move it, along with the red 3 together, beneath a pile with a red 5 at the bottom. You could not, however, grab the red 7 from that pile without also moving the rest of the cards (b6, r5, b4, r3 ) beneath it.
- The goal of the game is to move all cards from the originally displayed 8 piles to 4 new "goal" piles that are initially empty. Upon completion, each pile must contain only cards of a unique suit (clubs, diamonds, hearts, or spades) and the face values must ascend from ace to king consecutively. Disallow any card movements that don't allow for that arrangement.
- There are 4 additional spaces, or "free cells" (the name of the game), that can be used to temporarily hold and move cards around between piles. They are useful in moving cards when there are no positions within the initial piles or in the goal piles that allow a card to be moved according to the previous rules. Only single exposed cards (no covered cards or piles) can be moved to a free cell.
Most of the conditional operations in the rest of the program will occur in the 'up action block of the movestyle code, because they need to occur when the user drops a card somewhere. To complete step 1 above we need to check columns for alternating red-black patterns. Then we need to check the ordinal pattern to make sure it goes from high to low in order. That's no so hard to do, because we have all the necessary information attached to each card in our original card data block. I added the following code to the 'up action block of the movestyle code, to determine which cards are in the same column as a moved card:
column-coords: copy [] ; The loop below checks every coordinate in the card data block. If ; the horizontal position is the same as the card being put down, ; append that coordinate to the "column-coords" block: foreach item cards [ if ((type? item) = pair!) [ if item/1 = face/offset/1 [ append column-coords item ] ] ] column: copy [] ; Go through the coordinates collected above, find the name of the ; card at each coordinate, and add each name to the "columns" block: foreach item (sort copy column-coords) [ append column (pick cards ((index? find cards item) - 3)) ] print columnFantastic! Now I can accomplish any computations that have to do with the way columns of cards are arranged :)
You can take the design from here and add as many features as you'd like!
21.4 Case: Creating the REBOL "Demo"
The following short example contains 10 complete programs, and demonstrates just how potent REBOL code can be. (a Windows .exe is also available here):
REBOL[title:"Demo"]p: :append kk: :pick r: :random y: :layout q: 'image z: :if gg: :to-image v: :length? g: :view k: :center-face ts: :to-string tu: :to-url sh: :show al: :alert rr: :request-date co: :copy g y[style h btn 150 h"Paint"[g/new k y[s: area black 650x350 feel[engage: func[f a e][ z a = 'over[p pk: s/effect/draw e/offset sh s]z a = 'up[p pk 'line]]] effect[draw[line]]b: btn"Save"[save/png %a.png gg s al"Saved 'a.png'"]btn "Clear"[s/effect/draw: co[line]sh s]]]h"Game"[u: :reduce x: does[al join{ SCORE: }[v b]unview]s: gg y/tight[btn red 10x10]o: gg y/tight[btn tan 10x10]d: 0x10 w: 0 r/seed now b: u[q o(((r 19x19)* 10)+ 50x50)q s(((r 19x19)* 10)+ 50x50)]g/new k y/tight[c: area 305x305 effect[draw b]rate 15 feel[engage: func[f a e][z a = 'key[d: select u['up 0x-10 'down 0x10 'left -10x0 'right 10x0]e/key]z a = 'time[z any[b/6/1 < 0 b/6/2 < 0 b/6/1 > 290 b/6/2 > 290][x]z find(at b 7)b/6[x]z within? b/6 b/3 10x10[p b u[q s(last b)]w: 1 b/3:((r 29x29)* 10)]n: co/part b 5 p n(b/6 + d)for i 7(v b)1[ either(type?(kk b i)= pair!)[p n kk b(i - 3)][p n kk b i]]z w = 1[clear( back tail n)p n(last b)w: 0]b: co n sh c]]]do[focus c]]]h"Puzzle"[al{ Arrange tiles alphabetically:}g/new k y[origin 0x0 space 0x0 across style p button 60x60[z not find[0x60 60x0 0x-60 -60x0]face/offset - x/offset[ exit]tp: face/offset face/offset: x/offset x/offset: tp]p"O"p"N"p"M"p"L" return p"K"p"J"p"I"p"H"return p"G"p"F"p"E"p"D"return p"C"p"B"p"A"x: p white edge[size: 0]]]h"Calendar"[do bx:[z not(exists? %s)[write %s ""]rq: rr g/new k y[h5 ts rq aa: area ts select to-block(find/last(to-block read %s)rq)rq btn"Save"[write/append %s rejoin[rq" {"aa/text"} "]unview do bx]] ]]h"Video"[wl: tu request-text/title/default"URL:"join"http://tinyurl.com" "/m54ltm"g/new k y[image load wl 640x480 rate 0 feel[engage: func[f a e][ z a = 'time[f/image: load wl show f]]]]]h"IPs"[parse read tu join"http://" "guitarz.org/ip.cgi"[thru<title>copy my to</title>]i: last parse my none al ts rejoin["WAN: "i" -- LAN: "read join dns:// read dns://]]h"Email"[ g/new k y[mp: field"pop://user:pass@site.com"btn"Read"[ma: co[]foreach i read tu mp/text[p ma join i"^/^/^/^/^/^/"editor ma]]]]h"Days"[g/new k y[ btn"Start"[sd: rr]btn"End"[ed: rr db/text: ts(ed - sd)show db]text{Days Between:}db: field]]h"Sounds"[ps: func[sl][wait 0 rg: load sl wf: 1 sp: open sound:// insert sp rg wait sp close sp wf: 0]wf: 0 change-dir %/c/Windows/media do wl:[wv: co[]foreach i read %.[z %.wav = suffix? i[p wv i]]]g/new k y[ft: text-list data wv[z wf <> 1[z error? try[ps value][al "Error"close sp wf: 0]]]btn"Dir"[change-dir request-dir do wl ft/data: wv sh ft]]]h{FTP}[g/new k y[px: field"ftp://user:pass@site.com/folder/"[ either dir? tu va: value[f/data: sort read tu va sh f][editor tu va]]f: text-list[editor tu join px/text value]btn"?"[al{Type a URL path to browse (nonexistent files are created). Click files to edit.}]]]]The 10 programs included in that demo are all shortened versions of other pieces of code found throughout this tutorial:
The "paint" program was covered in the section of the tutorial about the draw dialect:
view center-face layout [ s: area black 650x350 feel [ engage: func [f a e] [ if a = 'over [ append s/effect/draw e/offset show s ] if a = 'up [append s/effect/draw 'line] ] ] effect [draw [line]] b: btn "Save" [ save/png %a.png to-image s alert "Saved 'a.png'" ] btn "Clear" [ s/effect/draw: copy [line] show s] ] ]The "game" is the obfuscated snake program covered earlier:
do[p: :append u: :reduce k: :pick r: :random y: :layout q: 'image z: :if g: :to-image v: :length? x: does[alert join{SCORE: }[v b]quit]s: g y/tight [btn red 10x10]o: g y/tight[btn tan 10x10]d: 0x10 w: 0 r/seed now b: u[q o(((r 19x19)* 10)+ 50x50)q s(((r 19x19)* 10)+ 50x50)]view center-face y/tight[c: area 305x305 effect[draw b]rate 15 feel[engage: func[f a e][z a = 'key[d: select u['up 0x-10 'down 0x10 'left -10x0 'right 10x0]e/key]z a = 'time[z any[b/6/1 < 0 b/6/2 < 0 b/6/1 > 290 b/6/2 > 290][x]z find(at b 7)b/6[x]z within? b/6 b/3 10x10[p b u[q s(last b)]w: 1 b/3:((r 29x29)* 10)]n: copy/part b 5 p n(b/6 + d)for i 7(v b)1 [either(type?(k b i)= pair!)[p n k b(i - 3)][p n k b i]]z w = 1[clear(back tail n)p n(last b)w: 0]b: copy n show c]]]do[focus c]]]The "puzzle" is the tile program explained in the first section of the tutorial about GUIs:
alert {Arrange tiles alphabetically:} view center-face layout [ origin 0x0 space 0x0 across style p button 60x60 [ if not find [0x60 60x0 0x-60 -60x0] face/offset - x/offset [exit] temp: face/offset face/offset: x/offset x/offset: temp ] p "O" p "N" p "M" p "L" return p "K" p "J" p "I" p "H" return p "G" p "F" p "E" p "D" return p "C" p "B" p "A" x: p white edge [size: 0] ]The "calendar" is a simple application in which the user selects a day using the date requester function. Events for the day are typed into an area widget and then appended to a text file. The text file is searched every time a date is chosen. If the chosen date is found, the events for that day are shown in the area widget, which can be edited and saved back to the text file:
do the-calendar: [ if not (exists? %s) [write %s ""] the-date: request-date view center-face layout [ h5 to-string the-date aa: area to-string select to-block ( find/last (to-block read %s) the-date ) the-date btn "Save" [ write/append %s rejoin [the-date " {" aa/text "} " ] unview do the-calendar ] ] ]The "video" program was covered in the section of the tutorial about multitasking. All it does is continually load and display images from a web cam server. The image refresh is handled using a feel-engage loop, which checks for a timer event:
video-address: to-url request-text/title/default "URL:" trim { http://tinyurl.com/m54ltm} view center-face layout [ image load video-address 640x480 rate 0 feel [ engage: func [f a e] [ if a = 'time [ f/image: load video-address show f ] ] ] ]The "IP" program was covered in the section about the REBOL parse dialect. This program reads a web page which displays the remote WAN IP address of the user's computer in the title tag, then parses out all the extra text and displays the IP address, along with the user's local IP address (the local address is gotten by using REBOL's built in dns:// protocol:
parse read to-url "http://guitarz.org/ip.cgi" [ thru <title> copy my to </title> ] i: last parse my none alert to-string rejoin [ "WAN: " i " -- LAN: " read join dns:// read dns:// ]The "email" program is extremely simple. The user enters email account information into a GUI text field, and then the mail from that account is read using REBOL's native POP protocol. The contents of the mailbox are displayed in REBOL's built-in text editor, each separated by 6 newlines:
view center-face layout [ email-login: field "pop://user:pass@site.com" btn "Read" [ my-mail: copy [] foreach i (read to-url email-login/text) [ append my-mail join i "^/^/^/^/^/^/" editor my-mail ] ] ]The "days between" program was covered in an earlier case study. Here's a simple version of the program (an example given in the first part of the case study):
view center-face layout [ btn "Start" [sd: request-date] btn "End" [ ed: request-date db/text: to-string (ed - sd) show db ] text "Days Between:" db: field ]The "sounds" program was also covered earlier:
play-sound: func [sound-file] [ wait 0 ring: load sound-file wait-flag: 1 sound-port: open sound:// insert sound-port ring wait sound-port close sound-port wait-flag: 0 ] wait-flag: 0 change-dir %/c/Windows/media do get-waves: [ waves-list: copy [] foreach i read %. [ if %.wav = suffix? i [ append waves-list i ] ] ] view center-face layout [ waves-gui-list: text-list data waves-list [ if wait-flag <> 1 [ if error? try [play-sound value] [ alert "Error" close sound-port wait-flag: 0 ] ] ] btn "Dir" [ change-dir request-dir do get-waves waves-gui-list/data: waves-list show waves-gui-list ] ]The "FTP" program is a stripped down version of the "FTP Tool" explained earlier:
view center-face layout [ px: field "ftp://user:pass@site.com/folder/" [ either dir? to-url value [ f/data: sort read to-url value show f ][ editor to-url value ] ] f: text-list [ editor to-url join px/text value ] btn "?" [ alert { Type a URL path to browse (nonexistent files are created). Click files to edit. } ] ]I enclosed all of those examples in a simple GUI, with buttons to run each program:
REBOL [title: "Demo"] view layout [ style h btn 150 h "Paint" [ ; code for the paint program goes here ] h "Game" [ ; code for the game program goes here ] h "Puzzle" [ ; code for the puzzle program goes here ] h "Calendar" [ ; code for the calendar program goes here ] h "Video" [ ; code for the video program goes here ] h "IPs" [ ; code for the IP program goes here ] h "Email" [ ; code for the email program goes here ] h "Days" [ ; code for the days-between program goes here ] h "Sounds" [ ; code for the sound program goes here ] h "FTP" [ ; code for the FTP program goes here ] ]To make the demo as compact as possible, I used the same techniques as in the obfuscated snake program (from earlier in the tutorial). Here are the global functions that I renamed with shorter word labels:
p: :append kk: :pick r: :random y: :layout q: 'image z: :if gg: :to-image v: :length? g: :view k: :center-face ts: :to-string tu: :to-url sh: :show al: :alert rr: :request-date co: :copyI also renamed other functions within their local contexts. In the following code, the value "s/effect/draw" is assigned the variable "pk". That saves having to write "s/effect/draw" again. That value does not exist in the global context, so that variable must be assigned locally. This type of shortened local variable assignment occurs several times throughout the demo code:
view layout [ s: area black 650x350 feel [ engage: func [f a e] [ if a = 'over [ append pk: s/effect/draw e/offset show s ] if a = 'up [append pk 'line] ] ] effect [ draw [line] ] ]To finish the application, I simply removed any spaces which surrounded parentheses or brackets. The final code is found in the first section of this tutorial. Here's a screen shot - it's less than 1/2 a page of printed code:
22. Other Scripts
This section of the tutorial contains various random scripts that you might find useful and educational. There are a number of additional script examples available at http://re-bol.com/examples.txt. Don't forget to look at all the scripts at rebol.org - not just in the scripts section, but also in the email and AltME archives. It's a treasure trove of working code examples and answers to virtually any coding problem!
22.1 Thumbnail Maker
This program resizes and arranges a list of image files into a single preview image. The screen shot image sheet at the beginning of this tutorial was created using this application.
REBOL [Title: "Thumbnail Maker"] ; Create a little GUI to allow the user to adjust image settings: view center-face layout [ text "Resize input images to this height:" height: field "200" text "Create output mosaic of this width:" width: field "600" text "Space between thumbnails:" padding-size: field "30" text "Color between thumbnails:" btn "Select color" [background-color: request-color/color white] text "Thumbnails will be displayed in this order:" the-images: area across btn "Select images" [ ; Select some files: some-images: request-file/title trim/lines {Hold down the [CTRL] key to select multiple images:} "" ; Error check: if some-images = none [return] ; Show the selected files in the area widget above, with ; each file on a new line: foreach single-image some-images [ append the-images/text single-image append the-images/text "^/" ] show the-images ] ; This button creates the output thumbnail mosaic: btn "Create Thumbnail Mosaic" [ ; Set sizing variables to the values entered in the GUI: y-size: to-integer height/text mosaic-size: to-integer width/text padding: to-integer padding-size/text ; Set the background color (white if none selected): if error? try [background-color: to-tuple background-color][ background-color: white ] ; The list of images that will be resized is stored in a block ; labeled "images". The "parse" function is covered later in ; this tutorial. The following code simply separates each line ; item in the text area above, and returns a block of all the ; items: images: copy parse/all the-images/text "^/" ; Error check: if empty? images [alert "No images selected." break] ; The output image will be created from a "view layout" GUI block. ; That block will be labeled "mosaic" and will contain all the ; resized image data and layout formatting needed to create the ; thumbnail image. We'll start building that block by ; including the background color, spacing, and "across" words ; needed to layout the GUI. Because the block contains some ; variables, we'll use the "compose" function to evaluate them ; (treat them as if they'd been typed in explicitly): mosaic: compose [ backcolor (background-color) space (padding) across ] ; Next, we'll use a foreach loop to go through the list of images, ; read and resize each image, and add the resized image data to ; the mosaic block. The variable "picture" will be used to refer ; to each image as the loop progresses through each item in the ; list: foreach picture images [ ; Give the user some feedback with a litte message: flash rejoin ["Resizing " picture "..."] ; Read the image data, and assign it the variable label ; "original": original: load to-file picture ; After the data is done loading, erase the message above: unview ; We can refer to the size of the original image using the ; format "orginal/size". That returns width and height ; values in the form of an XxY pair. To refer to the height ; (Y) value only, we can use the format "original/size/2" ; (the second element in the pair). If the height of the ; original image is larger than the "y-size" variable set at ; the beginning of the program, we'll resize the image so ; it fits that height, and append the resized image data to ; the "mosaic" block. Otherwise, we'll simply append the ; orginal image to the block. We're also going to include ; the "image" word, because the "mosaic" block needs to ; include all the functions and data needed to create a view ; layout GUI window: ; If the original image is taller than the prescribed height: either original/size/2 > y-size [ ; Figure a percentage amount the width needs to be ; resized: new-x-factor: y-size / original/size/2 ; Calculate the width of the new image size, and assign ; that value to the variable "new-x-size": new-x-size: round original/size/1 * new-x-factor ; Create the resized image by using the "layout" function ; (as in "view layout"). Specify a new size for the ; image by rejoining the "new-x-size" variable above with ; the "y-size" value specified earlier, and convert that ; value to a pair. Create a new image from that layout ; using the "to-image" function, and assign it to the ; variable "new-image": new-image: to-image layout/tight [ image original as-pair new-x-size y-size ] ; Next, append the resized image data to the "mosaic" ; block. We'll compose the block because we want the ; new-image data to be included as if it was typed in ; explicitly. The word "image" also needs to be included ; because that's needed to show an image in a view layout ; block: append mosaic compose [image (new-image)] ][ ; Here's the second part of the "either" condition above. ; If the height of the original is less than the "y-size" ; variable, simply append the original image to the ; "mosaic" block: append mosaic compose [image (original)] ] ; As the current foreach loop stands, each resized image is ; simply added to the "mosaic" layout from left to right. We ; need to check the size of the "mosaic" layout every time we ; add an image. If the layout is wider than the width we set ; at the beginning of the program (the "mosaic-size" ; variable), we need to insert a "return" word into the ; "mosaic" GUI layout block: ; Create a temporary layout of the "mosaic" block: current-layout: layout/tight mosaic ; If the width of the current layout is larger than the ; prescribed width, insert the "return" word BEFORE the ; current resized image. A tick mark is put onto the 'return ; word so that the actual unevaluated text "return" is ; appended to the mosaic block. "back back tail" puts the ; "return" word in the correct place in the layout block: if current-layout/size/1 > mosaic-size [ insert back back tail mosaic 'return ] ] ; Prompt the user for a file name to save the final "mosaic" ; layout image: filename: to-file request-file/file/save "mosaic.png" ; Create an image from the final "mosaic" layout block, and save ; that image to the file name above: save/png filename (to-image layout mosaic) ; Show the user the saved image: view/new layout [image load filename] ] ]You can use this program to quickly resize collections of photos for email, web sites, etc.
22.2 Loops and Conditions - A Simple Data Storage App
One of the most important applications of loop structures is to step through lists of data. By stepping through elements in a block, loops can be used to process and perform actions on each item in a given data series. This technique is used in all types of programming, and it's a cornerstone of the way programmers think about working with tables of data (such as those found in databases). Because many programs work with lists of data, you'll very often come across situations that require the use of loops. Thinking about how to put looping structures to use is a fundamental part of learning to write code in any language. The example below demonstrates several ways in which you'll see loops commonly put to use.
REBOL [title: "Loops and Conditions - a Simple Data Storage App"] ; First, a small user database is defined. It's organized ; into a block structure: the "users" block contains 5 ; blocks, which each contain 5 items of information for ; each user. Blank items are represented with empty quotes. users: [ ["John" "Smith" "123 Toleen Lane" "Forest Hills, NJ" "555-1234"] ["Paul" "Thompson" "234 Georgetown Pl." "Peanut Grove, AL" "555-2345"] ["Jim" "Persee" "345 Portman Pike" "Orange Grove, FL" "555-3456"] ["George" "Jones" "456 Topforge Court" "Mountain Creek, CO" ""] ["Tim" "Paulson" "" "" "555-5678"] ] ; This program does not have a GUI. Instead, it's a text ; based "console" program. Since there's no GUI, we need ; to format the output so that it's got a nice layout on the ; screen. Here's a little function that uses a loop to draw ; a line. It prints 65 dashes next to each other, and then ; a carriage return. We'll use those lines to help print ; nicely formatted output: draw-line: does [loop 65 [prin "-"] print ""] ; Note that this is not the most efficient way to draw a line ; of characters, because the program needs to run through ; the loop every time a line is drawn. You'll see some ; flicker on the screen every time this happens, because ; the computer has to run through the "prin" function 65 ; times for each line. Although it only takes a fraction of ; a second on a modern computer, it's still quite noticeable. ; It would be faster, instead, to build a block of characters ; once, and then print that block, as follows: ; ; a-line: copy [] ; loop 65 [append a-line "-"] ; ; remove the spaces and turn it ; ; into a string of characters: ; a-line: trim to-string a-line ; ; now you can print "a-line" ; ; anywhere you need it: ; print a-line ; ; The inefficient code above is left in this example to ; demonstrate a point about how the coding thought process ; can dramatically effect the performance of programs you ; create. That's especially true for programs that perform ; complex loops on large lists of data. The more efficient ; line printing function is implemented in another example ; following this one, to demonstrate the difference in its ; effectiveness. ; Next is a small function that prints out all of the data ; in the database. It uses a foreach loop to cycle through ; each block of user data, and then it prints a line ; displaying each element in the block (items numbered 1-5 ; in each block). This creates a nicely formatted display: print-all: does [ foreach user users [ draw-line print rejoin ["User: " user/1 " " user/2] draw-line print rejoin ["Address: " user/3 " " user/4] print rejoin ["Phone: " user/5] print newline ] ] ; The following code uses a forever loop to continually ; request a choice from the user. It uses several foreach ; loops to pull information from the data block, and a ; conditional "switch" structure to decide how to respond ; to the user's request. The "switch" inside a forever ; loop is a common design in command line programs: forever [ ; First, print some nice formatting and display info: prin "^(1B)[J" ; this code clears the screen. print "Here are the current users in the database:^/" ; The "^/" at the end of the line above prints a newline. draw-line ; run the function defined above ; Now print the list of user names. A foreach loop is ; used to get the first and last name of each user in the ; database. The first name is item 1 in each block, and ; the last name is item 2 in each block. So for each ; block in the database, "user/1" and "user/2" are ; printed: foreach user users [prin rejoin [user/1 " " user/2 " "]] print "" draw-line ; print some instructions: prin "Type the name of a user below " print "(part of a name will perform search):^/" print "Type 'all' for a complete database listing." print "Press [Enter] to quit.^/" ; Now ask the user for a choice: answer: ask {What person would you like info about? } print newline ; Decide what to do with the user's response: switch/default answer [ ; If they typed "all", execute the "print-all" ; function defined earlier: "all" [print-all] ; If they typed the [Enter] key alone (""), print a ; goodbye message, and end the program. Note that ; "ask" is used to display the message, instead of ; "print". This allows the program to wait for the ; user to press a key before ending the program: "" [ask "Goodbye! Press [Enter] to end." quit] ; If neither of the choices above were selected, the ; default block below is executed (this is the last ; part of the switch structure): ][ ; This section starts by creating a "flag" variable, ; which is used to track whether or not the user's ; choice has been found in the database - the word ; "found" is initially set to false to indicate that ; the user name has not yet been found: found: false ; Next, a foreach loop steps through each user block ; in the database: foreach user users [ ; If the entered user name is found in the ; database (either the first or last name), the ; info for that user is printed out in a nicely ; formatted display, and the "found" flag is set ; to true. The "rejoin" action is used to join ; the first name and last name, and is used in ; conjunction with the "find" action to check ; whether the user's answer matches any part of ; the names in the database (when you run this ; code, try entering single characters, or a ; part of a name, to see what happens). if find rejoin [user/1 " " user/2] answer [ draw-line print rejoin ["User: " user/1 " " user/2] draw-line print rejoin ["Address: " user/3 " " user/4] print rejoin ["Phone: " user/5] print newline found: true ] ] ; If the "found" variable is still false after ; looping through the entire user database, then the ; user name was not found in the database. Print a ; message to that effect: if found <> true [ ; "<>" means "not equal to" print "That user is not in the database!^/"] ] ; Wait for a user response, and then continue again at ; the beginning of the forever loop: ask "Press [ENTER] to continue" ]Here's the entire program without the comments. Try to follow the program flow on your own. NOTE: In this version, the inefficient "draw-line" function is replaced by the suggested "print a-line" routine above. As a result, you'll see a dramatic reduction in screen flicker:
Rebol [] users: [ ["John" "Smith" "123 Tomline Lane" "Forest Hills, NJ" "555-1234"] ["Paul" "Thompson" "234 Georgetown Pl." "Peanut Grove, AL" "555-2345"] ["Jim" "Persee" "345 Pickles Pike" "Orange Grove, FL" "555-3456"] ["George" "Jones" "456 Topforge Court" "Mountain Creek, CO" ""] ["Tim" "Paulson" "" "" "555-5678"] ] a-line: copy [] loop 65 [append a-line "-"] a-line: trim to-string a-line print-all: does [ foreach user users [ print a-line print rejoin ["User: " user/1 " " user/2] print a-line print rejoin ["Address: " user/3 " " user/4] print rejoin ["Phone: " user/5] print newline ] ] forever [ prin "^(1B)[J" print "Here are the current users in the database:^/" print a-line foreach user users [prin rejoin [user/1 " " user/2 " "]] print "" print a-line prin "Type the name of a user below " print "(part of a name will perform search):^/" print "Type 'all' for a complete database listing." print "Press [Enter] to quit.^/" answer: ask {What person would you like info about? } print newline switch/default answer [ "all" [print-all] "" [ask "Goodbye! Press any key to end." quit] ][ found: false foreach user users [ if find rejoin [user/1 " " user/2] answer [ print a-line print rejoin ["User: " user/1 " " user/2] print a-line print rejoin ["Address: " user/3 " " user/4] print rejoin ["Phone: " user/5] print newline found: true ] ] if found <> true [ print "That user is not in the database!^/" ] ] ask "Press [ENTER] to continue" ]For some perspective, here's a GUI version of the same program that demonstrates how GUI and command line programming styles differ. Notice how much of the data handling is managed by the built-in GUI tools in the language, rather than by homemade loops:
REBOL [title: "Loops and Conditions - Data Storage App - GUI Example"] users: [ ["John" "Smith" "123 Tomline Lane" "Forest Hills, NJ" "555-1234"] ["Paul" "Thompson" "234 Georgetown Pl." "Peanut Grove, AL" "555-2345"] ["Jim" "Persee" "345 Pickles Pike" "Orange Grove, FL" "555-3456"] ["George" "Jones" "456 Topforge Court" "Mountain Creek, CO" ""] ["Tim" "Paulson" "" "" "555-5678"] ] user-list: copy [] foreach user users [append user-list user/1] user-list: sort user-list view display-gui: layout [ h2 "Click a user name to display their information:" across list-users: text-list 200x400 data user-list [ current-info: [] foreach user users [ if find user/1 value [ current-info: rejoin [ "FIRST NAME: " user/1 newline newline "LAST NAME: " user/2 newline newline "ADDRESS: " user/3 newline newline "CITY/STATE: " user/4 newline newline "PHONE: " user/5 ] ] ] display/text: current-info show display show list-users ] display: area "" 300x400 wrap ]
22.3 Listview Multi Column Data Grid Example
This example uses the listview module found at http://www.hmkdesign.dk/rebol/list-view/list-view.r. The listview module handles all the main work of displaying, sorting, filtering, altering, and manipulating data, with a familiar user interface that's easy to program. Documentation is available at http://www.hmkdesign.dk/rebol/list-view/list-view.html.
Clicking on a column header in the example below sorts the data by the selected column, ascending or descending. Clicking the diamond in the upper right hand corner returns the data to its unsorted order. Selecting a row of data with the mouse allows each cell to be edited directly. Because inline editing is possible, no additional GUI widgets are required for data input/output. That makes the listview module a very powerful tool which is useful in a wide variety of situations.
REBOL [title: "Listview Data Grid"] ; The function below watches for the GUI close button, to keep ; the program from being shut down accidentally. The code was ; adjusted from an example at: ; http://www.rebolforces.com/view-faq.html evt-close: func [face event] [ either event/type = 'close [ inform layout [ across Button "Save Changes" [ ; when the save button is clicked, a backup data ; file is automatically created: backup-file: to-file rejoin ["backup_" now/date] write backup-file read %database.db save %database.db theview/data quit ] Button "Lose Changes" [quit] Button "CANCEL" [hide-popup] ] none ] [ event ] ] insert-event-func :evt-close ; Download and import/run ("do") the list-view.r module: if not exists? %list-view.r [write %list-view.r read http://www.hmkdesign.dk/rebol/list-view/list-view.r ] do %list-view.r ; The following conditional evaluation checks to see if a ; database file exists. If not, it creates a file with ; some empty blocks: if not exists? %database.db [write %database.db {[][]}] ; Now the stored data is read into a variable word: database: load %database.db ; Here's the guts of the program. Be sure to read the ; list-view documentation to see how the widget works. view center-face gui: layout [ h3 {To enter data, double-click any row, and type directly into the listview. Click column headers to sort:} theview: list-view 775x200 with [ data-columns: [Student Teacher Day Time Phone Parent Age Payments Reschedule Notes] data: copy database tri-state-sort: false editable?: true ] across button "add row" [theview/insert-row] button "remove row" [ if (to-string request-list "Are you sure?" [yes no]) = "yes" [ theview/remove-row ] ] button "filter data" [ filter-text: request-text/title trim { Filter Text (leave blank to refresh all data):} if filter-text <> none [ theview/filter-string: filter-text theview/update ] ] button "save db" [ backup-file: to-file rejoin ["backup_" now/date] write backup-file read %database.db save %database.db theview/data ] ]This example downloads the list-view module from the Internet, and then imports it from the hard drive. The following lines require that there is either an Internet connection available, or that the list-view.r module already exists on the user's hard drive:
if not exists? %list-view.r [write %list-view.r read http://www.hmkdesign.dk/rebol/list-view/list-view.r ] do %list-view.rIf you want to use the list-view.r module in a script, without having to download it or include it a separate file (so that no external dependencies are required to run the script), you can replace the above lines with the following code. The following code is the list-view.r file, compressed using "compress read http://www.hmkdesign.dk/rebol/list-view/list-view.r":
do decompress #{ 789CCD3D6B73E3C871DFF52BE6369592F67629905A9F73A6B2A7B2EFECD8E557 2AE738A96221551031142181040D8092B8A9FC97FCD474F7BCBA07038ADA3B3B E6D56909CCABA7BBA75FD333FCB75FFEE28FBF538B33A5FE54F5B59EAB377FFE CD77EA77BFF9FE4F933FFFE697FFA17E552CF51B28FD558585FF58575D3F79AC F4D3650B2F7FBEEFD74D3B578B37BFD6DBB67A50BFAF1E0A5DABDFB6504D6F3B BD7D9343B56F9BDDA1ADEED63DF47E359D7EF55EC1DF9FAA89FAF5EF7FABBED3 5D75B7C521BE6D75D1EB728EA55F4D665793AB9FC1DBEFE01DBDFAE9643A9B5C CDE0D59F75DB55CD76AEA697D3CBABAFE1CDEFAA250E3757FF0D0F4AFDE2FBEF D4C5D3D3D365B383D7CDBE5DEACBA6BDCB6A53ADCB6EBB72621F2E77EBDD5B6A F5EF9D5645AF0E505F354F5B059378B88492FF81FFFF75DFEE1A1AE05FF456B7 45AD76E68D428C2042D453D5AFD5A6D81ED40AE6B16F75A7564DABF650A7DA2A C0EA2576F487A6F760FE695D411D40AC827F8BC7A2AA8BDB1A619853F1BAEF77 F32CC379AC370F25E1E9B27CC85A7DDBD499A74426690218D39B4615DB52F5BA EB9705CCF787765E428FAEF36609DDB59A7509B3DB140FBA6C965738E30DE0F0 F3A7D03FF79FD972DD6FEACF6B3A013AF44D7BF8FCC17D0F1608A4F4AFCDAB39 2D2EA5BED740F71FDC717E969F9D75FDA1AE3EE96C53C02A6BA97F6AB0AA740D CBE7177FFC4FC38C66E00EAAC25279BE9AD2A32EEFE01109465FD5C294CF9E67 4AAF567A098BF4BCBAD58FB08C974D8DABFBEA27B0CACCFF3975317C4FAF57CD 161A6F9BADA6C75DD1167620FCAA164F6DB1BB99AB555177DA74B4AA8BBB0E10 4480ABBEB8BDD5A56A352C9EAD6AB693FD76D52CF71D30D86EDFDB165AD7B6D3 65FF3CE9F5739FE9B2EAD56D050C6F26ACA08BB22D9E60A8FD7609BD830853C5 B257B05E735745A96AA58ABA560B605FAA714ED3EAD46DDD2C1F6EE85D665EE5 2AB452AC60AE76D5F281D7343DFDF337808B65514FF0C9B7CCCFE4BFA5EE09DB 1E614A358FBA152FF4F6AE4072451301EA6C7B3695FA71AEEE748F2B713537F0 00CAA1CE24FEAECED9836FDF01BB2CD7D4359F69895290BF008080AF80E5F45F F6456D70A4904DBFCCC284D562BFAD51DA1375F2A8036413A069B66D26DDBA79 A22EF2A886E9710980027A9AD5AAD3D05733A117664C4240668AA2C6BE57F69E 0F80388E60024ED836FDC44E8A8DFEF2E083D999BE6C276B40834145D7172D54 4EBE9EF321635CA841577A5B8A16F3410BF56AA4A5D12611C7BF3FE843CC18B0 0889E06C2CCF93C478C05DA0B463C41BA0B0BF8FEA1FDEFCD7E4CD00A382E506 70C3B2D7CFC089B8FC138CBFD5C349E1A78695D5AF6F469AC420E05250AB0C06 A9BAF584A69A980DA068A42148B663AD4E40B9141E3962D5C93F75DEE97A7566 CA480FE0DB97D48011D62448F1AB9FB2D50633608802D6BF91460A358EB6DF0B 6043B0BDCE6BBDEA9D2AB8AD8BE5C35900F015B29F8404BDE95B90726801BA8A F4B62DB64102EE8AAA9D29FC7BA5B21A458E6AD50EDE5C0539B39BC1C8801F56 D7955C214CCF891298C2128C54B5707846CB0D2ACE32EC1BFECC184F60D901CB AEB0EC0ACB2A3024617DF7601201404537C1CEA18383A79B6A197A56FBBAB654 62EA72ABD9235374F8D50F6F5404D307CD63EB50B10245404A4EFD78AA019628 8EC019BB7ECC108AC952FB59505F7E56AC2E6958D7A06D9EEC0AC065411A3B51 543FF22500E353E78139A2D579ADBE47D1D5374DADFA6A37B27AAEDD572B4D08 AEF056D124091898172C0754E1386C59F4C5B5AA9BED1DC8DD667FB70E6D72D1 DEB49D23136BFE7E25D06DBB9F87CE79DD6BB009EAE26015231FC9F58EEC11DB 11A336422FF9023919987355FEC8EC615029308116D404451108F5B0922D4780 83B440003FAA733230ECF7A2063F039E39F1A5FDB4906C01E3A04C4517E48678 6C5D959AC46CCC3F25C377C43DB05AE67EBD9EA64B18ED784F82B194F80029B2 6E5DAD62AD4BA800C0417E832538D934A5464C6CF6755FA991F7B852621BC154 45C64A16401FBA9C80A4DE6FA4EA19DA66D0C0CA5B12876047EF61C2D63C8C20 1AEA3A03F86258A01C8A13255285C31868DA7878BBC41CC6E76B3E40D3C1FB7C 685779741E8518A47B18EEE8349C49319842B2769A8992A0C6CF4EC1396265B3 F0F52AAE6B55DE297523E22FE2719D92EC1A5075963586988BA8899527F48E34 E66BAA5F0DAAC7101DD3D2BC0E703294B6465727C8C1D5B7C302D3E202AE6C7E 1892ECB845878A0298B2AB6EABBAEA0FA0AB9461695528E43F80B05096B76F01 BFBAEFABED9D0279026F9BB6ACB6A0F8B0D527DD36D09769F5D4ECC1695E178F 9A6A3E633B57E9BDEAF6E8D07560F0FD945AD8EEA3468774A30FCF5368D46378 CA34D075B5B15040ABAD06371DF1EA56E135859B6E8B4EDB89811EEF804F6A5D 1FC09167B3E8A82621B8734380BAC3316E01E5A0C43072A61E4D84EFF2F2122A B560FA57184E6BF5535B010CCD8AC020610CCF6D417643DBEC016DB1A9FF1253 0FC58BF5EA8792084898CD86CD9BBA9C5844CC5F12C5B1F21F679A11971C3FC6 2D77961559FC43AB8ABF068B2A9EB6D3B6A11F7C33D2575C34E82F02DD982FE9 6234188CC2DFEFD4A2450F83D011A935F20CFBAC6CF6A0DE27CB1A293270DA53 96C6005B29854CE4307D53D77C76290FCE2162A40914BD20A89C99B42A85D992 1BF50FF81AD82D273A82F41759095C3BE32E2146A7DC1B442E9EAB5FFDFCDB5F 7277705D8238873F93DB7E6BBEAC2A30DFFDD3B269B7DA96D65D4F7F262B0C2F 764B68A94BEEBB18A7F1C314BD4B034659B5FD01FD38E8D41AC5F89A50C71A8E 0423A7CF53E759CE7E32BDB4FFC7F14933F96B0A21BC574D59BEB7D2E73D88A2 E5C31D08846D6986A5E01C389B2C64A9AEAEE0DF0FF0FFD554CDBE867FA730CA D7533EA20877960D88A08535F3705E18B76C3BEB037760A417E1C1B4EC76C512 24F9C4F600D2AE2D6D0D2A47D181C47322C60AA9C42B60C06AA9DDD3B2814712 B27327D1B02B29AF4C90883FAF7551A2DFE69E3D19B0F15355F66B78E9FEDD3D FB57A21E460BE09DFD2714451EA12FE80F3BCD2B3A478EFBF8655BDCF1E755D5 33A601866BEA1ABA2778E6C8E293B536FB49369A0153F2D0AE2786E9A69C04C4 533C9EE011ED31081A0698CF2B8181562013C03D300EB66B99C38F9C402B9A55 5C4FCC3C78BD60557828E815DAD748DAA25B824B087FB60DBEB735820D8E753A 985DADADED8D7641B06B0DB083568E1179479E0CBE5F7AB0668A2D78B4BEA7AF 87EB1B57406818E60012C01802AE529899E5830AC39FBD9E60012337185DDB3E 3069C096779E85C6F55F3CA64D1D74970DC5AB12D06B14B7571782DB802ACDD3 0D0301390CB51217713D182E456BF8DF8AACEED0F57A93B9A2CC44417EFC685A B1240368821EBE67946AB323BC19B7DFB8B6CDED3DE0FC8BDC3976A6A67E3635 8D00B390D1046CFDC00F2BD68C948799C06351EFB5FD3E658BC58DDE7DCA9DE8 EE3EA9FD0EA071513EC26D2C3C0DC2A109AD0858CCADCE1764368096C9D9F085 E5A028463457914982032455B30B8E0F43B7731545652DB1A901ED019168BE71 B063549F74387ED19B1DA837921F14EE777B466635C05B9884D54EDBE2B1BA33 162A228BA4F699957250DBF0AE208D0B789B31409881890B4BA5459F60E1D97D C6E2210497F351C3CA083ECB2CC4210DF2199D77AD7E044FE74E7350E8253C67 DD43B523CA077E60CD8C394B3CC06AD21F1B7B22D670ABE1D3DC4D2E5426BEC9 171EC2E45CFC4C8FE286194CE8F3CE5C733581A1830565D5368260FC4EE674BA 165B7D87DE4E34E724FEB6A0EFFE8E118181021B9948CCF39DC40C6B6807409F F8E638AE60C94B039B0CA15091DBB1B2E2098460E025CDE0117AC4FCEC8834CE CFA4B35F5A8C0CC085503C6C62FEFDA9241A92274D9131B40A1C48CF00DDF63E E84A3133E79378960739B64293F9668C18E8AE582CF1419CA524442522E5C637 74C2D020011110C942B22C3986AC85967AF7E68D159F5444115CBB3B445B1F45 DF23CA7153268496785CA971E6B9EB5CA24720250CE2E722DA5AE3CDC7C5C40B D0D467D7185AA76885896C204B6816F2C0221E1B6A566AB9060B887044639890 09E86B1B13DAB8584EB7D3CB6A552DCF184060FE16308752AF0A30032795AAD4 93B23C073A1BDEA9BB8961B8208E1273F17112CBC481A45110DDF536F76C0C64 DA156D87012BC7ED92F7597E83EFDF75A3BE5153B138AE0943B4606DD8E7B6EA 3168B5D9C36AB8B586EFAEAE2815E9F6A0BE668DCD8C9D0B65FE1502C8E3C95A 74A6EF2FD48587E79DFA1AD44778CE32F5F5DBB7AC9327675B9ACF7EDB5771C0 C186172DFE9F4419347F8241645CE909D0E0464C8A3FC4CB1AD882B2AF688582 58DB217291BD040676BAE8D5BDA74E620FC42DAE0D2C422ACFE6F7A2821FCB32 5E0992B332CB371ECF8FB8DD6F025117B80B43CBD070C05D36C772B76D5A61ED 28A4042D2AF5D1E16C9065E11C38CFE7D76A59EBA28546CB624F296FEA767FF7 45DC8E057A39D72B3961117A11159964B6EBC46B22F9C28A3C63E1C29C6F982F 61340FD9E4B45A2B34B0D9AE2D17246CFD71A33320049D7A87F42A22339FEE22 57D508AC8AC61F59F9CCED65A30201B878E5110BDEC2D77F990F39AC088EDF61 B01C99CD2B68EEDD767833B40622D43DF72D98F699A1309F8EF74D69E311FC6B 0E08D62033C180F121AD8C7DAD0CEC608DE22EAEAD3EA82B8FEF0017D79CC0DD DA7182D0CDE958C3D0B33E3781015BEAF9CAC9F5A6D5C572AD7618D1B3992DB0 AE761939A038771B0004D599B9E01A59330EA1C695F3DD4596965D18C69F264E 76695D47795918440CF56E071577454DFC30693BE5AED4FAF061DAF9822FC7C0 AB2BD1E7C0D4A0CDFE68044669320DA6ECC549B60AB7DB22B2707EADB6A8E131 C6C22C9484C0712D6C7A99CB9E5B10FF2C5B698EF513670C58F73C9A550A7801 35233B6754D7AB60D5CFB0DC1203B0488065A5AECE07A66A6C63FB67261E1306 32DFB5065A9F47B2292E268BE27829C622BC07C2B229B8B91D7AA8A5B01C1AD6 BE2AF11ABA6C5D0D56C74C0DCA2ED0B18542E3BB7917E62DD4F60F9CF1FD4BF5 CF293770C0E7173878D4390BFFA4C761E2D7B063C213B125B19C5BB61925EBDE B1E132EBBD8761596D13B2B5A222D40061163A584CD9EAC7C964EA8255655378 EB40A7D5C40260D65F212DD56AE061FD888934D269B983395525F33E141E0950 6BD5AACCA833B1EC2CD020F25ACA44B6CF6BDC47F05E86CC51764ACB7A23CE2D C128412E144988B1D9B622BE27CC1EAB149652693371298D060B028B88A9055A F630F7A706B733845AE425C6BB37BEC052A62E79E57E6EF7334838F019216ECD EEA009AA50DA6E46CE13A2296B8B27836DCC1DED5C90A562C94D481943211548 83EDA1692457AA32BDCCC7177F3ED45B0407C70560DFBA15946492D35E3BBC34 FBCBC45A3030BCC817FC4D6A870FE506470771B3C2A473B4C9B7C5C687992AB5 020F9E6121E82E2C988B7C2CA9908D491645336C151C49088B39EDB954E5B303 E0251F0864E0C0CF21B51C99E88620B89EB9A5684CBE2A9B2FCDA2476A8477C3 DDEDDAD98DACC947DE8B410646FC4FDA755DFC75A7E7E7C418213929371356EF B55389498BCD5934ABB2769E5B81F9629874189628EEF839A6C4EFE873F4FA4E B75F2894015FE4E935FB43576BE40E792916BDE7ABD487851856088B769E045D 550A0C5A0CE14C6E949BDE88D783C539E1E0F8663D0E47C2D4DA39E0B3B6434B 874D84362CC54C705B1C98ADB8055F6B7F4B4E8E15B62673890285F495B58141 61C8A26D8B0328A7AAAF800005A6440D5ECD22638D32BF5CF6D884F1F8C0EB34 C30B0C3798028E683610D87E600D5E415738BC7F31A317720551CBC0EBAC7168 C63C2E33865732DC9F357FF7DBEA2F6006D02AF26143E7DC1A86054C7B12F91C 3026EBB0EA541A089B625BEDF6F56093E7FA69ADB78ACE7850ECAE51C56EA781 7188B2A815BAF783F01625B35486951FB6CDD3F6CC420EFA85897F162EC06966 A5D63B91836AB7A4C82B256EA56F4E397F2114987094A9DE95BACACD300C7B16 0B0E0AEC273FB222A8DC34C4D08C33508C056769E31345507C7187D26E72922D C2359F053A48152F70722660F84B436C332D2F78CCAC5E237D52BA32B299B266 5B9BE88430503B3C1185275C089F0BB40878166FBC8FC71640E5E271F0850F51 F4CE584889AB53064D1C476384907E2292C3BE49C84A41282BD88241CC082199 96A68A35CC04F19B353CDDE4F095E5DE882BECAE38AD2561240A52A38F4CE61B 2333C321D9B7AFA5D57124F9436DCC4B37091461DF44B96DEE0446B949309CA8 C0AD014F4C8BCD084B5F07B1834F82E79C7F4CFD10883E7DF57D96A6776ADE33 BF0181F1FD0B7243003E60CA48A362266BA57C01E60847E39106626E73F58A45 3304C546390C3C0696FF5DF00A160EB93D6525E91A8B1202D1F0FCE974E99B5D 208EEA37BBD74BC401950C70B188526C41052B07C70FA20EC6B72A61C41A0B3C 1897041561973F55800E99A1E2332D7E54996769312EF3E88899957C562187DC 1C2FAEB1D28D211A530586299DE3EF2403F504FC69867E993F5FCDA77C4E824F 47E660D394D3E7426C6ADA8277EA4D2A3735675AC5873C38BF28E3418B7E5C7B 1749A0FAA1813D8B229A381B5676CDCE819C50DB198B2F56CD8758E5CE92B7DD 68B7E36FBC729927E5162FB7070377894805338209E6E15249AC6CBEB6DD58AC 7020D85919559FCDFD1439432797A544BAD3DDE9840E11CF922E1057C3C1BDB3 21AA45225665F3F386F915CC8BE3397C30A0B75D9CCD5236A28AD844BC568F55 B707C8305B2D913CE113C8BD7EB65C8A94B2AC22AD2F80CDC714831B50BAD3E1 D9811F2ABF007320034793D21BD155C90E6FD597917AF2F5CD56A2A5CEB8AB18 9DAD10994700076E56A177679289F91BE33E1063924CB299D150946012B266A0 35E74F244A2C6C16836C5FE34F4B2843BFE65E0A02C2C12642FCA307C04238CD 4891A6CEE3B15302C41F6DB44103494D966EECBC94B2A76305FCB02CDBE37D91 3A7E5222E627D57B847D778C34428A3A1727829920F5960C3757CD5405C924B0 3C1CE597875DB9D52772C1CFAC4752E1166AE9F6932830ADB4DFD190F9DE5671 82392C93E473B99C43028CF062995D938A4A0524CACCFEA32EA5B29D9BDAB380 B854969E9066C22774E17E178E4FE47F380F8345FB7DB0AC6F2656F5A8325F9C FF61BFB9D56D8EAF29C45FE6A22711715C48F8C73D4F8FD95826C4E717068723 5C0F03B2C930B71F405662684874408E45FC7214027FC0A772795282BD727429 C4F18263F2C5C34B67278008E608050D7E82AA3A37572A78E7909F1C89B33B2C EF8D4AE3646249A8C73D4F3B10CF32E1D62C71E1EA98DC7701EE792296B452C9 A18CC8853629EEB25FAE69DF05A551A7F63B9EB04467A0CC150B8538CB6A8E25 893CB5E8FA0CFC981B1B245AF3D0353B50951AC31E02E015B99149679FAEA697 F67F26C5DB08B2D13354B3A367A8D8112A09F628C429AC9849B83C92085B5702 5D43608E4D6AB53201EB10DCC413294F32B8ACB7E6100521109F9ED6783E74D7 D487BB66AB3E3C7FA5FEE979F613359B3D7F95AB555DA50C49B29EC879227E08 D728C834109F2ECBF2A1C82202E0D5479EB1131FABA75A0EEFCE619269480381 8C394994D9C5D99E58CD62062FEC8A7788E8A8D08BCDA691CC16FB3B1235DCED C1E38011910677C888C32CEEC80B6344220FB3A246EE38210618BDD522CA2147 9D1BAE8148DE0171C269DAE86590586B963B45F45F0FB3A7D6E9E4293619BBD3 662E0A434C0A3E1AA49033C0792DC76E897A2E5B5F1CAA4A9E759747CC44963F 26C9B3D291E636E530D4CB1751C32102F00384B2E96A6EB91C3922363AF65866 9CFCA421102B3D7D2FD4E088821837003C02DDF124C3735CA06045C1431A4021 298EAEE3CF1A1F45C6622000C63016BF19EE47BB23E47FDDC5F312C5C74D5099 5278ECCE99780A8610A0EFB2E8CC71546F98DA673ED2F71F643A8AA9D9E4C853 3301D31355F20C88ADB248CC43E87D0B86BBFB6DECEE9FA3CA81DB0EFCD4F867 9810A1F9E75A129C978E98177F3BCD732A070EB8E35416F416BA4F0570A6BA5F 7B3380CE7EC7088A586F516F2F2DB6E309C8EE33B62CFEDF79946E327895C53F 9B82FD320D0C66E360AFE0A7976E6C93A41F879DB22729A849BD6058C408D373 7740DE2DC4936BD22D0E27A2C344E258524874619D2352946206D07B3FCC8769 B4BD65E03D2E6573BE89EE13F03EEB2ACA9D32EEB0BF92C0BF0F171760F254A2 D0A4BE7EA344BEEAF0AE04AC928CD971E20CA0727045E35A4F3631CA29033306 1043B9EB0D4400402C9191D06ADF4C4ABDAC36C06E33958DD44A98FCEC0208B2 3CA2595EAB6F8B7A89592FDA5CE3B36B9B9D6EEB43387333081E5852456E9585 CE15632C510A430F0914CD150B4985065FAA0B8A4C3FE359DF656BC2D4CF6F8F 2EAC231435DC98202815847B30CC55BFF0658C6AF69A8C74D4262294B95380DF 33C0AF2BCA8FB0AFA5D00849F9ED1E434AFA38893BE06F73A42FAE00A9249629 513A28798BDBB96D9039C3C4E4725B2AC83B3B82F4CDCC18F13D6AAE2B41BDB8 F400A545C977885C06B5BD5AC35D28E086CD17C2D4C5E1FDFE4614008B2383D3 7CE1A77AC8D5D9708E073F9DCC9D29E4B790940DB27F8D4A0A99071CB34D666E 88C753769EA3D59B45FE4699FFDE29275C07F3F2B340D9CE261140C0847D363F D9A078AE00A4F367F9D64CC46FC8FABE9E5F85D735CBE12FAB478CDE8BA5C8DA BD65180AB75BF20E180CD978378E73176BC72C74BD0B5394160FF3D4E4049A24 C2317ACB639F830D82F9405E244F1B470B3B0A05B3B80D5E0410401B179C815F 0601D3D4360648A58AFAEE3E01F6B8F81C9182A94E16AC5D1215DDA744A4173A 0B44C6432701F10B77330F7B3761B5638327488D49DDD85D9CBA41A3059EC174 EA76E2EC4DD8A484118A43B3EFB31E2F09F2E72EECA52E74EB187D93A7EB1B7F B9D2867ED801CCF5B6E93ABA4148AB29D83BA5BA70FC3475170B6587B75CC6BC 669F132F27F27288A784C76D4018B9D19EA5552C2E2E6C02E8297B9CEE8AF613 E04C812B6CC7AE557A1B351733879A5359211D3B245630141F1CEAF68047F09F 0740DD70B68700DCC8607593E0EC24E5DDD551C35DED3CA1B96D7A496C100CE8 CC7B4BDC21BE6284FE26DC3E4E3684B938CC98110BFA472C549A5DD43BBA71FC 22226134A4AFDECB532BC5FD8E81B8A82C360C643023664EB33C5DEFC6297039 391866AB31AEB7A42D6912F56C5FC6A43A27F66ED59038CF0941C96E28129917 D7E682CB0298A279C0AD6AB44F2F2F2F55853BFF7A0336F11A89D753B3ED3970 5B4919327D43BC62B1115C9F607132859B2538289260FCDE24016130D68F5E12 42671812DBBDB2B615D78B5C1C334EB88F99BBE8C8E510ECC51E073FABCE12C5 EC3484E1ED4EE281898867F5A6FC24DEC849445256F66A6D33F4E0F021BD662F A354D944C8E9874FEA07D969C61EB6C684E5D0F064EF1032470F112D9E7F317D 66ED7028BCE77006915BE6369BC25FD5FD6AF56674A6DBAC948A8D25D9BD4279 71C96D35725AFB845FA69189444E8C599E993ECFD2DE5A226BDB8C274639418B B2081D3F283E32197F4011955F42FBE6128A1CAF47F7911017FFD62C91468F0B EC452E486DE4452C5CBC0B228ED80E73F030C9F0661E3CC79642328B9C4B562B F5C55D96B1D2C45B356FF8A1DA4EE3B593FEB64B71F7A5B703F91D98D28CBB56 DD7EB7031292D4A72546DCCFC0323CCE226546B2D958D9D25DD5A11E14B8E094 CE4363A121B8B037ED90187FB257148338DF14DBE24E2BF30B01F67783FCE599 78B930ABBBA4DF1FB387663BB56A9B0D9DD1F189BAAD06389650B969F15663BA D5A7061FC2A30E80999FE4118CA47C053E3672F646258E69870D032C7A27CE88 F35F352247801F8B26D78588CD6FB35E3A7D11AD5B42F05C3DC8BB0F5E6FF98C 5AB9C376E3762E7422564454780F168C1328713BE62D5F18A4E0C1FA2FA1C0A5 324E822D1F3576D9825E8724F6706C9D207EEF990A20240EB7B42C6E0D0FBF53 F7CE1B7A0790A406F04702FD28C221B3275B1D77A1F598DC3FBDF7A6D4C0FA1F D47E69F7EF5E0A9141FBA389E1AC9A4D114F148D5DDD6C1B0E5978ACA64D74FD F88A3628553EAA9897CCE7B4DD539BB23E3EAF0430C7414D6C8D8674F4D12EED 4C928D6D8EFCAB710F7DFE60AAA4CE469F363A8DF31934B5908FD2153FE96D79 FCF09BF1E4EF0354AF8021DDFFA91CC54E2AFCBDD2ECF55CFD778C7190A2FCCA 6E7B4D8379F0E64896A92B3CF91F374F8A6D160F39A60A53E2DB0B5CFB0554D8 F4F2672F4869BC77AD2EEE68F01BB09C283534D13968F987C1F505665493E87C 0AC2EF333A6D3156683610EF33F6E357DE547A318DD97CA2E3E02966F309E90F 6A48CFD13EC7BA1B76319ADC556DC0D0BCB1F31C51BF6E83DB7A4A36AF31C9A1 836447FEE9613D74B4F3767171EF3C2833B2D9AD51C0947114CF7D08507561AA A72B9D2A901C51937958496CDF67C90C8DF039F2334A7CCC6491BB5A3E59C842 5847BAB8E8FD5D4DF16F28DE7BF9E3EDB5D9576FD1C41E41B45BDDE11ECCD181 D3F61A4D96FD289E885F0C71028BABC1DB9B306376873F37190FACF026E40FEA CDE5E5E59B14100B391CFBB13E51EDA8CC89B236AC91CD2FED272BD7DADBEA5D D499F77F702D8B3B9D7C9B68574FB91F8CE5E1597E5AC216B3E89559E3E9081E 17E52C5469F60747829532403A7AC82058FDEC22753301EB52F1CB9AA36E5E19 92F1B93FE4F2BA5CBB74842699DB4BC4A02C908BE46F05BF9C5A2E458BDB90F3 FB08C6F989B6120C1B5F444C11F8D89D3B21A12D31342697AD128ECE77708259 95915E83E18053BE8882F212744A328B21E730F0C4F1D9689C2A0505CCBAAEEC A55A3CCF7CC10B6437831D0409ACA1E345FAE7CC1C835AE039ACA3BC1D4F182D 45BA50BAEAFD36722EB614019F21203A9029B266483B381C9954AB6BF3FBF12E B7342D1106EE7733769BDDF806D6F1A5E6CE738CAC37897C374498E2EB174E1E 4FC9F49998D25D7DD8213D8A5ADBCBFEE4DE3A0703E4E387A86151DEEFBB7E98 BF11FF480BDA1FE2AA2096397218141EC766480A8DED26F6D3994E86452AF214 E41DC926FD31456044F590E6324279D795E49DA459586CC12D04AD547438E1A8 707848067FE8C8FEEF8ECA446D2EA6CF138C91316E01A6E22C10DB8D17B3E7E9 EB1AE0B190573598BC6E88B1132DFEABE334BF5DE95E881A2E62166568BC2EC3 5D1E3C58477B73E62F9A16738CDBDA63ABE6ADB928D59FEB8661CDB924CBFA89 7B1DF88657E2AE3FEA810F3308FCBB94499F3EC92BF39B56E2B38FB875257E31 96D241F19761DCC656986F7E969FFD1F598CCF767B840000 }
22.4 Image Effector
The next application creates a GUI interface, downloads and displays an image from the Internet, allows you to apply effects to it, and lets you save the effected image to the hard drive. In the mix, there are several routines which get data, and alert the user with text information.
; A header is still required, even if a title isn't included: REBOL [] ; The following line creates a short list of image effects that are built ; into REBOL, and assigns the variable word "effect-types" to the block: effect-types: [ "Invert" "Grayscale" "Emboss" "Blur" "Sharpen" "Flip 1x1" "Rotate 90" "Tint 83" "Contrast 66" "Luma 150" "None" ] ; The code below imports the simple "play-sound" function created earlier ; in the tutorial. For this to work correctly, the play_sound.r file ; should be saved to C:\. The either condition checks to see if the file ; exists. If so, it runs the code and sets a variable that we'll use ; later to decide whether or not to play a sound. If the file doesn't ; exist, the variable is simply set to false: either exists? %/c/play_sound.r [ do %/c/play_sound.r sound-available: true ][ sound-available: false ] ; The line below asks user for the URL of a new image (with a default ; location), and assigns that address to the word "image-url": image-url: to-url request-text/title/default { Enter the URL of an image to use:} trim { http://rebol.com/view/demos/palms.jpg} ; Now a GUI block will be constructed, to be display later using ; "view layout": gui: [ ; This first line horizontally aligns all the following GUI widgets, ; so they appear next to each other in the layout (the default ; behavior in REBOL is to align elements vertically): across ; This line changes the spacing of consecutive widgets so they're on ; top of each other: space -1 ; The following code displays the program menu, using a "choice" ; button widget (a menu-select type of button built into REBOL). ; The button is 160 pixels across, and is placed at the uppermost, ; leftmost pixel in the GUI (0x0) using the built-in word "at". at 20x2 choice 160 tan trim { Save Image} "View Saved Image" "Download New Image" trim { -------------} "Exit" [ ; This is the action block for the choice selector. It contains ; various functions to be performed, based on the choice selected ; by the user. Conditional "if" evaluations are used to determine ; which actions to perform. This could have been done with less ; code, using a "switch" structure. "If" was used, however, to ; demonstrate that there are always alternate ways to express ; yourself in code - just like in spoken language: if value = "Save Image" [ ; Request a filename to save the image as (defaults to ; "c:\effectedimage.png"): filename: to-file request-file/title/file/save trim { Save file as:} "Save" %/c/effectedimage.png ; Save the image to hard drive: save/png filename to-image picture ] if value = "View Saved Image" [ ; Request a file name from the user (defaults to ; "c:\effectedimage.png"): view-filename: to-file request-file/title/file { View file:} "" %/c/effectedimage.png ; Read the selected image from the hard drive and ; display it in a new GUI window: view/new center-face layout [image load view-filename] ] if value = "Download New Image" [ ; Ask for the location of a new image, and assign the entered ; URL the word label "new-image": new-image: load to-url request-text/title/default trim { Enter a new image URL} trim { http://www.rebol.com/view/bay.jpg} ; Replace the old image with the new one: picture/image: new-image ; Update the GUI display: show picture ] if value = "-------------" [] ; don't do anything if value = "Exit" [ ; If the variable we set earlier indicates that sound is ; available, play a little closing sound: if sound-available = true [ play-sound %/c/windows/media/tada.wav ] ; Exit the program: quit ] ] ; Here's another choice button which simply displays a little "about" ; message: choice tan "Info" "About" [ alert "Image Effector - Copyright 2005, Nick Antonaccio" ] ; The following line vertically aligns all successive GUI widgets - ; the opposite of "across": below ; Spread out the following widgets by 5 pixels: space 5 ; Put 2 pixels of blank space before the next widget: pad 2 ; This box widget draws a line 550 pixels wide, 1 pixel tall (just a ; cosmetic separator): box 550x1 white ; Put some more space before the next widget: pad 10 ; Here's a big text header for the GUI: vh1 "Double click each effect in the list on the right:" ; Advance to the next row in the GUI, and then begin arranging ; successive widgets across the screen again: return across ; Load the image entered at the beginning of the program, and give it ; a label: picture: image load image-url ; The code below creates a text-list widget and assigns a block of ; actions to it, to be run whenever the user clicks on an item in the ; list. The first line assigns the word "current-effect" to the value ; which the user has selected from the list. The second line applies ; that effect to the image (the words "to-block" and "form" are ; required for the way effects are applied syntactically. The third ; line displays the newly effected image. The "show" word is _very_ ; important. It needs to be used whenever a GUI element is updated: text-list data effect-types [ current-effect: value picture/effect: to-block form current-effect show picture ] ] ; The following line displays the gui block above. "/options [no title]" ; displays the window without a title bar (so it can't be moved around), ; and "center-face" centers the window on the screen: view/options center-face layout gui [no-title]
22.5 Little Menu Example
You've seen several modules that produce full blown menus. Here's a simpler homemade example constructed using only raw, native REBOL GUI components:
REBOL [Title: "Simple Menu Example"] ; "center-face" centers the GUI window: view center-face gui: layout [ size 400x300 at 100x100 H3 "You selected:" display: field ; Here's the menu. Make sure it goes AFTER other GUI code. ; If you put it before other code, the menu will appear be- ; hind other widgets in the GUI. The menu is basically just ; a text-list widget, which is initially hidden off-screen ; at position -200x-200. When an item in the list is ; clicked upon, the action block for the text-list runs ; through a conditional switch structure, to decide what to ; do for the chosen item. The code for each option first ; re-hides the menu by repositioning it off screen (at ; -200x-200 again). For use in your own programs, you can ; put as many items as you want in the list, and the action ; block for each item can perform any actions you want. ; Here, each option just updates the text in the "display" ; text entry field, created above. Change, add to, or ; delete the "item1" "item2" and "quit" elements to suit ; your needs: origin 2x2 space 5x5 across at -200x-200 file-menu: text-list "item1" "item2" "quit" [ switch value [ "item1" [ face/offset: -200x-200 show file-menu ; PUT YOUR CODE HERE: set-face display "File / item1" ] "item2" [ face/offset: -200x-200 show file-menu ; PUT YOUR CODE HERE: set-face display "File / item2" ] "quit" [quit] ] ] ; The menu initially just appears as some text choices at ; the top of the GUI. When the "File" menu is clicked, ; the action block of that text widget repositions the ; text-list above, so that it appears directly underneath ; the File menu ("face/offset" is the location of the ; currently selected text widget). It disappears when ; clicked again - the code checks to see if the text-list ; is positioned beneath the menu. If so, it repositions ; it out of sight. at 2x2 text bold "File" [ either (face/offset + 0x22) = file-menu/offset [ file-menu/offset: -200x-200 show file-menu ][ file-menu/offset: (face/offset + 0x22) show file-menu ] ] ; Here's an additional top level menu option. It provides ; just a single choice. Instead of opening a text-list ; widget with multiple options, it simply ensures that the ; other menu is closed (re-hidden), and then runs some code. text bold "Help" [ file-menu/offset: -200x-200 show file-menu ; PUT YOUR CODE HERE: set-face display "Help" ] ]
22.6 Shoot-Em-Up Video Game
This is a very simple graphic shoot-em-up which has nothing to do with business, but it does demonstrate important concepts required to move graphics on screen:
REBOL [title: "VID Shooter"] ; First, we'll set some initial values for variables that will be used ; throughout the game. The "random/seed now/time" function ensures that ; random generated numbers will be truly random: score: 0 speed: 10 lives: 5 fire: false random/seed now/time ; This line provides the user with some instructions: alert "[SPACE BAR: fire] | [K: move left] | [L: move right]" ; When certain events occur, we'll want to reload a completely fresh ; game screen. A simple way to do that is to label the entire section ; of GUI code, unview the existing GUI, and then run that entire section ; of code again. Here, we'll label the section "game", and run it ; initially with the "do" function. You could also use this technique ; to implement a "play again" feature, for example. To do that, you'd ; Simply wrap the entire program in a block, label it, and "do" it at ; the very beginning of the code. To play again, just do the label ; again: do game: [ ; Here's the game window: view center-face layout [ ; Set some layout properties: size 600x440 backdrop black ; Display a simple text scoreboard: at 246x0 info: text tan rejoin ["Score: " score " Lives: " lives] ; For this game we'll use some generic buttons and boxes for ; graphics, but we could just as easily use images of any type ; (simply embed the images in code using the binary embedder ; program, label each image, and then use the "image" word to ; display them). In the code below, the yellow box labeled "x" ; is the missile, the orange button labeled "y" is the moving ; target being shot at, and the blue button labeled "z" is the ; player's graphic. Notice that the target graphic is placed at ; an initial coordinate 50 pixels off to the left of the GUI, ; and at a random height between 30 and 330 pixels. The ; "as-pair" function combines the two numbers into a coordinate: at 280x440 x: box 2x20 yellow at (as-pair -50 (random 300) + 30) y: btn 50x20 orange at 280x420 z: btn 50x20 blue ; The following boxes are invisible, as a result of their "0x0" ; size. They exist here solely to perform actions when certain ; keys are pressed by the user (each box has a separate key ; assigned - their action blocks will execute whenever those ; keys are pressed by the user). Notice that when the box ; assigned to the "l" key is activated, it moves the player ; graphic 10 pixels to the right. The "k" key moves the player ; left, and the space bar is used to set some variables that ; will be used below to fire a missile: box 0x0 #"l" [z/offset: z/offset + 10x0 show z] box 0x0 #"k" [z/offset: z/offset + -10x0 show z] box 0x0 #" " [ ; The "fire" variable is used to track whether or not ; a missile is currently in the air. When the space ; bar is pressed by the user, the following code is ; only run when a missile ISN'T currently moving: if fire = false [ ; Set the missile currently firing flag to true: fire: true ; Set the missile position to be centered on the ; player graphic, at the bottom of the screen: x/offset: as-pair (z/offset/1 + 25) 440 ] ] ; This box is also invisible. It's only purpose is to enable a ; feel-engage-time routine. The box has a rate set to our ; "speed" variable, and the feel-engage routine checks for a ; given amount of time to pass. Every time that occurs (the ; number of times per second indicated by the "speed" variable), ; the enclosed block of code is run. In effect, this works ; exactly like a forever loop, but WITHOUT stopping any of the ; other operations in the game: box 0x0 rate speed feel [ engage: func [f a e] [ if a = 'time [ ; If the "fire" variable is currently set to true, ; move the missile up 30 pixels: if fire = true [x/offset: x/offset + 0x-30] ; If the missile reaches the top of the screen, ; move it back down to the bottom (out of sight ; below the bottom edge of the GUI), and set ; the flag variable to false so that it stops ; moving: if x/offset/2 < 0 [x/offset/2: 440 fire: false] ; Update the display: show x ; The code below moves the target piece. The ; randow X and Y portions of the coordinate move ; the graphic generally from left to right, but ; in a slightly unpredictable path that is a bit ; harder to shoot at: y/offset: y/offset + as-pair ((random 20) - 5) ((random 10) - 5) ; Check if the target has made it all the way over ; to the right side of the screen: if y/offset/1 > 600 [ ; If so, decrease the number of lives by one: lives: lives - 1 ; If no more lives are available, notify the user ; and end the game: if lives = 0 [ alert join "GAME OVER!!! Final Score: " score quit ] ; Otherwise, notify the user and refresh the ; screen (this automatically updates the score ; board and resets the graphics to new starting ; positions): alert "-1 Life!" unview do game ] ; Update the display: show y ; Now that the graphics have been moved, check for ; a collision between the missile and the target ; (if the target and missile starting points are ; within the specified distance): if within? x/offset (y/offset - 5x5) 60x30 [ ; If a collision has occured, notify the user, ; adjust the score and speed, set the fire ; flag to false, and refresh the game screen: alert "Ka-blammmm!!!" score: score + 1 speed: speed + 5 fire: false unview do game ] ] ] ] ] ]
22.7 Bingo Board
Here's a bingo board program used to help run an actual bingo business:
REBOL [title: "Bingo"] write/append %bingo_history.txt rejoin [ newline newline "NEW GAME: " now newline newline ] write %bingo_designer.r {rebol [] view center-face board-gui: layout/tight [ size 200x240 across space 0x0 style b button red 40x40 font-size 28 [ alert { Click the squares, then press the 'S' key to save the image. } ] style n button blue 40x40 effect [] [ either face/color = blue [ face/color: white show face ] [ face/color: blue show face ] ] b "B" b "I" b "N" b "G" b "O" return n n n n n return n n n n n return n n n n n return n n n n n return n n n n n return key keycode #"s" [ save/png file-name: to-file request-file/only/save/file %bingo-board_1.png to-image board-gui view/new layout [image load file-name] ] ] } insert-event-func [ either event/type = 'close [ really: request "Really close the program?" if really = true [quit] ] [event] ] cur-let: copy "" view center-face layout/tight [ size 1024x768 across space 0x0 style bb button 64x72 red bold font [size: 48] [ if ((request/confirm "End game?") = true) [quit] ] style nn button 64x72 black bold font [size: 14 color: 23.23.23] [ either face/font/size = 14 [ set-font face size 46 set-font face color white show face cur-num: to-integer face/text case [ (cur-num <= 15) [cur-let: "B"] ((cur-num > 15) and (cur-num <= 30)) [cur-let: "I"] ((cur-num > 30) and (cur-num <= 45)) [cur-let: "N"] ((cur-num > 45) and (cur-num <= 60)) [cur-let: "G"] ((cur-num > 60) and (cur-num <= 75)) [cur-let: "O"] ] write/append %bingo_history.txt rejoin [ now " " cur-let " " face/text newline ] box1/text: cur-let show box1 loop 3 [ box2/text: "" show box2 wait .4 box2/text: face/text show box2 wait .85 ] ] [ set-font face size 14 set-font face color white show face ] ] bb "B" nn "1" nn "2" nn "3" nn "4" nn "5" nn "6" nn "7" nn "8" nn "9" nn "10" nn "11" nn "12" nn "13" nn "14" nn "15" return bb "I" nn "16" nn "17" nn "18" nn "19" nn "20" nn "21" nn "22" nn "23" nn "24" nn "25" nn "26" nn "27" nn "28" nn "29" nn "30" return bb "N" nn "31" nn "32" nn "33" nn "34" nn "35" nn "36" nn "37" nn "38" nn "39" nn "40" nn "41" nn "42" nn "43" nn "44" nn "45" return bb "G" nn "46" nn "47" nn "48" nn "49" nn "50" nn "51" nn "52" nn "53" nn "54" nn "55" nn "56" nn "57" nn "58" nn "59" nn "60" return bb "O" nn "61" nn "62" nn "63" nn "64" nn "65" nn "66" nn "67" nn "68" nn "69" nn "70" nn "71" nn "72" nn "73" nn "74" nn "75" return box white 512x60 box 200.200.255 512x60 font-color blue font-size 52 "Prize: $" [ face/text: request-text/title/default "Enter Prize Text:" face/text ] return box1: box white 512x80 "" font [size: 50 color: (blue / 2)] box 200.200.255 512x80 font-size 38 font-color black "Current Game:" return box2: box white 512x240 "" font [size: 200 color: blue] box 200.200.255 136x240 image1: image 235.235.255 240x240 [ either true = request/confirm "Create new image?" [ launch %bingo_designer.r ] [ if error? try [ image1/image: load request-file/only show image1 ] [alert "Error loading image."] ] ] box 200.200.255 136x240 return box white 512x30 box 200.200.255 512x30 ]
22.8 Voice Alarms
Here's a program that lets you record your voice or other sounds to be played as alarms for any number of multiple events. Save and Load event lists. All alarm sounds repeat until stopped. Record yourself saying 'Remind the boss of his meeting with Jim' or 'Call home and make sure the kids walk the dog', then set alarms to play those voice messages on any given day/time. If you set the alarm as a date/time, the alarm will go off only once, on that date. If you set the alarm as a time, the alarm will go off every day at that time. The .wav recording code is MS Windows only, but the program can play any wave file that is usable in REBOL:
REBOL [title: "Voice Alarms"] lib: load/library %winmm.dll mci: make routine! [c [string!] return: [logic!]] lib "mciExecute" write %play-alarm.r { REBOL [] wait 0 the-sound: load %tmp.wav evnt: load %event.tmp if (evnt = []) [evnt: "Test"] forever [ if error? try [ insert s: open sound:// the-sound wait s close s ] [ alert "Error playing sound!" ] delay: :00:07 s: request/timeout [ join uppercase evnt " alarm - repeats until you click 'stop':" "Continue" "STOP" ] delay if s = false [break] ] } current: rejoin [form now/date newline form now/time] view center-face layout [ c: box black 400x200 font-size 50 current rate :00:01 feel [ engage: func [f a e] [ if a = 'time [ c/text: rejoin [form now/date newline form now/time] show c if error? try [ foreach evnt (to-block events/text) [ if any [ evnt/1 = form rejoin [ now/date {/} now/time ] evnt/1 = form now/time ] [ if error? try [ save %event.tmp form evnt/3 write/binary %tmp.wav read/binary to-file evnt/2 launch %play-alarm.r ] [ alert "Error playing sound!" ] ; request/timeout [(form evnt/3) "Ok"] :00:05 ] ] ] [] ; do nothing if user is manually editing events ] ] ] h3 "Alarm Events (these CAN be edited manually):" events: area ; {[8:00:00am %alarm1.wav "Test Alarm - DELETE ME"]} across btn "Record Alarm Sound" [ mci "open new type waveaudio alias wav" mci "record wav" request ["*** NOW RECORDING *** Click 'stop' to end:" "STOP"] mci "stop wav" if error? try [x: first request-file/file/save %alarm1.wav] [ mci "close wav" return ] mci rejoin ["save wav " to-local-file x] mci "close wav" request [rejoin ["Here's how " form x " sounds..."] "Listen"] if error? try [ save %event.tmp "test" write/binary %tmp.wav read/binary to-file x launch %play-alarm.r ] [ alert "Error playing sound!" ] ] btn "Add Event" [ event-name: request-text/title/default "Event Title:" "Event 1" the-time: request-text/title/default "Enter a date/time:" rejoin [ now/date {/} now/time ] if error? try [set-time: to-date the-time] [ if error? try [set-time: to-time the-time] [ alert "Not a valid time!" break ] ] my-sound: request-file/title/file ".WAV file:""" %alarm1.wav if my-sound = none [break] event-block: copy [] append event-block form the-time append event-block my-sound append event-block event-name either events/text = "" [spacer: ""][spacer: newline] events/text: rejoin [events/text spacer (mold event-block)] show events ] btn "Save Events" [ write to-file request-file/file/save %alarm_events.txt events/text ] btn "Load Events" [ if error? try [ events/text: read to-file request-file/file %alarm_events.txt ] [return] show events ] ]
22.9 Odds and Ends
This script provides a quick visual reference of all REBOL's built in colors:
REBOL [Title: "Quick Color Guide"] echo %colors.txt ? tuple! echo off lines: read/lines %colors.txt colors: copy [] gui: copy [across space 1x1] count: 0 foreach line at lines 2 [ if error? try [append colors to-word first parse line none][] ] foreach color colors [ append gui [style box box [alert to-string face/color]] append gui reduce ['box 110x25 color to-string color] count: count + 1 if count = 5 [append gui 'return count: 0] ] view center-face layout guiThis next quick script demonstrates how to convert REBOL color tuples to HTML colors, and vice-versa:
to-binary request-color to-tuple #{00CD00} view layout [box to-tuple #{5C743D}] ; view an HTML color on screen!This is a quick way to review the console history of your current REBOL session:
foreach line reverse copy system/console/history [print line]Here's how to remove the last 2 items from a block:
x: ["asdf" "qwer" "zxcv" "uiop" "hjkl" "vbnm"] y: head clear skip tail x -2 probe yThe script below demonstrates how to use email ports to read one message at a time from a pop server. Be sure to set your email user account settings before running this one (that's explained earlier in this tutorial):
for i 1 length? pp: open pop://user@site.com 1 compose [ ask find pp/(i) "Subject:" ]Here are a few examples of how the "request" function can be used:
; Two different formats include passing either a string or a block. ; If you pass a string, the default buttons will be "yes", "no", and ; "cancel". If you pass a block, you can specify the text on the ; buttons: request "Could this be useful?" request ["Just some information."] request ["Here are 2 buttons with altered text:" "Probably" "Not Really"] request ["3 buttons with altered text:" "Probably" "Not Really" "Dunno"] ; "Request" only returns 'true 'false or 'none. For an example like the ; one below, the user response can be converted to strings using a switch ; structure: answer: form request ["Complex example:" "choice 1" "choice 2" "choice 3"] switch/default answer [ "true" [the-answer: "choice 1"] "false" [the-answer: "choice 2"] "none" [the-answer: "choice 3"] ] [] print the-answer ; The "/type" modifier changes the icon displayed: request/type ["Here's a better icon for information display."] 'info request/type ["Altered title and button text go in a block:" "Good"] 'info request/ok/type "This example is the EXACT same thing as 'alert'." 'alert request/ok/type "Here's alert with a different icon." 'info request/ok/type "Here's another icon!" 'stop haltHere is a home made resizable requestor that I use when I don't want the "REBOL - " title bar to appear. It has a default timeout (set to 6 seconds in the example below), and can also be closed with a button click. This is particularly suitable for full screen commercial kiosk types of applications):
sz: 5 view layout [ btn "Click here to see a requestor with a 6 second timeout" [ view/new/options center-face information: layout [ text font-size (8 * sz) "Here's a message!" rate :00:06 feel [ engage: func [f a e] [ if a = 'time [unview/only information] ] ] box 1x1 ; spacer btn as-pair (12 * sz) (8 * sz) font-size (5 * sz) "Ok" [ unview/only information ] ][no-title] ] ]To edit the source of any mezzanine function, use the following format:
editor mold :request editor mold :informI actually use the following script to check the source files of this tutorial, to make sure that none of the lines of code are wider than 79 characters:
REBOL [title: "Find Long Lines"] doc: read/lines to-file request-file the-text: {} foreach line doc [ if ((find/part line " " 4)) [ if ((length? line) > 78) [ print line the-text: rejoin [the-text newline line] ] ] ] editor the-textHere's a duo of scripts that I use to sync my computer's clock to the time and date on my web server. The Windows API time setting function is based on Ladislav Mecir's Nist Clock Sync Script:
REBOL [] dif: 7:00 ; difference between web server and your local time zone date: (to-date trim read http://site.com/time.cgi) + dif lib: load/library %kernel32.dll set-clock: make routine! [ systemtime [struct! []] return: [integer!] ] lib "SetSystemTime" current: make struct! [ wYear [short] wMonth [short] wDayOfWeek [short] wDay [short] wHour [short] wMinute [short] wSecond [short] wMilliseconds [short] ] reduce [ date/year date/month date/weekday date/day date/time/hour date/time/minute to-integer date/time/second 0 ] either ((set-clock current) = 1) [ ask rejoin ["Time has been set to: " now "^/^/[Enter]... "] ] [ ask "Error setting time. Please check your Internet connection." ] free libHere's the CGI script that the above code needs (to obtain the date and time from the web server). Put it at the URL which is read when the 'date word above is set:
#! /home/path/public_html/rebol/rebol -cs REBOL [title: "time"] print "content-type: text/html^/" print nowHere's Ladislav's (better) version of the above Windows function. The script at http://www.fm.tul.cz/~ladislav/rebol/nistclock.r can set both Linux and Windows system clocks (the "set-system-time-lin" does the same thing in Linux):
the-date: to-date trim read http://site.com/time.cgi set-system-time-win: func [ {set system time in Windows; return True in case of success} [catch] date /local set-system-time ] [ unless value? 'kernel32 [kernel32: load/library %kernel32.dll] set-system-time: make routine! [ systemtime [struct! []] return: [int] ] kernel32 "SetSystemTime" date: date - date/zone date/zone: 0:0 0 <> set-system-time make struct! [ wYear [short] wMonth [short] wDayOfWeek [short] wDay [short] wHour [short] wMinute [short] wSecond [short] wMilliseconds [short] ] reduce [ date/year date/month date/weekday date/day date/time/hour date/time/minute to integer! date/time/second 0 ] ] set-system-time-win the-dateI use the following script to upload screen shots of my desktop directly to my web site (in the version I use, I put the text of the included script directly into my code):
REBOL [] do http://www.rebol.org/download-a-script.r?script-name=capture-screen.r the-image: ftp://user:pass@site.com/path/current.png ; You can also save to your local hard drive if you want: ; the-image: %current.png view center-face gui: layout [ button 150 "Upload Screen Shot" [ unview gui wait .2 save/png the-image capture-screen view center-face gui ] ]The following script demonstrates how to add and remove widgets from a GUI layout:
view gui: layout [ button1: button button2: button "remove" [ remove find gui/pane button1 show gui ] button3: button "add" [ append gui/pane button1 show gui ] ]Here's a way to get a unique string identifier from the current time (useful for MCI buffer names and other situations when you need to generate absolutely unique identifier strings without any odd characters):
replace/all replace/all replace/all form now "/" "" ":" "x" "-" "q" "." "" ; precise version (w/ milliseconds): replace/all replace/all replace/all replace/all form now/precise trim { /} "" ":" "x" "-" "q" "." ""This script creates an image, saves it to the hard drive, and then opens it in mspaint.exe:
save/bmp %test.bmp to-image layout [box] call/show join "mspaint.exe " to-local-file join what-dir %test.bmpThis script demonstrates how to use the AutoIT DLL to control the madplay.exe mp3 player:
REBOL [] if not exists? %AutoItDLL.dll [ write/binary %AutoItDLL.dll read/binary http://musiclessonz.com/rebol_tutorial/AutoItDLL.dll write/binary %madplay.exe read/binary http://musiclessonz.com/rebol_tutorial/madplay.exe ] lib: load/library %AutoItDLL.dll move-mouse: make routine! [ return: [integer!] x [integer!] y [integer!] z [integer!] ] lib "AUTOIT_MouseMove" send-keys: make routine! [ return: [integer!] keys [string!] ] lib "AUTOIT_Send" winactivate: make routine! [ return: [integer!] wintitle [string!] wintext [string!] ] lib "AUTOIT_WinActivate" set-option: make routine! [ return: [integer!] option [string!] param [integer!] ] lib "AUTOIT_SetTitleMatchMode" set-option "WinTitleMatchMode" 2 call/show {madplay.exe -v *.mp3} view layout [ across btn "forward" [ winactivate "\reb" "" send-keys "f" ] btn "back"[ winactivate "\reb" "" send-keys "b" ] btn "volume up" [ winactivate "\reb" "" send-keys "+" ] btn "volume-down"[ winactivate "\reb" "" send-keys "-" ] btn "pause" [ winactivate "\reb" "" send-keys "p" ] btn "quit" [ winactivate "\reb" "" send-keys "q" quit ] ]Here's a quick and dirty way to print out help for all built in functions. Also includes a complete list of VID styles ("view layout" GUI widgets), VID layout words, and VID facets (standard properties available for all the VID styles). Give it a minute to run...
REBOL [title: "Quick Manual"] print "This will take a minute..." wait 2 echo %words.txt what echo off ; "echo" saves console activity to a file echo %help.txt foreach line read/lines %words.txt [ word: first to-block line print "___________________________________________________________^/" print rejoin ["word: " uppercase to-string word] print "" do compose [help (to-word word)] ] echo off x: read %help.txt write %help.txt "VID STYLES (GUI WIDGETS):^/^/" foreach i extract svv/vid-styles 2 [write/append %help.txt join i newline] write/append %help.txt "^/^/LAYOUT WORDS:^/^/" foreach i svv/vid-words [write/append %help.txt join i newline] b: copy [] foreach i svv/facet-words [ if (not function? :i) [append b join to-string i "^/"] ] write/append %help.txt rejoin [ "^/^/STYLE FACETS (ATTRIBUTES):^/^/" b "^/^/SPECIAL STYLE FACETS:^/^/" ] y: copy "" foreach i (extract svv/vid-styles 2) [ z: select svv/vid-styles i ; additional facets are held in a "words" block: if z/words [ append y join i ": " foreach q z/words [if not (function? :q) [append y join q " "]] append y newline ] ] write/append %help.txt rejoin [ y "^/^/CORE FUNCTIONS:^/^/" at x 4 ] editor %help.txtHere's an email program that demonstrates how to set all your email account settings:
m: system/schemes/default q: system/schemes/pop view layout [ style f field u: f "username" p: f "password" s: f "smtp.address" o: f "pop.address" btn bold "Save Server Settings" [ m/user: u/text m/pass: p/text m/host: s/text q/host: o/text ] tab e: f "user@website.com" j: f "Subject" t: area btn bold "SEND" [ send/subject to-email e/text t/text j/text alert "Sent" ] tab y: f "your.email@somesite.com" btn bold "READ" [foreach i read to-url join "pop://" y/text [ask i]] ]This example keeps a real time word count of text in an area widget. Changing the rate will reduce system resource usage, but also slow the response time (a rate of 3-4 updates per second should be suitable for most cases):
view layout [ i: info rate 0 feel [ engage: func [f a e] [ if a = 'time [ l: length? parse m/text none i/text: join "Wordcount: " l show i ] ] ] m: area ]Here are two versions of the VOIP program given earlier in the section about ports. These are likely the most compact VOIP programs you'll find anywhere. The first features port error handling, automatic localhost testing (just press [ENTER] to use localhost as the IP address), hands-free operation, and automatic minimum volume testing (squelch - data not sent unless a given volume is detected, to save bandwidth). It can be pasted directly into the REBOL console, or saved to a file and run. The second is barebones (user sees errors when the connection is broken, must be saved to a file and run, etc.) but it does work. The file sizes of these scripts are 693 bytes and 554 bytes!!:
REBOL[]do[write %w{REBOL[]if error? try[p: first wait open/binary/no-wait tcp://:8][quit]wait 0 s: open sound:// forever[if error? try[m: find v: copy wait p #""][quit]i: to-integer to-string copy/part v m while[i > length? remove/part v next m][append v p]insert s load to-binary decompress v]}launch %w lib: load/library %winmm.dll x: make routine![c[ string!]return:[logic!]]lib"mciExecute"if(i: ask"Connect to IP: ")=""[i: "localhost"]if error? try[p: open/binary/no-wait rejoin[tcp:// i":8"]][ quit]x"open new type waveaudio alias b"forever[x"record b"wait 2 x "save b r"x"delete b from 0"insert v: compress to-string read/binary %r join l: length? v #""if l > 4000[insert p v]]] REBOL[]write %w{REBOL[]if error? try[p: first wait open/binary/no-wait tcp://:8][quit]wait 0 s: open sound:// forever[m: find v: copy wait p #"" i: to-integer to-string copy/part v m while[i > length? remove/part v next m][append v p]insert s load v]}launch %w lib: load/library %winmm.dll x: make routine![c[string!]return:[logic!]]lib"mciExecute"i: ask"IP: "p: open/binary/no-wait rejoin[tcp:// i":8"]x"open new type waveaudio alias b" forever[x"record b"wait 2 x"save b r"x"delete b from 0"insert v: read/binary %r join length? v #""insert p v]The following short script demonstrates how to use the Intelligent Mail encoder dll from the US postal service.
REBOL [title: "USPS Intelligent Mail Encoder"] unless exists? %usps4cb.dll [ write/binary %usps4cb.dll read/binary http://re-bol.com/usps4cb.dll ] GEN-CODESTRING: make routine! [ t [string!] r[string!] c [string!] return: [integer!] ] load/library request-file/only/file %usps4cb.dll "USPS4CB" t: request-text/title/default "Tracking #:" "00700901032403000000" r: request-text/title/default "Routing #:" "55431308099" GEN-CODESTRING t r (make string! 65) alert first second first :GEN-CODESTRINGHere's an instant message example that allows users to upload their connection info (username, WAN IP, LAN IP, and network port), to a text file on an FTP server. Then others can simply click on their user name in a drop down box (choice button), to connect:
REBOL [title: "Instant Messenger"] servers: ftp://username:password@yoursite.com/public_html/im.txt ; EDIT flash "Retrieving server list..." if error? try [server-info: reverse read/lines servers] [ alert "Internet connection not available." server-info: copy [] ] unview name-list: copy [] foreach server server-info [append name-list first to-block server] insert head name-list "Connect to a Server:" view center-face layout [ across choice 280 data name-list [ mode: request [ { SELECT MODE: By default, this program is able to connect to a server running on any other computer in your Local Area Network. Choosing "LAN" mode connects you to a server's local IP address. If you select "Internet" Mode, you will connect to the server's WAN IP address (typically the address of the user's _router_). In order for Internet mode to work correctly, the selected port number chosen by the server user must be exposed on the Internet, or be forwarded from their router to the IP address of the computer running the server program. } "LAN" "Internet"] foreach server server-info [ server-block: parse server " " if ((form first server-block) = form value) [ b/text: server-block/1 show b either mode = false [ remote-ip: server-block/2 ] [ remote-ip: server-block/3 ] j/text: server-block/4 show j p: open/lines rejoin [tcp:// remote-ip j/text] z: 1 focus g break ] ] ] text "OR run as server:" b: field 106 "Username" text "Port: " j: field 55 ":8080" q: button 84 "Start Server" [ parse read http://guitarz.org/ip.cgi [ thru <title> copy p to </title> ] parse p [thru "Your IP Address is: " copy wan-ip to end] write/append servers rejoin [ b/text " " ; username wan-ip " " ; wan ip read join dns:// read dns:// " " ; local ip j/text "^/" ; port ] alert { Server is running. Connections from clients running on your Local Area Network should work without any problems. If you want to accept connections from the Internet, and you are connected by a router, then the port number you've selected must be forwarded from your router to the IP address of this computer (see portforward.com for more information about forwarding ports). } focus g p: first wait open/lines (join tcp:// j/text) z: 1 ] return r: area 700x400 rate 4 feel [ engage: func [f a e][ if a = 'time and value? 'z [ if error? try [x: first wait p] [quit] r/text: rejoin ["--> " x "^/" r/text] show r ] ] ] return g: field 400 "Type message here, then press [ENTER]" [ r/text: rejoin ["<-- " value "^/" r/text] show r insert p value focus face ] tabs 618 tab button "Save Chat Text" [editor r/text] return ]Here is a nice generic CGI example which demonstrates how to enter and decode both Get and Post data, slightly revised from the earlier examples in this text:
#!./rebol276 -cs REBOL[] print "content-type: text/html^/" either system/options/cgi/request-method = "POST" [ data: copy "" buffer: copy "" while [positive? read-io system/ports/input buffer 16380][ append data buffer clear buffer ] ] [ data: system/options/cgi/query-string ] cgi: construct decode-cgi data if (length? first cgi) < 2 [ print { <FORM METHOD="post" ACTION="./test.cgi"> <CENTER> <INPUT TYPE=hidden NAME=hiddenvalue VALUE="foo"> <INPUT TYPE=text size=50 name=text><BR><BR> <TEXTAREA cols=75 name=message rows=5></textarea><br><br> <INPUT TYPE="SUBMIT" NAME="Submit" VALUE="Submit"> </CENTER> <FORM> } quit ] print rejoin [ cgi/hiddenvalue "<br><br>" cgi/text "<br><br>" "<pre>" cgi/message "</pre>" ]Here is another version of Andreas Bolka's decode-multipart-form-data function (covered in the section of this tutorial about CGI programming):
decode-multipart-form-data: func [ p-content-type p-post-data /local list ct pd bd delim-beg delim-end mime-part ] [ list: copy [] if not found? find p-content-type "multipart/form-data" [return list] ct: copy p-content-type pd: copy p-post-data bd: join "--" copy find/tail ct "boundary=" delim-beg: join crlf crlf delim-end: rejoin [ crlf bd ] mime-part: [ ( ct-dispo: content: none ct-type: "text/plain" ) thru bd thru "content-disposition: " copy ct-dispo to crlf opt [ thru "content-type: " copy ct-type to crlf ] thru delim-beg copy content to delim-end ( handle-mime-part ct-dispo ct-type content ) ] handle-mime-part: func [ p-ct-dispo p-ct-type p-content /local fieldname ] [ p-ct-dispo: parse p-ct-dispo [describe ;=" here] fieldname: select p-ct-dispo "name" append list to-set-word fieldname either found? find p-ct-type "text/plain" [append list content][ append list make object! [ filename: select p-ct-dispo "filename" type: copy p-ct-type content: either none? p-content [ none ] [ copy p-content ] ] ] ] use [ ct-dispo ct-type content ] [ parse/all pd [ some mime-part ] ] return list ] ]This is a set of scripts by Andrew Grossman and Luis Rodriguez Jurado which also work with form-multipart data (just an example - NOT necessary for production use if you have Andreas's function):
#!c:/rebol.exe -cs REBOL [ TITLE: "form-upload" FILE: %form-upload.r DATE: 29-April-2000 ] print "Content-Type: text/html^/^/" print { <form METHOD=POST ACTION="post.r" enctype="multipart/form-data"> Enter a description of the file:: <input TYPE=text SIZE=50 NAME=text><br> Select the file: <input TYPE=file SIZE=15 NAME=myUpload><br><br><br> <input TYPE=submit VALUE="post.r"> </FORM></INPUT> } #!c:/rebol.exe -cs REBOL [ Title: "multipart POST" Date: 15-Sep-1999 Version: 1.2 File: %POST.r Author: {Andrew Grossman (modified by: Luis Rodriguez J - .29-April-2000)} Email: [grossdog--dartmouth--edu] Owner: "REBOL Technologies" Purpose: { To decode multipart encoded POST requests, including file uploads. } Usage: { Call this file in your CGI scriptand do decode-multi with a file argument of the directory where uploaded files will go and a logic argument to set whether files will be given the field they were uploaded as a name. Files are saved and variables are decoded and set. } Notes: { Fixed problem recognizing EOF. Functionality is now rock solid. Function calls won't change, so this is certainly useable. See the comment in the decode-multi function if you need mime types. Tested with MSIE and Netscape for Mac. } category: ['web 'cgi 'utility] ] decode-multi: func [ file-dir [file!] {Directory in which to put uploaded files} save-as-field [logic!] {save files as field name or uploaded filename} /local str boundary done name file done2 content ][ if equal? system/options/cgi/request-method "POST" [ either not parse system/options/cgi/content-type ["multipart/form-data" skip thru {boundary=} skip some {-} copy boundary to end] str: make string! input do decode-cgi str][ str: make string! input done: false while [not done] [ name: make string! "" str: make string! input either equal? "" str [done: true] [ either parse/all str [skip thru {name="} copy name to {"} skip thru {filename="} copy file to {"} skip to end] [ str: make string! input if not equal? str "" [str: make string! input] comment {if you need mime put "parse/all str [ "Content-Type:" skip copy mime to end ]" into the preceding if block.} done2: false content: make string! "" while [not done2] [ content-length: to-integer system/options/cgi/content-length str: make string! content-length read-io system/ports/input str content-length either d: find/reverse tail str boundary [ e: find/reverse tail copy/part str (index? d) {^/} content: copy/part str (index? e) - 2 done2: true] [ append content str ] ] if not none? file either save-as-field [name: dehex name write/binary file-dir/:name content] [ file: dehex file write/binary file-dir/:file content ] ] ][ parse str [skip thru {name="} copy name to {"}] str: make string! input str: dehex make string! input set to-word name str str: make string! input ] ] ] ] ] ] decode-multi %. trueThis is a slightly edited version of the 3D Maze program (raycasting engine) by Olivier Auverlot:
REBOL [title: "3D Maze - Ray Casting Example"] px: 9 * 1024 py: 11 * 1024 stride: 2 heading: 0 turn: 5 laby: [ [ 8 7 8 7 8 7 8 7 8 7 8 7 ] [ 7 0 0 0 0 0 0 0 13 0 0 8 ] [ 8 0 0 0 12 0 0 0 14 0 9 7 ] [ 7 0 0 0 12 0 4 0 13 0 0 8 ] [ 8 0 4 11 11 0 3 0 0 0 0 7 ] [ 7 0 3 0 12 3 4 3 4 3 0 8 ] [ 8 0 4 0 0 0 3 0 3 0 0 7 ] [ 7 0 3 0 0 0 4 0 4 0 9 8 ] [ 8 0 4 0 0 0 0 0 0 0 0 7 ] [ 7 0 5 6 5 6 0 0 0 0 0 8 ] [ 8 0 0 0 0 0 0 0 0 0 0 7 ] [ 8 7 8 7 8 7 8 7 8 7 8 7 ] ] ctable: [] for a 0 (718 + 180) 1 [ append ctable to-integer (((cosine a ) * 1024) / 20) ] palette: [ 0.0.128 0.128.0 0.128.128 0.0.128 128.0.128 128.128.0 192.192.192 128.128.128 0.0.255 0.255.0 255.255.0 0.0.255 255.0.255 0.255.255 255.255.255 ] get-angle: func [ v ] [ pick ctable (v + 1) ] retrace: does [ clear display/effect/draw xy1: xy2: 0x0 angle: remainder (heading - 66) 720 if angle < 0 [ angle: angle + 720 ] for a angle (angle + 89) 1 [ xx: px yy: py stepx: get-angle a + 90 stepy: get-angle a l: 0 until [ xx: xx - stepx yy: yy - stepy l: l + 1 column: make integer! (xx / 1024) line: make integer! (yy / 1024) laby/:line/:column <> 0 ] h: make integer! (1800 / l) xy1/y: 200 - h xy2/y: 200 + h xy2/x: xy1/x + 6 color: pick palette laby/:line/:column append display/effect/draw reduce [ 'pen color 'fill-pen color 'box xy1 xy2 ] xy1/x: xy2/x + 2 ; set to 1 for smooth walls ] ] player-move: function [ /backwards ] [ mul ] [ either backwards [ mul: -1 ] [ mul: 1 ] newpx: px - ((get-angle (heading + 90)) * stride * mul) newpy: py - ((get-angle heading) * stride * mul) c: make integer! (newpx / 1024) l: make integer! (newpy / 1024) if laby/:l/:c = 0 [ px: newpx py: newpy refresh-display ] ] evt-key: function [ f event ] [] [ if (event/type = 'key) [ switch event/key [ up [ player-move ] down [ player-move/backwards ] left [ heading: remainder (heading + (720 - turn)) 720 refresh-display ] right [ heading: remainder (heading + turn) 720 refresh-display ] ] ] event ] insert-event-func :evt-key refresh-display: does [ retrace show display ] screen: layout [ display: box 720x400 effect [ gradient 0x1 0.0.0 128.128.128 draw [] ] edge [ size: 1x1 color: 255.255.255 ] ] refresh-display view screenHere are a couple tiny utility scripts that I found useful:
; to replace a specific string inside special characters: code: "text1 <% replace this %> text3" replace code "<% replace this %>" "<% text2 %>" print code ; to replace everything between special characters: code: "text1 <% replace this %> <% replace this %> text3" parse/all code [ any [thru "<%" copy new to "%>" (replace code new " text2 ")] to end ] print codeThis script demonstrates how to insert a string into a file at a found position:
REBOL [] file: %mp3.html a-string: {<BODY bgcolor="#C8C8C8">} ; first way: write file read http://re-bol.com/examples/mp3.html content: read file insert (skip find content a-string length? a-string) trim { <center><h1>MP3 Example!</h1></center>} write file content editor file ; second way: write file read http://re-bol.com/examples/mp3.html content: read file begin: (index? find content a-string) + (length? a-string) altered: rejoin [ (copy/part content begin) {<center><h1>MP3 Example!</h1></center>} (at content begin) ] write file altered editor fileThis code determines the operating system you're running:
switch system/version/4 [ 2 [print "OSX"] 3 [print "Windows"] 4 [print "Linux"] 7 [print "FreeBSD"] 8 [print "NetBSD"] 9 [print "OpenBSD"] 10 [print "Solaris"] ] [alert "Can't be dertermined"]Here's a CGI program I keep on my web server to delete masses of email which contain any given "spam" text:
#! /home/path/public_html/rebol/rebol -cs REBOL [] print "content-type: text/html^/" print [<HTML><HEAD><TITLE>"Remove Emails"</TITLE></HEAD><BODY>] spam: [ {Failure} {Undeliverable} {failed} {Returned Mail} {not be delivered} {mail status notification} {Mail Delivery Subsystem} {(Delay)} ] print "logging in..." mail: open pop://user:pass@site.com print "logged in" while [not tail? mail] [ either any [ (find first mail spam/1) (find first mail spam/2) (find first mail spam/3) (find first mail spam/4) (find first mail spam/5) (find first mail spam/6) (find first mail spam/7) (find first mail spam/8) ][ remove mail print "removed" ][ mail: next mail ] print length? mail ] close mail print [</BODY></HTML>] haltThe following utility script takes an input string and returns and HTML string with all the web URLs appropriately wrapped as links:
bb: "some text http://guitarz.org http://yahoo.com" bb_temp: copy bb append bb_temp " " ; in case the URL doesn't have a trailing space append bb " " parse bb [any [thru "http://" copy link to " " ( replace bb_temp (rejoin [{http://} link]) (rejoin [ {<a href="} {http://} link {" target=_blank>http://} link {</a>}]))] to end ] bb: copy bb_temp print bbI use the following utility CGI script to copy entire directories of files from one web server to another:
#!/home/path/public_html/rebol/rebol -cs REBOL [] print "content-type: text/html^/" print [<HTML><HEAD><TITLE>"wgetter"</TITLE></HEAD><BODY>] foreach file (read ftp://user:pass@site.com/public_html/path/) [ print file print <BR> write/binary (to-file file) (read/binary (to-url (rejoin [http://site.com/path/ file]))) ] print [</BODY></HTML>]I use this next script to make sure that there are no files chmod 777 on my webservers. Built in is a routine that writes the name of every folder and every file on my server, to a text file. I run this one in the CGI console, with a "do chmod777to555.r":
REBOL [title: "chmod777to555"] start-dir: what-dir all-files: to-file join start-dir %find777all.txt write all-files "" recurse: func [current-folder] [ out-data: copy "" write/append all-files rejoin["CURRENT_DIRECTORY: " what-dir newline] call/output {ls -al} out-data write/append all-files join out-data newline foreach item (read current-folder) [ if dir? item [ change-dir item recurse %.\ change-dir %..\ ] ] ] recurse %.\ file-list: to-file join start-dir %found777.txt write file-list "" current-directory: "" foreach line (read/lines all-files) [ if find line "CURRENT_DIRECTORY: " [ current-directory: line ] if find line "rwxrwxrwx" [ write/append file-list rejoin [ (find/match current-directory "CURRENT_DIRECTORY: ") (last parse/all line " ") ] write/append file-list newline ] ] foreach file (read/lines file-list) [ call rejoin [{chmod 755 } (to-local-file file)] ]I've used variations of the following script to rename all the files with a given extension in a folder, to a different extension. The script copies all the files to the same name, without any extension at all:
foreach file read %. [ if (suffix? file) = %.src [ write (to-file first parse file ".")(read to-file file) ] ]Here's how to move one item in a series to a different position:
x: ["one" "two" "three" "four" "five" "six"] move/to (find x "five") 2 print xI use the following script to keep my collection of Haxe language libraries up to date:
REBOL [] write %haxelibs.txt read http://lib.haxe.org/files/ the-list: read/lines %haxelibs.txt clean: copy [] foreach line the-list [ x: (parse/all form (find line ".zip") ">") if (length? x) > 2 [ y: parse form second x "<" append clean first y ] ] errors: copy [] make-dir %haxelibs change-dir %haxelibs save %list.txt clean ; comment this if you need to edit list.txt downloaded: read %. if exists? %previously_downloaded.txt [ append downloaded load %previously_downloaded.txt ] save %previously_downloaded.txt unique downloaded ; editor downloaded foreach file clean [ if not (find downloaded (to-file file)) [ either error? try [size? (join http://lib.haxe.org/files/ file)] [ print join "ERROR: " file append errors file ] [ print rejoin [ {Downloading: } file { (} size? (join http://lib.haxe.org/files/ file) { kb)} ] if error? try [ write/binary (to-file file) (read/binary (join http://lib.haxe.org/files/ file)) ] [ print join "ERROR: " file append errors file ] ] ] ] save %haxe_lib_download_errors.txt errors halt foreach file clean [if find downloaded (to-file file) [print file]]I use the following line to view/edit the code of script which has been run directly from a zip file (compressed folder) in Windows:
editor to-file request-file system/script/pathHere's how to refer to widgets in the main window pane of a GUI window:
foreach item system/view/screen-face/pane/1/pane [ remove find system/view/screen-face/pane/1/pane item ; this removes all widgets ]Here is a Windows API function to use MCI functions:
lib: load/library %winmm.dll mciSendString: make routine! [ command [string!] rStr [string!] cchReturn [integer!] hwndCallBack [integer!] return: [integer!] ] lib "mciSendStringA"The following example demonstrates some techniques that can be used to position widgets relative to one another when a GUI is resized:
REBOL [] svv/vid-face/color: white view/new/options gui: layout [ across t1: text "50x50" t2: text "- 50x25" t3: text "- 25x50" ] [resize] insert-event-func [ either event/type = 'resize [ fs: t1/parent-face/size t1/offset: fs / 2x2 t2/offset: t1/offset - 50x25 t3/offset: t1/offset - 25x50 show gui none ] [event] ] ss: system/view/screen-face/size gui/size: (ss - 200x200) gui/offset: (ss / 2x2) - (gui/size / 2x2) show gui do-eventsThe following scripts demonstrate several different ways to run the code from the action block of another widget (i.e., to simulate mouse clicks or other actions on any given face). To understand more, run "source do-face" and "source do-face-alt" in the REBOL console to see how the "do-face" and "do-alt-face" functions work:
view layout [ button1: btn "Button 1" [alert "Button 1 action block has been run."] btn "Button 2" [do-face button1 1] ] view layout [ b1: btn "B1" [alert "B1 left click"] [alert "B1 right click"] btn "B2" [do-face b1 1] [do-face-alt b1 1] ] view layout [ button1: btn "Button 1" [alert "Button 1 action block has been run."] btn "Button 2" [button1/action button1 none] ; "button1 none" in the line above releases the down state of the btn ]The following script from http://www.pat665.free.fr/gtk/rebol-view.html demonstrates another way to do the same thing:
view layout [ b: button "Test" [print "Test pressed"] button "In" [b/state: true show b] button "Out" [b/state: false show b] a: button "Action" [ b/feel/engage :b 'down none b/feel/engage :b 'up none a/state: false show a ; Not sure why this line is needed... ] ]Here's a 92 character version of the classic "FizzBuzz" program:
repeat i 100[j:""if i // 3 = 0[j:"fizz"]if i // 5 = 0 [j: join j"buzz"]if j =""[j: i]print j]The following example demonstrates how to use the Captcha library from Softinov:
REBOL [] write/binary %Caliban.caf read/binary http://re-bol.com/Caliban.caf do http://re-bol.com/captcha.r captcha/set-fonts-path %./ captcha/level: 4 write/binary %captcha.png captcha/generate write %captcha.txt captcha/text view center-face layout [ image (load %captcha.png) text "Enter the captcha text:" f1: field [ either f1/text = (read %captcha.txt) [ alert "Correct" ] [ alert "Incorrect" ] ] ]Here's a way to get separate characters from random words (this was originally intended to be used as part of a captcha routine):
x: copy [] wrds: (first system/words) foreach ch mold pick wrds (random length? wrds) [append x ch] print xHere's a version of the "Parts Database" application that adds images on each entry, search facility, and other useful features:
REBOL [title: "Student Photo Database (variation on Data Card File)"] write %StudentList.csv {STUDENTID,LASTNAME,FIRSTNAME,DOB,GRADE 111111,Doe,Steven D,6/16/1992,12 111112,Doe,Jonathan Daniel,12/16/1991,12 111113,Smith,Karen J,12/3/1991,12 111114,Jones,Michael J,6/4/1992,12 111115,Taylor,Ryan C,1/10/1992,12 111116,Adam,Kaitlan C,4/30/1992,12 111117,Washington,Gabryela,3/31/1992,12 111118,Travolta,Juan D,1/24/1992,12 111119,Cruise,Amber E,5/8/1992,12} either exists? %data.txt [ database: load %data.txt ][ filename: %StudentList.csv database: copy [] lines: read/lines filename foreach line lines [ append database parse/all line "," ] remove/part database 5 ; get rid of headers for counter 6 ((length? database) + 12) 6 [ insert (at database counter) to-file rejoin [ "/C/Photos/image_" (pick database (counter - 5)) ".jpg" ] ] save %data.txt database ] update: func [marker] [ n/text: pick database marker a/text: pick database (marker + 1) p/text: pick database (marker + 2) o/text: pick database (marker + 3) g/text: pick database (marker + 4) i/text: pick database (marker + 5) if error? try [photo/image: load to-file i/text] [ ; alert "No image selected" photo/image: none ] photo/text: "" show gui ] view center-face gui: layout [ text "Load an existing record:" name-list: text-list blue 300x80 data sort (extract database 6) [ if value = none [return] marker: index? find database value update marker ] text "ID:" n: field 300 text "Last:" a: field 300 text "First:" p: field 300 text "BD:" o: field 300 text "Grade:" g: field 300 text "Image:" i: btn 300 [ i/text: to-file request-file photo/image: load to-file i/text show gui ] at 340x20 photo: image white 300x300 across btn "Save" [ if n/text = "" [alert "You must enter a name." return] if find (extract database 6) n/text [ either true = request "Overwrite existing record?" [ remove/part (find database n/text) 6 ] [ return ] ] save %data.txt repend database [ n/text a/text p/text o/text g/text i/text ] name-list/data: sort (extract copy database 6) show name-list ] btn "Delete" [ if true = request rejoin ["Delete " n/text "?"] [ remove/part (find database n/text) 6 save %data.txt database do-face clear-button 1 name-list/data: sort (extract copy database 6) show name-list ] ] clear-button: btn "New" [ n/text: copy "" a/text: copy "" p/text: copy "" o/text: copy "" g/text: copy "" i/text: copy "" photo/image: none show gui ] next-btn: btn "Next" [ if error? try [ old-num: copy n/text n/text: form ((to-integer n/text) + 1) show n marker: index? find database n/text update marker ] [n/text: copy old-num show n alert "No more records"] ] prev-btn: btn "Previous" [ if error? try [ old-num: copy n/text n/text: form ((to-integer n/text) - 1) show n marker: index? find database n/text update marker ] [n/text: copy old-num show n alert "No more records"] ] key keycode [down] [do-face next-btn 1] key keycode [up] [do-face prev-btn 1] at 340x340 d1: drop-down 300 data [ "Last Name" "First Name" "Birthday" "Grade" ] at 340x380 f2: field 300 "Select field above, type search text here" [ if d1/data = none [alert "Select a search field above" return] search-field: to-integer select [ "Last Name" 2 "First Name" 3 "Birthday" 4 "Grade" 5 ] d1/data results: copy [] for counter search-field (length? database) 6 [ if find (pick database counter) copy f2/text [ append results pick database (counter - search-field + 1) ] ] t/data: copy results show t if [] = results [alert "None found"] ] at 340x420 t: text-list 300x60 [ name-list/picked: copy value show name-list if value = none [return] marker: index? find database value update marker ] ]Here's a version of the "Catch" program from earlier that replaces buttons with graphics, and adds a sound effect. You can create any game initially this way, simply using buttons, and later replace the buttons with more interesting graphic images, add sounds, etc.:
REBOL [title: "Feed The Gator"] bird: load to-binary decompress 64#{ eJzF2LuL4kAcwHG3shBURHDRRW3E+wuuPOEaC9lGC60EXyCClQjiM4qdzVWWVjYW iiA2Cj7wPOzEThALG7HYRixF737EU/bMTTLGzOQLgxCTyaeYxMTv77/0CravML7A +AbjDcaL4pXd/gO+/6m+jGu/n6vRaDAMY7fbTSaTzWa7zOn3+xm2zWbz5Pw8fSzF HTcajYLBoAIjn8/XbDalVV963J5KpXDIdwUCgV6vJ6tdhPour9crh/15+K1QKDSZ TER4t9ttsVhUsJcpnr3b7UoI/1wsFiuVSsw12HI+nz+fulAoVCoV7oF49sFgQAjO TaVSwRmPxyOQjUYjz54Oh0PIPh6PqcGhVqsluI/Vak2n08PhkNc+nU4pePGDlb5e r288tL3f78tt/ZtGo8lkMlwh2q5Wq4WnJZZSqYRreLnkWxYIuyyrJZFIZLPZxWLB 48WwwzQ01ZFIBNMrZJ/NZtTUuVxOhBpt12q1FNSwLEWrEXZYbqTVtVrtSTXCbjab yanhuV4S9b/21Wp1OBzIwaPRaKfTkRDO2vP5PCHvrWQyKa36aj+dToTIHo+n3W6T UF/tl09425TEa7FYnE4nPCuRI3PskF6vF4F1u93lchmwu92Oghdhh3Q63UNwae8b j8a5RxoMBkx4vV6XhXzrf7+rOPBqtUofexfiWSwcDvPAKRtR8b43xePxO7XL5aJG Ewzvf4L9fg8v8fP5nDTnoT6WfwB19HCVxhQAAA== } alligator: load to-binary decompress 64#{ eJxd0s1KW0EUB3C1K+lDuHVjXWSnkAvuXfgCBRG7bBeFlormPkKXQhuaN9BNxYUm UxF00UUWhUoIcRQXoYTkUm7T8Tof/845Z0o/5nL43XPmn+HmJmvrzx7N8KrHWoy1 HGs71my8aC2mfVpzf25nAMQKaAe69zqZLbEu/8hWaf+31u+JlnM3NXtK6kt7xBrL OYVyTzSpNx0yQ3FA5iiekA3oV9Hg8had4x6yjHLefUKD9Ajk/RR4SvkN4Dnl5xEc 9Y9lH1fgPAxCEF0yXCcn/+77/3VJL1Zt0Y7/nv9AxZa5rchuZi3ZUiXPc2VO2IEp k4aeF4PhS3Y0pPxP3JU0vwFYYwHyHGIrQp4Npa8ugSJa7ou3x0A3erEKT71/I3O/ K3nnVxYMv78z7uHjL0YGmPei/sxq3EmPMply4O+D13Biwe8JL87RYJvicsewh40R +yHf7LDYYpuoXZMDv8p9L6g62beK8/1Ri/1itPTQnOsXb8XDrqgL+bwapr7kc3vw E+7Vw1eZhzXym/I75Ah2l1VY4bkWxxnekVOEC/J7Bj7nPkf6/4txRX8BGfoeSmYD AAA= } gulp-sound: load to-binary decompress 64#{ eJxtlHtMU1ccx6vGR3kWLMWpm5pskc2pi3MkqFNYJsh0oigV5KEULK2lpdDb9vbe 9r56W1pogSKltBQqSGGAlYeimAlDkU1H1KgssrhBmFNhjAECHcZl2bVo1LjfyTm/ nO/vdf45n9joyMjphTTaoQj2Tq4QWB1Io9HmUSt8Fc2z59GWUEp6KpB6k8pC3zJs 7nzTvXbB/sdhmMdjcx5744q9SkHf1l4f/LLhq+K33jZnOI6/3gZBVAjq8Qj6Mkzl ek5KwBEpL11saGyrANhx4kKHzUBgmFKhUKKIAgBAlNRqNaSayiO1pEqeLeTzxZjJ nA+KAK2ByBaidle1XoGVnrLjx3kSlULEOSaBIBmkMZkL9Lo8owYUZYqyRLwMMVJo NqgkoL7MQoqOiXUVzpPl1a7OiyXS6K2RBxJiE1KgitrTteYyq0ktStgbE3MwTUha 7BXFmDxHjpGITE5Unu++dLaupc2UFTLfd5PEZi8xObp7W/Ts8N3Jx3npXMjqarQA 8XFHpJBUeAwscNRZ8wwF1a7auvIzVWRCwCL/XY6B4c5CWGYol+8LWfk52X63t1Ka mnw0Izk+XkCcbDpVKueKUdvpRofVfulms3TlIh8mODQ7fjpx2359ERTFZB3u+Gt2 MH+zr8+mgwJMZ2/vajYeDt2aYr72U7eNUDf+es+yYQFzQcQvs+MTmQH0zaTTsued j/HHT2b6vloc6L0+71Z/hw2RykVHvt6bVtTZd+ecraCq3sT28fNnFD4bdQ/sWhwQ xHG14HH7iHtPpi6ELgn0CnFNTQybdwSviYLs39TYyqwN565cq+evoQctDvv+6cjT ns/ogQGH6r4tVwh0PWMjzq1egb5rqqfHJhq3+Pt9kOW61l2jh3TOG0Pt/BV01sL9 A+7H/5xi+TGWpl/pq0cScxruP2qI8g70W2Zxj7ovb/cJYCS0D49dMXC5up4H13OC vFkLEodnhv8t8WUE+AsHn9w27totPj94XbXCZ6l31uj45MOkJUz65tbJiZGahJ1p rv6fcZYXa/7eodlHtLplXqyFkXenJ7qSwz4VNlxuTlrK8NvYNDPqrl9LDcq4Pzk5 aIyNFpdftITSmfQP256NuH9jL2L6MhVDk2Mdiojt8WBZniB8bWha7f2JOyf2BLO2 4b1jk301pAxAeFtWegfvbJgan36ofc/Hj7G/cuCPvlaYx04SZPCT4lKExvqLbRXg wS+jBZbv+vuuNhWDieuCAoN3EP0zU5PnOcu9vEO41Tdu9zp1AOc4N4PDPpSYlV/T dtaBcWJi+YbWH+/e7HAoD6zyZyyP0t9z//1nq2Cjj/8nKaXtP1ytOyHn8TkZ3DRu ugjWWU9WFqMivhCznunq6W42Z4Yt8wrYwGt++NR9x5K0/t33I0TFrZ1tTj3ATU7l iUFQli2SwFrTiaJ8jdZgrmpou+CqkOz+yD94XZK568Hvt5rwo3u+iEmR6IttZUYS yBRkyhFCDcnEmdkArMkvsTlqapx1VeWGnCNRYWHhidKi+pbW+tJ8pVwuQ3G1BoVz eOkcbg6caywoyMWVIKTEqf9ozNPrcrUYLMuRABBO6nUkppACAIzpqLQ8LYmpIBAE FRAEwbASwQmCwFSwgpIgJarW6inTUfUakiTVOAJTMkJoNCSuAmVSQCqHUdwTec4X tRrHVEpYqaKMIg9OqNVqAvcgh9RoczUkgSKeGMUlRKWkBqpQah6Gzkko/oJjOE7g L2FFAc2DM8zTjHoZDKsw4vlEDwyRF5xUKZVUj7lagsCxOfYR/wHwfuhW/AUAAA== } alert "Arrow keys move left/right, up goes faster, down goes slower" random/seed now/time speed: 9 score: 0 view center-face layout [ size 600x440 backdrop white across at 270x0 text "Score:" t: text bold 100 (form score) at 280x20 y: image bird at 280x340 z: image alligator key keycode [left] [z/offset: z/offset - 10x0 show z] key keycode [right] [z/offset: z/offset + 10x0 show z] key keycode [up] [speed: speed + 1] key keycode [down] [if speed > 1 [speed: speed - 1]] box 0x0 rate 0 feel [engage: func [f a e] [if a = 'time [ y/offset: y/offset + (as-pair 0 speed) show y if y/offset/2 > 440 [ y/offset: as-pair (random 550) 20 show y score: score - 1 ] if within? z/offset (y/offset - 50x0) 100x20 [ y/offset: as-pair (random 550) 20 show y score: score + 1 insert port: open sound:// gulp-sound wait port close port ] t/text: (form score) show t ]]] ]Here are a couple short versions of the catch game:
REBOL [title: "Catch Game"] s: 1 p: 3 d: 10 n: now/time random/seed now r: func [x] [y/offset: random 550x-20 p: p + .1 s: s + x] view/new center-face g: layout [ size 600x440 backdrop white t: text 200 y: btn red #" " [d: negate d] at 350x415 z: btn blue ] forever [ y/offset/2: y/offset/2 + round p z/offset/1: z/offset/1 - d z/offset/1: switch/default z/offset/1 [0 [0 + d] 550 [550 + d]][ z/offset/1 ] if overlap? z y [r +1] if y/offset/2 > 420 [r -1] t/text: rejoin ["Pieces: " s " | Time: " now/time - n] wait .01 if s = 0 [alert t/text quit] show g ] REBOL[title: "Catch"] s: 1 p: 3 d: 10 n: now/time random/seed now r: func [x] [y/offset: random 550x-20 p: p + .1 s: s + x] view/new center-face g: layout[ size 600x440 t: text 200 y: btn red #" "[d: negate d] at 350x415 z: btn ] forever [ y/offset/2: y/offset/2 + round p z/offset/1: z/offset/1 - d z/offset/1: switch/default z/offset/1[0[0 + d]550[550 + d]][z/offset/1] if overlap? z y [r +1] if y/offset/2 > 420 [r -1] t/text: form now/time - n wait .01 if s = 0[alert t/text quit] show g ]Here's a simple math test program that can be used and modified by teachers:
REBOL [title: "Math Test - Simple"] random/seed now ceil: counter: total: score: 0 calculate: does [ if error? try [ either (to-integer f3/text) = do rejoin [ (to-integer f1/text) " " oprtr/text " " (to-integer f2/text) ] [ alert "Correct!" score: score + 1 ] [ alert "Wrong!!!!" ] total: total + 1 counter: counter + 1 if (counter > 10) [ ceil: ceil + 10 counter: 0 ] f3/text: copy "" f1/text: copy form (random 9 + ceil) f2/text: copy form (random 9 + ceil) show gui focus f3 ] [alert "** ERROR: Please type a number" focus f3] ] show-score: does [ alert rejoin [ {You answered } score { CORRECT and } (total - score) { WRONG.} ] ] view center-face gui: layout [ f1: field copy form (random 9 + ceil) f2: field copy form (random 9 + ceil) f3: field key #"^M" [calculate] across oprtr: rotary 40 "+" "-" "*" "/" btn "Score" [show-score] do [focus f3] ]Here's a version of the math test program that makes use of a sprite sheet:
REBOL [title: "Math Test"] code: [ random/seed now ceil: counter: total: score: 0 calculate: does [ if error? try [ either (to-integer f3/text) = do rejoin [ (to-integer f1/text) " " oprtr/text " " (to-integer f2/text) ] [ alert "Correct!" score: score + 1 update-pic true ] [ alert "Wrong!!!!" update-pic false ] total: total + 1 counter: counter + 1 if (counter > 10) [ceil: ceil + 10 counter: 0] f3/text: copy "" f1/text: copy form (random 9 + ceil) f2/text: copy form (random 9 + ceil) show gui focus f3 ] [alert "** ERROR: Please type a number" focus f3] ] show-score: does [ alert rejoin [ {You answered } score { CORRECT and } (total - score) { WRONG.} ] ] update-pic: func [correct] [ z: either correct [ first random [0x0 64x0] ] [ first random [0x64 64x64] ] img/image: to-image layout/tight [ image 64x64 pic effect [crop z] ] show img ] view center-face gui: layout [ backdrop white f1: field copy form (random 9 + ceil) f2: field copy form (random 9 + ceil) f3: field key #"^M" [calculate] across oprtr: rotary 40 "+" "-" "*" "/" btn "Score" [show-score] text "" img: image 64x64 do [focus f3 update-pic true] ]] pic: load to-binary decompress 64#{ eJyVlnc02w/09z9GhdRetUcTIzGqKRWxaYMgiMSmatQqNUrNIqjWFqvUFsQetVWV 1mxLEZtWja/aOpSq1q+/55znnOff5/3v69z3eZ977rn3ns+drwDsGLQBGqD5J1ka WQA4XwR0AQb6CwwX6BkYLjCAQAyMYHYwmIkJzM3Kxsx+iZuP7xI3L6+AsISogCBE iJdXTFYMIikFg8P4ReUU5KQVJKRh0v9rQgMCgcCMYC4wmEtagFdA+v9b568ADkYg Boiho7kM0HLQ0HHQnL8BhAGA5sL/pgX+r0DAv7SMdDS0TP+wOjtAQ0dHR0tPy0h/ gZ7uH6ahpfvHOQBOcdBVLm2z25f9uHkQOrjo9BJGiFMT76Vr/kSoIulQt+/rv3IB GoCW7v/xBgC6CzS09ADDP4bgAGj/edPSMTDQ0v0fRkML0NFzcIpfvaDNZXab+7Jf dEkTAw8EkX5YOtH3+ev5AsBM98+Qg44D0ASmUb9s2lIjjUOxqszbnHsdWzMDDASH llOrOGEVy4/yXK8werlSUZqNVGwG2FRtM3qzwEymx7rZvdnowU6Sfk4+w20JHKHI ZINI8xPq7hVgYW7p+uSPZa26j21zym3b9IS/6RKiCQb68L61zyusGiP0gq7RD38M tNtWLEwWTy0FMOrega/lsN3OqoL4v3QpmtUO7UMvjlxUbajL/q4X8ONZbnb4sn92 S9lmAXbR3uy5vGXae/luvhHrhWyoaxzlFGhUFr1dcOPoCmWn1ZP7VE4k88hplQKt VsNzZkJdkkc1IlLpPqwns5VObfdo1/G1110eCpO6G6ub21Ymys+/FHdFNWzPbIgP ORYr37NsPDRoazTh7gDuUAuoj9q0Pt65WFTmz48gj3TK3qxV7onkfiyWT1NkIsbK qU+3IkW/caNGt84cQvVILTWCycXbBAo/1ljuOwK1KYYSsqu3ddPh2kIjwsFlSX6f 9IUyBvOmJdGV/aEum8+cZBjlUTvxTDogaNFdFt4b++UuP4d6/36tjhunhunMRxhZ yPg9y4yJ4a99sW1SokMDO3v1AXy242UpbHDijak2r8semxSLbZd/0JxvRpM93ggf og+34hmNtMxt5+Rv9gYrCTOtDEfAs6Cp9uvkzc6+lfBWnP6qfvzRUf2nwZ9bl2Rq ncV/mPM0ptptIs9a/sbPCAo0frPy7KBag1JZ/XlEQVP+r7CR6vSoOOpCvo2zZCLV zXOqECZ/lfMpNWheG4u1jOOszUy64Dfmi1YUq7cLzNvX6KgazdMeRgjJwH65NVEh vEtPkEUllEANPht9HCO9jJpXKTY8RSkO5T0N/pMo0XIzIgDG/zpN1HpOr/D1OTDY 4DdEQQrMW6jPG3bv/fSkWoajhZF+9Lfv1jr786r0P4o04kjTvr6AlkgVsDmU/stV XpX15kQqKCadNjSROh+wTtx77jV8qoZ+PAodE6rrVxXOd/4v4z/0k0s9ZnhVjXaC tkkimGu8WGQUZ1qafpCRzIpSRjzTa/E+ZQzxIWzcPB2hSpTLRm195F2NEofQQ12S VmgK5LeVGeJkH+PtciEh09SNWb0yW+lKJbuanLwgynem4AHX6E5HthcNjz9DVzj9 VZAcNoQ8nnHrIly1+VI1ugLW/tG/hBUlZO7pK4biHmXXpifaWD4mpdVKp10Le1nX RarndSC+Wy/bumVUid/qg/vnn05mdsULmOnbXoRdRG76WfizMr+QcfAUMc8R1kl5 bJiWe+W5YdRTp7Aqi/VOcdcbtZsFZUDhLyGeEWod6dOne8G/Av6c9Ad7F5DbzfIr B+8UwR/ECMu/9WROIEZh1oZ8z5zf7MdSoojafJ/StPk/lN4V+IP60CURyCqHyH/M wna4k7bommObibDlSESa6s2P+QZ9P2m83bl9X1J6x3M1g6b6fmwmDLGEMV3RsNL0 +jYWz7vXOxW/cdAiaR5HeH4OYNtv4eMUAn6mTSX2QaTAYlG+IYNKKa9rgu9b4XUi HgyN2VNIQYgNT3yFHfNs1bEgi8Zb18c73u6CD+QhhiEZO3HSZ+3Ob/FjOe/CKtVx OU5vQ4akW3VccUv3N50eD/MfL5BFCVAhV70b4AgVRRt4CS6T93iwl9dmlPq9Glrl kz76BJqRmjYkMN5j1lmN+O+5pLlvnP9s9fXZyeIqB64SDxn9/hQdUoWvXtVPVINe 54Mup97G73/PgVxP6ivrJu2FwiHRP16qkZzK3Ns/trIjOPr5K3QI2FLOEN9Kz5jI r5gYcnjq/R3tNyGcJc8lYrKXtQJBVI60yAjglOD9pss+J8IgVJegQvDAtrRIc3dy n4nQPREjJl1gu6z2eLaiq8vQM/TTBuLyNjI3DKTmIhKJDTgHDh6GUOM60bm+s7dx MHeZHNirBa5hJhFPyAfAQO2QLdy9F/5uawN7DnRspeIJPkNRO+7eMk8n2b+NHXA5 2Zn0c2rxjewjgaiLPRptu4vGcefAo08JZ/HmrSNepJx8q4OklNdIpD6wEsri2L3D dBPBvQ3x7v2PxyMDclo2xeE/9yOPwD+zWHDjrjJzl28OJzsnrlSVkzMjX0QLxD/8 drobvVIybK6EUTxZl3HH5UrAf8mGw38RA9uh1FIFYuWGwmLEMewVg4bbOCFhHFeH wuCrsk4wlnnOtS8bJvj/nEzKaLT6v9yekmN2T/Lxu9ZuWAt+r9Mq0IDIgXF3hb58 2sDRk5Bme0KaclwhlQLDK8zf5wTrKt6blLbH0WyTGzhTb3nIUbUhzleCxsLCBaPH 88KNQjxS8aFN8q03jULVRe6iwvaJAxhtWy/bx2IbpTF9QgEdh75a08+qwvZ9Ym5Q xk/+axdR3LgCcDYDuKZUxbobfpsVDxcfYOtQWbP6AUnhbYiXnI3iJlx6fl8UW023 XAnbx9i90xgy8ns6e7xF2Wi+3qt/g03CZvcwVGXSbKpv/zaMLJ/FCK4nBIwe95sa QL4JjDfffOtt/uVST2Fq+c0MdKJAgAb/fchrb9iIiW9RfMeuTjM6ZFqJMYkqZhAP U117uZDrp3ETzgf5MRZVwEdRxaQSnsM9F3Elozbs3H495VfEdTWpBmsj7keT9Y0H mNSEmjTWtQ+vbSl3phh4xjqWj5Af6QN1KjbFvR5NJoyn9+GyUuaH+44/zNyfJzBJ 3vhlMhqhlyPiW4cZ71TZ/IT2qahIvXdkPD8rzEdwP7pjazPJhFnEcWfWljiS47yx fh1sj91mHayPbxlU1eOWcrxe5jK66thOCiI4Vr/GicMDdflBb1MUH+ZnCiTMlEbR QvHMSdrETt7lwEQfOY/tu+SJQlzaO2LRxjGd5iRbOhLkMehHsR8Zkkr5pZamHhGp 7pGr+UZOoMiiRsWkwphyM21RFO2xXCsBx+CzYn4+NhC8GlukscC2tGxQM1Oh0THh 8eONigSC/TJaK7C5oBzG5hwsmN5NZMW8aEx7rR+z9FXQZuKeYIlh+aQb1eK1uwjC UsXDlSxCo2KhEB4F0oi3+Eu2mZCtz31dKUHt1rD7oS6xcpWUPduv55u5CYhG2l0U 1YKZaJXg4d/6MJtyMA/DfVstTdFGOC5+BJLkbHaMMzFFdeu0QS6osMrkZrU3mxeM xWwdVt77naL038xq+ZDpoQfzZR+/jwjuOJlIjl/XsItGconYLJ4PuFWxloXOdfY5 kJbIs49J839Y79x/PGbgLzTrLEcWLkZWgpvLHfew3Cp9B0kBdZJhrJHGdwxa+HYd jnNMquvhagJTq3VGgTB6CVcH8QU20G6V+u/rJYMBFcIWJGqp0iGj1OePt0u6Hf1d 6Lz8m6zvnMYblrCvioTeUGEKpOqfgJlseA73+aDOQL7QmsDzZQXpH6EZd+3U1VvL T2ojJGTKDe10zLpBTDCA4uurf/AJVYdH+QXZ/mDyNpfoL2JqbFeTpH6zD3ZLY0fC IW+D/PIDYmqEObN0t10NEgamI159DYciqtUUKwQWmCQcRL9zW6A3ZKCs4VlJTj8J HgR7RT4e0eFsSlJvh5ORFbd8okO1adkERqLlU9Kuh7y+zjOT3kFc5OVAz68ogmdv m6yAjmtxWmpZH8J+eRcXJ/MD1WUu1LpXbevncTBZ1cjPz2Q47A2hZhQafJd6WZ1z ydI9PeHzQskDOcfDR2LCuzHba0slsOORvY26gTQfP1pEMPHtx+qhfztBu7wHUzVA Nl/rWntn4m22ZKO/3O0uboBJsNFXARVYn774rRDqauFNLmmLgbm2QOnLxShQAOTI gBRuaqhBxSOEFpKDPkdw+ghUE9fr6Bg96GJbUrf4TL6AkCOlR22UI4ub8OlyqcFn cusUssj6mTT/D7jK5uFm24s4z82qQKiNNbxoqCp5a+JQbr4og0UYuG18/9GyYZxW JqoR3OhbmV0yNJwsZ++9YI6HX7ieIexhruDczg833dBmYhr5tYay+amNvmyvFUR6 xhr2d+FiYP9olbJZcviC9CdrIjHXj8jE+ZROKHopSh/SyTcE41favCWD3g0gqgrr VnfAl/hdUdgb79HePdOqrnKYpcU9lhMwzUn1md2xweC1uVQdZPH0qf7SpclL982t dRPERQ1NiKXBK/7oEOGUlIKbX1rAyzcJ3Q5OX5RWS5vXVFhQDQSaUXw4tfCvYwHz dubfCtNcPGaverqPOVxi+D3ozGQEyI/sBLbYGu1trsvdWvp2Dsy9l5fbYZvh0/Cv SMkzc75uad5T9RgdYniTPmPXMPfP46nqm/DRVJwut35Gfe7woOHQ66TZI9nM6HYq e3EEa2fVL/D9cmHZyC3+db5E0/Hh1t+eQVmegaj/vK8Wm+W2VZH/lFd+KVH7K2In /HIbXbd7nBXk/+AIiEw5B6y9g0Y6IBv5f5z3iz+9x1krLqBnq2Vee7cML/EPAy6s yg+5H+wV+Wse/plyq8PYTuf9t+aLR9uD1xvnVQ5Hzm6cYY5f/SbnRMh+eS8yGsLD 5BPhYUd32ZxyIiDV6S2C0Xz8fWQv3702c+/7WPvcnPlzIympjKvL9s9i1ul/zUXc V9xxjf0zr5eIeNwL3qiQGYr9Ii4RLJb9LXgTIAbTO6Zx38fOKqP1D355BSkx8+dA jb47fdqbIVF4GN7Ad8PbzvQYXndK0ZNFgsU2pDJ/QsZNfOauVmYa+EQb1F4Rfedp xfKiZKO1n1FzDwmatRSp+FGdGI6UKh+Y8qIsmKlHjz7+LP6GqEwzJBbHDPBEoWO/ 7/2tXtD27jTxXI9KijoLDE6ELDHL1iyV31IPCUuJpW6ftFXek16NO5IS8GLLd+qo a3uhvYXXFJw+tjqcjAggKm5UG0/jmTzLTZ/cw8UHK0ZxrsY/HQ0WCllP9dbrDFn6 cit2I9HScHM/U/03G5tmdtdVrmpL1Au4a8eGeNahQyZx7EP4yAOw5lcDjYVq61sa C1pHYw/X+/PaDDr9I4A3+d1XwIFlaB9ZF9pVAcZUQT84TusVXK3gZSXpYfi2yUnY 1tkWQfneYh2Yy4VIYZF1JEs7dqeKt3/WP4MWKQTKTBXGTm1xTVl0b4A3HKVlr9db 65wDHMtvE45N6U79aSaaGjRCphJZ87LhJrJhA8c5j1ZWmGkWQjmio8rKG3rkrj2t fKWK1HRrRJ1KCRiuBA2j3DTuhobrQd8FMr/xkPAKdGPC6EFJwUOii7P2KJVlEkJT zfN6gwPZzBazw6OvwF6S5qqv65jqPVTAotHdhXpcSbg34j/fgtab8SnjkmRDTGLV FB/0dye5hJAJq3rNTu9DeJOLUGdV4ra3qjFWIcSST/fj/ZM/hmD8DgoYp+k8kArV hZVz277iygSIeu8+DrRTIwyvM64Z+rp1bXXc7f1wgwT1b3F6sefOMMcyQZececkJ QVwrFTpBWCwA0JrXTCODbPeuGCtWmp4+eDBu0FpImW+3MkmY8oAnHUDEYnm8cX7j r4r9xvxKnqX1dj9BXkMr/6d1sNXQQ+cRoduxC36r6FNZjtgar3md6JCSBF3b7wIO UkyAJK44tkT03IGyeCaqf3INC5W7qNMuYaBGZHs6mNRKl2zYkYZWKVB6P+2LUDv6 sJOxTr9h/+IoxEqowsGHiirA5qK8km2nhHONKhFx3C2Vz3CcOUIanr4VWvpqjlJ0 UJIlBe84uVZtjHEJTnK7MM9a3uL2Z4jO+voiZaLSunlv9M3wpx84e63AK1IgeZhB YOuffYO9/FPHrY0aZ2rNA8MAr+jA2Kum7sqoYt6ttA8nhTqkz2IlMHoXZ1ZuMheR K1fGhzDEFeil0zJTnR9znMcUYdKUtj+wrEisXWPKzJI6Agnkly3hUXNmpdNb08zM RWUGuh0iv02Op/2CpttieafuTbyOaPvDVOt8DogelHzCdYXdU6F5omjjzD1a+h/a lXOV9oOj3Dq0wUnfQExUe4wtm2wHQxKv7yX1b5wdprpaQi8VJjn3h6x3TVV7e2e2 4RlhkPy1cyCYKoqpN8jCz0gfPTA8gusOGwRHXXzXkbxXZbUWfEKq9cvcHNf+7RT4 7x+ULwi04IGnLWW0tqO3sMGGEK8U0e4OWu3RJ3xSPjifHrZg6r3ESfL4AIfcmwQh 4cyWeO6S79gVxmOqnDdBsYG9wd3jw1fRuwUlNVJThnb4L9rits93r5XXaRmpQFq+ PJ9z1uhti5nl3ScHsizer8K0yh2VjKaBnpDGYW7qoxxLa+/Y9ebFivynuW62ewYS osh9CbskdR1OQuqi7sNE80+VP7qESOT6GnNWvIPfR9zaWMEIrmnkJMhN5PQWVT6u R7b/8vrI28KPJe9eHyth9KYZAUmu73TsjVejyFI+X9OPR3uNCZ7HBPjLNbyq5CfP dY4oL8+Mz7hV5yYH9ADHOiAFrC33jEi+aauWq9632b+YFSxxpcW1J2OY0WsXoc5J G3yml7FhUqWEbFFJtf0p4Z19ubVHpoBv0IPpaA6B0VNR8yvUQ1qkWlAucBcVxyLT /bqs7Y3BajCFWmuJWPpd//wvNql5iSMwh7XClZCf36jJsDxj+xbr9iSVzO23Kg/z b2WtVTGNg59Ak0cX0L6leFXhPiiTypUxPX0ytWz62enEyS0reMBTHXCCzs+oh6NB nxvV4h9iA3lYN5+f1qCdinCXlcwk5C+jlg7JiH0G7v7xhW+DbJA9NrkrPxdaeZ4s a0PEfDS32SWDc9ykGWrc6+OCXizb+l80TBM8zG5U0fma0eoMrPsVagm3Yr4kh3pX BVJR93xfVsYAPZi0klSOFz5zGh4nUd/6B4MFGj+Iz1D8n8XBKzbukF6UVBZpcTqz I2izkX4geh+khf4+q9Y50FBD4GzwdODgpH/K+dpL7cwD9Abz0Mow5q/eRtWW8ruc h0zemE8hni3YpFUP+/lvPz/k1BBClE53VRlSTtci5MokmyRaw410hwVBR7JnyB8Q sTghnlycvau8orZOFM6EAoH8/sI2peLUZN4tX14TloUiLd7G/G5aELQVLRl6qbTj hT+claSN0+T4evne8KGcZxniCzyGZSGAEXODchc5ibvaKmGrZle4YXvsahcwWK+u vk0vM/jUIvbpNAOJ5zIMKcau0PJzKSY9ZjG9CKdo2ygV6Mpi13exUsnGJCUHbWq2 sqpiETxHaBf7OjJe/6x9CluMRz1BldlS5DMhOXZKpV/M3bXoyeLiukyQ/RV6cuHc YPMU2VPcyfli3pObE9xBH0UIUurNIYOgiGt2ZI0x9Kygjf/VYVO1h46b2in5A9VL 07z1qD93bsyIda0pPGN59KEp+aXkB4CucG5kTSrJUyTeEw+fFuyKvmdRMbWujXGo nKQncsgJHQAkYJBT5UxXqnOGUFbXwrBkzPpfwVV8/SD26HqnD766qrLlyGwh2sz1 tTHpkY1FyOES7hspWA3Aoq/lJ6tsEfw+FtzicG8Ox9sq8846l2zQUhr+va2lSClV U/19MHcYR8VXd39v+cS3pfZGb+KtivA+eOR6W6VpLKy5nZecEd0qw69xgzm57zJ4 23W0V3+O0mW5OkBqn7P+fbscRYa6Df87EKnQSptHcktXCj8wV2zH4NVSNGg9f2Vt 28EupsKrWOLTk993bONKBkPoN9tRNvSRWc1dBSLCn/9eNrKEp/PZ1j6NDrMzNPAO 3+c/SauTu3qxBaeTnKgzbk17DozW1PQPW07vF6rThvx5TnnLoKWu2c49xsg9t8KG Y09PnbVM2FDpGuCMuK4tntu0lNKszkvK+POD40ug2fjhcyo4hQNfou8PeV+44mql eaUt/xzQPprNPdNPmtkxQ4JCSudo5xDXyAqFzaevJYsCXiwllAcBIblvIiqfLO24 m4l4gn+Mvfk6PK1MuW6/Ok7Yzqq8bRAEe+qipCQzelHCSlc75Let79y9TiTgmMzZ EOqS65865T5mCfs8ISmTDg2+5qgyGCSUPAKlVagl+hFp/WaIR9gI3LWMqqOBa6K7 I/Vvtc3DnX/dbe/z/fmxlh38EjKsrlcn3Ur1o7C+iXj+VNdzYd0S/1m/4r6NnFBP FuJpU1HAyG2om6YS1G/xLR0+UfhXewMu3eMjfkbylccVvcMpYWn/wmxSXaHgYxoD fXHpPjNQpBhlE/02QSi0h9OFP4mf+eXEW31VvP46d8bcOi3TKxD9Gt7Q6ahqorgT zOIzHTJDyg63Gb0k4K8TzBjSRCxNTx8Pf7Cp/UX5iweqV2X8+5VA7RhmPUVM5jPD apO5VOr6tMdA1K5yuUzYxDmQbfm5ysHZHTmeDbxCUh98FTk1TmVp5egMSNMbd/7X +wiDObOtqTtjdRfUCVVdv+QtXJQ+P7kI8YyB/a4jA/lr/FDmNfw+BVkzeg60yyEx uMl287XM7y2ySUV5tmDL4R24nGphrUDCCmvky+foDOxczjWjhb6JO5N05PgbDMSe B8HOqLE/nNXX32dCXmwLmssEDsBuAAz+pQFzNCmBlaSoTDKzBIwPCBpsqnsI3wv7 Vuel722QsufaLgC4wK8lXhzqfd0k9RZ66kX9aK7ERUtXgZLAiXbkdH+U6Fj7Ws2j 8O3OO72JPO9Ynm4Z9fTPjlnOkLcQ5LTuQDFvBm2rTcNgZflNWLx6FaMLtwwfo5m0 oP4g40rK1aov6V45IHP4vQnbGIlT3TT+O2rlmesw6stKzmJGk1MoV8whJwOWplcZ 3+lsy9qEmPM2m72lasjF+cCHEnd3gVwpRiLHCdEymgEu0aZto7RWB4qW23LYEq0y 4Jg/a85SuIm2cNFMhrtirURNAvFs7/SYyhJSfWH0t89AvDnFEKhjNXdU21L1I3Fn /nLx5+mDoPkPuSu3Hl3IfKOXRL0kvNQPxmVWhWeKvCGzpU91Hiwldn3maxm14X2K uA6br4epdYxDJYoRYD3+dZE1oW8/jiymKcMPG3cVuMP/C00EL9n1sTYu37n2ndCk aaW4JmoAs5gsYifhA9KJDWafkpEv6pEI2dFW1LULObmiN/zipJi8wABNioKWoN/G 1qJ9aJNJh/nUqbDOCmXIKICeF9LEHBdPXcOYmifgep8WW5Sat/9BpCnoK7IWo07r Q67a3K03GiyTmJkaMS9mBfYKkVT1RlaFgE97LIaUHPJ7U5ro5EcqghF3KH9FJnu/ hX6EOyyVfwO1p/ynedfDc95l4kKvu1mVlFMOq8zdjpJ5QybB1P9qC+SuDtVqR+9I ZWbs/HYHzWC4f8vv3qPw/r45dy9q2gmOHF4BRbok/ZKG5hNrRY8GdVmGXb01Yjsm J3Etsq5wEJHxu4CwjQEBg5zbk00y3XZwDM0NMpf6YEyocleg8/TDBhzGJlGkWUeF 1h/s7VXcWv3SuBdU09oqSW/5ypYlDd+TsMEkrj5TzPSKTygmjVSneyRYklEaoeGG 3Qi+a2xglKdbw6QzGHa93O8bpinFt1ihwBR+CVyy2LRXWG5LuM7FD/OunCTOW/S1 wrG7zNGD2mLfB9k0MGuH3yaXtWXS8/1BZN+cvkGGIVHr+8kzgk62H8FLBTxSzxsU wJHq5XqiOVvrG53vnuUpSa448RggFs1/LBBzteVjv5Fl6ASj+kZ9SVdfodikf2y0 HsA7hYXfYg5fQg5OWQOKIgyHq2cPMBsSFsa01qmGOrmJjxL6laHQLJldKSaAuQgy slfzEBvXpG1Fy2qwt5Fy9h1p72HqmYYN04n7GnyjeIo7MztHyV2DC4h+EZ3iN8eK iJRT+yt0F1arKvmzE9dbJxXzw2JZlFPQUqJfLeERbQTX390LU9hHVV0kmT86pLwC S1+/q8r3vOmD5GUO0hfdTyKXy/r94wKGj6bGnk1ZDITPfbuj2t3rjhSkUZ8L3kzf TKY/B57IF2reqtDroNw9ycpz0riell/1U3vp6jaZEw96ChfKZxFsXZ3oiNna2Km4 4eZ8lQGuzcU2dcVqH2uM77Yst4jx8B5pmY4DZQzSfvDnRgo5Nwp/LbD5vNTKb/xo qVP+wYKBzELxZYjKmD87a8CY9sFWqR4eJbmMK90LfZeZQPDot/gu9fkOJlXCjhZX Gnaorf5q/YuElf96a3ZF/eJDO/sXERItkXJ687cc/2KGUAMOBTdFy0Wt7Kynw5dX ROOP9yTdpj1Za2MHzD86yOa1ELf2Nkl69+yDl/tw0fyIdH+7+4HMPIqu1V4G50DC 8yGBWsHBgpa0XLpxQb3jMc2IEM7npnWaP8I8k+UDNhu9m3vKqOX8a59Qo4m3kIOQ 0HMgC57tpH79HNAyEOjxKYAbKtkS15/5Gye/C7I7Mc3I/5PahQAVD/OPC3ScA2wz RjUVO0FH9YoPia8HzDib/na/OizWBKtHsovEemxiT0Ea5epK2GJZPRf23po5048r B62eJkyikySTLmxLvvTd1wlU97rr74LS2BeNyeLS+isACKBZVxzNulxpLpS7se9D OAewpM9uLmRpl6QtD17TsixakyaIIXpMUih0LN7Q0NAeFY7yzUgVw3bKtX38KhDI aOumgiExqrGeA/XZ2V0mHtzL7brYIXN0BQj88kPCnOYizhugKwZoeWKjVJlZ5OT8 D95tFCxAj3/Ozm++zM4uxqRcxmZnZ3cYYn38G9XaMk6dHSTEaskp17c8PPvvJxHa dUN18oOSjW1zxzZuaqv8WjN5Ibl2rVnV3YNJFGyaBqwHCdjYNIQQVoO89joUFEjA 2pzXAcrGJkNV9WaBnJzc/Rfn8/8D1e5Xw6EgAAA= } do codeHere's another simple game example which illustrates several useful GUI techniques:
REBOL [Title: "Collect the Boxes"] random/seed now start-time: now/time level: to-integer request-text/title/default "Number of Boxes?" "10" gui: [ size 600x440 backdrop white at -99x0 key keycode [up] [p/offset: p/offset + 0x-10 show p] at -99x0 key keycode [down] [p/offset: p/offset + 0x10 show p] at -99x0 key keycode [left] [p/offset: p/offset + -10x0 show p] at -99x0 key keycode [right] [p/offset: p/offset + 10x0 show p] at -99x0 box rate 0 feel [engage: func [f a e][if a = 'time [ foreach f system/view/screen-face/pane/1/pane [ if f <> p [ if within? (f/offset + 10x10) p/offset 30x30 [ remove find system/view/screen-face/pane/1/pane f show system/view/screen-face/pane/1/pane ] ] if (length? system/view/screen-face/pane/1/pane) < 8 [ alert rejoin ["Your time: " now/time - start-time] quit ] ] ]]] ] for counter 1 level 1 [ append gui [at random 590x420 box 10x10 random 255.255.255] ] append gui [p: btn red 20x20] view center-face layout guiHere is a version of the Windows webcam program from earlier in this tutorial. This version was written for REBOL/face, and includes all the common avicap32.dll constants. It also contains the "do" files required in REBOL/face (they should be deleted if using REBOL/view). It also contains a function that can be used to hide and unhide windows:
REBOL [] do %gfx-colors.r do %gfx-funcs.r do %view-funcs.r do %view-vid.r do %view-edit.r do %view-feel.r do %view-images.r do %view-styles.r do %view-request.r do %view.r ;WM_CAP_START: 0x400 ;WM_START: to-integer #{00000400} WM_CAP_START: 1024 WM_CAP_UNICODE_START: WM_CAP_START + 100 WM_CAP_PAL_SAVEA: WM_CAP_START + 81 WM_CAP_PAL_SAVEW: WM_CAP_UNICODE_START + 81 WM_CAP_UNICODE_END: WM_CAP_PAL_SAVEW WM_CAP_ABORT: WM_CAP_START + 69 WM_CAP_DLG_VIDEOCOMPRESSION: WM_CAP_START + 46 WM_CAP_DLG_VIDEODISPLAY: WM_CAP_START + 43 WM_CAP_DLG_VIDEOFORMAT: WM_CAP_START + 41 WM_CAP_DLG_VIDEOSOURCE: WM_CAP_START + 42 WM_CAP_DRIVER_CONNECT: WM_CAP_START + 10 WM_CAP_DRIVER_DISCONNECT: WM_CAP_START + 11 WM_CAP_DRIVER_GET_CAPS: WM_CAP_START + 14 WM_CAP_DRIVER_GET_NAMEA: WM_CAP_START + 12 WM_CAP_DRIVER_GET_NAMEW: WM_CAP_UNICODE_START + 12 WM_CAP_DRIVER_GET_VERSIONA: WM_CAP_START + 13 WM_CAP_DRIVER_GET_VERSIONW: WM_CAP_UNICODE_START + 13 WM_CAP_EDIT_COPY: WM_CAP_START + 30 WM_CAP_END: WM_CAP_UNICODE_END WM_CAP_FILE_ALLOCATE: WM_CAP_START + 22 WM_CAP_FILE_GET_CAPTURE_FILEA: WM_CAP_START + 21 WM_CAP_FILE_GET_CAPTURE_FILEW: WM_CAP_UNICODE_START + 21 WM_CAP_FILE_SAVEASA: WM_CAP_START + 23 WM_CAP_FILE_SAVEASW: WM_CAP_UNICODE_START + 23 WM_CAP_FILE_SAVEDIBA: WM_CAP_START + 25 WM_CAP_FILE_SAVEDIBW: WM_CAP_UNICODE_START + 25 WM_CAP_FILE_SET_CAPTURE_FILEA: WM_CAP_START + 20 WM_CAP_FILE_SET_CAPTURE_FILEW: WM_CAP_UNICODE_START + 20 WM_CAP_FILE_SET_INFOCHUNK: WM_CAP_START + 24 WM_CAP_GET_AUDIOFORMAT: WM_CAP_START + 36 WM_CAP_GET_CAPSTREAMPTR: WM_CAP_START + 1 WM_CAP_GET_MCI_DEVICEA: WM_CAP_START + 67 WM_CAP_GET_MCI_DEVICEW: WM_CAP_UNICODE_START + 67 WM_CAP_GET_SEQUENCE_SETUP: WM_CAP_START + 65 WM_CAP_GET_STATUS: WM_CAP_START + 54 WM_CAP_GET_USER_DATA: WM_CAP_START + 8 WM_CAP_GET_VIDEOFORMAT: WM_CAP_START + 44 WM_CAP_GRAB_FRAME: WM_CAP_START + 60 WM_CAP_GRAB_FRAME_NOSTOP: WM_CAP_START + 61 WM_CAP_PAL_AUTOCREATE: WM_CAP_START + 83 WM_CAP_PAL_MANUALCREATE: WM_CAP_START + 84 WM_CAP_PAL_OPENA: WM_CAP_START + 80 WM_CAP_PAL_OPENW: WM_CAP_UNICODE_START + 80 WM_CAP_PAL_PASTE: WM_CAP_START + 82 WM_CAP_SEQUENCE: WM_CAP_START + 62 WM_CAP_SEQUENCE_NOFILE: WM_CAP_START + 63 WM_CAP_SET_AUDIOFORMAT: WM_CAP_START + 35 WM_CAP_SET_CALLBACK_CAPCONTROL: WM_CAP_START + 85 WM_CAP_SET_CALLBACK_ERRORA: WM_CAP_START + 2 WM_CAP_SET_CALLBACK_ERRORW: WM_CAP_UNICODE_START + 2 WM_CAP_SET_CALLBACK_FRAME: WM_CAP_START + 5 WM_CAP_SET_CALLBACK_STATUSA: WM_CAP_START + 3 WM_CAP_SET_CALLBACK_STATUSW: WM_CAP_UNICODE_START + 3 WM_CAP_SET_CALLBACK_VIDEOSTREAM: WM_CAP_START + 6 WM_CAP_SET_CALLBACK_WAVESTREAM: WM_CAP_START + 7 WM_CAP_SET_CALLBACK_YIELD: WM_CAP_START + 4 WM_CAP_SET_MCI_DEVICEA: WM_CAP_START + 66 WM_CAP_SET_MCI_DEVICEW: WM_CAP_UNICODE_START + 66 WM_CAP_SET_OVERLAY: WM_CAP_START + 51 WM_CAP_SET_PREVIEW: WM_CAP_START + 50 WM_CAP_SET_PREVIEWRATE: WM_CAP_START + 52 WM_CAP_SET_SCALE: WM_CAP_START + 53 WM_CAP_SET_SCROLL: WM_CAP_START + 55 WM_CAP_SET_SEQUENCE_SETUP: WM_CAP_START + 64 WM_CAP_SET_USER_DATA: WM_CAP_START + 9 WM_CAP_SET_VIDEOFORMAT: WM_CAP_START + 45 WM_CAP_SINGLE_FRAME: WM_CAP_START + 72 WM_CAP_SINGLE_FRAME_CLOSE: WM_CAP_START + 71 WM_CAP_SINGLE_FRAME_OPEN: WM_CAP_START + 70 WM_CAP_STOP: WM_CAP_START + 68 avicap32.dll: load/library %avicap32.dll user32.dll: load/library %user32.dll ; Hide rebface console: get-focus: make routine! [return: [int]] user32.dll "GetFocus" hwnd-hide-console: get-focus hide-window: make routine! [ hwnd [int] a [int] return: [int] ] user32.dll "ShowWindow" hide-window hwnd-hide-console 0 view/new center-face layout/tight [ image 320x240 across btn "Take Snapshot" [ sendmessage cap-result WM_CAP_GRAB_FRAME_NOSTOP 0 0 sendmessage-file cap-result WM_CAP_FILE_SAVEDIBA 0 "scrshot.bmp" ] btn "Exit" [ sendmessage cap-result WM_CAP_END 0 0 sendmessage cap-result WM_CAP_DRIVER_DISCONNECT 0 0 free user32.dll quit ] ] ; Set window title: set-caption: make routine! [ hwnd [int] a [string!] return: [int] ] user32.dll "SetWindowTextA" hwnd-set-title: get-focus set-caption hwnd-set-title "Web Camera" find-window-by-class: make routine! [ ClassName [string!] WindowName [integer!] return: [integer!] ] user32.dll "FindWindowA" hwnd: find-window-by-class "REBOLWind" 0 cap: make routine! [ cap [string!] child-val1 [integer!] val2 [integer!] val3 [integer!] width [integer!] height [integer!] handle [integer!] val4 [integer!] return: [integer!] ] avicap32.dll "capCreateCaptureWindowA" sendmessage: make routine! [ hWnd [integer!] val1 [integer!] val2 [integer!] val3 [integer!] return: [integer!] ] user32.dll "SendMessageA" sendmessage-file: make routine! [ hWnd [integer!] val1 [integer!] val2 [integer!] val3 [string!] return: [integer!] ] user32.dll "SendMessageA" cap-result: cap "cap" 1342177280 0 0 320 240 hwnd 0 ; 1342177280 in the line above is the value I got from ; BitOR(WS_CHILD,WS_VISIBLE) in two seperate development environments, ; but not sure if it will always hold true. sendmessage cap-result WM_CAP_DRIVER_CONNECT 0 0 sendmessage cap-result WM_CAP_SET_SCALE 1 0 sendmessage cap-result WM_CAP_SET_OVERLAY 1 0 sendmessage cap-result WM_CAP_SET_PREVIEW 1 0 sendmessage cap-result WM_CAP_SET_PREVIEWRATE 1 0 do-eventsHere's one final version of the web cam program, with a nicer save feature. In order for the save routine to work properly, this code should be saved to a .r script and run from there:
REBOL [] avicap32.dll: load/library %avicap32.dll user32.dll: load/library %user32.dll get-focus: make routine! [return: [int]] user32.dll "GetFocus" set-caption: make routine! [ hwnd [int] a [string!] return: [int] ] user32.dll "SetWindowTextA" find-window-by-class: make routine! [ ClassName [string!] WindowName [integer!] return: [integer!] ] user32.dll "FindWindowA" sendmessage: make routine! [ hWnd [integer!] val1 [integer!] val2 [integer!] val3 [integer!] return: [integer!] ] user32.dll "SendMessageA" sendmessage-file: make routine! [ hWnd [integer!] val1 [integer!] val2 [integer!] val3 [string!] return: [integer!] ] user32.dll "SendMessageA" cap: make routine! [ cap [string!] child-val1 [integer!] val2 [integer!] val3 [integer!] width [integer!] height [integer!] handle [integer!] val4 [integer!] return: [integer!] ] avicap32.dll "capCreateCaptureWindowA" view/new center-face layout/tight [ image 320x240 across btn "Take Snapshot" [ sendmessage cap-result 1085 0 0 sendmessage-file cap-result 1049 0 "scrshot.bmp" save-path: first split-path system/options/script view/new center-face layout [ image load join save-path %scrshot.bmp btn "save" [ (write/binary to-file pp: request-file/save/file %photo1.bmp read/binary join save-path %scrshot.bmp ) alert join "Saved " pp unview ] ] ] btn "Exit" [ sendmessage cap-result 1205 0 0 sendmessage cap-result 1035 0 0 free user32.dll quit ] ] hwnd-set-title: get-focus set-caption hwnd-set-title "Web Camera" ; title bar hwnd: find-window-by-class "REBOLWind" 0 cap-result: cap "cap" 1342177280 0 0 320 240 hwnd 0 sendmessage cap-result 1034 0 0 sendmessage cap-result 1077 1 0 sendmessage cap-result 1075 1 0 sendmessage cap-result 1074 1 0 sendmessage cap-result 1076 1 0 do-eventsThis is a sound synthesizing example derived from the quick hack demo by Cyphre:
REBOL [] wait 0 octave: ["c" "cs" "d" "ds" "e" "f" "fs" "g" "gs" "a" "as" "b" "c"] notes: copy [] oct: -1 repeat n 12 * 6 [ if (n - 1 // 12 + 1) = 1 [oct: oct + 1] insert tail notes reduce [ to-word join pick octave n - 1 // 12 + 1 oct 440 / ( 2 ** ((46 - n) / 12) ) ] ] make-sound: func [type freq ln /local tone freq2 result] [ switch type [ square [ freq: to-integer 22050 / freq tone: head insert/dup copy #{} to-char 0 freq result: copy #{} freq2: to-integer freq / 2 repeat n freq2 [ poke tone n to-char 0 poke tone n + freq2 to-char 255 ] insert/dup result tone ln / freq return result ] ] ] make-pattern: func [ tracks /local out snd-tracks t tempo mix ] [ out: make sound [ rate: 22050 channels: 1 bits: 8 volume: 0.5 data: #{} ] snd-tracks: copy [] loop (length? tracks) / 2 [ insert tail snd-tracks copy #{} ] t: 0 tempo: (60 / 120) ; SET THE TEMPO HERE foreach [inst track] tracks [ t: t + 1 repeat n length? track [ either track/:n = 'xx [ insert/dup tail snd-tracks/:t to-char 128 to-integer 22050 * tempo / 4 ] [ insert tail snd-tracks/:t make-sound inst select notes track/:n to-integer 22050 * tempo / 4 ] ] ] out/data: head insert/dup copy #{} to-char 0 length? snd-tracks/1 mix: array/initial length? snd-tracks/1 0 foreach track snd-tracks [ repeat n length? snd-tracks/1 [ poke mix n mix/:n + track/:n ] ] repeat n length? snd-tracks/1 [ poke out/data n to-char to-integer mix/:n / ((length? tracks) / 2) ] return out ] soundtrack: make sound [ rate: 22050 channels: 1 bits: 8 volume: 0.5 ; SET THE VOLUME HERE data: #{} ] ; Here are the notes to be played. All tracks should have the same ; number of notes. The note names for the musical alphabet are: ; c2 cs2 d2 ds2 e2 f2 fs2 g2 gs2 a2 as2 b2. Use "xx" for rests. ; ----------------------------------------------------------- tracks-1: [ square [ c1 cs1 d1 ds1 e1 f1 fs1 g1 gs1 a1 as1 b1 c1 xx cs1 xx d1 xx ds1 xx e1 xx f1 xx fs1 xx g1 xx gs1 xx a1 xx as1 xx b1 ] square [ e2 f2 fs2 g2 gs2 a2 as2 b2 c3 cs3 d3 ds3 e2 xx f2 xx fs2 xx g2 xx gs2 xx a2 xx as2 xx b2 xx c3 xx cs3 xx d3 xx ds3 ] ] ; ----------------------------------------------------------- ; This initiates the playing: p1: make-pattern tracks-1 insert/dup tail soundtrack/data p1/data 2 ; p2: make-pattern tracks-2 ; insert/dup tail soundtrack/data p2/data 1 ; the last # is the number of times to repeat the soundtrack sp: open sound:// insert sp soundtrack ; Here are some start-stop controls: ask "press enter to quit" ; wait sp close spThis script by Volker Nitsch demonstrates how to use the "set-it" func of the GUI list style:
stuff: copy [] view layout [ lst: list [across info info] 400x400 supply [ either count > length? stuff [face/text: "" face/image: none] [ lst/set-it face stuff index count ] ] with [probe words source set-it] ; get some hints button "add now" [ append/only stuff reduce [mold 1 + length? stuff mold now/time] show lst ] ]The following code demonstrates how to check for async keystrokes (including arrow keys) in the REBOL shell:
print "" p: open/binary/no-wait console:// q: open/binary/no-wait [scheme: 'console] forever [ if not none? wait/all [q :00:00.30] [ wait q qq: to string! copy q probe qq ] ]Be sure to see http://re-bol.com/examples.txt and http://rebol.org for more!
23. Learning More About REBOL - Important Documentation Links
A very old edition of this text with several hundred screen shot images is available at http://musiclessonz.com/rebol_tutorial-images.html). If you're completely new to programming, that text may offer some helpful simple perspective.
See http://re-bol.com/examples.txt for a complete REBOL code reference.
The tutorial at http://www.rebol.com/docs/rebol-tutorial-3109.pdf provides a nice summary of fundamental concepts. It's a great document to read next. To learn REBOL in earnest, read the REBOL core users manual: http://rebol.com/docs/core23/rebolcore.html. It covers all of the data types, built-in word functions and ways of dealing with data that make up the REBOL/Core language (but not the graphic extensions in View). It also includes many basic examples of code that you can use in your programs to complete common programmatic tasks. Also, be sure to keep the REBOL function dictionary handy whenever you write any REBOL code: http://rebol.com/docs/dictionary.html. It defines all the words in the REBOL language and their specific syntax use. The dictionary is also helpful in cross-referencing function words that do related actions in the language (great when you can't remember a function name you're looking for). Along the way, read the REBOL View and VID documents at: http://rebol.com/docs/easy-vid.html , http://rebol.com/docs/view-guide.html , http://rebol.com/docs/view-system.html , http://www.rebol.com/how-to/feel.html , http://www.pat665.free.fr/gtk/rebol-view.html , and run the script at http://www.rebol.org/download-a-script.r?script-name=vid-usage.r. Those documents explain how to write Graphical User Interfaces in REBOL. Once you've got an understanding of the grammar and vocabulary of the language, dive into the REBOL cookbook: http://www.rebol.net/cookbook/. It contains many simple and useful examples of code needed to create real-world applications. When you've read all that, finish the rest of the documents at http://rebol.com/docs.html.
Beyond the basic documentation, there is a library of hundreds of commented REBOL scripts at http://rebol.org. There's also a searchable archive of the mailing list and AltME (community forum) containing several hundred thousand posts at rebol.org. That archive contains answers to many thousands of questions encountered by REBOL programmers. Rebol.org is an essential resource! There are numerous other web sites such as http://www.codeconscious.com/rebol, http://www.rebolforces.com (duplicated at http://www.rebolplanet.com), http://www.reboltech.com/library/library.html, http://www.fm.vslib.cz/~ladislav/rebol, http://www.compkarori.com/vanilla/display/index, http://www.rebol.net, http://reboltutorial.com, http://blog.revolucent.net/search/label/REBOL, http://www.reboltalk.com/forum, http://anton.wildit.net.au/rebol, http://rebolweek.blogspot.com, http://groups-beta.google.com/group/Rebol, and rebolfrance (translated by Google) that provide more help in understanding and using the language. Don't miss Carl Sassenrath's personal blog, discussions about REBOL3, alpha downloads of REBOL3, and REBOL3 documentation. For a complete list of all web pages and articles related to REBOL, see http://dmoz.org/Computers/Programming/Languages/REBOL/.
Don't forget to click the rebsite icons in the "REBOL" and "Public" folders, right in the desktop of the REBOL interpreter. Right-click any of the hundreds of individual program icons and select "edit" to see the code for any example. That's a great way to see how to do things in REBOL.
24. Beyond REBOL
Modern computers are complex systems built upon multiple layers of technology. The physical hardware (CPU, RAM memory, hard drive, keyboard, mouse, monitor, etc.) form the foundation. The operating system (Windows, Mac, Linux, etc.) manages that hardware, enables software drivers, provides a common user interface, and provides many basic facilities to make the whole system useful (file management, connection to network protocols, etc.). Software built upon the fundamental components in the operating system make more specific applications possible (word processors, games, etc). In our modern world, many of the applications we use are built upon multiple software layers, on top of the already complex foundation. The Internet is made up of many types of hardware systems, running many different operating systems, connected by compatible network protocols, running many different web and email server programs, storing information via database programs of all types, etc. All those layers work together to serve data via generally compatible formats (HTML files containing page layouts, standard image types such as .jpg and .gif, standard sound formats such as .mp3 and .wav, and standard video formats such as Flash). That's all accessed by a variety of different web browser programs, email clients, cell phone apps, etc., which connect to those standard protocols through the OS, and read/save info in those formats. On top of that complex structure, languages like Javascript run within web browser software to control data which appears on web pages. Languages like PHP and others run on web server software to control how they output data.
REBOL is a language that operates at many of those levels. It can run as a browser plug-in to control data display in web pages. It can run on a web server to build and serve web sites. It neatly "wraps" up most common functions that various operating systems enable, to provide file handling, network control, and other system level facilities. It provides a single, simple format that lets you talk to all different computers in the same ways, at all those levels. It's got it's own way of speaking that is different from many other languages. That grammar and vocabulary is called the "API". If you continue to pursue programming in various environments, you'll encounter many different language APIs which, in the end, do most of the same things as REBOL, but which use very different approaches to grammar and syntax. Eventually, you'll learn to deal with the raw API of the operating system (using native language compilers, DLLs, and other native interfaces). The operating system API is the base language that most other languages are actually translating to. Because the operating system needs to access the computer hardware quickly, it is written in a "lower level" language - one that is formatted to think more like the computer's raw calculations, and less like human speech.
With REBOL, you can do most typical things that programmers want to do, but there are many functions in the various operating system APIs that aren't included (i.e., web cam access, sound input, low level hardware control, etc.). To do that, be prepared to explore the raw operating system API, and the language(s) in which it was written. On Windows, Unix, Macintosh, and other platforms, that typically means learning the syntax and structure of the "C" and "C++" languages. Also, learning common methods for accessing shared code files such as .dll's is very important. Once you've learned the full REBOL API, that's a good direction to take in your studies.
Other favorite programming languages of this author, which pack a lot of computing punch, like Rebol, include:
- Java - The most popular programming language around. If you want a job programming, JAVA should be in your short list of languages to learn. Programs written in JAVA can run on Windows, Mac, Linux, cell phones, web browsers, and most other modern operating platforms, using the same code. JAVA has tens of millions of users, so support for it is enormous, and integration with other tools is ubiquitous. The overwhelming majority of desktop computers already have the JAVA virtual machine installed, and you can accomplish just about any programming goal with JAVA tools. One down side of JAVA is that it's much larger and more complex (both in language structure and download size) than REBOL and other tools. You'll need to learn more about traditional object oriented design patterns to work with JAVA.
- Python - Another very popular free/open source programming tool that runs on most operating systems. It's smaller and easier to learn than JAVA, but is still powerful and has strong support around the world. It's great for creating web site scripts as well as desktop apps of all sorts. Python covers much of the same problem domain, and has some size/simplicity features similar to REBOL (although REBOL is much smaller and simpler to use :).
- LiveCode - A commercial visual IDE based development product that cross-compiles applications for all desktop OSs, iOS (iPhone, iPad, etc.), and Android. You can create compiled applications for Mac, Linux, Android, or iOS on a Windows machine, and vice-versa, between any development operating system. LiveCode is expensive, but the tooling is high quality, and results are professional looking. LiveCode was initially built on the old HyperCard system for Mac, but has evolved into a powerful modern development platform. The language is intended to be easily readable, using natural language constructs that flow like spoken English. Available add-on components provide powerful features such as animation, 3D graphics, database integration, reporting, etc. The entire LiveCode ecosystem is geared towards providing "non-programmers" powerful capability using productive workflow patterns and simple syntax. Commercial support is available, and an open source release is planned in 2013.
- Purebasic - A nice compiler that creates very small and fast native applications for Windows, Mac, and Linux. It's not free, but it is inexpensive, and upgrades are free for life. Purebasic offers many of the benefits of programming with lower level languages such as assembler and C/C++ (execution speed, and access to low level optimization). It comes with a very nice integrated development environment and makes use of a friendly and very productive cross platform language implementation.
- Haxe/Neko - compiles your code to several different languages/platforms. It runs on Windows, Mac, and Linux, using the exact same code. It contains the entire Flash Actionscript3 API, and can compile directly to standard .swf files, which makes it extraordinarily powerful for creating multimedia applications, for use in both online and desktop applications. Haxe can compile to the Neko virtual machine, for use in server and desktop applications. Neko applications can be converted directly to native Windows, Mac and Linux executables. Haxe can also compile directly to Javascript, PHP, and C++ code, all using the exact same core language. It uses a traditional syntax familiar to those who know Java and C++. It's a very small download, runs extremely fast, is free/open source, and is very stable. Haxe is a great tool to compliment REBOL, because it's strengths cover some of REBOL's weaknesses (Flash multimedia development and integration with other popular high level and low level development tools). Mobile apps for all popular phone/tablet platforms and HTML5 can be created using the Haxe/NME toolkit. A tutorial about Haxe by this author is available at http://haxe.us. Mtasc is another free Flash compiler, created by the same person as Haxe. It's older, but may be useful if you want to compile code written in the Actionscript2 API. Openlaszlo is one more free, cross-platform tool for those interested in developing rich multimedia web applications. It has its own language implementation (different from the Flash Actionscript API), but can compile the exact same code to either Flash or DHTML, so applications written in Openlaszlo can run in virtually any web environment.
- AutoIt - The unique characteristic of Autoit is that it includes many built-in functions to control other Windows programs. You can programatically push buttons, type text, select menu items, choose items from lists, etc. in any program window, as if those actions had been performed by a user clicking and typing on screen. This allows you to automate and speed up repetitive routines, and to customize the use of existing applications. AutoIt is extremely simple to learn, it's free and quick to download/install, has a large user base, easily compiles scripts to standard .exe programs, and is a powerful general purpose scripting language that can be used to create all types of applications for Windows.
- RFO Basic! is a simple and practical tool for developing Android phone and tablet apps. RFO Basic! runs entirely on your Android device. It's a tiny, self contained, on-device programming solution, which doesn't require any software installed on a desktop computer. You can create RFO Basic applications on your desktop PC, and if you install the Eclipse IDE and Android API, you'll be able to produce full-fledged Android APK files ("apps", "programs") which can be distributed in the Android app store. For those who want the simplest possible deployment solution, there's a tiny free program for Windows which automatically creates APKs for you. No additional knowledge of the Android environment is required. RFO Basic is powerful. It provides access to hardware, sensors, sound, graphics, multitouch, file system, SQLite, network sockets, FTP, HTTP, bluetooth, HTML GUI, encryption, SMS, phone, email, text-to-speech, voice recognition, GPS, math, string functions, list functions, etc. Unlike other flavors of BASIC which are limited to introducing fundamental programming concepts, RFO Basic is a rich, modern, featured-filled language. A tutorial by this author about RFO Basic! is available at http://rfobasic.com. NS Basic is another tool geared towards mobile development. It creates mobile and web user interfaces that run on the web and on all popular mobile platforms via the web interface. To access hardware features in NS Basic, the PhoneGap library can be integrated. A tutorial about NS Basic by this author is available at http://ns-basic.com. Tools such as GL Basic and http://Basic4Android should be explored if you enjoy writing BASIC code and want to create applications for all mobile and web platforms. GL Basic is particularly easy to use and has a powerful 3D API which cross compiles applications to all the most popular desktop and mobile platforms, as well as HTML5.
- If your goal is to work as a commercial programmer, you should become fluent with the most popular tools. To work with development teams, you need to know the language(s) they use. The list at http://www.tiobe.com/index.php/content/paperinfo/tpci/index.html will point you in the right direction (C/C++, C#, Visual Basic, PHP, PERL, etc.). You'll also need to know HTML and Javascript if you want to do any work as a web developer. Diving into each of these language ecosystems requires learning the popular supporting tools, just as much as the languages. Getting to know IDEs such as Eclipse and Netbeans for Java, Dreamweaver for HTML, MySQL to store data in PHP, etc., will require just as much time and experience as learning programming language syntax and APIs.
Exploring those tools should give focus to your further studies. Good luck and have fun!
25. About The Author
Hi, my name is Nick Antonaccio. I'm an experienced developer with a broad background creating hardware and software systems that satisfy practical data management needs. Do a Google search for "computer programming tutorial", "learn ns basic", "learn haxe", "learn rebol", "learn rfo basic", and you'll see my instructional texts at the top of every first page in the search results. I've been programming for more than 30 years, and have been an entrepreneur/business owner for more than a quarter of a century. I've written software and designed computing systems which help run hundreds of businesses and organizations, from small mom and pop start-ups to major corporations. Unlike many programmers, I have a great deal of real world experience starting and running a number of my own businesses, and I've helped a wide variety of other organizations start and operate successfully, using custom designed hardware and software systems.
25.1 My Businesses
Below are 2 businesses that I currently own and operate:
- Merchants' Village: This 120,000 sq. ft. indoor market manages sales for over 170 vendors. It's been in operation since 2010 and has processed millions of item purchase transactions. I designed this business idea and wrote the software that runs all operations at this location. The programs include an industrial quality point of sale system, reporting system, check writing software, security video software, scheduling system, data backup system, time clock, web site maintenance software, bar code printing and reading software, and more, with mobile and web components used by managers, employees, and vendors to handle 1,000-10,000 weekly customers.
- The Rockfactory and Musiclessonz.com: This music lesson studio and associated video conference lesson business is one of the most prominent in its niche. Featured on the front page of the New York Times January 2012, this business runs entirely on software I wrote. Programs to manage daily appointment scheduling, accounting, music printing, lesson plan organization, audio recording, karaoke performance, music composition, videoconferencing, event scheduling, student sign-in notification, and more, enable many hundreds of lessons a week. 25+ instructors have been employed at that business since 2004 (search "video conference music lessons" or "live online music lessons" in Google to see how it works).
Those are just two of the hundreds of successful business computing projects and software applications I've conceived, created and put into commercial production. Other hardware systems and software applications I've written have been operating reliably in critical environments for more than 2 decades.
25.2 Client List and Previous Experience
A few of my clients have included:
P & R Grocery Trinity Lending Peddlers Mall Tennessee Branch Water Indianapolis State Museum Farm Bureau Insurance Allied / Spectrum Janitorial Palm Harbor Homes Diana Michaels Jewelers Hays and Sons Fire Restoration KWK Property Management Bowen Productions Recording Studios Advantage Graphics Garden Homes Real Estate Oscar Renda Construction Blue Star Battery Company Brehob Electrical Engineering Flanner and Buchanan Funeral Homes Orchard Park Retirement Centers The Law Offices of Scott Montgomery American Cabaret Theatre Indiana Mulch and Stone Carriage Cleaners Kirk Automotive EBC Business Centers Eagle Point Apartments Pennsylvania Powered Paragliding The Indiana state school system The Princeton, NJ school system Milestone Veneer Deaton's Mechanical Earl's Auction Company & Liquidators, Inc. A number of state government offices Hundreds of additional businesses and home usersI know what it's like to work with a wide variety of organizations and different types of businesses. For 8 years I owned and operated a retail computer store with 4 locations, where operations included assembling hardware, installing and maintaining network business systems, training and providing IT/technical support services, and developing desktop/network/web software for a wide range of businesses.
I've created and implemented numerous critical inventory, scheduling, accounting, point of sale, reporting, automation, hardware control, and custom data management systems for dozens of busy businesses. I've written software to help automate local cable cut-away spots for FOX TV. I've written software used by BJs corporation to train employees. I wrote the program that handles all inventory and pricing operations for P&R Grocery. I wrote the bar code system that handles trade-in clothing purchases at Zeus's Closet. I wrote an application for Palm Harbor Homes to automate sales tracking and follow-up procedures. I created a web app for the Princeton, NJ school system to match students with tutors based on schedule, subject, and other various needs. I wrote a bingo board program to display boards for a local bingo establishment. I created the web based member sign up and classified ad boards for the PAPPG paramotor club. I wrote a program to help Etsy sellers quickly add, alter, and search/replace listing data in their online shops. I've written many hundreds of other custom data management applications that help businesses and individuals keep track of important info. I know intimately what it's like to have a business idea that requires a flawlessly operating computing system and/or piece of software at its core. I truly enjoy creating useful software which enables successful business concepts, improves bottom line performance and productively, and/or creates opportunities to satisfy personal interests.
I specialize in writing plain and simple applications that get data management jobs done, quickly and easily. Because I've been personally involved in many varied business environments and have experienced a wide range of software use cases, I'm intimately familiar with the difficulties involved - and the solutions required - to improve bottom line results by implementing productive computing solutions. My real world experience involves much more than just software development. I know quite a bit about marketing and sales, accounting, human resources management, and even more about how daily operations can be improved in businesses of all sizes and types, using computers and software tools.
My development kit includes efficient and effective tools for building web and mobile apps with clean and simple user interfaces. Because my code base for projects is often several orders of magnitude smaller than would be required using other mainstream tools, I'm able to quickly provide updates and improvements to projects, and to satisfy requests for changes to code, just as quickly as I create original code. In any production environment that makes use of custom software for any period of time, the ability to make changes efficiently is a critical consideration.
I was voted "Reboler of the Year" in 2010, for the large volume of instructional material and code I've donated publicly. You can find more than 100 of my applications and code examples at http://rebol.org (I've donated more code to that site than any other single developer in the community). My 450 page tutorial at http://howto-program.com and the more than 80 associated tutorial videos are popular online (search "computer programming tutorial" in Google to see the results). My instructional texts for NS Basic, the Etsy Developer API, Haxe, and RFO Basic are all distributed by the creators of those tools as primary learning resources for developers. I operate rebolforum.com (and wrote the forum software that runs that site), to regularly help other developers learn to improve productivity.
Below are some screen shots of the software I created for Merchants' Village. They provide a sense for the types of straightforward interfaces I create for business apps.
Full set of screen shots: http://re-bol.com/merchants_village_screen_shots.zip

25.3 Contact Me
If you have a programming project in mind or need to find a developer to complete a piece of software, please send an email to com1@com-pute.com . I'm happy to discuss the options!
Keywords:
software development, program a computer, how to write software, computer programming, business computing, how to create programs, write code, learn about programming, coding, get started programming
Copyright © Nick Antonaccio 2013, All Rights Reserved
